-
SpringCloud学习-周阳
SpringCloud + SpringCloud alibaba
https://www.bilibili.com/video/BV18E411x7eT?p=3&spm_id_from=pageDriver
SpringCloud :分布式的微服务架构的
一站式解决方案,是多种为服务器架构落地技术的集合体,俗称微服务全家桶


A、SpringCloud
一、SpringCloud入门Eureka
1、SpringCloud和SpringBoot版本选择
https://github.com/spring-projects/spring-boot/releases/ 可以看到spring-boot的最新版本。 https://spring.io/projects/spring-boot#learn 可以看到官网SpringBoot的版本 # 官网推荐大概版本: cloud --> boot https://spring.io/projects/spring-cloud#overview https://spring.io/projects/spring-cloud#learn 通过点击 Reference Doc.,可以看到官方推荐的具体cloud-boot版本 https://docs.spring.io/spring-cloud/docs/Hoxton.SR12/reference/html/ Release Train Version: Hoxton.SR12 Supported Boot Version: 2.3.12.RELEASE # 具体版本对应关系选择 https://start.spring.io/actuator/info # 终极方案,在spring-cloud-alibaba里,推荐了boot-cloud-cloudalibaba的版本关系 https://github.com/alibaba/spring-cloud-alibaba/wiki/%E7%89%88%E6%9C%AC%E8%AF%B4%E6%98%8E- 1
- 2
- 3
- 4
- 5
- 6
- 7
- 8
- 9
- 10
- 11
- 12
- 13
小版本
Spring Cloud 小版本分为:
SNAPSHOT: 快照版本,随时可能修改
M: MileStone,M1表示第1个里程碑版本,一般同时标注PRE,表示预览版版。
SR: Service Release,SR1表示第1个正式版本,一般同时标注GA:(GenerallyAvailable),表示稳定版本。
2、各组件版本确定
工具 版本 SpringCloud Hoxton.SR12 SpringBoot 2.3.12.RELEASE cloud alibaba 2.2.7.RELEASE java java11 maven 3.5.2 mysql 8.0.22 3、基本环境搭建
1、 创建project-父工程搭建
1.1 创建project


1.2 字符编码
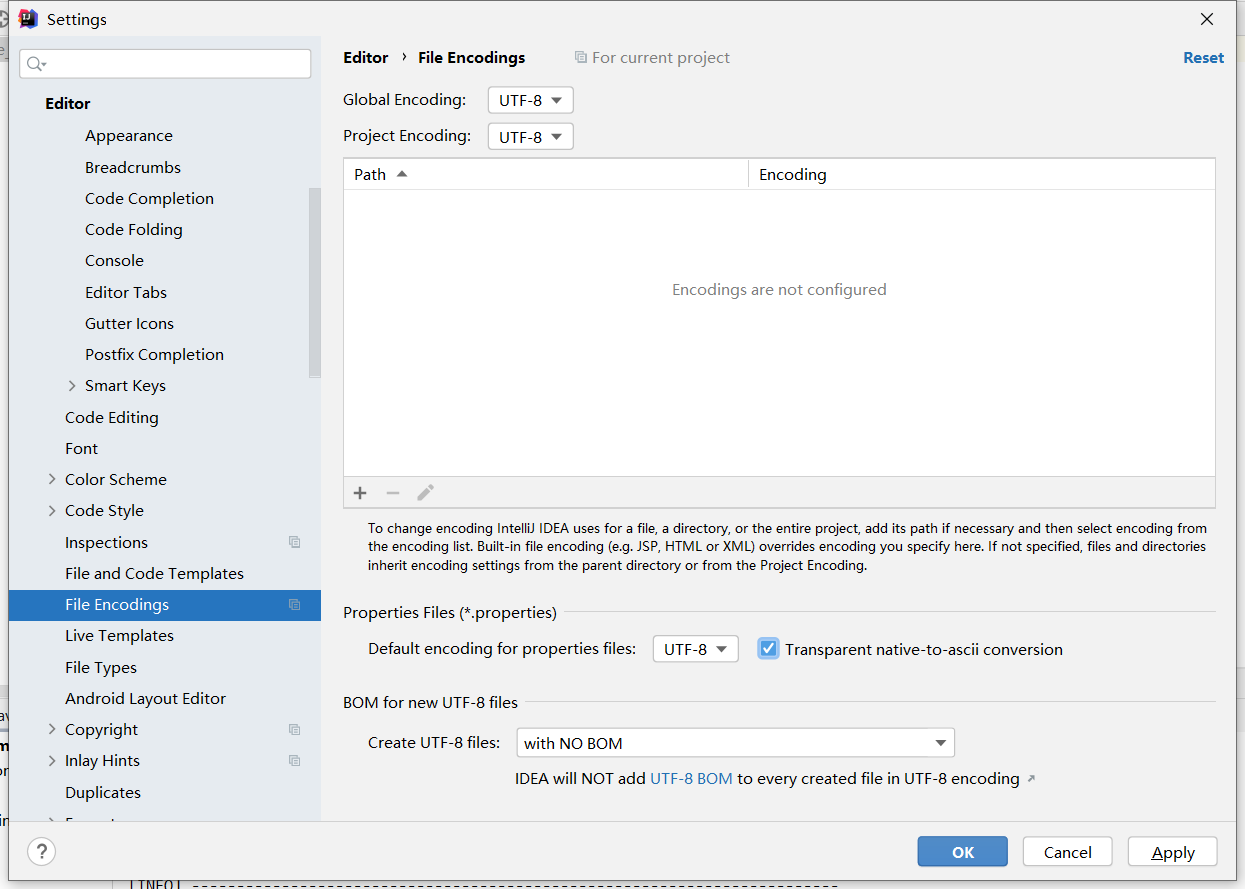
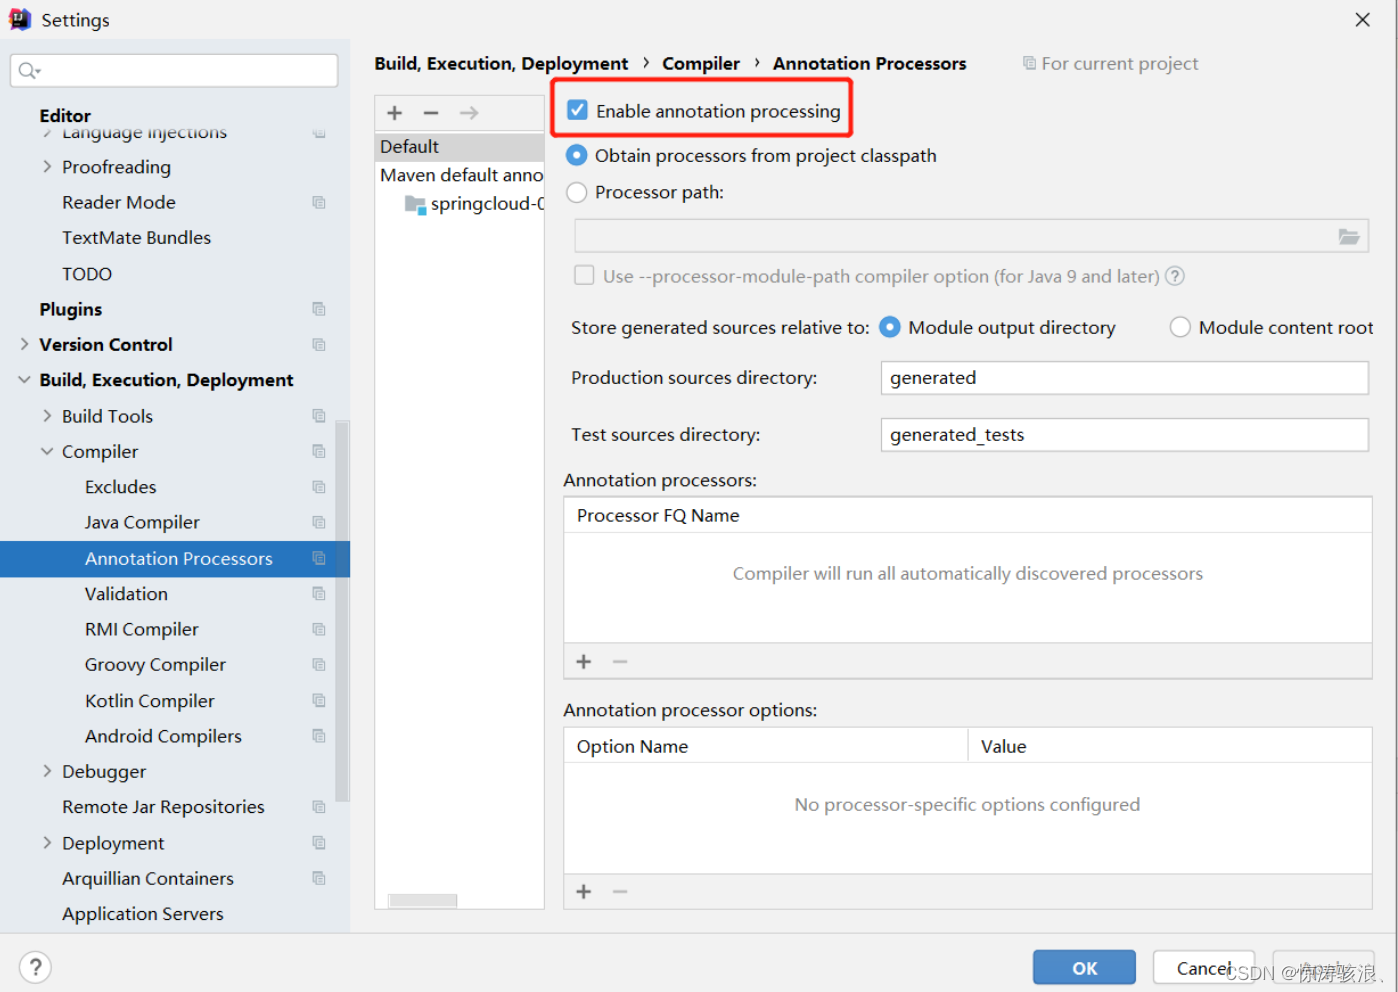
1.3 注解生效激活
1.4 配置父项目的pom.xml文件
<project xmlns="http://maven.apache.org/POM/4.0.0" xmlns:xsi="http://www.w3.org/2001/XMLSchema-instance" xsi:schemaLocation="http://maven.apache.org/POM/4.0.0 https://maven.apache.org/xsd/maven-4.0.0.xsd"> <modelVersion>4.0.0modelVersion> <groupId>com.ityj.springcloudgroupId> <artifactId>spring-cloud-2022artifactId> <version>0.0.1-SNAPSHOTversion> <packaging>pompackaging> <description>Parent project for Spring Cloud learning!description> <properties> <java.version>11java.version> <project.build.sourceEncoding>UTF-8project.build.sourceEncoding> <maven.compiler.source>11maven.compiler.source> <maven.compiler.target>11maven.compiler.target> <spring-boot.version>2.3.12.RELEASEspring-boot.version> <spring-cloud.version>Hoxton.SR12spring-cloud.version> <spring-cloud-alibaba.version>2.2.7.RELEASEspring-cloud-alibaba.version> <mysql.version>8.0.22mysql.version> <druid.version>1.2.9druid.version> <mybatis-plus.version>3.5.1mybatis-plus.version> properties> <dependencyManagement> <dependencies> <dependency> <groupId>org.springframework.bootgroupId> <artifactId>spring-boot-dependenciesartifactId> <version>${spring-boot.version}version> <type>pomtype> <scope>importscope> dependency> <dependency> <groupId>org.springframework.cloudgroupId> <artifactId>spring-cloud-dependenciesartifactId> <version>${spring-cloud.version}version> <type>pomtype> <scope>importscope> dependency> <dependency> <groupId>com.alibaba.cloudgroupId> <artifactId>spring-cloud-alibaba-dependenciesartifactId> <version>${spring-cloud-alibaba.version}version> <type>pomtype> <scope>importscope> dependency> <dependency> <groupId>mysqlgroupId> <artifactId>mysql-connector-javaartifactId> <version>${mysql.version}version> dependency> <dependency> <groupId>com.baomidougroupId> <artifactId>mybatis-plus-boot-starterartifactId> <version>${mybatis-plus.version}version> dependency> <dependency> <groupId>com.alibabagroupId> <artifactId>druid-spring-boot-starterartifactId> <version>${druid.version}version> dependency> dependencies> dependencyManagement> <build> <plugins> <plugin> <groupId>org.springframework.bootgroupId> <artifactId>spring-boot-maven-pluginartifactId> <configuration> <fork>truefork> <addResources>trueaddResources> configuration> plugin> plugins> build> project>- 1
- 2
- 3
- 4
- 5
- 6
- 7
- 8
- 9
- 10
- 11
- 12
- 13
- 14
- 15
- 16
- 17
- 18
- 19
- 20
- 21
- 22
- 23
- 24
- 25
- 26
- 27
- 28
- 29
- 30
- 31
- 32
- 33
- 34
- 35
- 36
- 37
- 38
- 39
- 40
- 41
- 42
- 43
- 44
- 45
- 46
- 47
- 48
- 49
- 50
- 51
- 52
- 53
- 54
- 55
- 56
- 57
- 58
- 59
- 60
- 61
- 62
- 63
- 64
- 65
- 66
- 67
- 68
- 69
- 70
- 71
- 72
- 73
- 74
- 75
- 76
- 77
- 78
- 79
- 80
- 81
- 82
- 83
- 84
- 85
- 86
- 87
- 88
- 89
- 90
1.5 dependencies VS dependencyManagement
- (1) dependencyManagement用于父类管理的,通常会在一个项目的最顶层父pom文件中出现。
- (2) pom中的dependencyManagement元素能让子项目中引入依赖而无需显式地列出版本号。maven会沿着父子层级关系向上走,直到找到一个拥有dependencyManagement元素的项目,然后就会使用这个dependencyManagement指定的版本号。
- (3) 子项目需要的依赖,需要显式地声明,无需添加版本号。(子项目指定版本号就会优先使用自己设置的)
2、创建payment8001子模块(生产者)
1.1 建module
cloud-provider-payment8001生产者
https://github.com/12722097458/spring-cloud-2022/commit/cca9413143c31cdaf850f44835dd42fa2a1aa1b1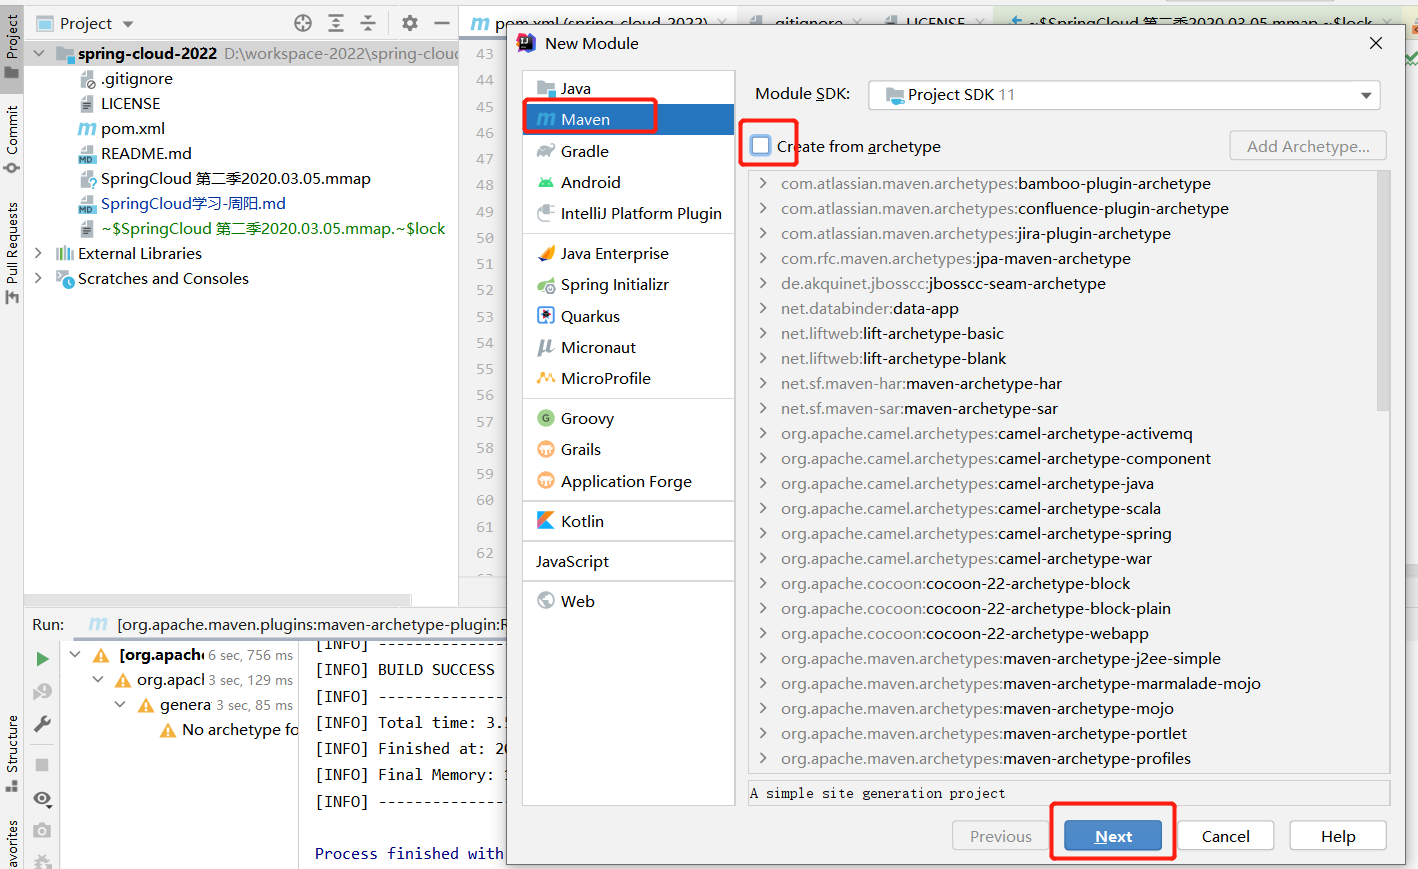
1.2 改pom
<project xmlns="http://maven.apache.org/POM/4.0.0" xmlns:xsi="http://www.w3.org/2001/XMLSchema-instance" xsi:schemaLocation="http://maven.apache.org/POM/4.0.0 http://maven.apache.org/xsd/maven-4.0.0.xsd"> <parent> <artifactId>spring-cloud-2022artifactId> <groupId>com.ityj.springcloudgroupId> <version>0.0.1-SNAPSHOTversion> parent> <modelVersion>4.0.0modelVersion> <artifactId>cloud-provider-payment8081artifactId> <dependencies> <dependency> <groupId>org.springframework.bootgroupId> <artifactId>spring-boot-starter-webartifactId> dependency> <dependency> <groupId>org.springframework.bootgroupId> <artifactId>spring-boot-starter-actuatorartifactId> dependency> <dependency> <groupId>mysqlgroupId> <artifactId>mysql-connector-javaartifactId> dependency> <dependency> <groupId>com.baomidougroupId> <artifactId>mybatis-plus-boot-starterartifactId> dependency> <dependency> <groupId>com.alibabagroupId> <artifactId>druid-spring-boot-starterartifactId> dependency> <dependency> <groupId>org.springframework.bootgroupId> <artifactId>spring-boot-starter-testartifactId> dependency> <dependency> <groupId>org.projectlombokgroupId> <artifactId>lombokartifactId> <optional>trueoptional> dependency> <dependency> <groupId>org.springframework.bootgroupId> <artifactId>spring-boot-devtoolsartifactId> <scope>runtimescope> <optional>trueoptional> dependency> <dependency> <groupId>com.github.xiaoymingroupId> <artifactId>knife4j-spring-boot-starterartifactId> dependency> <dependency> <groupId>org.springframework.bootgroupId> <artifactId>spring-boot-starter-validationartifactId> dependency> dependencies> project>- 1
- 2
- 3
- 4
- 5
- 6
- 7
- 8
- 9
- 10
- 11
- 12
- 13
- 14
- 15
- 16
- 17
- 18
- 19
- 20
- 21
- 22
- 23
- 24
- 25
- 26
- 27
- 28
- 29
- 30
- 31
- 32
- 33
- 34
- 35
- 36
- 37
- 38
- 39
- 40
- 41
- 42
- 43
- 44
- 45
- 46
- 47
- 48
- 49
- 50
- 51
- 52
- 53
- 54
- 55
- 56
- 57
- 58
- 59
- 60
- 61
- 62
- 63
- 64
- 65
- 66
- 67
- 68
1.3 写配置文件yml
如果pom引入后,yml配置文件没有变成spring的树叶形状,需要考虑对应的依赖是否正确引入了。鼠标左键能否查看dependency的详细信息
server: port: 8001 spring: application: name: cloud-payment-service datasource: driver-class-name: com.mysql.cj.jdbc.Driver url: jdbc:mysql://192.168.137.110:3306/db_cloud?useSSL=true&useUnicode=true&characterEncoding=utf-8&serverTimezone=Asia/Shanghai username: root password: root knife4j: enable: true # http://localhost:8001/doc.html setting: language: en-US- 1
- 2
- 3
- 4
- 5
- 6
- 7
- 8
- 9
- 10
- 11
- 12
- 13
- 14
- 15
- 16
1.4 编写启动类
@SpringBootApplication @MapperScan("com.ityj.springcloud.mapper") public class Payment8001Starter { public static void main(String[] args) { SpringApplication.run(Payment8081Starter.class, args); } }- 1
- 2
- 3
- 4
- 5
- 6
- 7
- 8
1.5 编写业务代码
(1)数据表创建
CREATE TABLE payment ( id BIGINT(20) NOT NULL AUTO_INCREMENT PRIMARY KEY, serial VARCHAR(200) ) ENGINE=INNODB AUTO_INCREMENT=1- 1
- 2
- 3
- 4
(2)实体类entity编写
@Data @TableName("payment") public class PaymentPO implements Serializable { @TableId(value = "id", type = IdType.AUTO) private Long id; @TableField(value = "serial") private String serial; } @Data public class PaymentDTO { @NotEmpty(message = "The value of serial can not be empty!") private String serial; }- 1
- 2
- 3
- 4
- 5
- 6
- 7
- 8
- 9
- 10
- 11
- 12
- 13
- 14
- 15
编写了返回给前端的统一接口CommonResult
@Data @AllArgsConstructor public class CommonResult<T> implements Serializable { private static final Integer SUCCESS_CODE = 0; private static final Integer FAIL_CODE = -1; private Integer code; private String msg; private transient T data; public static <T> CommonResult<T> success(T data) { return new CommonResult<>(SUCCESS_CODE, CommonConstant.SUCCESS_MSG, data); } public static CommonResult<String> success() { return new CommonResult<>(SUCCESS_CODE, CommonConstant.SUCCESS_MSG, null); } public static <T> CommonResult<T> fail(String message) { return new CommonResult<>(FAIL_CODE, message, null); } }- 1
- 2
- 3
- 4
- 5
- 6
- 7
- 8
- 9
- 10
- 11
- 12
- 13
- 14
- 15
- 16
- 17
- 18
- 19
- 20
- 21
- 22
Knife4j文档管理配置
@EnableSwagger2WebMvc @Configuration public class Knife4jConfig { private final OpenApiExtensionResolver openApiExtensionResolver; @Autowired public Knife4jConfig(OpenApiExtensionResolver openApiExtensionResolver) { this.openApiExtensionResolver = openApiExtensionResolver; } @Bean public Docket createRestApi() { return new Docket(DocumentationType.SWAGGER_2) .apiInfo(apiInfo()) .select() .apis(RequestHandlerSelectors.basePackage("com.ityj.springcloud.controller")) .paths(PathSelectors.any()) .build() .extensions(openApiExtensionResolver.buildExtensions("")); } private ApiInfo apiInfo() { return new ApiInfoBuilder() .title("Spring Cloud Learning") .description("Restful API") .termsOfServiceUrl("www.ityj.com") .version("version 1.0") .build(); } }- 1
- 2
- 3
- 4
- 5
- 6
- 7
- 8
- 9
- 10
- 11
- 12
- 13
- 14
- 15
- 16
- 17
- 18
- 19
- 20
- 21
- 22
- 23
- 24
- 25
- 26
- 27
- 28
- 29
- 30
- 31
knife4j: enable: true # http://localhost:8001/doc.html setting: language: en-US- 1
- 2
- 3
- 4
(3)通过mybatis-plus实现mapper创建
public interface PaymentMapper extends BaseMapper<PaymentPO> { }- 1
- 2
(4)service业务层编写
public interface PaymentService extends IService<PaymentPO> { String save(PaymentDTO paymentDTO); } @Service public class PaymentServiceImpl extends ServiceImpl<PaymentMapper, PaymentPO> implements PaymentService { @Transactional @Override public String save(PaymentDTO paymentDTO) { PaymentPO paymentPO = new PaymentPO(); BeanUtils.copyProperties(paymentDTO, paymentPO); int insert = baseMapper.insert(paymentPO); return insert > 0 ? null : "Save error!"; } }- 1
- 2
- 3
- 4
- 5
- 6
- 7
- 8
- 9
- 10
- 11
- 12
- 13
- 14
- 15
- 16
- 17
(5)controller编写
@RestController @RequestMapping("/payment") public class PaymentController { @Autowired private PaymentService paymentService; @GetMapping("/get/{id}") public CommonResult<PaymentPO> getById(@PathVariable("id") Long id) { return CommonResult.success(paymentService.getById(id)); } @PostMapping("/save") public CommonResult<String> save(@RequestBody @Valid PaymentDTO paymentDTO) { String message = paymentService.save(paymentDTO); return StringUtils.hasText(message) ? CommonResult.fail(message) : CommonResult.success(); } }- 1
- 2
- 3
- 4
- 5
- 6
- 7
- 8
- 9
- 10
- 11
- 12
- 13
- 14
- 15
- 16
- 17
- 18
- 19
(6)测试即可
http://localhost:8001/doc.html3、创建order消费者模块
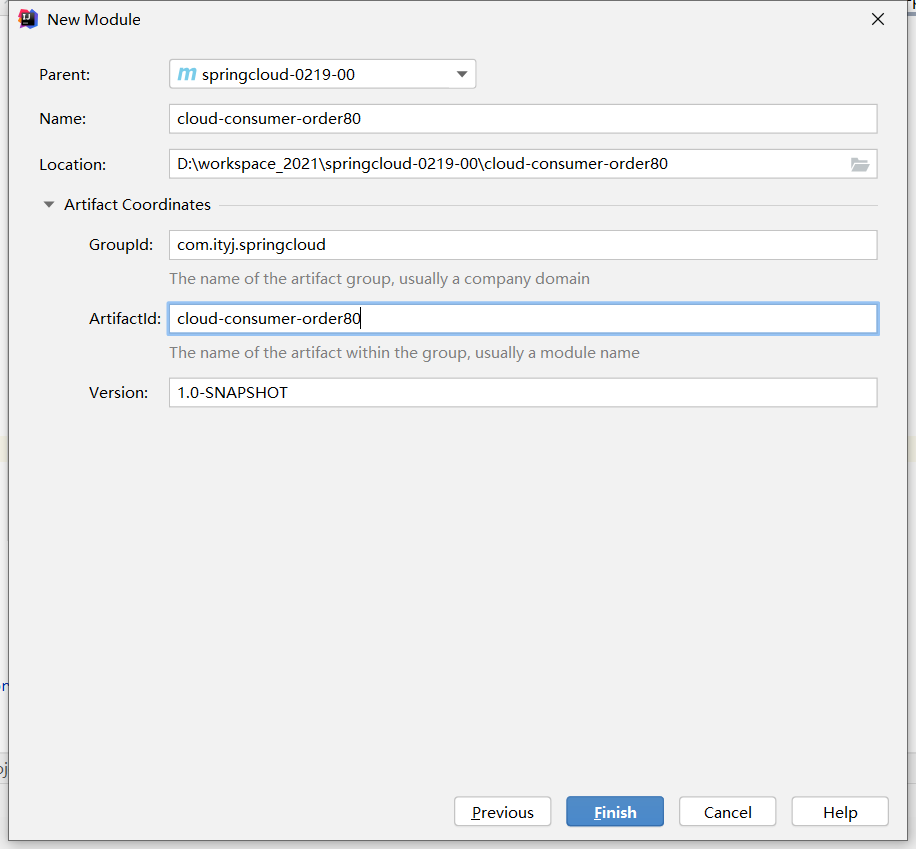
创建cloud-consumer-order80消费者
同样是以下步骤
1.1 建module
1.2 改pom
<project xmlns="http://maven.apache.org/POM/4.0.0" xmlns:xsi="http://www.w3.org/2001/XMLSchema-instance" xsi:schemaLocation="http://maven.apache.org/POM/4.0.0 http://maven.apache.org/xsd/maven-4.0.0.xsd"> <parent> <artifactId>spring-cloud-2022artifactId> <groupId>com.ityj.springcloudgroupId> <version>0.0.1-SNAPSHOTversion> parent> <modelVersion>4.0.0modelVersion> <artifactId>cloud-consumer-order80artifactId> <dependencies> <dependency> <groupId>org.springframework.bootgroupId> <artifactId>spring-boot-starter-webartifactId> dependency> <dependency> <groupId>org.springframework.bootgroupId> <artifactId>spring-boot-starter-actuatorartifactId> dependency> <dependency> <groupId>org.projectlombokgroupId> <artifactId>lombokartifactId> <optional>trueoptional> dependency> <dependency> <groupId>org.springframework.bootgroupId> <artifactId>spring-boot-devtoolsartifactId> <scope>runtimescope> <optional>trueoptional> dependency> <dependency> <groupId>com.github.xiaoymingroupId> <artifactId>knife4j-spring-boot-starterartifactId> dependency> dependencies> project>- 1
- 2
- 3
- 4
- 5
- 6
- 7
- 8
- 9
- 10
- 11
- 12
- 13
- 14
- 15
- 16
- 17
- 18
- 19
- 20
- 21
- 22
- 23
- 24
- 25
- 26
- 27
- 28
- 29
- 30
- 31
- 32
- 33
- 34
- 35
- 36
- 37
- 38
- 39
- 40
- 41
- 42
- 43
- 44
- 45
1.3 改配置文件yml
服务端设置端口号为80
server: port: 80 spring: application: name: cloud-order-service knife4j: enable: true # http://localhost:80/doc.html setting: language: en-US- 1
- 2
- 3
- 4
- 5
- 6
- 7
- 8
- 9
- 10
- 11
1.4 编写启动类
@SpringBootApplication public class ConsumerOrder80Starter { public static void main(String[] args) { SpringApplication.run(ConsumerOrder80Starter.class, args); } }- 1
- 2
- 3
- 4
- 5
- 6
1.5 编写业务代码
这里是消费者,需要调用生产者provider,因此用到RestTemplate技术,类似于httpClient连接客户端的技术。
RestTemplate 是从 Spring3.0 开始支持的一个 HTTP 请求工具,它提供了常见的REST请求方案的模版,例如 GET 请求、POST 请求、PUT 请求、DELETE 请求以及一些通用的请求执行方法 exchange 以及 execute。
使用步骤:
(1)编写配置类获取RestTemplate
@Configuration public class ApplicationContextConfig { @Bean public RestTemplate restTemplate() { return new RestTemplate(); } }- 1
- 2
- 3
- 4
- 5
- 6
- 7
- 8
- 9
(2)和controller控制器共同实现服务间的调用
@RestController @Slf4j public class OrderController { @Autowired private RestTemplate restTemplate; private static final String PAYMENT_URL = "http://localhost:8001/"; @GetMapping("/consumer/payment/get/{id}") public CommonResult<PaymentPO> getById(@PathVariable("id") Long id) { return restTemplate.getForObject(PAYMENT_URL + "payment/get/" + id, CommonResult.class); } @GetMapping("/consumer/payment/save") public CommonResult<String> save(PaymentDTO paymentDTO) { log.info("Save: {}", paymentDTO); return restTemplate.postForObject(PAYMENT_URL + "payment/save", paymentDTO, CommonResult.class); } } //实体类CommonResult和Payment和payment8001一模一样:后续优化- 1
- 2
- 3
- 4
- 5
- 6
- 7
- 8
- 9
- 10
- 11
- 12
- 13
- 14
- 15
- 16
- 17
- 18
- 19
- 20
- 21
- 22
- 23
4、抽取公共模块,减少重复代码
创建模块cloud-api-commons
1.1 建module
1.2 改pom
1.3 抽取共性代码
(1)相同的CommonResult和Payment实体类在payment和order两个模块中都使用到了,可以抽取出来,两个模块再引入commons
1.4 order和payment模块引入commons
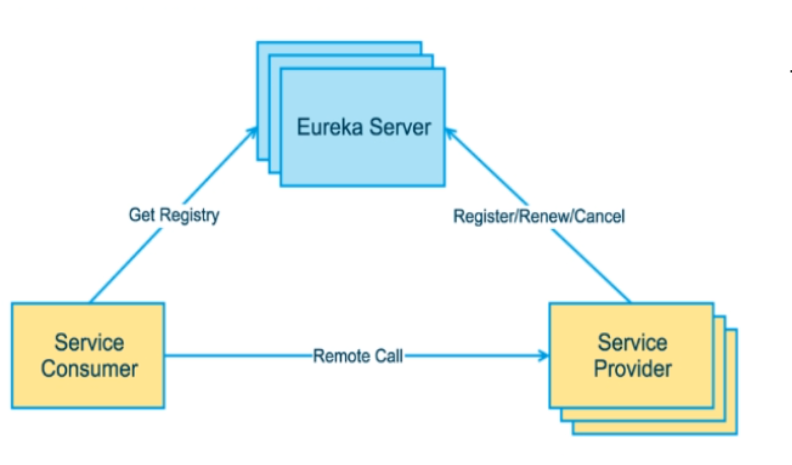
4、Eureka单机服务注册中心
Eureka是spring cloud中的一个负责服务注册与发现的组件;
一个Eureka中分为eureka server和eureka client。其中eureka server是作为服务的注册与发现中心。eureka client既可以作为服务的生产者,又可以作为服务的消费者。
1、单机Eureka服务端
建Eureka服务端cloud-eureka-server7001git提交记录
IDEA生成eurekaServer端服务注册中心类似物业公司
1.1 建module

1.2 改pom
引入Eureka服务端的依赖
<project xmlns="http://maven.apache.org/POM/4.0.0" xmlns:xsi="http://www.w3.org/2001/XMLSchema-instance" xsi:schemaLocation="http://maven.apache.org/POM/4.0.0 http://maven.apache.org/xsd/maven-4.0.0.xsd"> <parent> <artifactId>spring-cloud-2022artifactId> <groupId>com.ityj.springcloudgroupId> <version>0.0.1-SNAPSHOTversion> parent> <modelVersion>4.0.0modelVersion> <artifactId>cloud-eureka-server7001artifactId> <dependencies> <dependency> <groupId>com.ityj.springcloudgroupId> <artifactId>cloud-api-commonsartifactId> <version>${project.parent.version}version> dependency> <dependency> <groupId>org.springframework.cloudgroupId> <artifactId>spring-cloud-starter-netflix-eureka-serverartifactId> dependency> dependencies> project>- 1
- 2
- 3
- 4
- 5
- 6
- 7
- 8
- 9
- 10
- 11
- 12
- 13
- 14
- 15
- 16
- 17
- 18
- 19
- 20
- 21
- 22
- 23
- 24
- 25
- 26
- 27
1.3 改yml
server: port: 7001 eureka: instance: hostname: localhost #eureka服务端的实例名字 client: register-with-eureka: false #表识不向注册中心注册自己 fetch-registry: false #表示自己就是注册中心,职责是维护服务实例,并不需要去检索服务 service-url: defaultZone: http://${eureka.instance.hostname}:${server.port}/eureka/ #设置与eureka server交互的地址查询服务和注册服务都需要依赖这个地址- 1
- 2
- 3
- 4
- 5
- 6
- 7
- 8
- 9
- 10
- 11
- 12
1.4 启动类
@SpringBootApplication @EnableEurekaServer public class EurekaServer7001Starter { public static void main(String[] args) { SpringApplication.run(EurekaServer7001Starter.class, args); } }- 1
- 2
- 3
- 4
- 5
- 6
- 7
- 8
1.5 启动测试

2、服务提供方8081入驻eurekaServer
EurekaClient端cloud-provider-payment8081将注册进EurekaServer成为服务提供者provider,类似尚硅谷学校对外提供授课服务
1.1 改pom
添加eurekaClient的依赖
<dependency> <groupId>org.springframework.cloudgroupId> <artifactId>spring-cloud-starter-netflix-eureka-clientartifactId> dependency>- 1
- 2
- 3
- 4
- 5
1.2 改启动类
标注此项目是eureka客户端
@EnableEurekaClient // 表明是eureka客户端- 1
1.3 改yml
标注是否注册进eureka,并指明eureka服务端地址
eureka: client: register-with-eureka: true fetchRegistry: true service-url: defaultZone: http://localhost:7001/eureka # eureka服务端的地址- 1
- 2
- 3
- 4
- 5
- 6
1.4 测试
启动8081,并访问http://localhost:7001/

3、服务消费者订单模块80入驻eurekaServer
同理操作即可。及得yml加上spring.application.name=cloud-order-service
修改后,启动80服务,访问http://localhost:7001/

5、Eureka集群服务注册中心
如果是单机版的Eureka服务,容错性差。违背了微服务RPC远程服务调用的核心:高可用。
需要搭建Eureka注册中心集群,实现负载均衡+故障容错

1、EurekaServer集群环境构建
1.1 新建7002server和7002server
参考7001server新建cloud-eureka-server7002/cloud-eureka-server7002:新建后再修改相关的配置
1.2 修改Windows映射配置
- 找到C:\Windows\System32\drivers\etc路径下的hosts文件
- 修改映射配置添加进hosts文件
- 127.0.0.1 eureka7001.com
- 127.0.0.1 eureka7002.com
- 127.0.0.1 eureka7003.com
# Copyright (c) 1993-2009 Microsoft Corp. # # This is a sample HOSTS file used by Microsoft TCP/IP for Windows. # # This file contains the mappings of IP addresses to host names. Each # entry should be kept on an individual line. The IP address should # be placed in the first column followed by the corresponding host name. # The IP address and the host name should be separated by at least one # space. # # Additionally, comments (such as these) may be inserted on individual # lines or following the machine name denoted by a '#' symbol. # # For example: # # 102.54.94.97 rhino.acme.com # source server # 38.25.63.10 x.acme.com # x client host # localhost name resolution is handled within DNS itself. # 127.0.0.1 localhost # ::1 localhost 127.0.0.1 eureka7001.com 127.0.0.1 eureka7002.com 127.0.0.1 eureka7003.com- 1
- 2
- 3
- 4
- 5
- 6
- 7
- 8
- 9
- 10
- 11
- 12
- 13
- 14
- 15
- 16
- 17
- 18
- 19
- 20
- 21
- 22
- 23
- 24
1.3 修改EurekaServer 7001/7002/7003的配置文件
7001:
server: port: 7001 eureka: instance: hostname: eureka7001.com #eureka服务端的实例名字 client: register-with-eureka: false #表识不向注册中心注册自己 fetch-registry: false #表示自己就是注册中心,职责是维护服务实例,并不需要去检索服务 service-url: defaultZone: http://eureka7002.com:7002/eureka/,http://eureka7003.com:7003/eureka/ #设置与eureka server交互的地址查询服务和注册服务都需要依赖这个地址- 1
- 2
- 3
- 4
- 5
- 6
- 7
- 8
- 9
- 10
- 11
7002:
server: port: 7002 eureka: instance: hostname: eureka7002.com #eureka服务端的实例名字 client: register-with-eureka: false #表识不向注册中心注册自己 fetch-registry: false #表示自己就是注册中心,职责是维护服务实例,并不需要去检索服务 service-url: defaultZone: http://eureka7001.com:7001/eureka/,http://eureka7003.com:7003/eureka/ #设置与eureka server交互的地址查询服务和注册服务都需要依赖这个地址;互相守望,相互注册。多个用逗号隔开- 1
- 2
- 3
- 4
- 5
- 6
- 7
- 8
- 9
- 10
- 11
7003:
server: port: 7003 eureka: instance: hostname: eureka7003.com #eureka服务端的实例名字 client: register-with-eureka: false #表识不向注册中心注册自己 fetch-registry: false #表示自己就是注册中心,职责是维护服务实例,并不需要去检索服务 service-url: defaultZone: http://eureka7001.com:7001/eureka/,http://eureka7002.com:7002/eureka/ #设置与eureka server交互的地址查询服务和注册服务都需要依赖这个地址;互相守望,相互注册。多个用逗号隔开- 1
- 2
- 3
- 4
- 5
- 6
- 7
- 8
- 9
- 10
- 11
1.3 测试
因为在C:\Windows\System32\drivers\etc路径下的hosts文件修改了localhost的配置
所以此时localhost可以映射为 – 》 eureka7001.com 、 eureka7002.com 和 eureka7003.com
此时启动7001、7002和7003服务
访问以下链接都可以:(7001、7002和7003服务互相注册)
- http://localhost:7001/
- http://127.0.0.1:7001/
- http://eureka7001.com:7001/

2、将客户端发布到EurekaServer集群上
将支付服务8081微服务和订单服务80发布到上面2台Eureka集群配置中
1.1 修改yml配置
只需要修改对应的配置文件即可
eureka: client: register-with-eureka: false #true 标识不向注册中心注册自己 false 不注册 fetchRegistry: true service-url: #defaultZone: http://localhost:7001/eureka # eureka服务端的地址 :单机版 defaultZone: http://eureka7001.com:7001/eureka,http://eureka7002.com:7002/eureka,http://eureka7003.com:7003/eureka #集群版- 1
- 2
- 3
- 4
- 5
- 6
- 7
1.2 测试
启动项目,访问http://eureka7001.com:7001/ , http://eureka7002.com:7002/ 和 http://eureka7002.com:7002/
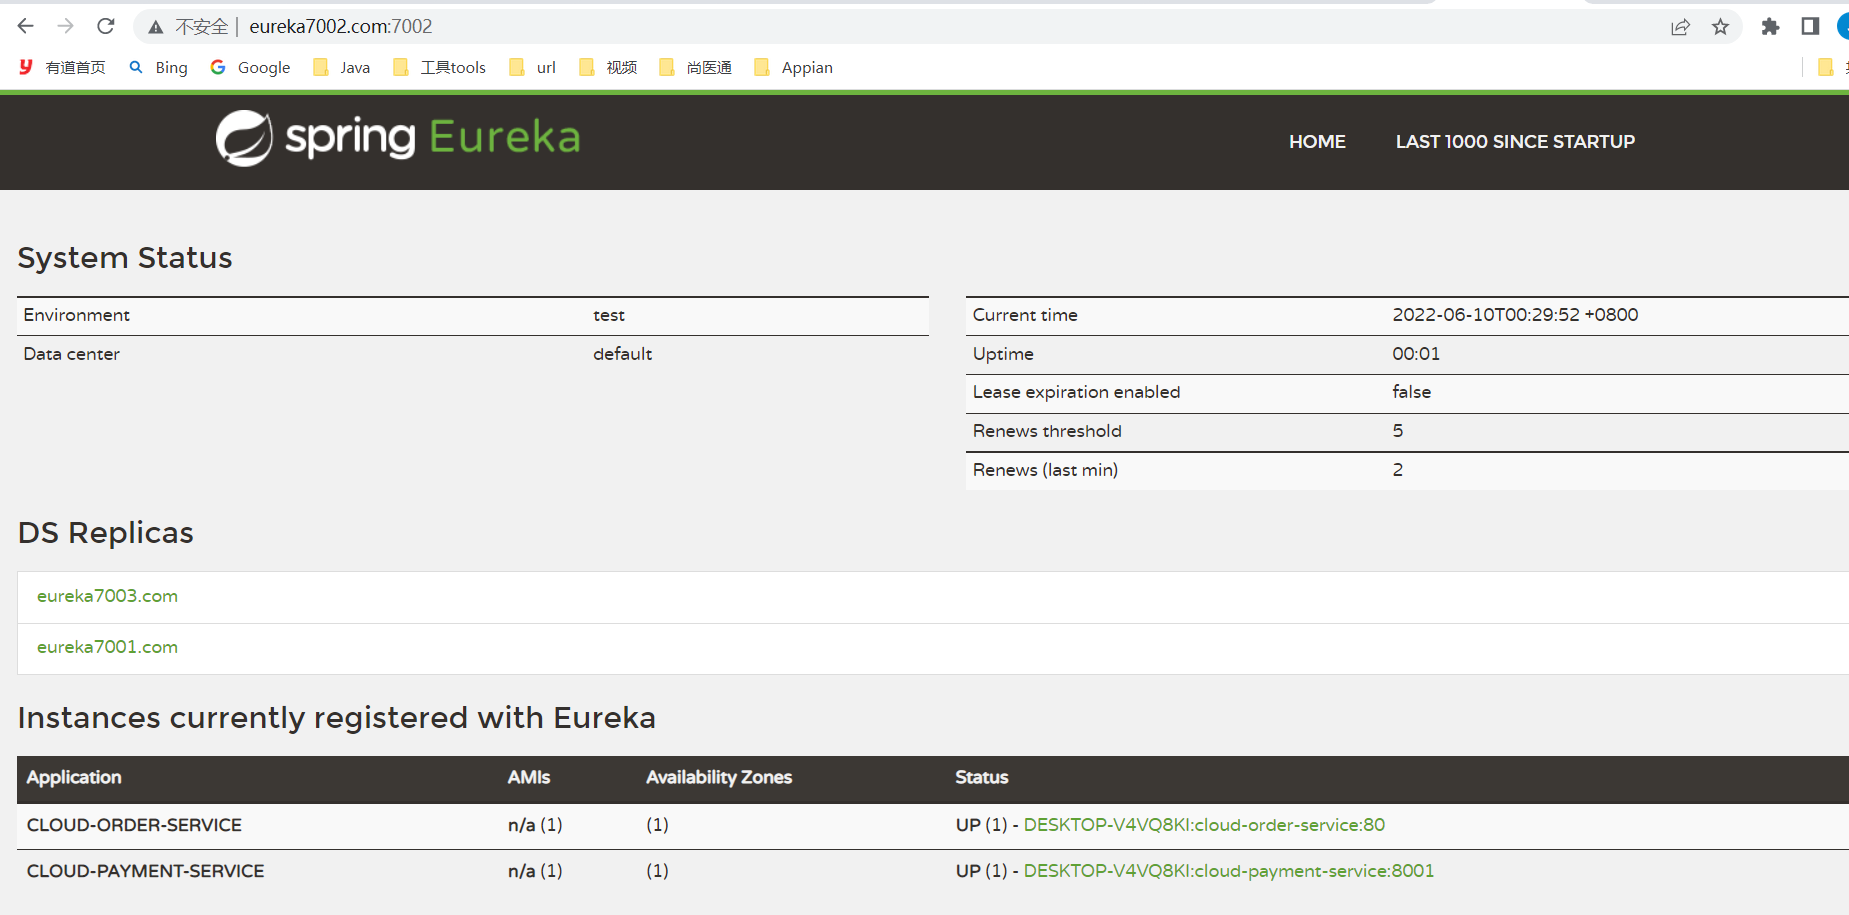
发现相互注册成功
访问http://eureka7001.com:80/doc.html对应的链接并进行调试,看结果是否成功!
对于http请求,80端口默认可以不写。https默认:443

3、支付服务提供者8081和8082集群环境构建
服务提供者8082和8081保持一致,消费者访问时通过交替访问8081和8082实现负载均衡,增加稳定性。
1.1 模仿8081,创建8082的module
1.2 修改8082yml端口为8082
1.3 修改8082和8082的controller返回结果:带上端口号,方便知道调用的服务
1.4 修改cloud-consumer-order80中的ApplicationContextConfig.getRestTemplate()
-
添加注解@LoadBalanced 开启负载均衡:轮询
-
并修改restTemplate的url为
PAYMENT_URL = "http://CLOUD-PAYMENT-SERVICE/";
1.5 测试
启动服务,访问http://localhost/consumer/payment/getPayment/11
发现访问的服务是8081和8082交替执行,实现了负载均衡。
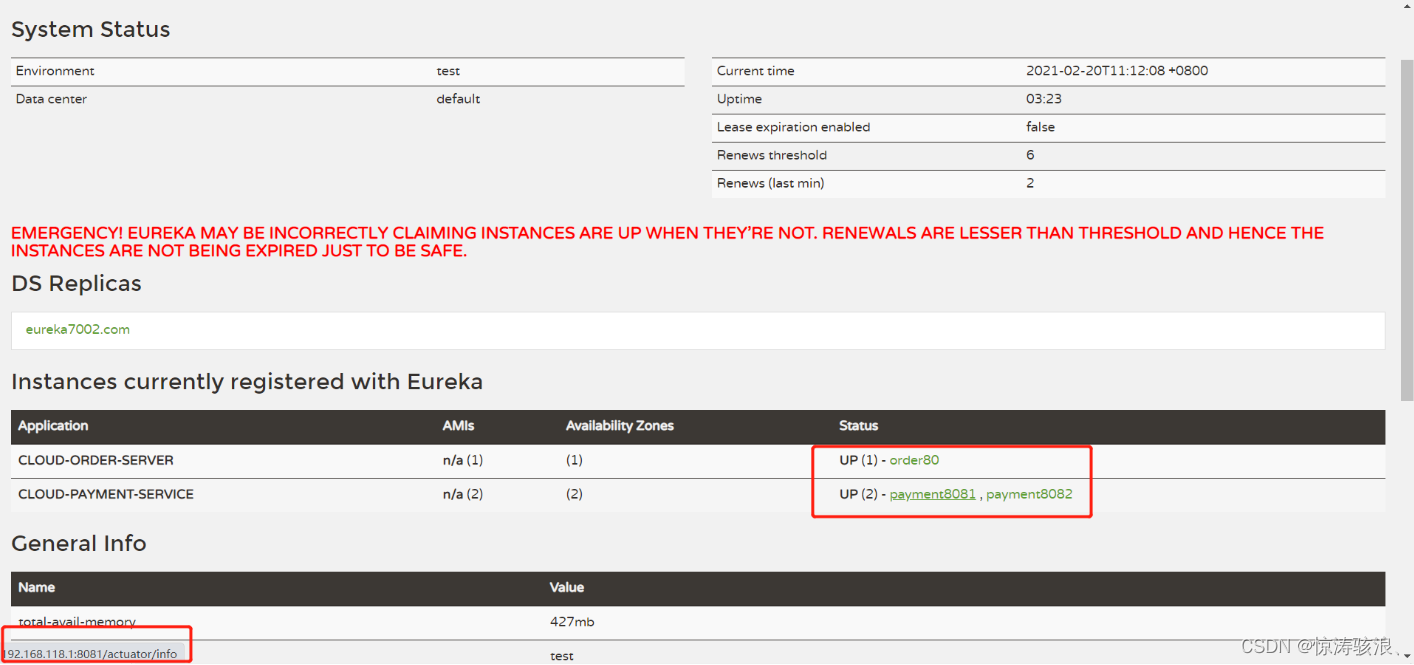
4、actuator微服务信息完善
eureka: instance: instance-id: payment8081 # actuator微服务信息完善 prefer-ip-address: true #访问路径可以显示ip- 1
- 2
- 3
- 4
- 5
可以自定义显示的服务器信息
5、服务发现DiscoveryClient
import org.springframework.cloud.client.discovery.DiscoveryClient; @Autowired private DiscoveryClient discoveryClient; @RequestMapping(path = "/discoveryClient", method = RequestMethod.GET) public Object discoveryClient() { log.info("进入 discoveryClient()。。。"); List<ServiceInstance> instances = discoveryClient.getInstances("CLOUD-PAYMENT-SERVICE"); for (ServiceInstance instance : instances) { log.info(instance.getInstanceId() + "-" + instance.getScheme() + "-" + instance.getHost() + ":" + instance.getPort() + "-" + instance.getUri() + "-" + instance.getMetadata()); } List<String> services = discoveryClient.getServices(); log.info("services:{}", services.toString()); return discoveryClient; }- 1
- 2
- 3
- 4
- 5
- 6
- 7
- 8
- 9
- 10
- 11
- 12
- 13
- 14
- 15
- 16
- 17
- 18
- 19
启动类添加注解:
@SpringBootApplication @EnableEurekaClient // 表明是eureka客户端 @EnableDiscoveryClient public class Payment8081Starter { public static void main(String[] args) { SpringApplication.run(Payment8081Starter.class, args); } }- 1
- 2
- 3
- 4
- 5
- 6
- 7
- 8
- 9
6、Eureka的自我保护机制
Eureka默认的配置eureka.server.enable-self-preservation=true,开启了自我保护机制。

Eureka的保护模式主要是用于一组客户端和Eureka Server之间存在网络分区场景下的保护。一旦进入保护模式,Eureka Server将会尝试保护其服务注册表中的信息,不再删除服务注册表中的数据,也就是不会销毁任何微服务。(payment8001即使宕机,也会在Eureka界面显示。)
一句话:某时刻某一个微服务不可用了,Eureka不会立刻清理,依旧会对该微服务的信息进行保存
属于CAP里面的AP分支
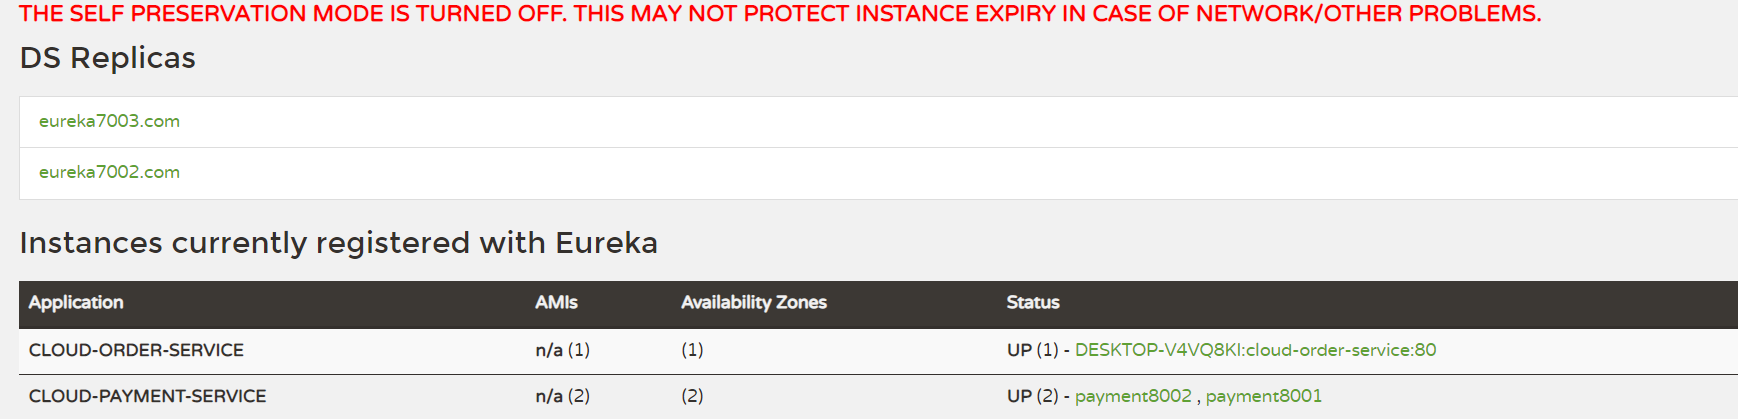
(1)禁用自我保护机制(一般不用)
1.1 注册中心eureakeServer端7001
修改eureka.server.enable-self-preservation=false
Eureka里的一个定时任务,每隔60秒清除无效instance
eureka.server.eviction-interval-timer-in-ms=60000
1.2 eureake Client端8001
默认的心跳时间如下:
eureka.instance.lease-renewal-interval-in-seconds=30
eureka.instance.lease-expiration-duration-in-seconds: 90
也就是每隔30秒会向Eureka Server发送一个健康信号。Eureka服务器在收到上一次健康信号超过90秒会将其剔除。需要client-server配合使用。
(2)测试
修改后页面如下:


二、服务注册进zookeeper(单机版)
1、在linux上安装zookeeper
(1)下载
http://archive.apache.org/dist/zookeeper/下载zookeeper-3.4.9.tar.gz(2)解压安装
下载完成后进入目录
/app/tools/cloud通过rz命令,将下载好的zookeeper-3.4.9.tar.gz进行解压命令为:
tar -zxvf zookeeper-3.4.9.tar.gz(3)安装后
cd zookeeper-3.4.9进入目录,通过mkdir zkData创建文件夹,通过配置用于存储持久化的数据。(4)简单修改配置文件
cd /app/tools/cloud/zookeeper-3.4.9/conf # 复制文件 cp zoo_sample.cfg zoo.cfg vi zoo.cfg #将 dataDir修改为 --》 dataDir=/app/tools/cloud/zookeeper-3.4.9/zkData cd /app/tools/cloud/zookeeper-3.4.9/bin # 可以启动或关闭zk服务器,以及启动zk客户端。 sh zkServer.sh stop # 关闭zk服务器 sh zkServer.sh start # 启动zk服务器 sh zkServer.sh status # 查看状态 sh zkCli.sh # 启动zk客户端 #zk客户端基本命令 ls / ls /service get /service/zookeeper- 1
- 2
- 3
- 4
- 5
- 6
- 7
- 8
- 9
- 10
- 11
- 12
- 13
- 14
- 15
- 16
- 17
对于集群模式:
# 201、202、203三台服务器都安装zookeeper # 1、在zkData目录下新建一个myid的文件,并指定唯一ID--》1 2 3 cd /app/tools/cloud/zookeeper-3.4.9/zkData touch myid vi myid --> 分别指定 1 2 3 # 2、再次配置zoo.cfg文件 vi /app/tools/cloud/zookeeper-3.4.9/conf/zoo.cfg 集群模式:在最后一行添加以下配置 #######################cluster########################## server.1=192.168.118.201:2888:3888 server.2=192.168.118.202:2888:3888 server.3=192.168.118.203:2888:3888 server.1/2/3表示myid设置的值的大小 # 3. 分别启动201、202、203的三台zookeeper cd /app/tools/cloud/zookeeper-3.4.9/bin sh zkServer.sh start 成功启动后sh zkServer.sh status发现202是leader,201和203都是follower(记着关闭防火墙)- 1
- 2
- 3
- 4
- 5
- 6
- 7
- 8
- 9
- 10
- 11
- 12
- 13
- 14
- 15
- 16
- 17
- 18
- 19
- 20
- 21
- 22
- 23
(5)zookeeper基本命令操作
help ls / ls2 / # 'ls2' has been deprecated. Please use 'ls [-s] path' instead. ls -s / # 创建两个节点,创建节点时必须同时写入数据 create /sanguo "songjiang" # 持久存在 get /sanguo # 取数 create -e /sanguo/wuguo "zhouyu" # 临时存在,客户端退出重新进入后就消失了 # 监听 get /sanguo watch # 如果此时其他客户端修改了/sanguo节点的数值,就可以被发现(只可以监听一次) 另一服务器set /sanguo "shizitou", 此时可以监控到WatchedEvent state:SyncConnected type:NodeDataChanged path:/sanguo stat / # 查看节点的详细信息- 1
- 2
- 3
- 4
- 5
- 6
- 7
- 8
- 9
- 10
- 11
- 12
- 13
- 14
- 15
- 16
(6)zookeeper面试题:
请简述 ZooKeeper 的选举机制?
1)半数机制:集群中半数以上机器存活,集群可用。所以 Zookeeper 适合安装奇数台 服务器。
2)Zookeeper 虽然在配置文件中并没有指定 Master 和 Slave。但是,Zookeeper 工作时, 是有一个节点为 Leader,其他则为 Follower,Leader 是通过内部的选举机制临时产生的。
ZooKeeper 的监听原理是什么?

2、创建一个生产者8084和一个消费者80注册入zookeeper
1. 创建一个服务提供者cloud-provider-payment8084
(1)建module
(2)改pom
这里需要注意的是 zookeeper的依赖版本问题。zookeeper-3.5.3-beta.jar:3,如果linux安装的zookeeper版本为3.4.9,和springboot默认版本不一致,会导致启动报错:解决方案1安装3.5.3-beta的程序。2是排除3.5.3-beta依赖,导入3.4.9的zookeeper
这里用的是第一种,完全模仿8001创建出8004. pom删除eureka引入zookeeper
<dependency> <groupId>org.springframework.cloudgroupId> <artifactId>spring-cloud-starter-zookeeper-discoveryartifactId> dependency>- 1
- 2
- 3
- 4
(3)写yml
和8001的区别如下:端口以及注册中心。删除eureka的配置,添加zookeeper的配置
server: port: 8004 cloud: zookeeper: connect-string: 192.168.137.110:2181- 1
- 2
- 3
- 4
- 5
- 6
(4)启动类
@SpringBootApplication @MapperScan("com.ityj.springcloud.mapper") @EnableDiscoveryClient public class Payment8004Starter { public static void main(String[] args) { SpringApplication.run(Payment8004Starter.class, args); } }- 1
- 2
- 3
- 4
- 5
- 6
- 7
- 8
(5)编写业务代码
和8001保持一致,改了一下路径
@Slf4j @RestController @RequestMapping("/zk/payment") public class PaymentController { @Autowired private PaymentService paymentService; @Value("${server.port}") private String serverPort; @GetMapping("/get/{id}") public CommonResult<PaymentDTO> getById(@PathVariable("id") Long id) { PaymentDTO paymentDTO = paymentService.getPaymentById(id); return CommonResult.success(paymentDTO, "ServerPort:" + serverPort); } @PostMapping("/save") public CommonResult<String> save(@RequestBody @Valid PaymentDTO paymentDTO) { String message = paymentService.save(paymentDTO); return StringUtils.hasText(message) ? CommonResult.fail(message) : CommonResult.success("ServerPort:" + serverPort); } }- 1
- 2
- 3
- 4
- 5
- 6
- 7
- 8
- 9
- 10
- 11
- 12
- 13
- 14
- 15
- 16
- 17
- 18
- 19
- 20
- 21
- 22
- 23
(6)测试
启动Payment8084ZkStarter服务,在linux上查看zookeeper的服务信息
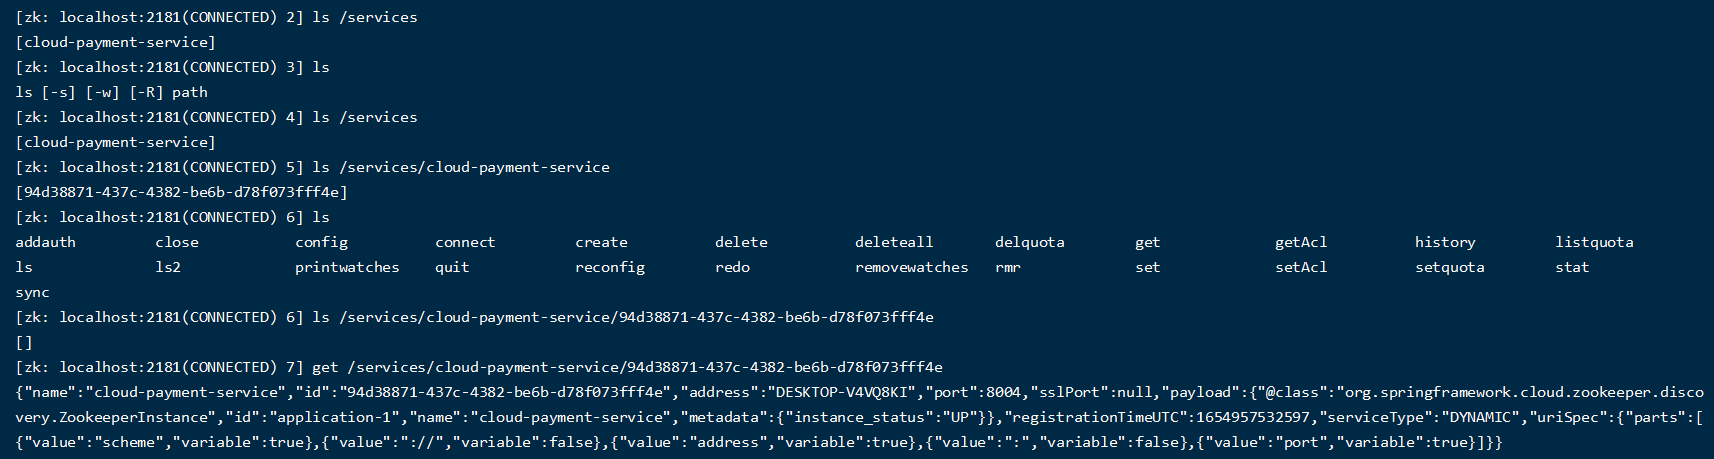
(7)总结
当8004宕机时,查看zookeeper注册中心的情况,再次重启观察对应的实例名称。
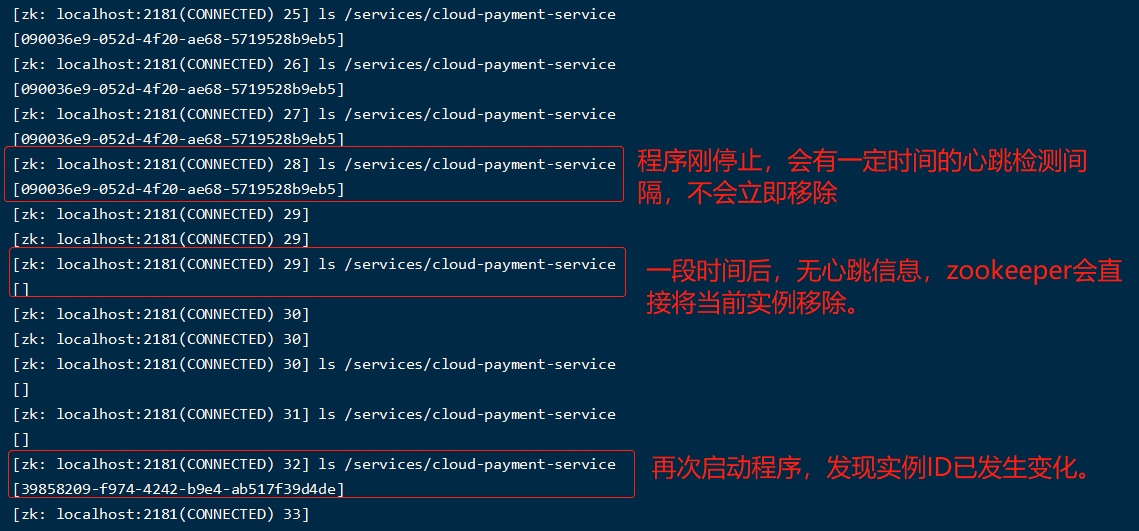
zookeeper的服务节点是临时节点(CP)
2. 创建一个消费者cloud-consumerzk-order80
(1)建module
(2)改pom,模仿消费者80,把注册中心dependency改成zk
<dependency> <groupId>org.springframework.cloudgroupId> <artifactId>spring-cloud-starter-zookeeper-discoveryartifactId> dependency>- 1
- 2
- 3
- 4
(3)改yml
server: port: 80 spring: application: name: cloud-order-service cloud: zookeeper: connect-string: 192.168.137.110:2181- 1
- 2
- 3
- 4
- 5
- 6
- 7
- 8
- 9
- 10
(4)启动类
@SpringBootApplication @EnableDiscoveryClient public class ConsumerOrderZK80Starter { public static void main(String[] args) { SpringApplication.run(ConsumerOrderZK80Starter.class, args); } }- 1
- 2
- 3
- 4
- 5
- 6
- 7
(5)业务代码
消费者消费服务提供者,通过RestTemplate进行信息交互,所以先要引入RestTemplate
和另一个80保持一致,改了一下路径
@RestController @Slf4j public class OrderController { @Autowired private RestTemplate restTemplate; private static final String PAYMENT_URL = "http://cloud-payment-service/"; // zookeeper注意大小写 @GetMapping("/consumer/zk/payment/get/{id}") public CommonResult<PaymentDTO> getById(@PathVariable("id") Long id) { return restTemplate.getForObject(PAYMENT_URL + "zk/payment/get/" + id, CommonResult.class); } @GetMapping("/consumer/zk/payment/save") public CommonResult<String> save(PaymentDTO paymentDTO) { log.info("Save: {}", paymentDTO); return restTemplate.postForObject(PAYMENT_URL + "zk/payment/save", paymentDTO, CommonResult.class); } }- 1
- 2
- 3
- 4
- 5
- 6
- 7
- 8
- 9
- 10
- 11
- 12
- 13
- 14
- 15
- 16
- 17
- 18
- 19
- 20
(6)测试
启动80,看到zookeeper已经注册了80服务

再访问业务代码http://localhost/consumer/zk/payment/get/1

三、服务注册与发现进consul
https://www.consul.io/intro/index.html 官网地址
https://www.springcloud.cc/spring-cloud-consul.html 使用教程
1、下载并安装consul
1.1 在官网下载consul_1.9.3_linux_amd64.zip
1.2 下载完成后上传到/app/tools/cloud,并通过
unzip consul_1.9.3_linux_amd64.zip进行解压。1.3 解压完成后出现一个consul的文件,执行
./consul看到如下界面说明安装成功
1.4 安装成功后执行以下命令进行启动
./consul agent -dev -ui -node=consul-dev -client=192.168.118.128- 1

启动成功后再浏览器上访问:http://192.168.118.128:8500

出现页面表示安装成功,如果页面打不开,记着关闭防火墙重试。
使用docker安装consul(使用中)
docker pull consul:latest docker run -d --name consul-dev -p 8500:8500 consul:latest- 1
- 2
- 3

2、创建服务提供者,并入驻consul
1.1 建module
新建Module支付服务provider8006
1.2 改pom
<project xmlns="http://maven.apache.org/POM/4.0.0" xmlns:xsi="http://www.w3.org/2001/XMLSchema-instance" xsi:schemaLocation="http://maven.apache.org/POM/4.0.0 http://maven.apache.org/xsd/maven-4.0.0.xsd"> <parent> <artifactId>spring-cloud-2022artifactId> <groupId>com.ityj.springcloudgroupId> <version>0.0.1-SNAPSHOTversion> parent> <modelVersion>4.0.0modelVersion> <artifactId>cloud-providerconsul-payment8006artifactId> <dependencies> <dependency> <groupId>com.ityj.springcloudgroupId> <artifactId>cloud-api-commonsartifactId> <version>${project.parent.version}version> dependency> <dependency> <groupId>org.springframework.cloudgroupId> <artifactId>spring-cloud-starter-consul-discoveryartifactId> dependency> <dependency> <groupId>mysqlgroupId> <artifactId>mysql-connector-javaartifactId> dependency> <dependency> <groupId>com.baomidougroupId> <artifactId>mybatis-plus-boot-starterartifactId> dependency> <dependency> <groupId>com.alibabagroupId> <artifactId>druid-spring-boot-starterartifactId> dependency> <dependency> <groupId>org.springframework.bootgroupId> <artifactId>spring-boot-starter-validationartifactId> dependency> dependencies> project>- 1
- 2
- 3
- 4
- 5
- 6
- 7
- 8
- 9
- 10
- 11
- 12
- 13
- 14
- 15
- 16
- 17
- 18
- 19
- 20
- 21
- 22
- 23
- 24
- 25
- 26
- 27
- 28
- 29
- 30
- 31
- 32
- 33
- 34
- 35
- 36
- 37
- 38
- 39
- 40
- 41
- 42
- 43
- 44
- 45
- 46
- 47
- 48
- 49
1.3 改yml
server: port: 8006 spring: application: name: cloud-consul-payment-service datasource: driver-class-name: com.mysql.cj.jdbc.Driver url: jdbc:mysql://192.168.137.110:3306/db_cloud?useSSL=true&useUnicode=true&characterEncoding=utf-8&serverTimezone=Asia/Shanghai username: root password: root cloud: consul: host: 192.168.137.110 port: 8500 discovery: service-name: ${spring.application.name} prefer-ip-address: true ip-address: 192.168.1.8- 1
- 2
- 3
- 4
- 5
- 6
- 7
- 8
- 9
- 10
- 11
- 12
- 13
- 14
- 15
- 16
- 17
- 18
- 19
- 20
1.4 启动类
@SpringBootApplication @MapperScan("com.ityj.springcloud.mapper") @EnableDiscoveryClient public class Payment8006Starter { public static void main(String[] args) { SpringApplication.run(Payment8006Starter.class, args); } }- 1
- 2
- 3
- 4
- 5
- 6
- 7
- 8
1.5 业务编写
@Slf4j @RestController @RequestMapping("/consul/payment") public class PaymentController { @Autowired private PaymentService paymentService; @Value("${server.port}") private String serverPort; @GetMapping("/get/{id}") public CommonResult<PaymentDTO> getById(@PathVariable("id") Long id) { PaymentDTO paymentDTO = paymentService.getPaymentById(id); return CommonResult.success(paymentDTO, "ServerPort:" + serverPort); } @PostMapping("/save") public CommonResult<String> save(@RequestBody @Valid PaymentDTO paymentDTO) { String message = paymentService.save(paymentDTO); return StringUtils.hasText(message) ? CommonResult.fail(message) : CommonResult.success("ServerPort:" + serverPort); } }- 1
- 2
- 3
- 4
- 5
- 6
- 7
- 8
- 9
- 10
- 11
- 12
- 13
- 14
- 15
- 16
- 17
- 18
- 19
- 20
- 21
- 22
- 23
1.6 测试
启动Payment8006Starter服务
访问http://192.168.137.110:8500

访问http://localhost:8006/consul/payment/get/1

3、创建消费者,并入驻consul
1.1 建module
新建Module消费服务cloud-consumerconsul-order80
1.2 改pom
<project xmlns="http://maven.apache.org/POM/4.0.0" xmlns:xsi="http://www.w3.org/2001/XMLSchema-instance" xsi:schemaLocation="http://maven.apache.org/POM/4.0.0 http://maven.apache.org/xsd/maven-4.0.0.xsd"> <parent> <artifactId>spring-cloud-2022artifactId> <groupId>com.ityj.springcloudgroupId> <version>0.0.1-SNAPSHOTversion> parent> <modelVersion>4.0.0modelVersion> <artifactId>cloud-consumerconsul-order80artifactId> <dependencies> <dependency> <groupId>com.ityj.springcloudgroupId> <artifactId>cloud-api-commonsartifactId> <version>${project.parent.version}version> dependency> <dependency> <groupId>org.springframework.cloudgroupId> <artifactId>spring-cloud-starter-consul-discoveryartifactId> dependency> dependencies> project>- 1
- 2
- 3
- 4
- 5
- 6
- 7
- 8
- 9
- 10
- 11
- 12
- 13
- 14
- 15
- 16
- 17
- 18
- 19
- 20
- 21
- 22
- 23
- 24
- 25
- 26
- 27
1.3 改yml
server: port: 80 spring: application: name: cloud-consul-order-service cloud: consul: host: 192.168.137.110 port: 8500 discovery: service-name: ${spring.application.name} prefer-ip-address: true ip-address: 192.168.1.8- 1
- 2
- 3
- 4
- 5
- 6
- 7
- 8
- 9
- 10
- 11
- 12
- 13
- 14
- 15
1.4 启动类
@SpringBootApplication @EnableDiscoveryClient public class ConsumerOrderConsul80Starter { public static void main(String[] args) { SpringApplication.run(ConsumerOrderConsul80Starter.class, args); } }- 1
- 2
- 3
- 4
- 5
- 6
- 7
1.5 业务编写
@RestController @Slf4j public class OrderController { @Autowired private RestTemplate restTemplate; private static final String PAYMENT_URL = "http://cloud-consul-payment-service/"; @GetMapping("/consumer/consul/payment/get/{id}") public CommonResult<PaymentDTO> getById(@PathVariable("id") Long id) { return restTemplate.getForObject(PAYMENT_URL + "consul/payment/get/" + id, CommonResult.class); } @GetMapping("/consumer/consul/payment/save") public CommonResult<String> save(PaymentDTO paymentDTO) { log.info("Save: {}", paymentDTO); return restTemplate.postForObject(PAYMENT_URL + "consul/payment/save", paymentDTO, CommonResult.class); } }- 1
- 2
- 3
- 4
- 5
- 6
- 7
- 8
- 9
- 10
- 11
- 12
- 13
- 14
- 15
- 16
- 17
- 18
- 19
- 20
- 21
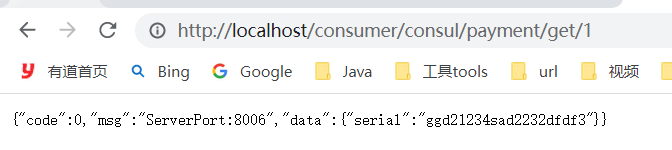
1.6 测试

访问http://localhost/consumer/consul/payment/get/1
1.7 Consul总结
CP,强一致性和分区容错性。
当某个服务宕机,一定时间未收到心跳响应,直接剔除。
四、eureka、zookeeper以及consul异同
CAP:分布式系统有三个指标。CAP理论关注粒度是数据,而不是整体系统设计的策略
- C:Consistency(强一致性)
- A:Availability(可用性)
- P:Partition tolerance(分区容错):基本都需要满足

- eureka强调AP,保证服务能正常运行。当某一个服务宕机时,并不会立即将其注册信息删除。好死不如赖活
- zookeeper只有一个客户端,没有UI页面。
- zookeeper和consul针对CP。
五、服务调用Ribbon & Feign
1、Spring Cloud Ribbon
Spring Cloud Ribbon是基于Netflix Ribbon实现的一套客户端负载均衡工具。
主要提供客户端的软件负载均衡算法和服务调用
1、负载均衡(Load Balancer)介绍
简单地说:负载均衡就是将用户请求平摊分配到多个服务上,从而达到系统的HA(高可用)。
常见的负载均衡软件有:Nginx,LVS,硬件F5等
2、Ribbon本地负载均衡和Nginx服务端负载均衡区别
(1)Nginx是服务端负载均衡,客户端所有的请求都会交给nginx,然后由nginx实现转发请求。即负载均衡是由服务端实现的。
(2)Ribbon是本地负载均衡,在调用微服务接口时,会在注册中心获取服务注册信息服务列表后 缓存到JVM的本地,从而在本地实现远程RPC远程服务调用技术。
一个牙疼的病人来到医院,需要找一个口腔科的医生。
病人A到医院,进行挂号,挂了一个口腔科的号码,可以认为这里是Nginx进行分配的。
口腔科有多位医生,没人负责一天,给病人A看病的医生可以认为是由Ribbon本地负载的。
3、Ribbon能干嘛:负载均衡+RestTemplate调用
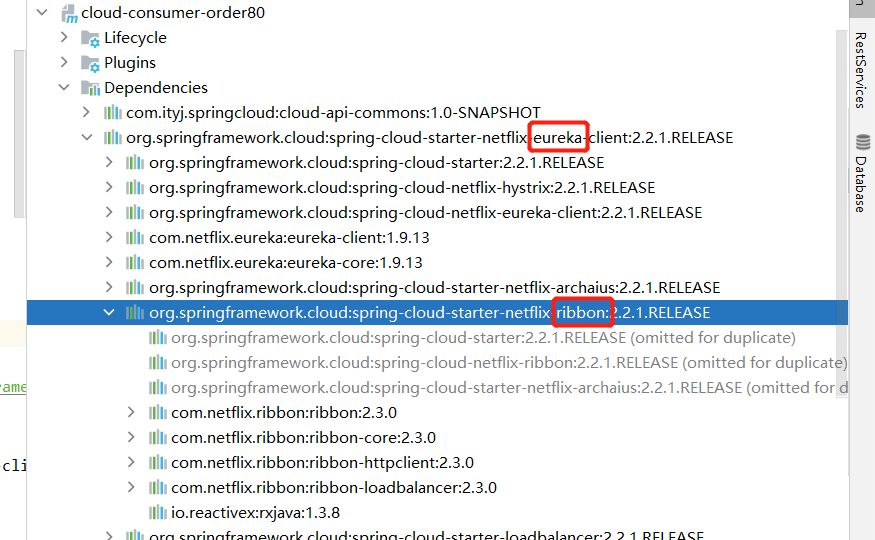
eureka依赖已经引入可Ribbon,所以加入@LoadBalancer可以实现默认的轮询的负载均衡策略
- 1
- 2
- 3
- 4
(1)Ribbon的负载规则替换
Ribbon核心组件IRule:根据特定算法从服务列表中选取一个要访问的服务

修改order80的负载规则:访问消费者的controller时,默认对服务提供者payment8081和8082是轮询使用。现在改为随机方式,
(1)写配置。
这里要求不配置文件不能被SpringBoot的@ComponetScan扫描到,否则自定义的这个配置类就会被所有的Ribbon客户端共享,达不到特殊定制化的目的。(ssssss)

package com.ityj.myrule; import com.netflix.loadbalancer.IRule; import com.netflix.loadbalancer.RandomRule; import org.springframework.context.annotation.Bean; import org.springframework.context.annotation.Configuration; @Configuration public class MyRandomRule { @Bean public IRule randomRule() { //定义为随机负载规则 return new RandomRule(); } }- 1
- 2
- 3
- 4
- 5
- 6
- 7
- 8
- 9
- 10
- 11
- 12
- 13
- 14
- 15
(2)改启动类
@RibbonClient(name = "CLOUD-PAYMENT-SERVICE", configuration = MyRandomRule.class) //修改其负载规则- 1
(3)启动服务,进行测试
http://localhost/consumer/payment/get/1
多次访问,对应端口随机改变。表明切换成功。

IRule --> AbstractLoadBalancerRule --> RoundRobinRule(默认的轮询机制) -->choose()方法实现服务器的选择。- 1
2、Feign和Open Feign
什么是Feign?
Feign是一个声明式的WebService客户端,使用Feign能让编写Web Service更加简单。它的使用方法是定义一个服务接口,然后在上面添加注解。Feign可以与Eureka和Ribbon组合使用达到负载均衡。

1、Open Feign使用步骤
(1)建module
建一个cloud-consumer-openfeign-order80的module
(2)改pom
这里主要是多了一个
spring-cloud-starter-openfeign的坐标。包含了ribbon的依赖<project xmlns="http://maven.apache.org/POM/4.0.0" xmlns:xsi="http://www.w3.org/2001/XMLSchema-instance" xsi:schemaLocation="http://maven.apache.org/POM/4.0.0 http://maven.apache.org/xsd/maven-4.0.0.xsd"> <parent> <artifactId>spring-cloud-2022artifactId> <groupId>com.ityj.springcloudgroupId> <version>0.0.1-SNAPSHOTversion> parent> <modelVersion>4.0.0modelVersion> <artifactId>cloud-consumer-openfeign-order80artifactId> <dependencies> <dependency> <groupId>com.ityj.springcloudgroupId> <artifactId>cloud-api-commonsartifactId> <version>${project.parent.version}version> dependency> <dependency> <groupId>org.springframework.cloudgroupId> <artifactId>spring-cloud-starter-netflix-eureka-clientartifactId> dependency> <dependency> <groupId>org.springframework.cloudgroupId> <artifactId>spring-cloud-starter-openfeignartifactId> dependency> dependencies> project>- 1
- 2
- 3
- 4
- 5
- 6
- 7
- 8
- 9
- 10
- 11
- 12
- 13
- 14
- 15
- 16
- 17
- 18
- 19
- 20
- 21
- 22
- 23
- 24
- 25
- 26
- 27
- 28
- 29
- 30
- 31
- 32
- 33
- 34
(3)写yml
server: port: 80 spring: application: name: cloud-openfeign-order-service eureka: client: register-with-eureka: true fetch-registry: true service-url: defaultZone: http://eureka7001.com:7001/eureka,http://eureka7002.com:7002/eureka,http://eureka7003.com:7003/eureka #集群版- 1
- 2
- 3
- 4
- 5
- 6
- 7
- 8
- 9
- 10
- 11
- 12
- 13
(4)启动类
@SpringBootApplication @EnableEurekaClient @EnableFeignClients // openfeign public class ConsumerOpenFeignOrder80Starter { public static void main(String[] args) { SpringApplication.run(ConsumerOpenFeignOrder80Starter.class, args); } }- 1
- 2
- 3
- 4
- 5
- 6
- 7
- 8
(5)编写业务代码
-
新建PaymentFeignService接口并新增注解@FeignClient(value = “CLOUD-PAYMENT-SERVICE”)
-
将服务提供者8081的controller声明复制过来,当做接口
@Component @FeignClient(value = "CLOUD-PAYMENT-SERVICE") public interface PaymentFeignService { @GetMapping("/payment/get/{id}") CommonResult<PaymentDTO> getById(@PathVariable("id") Long id); @PostMapping("/payment/save") CommonResult<String> save(@RequestBody @Valid PaymentDTO paymentDTO); }- 1
- 2
- 3
- 4
- 5
- 6
- 7
- 8
- 9
- 10
-
编写controller,调用PaymentFeignService接口。
@RestController @RequestMapping("/openfeign") @Slf4j public class OrderFeignController { @Autowired private PaymentFeignService paymentFeignService; @GetMapping("/consumer/payment/get/{id}") public CommonResult<PaymentDTO> getById(@PathVariable("id") Long id) { return paymentFeignService.getById(id); } @GetMapping("/consumer/payment/save") public CommonResult<String> save(PaymentDTO paymentDTO) { return paymentFeignService.save(paymentDTO); } }- 1
- 2
- 3
- 4
- 5
- 6
- 7
- 8
- 9
- 10
- 11
- 12
- 13
- 14
- 15
- 16
- 17
- 18
(6)测试
启动7001,7002,7003,8081,8082以及feign80
http://localhost/openfeign/consumer/payment/get/1
结果成功显示,并且端口交替返回,表示ribbon的负载均衡已生效。
(7)总结
- 启动类上要标明开启OpenFeign注解
@EnableFeignClients - 自定义的service接口,需要标明
@FeignClient(value = "CLOUD-PAYMENT-SERVICE") - 默认的消费者等待返回结果的超时时间是1S
2、Open Feign修改超时时间
修改yml配置文件
添加
feign: client: config: default: connectTimeout: 5000 # 设置feign调用producer的最大超时时间 readTimeout: 5000- 1
- 2
- 3
- 4
- 5
- 6
3、OpenFeign日志打印功能
(1)添加配置文件
@Configuration public class FeignConfig { @Bean public Logger.Level loggerLevel() { return Logger.Level.FULL; } }- 1
- 2
- 3
- 4
- 5
- 6
- 7
- 8
- 9
(2)修改yml
logging: level: com.ityj.springcloud.service.PaymentFeignService: debug- 1
- 2
- 3
(3)结果

六、服务降级Hystrix
分布式系统面临的问题:
复杂分布式结构中的应用程序有多个依赖关系,每个依赖关系在调用的时候不可避免会出现失败的情况,如果不妥善处理,就可能出现’‘雪崩’'严重后果。
1、Hystrix介绍


2、Hystrix服务提供者8001构建
(1)建module
新建module:cloud-provider-hystrix-payment8001
(2)改pom
<project xmlns="http://maven.apache.org/POM/4.0.0" xmlns:xsi="http://www.w3.org/2001/XMLSchema-instance" xsi:schemaLocation="http://maven.apache.org/POM/4.0.0 http://maven.apache.org/xsd/maven-4.0.0.xsd"> <parent> <artifactId>spring-cloud-2022artifactId> <groupId>com.ityj.springcloudgroupId> <version>0.0.1-SNAPSHOTversion> parent> <modelVersion>4.0.0modelVersion> <artifactId>cloud-provider-hystrix-payment8001artifactId> <dependencies> <dependency> <groupId>com.ityj.springcloudgroupId> <artifactId>cloud-api-commonsartifactId> <version>${project.parent.version}version> dependency> <dependency> <groupId>org.springframework.cloudgroupId> <artifactId>spring-cloud-starter-netflix-eureka-clientartifactId> dependency> dependencies> project>- 1
- 2
- 3
- 4
- 5
- 6
- 7
- 8
- 9
- 10
- 11
- 12
- 13
- 14
- 15
- 16
- 17
- 18
- 19
- 20
- 21
- 22
- 23
- 24
- 25
- 26
- 27
(3)写yml
server: port: 8001 spring: application: name: cloud-provider-hystrix-payment eureka: client: register-with-eureka: true fetch-registry: true service-url: defaultZone: http://eureka7001.com:7001/eureka,http://eureka7002.com:7002/eureka,http://eureka7003.com:7003/eureka #集群版 instance: instance-id: payment8001 prefer-ip-address: true- 1
- 2
- 3
- 4
- 5
- 6
- 7
- 8
- 9
- 10
- 11
- 12
- 13
- 14
- 15
- 16
- 17
(4)启动类
@SpringBootApplication @EnableEurekaClient public class PaymentHystrix8001Starter { public static void main(String[] args) { SpringApplication.run(PaymentHystrix8001Starter.class, args); } }- 1
- 2
- 3
- 4
- 5
- 6
- 7
(5)业务逻辑编写
service中包含两个方法:一个是直接返回入参,几乎不耗时;另一个是休眠一定时间再返回入参,会等待一定时间。
@Service public class PaymentServiceImpl implements PaymentService { @Override public String success(Long id) { return Thread.currentThread().getName() + "-success-" + id; } @SneakyThrows @Override public String timeout(Long id) { long time = 3; TimeUnit.SECONDS.sleep(time); return Thread.currentThread().getName() + "-timeout:" + time + "-" + id; } }- 1
- 2
- 3
- 4
- 5
- 6
- 7
- 8
- 9
- 10
- 11
- 12
- 13
- 14
- 15
- 16
- 17
@RestController @RequestMapping("/payment") @Slf4j public class PaymentController { @Autowired private PaymentService paymentService; @GetMapping("/success/{id}") public CommonResult<String> success(@PathVariable("id") Long id) { String result = paymentService.success(id); log.info(result); return CommonResult.success(result); } @GetMapping("/timeout/{id}") public CommonResult<String> timeout(@PathVariable("id") Long id) { String result = paymentService.timeout(id); log.info(result); return CommonResult.success(result); } }- 1
- 2
- 3
- 4
- 5
- 6
- 7
- 8
- 9
- 10
- 11
- 12
- 13
- 14
- 15
- 16
- 17
- 18
- 19
- 20
- 21
- 22
(6)测试
启动 7001, 7002,7003, cloud-provider-hystrix-payment8001
访问Eureka:http://localhost:7001/,看到8001已经注册进去

访问 localhost:8001/payment/timeout/312
localhost:8001/payment/success/312
都可以正常运行
(7) 利用JMeter测试高并发情况
Jmeter安装
https://baijiahao.baidu.com/s?id=1663295636729480721&wfr=spider&for=pc
-
https://jmeter.apache.org/ 下载apache-jmeter-5.4.1.tgz
-
下载后进行解压,解压完成即可
-
鼠标左键双击bin目录下 jmeter.bat或ApacheJMeter.jar进行启动

-
配置一个连接进行高并发模拟:一组200个线程,执行100次


结论
测试最后发现,当paymentInfo_timeout进行高并发调用时,也会影响到paymentInfo_OK接口效率。
3、Hystrix消费者80
(1)建module
新建cloud-consumer-feign-hystrix-order80来访问8081,模拟出现问题的情况
(2)改pom
<project xmlns="http://maven.apache.org/POM/4.0.0" xmlns:xsi="http://www.w3.org/2001/XMLSchema-instance" xsi:schemaLocation="http://maven.apache.org/POM/4.0.0 http://maven.apache.org/xsd/maven-4.0.0.xsd"> <parent> <artifactId>spring-cloud-2022artifactId> <groupId>com.ityj.springcloudgroupId> <version>0.0.1-SNAPSHOTversion> parent> <modelVersion>4.0.0modelVersion> <artifactId>cloud-consumer-feign-hystrix-order80artifactId> <dependencies> <dependency> <groupId>com.ityj.springcloudgroupId> <artifactId>cloud-api-commonsartifactId> <version>${project.parent.version}version> dependency> <dependency> <groupId>org.springframework.cloudgroupId> <artifactId>spring-cloud-starter-netflix-eureka-clientartifactId> dependency> <dependency> <groupId>org.springframework.cloudgroupId> <artifactId>spring-cloud-starter-openfeignartifactId> dependency> dependencies> project>- 1
- 2
- 3
- 4
- 5
- 6
- 7
- 8
- 9
- 10
- 11
- 12
- 13
- 14
- 15
- 16
- 17
- 18
- 19
- 20
- 21
- 22
- 23
- 24
- 25
- 26
- 27
- 28
- 29
- 30
- 31
- 32
(3)改yml
server: port: 80 spring: application: name: cloud-openfeign-order-service eureka: client: register-with-eureka: true fetch-registry: true service-url: defaultZone: http://eureka7001.com:7001/eureka,http://eureka7002.com:7002/eureka,http://eureka7003.com:7003/eureka #集群版 feign: client: config: default: connectTimeout: 5000 # 设置feign调用producer的最大超时时间 readTimeout: 5000- 1
- 2
- 3
- 4
- 5
- 6
- 7
- 8
- 9
- 10
- 11
- 12
- 13
- 14
- 15
- 16
- 17
- 18
- 19
- 20
(4)启动类
@SpringBootApplication @EnableEurekaClient @EnableFeignClients public class ConsumerOrderHystrix80Starter { public static void main(String[] args) { SpringApplication.run(ConsumerOrderHystrix80Starter.class, args); } }- 1
- 2
- 3
- 4
- 5
- 6
- 7
- 8
(5)业务层
通过openfeign访问服务提供者8001接口编写
@Component @FeignClient(value = "cloud-provider-hystrix-payment") public interface PaymentFeignService { @GetMapping("/payment/success/{id}") CommonResult<String> success(@PathVariable("id") Long id); @GetMapping("/payment/timeout/{id}") CommonResult<String> timeout(@PathVariable("id") Long id); }- 1
- 2
- 3
- 4
- 5
- 6
- 7
- 8
- 9
- 10
controller实现
@RestController @RequestMapping("/hystrix") @Slf4j public class OrderFeignController { @Autowired private PaymentFeignService paymentFeignService; @GetMapping("/consumer/payment/success/{id}") public CommonResult<String> success(@PathVariable("id") Long id) { return paymentFeignService.success(id); } @GetMapping("/consumer/payment/timeout/{id}") public CommonResult<String> timeout(@PathVariable("id") Long id) { return paymentFeignService.timeout(id); } }- 1
- 2
- 3
- 4
- 5
- 6
- 7
- 8
- 9
- 10
- 11
- 12
- 13
- 14
- 15
- 16
- 17
- 18
- 19
调用localhost/hystrix/consumer/payment/success/312,正常访问。
注意:消费者调用8081用的是open feign,而open feign默认的超时时间是1秒
添加配置,即可正常访问了。
feign: client: config: default: connectTimeout: 5000 # 设置feign调用producer的最大超时时间 readTimeout: 5000- 1
- 2
- 3
- 4
- 5
- 6
4、问题解决(Hystrix)
1. 服务降级(fallback):设置一个兜底策略
主要用到三个注解
@HystrixCommand、@EnableCircuitBreaker和@DefaultProperties- 1
这些可以用在生产者上也可以用在消费者上。一般情况是会用于消费者端。
(1)这里先说明用于8001的服务提供者身上:
使用步骤:
-
在想要处理的业务层方法上添加@HystrixCommand注解并添加相关属性
@SneakyThrows @Override @HystrixCommand(fallbackMethod = "timeoutHandler", commandProperties = { @HystrixProperty(name = "execution.isolation.thread.timeoutInMilliseconds", value = "3000") //3秒钟以内就是正常的业务逻辑 }) public String timeout(Long id) { //Double.valueOf(null); long time = 5; TimeUnit.SECONDS.sleep(time); return Thread.currentThread().getName() + "-timeout:" + time + "-" + id; } // 兜底策略 public String timeoutHandler(Long id) { return Thread.currentThread().getName() + "-timeoutHandler: 程序繁忙,请稍后再试---" + id; }- 1
- 2
- 3
- 4
- 5
- 6
- 7
- 8
- 9
- 10
- 11
- 12
- 13
- 14
- 15
- 16
-
在启动类上添加@EnableCircuitBreaker注解
-
启动8001服务,访问localhost:8001/payment/timeout/312

-
处理runtimeException, 在@HystrixCommand指定method即可。上面对于超时的配置同样适用于普通报错。
(2)对80的消费者端进行fallback服务降级
-
- 配置文件修改
feign: hystrix: enabled: true #如果处理自身的容错就开启。开启方式与生产端不一样。- 1
- 2
- 3
-
- 启动类添加注解
启动类添加
@EnableHystrix // 启动Hystrix服务降级-
- 编写逻辑代码
@GetMapping("/consumer/payment/timeout/{id}") @HystrixCommand(fallbackMethod = "orderTimeoutHandler", commandProperties = { @HystrixProperty(name = "execution.isolation.thread.timeoutInMilliseconds", value = "1500") }) public CommonResult<String> timeout(@PathVariable("id") Long id) { return paymentFeignService.timeout(id); } public CommonResult<String> orderTimeoutHandler(Long id) { return CommonResult.fail("orderTimeoutHandler: 80消费者端无法在规定时间内获取到响应数据或者程序出错!id = " + id); }- 1
- 2
- 3
- 4
- 5
- 6
- 7
- 8
- 9
- 10
- 11
消费者order80认为1.5秒内的返回为正常的,否则就走超时的兜底逻辑。
-
4.测试可以发现超时或者order端报错能走到自己写的兜底策略

(3)问题总结与优化
优化1:defaultFallback
现在每个方法需要写一个兜底策略,代码冗余严重。可以用@DefaultProperties(defaultFallback = “”)注解,对一系列方法配置一个默认的策略。
// 全局的兜底策略 : fallback方法 public CommonResult<String> globalFallBackHandler() { return CommonResult.fail(Thread.currentThread().getName() + "全局兜底策略执行了。。。"); }- 1
- 2
- 3
- 4
@DefaultProperties(defaultFallback = "globalFallBackHandler", commandProperties = { @HystrixProperty(name = "execution.isolation.thread.timeoutInMilliseconds", value = "10000") })- 1
- 2
- 3
@GetMapping("/consumer/payment/success/{id}") @HystrixCommand public CommonResult<String> success(@PathVariable("id") Long id) { //Double.valueOf("sdf"); return paymentFeignService.success(id); }- 1
- 2
- 3
- 4
- 5
- 6
此时可以直接关闭服务提供者8001,然后调用/consumer/payment/success/{id},可以看到走了defaultFallback

优化2:FeignClient–> fallback属性
@Component @FeignClient(value = "cloud-provider-hystrix-payment") public interface PaymentFeignService {- 1
- 2
- 3
一个自定义的FeignClient接口,可以指向一个服务提供者,因此可以根据这个特点,对这个接口进行实现,完成定制化。避免和业务逻辑混一起。
(1)新建一个类HystrixOrderServiceImpl.java实现接口OrderService
@Service public class PaymentFallbackService implements PaymentFeignService { @Override public CommonResult<String> success(Long id) { return CommonResult.fail("PaymentFallbackService.success()---> 进入了openfeign默认的兜底策略"); } @Override public CommonResult<String> timeout(Long id) { return CommonResult.fail("PaymentFallbackService.timeout()---> 进入了openfeign默认的兜底策略"); } }- 1
- 2
- 3
- 4
- 5
- 6
- 7
- 8
- 9
- 10
- 11
- 12
(2)修改openfeign访问生产者的统一接口OrderService
添加fallback的属性。
@Component @FeignClient(value = "cloud-provider-hystrix-payment", fallback = PaymentFallbackService.class) public interface PaymentFeignService {}- 1
- 2
- 3
(3)确保配置文件yml开启了hystrix
feign: hystrix: enabled: true #如果处理自身的容错就开启。开启方式与生产端不一样。- 1
- 2
- 3
(4)启动相关服务器。进行测试。关闭8001或者在服务提供方制造错误,
再次调用链接localhost/hystrix/consumer/payment/success/89465,发现进入服务降级的方法。

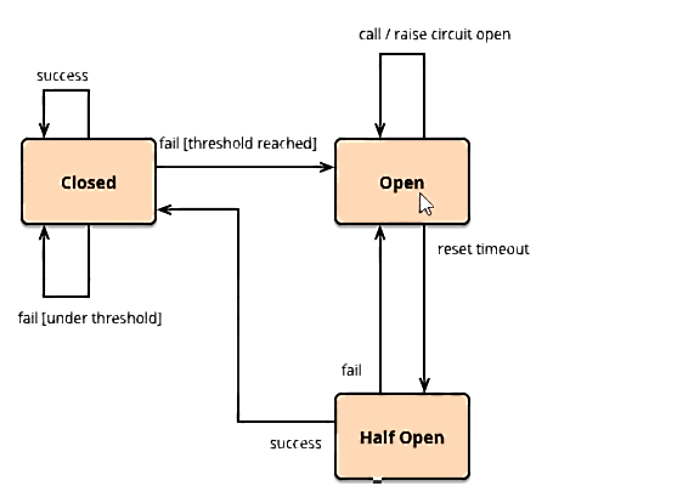
2. 服务熔断(break)

如何配置服务熔断:
1、修改cloud-provider-hystrix-payment8001,在PaymentService类中添加paymentCircuitBreaker方法以及其对应的异常服务降级(兜底)方法paymentCircuitBreaker_fallback
@HystrixCommand(fallbackMethod = "circuitBreakHandler", commandProperties = { @HystrixProperty(name = "circuitBreaker.enabled", value = "true"), //是否开启断路器 @HystrixProperty(name = "circuitBreaker.requestVolumeThreshold", value = "10"), //请求次数 @HystrixProperty(name = "circuitBreaker.sleepWindowInMilliseconds", value = "10000"), //时间范围 @HystrixProperty(name = "circuitBreaker.errorThresholdPercentage", value = "60") //失败率达到多少后跳闸 }) @Override public String circuitBreak(Long id) { if (id < 0) { throw new RuntimeException("Id cannot less than zero!"); } return Thread.currentThread().getName() + "-------" + id; } public String circuitBreakHandler(Long id) { return "服务熔断后fallback---> circuitBreakHandler: 当前服务不可用,请稍等重试!id = " + id; }- 1
- 2
- 3
- 4
- 5
- 6
- 7
- 8
- 9
- 10
- 11
- 12
- 13
- 14
- 15
- 16
- 17
2、 添加对应的controller调用接口
@GetMapping("/consumer/payment/circuitBreak/{id}") public CommonResult<String> circuitBreak(@PathVariable("id") Long id) { return paymentFeignService.circuitBreak(id); }- 1
- 2
- 3
- 4
3、启动类添加注解
@SpringBootApplication @EnableEurekaClient @EnableCircuitBreaker // 开启服务熔断 public class PaymentHystrix8001Starter { public static void main(String[] args) { SpringApplication.run(PaymentHystrix8001Starter.class, args); } }- 1
- 2
- 3
- 4
- 5
- 6
- 7
- 8
4、检查配置文件(80)
feign: hystrix: enabled: true- 1
- 2
- 3
5、测试服务熔断
上述方法为:当id为负数时,抛出异常。
而配置的服务熔断为:10秒范围内最少10次请求,并且60%以上的失败时,会进行熔断。而一段时间后,如果访问的成功率较好,将会恢复链路。
准备链接localhost/hystrix/consumer/payment/circuitBreak/787和localhost/hystrix/consumer/payment/circuitBreak/-111
模拟正常:多次访问第一个链接,无事发生
模拟异常:连续多次访问第二个链接*(抛异常),一段时间后再访问第一个链接,发现第一个链接也返回异常数据:服务熔断掉了;继续访问第一个链接,一段时间后发现可以正常访问了,表示链路恢复了。

3. 服务限流(flowlimit)
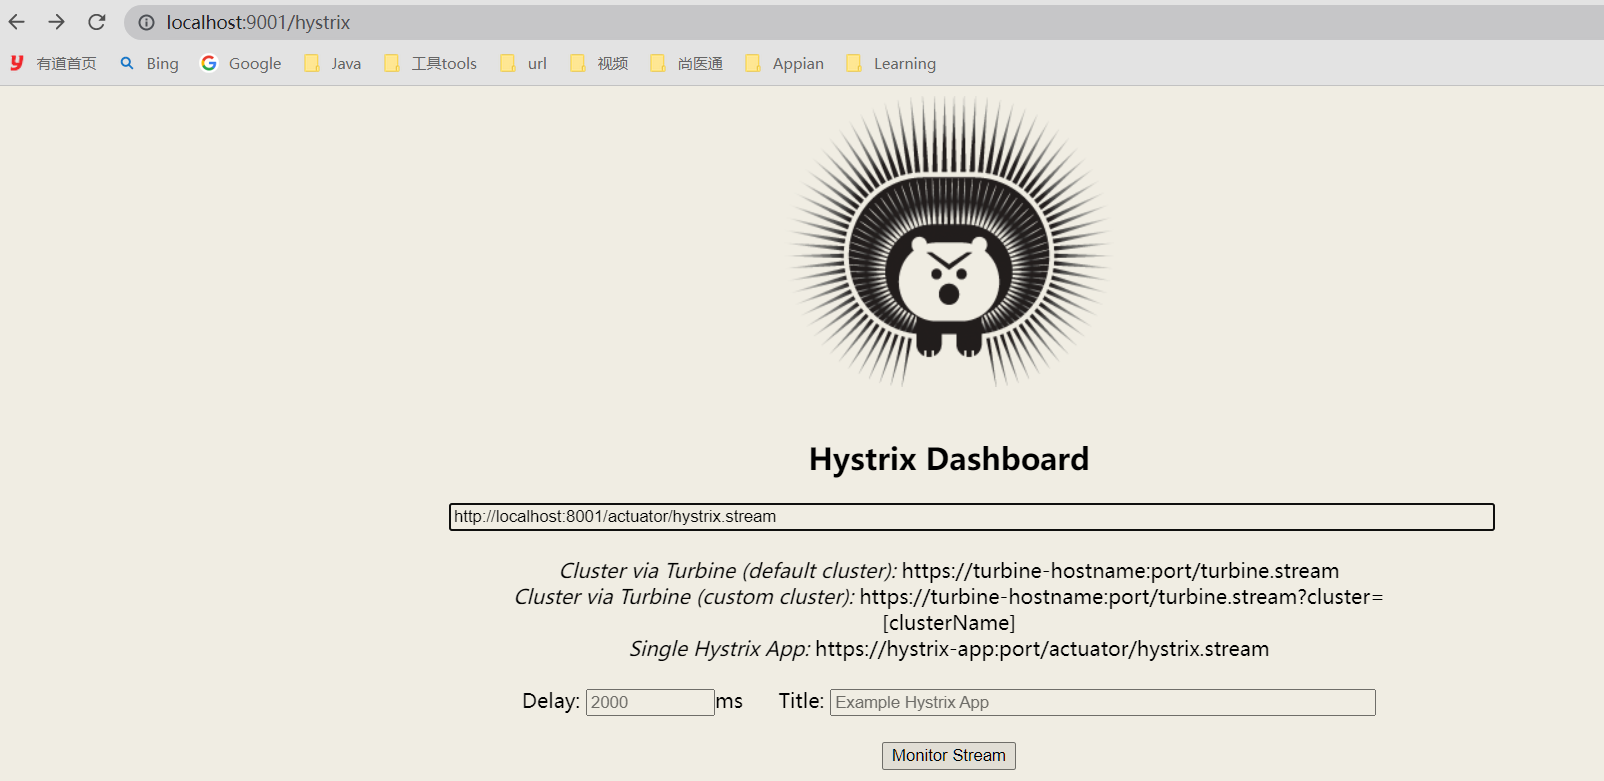
5. 服务监控hystrixDashboard

1、搭建dashboard9001项目
(1)新建module,新建cloud-consumer-hystrix-dashboard9001
(2)改pom
<project xmlns="http://maven.apache.org/POM/4.0.0" xmlns:xsi="http://www.w3.org/2001/XMLSchema-instance" xsi:schemaLocation="http://maven.apache.org/POM/4.0.0 http://maven.apache.org/xsd/maven-4.0.0.xsd"> <parent> <artifactId>spring-cloud-2022artifactId> <groupId>com.ityj.springcloudgroupId> <version>0.0.1-SNAPSHOTversion> parent> <modelVersion>4.0.0modelVersion> <artifactId>cloud-consumer-hystrix-dashboard9001artifactId> <dependencies> <dependency> <groupId>com.ityj.springcloudgroupId> <artifactId>cloud-api-commonsartifactId> <version>${project.parent.version}version> dependency> <dependency> <groupId>org.springframework.cloudgroupId> <artifactId>spring-cloud-starter-netflix-hystrix-dashboardartifactId> dependency> dependencies> project>- 1
- 2
- 3
- 4
- 5
- 6
- 7
- 8
- 9
- 10
- 11
- 12
- 13
- 14
- 15
- 16
- 17
- 18
- 19
- 20
- 21
- 22
- 23
- 24
- 25
- 26
- 27
- 28
(3)改yml
server: port: 9001 # http://localhost:9001/hystrix hystrix: dashboard: proxy-stream-allow-list: "*" # 解决HystrixDashboard 监控页面 Unable to connect to Command Metric Stream.- 1
- 2
- 3
- 4
- 5
- 6
(4)启动类
需要添加@EnableHystrixDashboard新的注解
@SpringBootApplication @EnableHystrixDashboard public class HystrixDashboard9001Starter { public static void main(String[] args) { SpringApplication.run(HystrixDashboard9001Starter.class, args); } }- 1
- 2
- 3
- 4
- 5
- 6
- 7
(5)测试
启动http://localhost:9001/hystrix

2、启动8001,并让dashbord9001对8001进行监控
(1)pom
确保8001中有actuator的依赖
<dependency> <groupId>org.springframework.bootgroupId> <artifactId>spring-boot-starter-actuatorartifactId> dependency>- 1
- 2
- 3
- 4
(2)确保开启了actuator/hystrix.stream 的监控配置
server: port: 8001 ... management: endpoints: web: exposure: include: health,info,hystrix.stream #根据需求增删路径- 1
- 2
- 3
- 4
- 5
- 6
- 7
- 8
- 9
- 10
(3)启动7001,7002,7003,8001,801,9001dashbord
访问http://localhost:9001/hystrix监控平台,并对http://localhost:8001/actuator/hystrix.stream进行监控;
对8001服务熔断的接口进行访问测试:
http://localhost:8001//payment/circuitBreak/333 成功
http://localhost:8001//payment/circuitBreak/-11 失败
多次访问失败链接,发现断路器打开。一段时间后再次访问失败的链接,发现断路器关闭,可以正常工作。


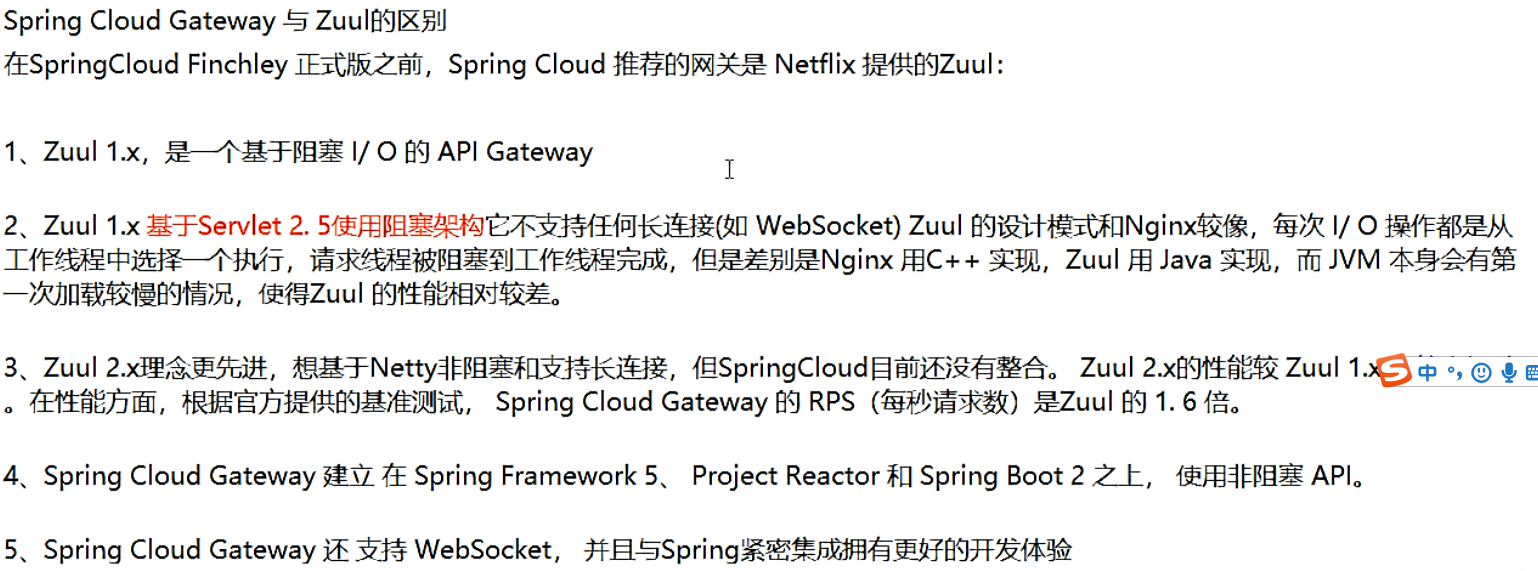
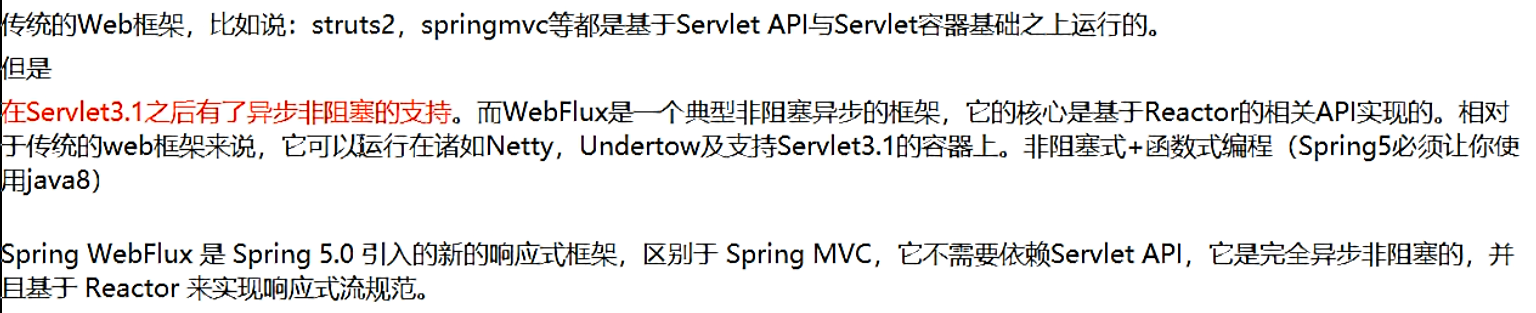
七、Gateway网关
原本网关主要是使用zuul1.X但是,1.X存在一些问题,在升级到2.X过程中公司内部出现一些问题,导致效率低下。Spring选择自己研发GateWay


Spring Cloud Gateway 使用的Webflux中的reactor-netty响应式编程组件,底层使用了Netty通讯框架
能干嘛:
- 反向代理
- 鉴权
- 流量控制
- 熔断
- 日志监控


1、三大核心概念
1.1 Route(路由)
路由是构建网关的基本模块,它由ID,目标URI,一系列的断言和过滤器组成,如果断言为true则匹配该路由
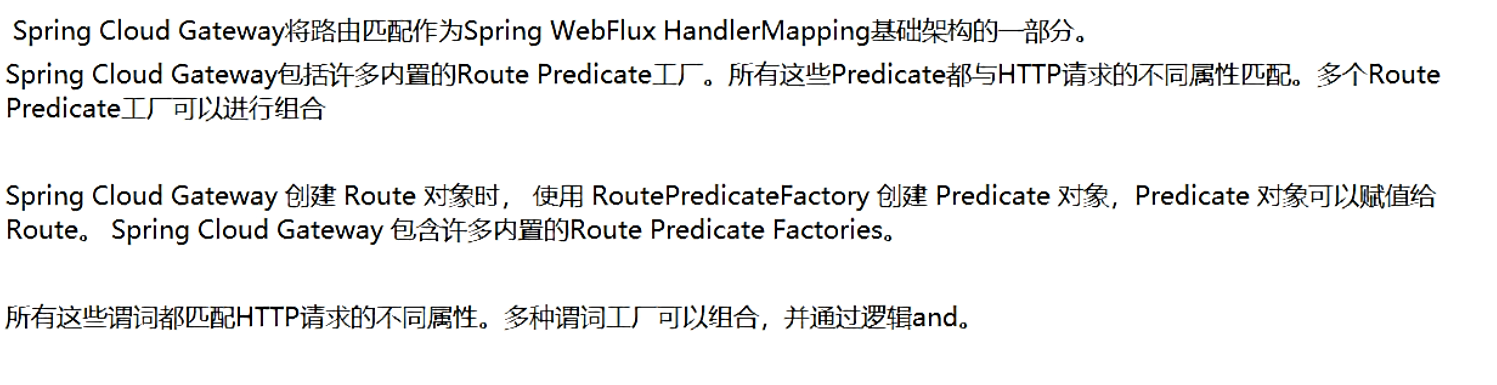
1.2 Predicate(断言)
参考的是java8的java.util.function.Predicate开发人员可以匹配HTTP请求中的所有内容(例如请求头或请求参数),如果请求与断言相匹配则进行路由
1.3 Filter(过滤)
指的是Spring框架中GatewayFilter的实例,使用过滤器,可以在请求被路由前或者之后对请求进行修改。

2、搭建gateway9527项目
(1)建module
创建cloud-gateway-gateway9527项目。
(2)改pom
<project xmlns="http://maven.apache.org/POM/4.0.0" xmlns:xsi="http://www.w3.org/2001/XMLSchema-instance" xsi:schemaLocation="http://maven.apache.org/POM/4.0.0 http://maven.apache.org/xsd/maven-4.0.0.xsd"> <parent> <artifactId>spring-cloud-2022artifactId> <groupId>com.ityj.springcloudgroupId> <version>0.0.1-SNAPSHOTversion> parent> <modelVersion>4.0.0modelVersion> <artifactId>cloud-gateway-gateway9527artifactId> <dependencies> <dependency> <groupId>org.springframework.cloudgroupId> <artifactId>spring-cloud-starter-gatewayartifactId> dependency> <dependency> <groupId>org.springframework.cloudgroupId> <artifactId>spring-cloud-starter-netflix-eureka-clientartifactId> dependency> <dependency> <groupId>com.ityj.springcloudgroupId> <artifactId>cloud-api-commonsartifactId> <version>0.0.1-SNAPSHOTversion> <exclusions> <exclusion> <groupId>org.springframework.bootgroupId> <artifactId>spring-boot-starter-webartifactId> exclusion> <exclusion> <groupId>com.github.xiaoymingroupId> <artifactId>knife4j-spring-boot-starterartifactId> exclusion> exclusions> dependency> dependencies> project>- 1
- 2
- 3
- 4
- 5
- 6
- 7
- 8
- 9
- 10
- 11
- 12
- 13
- 14
- 15
- 16
- 17
- 18
- 19
- 20
- 21
- 22
- 23
- 24
- 25
- 26
- 27
- 28
- 29
- 30
- 31
- 32
- 33
- 34
- 35
- 36
- 37
- 38
- 39
- 40
- 41
- 42
- 43
- 44
- 45
(3)改yml
server: port: 9527 spring: application: name: cloud-gateway eureka: instance: hostname: cloud-gateway-service instance-id: gateway9527 prefer-ip-address: true client: service-url: register-with-eureka: true fetch-registry: true defaultZone: http://eureka7001.com:7001/eureka,http://eureka7002.com:7002/eureka,http://eureka7003.com:7003/eureka- 1
- 2
- 3
- 4
- 5
- 6
- 7
- 8
- 9
- 10
- 11
- 12
- 13
- 14
- 15
(4)主启动类
@SpringBootApplication @EnableEurekaClient public class Gateway9527Starter { public static void main(String[] args) { SpringApplication.run(Gateway9527Starter.class, args); } }- 1
- 2
- 3
- 4
- 5
- 6
- 7
- 8
(5)测试
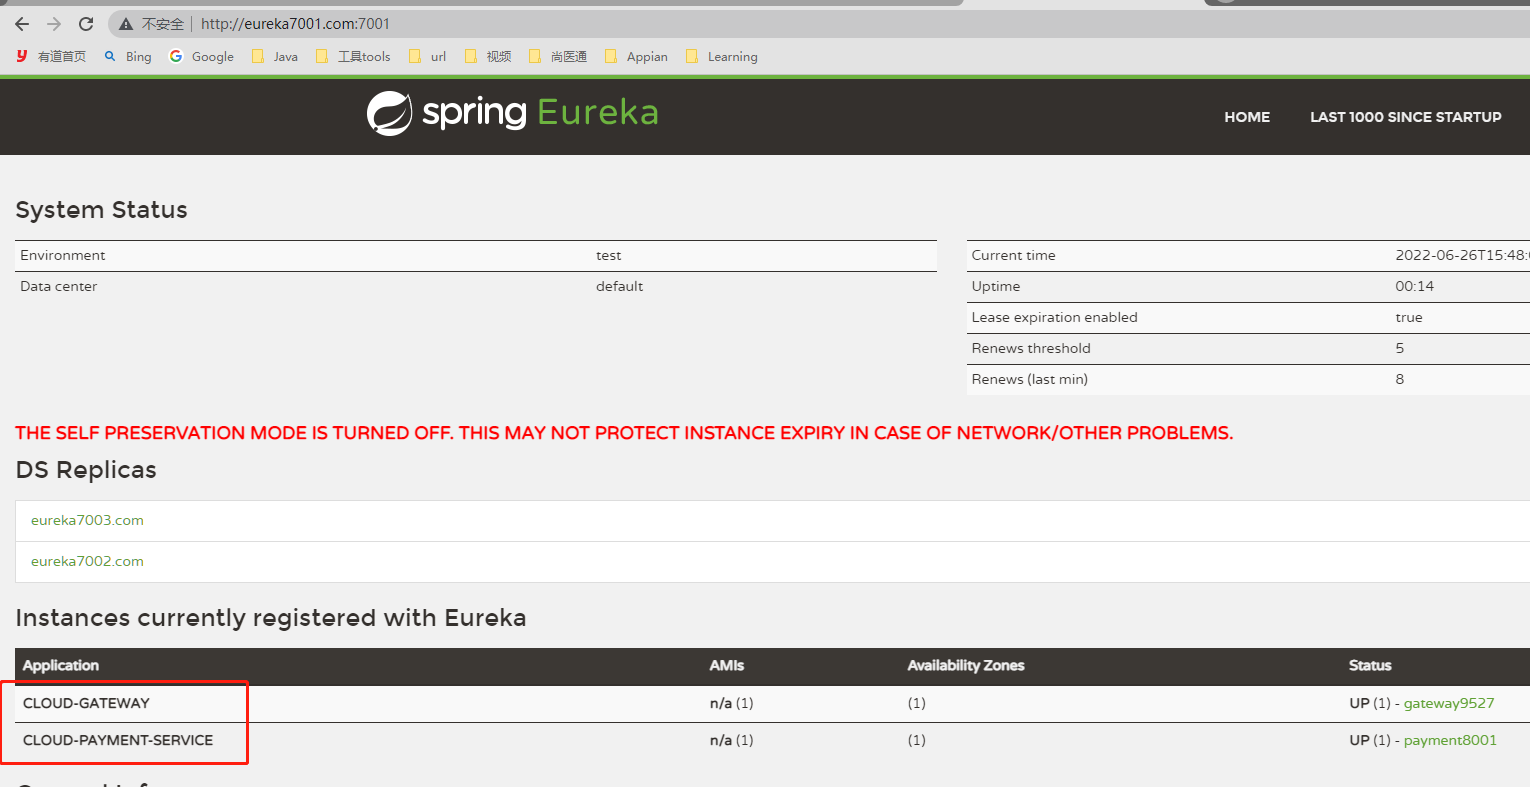
目前网关没有做任何工作,只是将自己注册进了eureka
启动7001,7002,7003,8001, 以及9275查看eureka是否将其注册进去了。
http://eureka7001.com:7001/
3、9527网关路由映射8081
启动8081,访问http://localhost:8001/payment/get/1能 正常返回结果。
需求:我们目前不想暴露8001端口,希望在8001外面套一层9527
即访问 http://localhost:9527/payment/get/1也可以正常访问。
只需要修改9527的配置文件
spring: cloud: gateway: routes: - id: payment_route #路由的ID,没有固定规则但要求唯一,建议配合服务名 uri: http://localhost:8001 #匹配后提供服务的路由地址 predicates: - Path=/payment/get/** #断言,路径相匹配的进行路由 - id: payment_route2 uri: http://localhost:8001 predicates: - Path=/payment/discovery #断言,路径相匹配的进行路由- 1
- 2
- 3
- 4
- 5
- 6
- 7
- 8
- 9
- 10
- 11
- 12
- 13
测试:
访问http://localhost:9527/payment/get/1,可以正常返回结果。

4、通过配置类实现路由
@Configuration public class GatewayRouteConfig { @Bean public RouteLocator routeLocator(RouteLocatorBuilder routeLocatorBuilder) { RouteLocatorBuilder.Builder routes = routeLocatorBuilder.routes(); routes.route("route_mil", x -> x.path("/mil").uri("http://news.baidu.com/guonei")).build(); routes.route("route_game", x -> x.path("/game").uri("http://news.baidu.com/game")).build(); return routes.build(); } }- 1
- 2
- 3
- 4
- 5
- 6
- 7
- 8
- 9
- 10
- 11
- 12
和通过配置文件编写的一样:
spring: cloud: gateway: routes: - id: route_mil #路由的ID,没有固定规则但要求唯一,建议配合服务名 http://news.baidu.com/mil uri: http://news.baidu.com #匹配后提供服务的路由地址 predicates: - Path=/mil #断言,路径相匹配的进行路由 - id: route_game uri: http://news.baidu.com predicates: - Path=/game #断言,路径相匹配的进行路由- 1
- 2
- 3
- 4
- 5
- 6
- 7
- 8
- 9
- 10
- 11
- 12
- 13

5、通过微服务名实现动态路由
默认情况下Gateway会根据注册中心的服务列表,以注册中心上微服务名为路径创建动态路由进行转发,从而实现动态路由的功能
在8081和8082服务下都有`/payment/get/1获取端口号的方法,8001和8002也注册进了Eureka,服务名称为CLOUD-PAYMENT-SERVICE。可以通过这个服务名结合gateway实现负载均衡。
1、启动Eureka7001和Eureka7001、7003、gateway9527和服务8081与服务8082
2、修改gateway9527的yml
- 添加spring.cloud.gateway.discovery.locator.enabled=true
- 修改spring.cloud.gateway.routes[1/2].uri=lb://CLOUD-PAYMENT-SERVICE
server: port: 9527 spring: application: name: cloud-gateway cloud: gateway: routes: - id: payment_route #路由的ID,没有固定规则但要求唯一,建议配合服务名 #uri: http://localhost:8001 #匹配后提供服务的路由地址 uri: lb://CLOUD-PAYMENT-SERVICE #匹配后提供服务的路由地址 predicates: - Path=/payment/get/** #断言,路径相匹配的进行路由 - id: payment_route2 uri: http://localhost:8001 predicates: - Path=/payment/discovery #断言,路径相匹配的进行路由 - id: route_guoji #路由的ID,没有固定规则但要求唯一,建议配合服务名 http://news.baidu.com/guoji #uri: http://news.baidu.com #匹配后提供服务的路由地址 uri: lb://CLOUD-PAYMENT-SERVICE #匹配后提供服务的路由地址 predicates: - Path=/guoji #断言,路径相匹配的进行路由 - id: route_guonei uri: http://news.baidu.com predicates: - Path=/guonei #断言,路径相匹配的进行路由 discovery: locator: enabled: true eureka: instance: hostname: cloud-gateway-service instance-id: gateway9527 prefer-ip-address: true client: service-url: register-with-eureka: true fetch-registry: true defaultZone: http://eureka7001.com:7001/eureka,http://eureka7002.com:7002/eureka,http://eureka7003.com:7003/eureka- 1
- 2
- 3
- 4
- 5
- 6
- 7
- 8
- 9
- 10
- 11
- 12
- 13
- 14
- 15
- 16
- 17
- 18
- 19
- 20
- 21
- 22
- 23
- 24
- 25
- 26
- 27
- 28
- 29
- 30
- 31
- 32
- 33
- 34
- 35
- 36
- 37
- 38
- 39
- 40
- 41
- 42
- 43
- 44
3、测试
调用连接 http://localhost:9527/payment/get/1
发现服务端口8081和8082轮询调用

6、Predicate的使用
启动9527项目,发现启动项里有很多Route Predicate Factories

总结:说白了,Predicate就是为了实现一组匹配规则,让请求过来找到对应的Route进行处理
添加一系列的and条件
predicates: - Path=/payment/get/** #断言,路径相匹配的进行路由 - After=2022-06-26T17:55:13.076168800+08:00[Asia/Shanghai] # 可以通过 ZonedDateTime.now() 获取携带时区的当前时间。多个predicates之间相当于and,这里的意思是只有在2021-02-25T22:41:56.214+08:00[Asia/Shanghai]之后此路由才能生效。 - Cookie=username,Jack # curl -X GET http://localhost:9527/payment/get/1 --cookie "username=Jack" - Header=X-Request-Id, \d+ #请求头中要有X-Request-Id属性并且值为整数的正则表达式 curl -X GET http://localhost:9527/payment/get/1 -H "X-Request-Id:123" --cookie "username=Jack" - Host=**.jack.com # curl -X GET http://localhost:9527/payment/get/1 -H "Host:www.jack.com" -H "X-Request-Id:123" --cookie "username=Jack"- 1
- 2
- 3
- 4
- 5
- 6
7、Filter的使用

1、自定义全局GlobalFilter过滤器
(1)在9725gateway服务中添加GatewayFilter模拟对未登录的用户过滤
即:当请求中不含uname=xxx的键值对时,进行拒绝。
@Component @Slf4j public class GatewayFilter implements GlobalFilter, Ordered { @Override public Mono<Void> filter(ServerWebExchange exchange, GatewayFilterChain chain) { // http://localhost:9527/payment/discovery?uname=222 String uname = exchange.getRequest().getQueryParams().getFirst("uname"); log.info("Into GatewayFilter..., uname = {}", uname); if (!StringUtils.hasText(uname)) { log.info("Please input username!"); exchange.getResponse().setStatusCode(HttpStatus.BAD_GATEWAY); return exchange.getResponse().setComplete(); } return chain.filter(exchange); } @Override public int getOrder() { return 0; } }- 1
- 2
- 3
- 4
- 5
- 6
- 7
- 8
- 9
- 10
- 11
- 12
- 13
- 14
- 15
- 16
- 17
- 18
- 19
- 20
- 21
- 22
- 23
(2)测试
正确:http://localhost:9527/payment/discovery?uname=222

错误:http://localhost:9527/payment/discovery

八、Config分布式配置中心


1、Config服务端配置与测试
1、安装git,并创建springcloud-config的仓库
https://blog.csdn.net/weixin_44588243/article/details/114207103
2、在Gitee上创建一个项目springcloud-config仓库
用于存放公用的配置文件,作为config服务器的远程服务器文件。 --》config server
(1)建module
cloud-config-center-3344
(2)改pom
<project xmlns="http://maven.apache.org/POM/4.0.0" xmlns:xsi="http://www.w3.org/2001/XMLSchema-instance" xsi:schemaLocation="http://maven.apache.org/POM/4.0.0 http://maven.apache.org/xsd/maven-4.0.0.xsd"> <parent> <artifactId>spring-cloud-2022artifactId> <groupId>com.ityj.springcloudgroupId> <version>0.0.1-SNAPSHOTversion> parent> <modelVersion>4.0.0modelVersion> <artifactId>cloud-config-center-3344artifactId> <dependencies> <dependency> <groupId>com.ityj.springcloudgroupId> <artifactId>cloud-api-commonsartifactId> <version>${project.parent.version}version> dependency> <dependency> <groupId>org.springframework.cloudgroupId> <artifactId>spring-cloud-config-serverartifactId> dependency> <dependency> <groupId>org.springframework.cloudgroupId> <artifactId>spring-cloud-starter-netflix-eureka-clientartifactId> dependency> dependencies> project>- 1
- 2
- 3
- 4
- 5
- 6
- 7
- 8
- 9
- 10
- 11
- 12
- 13
- 14
- 15
- 16
- 17
- 18
- 19
- 20
- 21
- 22
- 23
- 24
- 25
- 26
- 27
- 28
- 29
- 30
- 31
- 32
- 33
(3)改yml
server: port: 3344 spring: application: name: cloud-config-center cloud: config: server: git: uri: https://github.com/12722097458/spring-cloud-2022-config.git search-paths: - spring-cloud-2022-config label: master eureka: client: register-with-eureka: true fetch-registry: true service-url: defaultZone: http://eureka7001.com:7001/eureka,http://eureka7002.com:7002/eureka,http://eureka7003.com:7003/eureka instance: instance-id: config3344 prefer-ip-address: true- 1
- 2
- 3
- 4
- 5
- 6
- 7
- 8
- 9
- 10
- 11
- 12
- 13
- 14
- 15
- 16
- 17
- 18
- 19
- 20
- 21
- 22
(4)启动类
作为配置文件服务端,需要添加注解:@EnableConfigServer
@SpringBootApplication @EnableEurekaClient @EnableConfigServer // 作为config配置的服务端 public class CloudConfig3344Starter { public static void main(String[] args) { SpringApplication.run(CloudConfig3344Starter.class, args); } }- 1
- 2
- 3
- 4
- 5
- 6
- 7
- 8
(5)测试
启动eureka服务端:7001,7002,7003以及新建的3344配置文件服务端。
在C:\Windows\System32\drivers\etc\hosts中配置一个映射host
127.0.0.1 config-3344.com- 1
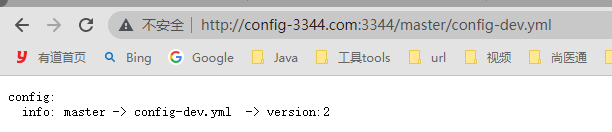
访问http://config-3344.com:3344/master/config-dev.yml(config-dev.yml是github远程仓库的文件),看能否获取到其内容。
结果可以。
2、Config客户端配置与测试
服务端3344访问远程仓库的数据并作为各个微服务的配置中心,而各个微服务3355,3366。。。通过3344来获取和远程仓库一致的配置信息。
(1)建module
cloud-config-client-3355
(2)改pom
<project xmlns="http://maven.apache.org/POM/4.0.0" xmlns:xsi="http://www.w3.org/2001/XMLSchema-instance" xsi:schemaLocation="http://maven.apache.org/POM/4.0.0 http://maven.apache.org/xsd/maven-4.0.0.xsd"> <parent> <artifactId>spring-cloud-2022artifactId> <groupId>com.ityj.springcloudgroupId> <version>0.0.1-SNAPSHOTversion> parent> <modelVersion>4.0.0modelVersion> <artifactId>cloud-config-client-3355artifactId> <dependencies> <dependency> <groupId>com.ityj.springcloudgroupId> <artifactId>cloud-api-commonsartifactId> <version>${project.parent.version}version> dependency> <dependency> <groupId>org.springframework.cloudgroupId> <artifactId>spring-cloud-config-clientartifactId> dependency> <dependency> <groupId>org.springframework.cloudgroupId> <artifactId>spring-cloud-starter-netflix-eureka-clientartifactId> dependency> dependencies> project>- 1
- 2
- 3
- 4
- 5
- 6
- 7
- 8
- 9
- 10
- 11
- 12
- 13
- 14
- 15
- 16
- 17
- 18
- 19
- 20
- 21
- 22
- 23
- 24
- 25
- 26
- 27
- 28
- 29
- 30
- 31
- 32
- 33
(3)加bootstap.yml

由于idea不会将bootstrap.yml转换成带小叶子的spring配置文件,需要手动操作。

找到对应的文件就行了。
server: port: 3355 spring: application: name: config-client-3355 cloud: config: label: master name: config profile: dev uri: http://localhost:3344 eureka: client: register-with-eureka: true fetch-registry: true service-url: defaultZone: http://eureka7001.com:7001/eureka,http://eureka7002.com:7002/eureka,http://eureka7003.com:7003/eureka instance: instance-id: config-client-3355 prefer-ip-address: true- 1
- 2
- 3
- 4
- 5
- 6
- 7
- 8
- 9
- 10
- 11
- 12
- 13
- 14
- 15
- 16
- 17
- 18
- 19
- 20
- 21
(4)启动类编写
@SpringBootApplication @EnableEurekaClient public class ConfigClient3355Starter { public static void main(String[] args) { SpringApplication.run(ConfigClient3355Starter.class, args); } }- 1
- 2
- 3
- 4
- 5
- 6
- 7
(5)业务类编写
访问远程仓库对应的属性,看能否正常获取。其实访问的是3344服务端
@RestController public class ConfigController { @Value("${config.info}") private String configInfo; @GetMapping("/configInfo") public String getConfigInfo(){ return configInfo; } }- 1
- 2
- 3
- 4
- 5
- 6
- 7
- 8
- 9
- 10
- 11
(6)测试
启动时,第一次bootstrap.yml写成了bootstrp,导致无法扫描到这个配置文件,所以访问远程仓库属性导致注入失败,一直报错。
启动7001,7002,7003,3344以及3355
访问http://config-3344.com:3344/master/config-dev.yml,正常。
访问http://config-3344.com:3355/configInfo,正常访问,可以获取到远程仓库的属性。(是通过3344访问出来的)
继续测试:
修改远程仓库的配置内容,3344访问可以立即更新,而3355/configInfo获取的还是未更新前的属性。
重启3355后,3355也能获取到最新的配置了。
现在就出现了一个问题,分布式配置还未实现动态刷新,如果每次更改都需要重启,将会非常麻烦。
3、Config客户端之动态刷新 - 手动版
避免每次更新配置都要重启客户端微服务3355,我们需要修改3355模块:
(1)POM引入actuator监控
确保已经引入
<dependency> <groupId>org.springframework.bootgroupId> <artifactId>spring-boot-starter-actuatorartifactId> dependency>- 1
- 2
- 3
- 4
目前此依赖要求和spring-boot-starter-web绑定,两者同时引入。除了网关gateway,其他都加上。
(2)修改YML,暴露监控端口
3355中添加
management: endpoints: web: exposure: include: health,info,hystrix.stream,refresh # refresh POST请求可用于远程仓库配置更新后,3355同步3344server的信息 curl -X POST http://localhost:3355/actuator/refresh- 1
- 2
- 3
- 4
- 5
(3)修改控制器
添加注解
@RefreshScope(4)重启3355,测试
启动7001,7002,3344,3355
访问http://config-3344.com:3344/master/config-dev.yml,正常。
访问http://localhost:3355/configInfo,正常。
修改远程仓库的config-dev.yml
访问http://config-3344.com:3344/master/config-dev.yml,直接更新,得到最新数据。
访问http://localhost:3355/configInfo,未更新。
???
还需要一个步骤,需要发送一个post请求,来手动刷新配置。
curl -X POST "http://localhost:3355/actuator/refresh"
刷新完,无需重启项目,再次访问http://localhost:3355/configInfo,发现已经是最新的数据。
(5)总结
此时每次修改后都需要运维人员手动调用链接进行刷新,也很麻烦。
需要找到一种方法:可否广播,一次通知,处处生效?Bus可以解决
九、SpringCloud Bus 消息总线
Spring Cloud Bus配合Spring Cloud Config使用可以实现配置的动态刷新,通过广播实现一次通知,处处生效。

Bus支持两种消息代理:RabbitMQ和Kafka

为何被称为总线?
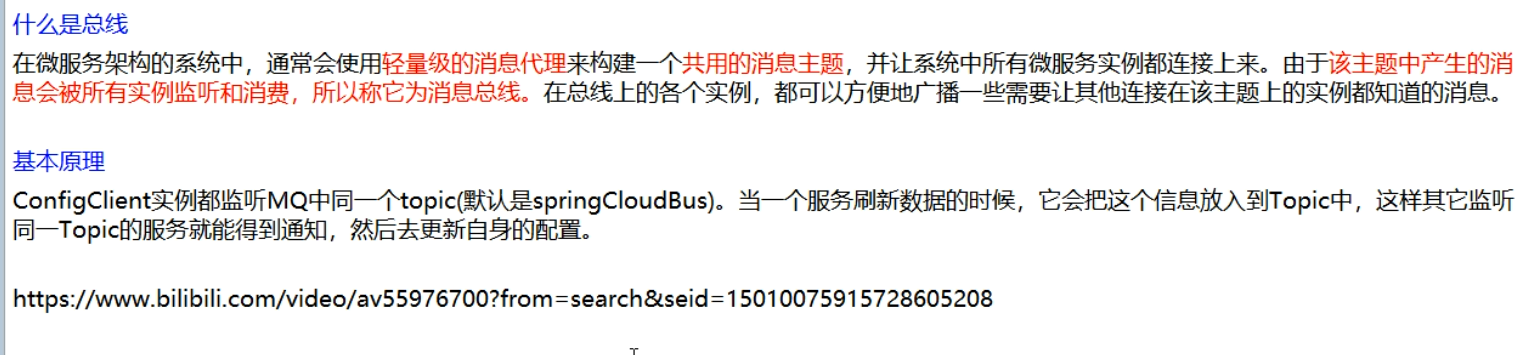
1、RabbitMQ环境配置
(1)下载安装Erlang
(2)下载安装rabbitmq-server
安装完毕,进入sbin目录:D:\Java\RabbitMQ\rabbitmq-server-3.7.15\rabbitmq_server-3.7.15\sbin
cmd进入命令窗口,执行
rabbitmq-plugins enable rabbitmq_management命令:
(3)访问地址查看是否安装成功
点击可视化插件:RabbitMQ Service - start,启动服务,并访问http://localhost:15672/
默认用户为 guest/guest


2、模仿3355创建config客户端3366
只有端口为3366,其余都和3355相同
创建完毕,测试:
启动7001,7002,7003,3344,3355,3366
访问http://config-3344.com:3344/master/config-dev.yml:结果为最新配置。
http://localhost:3355/configInfo:也是最新的
http://localhost:3366/configInfo:也是最新的
修改远程配置文件config-dev.yml
发现只有3344会立即更新,而3355和3366都需要分别执行以下命令刷新后可以正常显示最新的配置:
curl -X POST "http://localhost:3355/actuator/refresh" curl -X POST "http://localhost:3366/actuator/refresh"- 1
- 2
3、修改配置,实现全局广播
一次通知,处处生效
利用消息总线触发一个服务端ConfigServer的/bus/refresh端点,而刷新所有客户端的配置(更加推荐)
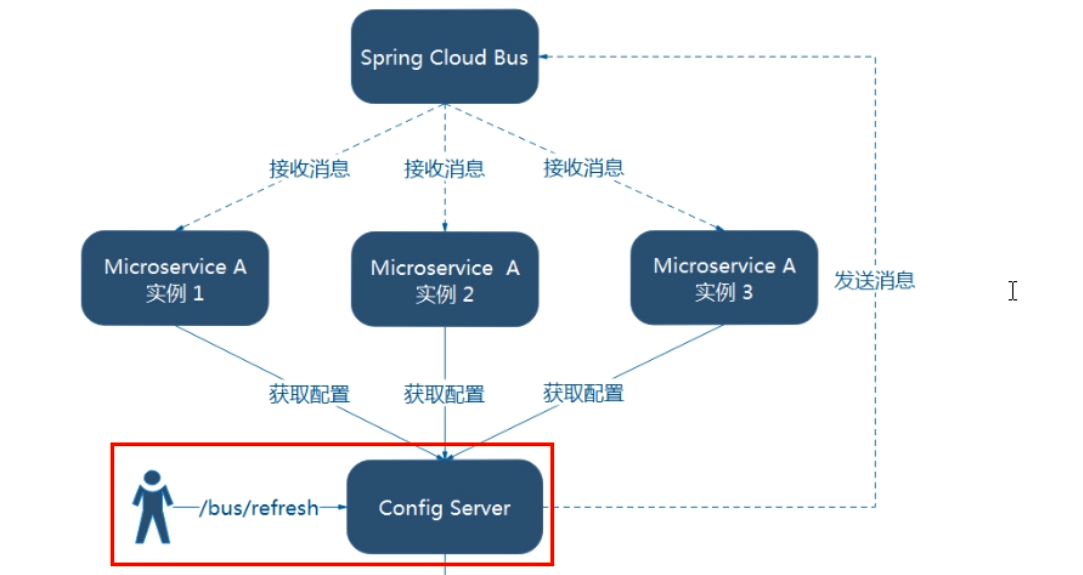
(1)给cloud-config-center-3344配置中心服务端添加消息总线支持
-
改pom
新增依赖
<dependency> <groupId>org.springframework.cloudgroupId> <artifactId>spring-cloud-starter-bus-amqpartifactId> dependency>- 1
- 2
- 3
- 4
-
改yml
server: port: 3344 spring: application: name: cloud-config-center cloud: config: server: git: uri: https://github.com/12722097458/spring-cloud-2022-config.git search-paths: - spring-cloud-2022-config label: master rabbitmq: host: localhost port: 5672 username: guest password: guest eureka: client: register-with-eureka: true fetch-registry: true service-url: defaultZone: http://eureka7001.com:7001/eureka,http://eureka7002.com:7002/eureka,http://eureka7003.com:7003/eureka instance: instance-id: config3344 prefer-ip-address: true management: endpoints: web: exposure: include: 'bus-refresh' # curl -X POST http://localhost:3344/actuator/bus-refresh- 1
- 2
- 3
- 4
- 5
- 6
- 7
- 8
- 9
- 10
- 11
- 12
- 13
- 14
- 15
- 16
- 17
- 18
- 19
- 20
- 21
- 22
- 23
- 24
- 25
- 26
- 27
- 28
- 29
- 30
- 31
- 32
- 33
- 34
添加了rabbitMQ的配置和最后的bus配置。
(2)给cloud-config-center-3355/3366客户端添加消息总线支持
-
改pom
添加依赖,和3344一致
<dependency> <groupId>org.springframework.cloudgroupId> <artifactId>spring-cloud-starter-bus-amqpartifactId> dependency>- 1
- 2
- 3
- 4
-
添加rabbitMQ的配置
server端口是5672,UI页面的端口是15672
spring: rabbitmq: host: localhost port: 5672 username: guest password: guest- 1
- 2
- 3
- 4
- 5
- 6
(3)测试
启动7001,7002,3344,3355,3366以及rabbitMQ的客户端
访问http://config-3344.com:3344/master/config-dev.yml:结果为最新配置。
http://localhost:3355/configInfo:也是最新的
http://localhost:3366/configInfo:也是最新的
修改远程的配置文件,发现3355和3366都不会更新。
???
需要手动对3344进行一次刷新,刷新后3344会广播到对应的客户端上,进行配置更新。
curl -X POST "http://localhost:3344/actuator/bus-refresh"- 1
执行完毕后3355和3366客户端的配置已经能够获取到最新的了。
一次请求,处处生效。
4、实现定点广播
如果指向定点广播,不想全局广播。即指定客户端进行广播,可以使用以下的请求进行处理。
公式:http://localhost:配置中心的端口号/actuator/bus-refresh/{destination}
eg:只通知3355,不通知3366
curl -X POST "http://localhost:3344/actuator/bus-refresh/config-client:3355"最后发现,实现了通知3355而未通知3366
十、SpringCloud Stream消息驱动
1、消息驱动概述
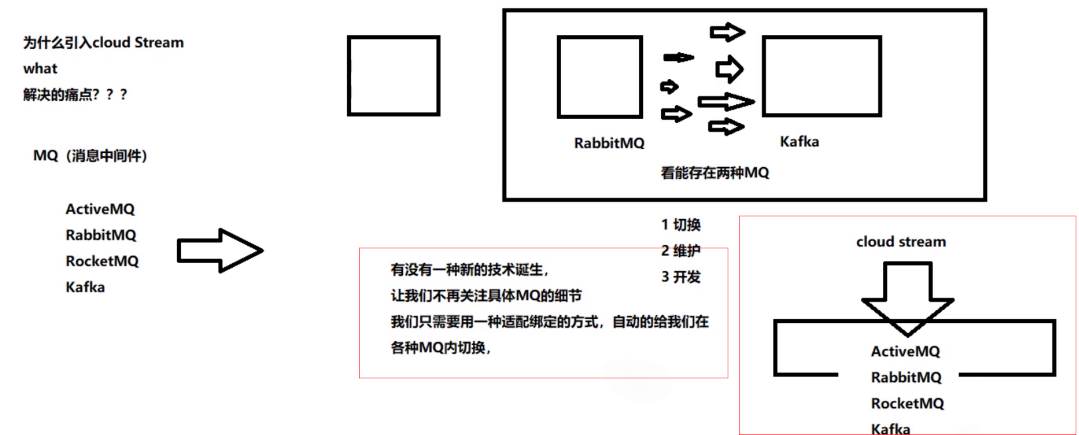
屏蔽底层消息中间件的差异,降低切换版本,统一消息的编程模型

为什么用Cloud Stream?


Stream中的消息通信方式遵循了发布-订阅模式,Topic主题进行广播:在RabbitMQ就是Exchange,在kafka中就是Topic。


2、消息驱动之生产者8801项目搭建
(1)cloud-stream-rabbitmq-provider8801创建
(2)pom修改
特殊:
<dependency> <groupId>org.springframework.cloudgroupId> <artifactId>spring-cloud-starter-stream-rabbitartifactId> dependency>- 1
- 2
- 3
- 4
<project xmlns="http://maven.apache.org/POM/4.0.0" xmlns:xsi="http://www.w3.org/2001/XMLSchema-instance" xsi:schemaLocation="http://maven.apache.org/POM/4.0.0 http://maven.apache.org/xsd/maven-4.0.0.xsd"> <parent> <artifactId>spring-cloud-2022artifactId> <groupId>com.ityj.springcloudgroupId> <version>0.0.1-SNAPSHOTversion> parent> <modelVersion>4.0.0modelVersion> <artifactId>cloud-stream-rabbitmq-provider8801artifactId> <dependencies> <dependency> <groupId>org.springframework.cloudgroupId> <artifactId>spring-cloud-starter-stream-rabbitartifactId> dependency> <dependency> <groupId>org.springframework.cloudgroupId> <artifactId>spring-cloud-starter-netflix-eureka-clientartifactId> dependency> <dependency> <groupId>com.ityj.springcloudgroupId> <artifactId>cloud-api-commonsartifactId> <version>0.0.1-SNAPSHOTversion> dependency> dependencies> project>- 1
- 2
- 3
- 4
- 5
- 6
- 7
- 8
- 9
- 10
- 11
- 12
- 13
- 14
- 15
- 16
- 17
- 18
- 19
- 20
- 21
- 22
- 23
- 24
- 25
- 26
- 27
- 28
- 29
- 30
- 31
- 32
- 33
- 34
- 35
(3)改yml
server: port: 8801 spring: application: name: cloud-stream-provider cloud: stream: binders: # 在此处配置要绑定的rabbitmq的服务信息; defaultRabbit: # 表示定义的名称,用于于binding整合 type: rabbit # 消息组件类型 environment: # 设置rabbitmq的相关的环境配置 spring: rabbitmq: host: localhost port: 5672 username: guest password: guest bindings: # 服务的整合处理 output: # 这个名字是一个通道的名称 destination: studyExchange # 表示要使用的Exchange名称定义 content-type: application/json # 设置消息类型,本次为json,文本则设置“text/plain” binder: defaultRabbit # 设置要绑定的消息服务的具体设置 eureka: client: # 客户端进行Eureka注册的配置 register-with-eureka: true fetch-registry: true service-url: defaultZone: http://eureka7001.com:7001/eureka,http://eureka7002.com:7002/eureka,http://eureka7003.com:7003/eureka instance: instance-id: send-8801.com # 在信息列表时显示主机名称 prefer-ip-address: true # 访问的路径变为IP地址- 1
- 2
- 3
- 4
- 5
- 6
- 7
- 8
- 9
- 10
- 11
- 12
- 13
- 14
- 15
- 16
- 17
- 18
- 19
- 20
- 21
- 22
- 23
- 24
- 25
- 26
- 27
- 28
- 29
- 30
- 31
- 32
- 33
- 34
(4)启动类
@SpringBootApplication @EnableEurekaClient public class StreamPayment8801Starter { public static void main(String[] args) { SpringApplication.run(StreamPayment8801Starter.class, args); } }- 1
- 2
- 3
- 4
- 5
- 6
- 7
(5)业务代码
-
发送消息接口
public interface MessageProviderService { String sendMessage(); }- 1
- 2
- 3
-
发送消息接口实现类
@EnableBinding(Source.class) //定义消息的推送管道 @Slf4j public class MessageProviderServiceImpl implements MessageProviderService { @Qualifier("output") @Autowired private MessageChannel messageChannel; @Override public String sendMessage() { String message = UUID.fastUUID().toString(); log.info("Sending data {} to RabbitMQ...", message); messageChannel.send(MessageBuilder.withPayload(message).build()); return message; } }- 1
- 2
- 3
- 4
- 5
- 6
- 7
- 8
- 9
- 10
- 11
- 12
- 13
- 14
- 15
- 16
-
controller
@RestController @Slf4j public class MessageSendController { @Autowired private MessageProviderService messageProviderService; @GetMapping("/sendMessage") public String sendMessage() { return messageProviderService.sendMessage(); } }- 1
- 2
- 3
- 4
- 5
- 6
- 7
- 8
- 9
- 10
- 11
- 12
- 13
(6)测试
启动7001,7002, 7003 以及8801;启动rabbitMQ服务器
访问http://localhost:8801/sendMessage,最终可以在rabbitMQ页面上看到波动情况。

3、消息驱动之消费者8802
(1)新建cloud-stream-rabbitmq-consumer8802
(2)改pom
<project xmlns="http://maven.apache.org/POM/4.0.0" xmlns:xsi="http://www.w3.org/2001/XMLSchema-instance" xsi:schemaLocation="http://maven.apache.org/POM/4.0.0 http://maven.apache.org/xsd/maven-4.0.0.xsd"> <parent> <artifactId>spring-cloud-2022artifactId> <groupId>com.ityj.springcloudgroupId> <version>0.0.1-SNAPSHOTversion> parent> <modelVersion>4.0.0modelVersion> <artifactId>cloud-stream-rabbitmq-consumer8802artifactId> <dependencies> <dependency> <groupId>org.springframework.cloudgroupId> <artifactId>spring-cloud-starter-stream-rabbitartifactId> dependency> <dependency> <groupId>org.springframework.cloudgroupId> <artifactId>spring-cloud-starter-netflix-eureka-clientartifactId> dependency> <dependency> <groupId>com.ityj.springcloudgroupId> <artifactId>cloud-api-commonsartifactId> <version>${project.version}version> dependency> dependencies> project>- 1
- 2
- 3
- 4
- 5
- 6
- 7
- 8
- 9
- 10
- 11
- 12
- 13
- 14
- 15
- 16
- 17
- 18
- 19
- 20
- 21
- 22
- 23
- 24
- 25
- 26
- 27
- 28
- 29
- 30
- 31
- 32
(3)写yml
server: port: 8802 spring: application: name: cloud-stream-consumer cloud: stream: binders: # 在此处配置要绑定的rabbitmq的服务信息; defaultRabbit: # 表示定义的名称,用于于binding整合 type: rabbit # 消息组件类型 environment: # 设置rabbitmq的相关的环境配置 spring: rabbitmq: host: localhost port: 5672 username: guest password: guest bindings: # 服务的整合处理 input: # 这个名字是一个通道的名称 destination: studyExchange # 表示要使用的Exchange名称定义 content-type: application/json # 设置消息类型,本次为json,文本则设置“text/plain” binder: defaultRabbit # 设置要绑定的消息服务的具体设置 eureka: client: # 客户端进行Eureka注册的配置 register-with-eureka: true fetch-registry: true service-url: defaultZone: http://eureka7001.com:7001/eureka,http://eureka7002.com:7002/eureka,http://eureka7003.com:7003/eureka instance: instance-id: send-8802.com # 在信息列表时显示主机名称 prefer-ip-address: true # 访问的路径变为IP地址- 1
- 2
- 3
- 4
- 5
- 6
- 7
- 8
- 9
- 10
- 11
- 12
- 13
- 14
- 15
- 16
- 17
- 18
- 19
- 20
- 21
- 22
- 23
- 24
- 25
- 26
- 27
- 28
- 29
- 30
- 31
- 32
- 33
(4)启动类
@EnableEurekaClient @SpringBootApplication public class StreamConsumer8802Starter { public static void main(String[] args) { SpringApplication.run(StreamConsumer8802Starter.class, args); } }- 1
- 2
- 3
- 4
- 5
- 6
- 7
(5)业务编写
@EnableBinding(Sink.class) @Component @Slf4j public class MessageReceiveService { @Value("${server.port}") private String serverPort; @StreamListener(value = Sink.INPUT) public void receive(Message<String> message) { log.info("Receive data {}, Server port is:{}", message.getPayload(), serverPort); } }- 1
- 2
- 3
- 4
- 5
- 6
- 7
- 8
- 9
- 10
- 11
- 12
- 13
(6)测试
启动7001、7002、7003、8801、8802和rabbitMQ的服务端
多次访问生产者 http://localhost:8801/sendMessage,在rabbitMQ页面上看到波动情况。
其中8802的控制台可以看到有打印信息出现,即进行了消费。

4、消息驱动之消费者8803
复制8802,再新建一个消费者模块。
cloud-stream-rabbitmq-consumer8803
测试:
再启动8803
并多次访问生产者 http://localhost:8801/sendMessage。
此时分别查看8802和8803的控制台打印情况:
8801生产者:

8802消费者:

8803消费者:

发现,生产的两条数据,被8802和8803同时消费掉了。出现了重复消费的问题。
5、分组消费与持久化解决重复消费问题
生产实际案例:
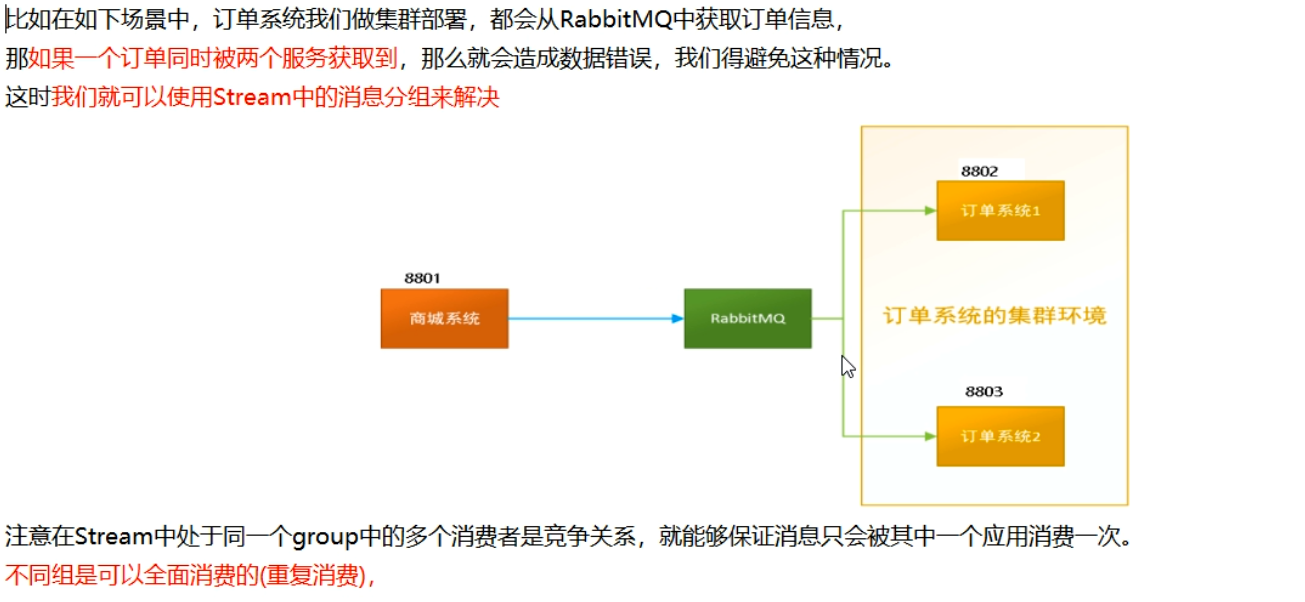
(1)分组
微服务应用放置于同一个group中,就能够保证消息只会被其中一个应用消费一次。不同的组是可以消费的,同一个组内会发生竞争关系,只有其中一个可以消费。
同组竞争,不同组会重复消费。
8802和8803默认每一个微服务的组都是不同的:

修改8802和8803配置文件,显式地指定组名。
group: ityjGroup8802spring.cloud.stream.bindings.input.group=group-consumer-yj- 1
==此时8802和8803在同一个组内,不会出现重复消费的问题。==两个消费者轮询消费.
8801

8802

8803

(2)持久化
如果启动了8801生产者,此时消费者没有启动。生产者又生产了很多的数据,此时再启动消费者8802,如果消费者启动后能够发现8801生产的数据并进行消费,则说明可以持久化。否则不能;
此时如果配置了group属性,就可以持久化,没有配置就不行。
删除8802的group: group-consumer-yj配置,此时8803有group: group-consumer-yj配置
关闭8802和8803
多次访问:http://localhost:8801/sendMessage
启动8802服务,发现8802启动后不能消费8001已有的数据(没有配置group)
启动8803服务,发现8803启动后可以消费8001已有的数据。
所以group分组一定要加上
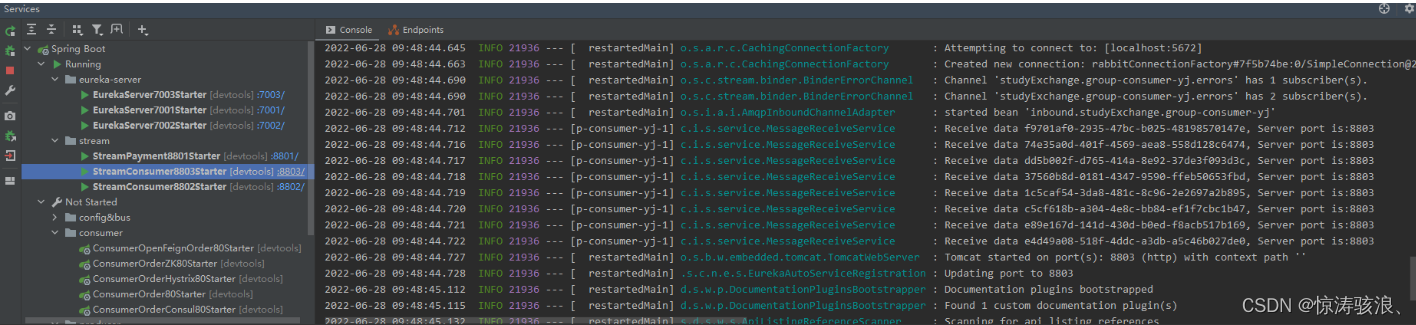

可以看到对于group:group-consumer-yj2没有消费者正常工作,所以任务都存在队列里,当有服务工作时会进行消费(实现了持久化)

十一、SpringCloud Sleuth分布式请求链路追踪
为什么会出现这个技术?需要解决哪些问题?

是什么?
Spring Cloud Sleuth提供了一套完整的服务跟踪的解决方案,在分布式系统中提供追踪解决方案并且兼容支持了zipkin。

一、搭建链路监控步骤
1、启动zipkin
cd D:\Java\zipkin-server-2.12.9-exec java -jar zipkin-server-2.12.9-exec.jar- 1
- 2
启动成功后,访问http://localhost:9411/zipkin/,正常显示即表示启动成功!

2、运行控制台
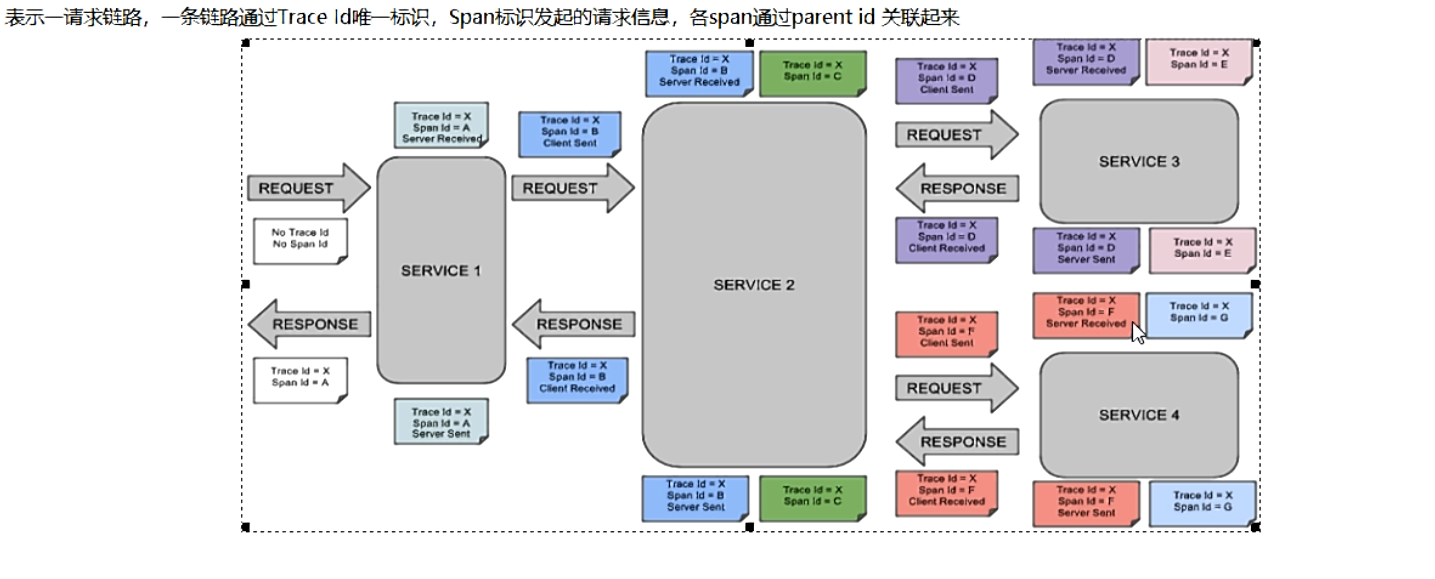
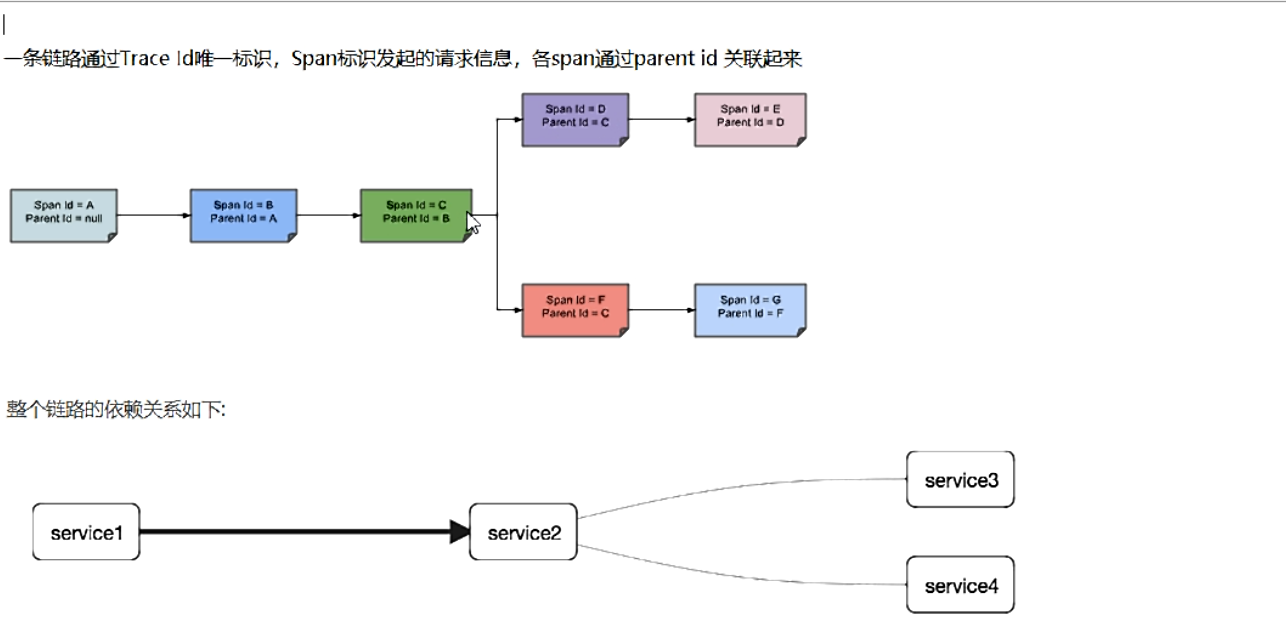
Trace:类似于树结构的Span集合,表示一条调用链路,存在唯一标识;span:表示调用链路来源,通俗的理解span就是一次请求信息
3、修改8081提供者和80服务消费者
1.修改cloud-provider-hystrix-payment:8001
(1)改pom
添加依赖
<dependency> <groupId>org.springframework.cloudgroupId> <artifactId>spring-cloud-starter-zipkinartifactId> dependency>- 1
- 2
- 3
- 4
- 5
(2)改yml
spring: # 搭建链路监控 zipkin: base-url: http://localhost:9411 sleuth: sampler: # 采样值介于0到1之间,1表示全部采集 probability: 1- 1
- 2
- 3
- 4
- 5
- 6
- 7
- 8
2.修改cloud-openfeign-order-service:80
(1)改pom
<dependency> <groupId>org.springframework.cloudgroupId> <artifactId>spring-cloud-starter-zipkinartifactId> dependency>- 1
- 2
- 3
- 4
- 5
(2)改yml
spring: # 搭建链路监控 zipkin: base-url: http://localhost:9411 sleuth: sampler: # 采样值介于0到1之间,1表示全部采集 probability: 1- 1
- 2
- 3
- 4
- 5
- 6
- 7
- 8
3.测试
多次访问http://localhost/hystrix/consumer/payment/success/3
并登录http://localhost:9411/zipkin/
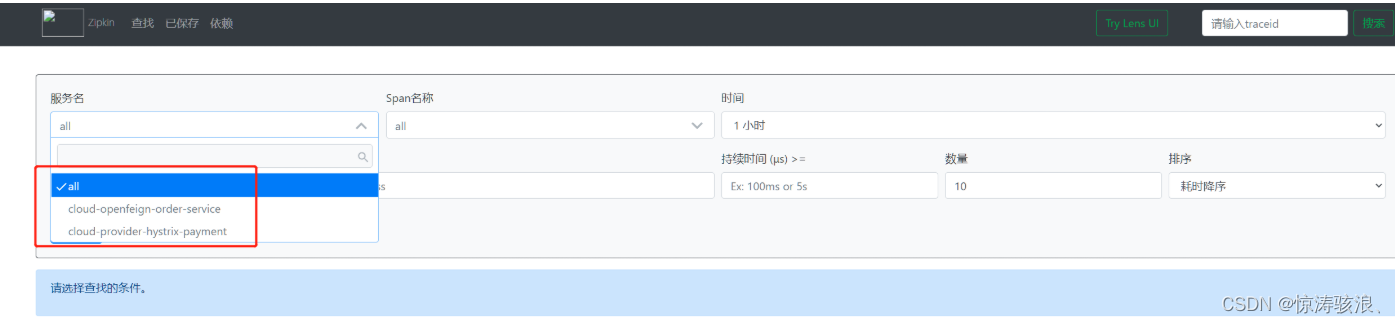
可见,服务名有了注册的服务。
可以点击依赖进行查看微服务之间的关系,以及其他的细节内容。


B、SpringCloud Alibaba
一、SpringCloud Alibaba Nacos服务注册和配置中心
1、Nacos简介
Nacos:前四个字母分别为Naming和Configuration的前两个字母,最后的s为Service
Nacos就是注册中心+配置中心的组合,一个更易于构建云原生应用的动态服务发现,配置管理和服务管理中心
Nacos = Eureka+Config+Bus
能干嘛?
替代Eureka做服务注册中心,替代Config做服务配置中心。

2、安装并运行Nacos
https://github.com/alibaba/nacos/releases?page=1 cd D:\Java\cloud-alibaba\nacos-server-2.1.0\nacos\bin startup.cmd -m standalone # 以单机模式启动- 1
- 2
- 3
先从官网下载Nacos,nacos-server-2.1.0.zip解压运行bin目录下的startup.cmd即可。
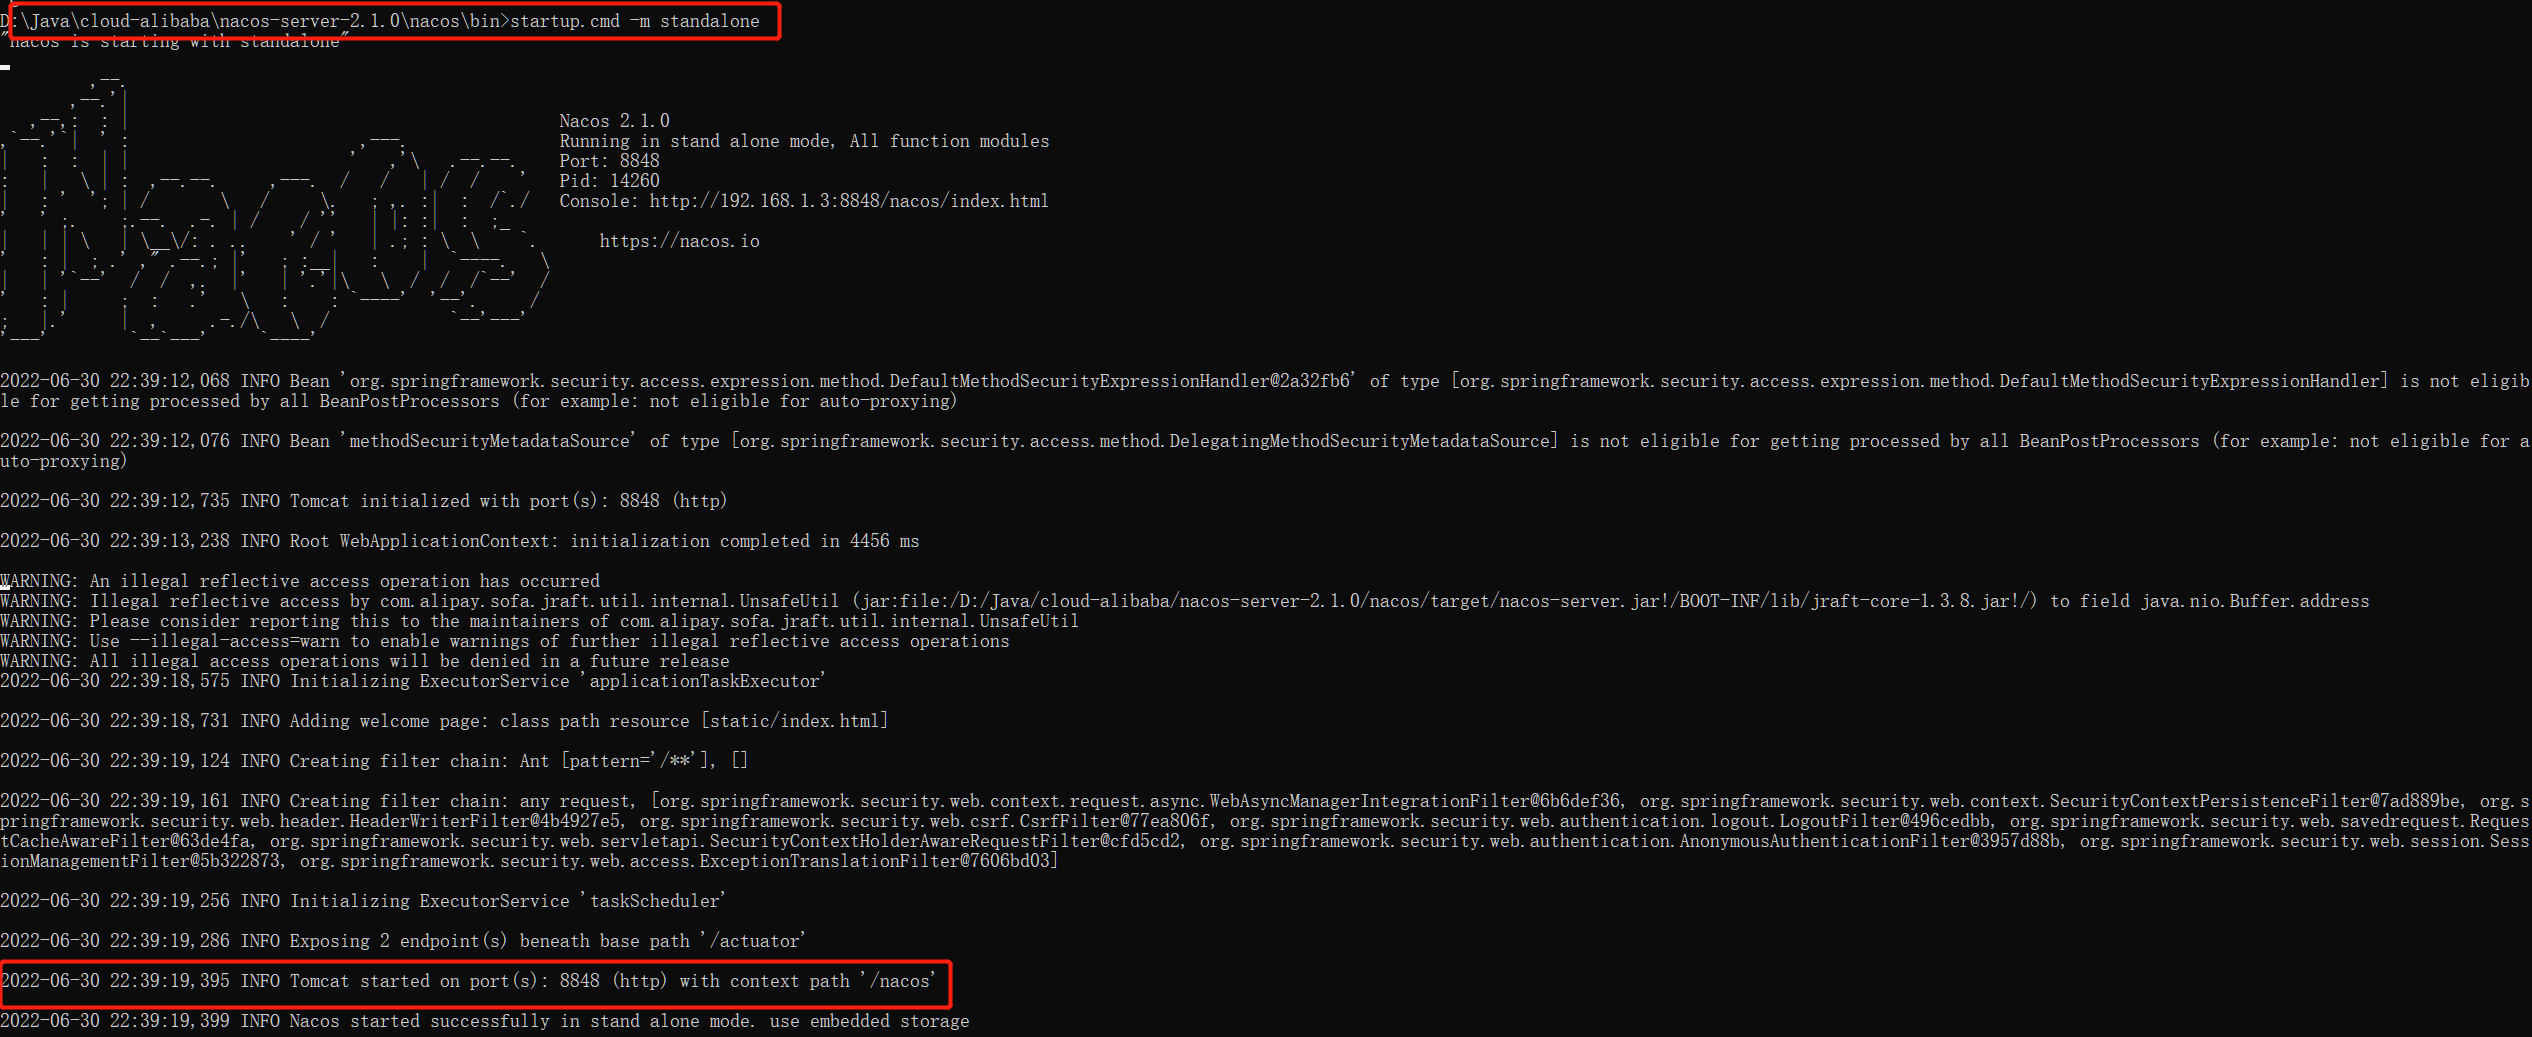
启动后登录其前端页面:http://localhost:8848/nacos

3、Nacos作为服务注册中心替代Eureka
1、服务提供者cloudalibaba-provider-payment9001创建
(1)新建module
(2)改pom
-
确保父项目中有
spring-cloud-alibaba-dependencies -
在payment9001中修改自己的pom,引入Nacos
<project xmlns="http://maven.apache.org/POM/4.0.0" xmlns:xsi="http://www.w3.org/2001/XMLSchema-instance" xsi:schemaLocation="http://maven.apache.org/POM/4.0.0 http://maven.apache.org/xsd/maven-4.0.0.xsd"> <parent> <artifactId>spring-cloud-2022artifactId> <groupId>com.ityj.springcloudgroupId> <version>0.0.1-SNAPSHOTversion> parent> <modelVersion>4.0.0modelVersion> <artifactId>cloudalibaba-provider-payment9001artifactId> <dependencies> <dependency> <groupId>com.ityj.springcloudgroupId> <artifactId>cloud-api-commonsartifactId> <version>0.0.1-SNAPSHOTversion> dependency> <dependency> <groupId>com.alibaba.cloudgroupId> <artifactId>spring-cloud-starter-alibaba-nacos-discoveryartifactId> dependency> dependencies> project>- 1
- 2
- 3
- 4
- 5
- 6
- 7
- 8
- 9
- 10
- 11
- 12
- 13
- 14
- 15
- 16
- 17
- 18
- 19
- 20
- 21
- 22
- 23
- 24
- 25
- 26
- 27
(3)改yml
server: port: 9001 spring: application: name: nacos-payment-provider cloud: nacos: discovery: server-addr: localhost:8848 management: endpoints: web: exposure: include: '*'- 1
- 2
- 3
- 4
- 5
- 6
- 7
- 8
- 9
- 10
- 11
- 12
- 13
- 14
- 15
- 16
- 17
(4)主启动
@SpringBootApplication @EnableDiscoveryClient public class NacosProvider9001Starter { public static void main(String[] args) { SpringApplication.run(NacosProvider9001Starter.class, args); } }- 1
- 2
- 3
- 4
- 5
- 6
- 7
- 8
(5)业务代码
@RestController @RequestMapping("/payment") public class PaymentController { @Value("${server.port}") private String serverPort; @GetMapping("/nacos/{id}") public String getPortInfo(@PathVariable("id") Integer id) { return "Input parameter id:" + id + ",serverPort:" + serverPort; } }- 1
- 2
- 3
- 4
- 5
- 6
- 7
- 8
- 9
- 10
- 11
- 12
- 13
(6)测试
启动Nacos服务以及9001
访问http://localhost:8848/nacos,发现9001已经在nacos上注册完毕。

调用controller链接:http://localhost:9001/payment/nacos/33
可正常访问。

2、模仿9001,新建模块9002
只有端口号不同。
新建cloudalibaba-provider-payment9002
或者取巧不想新建重复体力劳动,直接在idea中拷贝虚拟端口映射


保存,启动9011,访问http://localhost:9001/payment/nacos/33和http://localhost:9011/payment/nacos/33都可以正常。
但是不推荐使用。
模仿9001创建module9002。用于负载均衡测试。
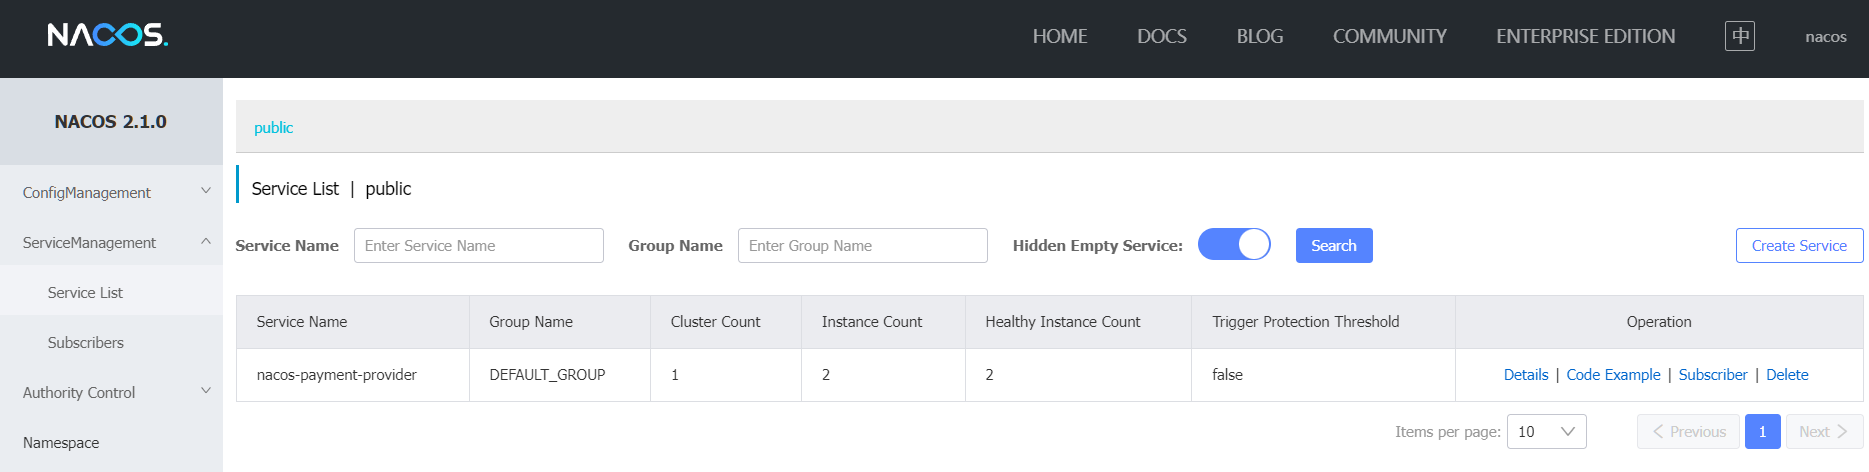
3、基于Nacos的服务消费者
(1)建module
cloudalibaba-consumer-nacos-order83
(2)改pom
<project xmlns="http://maven.apache.org/POM/4.0.0" xmlns:xsi="http://www.w3.org/2001/XMLSchema-instance" xsi:schemaLocation="http://maven.apache.org/POM/4.0.0 http://maven.apache.org/xsd/maven-4.0.0.xsd"> <parent> <artifactId>spring-cloud-2022artifactId> <groupId>com.ityj.springcloudgroupId> <version>0.0.1-SNAPSHOTversion> parent> <modelVersion>4.0.0modelVersion> <artifactId>cloudalibaba-consumer-nacos-order83artifactId> <dependencies> <dependency> <groupId>com.ityj.springcloudgroupId> <artifactId>cloud-api-commonsartifactId> <version>0.0.1-SNAPSHOTversion> dependency> <dependency> <groupId>com.alibaba.cloudgroupId> <artifactId>spring-cloud-starter-alibaba-nacos-discoveryartifactId> dependency> dependencies> project>- 1
- 2
- 3
- 4
- 5
- 6
- 7
- 8
- 9
- 10
- 11
- 12
- 13
- 14
- 15
- 16
- 17
- 18
- 19
- 20
- 21
- 22
- 23
- 24
- 25
- 26
- 27
nacos支持负载均衡,因为内部集成了ribbon。
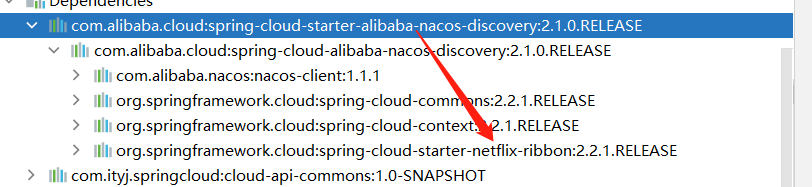
(3)改yml
server: port: 83 spring: application: name: nacos-payment-consumer cloud: nacos: discovery: server-addr: localhost:8848 management: endpoints: web: exposure: include: '*'- 1
- 2
- 3
- 4
- 5
- 6
- 7
- 8
- 9
- 10
- 11
- 12
- 13
- 14
- 15
- 16
- 17
(4)启动类
@SpringBootApplication @EnableDiscoveryClient public class NacosConsumer83Starter { public static void main(String[] args) { SpringApplication.run(NacosConsumer83Starter.class, args); } }- 1
- 2
- 3
- 4
- 5
- 6
- 7
(5)业务类
作为一个消费端,暂且使用原始的restTemplate来实现和客户端的交互。
此时需要一个配置类来获取restTemplate
@Configuration public class ApplicationContextConfig { // 注册RestTemplate用于服务访问 @Bean @LoadBalanced // 负载均衡:默认轮询 public RestTemplate getRestTemplate() { return new RestTemplate(); } }- 1
- 2
- 3
- 4
- 5
- 6
- 7
- 8
- 9
- 10
- 11
业务层就是调用provider的/payment/nacos/{id}请求
@RestController public class OrderController { @Autowired private RestTemplate restTemplate; private static final String PAYMENT_URL = "http://nacos-payment-provider/"; @GetMapping("/consumer/payment/nacos/{id}") public String getById(@PathVariable("id") Long id) { return restTemplate.getForObject(PAYMENT_URL + "payment/nacos/" + id, String.class); } }- 1
- 2
- 3
- 4
- 5
- 6
- 7
- 8
- 9
- 10
- 11
- 12
- 13
- 14
(6)测试
启动9001,9002和83
现在Nacos页面上查看服务注册情况:三个都已经注册成功!

访问http://localhost:83/consumer/payment/nacos/33消费者调用情况:
发现可以正常调用,并且实现了负载均衡:轮询
4、各种服务注册对比

Nacos支持AP和CP模式的切换
A:高可用,一定有返回
C:数据一致性

curl -X PUT '$NACOS_SERVER:8848/nacos/v1/ns/operator/switches?entry=serverMode&value=CP'4、Nacos作为配置中心替代Config+Bus
config+bus的配置中心,需要一个server来获取远程仓库的配置,再将此配置分发到各个微服务,链路较长,而同步比较麻烦。
Nacos的前端页面已经集成了配置中心,可以直接在上面修改,而修改后可以直接获取到。降低耦合
1、搭建nacos的服务
(1)建module
cloudalibaba-config-nacos-client3377
(2)引pom
<project xmlns="http://maven.apache.org/POM/4.0.0" xmlns:xsi="http://www.w3.org/2001/XMLSchema-instance" xsi:schemaLocation="http://maven.apache.org/POM/4.0.0 http://maven.apache.org/xsd/maven-4.0.0.xsd"> <parent> <artifactId>springcloud-0219-00artifactId> <groupId>com.ityj.springcloudgroupId> <version>1.0-SNAPSHOTversion> parent> <modelVersion>4.0.0modelVersion> <artifactId>cloudalibaba-config-nacos-client3377artifactId> <dependencies>- 1
- 2
- 3
- 4
- 5
- 6
- 7
- 8
- 9
- 10
- 11
- 12
- 13
- 14
- 15
- 16
- 17
- 18
- 19
- 20
- 21
- 22
- 23
- 24
- 25
- 26
- 27
- 28
- 29
- 30
- 31
- 32
- 33
- 34
- 35
- 36
- 37
- 38
- 39
- 40
- 41
- 42
- 43
- 44
- 45
- 46
- 47
(3)写yml(2个)
application.yml是获取Nacos配置中心的配置文件内容,而bootstrap.yml是自己个性化的内容。
yml的两个配置,为什么要配置两个?

application.yml
spring: profiles: active: dev- 1
- 2
- 3
bootstrap.yml
server: port: 3377 spring: application: name: nacos-config-client cloud: nacos: discovery: server-addr: localhost:8848 config: server-addr: localhost:8848 file-extension: yaml management: endpoints: web: exposure: include: '*' # ${spring.application.name}-${spring.profile.active}.${spring.cloud.nacos.config.file-extension} # nacos-config-client-dev.yaml- 1
- 2
- 3
- 4
- 5
- 6
- 7
- 8
- 9
- 10
- 11
- 12
- 13
- 14
- 15
- 16
- 17
- 18
- 19
- 20
- 21
- 22
- 23
(4)启动类
@SpringBootApplication @EnableDiscoveryClient public class NacosConfigClient3377Starter { public static void main(String[] args) { SpringApplication.run(NacosConfigClient3377Starter.class, args); } }- 1
- 2
- 3
- 4
- 5
- 6
- 7
- 8
- 9
(5)controller业务层
@RestController @RefreshScope public class ConfigController { @Value("${config.info}") private String configInfo; @GetMapping("/nacos/configInfo") public String getConfigInfo() { return configInfo; } }- 1
- 2
- 3
- 4
- 5
- 6
- 7
- 8
- 9
- 10
- 11
- 12
- 13
(6)添加Nacos配置
登录http://localhost:8848/nacos,在配置列表里新增nacos-config-client-dev.yaml配置文件,文件名是根据上述两个配置中固定的。

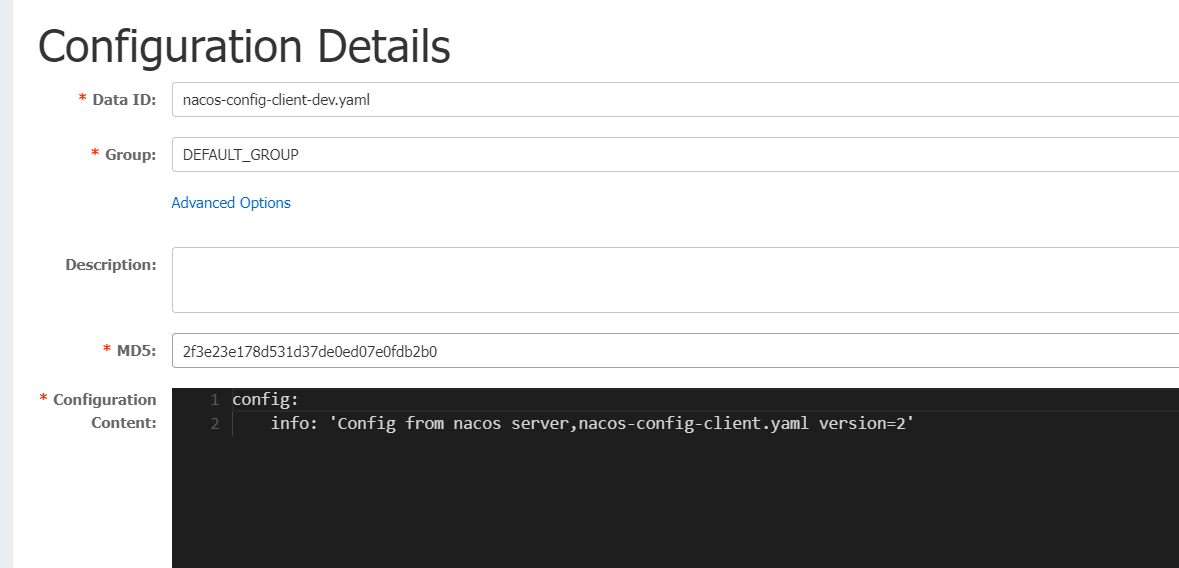
(7)测试
访问http://localhost:3377/nacos/configInfo,可正常获取
修改Nacos的配置,再次访问http://localhost:3377/nacos/configInfo,发现已经实时更新。
2、Nacos配置的具体化-分类配置
对于多环境多项目管理,可以通过Nacos简单地实现。

(1)Data Id
dataId是根据spring.profiles.active的不同来实现区分的:
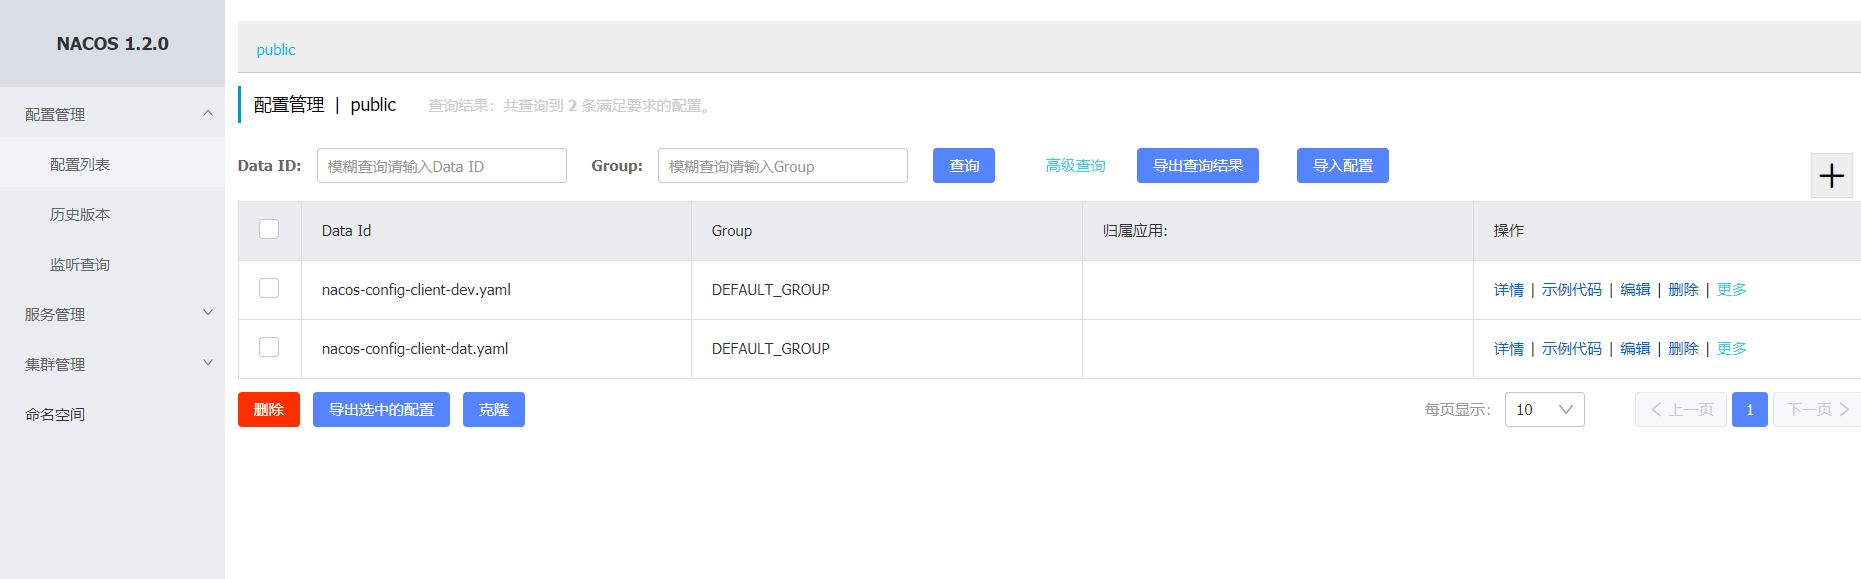

修改application.yml的active属性即可
spring: profiles: active: dat- 1
- 2
- 3
重启3377,访问http://localhost:3377/config/info,可实现切换。

(2)group实现分组
默认是 DEFAULT_GROUP
新建一个DAT的group:DAT_GROUP
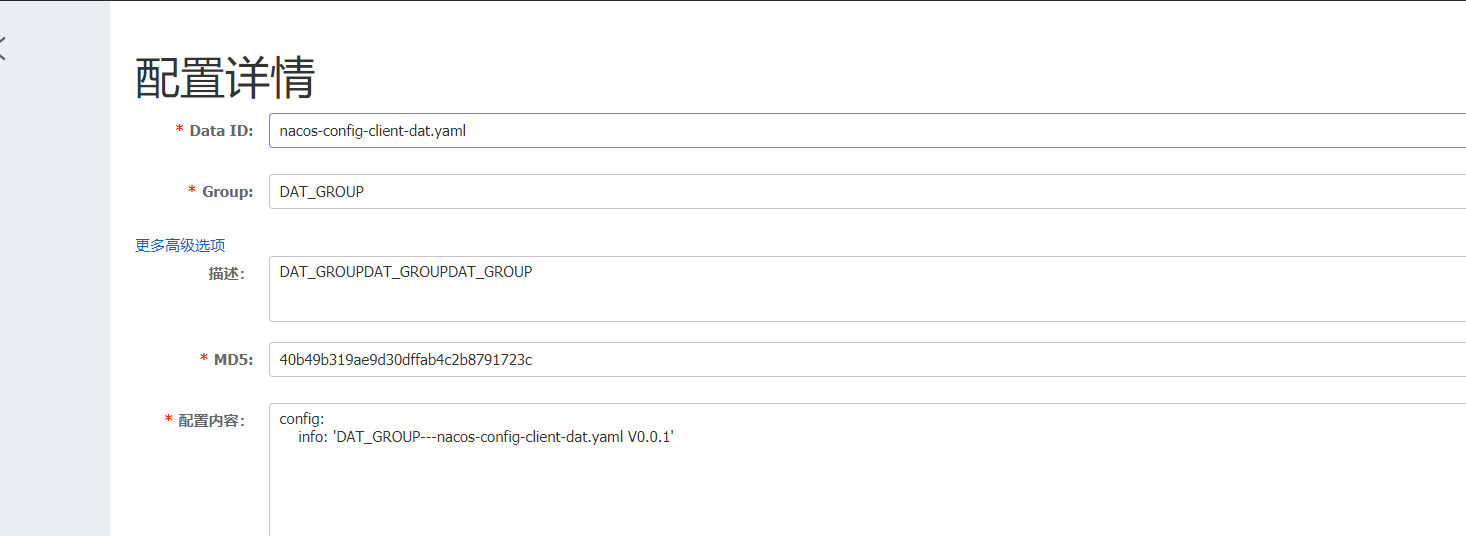
此时修改bootstrap.yml的配置:添加group的属性
spring: application: name: nacos-config-client cloud: nacos: config: server-addr: localhost:8848 #配置中心地址 file-extension: yaml #指定yaml格式的配置 group: DAT_GROUP # 指定group- 1
- 2
- 3
- 4
- 5
- 6
- 7
- 8
- 9
上一步骤application.yml激活的还是dat
重启访问http://localhost:3377/config/info,可实现切换。

(3)通过namespace实现多项目的划分
通过namespace可以对不同的项目进行分组,比如ssm-learning和springboot-learning会拥有不同的配置文件,此时就可以通过命名空间来实现项目的划分。

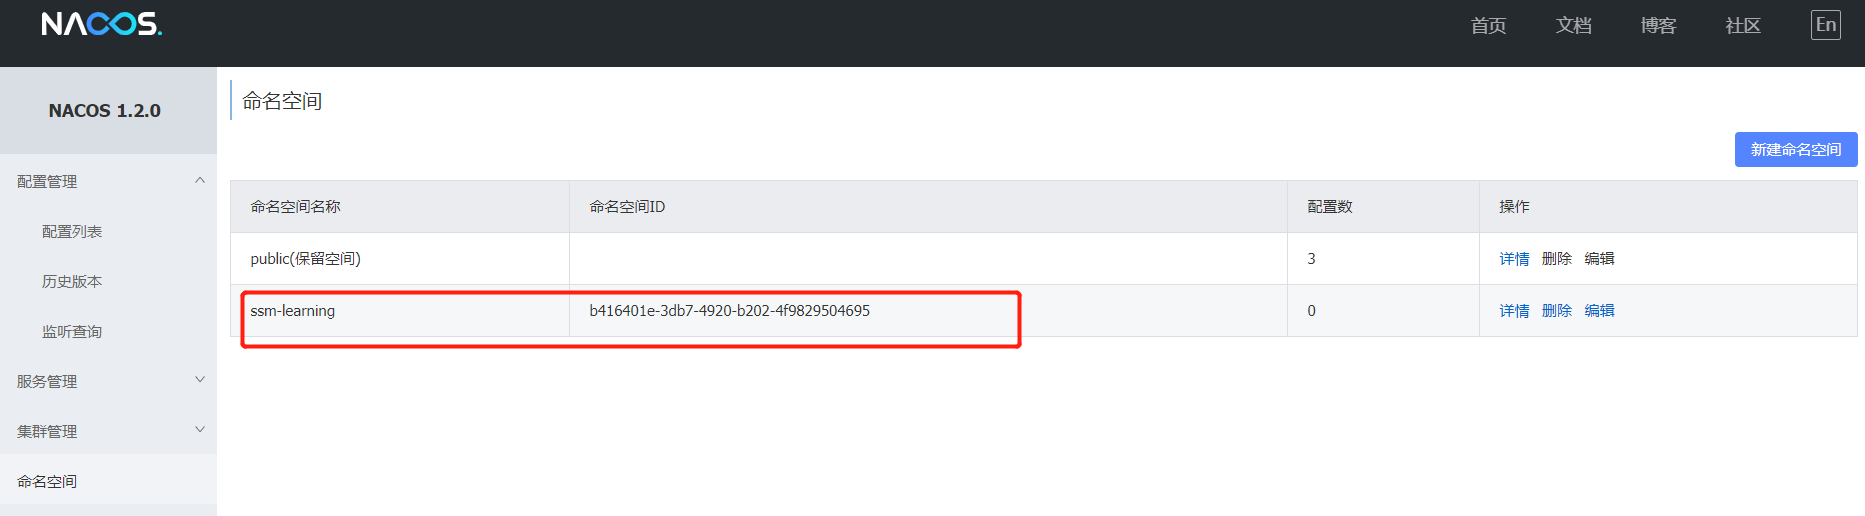
自动生成了一个命名空间id,这个id需要配置在项目的配置文件中,实现分组查找。

多了一个命名空间ssm-learning
在ssm-learning命名空间中新建 nacos-config-client-dat.yaml的配置文件
组改为DAT_GROUP,这样项目中group就不需要修改了,而正常生产中也需要制定相应的group,避免default
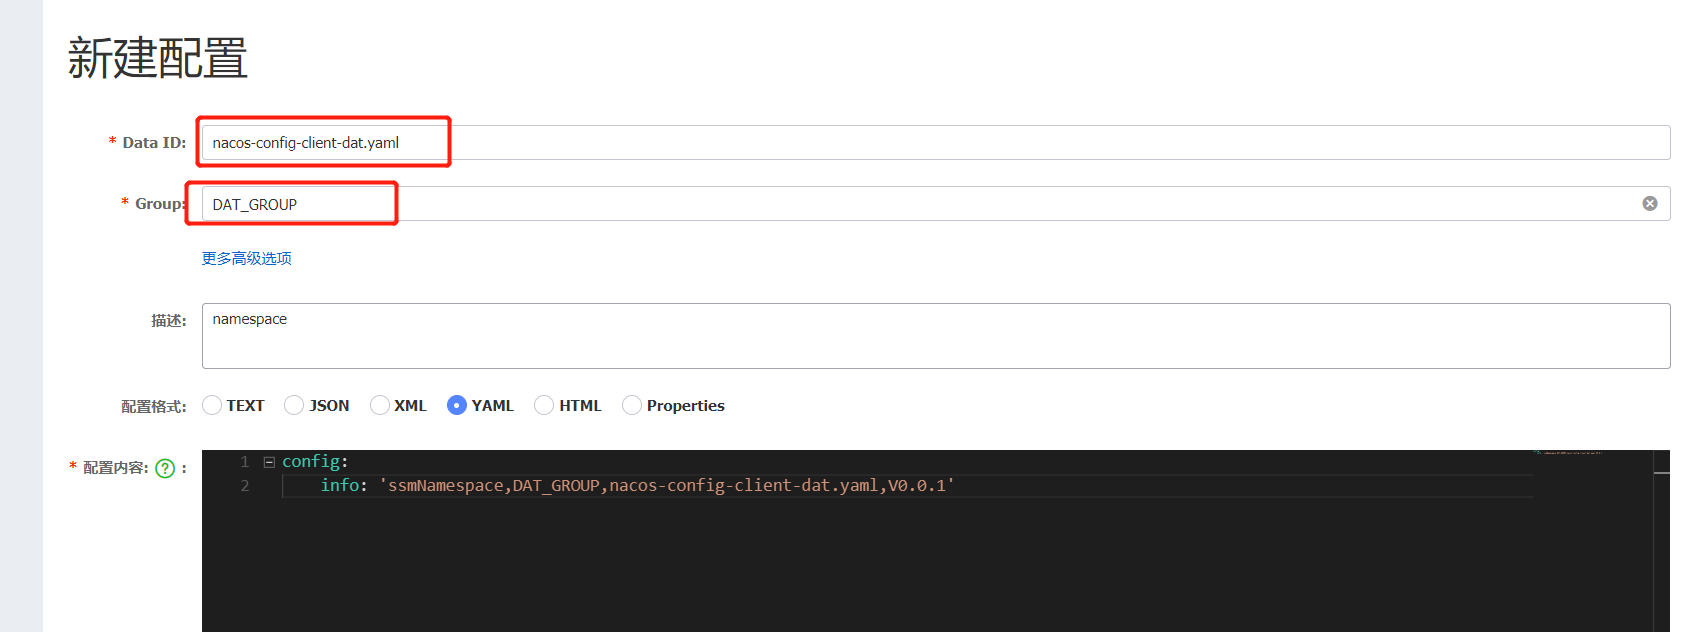
修改yml
spring: application: name: nacos-config-client cloud: nacos: discovery: server-addr: localhost:8848 #服务注册中心地址 config: server-addr: localhost:8848 #配置中心地址 file-extension: yaml #指定yaml格式的配置 group: DAT_GROUP namespace: b416401e-3db7-4920-b202-4f9829504695- 1
- 2
- 3
- 4
- 5
- 6
- 7
- 8
- 9
- 10
- 11
- 12
重启,调用http://localhost:3377/config/info,可正常访问。


hostname -i
5、Nacos集群和持久化配置(重要)
1、切换nacos默认数据源
nacos默认的数据源是Derby,如果多个节点的nacos出现时,每一个节点有一个内嵌的Derby数据库,会导致数据不一致。所以切换到mysql.
官方的教程:
https://nacos.io/zh-cn/docs/cluster-mode-quick-start.html https://nacos.io/zh-cn/docs/deployment.html- 1
- 2
(1)建表
找到conf目录下的nacos-mysql.sql文件,执行脚本,生成对应的表。
cat D:\Java\cloud-alibaba\nacos-server-2.1.0\nacos\conf\nacos-mysql.sql OR https://github.com/alibaba/nacos/blob/develop/config/src/main/resources/META-INF/nacos-db.sql- 1
- 2
- 3

create database nacos_config;- 1
/* * Copyright 1999-2018 Alibaba Group Holding Ltd. * * Licensed under the Apache License, Version 2.0 (the "License"); * you may not use this file except in compliance with the License. * You may obtain a copy of the License at * * http://www.apache.org/licenses/LICENSE-2.0 * * Unless required by applicable law or agreed to in writing, software * distributed under the License is distributed on an "AS IS" BASIS, * WITHOUT WARRANTIES OR CONDITIONS OF ANY KIND, either express or implied. * See the License for the specific language governing permissions and * limitations under the License. */ /******************************************/ /* 数据库全名 = nacos_config */ /* 表名称 = config_info */ /******************************************/ CREATE TABLE `config_info` ( `id` bigint(20) NOT NULL AUTO_INCREMENT COMMENT 'id', `data_id` varchar(255) NOT NULL COMMENT 'data_id', `group_id` varchar(255) DEFAULT NULL, `content` longtext NOT NULL COMMENT 'content', `md5` varchar(32) DEFAULT NULL COMMENT 'md5', `gmt_create` datetime NOT NULL DEFAULT CURRENT_TIMESTAMP COMMENT '创建时间', `gmt_modified` datetime NOT NULL DEFAULT CURRENT_TIMESTAMP COMMENT '修改时间', `src_user` text COMMENT 'source user', `src_ip` varchar(50) DEFAULT NULL COMMENT 'source ip', `app_name` varchar(128) DEFAULT NULL, `tenant_id` varchar(128) DEFAULT '' COMMENT '租户字段', `c_desc` varchar(256) DEFAULT NULL, `c_use` varchar(64) DEFAULT NULL, `effect` varchar(64) DEFAULT NULL, `type` varchar(64) DEFAULT NULL, `c_schema` text, `encrypted_data_key` text NOT NULL COMMENT '秘钥', PRIMARY KEY (`id`), UNIQUE KEY `uk_configinfo_datagrouptenant` (`data_id`,`group_id`,`tenant_id`) ) ENGINE=InnoDB DEFAULT CHARSET=utf8 COLLATE=utf8_bin COMMENT='config_info'; /******************************************/ /* 数据库全名 = nacos_config */ /* 表名称 = config_info_aggr */ /******************************************/ CREATE TABLE `config_info_aggr` ( `id` bigint(20) NOT NULL AUTO_INCREMENT COMMENT 'id', `data_id` varchar(255) NOT NULL COMMENT 'data_id', `group_id` varchar(255) NOT NULL COMMENT 'group_id', `datum_id` varchar(255) NOT NULL COMMENT 'datum_id', `content` longtext NOT NULL COMMENT '内容', `gmt_modified` datetime NOT NULL COMMENT '修改时间', `app_name` varchar(128) DEFAULT NULL, `tenant_id` varchar(128) DEFAULT '' COMMENT '租户字段', PRIMARY KEY (`id`), UNIQUE KEY `uk_configinfoaggr_datagrouptenantdatum` (`data_id`,`group_id`,`tenant_id`,`datum_id`) ) ENGINE=InnoDB DEFAULT CHARSET=utf8 COLLATE=utf8_bin COMMENT='增加租户字段'; /******************************************/ /* 数据库全名 = nacos_config */ /* 表名称 = config_info_beta */ /******************************************/ CREATE TABLE `config_info_beta` ( `id` bigint(20) NOT NULL AUTO_INCREMENT COMMENT 'id', `data_id` varchar(255) NOT NULL COMMENT 'data_id', `group_id` varchar(128) NOT NULL COMMENT 'group_id', `app_name` varchar(128) DEFAULT NULL COMMENT 'app_name', `content` longtext NOT NULL COMMENT 'content', `beta_ips` varchar(1024) DEFAULT NULL COMMENT 'betaIps', `md5` varchar(32) DEFAULT NULL COMMENT 'md5', `gmt_create` datetime NOT NULL DEFAULT CURRENT_TIMESTAMP COMMENT '创建时间', `gmt_modified` datetime NOT NULL DEFAULT CURRENT_TIMESTAMP COMMENT '修改时间', `src_user` text COMMENT 'source user', `src_ip` varchar(50) DEFAULT NULL COMMENT 'source ip', `tenant_id` varchar(128) DEFAULT '' COMMENT '租户字段', `encrypted_data_key` text NOT NULL COMMENT '秘钥', PRIMARY KEY (`id`), UNIQUE KEY `uk_configinfobeta_datagrouptenant` (`data_id`,`group_id`,`tenant_id`) ) ENGINE=InnoDB DEFAULT CHARSET=utf8 COLLATE=utf8_bin COMMENT='config_info_beta'; /******************************************/ /* 数据库全名 = nacos_config */ /* 表名称 = config_info_tag */ /******************************************/ CREATE TABLE `config_info_tag` ( `id` bigint(20) NOT NULL AUTO_INCREMENT COMMENT 'id', `data_id` varchar(255) NOT NULL COMMENT 'data_id', `group_id` varchar(128) NOT NULL COMMENT 'group_id', `tenant_id` varchar(128) DEFAULT '' COMMENT 'tenant_id', `tag_id` varchar(128) NOT NULL COMMENT 'tag_id', `app_name` varchar(128) DEFAULT NULL COMMENT 'app_name', `content` longtext NOT NULL COMMENT 'content', `md5` varchar(32) DEFAULT NULL COMMENT 'md5', `gmt_create` datetime NOT NULL DEFAULT CURRENT_TIMESTAMP COMMENT '创建时间', `gmt_modified` datetime NOT NULL DEFAULT CURRENT_TIMESTAMP COMMENT '修改时间', `src_user` text COMMENT 'source user', `src_ip` varchar(50) DEFAULT NULL COMMENT 'source ip', PRIMARY KEY (`id`), UNIQUE KEY `uk_configinfotag_datagrouptenanttag` (`data_id`,`group_id`,`tenant_id`,`tag_id`) ) ENGINE=InnoDB DEFAULT CHARSET=utf8 COLLATE=utf8_bin COMMENT='config_info_tag'; /******************************************/ /* 数据库全名 = nacos_config */ /* 表名称 = config_tags_relation */ /******************************************/ CREATE TABLE `config_tags_relation` ( `id` bigint(20) NOT NULL COMMENT 'id', `tag_name` varchar(128) NOT NULL COMMENT 'tag_name', `tag_type` varchar(64) DEFAULT NULL COMMENT 'tag_type', `data_id` varchar(255) NOT NULL COMMENT 'data_id', `group_id` varchar(128) NOT NULL COMMENT 'group_id', `tenant_id` varchar(128) DEFAULT '' COMMENT 'tenant_id', `nid` bigint(20) NOT NULL AUTO_INCREMENT, PRIMARY KEY (`nid`), UNIQUE KEY `uk_configtagrelation_configidtag` (`id`,`tag_name`,`tag_type`), KEY `idx_tenant_id` (`tenant_id`) ) ENGINE=InnoDB DEFAULT CHARSET=utf8 COLLATE=utf8_bin COMMENT='config_tag_relation'; /******************************************/ /* 数据库全名 = nacos_config */ /* 表名称 = group_capacity */ /******************************************/ CREATE TABLE `group_capacity` ( `id` bigint(20) unsigned NOT NULL AUTO_INCREMENT COMMENT '主键ID', `group_id` varchar(128) NOT NULL DEFAULT '' COMMENT 'Group ID,空字符表示整个集群', `quota` int(10) unsigned NOT NULL DEFAULT '0' COMMENT '配额,0表示使用默认值', `usage` int(10) unsigned NOT NULL DEFAULT '0' COMMENT '使用量', `max_size` int(10) unsigned NOT NULL DEFAULT '0' COMMENT '单个配置大小上限,单位为字节,0表示使用默认值', `max_aggr_count` int(10) unsigned NOT NULL DEFAULT '0' COMMENT '聚合子配置最大个数,,0表示使用默认值', `max_aggr_size` int(10) unsigned NOT NULL DEFAULT '0' COMMENT '单个聚合数据的子配置大小上限,单位为字节,0表示使用默认值', `max_history_count` int(10) unsigned NOT NULL DEFAULT '0' COMMENT '最大变更历史数量', `gmt_create` datetime NOT NULL DEFAULT CURRENT_TIMESTAMP COMMENT '创建时间', `gmt_modified` datetime NOT NULL DEFAULT CURRENT_TIMESTAMP COMMENT '修改时间', PRIMARY KEY (`id`), UNIQUE KEY `uk_group_id` (`group_id`) ) ENGINE=InnoDB DEFAULT CHARSET=utf8 COLLATE=utf8_bin COMMENT='集群、各Group容量信息表'; /******************************************/ /* 数据库全名 = nacos_config */ /* 表名称 = his_config_info */ /******************************************/ CREATE TABLE `his_config_info` ( `id` bigint(64) unsigned NOT NULL, `nid` bigint(20) unsigned NOT NULL AUTO_INCREMENT, `data_id` varchar(255) NOT NULL, `group_id` varchar(128) NOT NULL, `app_name` varchar(128) DEFAULT NULL COMMENT 'app_name', `content` longtext NOT NULL, `md5` varchar(32) DEFAULT NULL, `gmt_create` datetime NOT NULL DEFAULT CURRENT_TIMESTAMP, `gmt_modified` datetime NOT NULL DEFAULT CURRENT_TIMESTAMP, `src_user` text, `src_ip` varchar(50) DEFAULT NULL, `op_type` char(10) DEFAULT NULL, `tenant_id` varchar(128) DEFAULT '' COMMENT '租户字段', `encrypted_data_key` text NOT NULL COMMENT '秘钥', PRIMARY KEY (`nid`), KEY `idx_gmt_create` (`gmt_create`), KEY `idx_gmt_modified` (`gmt_modified`), KEY `idx_did` (`data_id`) ) ENGINE=InnoDB DEFAULT CHARSET=utf8 COLLATE=utf8_bin COMMENT='多租户改造'; /******************************************/ /* 数据库全名 = nacos_config */ /* 表名称 = tenant_capacity */ /******************************************/ CREATE TABLE `tenant_capacity` ( `id` bigint(20) unsigned NOT NULL AUTO_INCREMENT COMMENT '主键ID', `tenant_id` varchar(128) NOT NULL DEFAULT '' COMMENT 'Tenant ID', `quota` int(10) unsigned NOT NULL DEFAULT '0' COMMENT '配额,0表示使用默认值', `usage` int(10) unsigned NOT NULL DEFAULT '0' COMMENT '使用量', `max_size` int(10) unsigned NOT NULL DEFAULT '0' COMMENT '单个配置大小上限,单位为字节,0表示使用默认值', `max_aggr_count` int(10) unsigned NOT NULL DEFAULT '0' COMMENT '聚合子配置最大个数', `max_aggr_size` int(10) unsigned NOT NULL DEFAULT '0' COMMENT '单个聚合数据的子配置大小上限,单位为字节,0表示使用默认值', `max_history_count` int(10) unsigned NOT NULL DEFAULT '0' COMMENT '最大变更历史数量', `gmt_create` datetime NOT NULL DEFAULT CURRENT_TIMESTAMP COMMENT '创建时间', `gmt_modified` datetime NOT NULL DEFAULT CURRENT_TIMESTAMP COMMENT '修改时间', PRIMARY KEY (`id`), UNIQUE KEY `uk_tenant_id` (`tenant_id`) ) ENGINE=InnoDB DEFAULT CHARSET=utf8 COLLATE=utf8_bin COMMENT='租户容量信息表'; CREATE TABLE `tenant_info` ( `id` bigint(20) NOT NULL AUTO_INCREMENT COMMENT 'id', `kp` varchar(128) NOT NULL COMMENT 'kp', `tenant_id` varchar(128) default '' COMMENT 'tenant_id', `tenant_name` varchar(128) default '' COMMENT 'tenant_name', `tenant_desc` varchar(256) DEFAULT NULL COMMENT 'tenant_desc', `create_source` varchar(32) DEFAULT NULL COMMENT 'create_source', `gmt_create` bigint(20) NOT NULL COMMENT '创建时间', `gmt_modified` bigint(20) NOT NULL COMMENT '修改时间', PRIMARY KEY (`id`), UNIQUE KEY `uk_tenant_info_kptenantid` (`kp`,`tenant_id`), KEY `idx_tenant_id` (`tenant_id`) ) ENGINE=InnoDB DEFAULT CHARSET=utf8 COLLATE=utf8_bin COMMENT='tenant_info'; CREATE TABLE `users` ( `username` varchar(50) NOT NULL PRIMARY KEY, `password` varchar(500) NOT NULL, `enabled` boolean NOT NULL ); CREATE TABLE `roles` ( `username` varchar(50) NOT NULL, `role` varchar(50) NOT NULL, UNIQUE INDEX `idx_user_role` (`username` ASC, `role` ASC) USING BTREE ); CREATE TABLE `permissions` ( `role` varchar(50) NOT NULL, `resource` varchar(255) NOT NULL, `action` varchar(8) NOT NULL, UNIQUE INDEX `uk_role_permission` (`role`,`resource`,`action`) USING BTREE ); INSERT INTO users (username, password, enabled) VALUES ('nacos', '$2a$10$EuWPZHzz32dJN7jexM34MOeYirDdFAZm2kuWj7VEOJhhZkDrxfvUu', TRUE); INSERT INTO roles (username, role) VALUES ('nacos', 'ROLE_ADMIN');- 1
- 2
- 3
- 4
- 5
- 6
- 7
- 8
- 9
- 10
- 11
- 12
- 13
- 14
- 15
- 16
- 17
- 18
- 19
- 20
- 21
- 22
- 23
- 24
- 25
- 26
- 27
- 28
- 29
- 30
- 31
- 32
- 33
- 34
- 35
- 36
- 37
- 38
- 39
- 40
- 41
- 42
- 43
- 44
- 45
- 46
- 47
- 48
- 49
- 50
- 51
- 52
- 53
- 54
- 55
- 56
- 57
- 58
- 59
- 60
- 61
- 62
- 63
- 64
- 65
- 66
- 67
- 68
- 69
- 70
- 71
- 72
- 73
- 74
- 75
- 76
- 77
- 78
- 79
- 80
- 81
- 82
- 83
- 84
- 85
- 86
- 87
- 88
- 89
- 90
- 91
- 92
- 93
- 94
- 95
- 96
- 97
- 98
- 99
- 100
- 101
- 102
- 103
- 104
- 105
- 106
- 107
- 108
- 109
- 110
- 111
- 112
- 113
- 114
- 115
- 116
- 117
- 118
- 119
- 120
- 121
- 122
- 123
- 124
- 125
- 126
- 127
- 128
- 129
- 130
- 131
- 132
- 133
- 134
- 135
- 136
- 137
- 138
- 139
- 140
- 141
- 142
- 143
- 144
- 145
- 146
- 147
- 148
- 149
- 150
- 151
- 152
- 153
- 154
- 155
- 156
- 157
- 158
- 159
- 160
- 161
- 162
- 163
- 164
- 165
- 166
- 167
- 168
- 169
- 170
- 171
- 172
- 173
- 174
- 175
- 176
- 177
- 178
- 179
- 180
- 181
- 182
- 183
- 184
- 185
- 186
- 187
- 188
- 189
- 190
- 191
- 192
- 193
- 194
- 195
- 196
- 197
- 198
- 199
- 200
- 201
- 202
- 203
- 204
- 205
- 206
- 207
- 208
- 209
- 210
- 211
- 212
- 213
- 214
- 215
- 216
- 217
- 218
- 219
- 220
- 221
- 222
(2)切换数据源:改配置
将下面的配置append到conf/application.properties中。
spring.datasource.platform=mysql db.num=1 db.url.0=jdbc:mysql://192.168.137.110:3306/nacos_config?characterEncoding=utf8&connectTimeout=1000&socketTimeout=3000&autoReconnect=true&useSSL=true&useUnicode=true&serverTimezone=Asia/Shanghai db.user=root db.password=root- 1
- 2
- 3
- 4
- 5
- 6
(3)重启nacos测试
重启后之前的配置和namespace都清空了。再次添加配置,发现已经持久化到数据库中了。

2、在Linux上安装nacos并切换到mysql数据源
1.1 下载nacos-server-2.1.0.tar.gz
1.2 上传并压缩上述文件
cd /app/tools/springcloud rz tar -zxvf nacos-server-2.1.0.tar.gz- 1
- 2
- 3

1.3 修改application.properties进行数据源切换
追加配置:
spring.datasource.platform=mysql db.num=1 db.url.0=jdbc:mysql://192.168.137.110:3306/nacos_config?characterEncoding=utf8&connectTimeout=1000&socketTimeout=3000&autoReconnect=true&useSSL=true&useUnicode=true&serverTimezone=Asia/Shanghai db.user=root db.password=root- 1
- 2
- 3
- 4
- 5
- 6
1.4 启动nacos测试
sh /app/tools/springcloud/nacos/bin/startup.sh -m standalone- 1

因为和之前windows上配置的是相同的mysql数据库,所以数据一致的,已经存在了之前保存好的namespace. 切换成功。

3、将nacos配置成集群模式,启动多个nacos
1.1 修改cluster.config
备份文件,并添加三个配置
[root@localhost bin]# cd ../conf/ [root@localhost conf]# ls 1.4.0-ipv6_support-update.sql application.properties application.properties.example cluster.conf.example nacos-logback.xml nacos-mysql.sql schema.sql [root@localhost conf]# cp cluster.conf.example cluster.conf [root@localhost conf]# vi cluster.conf [root@localhost conf]# cat cluster.conf 192.168.137.110:3333 192.168.137.110:4444 192.168.137.110:5555- 1
- 2
- 3
- 4
- 5
- 6
- 7
- 8
- 9
1.2 修改application.properties
- 1、添加mysql的配置
spring.datasource.platform=mysql db.num=1 db.url.0=jdbc:mysql://192.168.137.110:3306/nacos_config?characterEncoding=utf8&connectTimeout=1000&socketTimeout=3000&autoReconnect=true&useSSL=true&useUnicode=true&serverTimezone=Asia/Shanghai db.user=root db.password=root- 1
- 2
- 3
- 4
- 5
- 6
- 2、修改server.port
server.port=3333- 1
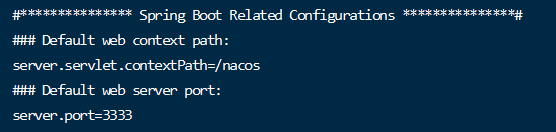
1.3 复制压缩后的文件三份,分别为nacos3333,ncaos4444,nacos5555
并分别修改其application.properties中的server.port为3333,4444和5555

1.4 启动nacos进行测试
sh /app/tools/springcloud/nacos3333/bin/startup.sh sh /app/tools/springcloud/nacos4444/bin/startup.sh sh /app/tools/springcloud/nacos5555/bin/startup.sh ps -ef|grep nacos|grep -v grep|wc -l # 查看启动了几个nacos- 1
- 2
- 3
- 4
- 5


4、通过nginx将上述三个nacos进行代理
1.1 安装nginx
直接解压即可
1.2 修改nginx.conf
http { include mime.types; default_type application/octet-stream; sendfile on; keepalive_timeout 65; #gzip on; upstream nacos-cluster { server 192.168.137.110:3333; server 192.168.137.110:4444; server 192.168.137.110:5555; } server { listen 1111; server_name localhost; location / { proxy_pass http://nacos-cluster; } error_page 500 502 503 504 /50x.html; location = /50x.html { root html; } } }- 1
- 2
- 3
- 4
- 5
- 6
- 7
- 8
- 9
- 10
- 11
- 12
- 13
- 14
- 15
- 16
- 17
- 18
- 19
- 20
- 21
- 22
- 23
- 24
- 25
- 26
- 27
- 28
- 29
- 30
- 31

1.3 启动nginx测试
/usr/local/nginx/sbin/nginx -c /app/tools/springcloud/nginx-1.18.0/conf/nginx.conf cd /usr/local/nginx/sbin ./nginx # 启动 ./nginx -s stop #停止 ./nginx -s quit #安全退出 ./nginx -s reload #重新加载配置文件- 1
- 2
- 3
- 4
- 5
- 6
- 7
在3台nacos成功启动的基础上,启动好nginx

5、启动3个nacos和1个nginx进行测试
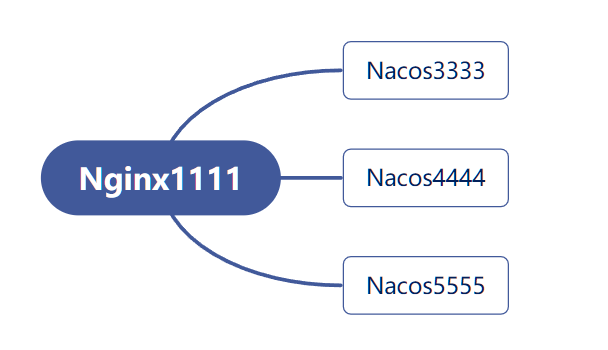
# 启动nacos sh /app/tools/springcloud/nacos3333/bin/startup.sh sh /app/tools/springcloud/nacos4444/bin/startup.sh sh /app/tools/springcloud/nacos5555/bin/startup.sh # 启动nginx /usr/local/nginx/sbin/nginx -c /app/tools/springcloud/nginx-1.18.0/conf/nginx.conf- 1
- 2
- 3
- 4
- 5
- 6

关掉nacos5555, 发现页面同时更新。此时并不会影响nacos正常工作。
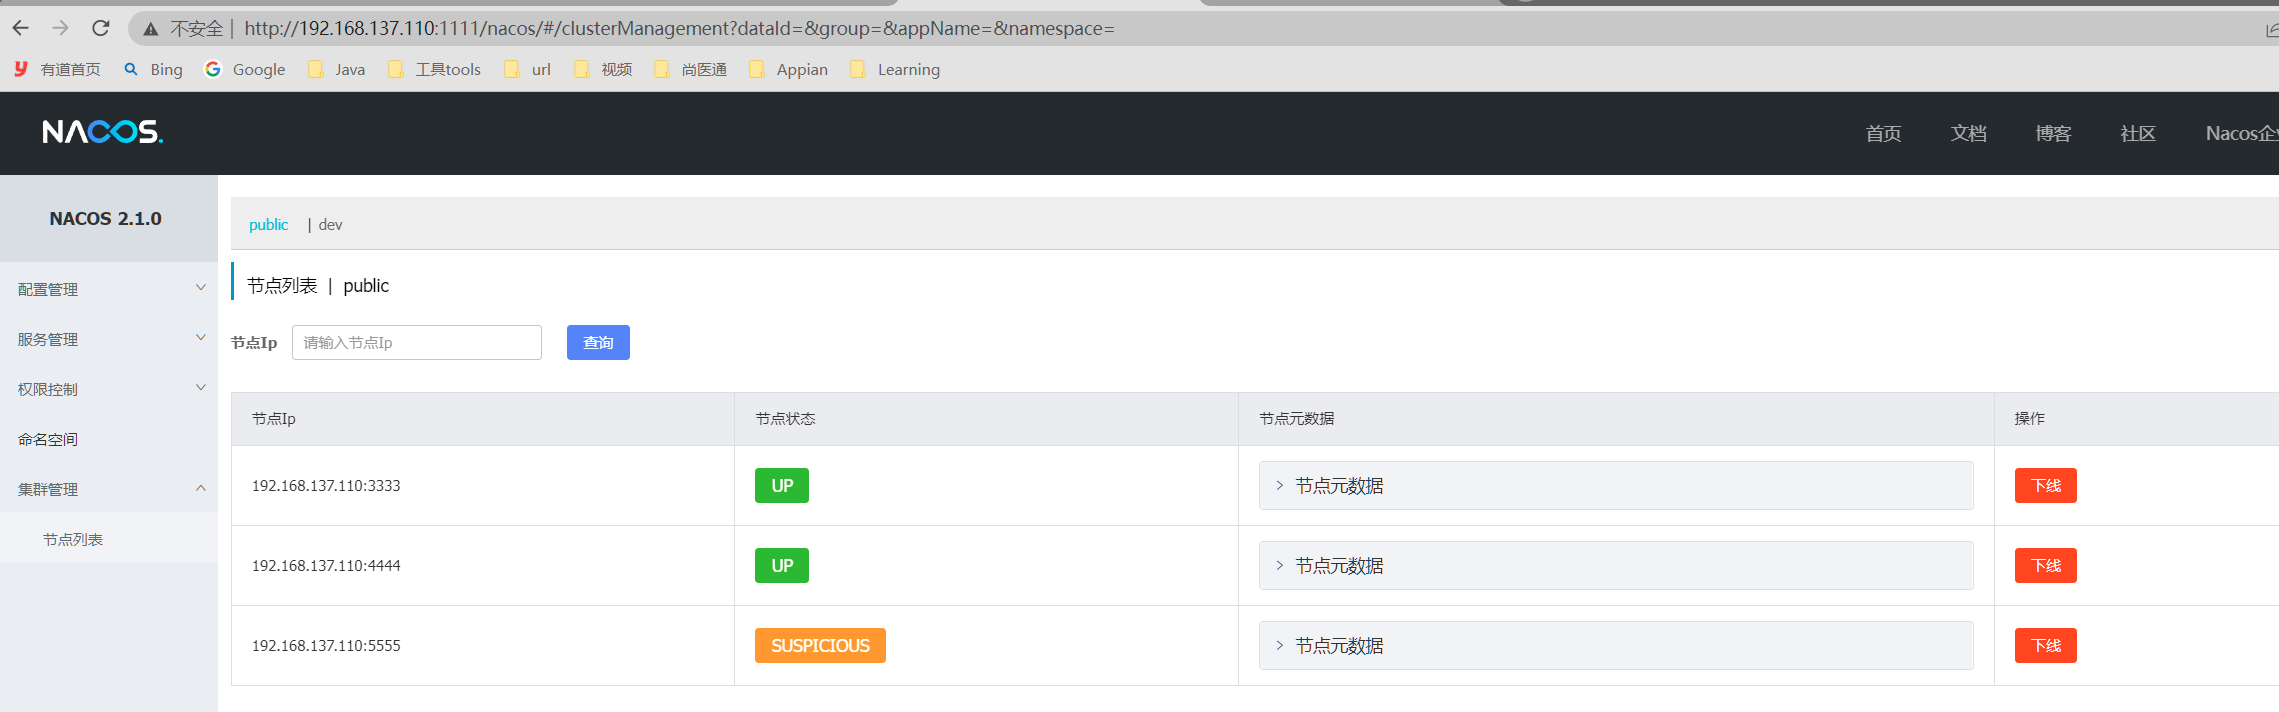

二、Sentinel
一句话解释,之前我们讲解过的Hystrix
1、安装Sentinel控制台
其实就是有一个jar包,运行即可,默认端口为8080。
https://github.com/alibaba/Sentinel/releases/tag/1.8.4
2、创建项目,入驻Sentinel
(1)建module
cloudalibaba-sentinel-service8401
(2)改pom
<project xmlns="http://maven.apache.org/POM/4.0.0" xmlns:xsi="http://www.w3.org/2001/XMLSchema-instance" xsi:schemaLocation="http://maven.apache.org/POM/4.0.0 http://maven.apache.org/xsd/maven-4.0.0.xsd"> <parent> <artifactId>spring-cloud-2022artifactId> <groupId>com.ityj.springcloudgroupId> <version>0.0.1-SNAPSHOTversion> parent> <modelVersion>4.0.0modelVersion> <artifactId>cloudalibaba-sentinel-service8401artifactId> <dependencies> <dependency> <groupId>com.ityj.springcloudgroupId> <artifactId>cloud-api-commonsartifactId> <version>0.0.1-SNAPSHOTversion> dependency> <dependency> <groupId>com.alibaba.cloudgroupId> <artifactId>spring-cloud-starter-alibaba-nacos-discoveryartifactId> dependency> <dependency> <groupId>com.alibaba.cloudgroupId> <artifactId>spring-cloud-starter-alibaba-sentinelartifactId> dependency> <dependency> <groupId>com.alibaba.cspgroupId> <artifactId>sentinel-datasource-nacosartifactId> dependency> dependencies> project>- 1
- 2
- 3
- 4
- 5
- 6
- 7
- 8
- 9
- 10
- 11
- 12
- 13
- 14
- 15
- 16
- 17
- 18
- 19
- 20
- 21
- 22
- 23
- 24
- 25
- 26
- 27
- 28
- 29
- 30
- 31
- 32
- 33
- 34
- 35
- 36
- 37
- 38
(3)写yml
server: port: 8401 spring: application: name: cloudalibaba-sentinel-service cloud: nacos: discovery: server-addr: 192.168.137.110:3333,192.168.137.110:4444,192.168.137.110:5555 sentinel: transport: dashboard: localhost:8080 # sentinel dashboard的路径 port: 8719 #默认8719,假如被占用了会自动从8719开始依次+1扫描。直至找到未被占用的端口 management: endpoints: web: exposure: include: '*'- 1
- 2
- 3
- 4
- 5
- 6
- 7
- 8
- 9
- 10
- 11
- 12
- 13
- 14
- 15
- 16
- 17
- 18
- 19
- 20
(4)主启动
@SpringBootApplication @EnableDiscoveryClient public class SentinelService8401Starter { public static void main(String[] args) { SpringApplication.run(SentinelService8401Starter.class, args); } }- 1
- 2
- 3
- 4
- 5
- 6
- 7
(5)业务方法
@RestController public class FlowLimitController { @GetMapping("/testA") public String testA() { return "------testA"; } @GetMapping("/testB") public String testB() { return "------testB"; } }- 1
- 2
- 3
- 4
- 5
- 6
- 7
- 8
- 9
- 10
- 11
- 12
- 13
(6)测试
启动Nacos集群,再启动Sentinel,最后启动8401(Sentinel可以不依赖于nacos, 独立运行)
启动成功后,在Nacos服务注册中心可以看到8401的服务;
而sentinel的控制台并没有发现有信息:主要是sentinel是属于懒加载,只有服务访问了,才可以看到。
访问http://localhost:8401/testA和http://localhost:8401/testB后,可以看到控制台有对这两个接口的监控详细信息。
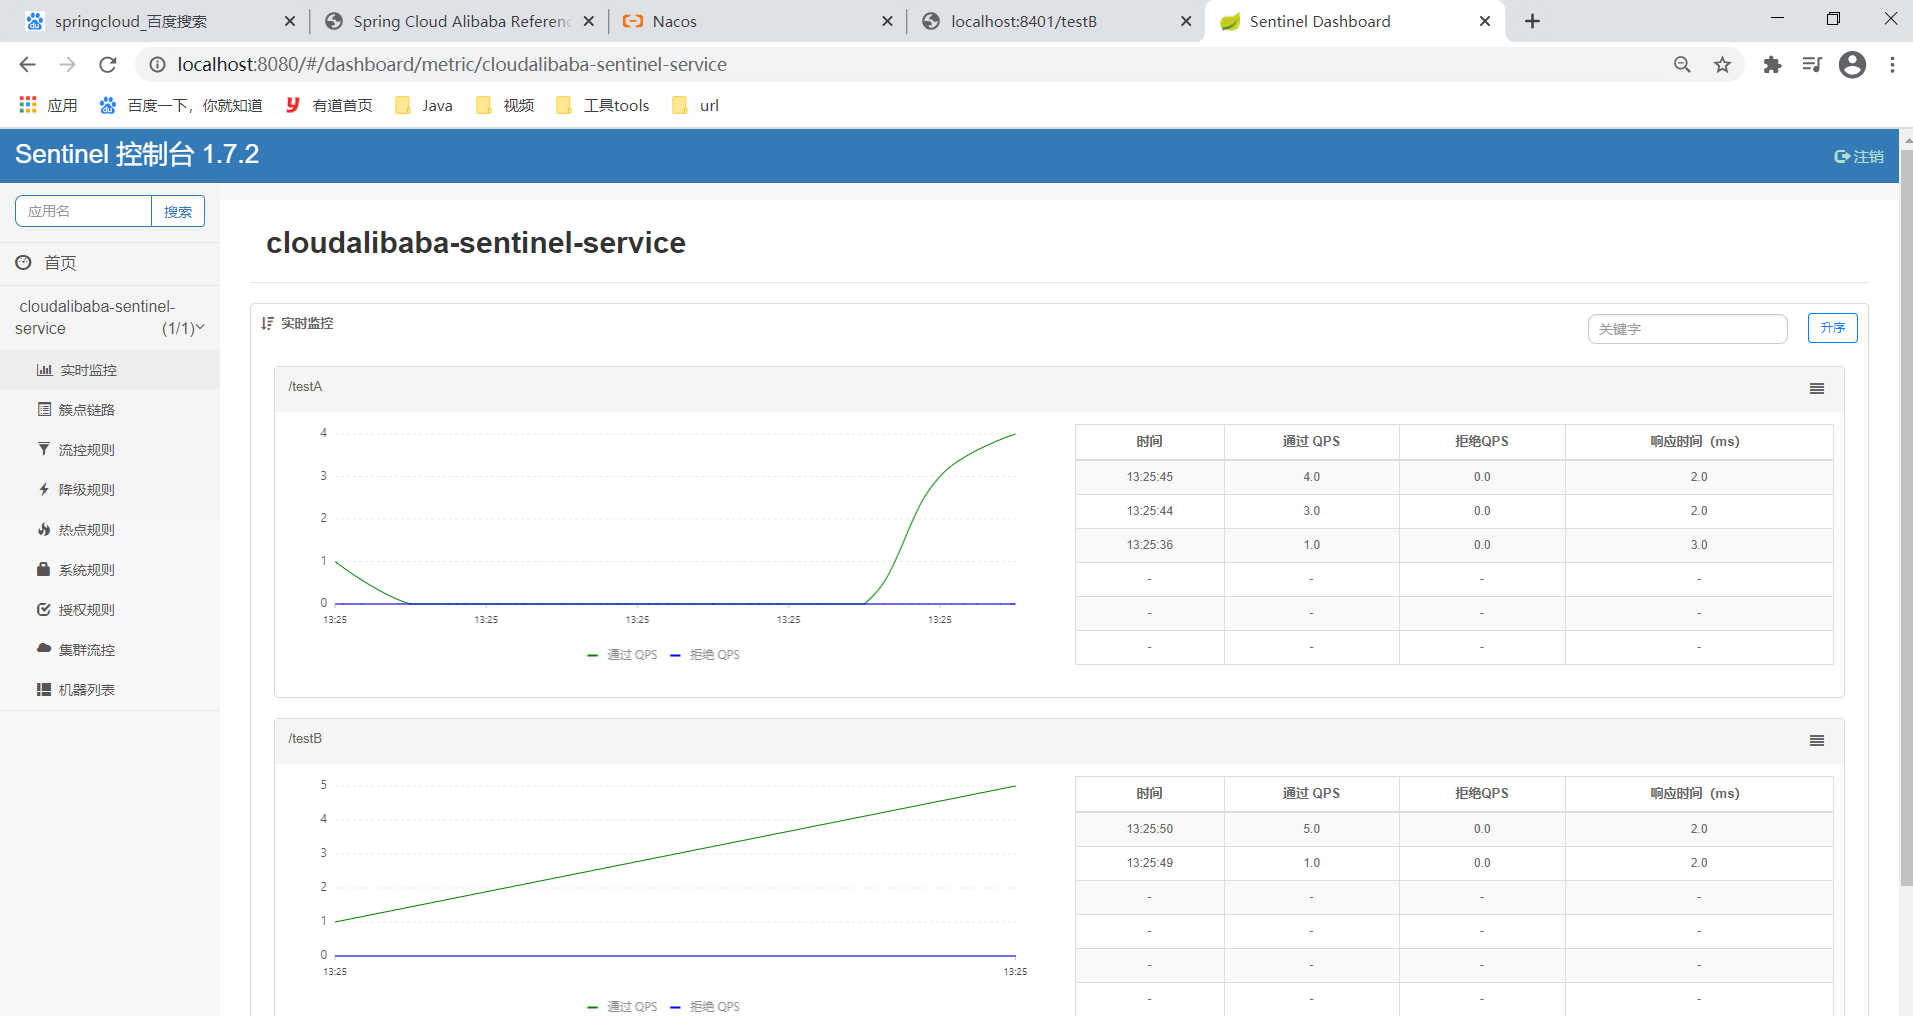
3、流控模式
(1)QPS直接失败
QPS:每秒的访问量
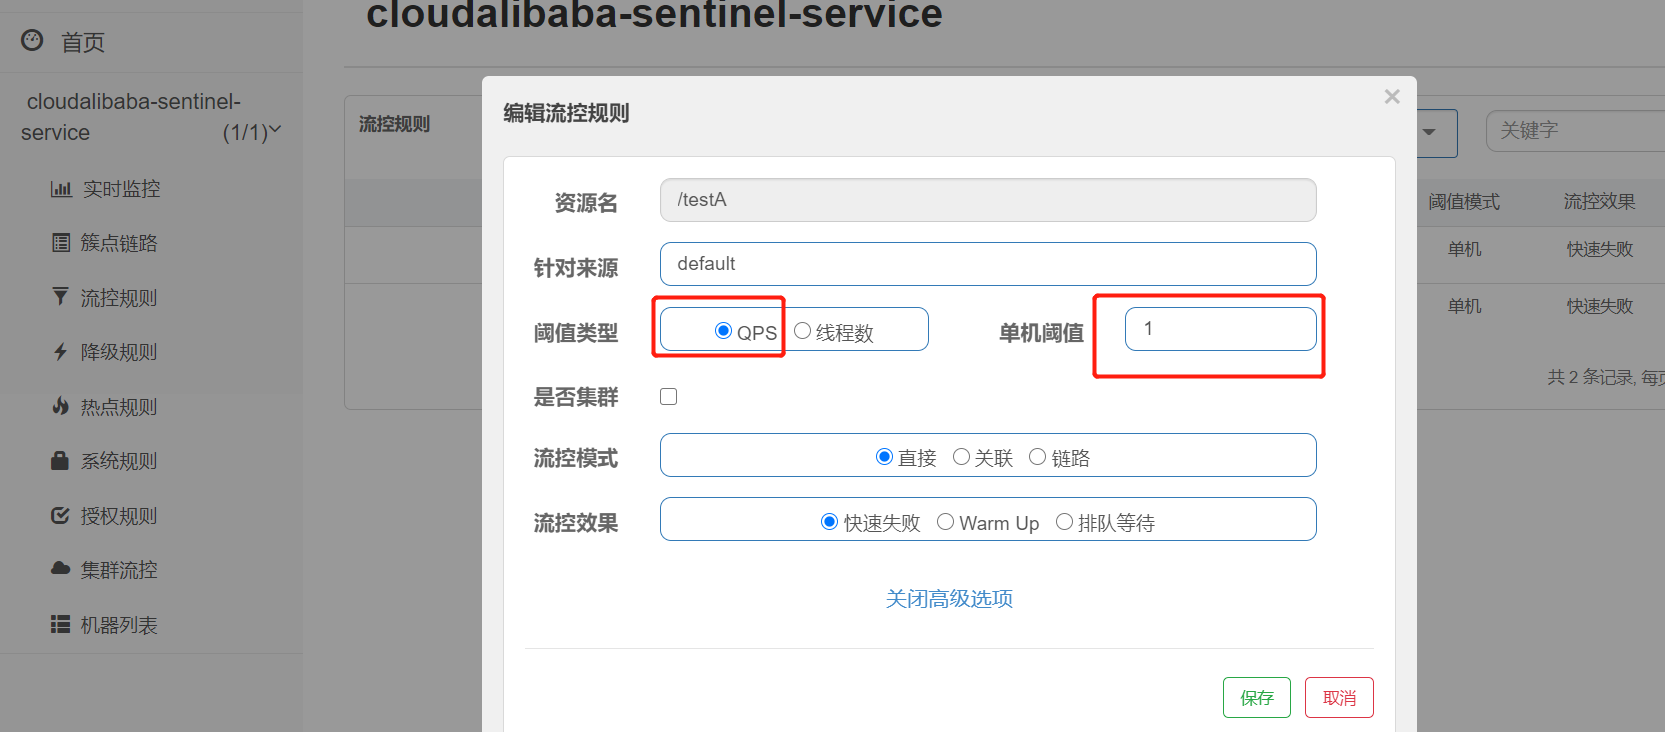
表示每秒仅支持访问一次,超过一次将会放回错误信息!

(2)线程数直接失败
修改/testB的程序,休眠1分钟
@GetMapping("/testB") public String testB() { try { TimeUnit.SECONDS.sleep(1); } catch (InterruptedException e) { e.printStackTrace(); } return "------testB"; }- 1
- 2
- 3
- 4
- 5
- 6
- 7
- 8
- 9
- 10
在Sentinel控制面板中进行配置:
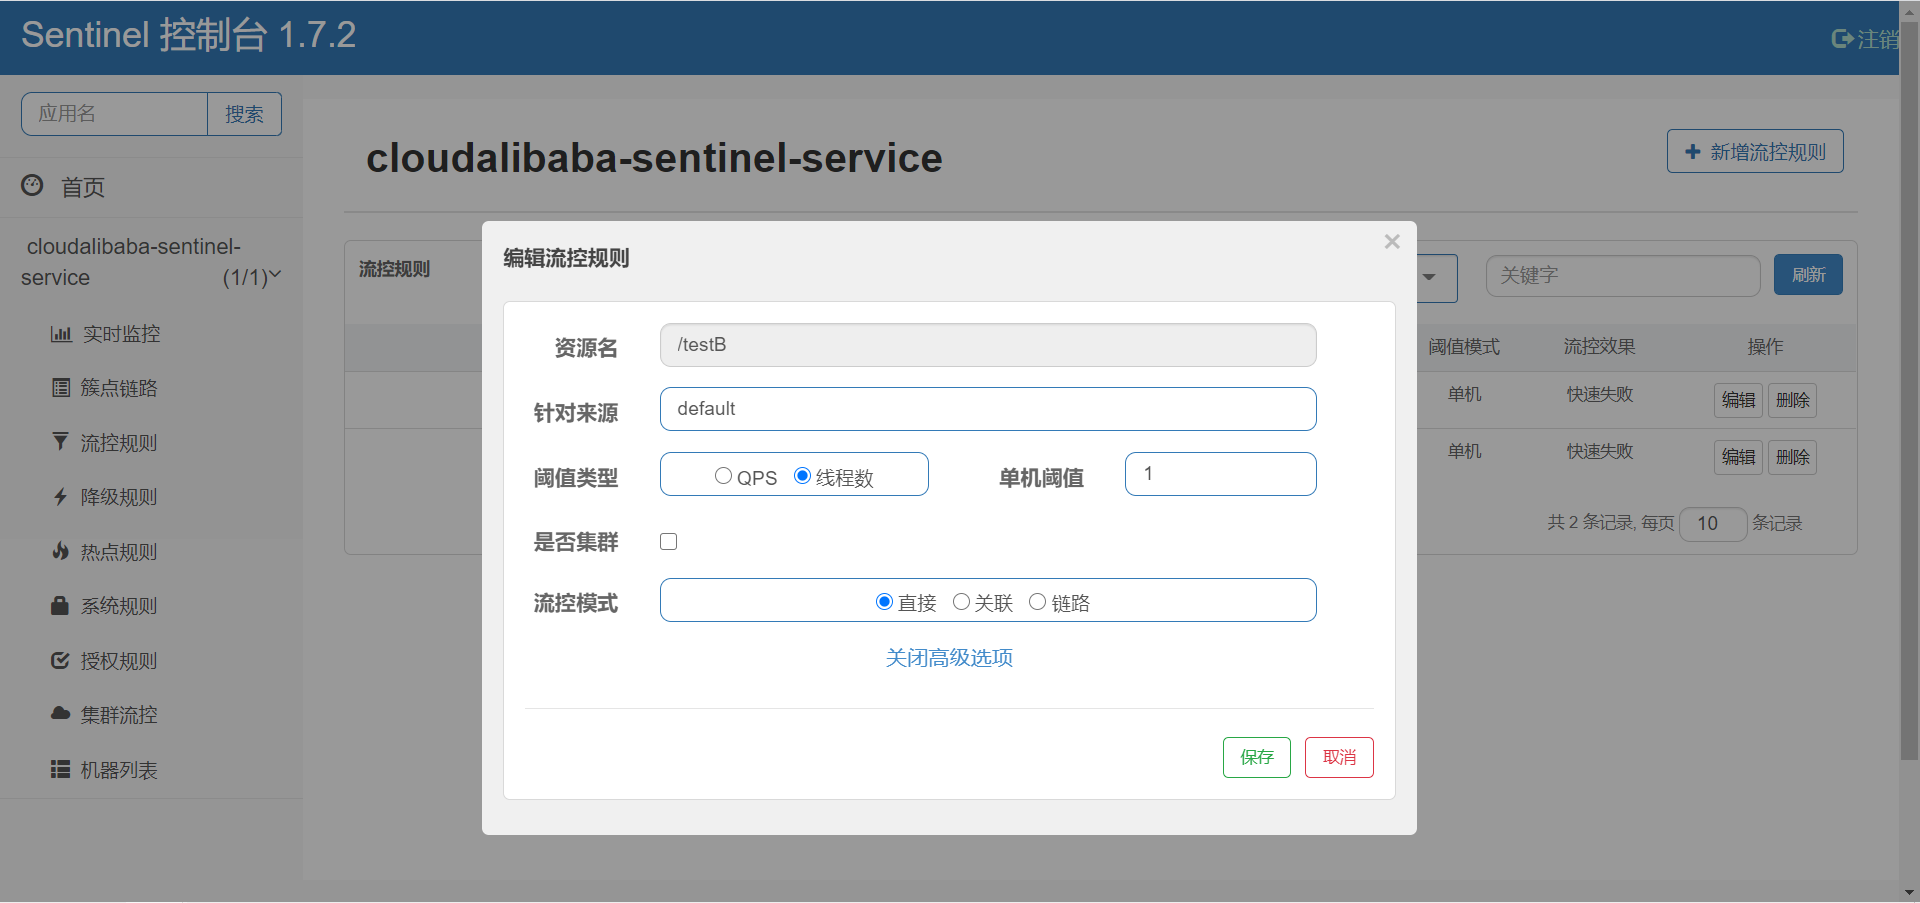
线程数大于1将会直接报错。
此时调用多个线程访问,即多次F5刷新,此时会返回错误信息:

(3)流控效果-Warm Up

静置一段时间后初次访问开始计算
前5秒为预热时间,这段时间的请求阈值是 10 / 3 = 3;其中10是设置的,3是系统默认的coldFactor
超过5秒,回归正常的阈值设置10;查过10的QPS将会限流


应用场景:

(4)流控效果-排队等待
testB接口每秒只支持执行一次,多余的接口会排队等待,超时时间为500ms


(5)关联模式
A关联B,如果B的QPS查过阈值,A将会限流报错。
订单模块关联支付模块,如果支付模块访问量过大,订单模块需要限流。
程序中去掉testB的休眠。
@GetMapping("/testB") public String testB() { /*try { TimeUnit.SECONDS.sleep(1); } catch (InterruptedException e) { e.printStackTrace(); }*/ return "------testB"; }- 1
- 2
- 3
- 4
- 5
- 6
- 7
- 8
- 9
- 10
配置sentinel
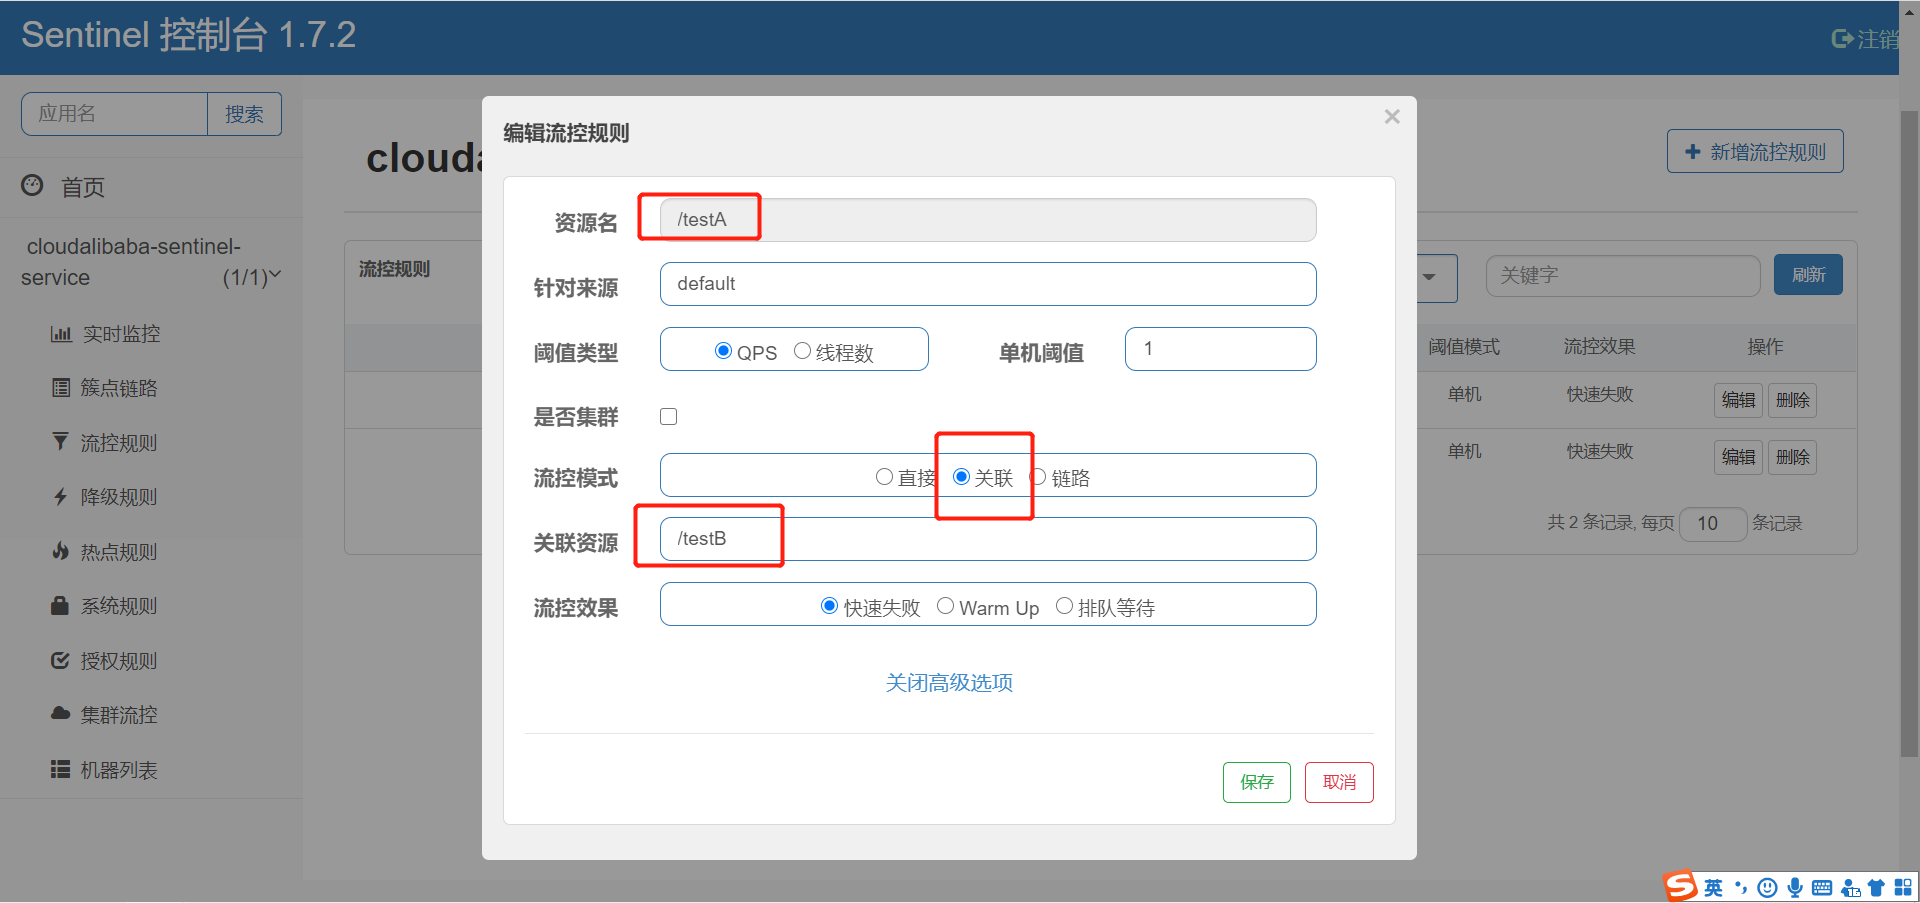
测试:
使用postman访问/testB,模拟高并发


先保证testA可以正常运行,在postman中调用testB的接口
同时调用A,看A的运行情况。

A直接被限流,当B执行完毕(没有高并发访问)时,A可以再次正常运行。
4、Sentinel熔断降级
1.8+有了新的改版:https://github.com/alibaba/Sentinel/wiki/%E7%86%94%E6%96%AD%E9%99%8D%E7%BA%A7

(1)RT


添加测试方法:
@GetMapping("/testD") public String testD() { try { TimeUnit.SECONDS.sleep(1); } catch (InterruptedException e) { e.printStackTrace(); } log.info("testD 测试RT"); return "------testD"; }- 1
- 2
- 3
- 4
- 5
- 6
- 7
- 8
- 9
- 10
- 11

RT是指平均响应时间,如果1秒内持续进入了5个及以上的线程请求,并且平均响应时间大于0.2秒,那么接下来的5秒钟,服务将会熔断,不可用。5秒后恢复正常。
使用Jmeter压测,1秒钟5次请求,并且一直执行,而testD方法的执行时间大于200ms,所以会进行熔断降级处理。


(2)异常比例
不要加异常处理器ExceptionHandler,否则不会被认为是异常


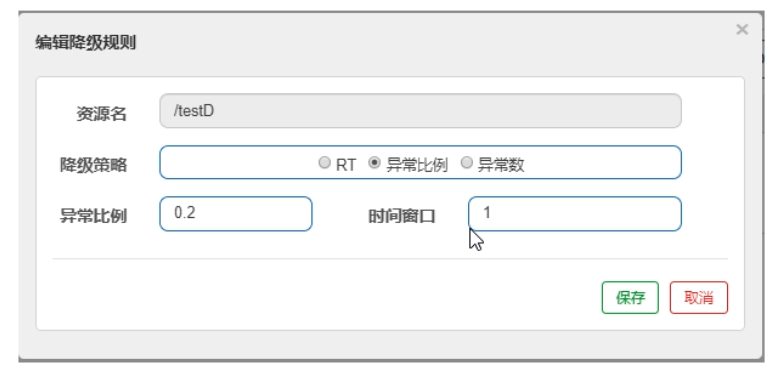
(3)异常数

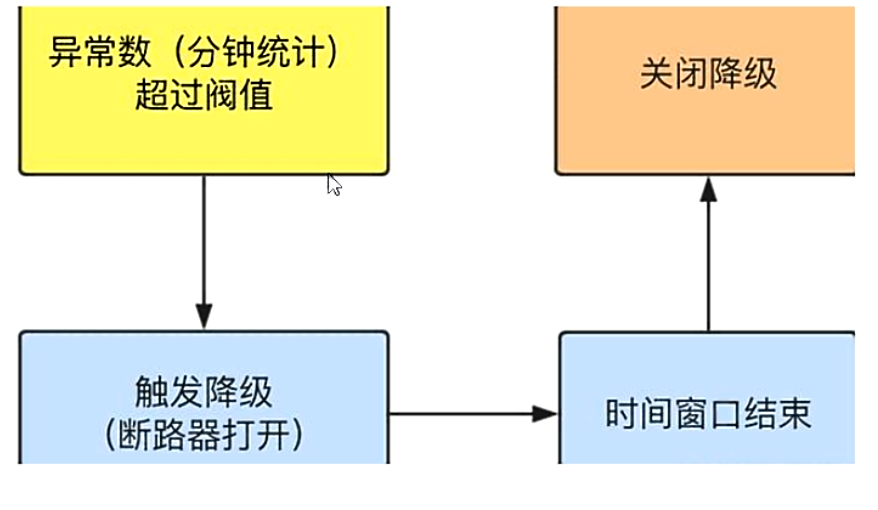

5、热点key降级
热点限流就是通过一个自定义的兜底方法,实现对于异常的处理。
之前配置的sentinel降级:如果程序出错,将会返回系统默认的规则。
这里的兜底就是Hystrix中的兜底方法(类似)。
注解这里是@SentinelResource,替代了豪猪哥的@HystrixCommand
1、程序编写实现热点限流
(1)写业务
@SentinelResource(value = "testHotKey", fallback = "hotKey_fallBack") @GetMapping("/testHotKey") public String testHotKey(@RequestParam(value = "id", required = false) String id, @RequestParam(value = "name", required = false) String name) { return "------testHotKey:" + id + name; } public String hotKey_fallBack(String id, String name) { return "------hotKey_fallBack"; }- 1
- 2
- 3
- 4
- 5
- 6
- 7
- 8
- 9
- 10
(2)在sentinel配置页面配置
在访问带有p1参数的请求:http://localhost:8401/testHotKey?id=22,如果一分钟请求数大于1,在接下来的统计窗口1秒中,会走兜底方法,而不是Whitelabel Error Page
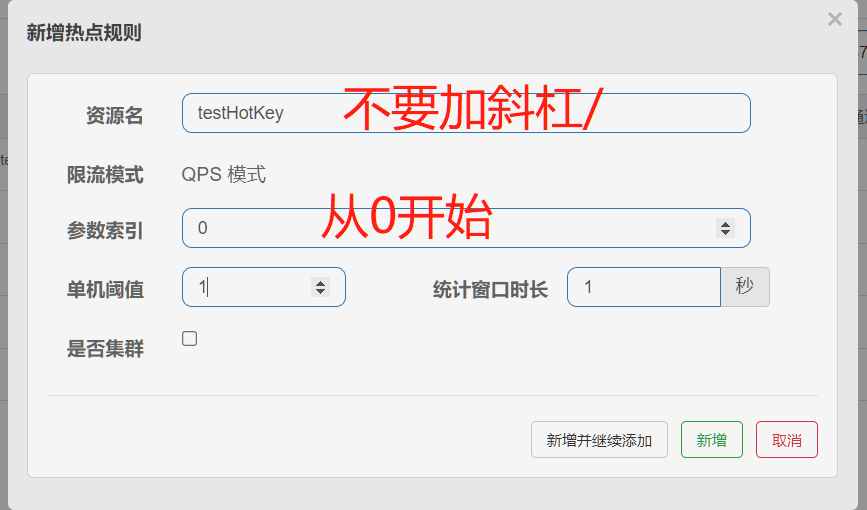
2、热点限流设置白名单
如果说http://localhost:8401/testHotKey?id=666的请求p1=666为白名单,就是说访问http://localhost:8401/testHotKey?id=666时,会有一个新的自定义的阈值条件,达到此条件会走兜底方法。
配置即可:

测试http://localhost:8401/testHotKey?id=666和http://localhost:8401/testHotKey?id=123
发现666不会走兜底策略(访问没到200阈值)
而p1=123直接很快进入兜底方法。

6、系统规则
作为系统的总把关,例如网红小吃店,如果只能容纳50人,到50后就拒绝进入了。

http://localhost:8401/testA
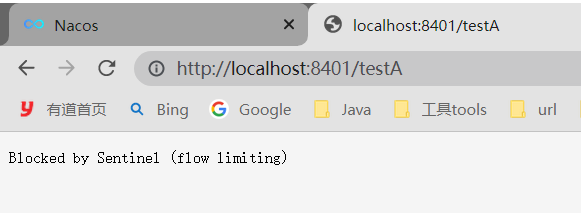
最好不要使用,范围太大。
7、@SentinelResource
1、按资源名称限流+后续处理
blockHandler 只针对sentinel控制台的配置的规则,比如限流这些条件达到了,会走handleException方法。
如果java报错,还是把错误信息给显示在了页面上,不和谐
@RestController public class RateLimitController { @GetMapping("/byResource") @SentinelResource(value = "byResource", blockHandler = "handleException") public CommonResult byResource() { return new CommonResult(200, "按资源名称限流测试OK", new Payment(2020L, "serial001")); } public CommonResult handleException(BlockException exception) { return new CommonResult(444, exception.getClass().getCanonicalName() + "\t 服务不可用"); } }- 1
- 2
- 3
- 4
- 5
- 6
- 7
- 8
- 9
- 10
- 11
- 12
- 13
http://localhost:8401/byResource


多次访问

问题:
关闭8401服务,sentinel工作台上没有了相关的服务,请求也变为访问错误

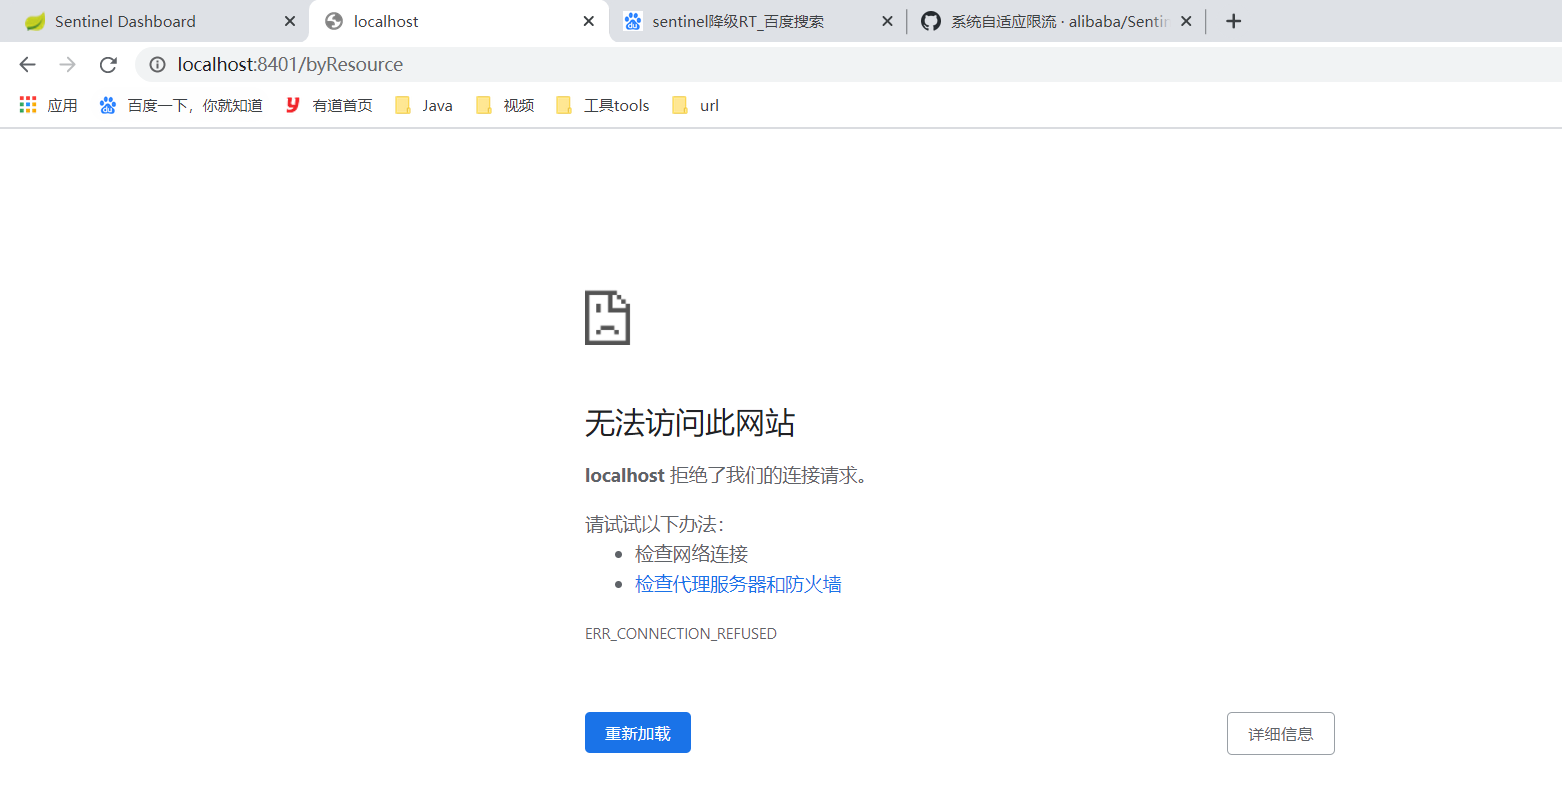
说明注册没有持久化。
2、按照Url地址限流+后续处理
@GetMapping("/rateLimit/byUrl") @SentinelResource(value = "byUrl") public CommonResult byUrl() { return new CommonResult(200,"按url限流测试OK",new Payment(2020L,"serial002")); }- 1
- 2
- 3
- 4
- 5
- 6

这个没有编写对应的兜底策略,返回的是系统默认提示。
http://localhost:8401/rateLimit/byUrl

问题:

3、客户自定义限流处理逻辑
顶一一个全局的兜底策略,出问题走此逻辑。
(1)自定义的全局兜底策略
/* * 1. 必须是 static * com.alibaba.csp.sentinel.annotation.aspectj.SentinelResourceAspect.invokeResourceWithSentinel * 2. 最后一个参数必须是BlockException,并且前面的参数要和原方法保持一致 * */ public class CustomerBlockHandler { public static CommonResult handleException(BlockException exception) { return new CommonResult(2021, "自定义限流处理信息....CustomerBlockHandler"); } }- 1
- 2
- 3
- 4
- 5
- 6
- 7
- 8
- 9
- 10
- 11
(2)普通的业务类
配置了@SentinelResource,以及其指向的兜底策略blockHandlerClass + blockHandler
@GetMapping("/rateLimit/customerBlockHandler") @SentinelResource(value = "customerBlockHandler", blockHandlerClass = CustomerBlockHandler.class, blockHandler = "handleException") public CommonResult customerBlockHandler() { return new CommonResult(200, "按客戶自定义", new Payment(2020L, "serial003")); }- 1
- 2
- 3
- 4
- 5
- 6
- 7
(3)测试
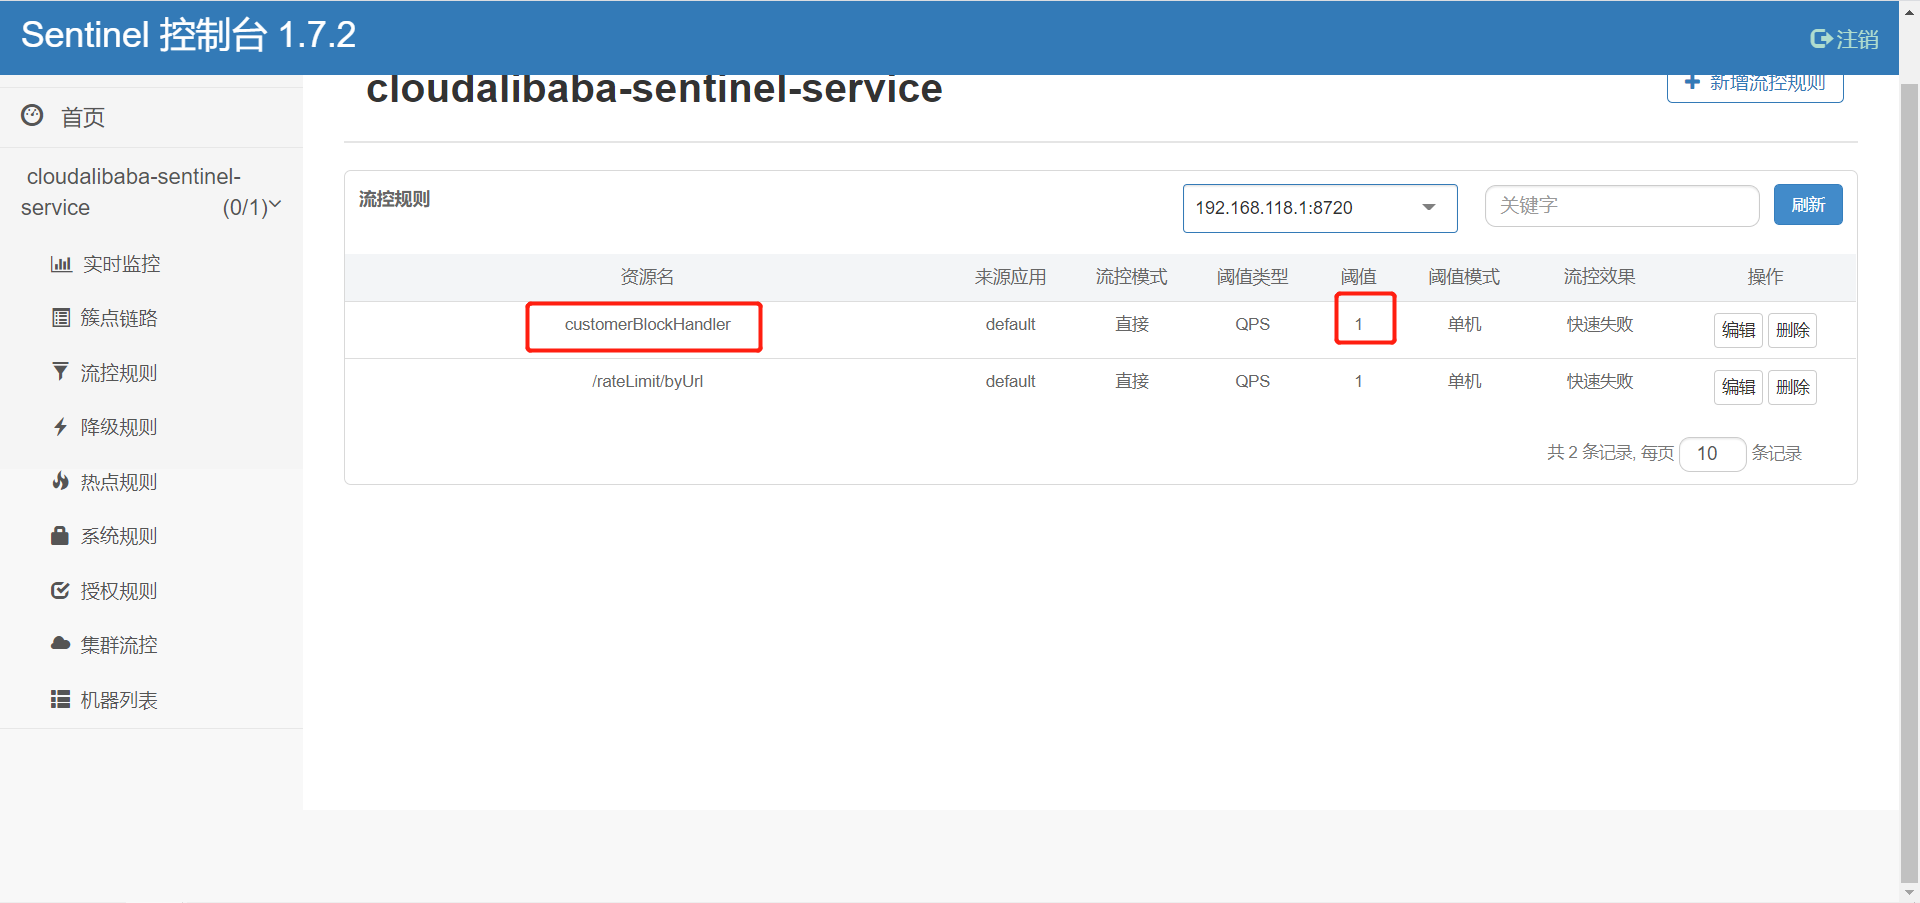
http://localhost:8401/rateLimit/customerBlockHandler

多次访问,可见:走了自定义的全局处理策略。
8、服务熔断功能
整合openfeign,结合blockHandler和fallback实现高可用
9、规则持久化
Sentinel目前配置的规则并未进行持久化,一旦项目重启,规则将消失。
解决方法:可以存到某些持久化容器里,或者数据库。官方推荐通过nacos进行存储(就是持久化到Mysql中了)
将cloudalibaba-consumer-nacos-order84的payment/get/{id}持久化到nacos的步骤
(1)添加依赖
<dependency> <groupId>com.alibaba.cspgroupId> <artifactId>sentinel-datasource-nacosartifactId> dependency>- 1
- 2
- 3
- 4
(2)添加配置
spring: cloud: sentinel: datasource: ds1: nacos: server-addr: 192.168.137.110:3333,192.168.137.110:4444,192.168.137.110:5555 dataid: ${spring.application.name} groupid: DEFAULT_GROUP data-type: json rule-type: flow- 1
- 2
- 3
- 4
- 5
- 6
- 7
- 8
- 9
- 10
- 11
- 12
(3)nacos控制台添加配置
[ { "resource": "payment/get/{id}", "limitApp": "default", "grade": 1, "count": 1, "strategy": 0, "controlBehavior": 0, "clusterMode": false } ]- 1
- 2
- 3
- 4
- 5
- 6
- 7
- 8
- 9
- 10
- 11


(4)测试
启动对应的应用后,访问
http://localhost:84/consumer/payment/get/555发现限流规则已生效。Sentinel的dashboard也显示出了限流规则。重启后依然生效。(记着访问几次对应的请求)

三、Seata
一次业务操作需要跨多个数据源或需要跨多个系统进行远程调用,就会产生分布式事务问题。
Seata是一款开源的分布式事务解决方案,致力于在微服务架构下提供高性能和简单易用的分布式事务服务。
一个典型的分布式事务过程是由ID+三组件模型构成;
- Transaction ID(全局唯一的事务ID)
- Transaction Coordinator(TC):事务协调器,维护全局事务的运行状态,负责协调并驱动全局事务的提交或回滚;
- Transaction Manager™ :控制全局事务的边界,负责开启一个全局事务,并最终发起全局提交或全局回滚的决议;
- Resource Manager(RM) :控制分支事务,负责分支注册,状态汇报,并接收事务协调器的指令,驱动分支(本地)事务的提交和回滚;
处理过程:

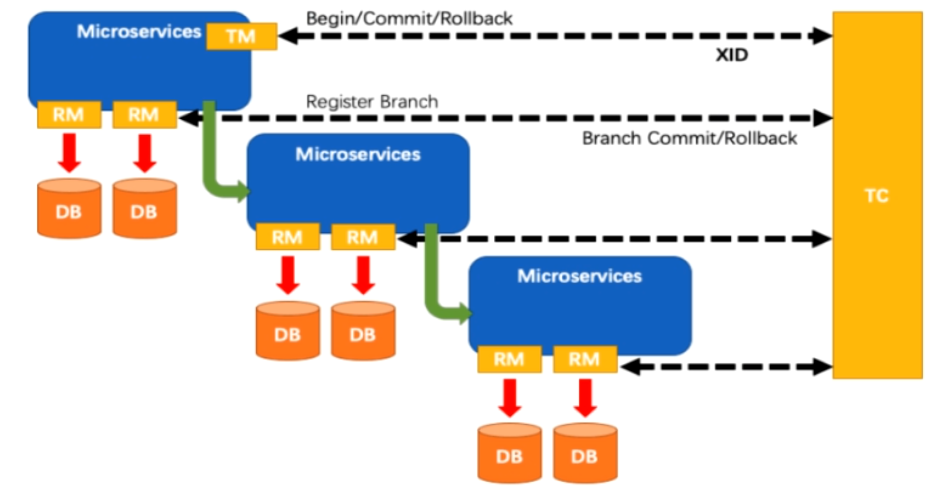
1、Seata Server本地启动
- 这里Seata Server版本是1.4.2
- 持久化选择的工具是Mysql
- 192.168.137.110:3306 root/root
- 注册中心使用的是Nacos集群
- 192.168.137.110:3333,192.168.137.110:4444,192.168.137.110:5555
(1)下载seata-1.4.2.zip
https://github.com/seata/seata/releases/tag/v1.4.2- 1
(2)创建对应的数据表
在D:\Java\cloud-alibaba\seata\seata-server-1.4.2\conf中有一个README-zh.md文件,在server模块超链接server,进入db目录,复制mysql.sql中的文件,创建这三张表。需要先创建一个database. 我这里的名字是db_seata
-- -------------------------------- The script used when storeMode is 'db' -------------------------------- -- the table to store GlobalSession data CREATE TABLE IF NOT EXISTS `global_table` ( `xid` VARCHAR(128) NOT NULL, `transaction_id` BIGINT, `status` TINYINT NOT NULL, `application_id` VARCHAR(32), `transaction_service_group` VARCHAR(32), `transaction_name` VARCHAR(128), `timeout` INT, `begin_time` BIGINT, `application_data` VARCHAR(2000), `gmt_create` DATETIME, `gmt_modified` DATETIME, PRIMARY KEY (`xid`), KEY `idx_status_gmt_modified` (`status` , `gmt_modified`), KEY `idx_transaction_id` (`transaction_id`) ) ENGINE = InnoDB DEFAULT CHARSET = utf8mb4; -- the table to store BranchSession data CREATE TABLE IF NOT EXISTS `branch_table` ( `branch_id` BIGINT NOT NULL, `xid` VARCHAR(128) NOT NULL, `transaction_id` BIGINT, `resource_group_id` VARCHAR(32), `resource_id` VARCHAR(256), `branch_type` VARCHAR(8), `status` TINYINT, `client_id` VARCHAR(64), `application_data` VARCHAR(2000), `gmt_create` DATETIME(6), `gmt_modified` DATETIME(6), PRIMARY KEY (`branch_id`), KEY `idx_xid` (`xid`) ) ENGINE = InnoDB DEFAULT CHARSET = utf8mb4; -- the table to store lock data CREATE TABLE IF NOT EXISTS `lock_table` ( `row_key` VARCHAR(128) NOT NULL, `xid` VARCHAR(128), `transaction_id` BIGINT, `branch_id` BIGINT NOT NULL, `resource_id` VARCHAR(256), `table_name` VARCHAR(32), `pk` VARCHAR(36), `status` TINYINT NOT NULL DEFAULT '0' COMMENT '0:locked ,1:rollbacking', `gmt_create` DATETIME, `gmt_modified` DATETIME, PRIMARY KEY (`row_key`), KEY `idx_status` (`status`), KEY `idx_branch_id` (`branch_id`), KEY `idx_xid` (`xid`) ) ENGINE = InnoDB DEFAULT CHARSET = utf8mb4; CREATE TABLE IF NOT EXISTS `distributed_lock` ( `lock_key` CHAR(20) NOT NULL, `lock_value` VARCHAR(20) NOT NULL, `expire` BIGINT, primary key (`lock_key`) ) ENGINE = InnoDB DEFAULT CHARSET = utf8mb4; INSERT INTO `distributed_lock` (lock_key, lock_value, expire) VALUES ('AsyncCommitting', ' ', 0); INSERT INTO `distributed_lock` (lock_key, lock_value, expire) VALUES ('RetryCommitting', ' ', 0); INSERT INTO `distributed_lock` (lock_key, lock_value, expire) VALUES ('RetryRollbacking', ' ', 0); INSERT INTO `distributed_lock` (lock_key, lock_value, expire) VALUES ('TxTimeoutCheck', ' ', 0);- 1
- 2
- 3
- 4
- 5
- 6
- 7
- 8
- 9
- 10
- 11
- 12
- 13
- 14
- 15
- 16
- 17
- 18
- 19
- 20
- 21
- 22
- 23
- 24
- 25
- 26
- 27
- 28
- 29
- 30
- 31
- 32
- 33
- 34
- 35
- 36
- 37
- 38
- 39
- 40
- 41
- 42
- 43
- 44
- 45
- 46
- 47
- 48
- 49
- 50
- 51
- 52
- 53
- 54
- 55
- 56
- 57
- 58
- 59
- 60
- 61
- 62
- 63
- 64
- 65
- 66
- 67
- 68
- 69
- 70
- 71
- 72
- 73
- 74
(3)修改conf/file.conf文件
文件路径为D:\Java\cloud-alibaba\seata\seata-server-1.4.2\conf\file.conf
将store.mode改为db以及修改对应的数据库连接信息

## transaction log store, only used in seata-server store { ## store mode: file、db、redis mode = "db" ## rsa decryption public key publicKey = "" ## file store property file { ## store location dir dir = "sessionStore" # branch session size , if exceeded first try compress lockkey, still exceeded throws exceptions maxBranchSessionSize = 16384 # globe session size , if exceeded throws exceptions maxGlobalSessionSize = 512 # file buffer size , if exceeded allocate new buffer fileWriteBufferCacheSize = 16384 # when recover batch read size sessionReloadReadSize = 100 # async, sync flushDiskMode = async } ## database store property db { ## the implement of javax.sql.DataSource, such as DruidDataSource(druid)/BasicDataSource(dbcp)/HikariDataSource(hikari) etc. datasource = "druid" ## mysql/oracle/postgresql/h2/oceanbase etc. dbType = "mysql" driverClassName = "com.mysql.cj.jdbc.Driver" ## if using mysql to store the data, recommend add rewriteBatchedStatements=true in jdbc connection param url = "jdbc:mysql://192.168.137.110:3306/db_seata?useSSL=true&useUnicode=true&characterEncoding=utf-8&serverTimezone=Asia/Shanghai" user = "root" password = "root" minConn = 5 maxConn = 100 globalTable = "global_table" branchTable = "branch_table" lockTable = "lock_table" queryLimit = 100 maxWait = 5000 } ## redis store property redis { ## redis mode: single、sentinel mode = "single" ## single mode property single { host = "127.0.0.1" port = "6379" } ## sentinel mode property sentinel { masterName = "" ## such as "10.28.235.65:26379,10.28.235.65:26380,10.28.235.65:26381" sentinelHosts = "" } password = "" database = "0" minConn = 1 maxConn = 10 maxTotal = 100 queryLimit = 100 } }- 1
- 2
- 3
- 4
- 5
- 6
- 7
- 8
- 9
- 10
- 11
- 12
- 13
- 14
- 15
- 16
- 17
- 18
- 19
- 20
- 21
- 22
- 23
- 24
- 25
- 26
- 27
- 28
- 29
- 30
- 31
- 32
- 33
- 34
- 35
- 36
- 37
- 38
- 39
- 40
- 41
- 42
- 43
- 44
- 45
- 46
- 47
- 48
- 49
- 50
- 51
- 52
- 53
- 54
- 55
- 56
- 57
- 58
- 59
- 60
- 61
- 62
- 63
- 64
- 65
- 66
nacos添加配置
Data ID: seataServer.properties Group: SEATA_GROUP 内容: transport.type=TCP transport.server=NIO transport.heartbeat=true transport.enableClientBatchSendRequest=true transport.threadFactory.bossThreadPrefix=NettyBoss transport.threadFactory.workerThreadPrefix=NettyServerNIOWorker transport.threadFactory.serverExecutorThreadPrefix=NettyServerBizHandler transport.threadFactory.shareBossWorker=false transport.threadFactory.clientSelectorThreadPrefix=NettyClientSelector transport.threadFactory.clientSelectorThreadSize=1 transport.threadFactory.clientWorkerThreadPrefix=NettyClientWorkerThread transport.threadFactory.bossThreadSize=1 transport.threadFactory.workerThreadSize=default transport.shutdown.wait=3 transport.serialization=seata transport.compressor=none # server server.recovery.committingRetryPeriod=1000 server.recovery.asynCommittingRetryPeriod=1000 server.recovery.rollbackingRetryPeriod=1000 server.recovery.timeoutRetryPeriod=1000 server.undo.logSaveDays=7 server.undo.logDeletePeriod=86400000 server.maxCommitRetryTimeout=-1 server.maxRollbackRetryTimeout=-1 server.rollbackRetryTimeoutUnlockEnable=false server.distributedLockExpireTime=10000 # store #model改为db store.mode=db store.lock.mode=file store.session.mode=file # store.publicKey="" store.file.dir=file_store/data store.file.maxBranchSessionSize=16384 store.file.maxGlobalSessionSize=512 store.file.fileWriteBufferCacheSize=16384 store.file.flushDiskMode=async store.file.sessionReloadReadSize=100 store.db.datasource=druid store.db.dbType=mysql #修改数据驱动,这里是mysql8,使用mysql5的话请修改 store.db.driverClassName=com.mysql.cj.jdbc.Driver # 改为上面创建的seata服务数据库 store.db.url=jdbc:mysql://192.168.137.110:3306/db_seata?useSSL=true&useUnicode=true&characterEncoding=utf-8&serverTimezone=Asia/Shanghai # 改为自己的数据库用户名 store.db.user=root # 改为自己的数据库密码 store.db.password=root store.db.minConn=5 store.db.maxConn=30 store.db.globalTable=global_table store.db.branchTable=branch_table store.db.distributedLockTable=distributed_lock store.db.queryLimit=100 store.db.lockTable=lock_table store.db.maxWait=5000 store.redis.mode=single store.redis.single.host=127.0.0.1 store.redis.single.port=6379 # store.redis.sentinel.masterName="" # store.redis.sentinel.sentinelHosts="" store.redis.maxConn=10 store.redis.minConn=1 store.redis.maxTotal=100 store.redis.database=0 # store.redis.password="" store.redis.queryLimit=100 # log log.exceptionRate=100 # metrics metrics.enabled=false metrics.registryType=compact metrics.exporterList=prometheus metrics.exporterPrometheusPort=9898 # service # 自己命名一个vgroupMapping my_test_tx_group等下要用到 重中之重 service.vgroupMapping.my_test_tx_group=default service.default.grouplist=127.0.0.1:8091 service.enableDegrade=false service.disableGlobalTransaction=false # client client.rm.asyncCommitBufferLimit=10000 client.rm.lock.retryInterval=10 client.rm.lock.retryTimes=30 client.rm.lock.retryPolicyBranchRollbackOnConflict=true client.rm.reportRetryCount=5 client.rm.tableMetaCheckEnable=false client.rm.tableMetaCheckerInterval=60000 client.rm.sqlParserType=druid client.rm.reportSuccessEnable=false client.rm.sagaBranchRegisterEnable=false client.rm.tccActionInterceptorOrder=-2147482648 client.tm.commitRetryCount=5 client.tm.rollbackRetryCount=5 client.tm.defaultGlobalTransactionTimeout=60000 client.tm.degradeCheck=false client.tm.degradeCheckAllowTimes=10 client.tm.degradeCheckPeriod=2000 client.tm.interceptorOrder=-2147482648 client.undo.dataValidation=true client.undo.logSerialization=jackson client.undo.onlyCareUpdateColumns=true client.undo.logTable=undo_log client.undo.compress.enable=true client.undo.compress.type=zip client.undo.compress.threshold=64k- 1
- 2
- 3
- 4
- 5
- 6
- 7
- 8
- 9
- 10
- 11
- 12
- 13
- 14
- 15
- 16
- 17
- 18
- 19
- 20
- 21
- 22
- 23
- 24
- 25
- 26
- 27
- 28
- 29
- 30
- 31
- 32
- 33
- 34
- 35
- 36
- 37
- 38
- 39
- 40
- 41
- 42
- 43
- 44
- 45
- 46
- 47
- 48
- 49
- 50
- 51
- 52
- 53
- 54
- 55
- 56
- 57
- 58
- 59
- 60
- 61
- 62
- 63
- 64
- 65
- 66
- 67
- 68
- 69
- 70
- 71
- 72
- 73
- 74
- 75
- 76
- 77
- 78
- 79
- 80
- 81
- 82
- 83
- 84
- 85
- 86
- 87
- 88
- 89
- 90
- 91
- 92
- 93
- 94
- 95
- 96
- 97
- 98
- 99
- 100
- 101
- 102
- 103
- 104
- 105
- 106
- 107
- 108
- 109
- 110
(4)修改conf/registry.conf文件
文件路径为D:\Java\cloud-alibaba\seata\seata-server-1.4.2\conf\registry.conf
修改registry和config标签下的type=nacos以及具体nacos配置信息

registry { # file 、nacos 、eureka、redis、zk、consul、etcd3、sofa type = "nacos" nacos { application = "seata-server" serverAddr = "192.168.137.110:3333,192.168.137.110:4444,192.168.137.110:5555" group = "SEATA_GROUP" namespace = "34ebbd28-87c2-4e08-8295-d5873d10f079" cluster = "default" username = "nacos" password = "nacos" } eureka { serviceUrl = "http://localhost:8761/eureka" application = "default" weight = "1" } redis { serverAddr = "localhost:6379" db = 0 password = "" cluster = "default" timeout = 0 } zk { cluster = "default" serverAddr = "127.0.0.1:2181" sessionTimeout = 6000 connectTimeout = 2000 username = "" password = "" } consul { cluster = "default" serverAddr = "127.0.0.1:8500" aclToken = "" } etcd3 { cluster = "default" serverAddr = "http://localhost:2379" } sofa { serverAddr = "127.0.0.1:9603" application = "default" region = "DEFAULT_ZONE" datacenter = "DefaultDataCenter" cluster = "default" group = "SEATA_GROUP" addressWaitTime = "3000" } file { name = "file.conf" } } config { # file、nacos 、apollo、zk、consul、etcd3 type = "nacos" nacos { serverAddr = "192.168.137.110:3333,192.168.137.110:4444,192.168.137.110:5555" namespace = "34ebbd28-87c2-4e08-8295-d5873d10f079" group = "SEATA_GROUP" username = "nacos" password = "nacos" dataId = "seataServer.properties" } consul { serverAddr = "127.0.0.1:8500" aclToken = "" } apollo { appId = "seata-server" ## apolloConfigService will cover apolloMeta apolloMeta = "http://192.168.1.204:8801" apolloConfigService = "http://192.168.1.204:8080" namespace = "application" apolloAccesskeySecret = "" cluster = "seata" } zk { serverAddr = "127.0.0.1:2181" sessionTimeout = 6000 connectTimeout = 2000 username = "" password = "" nodePath = "/seata/seata.properties" } etcd3 { serverAddr = "http://localhost:2379" } file { name = "file.conf" } }- 1
- 2
- 3
- 4
- 5
- 6
- 7
- 8
- 9
- 10
- 11
- 12
- 13
- 14
- 15
- 16
- 17
- 18
- 19
- 20
- 21
- 22
- 23
- 24
- 25
- 26
- 27
- 28
- 29
- 30
- 31
- 32
- 33
- 34
- 35
- 36
- 37
- 38
- 39
- 40
- 41
- 42
- 43
- 44
- 45
- 46
- 47
- 48
- 49
- 50
- 51
- 52
- 53
- 54
- 55
- 56
- 57
- 58
- 59
- 60
- 61
- 62
- 63
- 64
- 65
- 66
- 67
- 68
- 69
- 70
- 71
- 72
- 73
- 74
- 75
- 76
- 77
- 78
- 79
- 80
- 81
- 82
- 83
- 84
- 85
- 86
- 87
- 88
- 89
- 90
- 91
- 92
- 93
- 94
- 95
- 96
- 97
(5)配置Nacos信息
1.1 创建一个namespace

1.2 创建一个配置seataServer.properties
[config-center](https://github.com/seata/seata/tree/develop/script/config-center) https://github.com/seata/seata/blob/develop/script/config-center/config.txt- 1
- 2

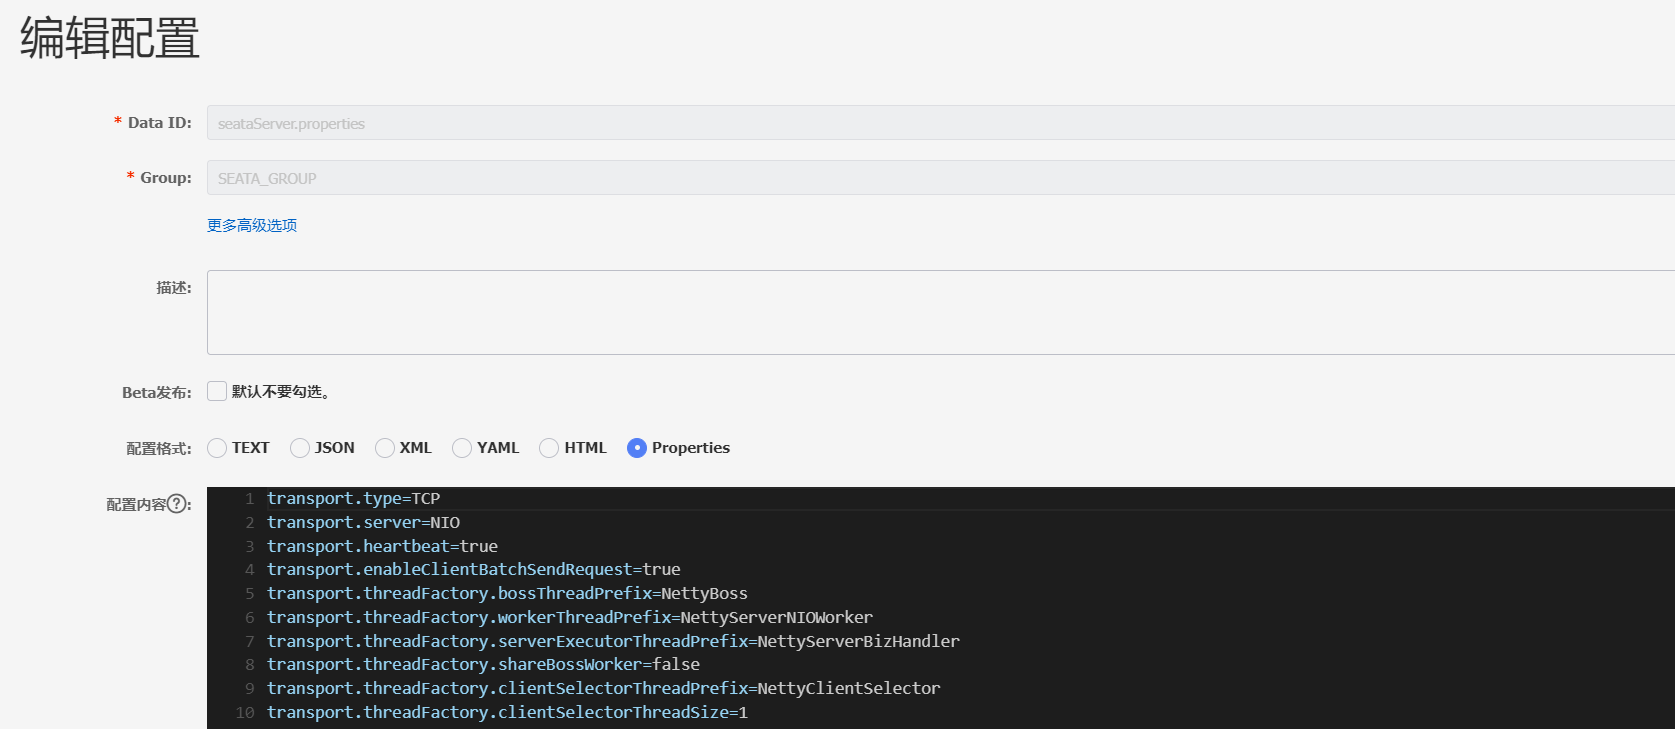
1.3配置内容
修改vgroupMapping和数据库配置信息
seataServer.properties SEATA_GROUP- 1
- 2
transport.type=TCP transport.server=NIO transport.heartbeat=true transport.enableClientBatchSendRequest=true transport.threadFactory.bossThreadPrefix=NettyBoss transport.threadFactory.workerThreadPrefix=NettyServerNIOWorker transport.threadFactory.serverExecutorThreadPrefix=NettyServerBizHandler transport.threadFactory.shareBossWorker=false transport.threadFactory.clientSelectorThreadPrefix=NettyClientSelector transport.threadFactory.clientSelectorThreadSize=1 transport.threadFactory.clientWorkerThreadPrefix=NettyClientWorkerThread transport.threadFactory.bossThreadSize=1 transport.threadFactory.workerThreadSize=default transport.shutdown.wait=3 transport.serialization=seata transport.compressor=none # server server.recovery.committingRetryPeriod=1000 server.recovery.asynCommittingRetryPeriod=1000 server.recovery.rollbackingRetryPeriod=1000 server.recovery.timeoutRetryPeriod=1000 server.undo.logSaveDays=7 server.undo.logDeletePeriod=86400000 server.maxCommitRetryTimeout=-1 server.maxRollbackRetryTimeout=-1 server.rollbackRetryTimeoutUnlockEnable=false server.distributedLockExpireTime=10000 # store #model改为db store.mode=db store.lock.mode=file store.session.mode=file # store.publicKey="" store.file.dir=file_store/data store.file.maxBranchSessionSize=16384 store.file.maxGlobalSessionSize=512 store.file.fileWriteBufferCacheSize=16384 store.file.flushDiskMode=async store.file.sessionReloadReadSize=100 store.db.datasource=druid store.db.dbType=mysql #修改数据驱动,这里是mysql8,使用mysql5的话请修改 store.db.driverClassName=com.mysql.cj.jdbc.Driver # 改为上面创建的seata服务数据库 store.db.url=jdbc:mysql://192.168.137.110:3306/db_seata?useSSL=true&useUnicode=true&characterEncoding=utf-8&serverTimezone=Asia/Shanghai # 改为自己的数据库用户名 store.db.user=root # 改为自己的数据库密码 store.db.password=root store.db.minConn=5 store.db.maxConn=30 store.db.globalTable=global_table store.db.branchTable=branch_table store.db.distributedLockTable=distributed_lock store.db.queryLimit=100 store.db.lockTable=lock_table store.db.maxWait=5000 store.redis.mode=single store.redis.single.host=127.0.0.1 store.redis.single.port=6379 # store.redis.sentinel.masterName="" # store.redis.sentinel.sentinelHosts="" store.redis.maxConn=10 store.redis.minConn=1 store.redis.maxTotal=100 store.redis.database=0 # store.redis.password="" store.redis.queryLimit=100 # log log.exceptionRate=100 # metrics metrics.enabled=false metrics.registryType=compact metrics.exporterList=prometheus metrics.exporterPrometheusPort=9898 # service # 自己命名一个vgroupMapping my_test_tx_group等下要用到 重中之重 service.vgroupMapping.my_test_tx_group=default service.default.grouplist=127.0.0.1:8091 service.enableDegrade=false service.disableGlobalTransaction=false # client client.rm.asyncCommitBufferLimit=10000 client.rm.lock.retryInterval=10 client.rm.lock.retryTimes=30 client.rm.lock.retryPolicyBranchRollbackOnConflict=true client.rm.reportRetryCount=5 client.rm.tableMetaCheckEnable=false client.rm.tableMetaCheckerInterval=60000 client.rm.sqlParserType=druid client.rm.reportSuccessEnable=false client.rm.sagaBranchRegisterEnable=false client.rm.tccActionInterceptorOrder=-2147482648 client.tm.commitRetryCount=5 client.tm.rollbackRetryCount=5 client.tm.defaultGlobalTransactionTimeout=60000 client.tm.degradeCheck=false client.tm.degradeCheckAllowTimes=10 client.tm.degradeCheckPeriod=2000 client.tm.interceptorOrder=-2147482648 client.undo.dataValidation=true client.undo.logSerialization=jackson client.undo.onlyCareUpdateColumns=true client.undo.logTable=undo_log client.undo.compress.enable=true client.undo.compress.type=zip client.undo.compress.threshold=64k- 1
- 2
- 3
- 4
- 5
- 6
- 7
- 8
- 9
- 10
- 11
- 12
- 13
- 14
- 15
- 16
- 17
- 18
- 19
- 20
- 21
- 22
- 23
- 24
- 25
- 26
- 27
- 28
- 29
- 30
- 31
- 32
- 33
- 34
- 35
- 36
- 37
- 38
- 39
- 40
- 41
- 42
- 43
- 44
- 45
- 46
- 47
- 48
- 49
- 50
- 51
- 52
- 53
- 54
- 55
- 56
- 57
- 58
- 59
- 60
- 61
- 62
- 63
- 64
- 65
- 66
- 67
- 68
- 69
- 70
- 71
- 72
- 73
- 74
- 75
- 76
- 77
- 78
- 79
- 80
- 81
- 82
- 83
- 84
- 85
- 86
- 87
- 88
- 89
- 90
- 91
- 92
- 93
- 94
- 95
- 96
- 97
- 98
- 99
- 100
- 101
- 102
- 103
- 104
- 105
- 106
- 107
(6)启动Seata server
需要保证配置的Mysql和nacos能正常连接
D:\Java\cloud-alibaba\seata\seata-server-1.4.2\bin\seata-server.bat- 1
(7)开启一个项目,并成功注册Seata
1.1 pom
<project xmlns="http://maven.apache.org/POM/4.0.0" xmlns:xsi="http://www.w3.org/2001/XMLSchema-instance" xsi:schemaLocation="http://maven.apache.org/POM/4.0.0 http://maven.apache.org/xsd/maven-4.0.0.xsd"> <parent> <artifactId>spring-cloud-2022artifactId> <groupId>com.ityj.springcloudgroupId> <version>0.0.1-SNAPSHOTversion> parent> <modelVersion>4.0.0modelVersion> <artifactId>seata-order-service2001artifactId> <dependencies> <dependency> <groupId>com.ityj.springcloudgroupId> <artifactId>cloud-api-commonsartifactId> <version>0.0.1-SNAPSHOTversion> dependency> <dependency> <groupId>com.alibaba.cloudgroupId> <artifactId>spring-cloud-starter-alibaba-nacos-discoveryartifactId> dependency> <dependency> <groupId>com.alibaba.cloudgroupId> <artifactId>spring-cloud-starter-alibaba-seataartifactId> <exclusions> <exclusion> <groupId>io.seatagroupId> <artifactId>seata-spring-boot-starterartifactId> exclusion> exclusions> dependency> <dependency> <groupId>io.seatagroupId> <artifactId>seata-spring-boot-starterartifactId> <version>1.4.2version> dependency> <dependency> <groupId>org.springframework.cloudgroupId> <artifactId>spring-cloud-starter-openfeignartifactId> dependency> <dependency> <groupId>mysqlgroupId> <artifactId>mysql-connector-javaartifactId> dependency> <dependency> <groupId>com.baomidougroupId> <artifactId>mybatis-plus-boot-starterartifactId> dependency> <dependency> <groupId>com.alibabagroupId> <artifactId>druid-spring-boot-starterartifactId> dependency> dependencies> project>- 1
- 2
- 3
- 4
- 5
- 6
- 7
- 8
- 9
- 10
- 11
- 12
- 13
- 14
- 15
- 16
- 17
- 18
- 19
- 20
- 21
- 22
- 23
- 24
- 25
- 26
- 27
- 28
- 29
- 30
- 31
- 32
- 33
- 34
- 35
- 36
- 37
- 38
- 39
- 40
- 41
- 42
- 43
- 44
- 45
- 46
- 47
- 48
- 49
- 50
- 51
- 52
- 53
- 54
- 55
- 56
- 57
- 58
- 59
- 60
- 61
- 62
- 63
1.2 yml
server: port: 2001 spring: application: name: seata-order-service cloud: nacos: discovery: server-addr: 192.168.137.110:3333,192.168.137.110:4444,192.168.137.110:5555 datasource: driver-class-name: com.mysql.cj.jdbc.Driver url: jdbc:mysql://192.168.137.110:3306/seata_account?useSSL=true&useUnicode=true&characterEncoding=utf-8&serverTimezone=Asia/Shanghai username: root password: root seata: enabled: true enable-auto-data-source-proxy: true #是否开启数据源自动代理,默认为true tx-service-group: my_test_tx_group #要与配置文件中的vgroupMapping一致 registry: #registry根据seata服务端的registry配置 type: Nacos #默认为file nacos: application: seata-server #配置自己的seata服务 server-addr: 192.168.137.110:3333,192.168.137.110:4444,192.168.137.110:5555 username: nacos password: nacos namespace: "34ebbd28-87c2-4e08-8295-d5873d10f079" cluster: default # 配置自己的seata服务cluster, 默认为 default group: SEATA_GROUP config: type: Nacos #默认file,如果使用file不配置下面的nacos,直接配置seata.service nacos: server-addr: 192.168.137.110:3333,192.168.137.110:4444,192.168.137.110:5555 group: SEATA_GROUP username: nacos password: nacos namespace: "34ebbd28-87c2-4e08-8295-d5873d10f079" dataId: seataServer.properties #配置自己的dataId,由于搭建服务端时把客户端的配置也写在了seataServer.properties,所以这里用了和服务端一样的配置文件,实际客户端和服务端的配置文件分离出来更好 feign: hystrix: enabled: false logging: level: io: seata: info management: endpoints: web: exposure: include: '*'- 1
- 2
- 3
- 4
- 5
- 6
- 7
- 8
- 9
- 10
- 11
- 12
- 13
- 14
- 15
- 16
- 17
- 18
- 19
- 20
- 21
- 22
- 23
- 24
- 25
- 26
- 27
- 28
- 29
- 30
- 31
- 32
- 33
- 34
- 35
- 36
- 37
- 38
- 39
- 40
- 41
- 42
- 43
- 44
- 45
- 46
- 47
- 48
- 49
- 50
- 51
- 52
- 53
- 54
- 55
1.3 启动类
@SpringBootApplication @EnableDiscoveryClient @EnableFeignClients @EnableAutoDataSourceProxy public class SeataOrder2001Starter { public static void main(String[] args) { SpringApplication.run(SeataOrder2001Starter.class, args); } }- 1
- 2
- 3
- 4
- 5
- 6
- 7
- 8
- 9
- 10
- 11
1.4 启动测试


2、订单/库存/账户业务数据库准备
有一个业务需要三个模块:下订单–>扣库存–>减账户(余额)
首先创建好三个数据库
CREATE DATABASE seata_order; CREATE DATABASE seata_storage; CREATE DATABASE seata_account;- 1
- 2
- 3
- 4
- 5
(1)seata_order:存储订单的table
drop table t_order; CREATE TABLE t_order( `id` BIGINT(11) NOT NULL AUTO_INCREMENT PRIMARY KEY, `user_id` BIGINT(11) DEFAULT NULL COMMENT '用户id', `product_id` BIGINT(11) DEFAULT NULL COMMENT '产品id', `count` INT(11) DEFAULT NULL COMMENT '数量', `money` DECIMAL(11,0) DEFAULT NULL COMMENT '金额', `status` INT(1) DEFAULT NULL COMMENT '订单状态:0:创建中; 1:已完结' ) ENGINE=INNODB AUTO_INCREMENT=7 DEFAULT CHARSET=utf8; SELECT * FROM t_order;- 1
- 2
- 3
- 4
- 5
- 6
- 7
- 8
- 9
- 10
- 11
(2)seata_storage:存储库存的table
drop table t_storage; CREATE TABLE t_storage( `id` BIGINT(11) NOT NULL AUTO_INCREMENT PRIMARY KEY, `product_id` BIGINT(11) DEFAULT NULL COMMENT '产品id', `total` INT(11) DEFAULT NULL COMMENT '总库存', `used` INT(11) DEFAULT NULL COMMENT '已用库存', `residue` INT(11) DEFAULT NULL COMMENT '剩余库存' ) ENGINE=INNODB AUTO_INCREMENT=2 DEFAULT CHARSET=utf8; INSERT INTO seata_storage.t_storage(`id`,`product_id`,`total`,`used`,`residue`) VALUES(1, 1, 100, 0, 100); SELECT * FROM t_storage;- 1
- 2
- 3
- 4
- 5
- 6
- 7
- 8
- 9
- 10
- 11
- 12
(3)seata_account: 存储账户信息的table
drop table t_account; CREATE TABLE t_account( `id` BIGINT(11) NOT NULL AUTO_INCREMENT PRIMARY KEY COMMENT 'id', `user_id` BIGINT(11) DEFAULT NULL COMMENT '用户id', `total` DECIMAL(10,0) DEFAULT NULL COMMENT '总额度', `used` DECIMAL(10,0) DEFAULT NULL COMMENT '已用余额', `residue` DECIMAL(10,0) DEFAULT '0' COMMENT '剩余可用额度' ) ENGINE=INNODB AUTO_INCREMENT=2 DEFAULT CHARSET=utf8; INSERT INTO seata_account.t_account(`id`,`user_id`,`total`,`used`,`residue`) VALUES(1, 17241, 1000, 0, 1000); SELECT * FROM t_account;- 1
- 2
- 3
- 4
- 5
- 6
- 7
- 8
- 9
- 10
- 11
(4)按照上述3库分别建对应的回滚日志表
对应的undo_log脚本位置
https://github.com/seata/seata/blob/develop/script/client/at/db/mysql.sql- 1
-- for AT mode you must to init this sql for you business database. the seata server not need it. CREATE TABLE IF NOT EXISTS `undo_log` ( `branch_id` BIGINT NOT NULL COMMENT 'branch transaction id', `xid` VARCHAR(128) NOT NULL COMMENT 'global transaction id', `context` VARCHAR(128) NOT NULL COMMENT 'undo_log context,such as serialization', `rollback_info` LONGBLOB NOT NULL COMMENT 'rollback info', `log_status` INT(11) NOT NULL COMMENT '0:normal status,1:defense status', `log_created` DATETIME(6) NOT NULL COMMENT 'create datetime', `log_modified` DATETIME(6) NOT NULL COMMENT 'modify datetime', UNIQUE KEY `ux_undo_log` (`xid`, `branch_id`) ) ENGINE = InnoDB AUTO_INCREMENT = 1 DEFAULT CHARSET = utf8mb4 COMMENT ='AT transaction mode undo table';- 1
- 2
- 3
- 4
- 5
- 6
- 7
- 8
- 9
- 10
- 11
- 12
- 13
- 14

3、订单/库存/账户业务微服务准备
业务需求:
下订单->减库存->扣余额->改(订单)状态
1、新建三个模块
seata-order-service2001、seata-storage-service2002和seata-account-service2003
order模块作为消费者入口,通过openfeign对库存storage和账户account模块进行调用。
具体的代码为:
https://github.ccom/12722097458/spring-cloud-2022/commit/93e94081160a25ad9a675ae4c91d42b3344d449f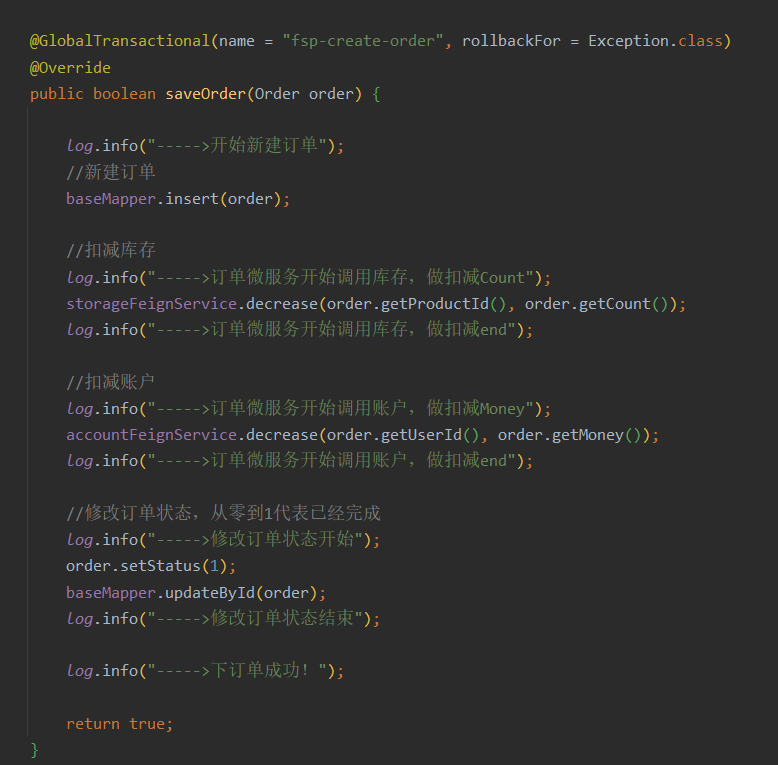
2、分布式事务测试
在库存和账户模块都有一个对当前输入的信息校验功能,如果对应的产品或账户不存在。也就不能够进行update操作。
这里直接抛出RuntimeException
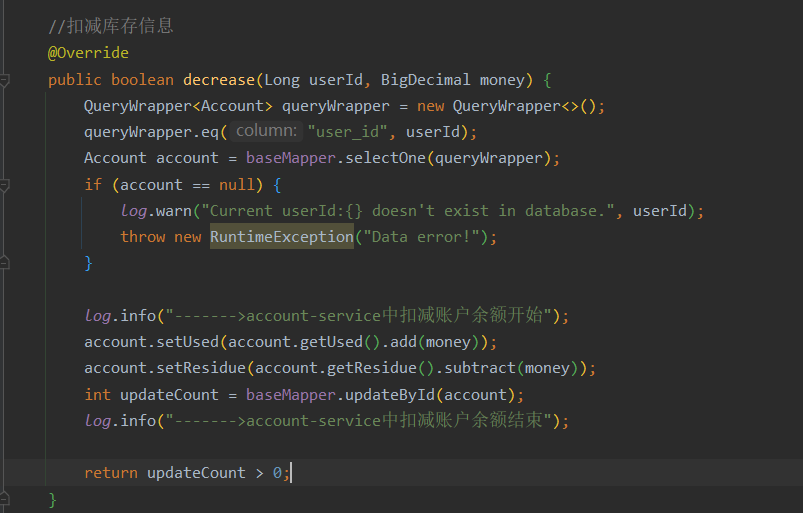
1.1 正常流程测试
初始化表数据为:
(1)t_order没有数据

(2)t_storage的库存为100,这里的productId为1

(3)t_account的账户余额为1000. userId为17241

调用下订单接口:
用户17241买了productId为1的产品1个,花了200。最后执行成功

对应的表数据成功更新:


1.2 异常流程测试
假设输入的用户为1234,在数据库是不存在的。所以下订单->减库存->扣余额->改(订单)状态这个流程中扣余额会抛出异常。
测试看订单t_order和库存t_storage表数据能否回滚。
在下订单的入口已经配置了全局事务的注解,并指定了回滚的异常类型
@GlobalTransactional(name = "fsp-create-order", rollbackFor = Exception.class)- 1
调用下订单接口,userId不存在,抛出异常。调用失败。
最终发现数据成功回滚


C、开发中遇到的BUG
1、application.yml的样式未改变。
(1) 父项目是一个简单的maven项目,不需要引入springboot-parent. 之前直接引入了parent,导致子模块的jar包不能正常引入。子模块pom文件没有正常引入
(2) 配置文件名字错误:写成了appliaction.yml
2、jar包冲突
根目录下莫名多了一个lib包,里面有一些jar,导致和maven仓库里的jar包冲突掉,项目启动失败。删除Lib文件夹。重启解决。
3、无空参构造导致报错
com.fasterxml.jackson.databind.exc.InvalidDefinitionException: Cannot construct instance of
com.ityj.springcloud.entity.model.CommonResult(no Creators, like default constructor, exist): cannot deserialize from Object value (no delegate- or property-based Creator)4、微服务Devtool热部署无法生效
原因是把spring-boot-devtools依赖放到commons模块。但是加了一个 true去掉就可以了。
true表示两个项目之间依赖不传递;不设置optional或者optional是false,表示传递依赖。
5、在zookeeper作为服务注册中心时,servicename大小写必须和配置文件中保持一致
{"code":-1,"msg":"java.lang.IllegalStateException: No instances available for CLOUD-PAYMENT-SERVICE","data":null}- 1
org.springframework.cloud.client.discovery.DiscoveryClient#getInstances
对于zookeeper,大小写敏感
public ZookeeperDependency getDependencyForAlias(final String alias) { for (Map.Entry<String, ZookeeperDependency> zookeeperDependencyEntry : this.dependencies .entrySet()) { if (zookeeperDependencyEntry.getKey().equals(alias)) { return zookeeperDependencyEntry.getValue(); } } return null; }- 1
- 2
- 3
- 4
- 5
- 6
- 7
- 8
- 9
对于eureka,大小写不敏感
public List<InstanceInfo> getInstancesByVirtualHostName(String virtualHostName) { return Optional.ofNullable(this.virtualHostNameAppMap.get(virtualHostName.toUpperCase(Locale.ROOT))) .map(VipIndexSupport::getVipList) .map(AtomicReference::get) .orElseGet(Collections::emptyList); }- 1
- 2
- 3
- 4
- 5
- 6
6、commons模块里引入了actuator的依赖,但是子项目无法访问/actuator/health。 一直404
原因是父项目的依赖添加错误。没有添加成starter…
原来:
<dependency> <groupId>org.springframework.bootgroupId> <artifactId>spring-boot-actuatorartifactId> dependency>- 1
- 2
- 3
- 4
正确的是:
<dependency> <groupId>org.springframework.bootgroupId> <artifactId>spring-boot-starter-actuatorartifactId> dependency>- 1
- 2
- 3
- 4
7、hystrixDashboard无法正常监控其他应用

接口是正常的

解决方法:
在90001dashboard中添加配置:
hystrix: dashboard: proxy-stream-allow-list: "*"- 1
- 2
- 3
重启即可。
8、java.lang.IllegalArgumentException: Source must not be null
原来的代码是:
@Override public PaymentDTO getPaymentById(Long id) { PaymentPO paymentPO = baseMapper.selectById(id); Assert.notNull(paymentPO, "Could not find related info."); BeanUtils.copyProperties(paymentPO, paymentDTO); return paymentDTO; }- 1
- 2
- 3
- 4
- 5
- 6
- 7
报错原因是paymentPO为null。导致BeanUtils.copyProperties出错。添加判断即可
Assert.notNull(paymentPO, "Could not find related info.");- 1
9、Nacos集群启动三个节点,过一会发现只剩两个了。
ps -ef|grep nacos|grep -v grep|wc -l- 1
因为nacos比较占用内存,我启动一个差不多1.5G占用,我的CentOS给了2G内存,所以不够用。
解决:
(1)分配大内存

(2) 调小nacos启动内存参数

(3)还不行就复制三份,修改application.properties的server.port, 分别设置为3333,4444和5555
10、nacos集群结合nginx启动后无法成功代理
报错信息:

原因:nginx配置错误: 名字加了下划线: nacos_cluster
处理:

修改后重启即可。
11、Cloud项目中Nacos2.0.3的nacosClient通过nginx暴露的端口注册nacos集群启动报错。
. ____ _ __ _ _ /\\ / ___'_ __ _ _(_)_ __ __ _ \ \ \ \ ( ( )\___ | '_ | '_| | '_ \/ _` | \ \ \ \ \\/ ___)| |_)| | | | | || (_| | ) ) ) ) ' |____| .__|_| |_|_| |_\__, | / / / / =========|_|==============|___/=/_/_/_/ :: Spring Boot :: (v2.3.12.RELEASE) 2022-07-08 09:31:18.555 INFO 2880 --- [ restartedMain] c.i.s.NacosProvider9002Starter : No active profile set, falling back to default profiles: default 2022-07-08 09:31:19.223 WARN 2880 --- [ restartedMain] o.s.boot.actuate.endpoint.EndpointId : Endpoint ID 'service-registry' contains invalid characters, please migrate to a valid format. 2022-07-08 09:31:19.293 INFO 2880 --- [ restartedMain] o.s.cloud.context.scope.GenericScope : BeanFactory id=d9a0d0be-2f15-378c-a47d-5762f76622d9 2022-07-08 09:31:19.612 INFO 2880 --- [ restartedMain] o.s.b.w.embedded.tomcat.TomcatWebServer : Tomcat initialized with port(s): 9002 (http) 2022-07-08 09:31:19.619 INFO 2880 --- [ restartedMain] o.apache.catalina.core.StandardService : Starting service [Tomcat] 2022-07-08 09:31:19.619 INFO 2880 --- [ restartedMain] org.apache.catalina.core.StandardEngine : Starting Servlet engine: [Apache Tomcat/9.0.46] 2022-07-08 09:31:19.698 INFO 2880 --- [ restartedMain] o.a.c.c.C.[Tomcat].[localhost].[/] : Initializing Spring embedded WebApplicationContext 2022-07-08 09:31:19.698 INFO 2880 --- [ restartedMain] w.s.c.ServletWebServerApplicationContext : Root WebApplicationContext: initialization completed in 1129 ms 2022-07-08 09:31:20.509 INFO 2880 --- [ restartedMain] c.a.n.p.a.s.c.ClientAuthPluginManager : [ClientAuthPluginManager] Load ClientAuthService com.alibaba.nacos.client.auth.impl.NacosClientAuthServiceImpl success. 2022-07-08 09:31:20.510 INFO 2880 --- [ restartedMain] c.a.n.p.a.s.c.ClientAuthPluginManager : [ClientAuthPluginManager] Load ClientAuthService com.alibaba.nacos.client.auth.ram.RamClientAuthServiceImpl success. 2022-07-08 09:31:28.185 INFO 2880 --- [ restartedMain] o.s.b.a.e.web.EndpointLinksResolver : Exposing 18 endpoint(s) beneath base path '/actuator' 2022-07-08 09:31:28.222 INFO 2880 --- [ restartedMain] pertySourcedRequestMappingHandlerMapping : Mapped URL path [/v2/api-docs] onto method [springfox.documentation.swagger2.web.Swagger2ControllerWebMvc#getDocumentation(String, HttpServletRequest)] 2022-07-08 09:31:28.232 WARN 2880 --- [ restartedMain] c.n.c.sources.URLConfigurationSource : No URLs will be polled as dynamic configuration sources. 2022-07-08 09:31:28.232 INFO 2880 --- [ restartedMain] c.n.c.sources.URLConfigurationSource : To enable URLs as dynamic configuration sources, define System property archaius.configurationSource.additionalUrls or make config.properties available on classpath. 2022-07-08 09:31:28.234 WARN 2880 --- [ restartedMain] c.n.c.sources.URLConfigurationSource : No URLs will be polled as dynamic configuration sources. 2022-07-08 09:31:28.234 INFO 2880 --- [ restartedMain] c.n.c.sources.URLConfigurationSource : To enable URLs as dynamic configuration sources, define System property archaius.configurationSource.additionalUrls or make config.properties available on classpath. 2022-07-08 09:31:28.285 INFO 2880 --- [ restartedMain] o.s.s.concurrent.ThreadPoolTaskExecutor : Initializing ExecutorService 'applicationTaskExecutor' 2022-07-08 09:31:28.305 INFO 2880 --- [ restartedMain] o.s.b.d.a.OptionalLiveReloadServer : LiveReload server is running on port 35729 2022-07-08 09:31:28.347 INFO 2880 --- [ restartedMain] o.s.s.c.ThreadPoolTaskScheduler : Initializing ExecutorService 'Nacos-Watch-Task-Scheduler' 2022-07-08 09:31:29.265 ERROR 2880 --- [ restartedMain] c.a.cloud.nacos.discovery.NacosWatch : namingService subscribe failed, properties:NacosDiscoveryProperties{serverAddr='192.168.137.110:1111', endpoint='', namespace='', watchDelay=30000, logName='', service='nacos-payment-provider', weight=1.0, clusterName='DEFAULT', group='DEFAULT_GROUP', namingLoadCacheAtStart='false', metadata={preserved.register.source=SPRING_CLOUD}, registerEnabled=true, ip='192.168.1.3', networkInterface='', port=-1, secure=false, accessKey='', secretKey='', heartBeatInterval=null, heartBeatTimeout=null, ipDeleteTimeout=null, failFast=true} com.alibaba.nacos.api.exception.NacosException: Request nacos server failed: at com.alibaba.nacos.client.naming.remote.gprc.NamingGrpcClientProxy.requestToServer(NamingGrpcClientProxy.java:288) ~[nacos-client-2.1.0.jar:na] at com.alibaba.nacos.client.naming.remote.gprc.NamingGrpcClientProxy.doSubscribe(NamingGrpcClientProxy.java:229) ~[nacos-client-2.1.0.jar:na] at com.alibaba.nacos.client.naming.remote.gprc.NamingGrpcClientProxy.subscribe(NamingGrpcClientProxy.java:214) ~[nacos-client-2.1.0.jar:na] at com.alibaba.nacos.client.naming.remote.NamingClientProxyDelegate.subscribe(NamingClientProxyDelegate.java:147) ~[nacos-client-2.1.0.jar:na] at com.alibaba.nacos.client.naming.NacosNamingService.subscribe(NacosNamingService.java:393) ~[nacos-client-2.1.0.jar:na] at com.alibaba.cloud.nacos.discovery.NacosWatch.start(NacosWatch.java:134) ~[spring-cloud-starter-alibaba-nacos-discovery-2.2.7.RELEASE.jar:2.2.7.RELEASE] at org.springframework.context.support.DefaultLifecycleProcessor.doStart(DefaultLifecycleProcessor.java:182) ~[spring-context-5.2.15.RELEASE.jar:5.2.15.RELEASE] at org.springframework.context.support.DefaultLifecycleProcessor.access$200(DefaultLifecycleProcessor.java:53) ~[spring-context-5.2.15.RELEASE.jar:5.2.15.RELEASE] at org.springframework.context.support.DefaultLifecycleProcessor$LifecycleGroup.start(DefaultLifecycleProcessor.java:360) ~[spring-context-5.2.15.RELEASE.jar:5.2.15.RELEASE] at org.springframework.context.support.DefaultLifecycleProcessor.startBeans(DefaultLifecycleProcessor.java:158) ~[spring-context-5.2.15.RELEASE.jar:5.2.15.RELEASE] at org.springframework.context.support.DefaultLifecycleProcessor.onRefresh(DefaultLifecycleProcessor.java:122) ~[spring-context-5.2.15.RELEASE.jar:5.2.15.RELEASE] at org.springframework.context.support.AbstractApplicationContext.finishRefresh(AbstractApplicationContext.java:895) ~[spring-context-5.2.15.RELEASE.jar:5.2.15.RELEASE] at org.springframework.context.support.AbstractApplicationContext.refresh(AbstractApplicationContext.java:554) ~[spring-context-5.2.15.RELEASE.jar:5.2.15.RELEASE] at org.springframework.boot.web.servlet.context.ServletWebServerApplicationContext.refresh(ServletWebServerApplicationContext.java:143) ~[spring-boot-2.3.12.RELEASE.jar:2.3.12.RELEASE] at org.springframework.boot.SpringApplication.refresh(SpringApplication.java:755) ~[spring-boot-2.3.12.RELEASE.jar:2.3.12.RELEASE] at org.springframework.boot.SpringApplication.refresh(SpringApplication.java:747) ~[spring-boot-2.3.12.RELEASE.jar:2.3.12.RELEASE] at org.springframework.boot.SpringApplication.refreshContext(SpringApplication.java:402) ~[spring-boot-2.3.12.RELEASE.jar:2.3.12.RELEASE] at org.springframework.boot.SpringApplication.run(SpringApplication.java:312) ~[spring-boot-2.3.12.RELEASE.jar:2.3.12.RELEASE] at org.springframework.boot.SpringApplication.run(SpringApplication.java:1247) ~[spring-boot-2.3.12.RELEASE.jar:2.3.12.RELEASE] at org.springframework.boot.SpringApplication.run(SpringApplication.java:1236) ~[spring-boot-2.3.12.RELEASE.jar:2.3.12.RELEASE] at com.ityj.springcloud.NacosProvider9002Starter.main(NacosProvider9002Starter.java:11) ~[classes/:na] at java.base/jdk.internal.reflect.NativeMethodAccessorImpl.invoke0(Native Method) ~[na:na] at java.base/jdk.internal.reflect.NativeMethodAccessorImpl.invoke(NativeMethodAccessorImpl.java:62) ~[na:na] at java.base/jdk.internal.reflect.DelegatingMethodAccessorImpl.invoke(DelegatingMethodAccessorImpl.java:43) ~[na:na] at java.base/java.lang.reflect.Method.invoke(Method.java:566) ~[na:na] at org.springframework.boot.devtools.restart.RestartLauncher.run(RestartLauncher.java:49) ~[spring-boot-devtools-2.3.12.RELEASE.jar:2.3.12.RELEASE] Caused by: com.alibaba.nacos.api.exception.NacosException: Client not connected, current status:STARTING at com.alibaba.nacos.common.remote.client.RpcClient.request(RpcClient.java:651) ~[nacos-client-2.1.0.jar:na] at com.alibaba.nacos.common.remote.client.RpcClient.request(RpcClient.java:631) ~[nacos-client-2.1.0.jar:na] at com.alibaba.nacos.client.naming.remote.gprc.NamingGrpcClientProxy.requestToServer(NamingGrpcClientProxy.java:278) ~[nacos-client-2.1.0.jar:na] ... 25 common frames omitted 2022-07-08 09:31:29.282 INFO 2880 --- [ restartedMain] o.s.b.w.embedded.tomcat.TomcatWebServer : Tomcat started on port(s): 9002 (http) with context path '' 2022-07-08 09:31:29.589 ERROR 2880 --- [ restartedMain] c.a.c.n.registry.NacosServiceRegistry : nacos registry, nacos-payment-provider register failed...NacosRegistration{nacosDiscoveryProperties=NacosDiscoveryProperties{serverAddr='192.168.137.110:1111', endpoint='', namespace='', watchDelay=30000, logName='', service='nacos-payment-provider', weight=1.0, clusterName='DEFAULT', group='DEFAULT_GROUP', namingLoadCacheAtStart='false', metadata={preserved.register.source=SPRING_CLOUD}, registerEnabled=true, ip='192.168.1.3', networkInterface='', port=9002, secure=false, accessKey='', secretKey='', heartBeatInterval=null, heartBeatTimeout=null, ipDeleteTimeout=null, failFast=true}}, com.alibaba.nacos.api.exception.NacosException: Request nacos server failed: at com.alibaba.nacos.client.naming.remote.gprc.NamingGrpcClientProxy.requestToServer(NamingGrpcClientProxy.java:288) ~[nacos-client-2.1.0.jar:na] at com.alibaba.nacos.client.naming.remote.gprc.NamingGrpcClientProxy.doRegisterService(NamingGrpcClientProxy.java:128) ~[nacos-client-2.1.0.jar:na] at com.alibaba.nacos.client.naming.remote.gprc.NamingGrpcClientProxy.registerService(NamingGrpcClientProxy.java:114) ~[nacos-client-2.1.0.jar:na] at com.alibaba.nacos.client.naming.remote.NamingClientProxyDelegate.registerService(NamingClientProxyDelegate.java:94) ~[nacos-client-2.1.0.jar:na] at com.alibaba.nacos.client.naming.NacosNamingService.registerInstance(NacosNamingService.java:145) ~[nacos-client-2.1.0.jar:na] at com.alibaba.cloud.nacos.registry.NacosServiceRegistry.register(NacosServiceRegistry.java:74) ~[spring-cloud-starter-alibaba-nacos-discovery-2.2.7.RELEASE.jar:2.2.7.RELEASE] at org.springframework.cloud.client.serviceregistry.AbstractAutoServiceRegistration.register(AbstractAutoServiceRegistration.java:239) ~[spring-cloud-commons-2.2.9.RELEASE.jar:2.2.9.RELEASE] at com.alibaba.cloud.nacos.registry.NacosAutoServiceRegistration.register(NacosAutoServiceRegistration.java:78) ~[spring-cloud-starter-alibaba-nacos-discovery-2.2.7.RELEASE.jar:2.2.7.RELEASE] at org.springframework.cloud.client.serviceregistry.AbstractAutoServiceRegistration.start(AbstractAutoServiceRegistration.java:138) ~[spring-cloud-commons-2.2.9.RELEASE.jar:2.2.9.RELEASE] at org.springframework.cloud.client.serviceregistry.AbstractAutoServiceRegistration.bind(AbstractAutoServiceRegistration.java:101) ~[spring-cloud-commons-2.2.9.RELEASE.jar:2.2.9.RELEASE] at org.springframework.cloud.client.serviceregistry.AbstractAutoServiceRegistration.onApplicationEvent(AbstractAutoServiceRegistration.java:88) ~[spring-cloud-commons-2.2.9.RELEASE.jar:2.2.9.RELEASE] at org.springframework.cloud.client.serviceregistry.AbstractAutoServiceRegistration.onApplicationEvent(AbstractAutoServiceRegistration.java:47) ~[spring-cloud-commons-2.2.9.RELEASE.jar:2.2.9.RELEASE] at org.springframework.context.event.SimpleApplicationEventMulticaster.doInvokeListener(SimpleApplicationEventMulticaster.java:172) ~[spring-context-5.2.15.RELEASE.jar:5.2.15.RELEASE] at org.springframework.context.event.SimpleApplicationEventMulticaster.invokeListener(SimpleApplicationEventMulticaster.java:165) ~[spring-context-5.2.15.RELEASE.jar:5.2.15.RELEASE] at org.springframework.context.event.SimpleApplicationEventMulticaster.multicastEvent(SimpleApplicationEventMulticaster.java:139) ~[spring-context-5.2.15.RELEASE.jar:5.2.15.RELEASE] at org.springframework.context.support.AbstractApplicationContext.publishEvent(AbstractApplicationContext.java:404) ~[spring-context-5.2.15.RELEASE.jar:5.2.15.RELEASE] at org.springframework.context.support.AbstractApplicationContext.publishEvent(AbstractApplicationContext.java:361) ~[spring-context-5.2.15.RELEASE.jar:5.2.15.RELEASE] at org.springframework.boot.web.servlet.context.WebServerStartStopLifecycle.start(WebServerStartStopLifecycle.java:46) ~[spring-boot-2.3.12.RELEASE.jar:2.3.12.RELEASE] at org.springframework.context.support.DefaultLifecycleProcessor.doStart(DefaultLifecycleProcessor.java:182) ~[spring-context-5.2.15.RELEASE.jar:5.2.15.RELEASE] at org.springframework.context.support.DefaultLifecycleProcessor.access$200(DefaultLifecycleProcessor.java:53) ~[spring-context-5.2.15.RELEASE.jar:5.2.15.RELEASE] at org.springframework.context.support.DefaultLifecycleProcessor$LifecycleGroup.start(DefaultLifecycleProcessor.java:360) ~[spring-context-5.2.15.RELEASE.jar:5.2.15.RELEASE] at org.springframework.context.support.DefaultLifecycleProcessor.startBeans(DefaultLifecycleProcessor.java:158) ~[spring-context-5.2.15.RELEASE.jar:5.2.15.RELEASE] at org.springframework.context.support.DefaultLifecycleProcessor.onRefresh(DefaultLifecycleProcessor.java:122) ~[spring-context-5.2.15.RELEASE.jar:5.2.15.RELEASE] at org.springframework.context.support.AbstractApplicationContext.finishRefresh(AbstractApplicationContext.java:895) ~[spring-context-5.2.15.RELEASE.jar:5.2.15.RELEASE] at org.springframework.context.support.AbstractApplicationContext.refresh(AbstractApplicationContext.java:554) ~[spring-context-5.2.15.RELEASE.jar:5.2.15.RELEASE] at org.springframework.boot.web.servlet.context.ServletWebServerApplicationContext.refresh(ServletWebServerApplicationContext.java:143) ~[spring-boot-2.3.12.RELEASE.jar:2.3.12.RELEASE] at org.springframework.boot.SpringApplication.refresh(SpringApplication.java:755) ~[spring-boot-2.3.12.RELEASE.jar:2.3.12.RELEASE] at org.springframework.boot.SpringApplication.refresh(SpringApplication.java:747) ~[spring-boot-2.3.12.RELEASE.jar:2.3.12.RELEASE] at org.springframework.boot.SpringApplication.refreshContext(SpringApplication.java:402) ~[spring-boot-2.3.12.RELEASE.jar:2.3.12.RELEASE] at org.springframework.boot.SpringApplication.run(SpringApplication.java:312) ~[spring-boot-2.3.12.RELEASE.jar:2.3.12.RELEASE] at org.springframework.boot.SpringApplication.run(SpringApplication.java:1247) ~[spring-boot-2.3.12.RELEASE.jar:2.3.12.RELEASE] at org.springframework.boot.SpringApplication.run(SpringApplication.java:1236) ~[spring-boot-2.3.12.RELEASE.jar:2.3.12.RELEASE] at com.ityj.springcloud.NacosProvider9002Starter.main(NacosProvider9002Starter.java:11) ~[classes/:na] at java.base/jdk.internal.reflect.NativeMethodAccessorImpl.invoke0(Native Method) ~[na:na] at java.base/jdk.internal.reflect.NativeMethodAccessorImpl.invoke(NativeMethodAccessorImpl.java:62) ~[na:na] at java.base/jdk.internal.reflect.DelegatingMethodAccessorImpl.invoke(DelegatingMethodAccessorImpl.java:43) ~[na:na] at java.base/java.lang.reflect.Method.invoke(Method.java:566) ~[na:na] at org.springframework.boot.devtools.restart.RestartLauncher.run(RestartLauncher.java:49) ~[spring-boot-devtools-2.3.12.RELEASE.jar:2.3.12.RELEASE] Caused by: com.alibaba.nacos.api.exception.NacosException: Client not connected, current status:STARTING at com.alibaba.nacos.common.remote.client.RpcClient.request(RpcClient.java:651) ~[nacos-client-2.1.0.jar:na] at com.alibaba.nacos.common.remote.client.RpcClient.request(RpcClient.java:631) ~[nacos-client-2.1.0.jar:na] at com.alibaba.nacos.client.naming.remote.gprc.NamingGrpcClientProxy.requestToServer(NamingGrpcClientProxy.java:278) ~[nacos-client-2.1.0.jar:na] ... 37 common frames omitted 2022-07-08 09:31:29.589 WARN 2880 --- [ restartedMain] ConfigServletWebServerApplicationContext : Exception encountered during context initialization - cancelling refresh attempt: org.springframework.context.ApplicationContextException: Failed to start bean 'webServerStartStop'; nested exception is java.lang.reflect.UndeclaredThrowableException 2022-07-08 09:31:29.590 INFO 2880 --- [ restartedMain] o.s.s.c.ThreadPoolTaskScheduler : Shutting down ExecutorService 'Nacos-Watch-Task-Scheduler' 2022-07-08 09:31:29.893 ERROR 2880 --- [ restartedMain] c.a.cloud.nacos.discovery.NacosWatch : namingService unsubscribe failed, properties:NacosDiscoveryProperties{serverAddr='192.168.137.110:1111', endpoint='', namespace='', watchDelay=30000, logName='', service='nacos-payment-provider', weight=1.0, clusterName='DEFAULT', group='DEFAULT_GROUP', namingLoadCacheAtStart='false', metadata={preserved.register.source=SPRING_CLOUD}, registerEnabled=true, ip='192.168.1.3', networkInterface='', port=9002, secure=false, accessKey='', secretKey='', heartBeatInterval=null, heartBeatTimeout=null, ipDeleteTimeout=null, failFast=true} com.alibaba.nacos.api.exception.NacosException: Request nacos server failed: at com.alibaba.nacos.client.naming.remote.gprc.NamingGrpcClientProxy.requestToServer(NamingGrpcClientProxy.java:288) ~[nacos-client-2.1.0.jar:na] at com.alibaba.nacos.client.naming.remote.gprc.NamingGrpcClientProxy.doUnsubscribe(NamingGrpcClientProxy.java:259) ~[nacos-client-2.1.0.jar:na] at com.alibaba.nacos.client.naming.remote.gprc.NamingGrpcClientProxy.unsubscribe(NamingGrpcClientProxy.java:240) ~[nacos-client-2.1.0.jar:na] at com.alibaba.nacos.client.naming.remote.NamingClientProxyDelegate.unsubscribe(NamingClientProxyDelegate.java:157) ~[nacos-client-2.1.0.jar:na] at com.alibaba.nacos.client.naming.NacosNamingService.unsubscribe(NacosNamingService.java:417) ~[nacos-client-2.1.0.jar:na] at com.alibaba.cloud.nacos.discovery.NacosWatch.stop(NacosWatch.java:177) ~[spring-cloud-starter-alibaba-nacos-discovery-2.2.7.RELEASE.jar:2.2.7.RELEASE] at com.alibaba.cloud.nacos.discovery.NacosWatch.destroy(NacosWatch.java:207) ~[spring-cloud-starter-alibaba-nacos-discovery-2.2.7.RELEASE.jar:2.2.7.RELEASE] at org.springframework.beans.factory.support.DisposableBeanAdapter.destroy(DisposableBeanAdapter.java:199) ~[spring-beans-5.2.15.RELEASE.jar:5.2.15.RELEASE] at org.springframework.beans.factory.support.DefaultSingletonBeanRegistry.destroyBean(DefaultSingletonBeanRegistry.java:587) ~[spring-beans-5.2.15.RELEASE.jar:5.2.15.RELEASE] at org.springframework.beans.factory.support.DefaultSingletonBeanRegistry.destroySingleton(DefaultSingletonBeanRegistry.java:559) ~[spring-beans-5.2.15.RELEASE.jar:5.2.15.RELEASE] at org.springframework.beans.factory.support.DefaultListableBeanFactory.destroySingleton(DefaultListableBeanFactory.java:1092) ~[spring-beans-5.2.15.RELEASE.jar:5.2.15.RELEASE] at org.springframework.beans.factory.support.DefaultSingletonBeanRegistry.destroySingletons(DefaultSingletonBeanRegistry.java:520) ~[spring-beans-5.2.15.RELEASE.jar:5.2.15.RELEASE] at org.springframework.beans.factory.support.DefaultListableBeanFactory.destroySingletons(DefaultListableBeanFactory.java:1085) ~[spring-beans-5.2.15.RELEASE.jar:5.2.15.RELEASE] at org.springframework.context.support.AbstractApplicationContext.destroyBeans(AbstractApplicationContext.java:1061) ~[spring-context-5.2.15.RELEASE.jar:5.2.15.RELEASE] at org.springframework.context.support.AbstractApplicationContext.refresh(AbstractApplicationContext.java:564) ~[spring-context-5.2.15.RELEASE.jar:5.2.15.RELEASE] at org.springframework.boot.web.servlet.context.ServletWebServerApplicationContext.refresh(ServletWebServerApplicationContext.java:143) ~[spring-boot-2.3.12.RELEASE.jar:2.3.12.RELEASE] at org.springframework.boot.SpringApplication.refresh(SpringApplication.java:755) ~[spring-boot-2.3.12.RELEASE.jar:2.3.12.RELEASE] at org.springframework.boot.SpringApplication.refresh(SpringApplication.java:747) ~[spring-boot-2.3.12.RELEASE.jar:2.3.12.RELEASE] at org.springframework.boot.SpringApplication.refreshContext(SpringApplication.java:402) ~[spring-boot-2.3.12.RELEASE.jar:2.3.12.RELEASE] at org.springframework.boot.SpringApplication.run(SpringApplication.java:312) ~[spring-boot-2.3.12.RELEASE.jar:2.3.12.RELEASE] at org.springframework.boot.SpringApplication.run(SpringApplication.java:1247) ~[spring-boot-2.3.12.RELEASE.jar:2.3.12.RELEASE] at org.springframework.boot.SpringApplication.run(SpringApplication.java:1236) ~[spring-boot-2.3.12.RELEASE.jar:2.3.12.RELEASE] at com.ityj.springcloud.NacosProvider9002Starter.main(NacosProvider9002Starter.java:11) ~[classes/:na] at java.base/jdk.internal.reflect.NativeMethodAccessorImpl.invoke0(Native Method) ~[na:na] at java.base/jdk.internal.reflect.NativeMethodAccessorImpl.invoke(NativeMethodAccessorImpl.java:62) ~[na:na] at java.base/jdk.internal.reflect.DelegatingMethodAccessorImpl.invoke(DelegatingMethodAccessorImpl.java:43) ~[na:na] at java.base/java.lang.reflect.Method.invoke(Method.java:566) ~[na:na] at org.springframework.boot.devtools.restart.RestartLauncher.run(RestartLauncher.java:49) ~[spring-boot-devtools-2.3.12.RELEASE.jar:2.3.12.RELEASE] Caused by: com.alibaba.nacos.api.exception.NacosException: Client not connected, current status:STARTING at com.alibaba.nacos.common.remote.client.RpcClient.request(RpcClient.java:651) ~[nacos-client-2.1.0.jar:na] at com.alibaba.nacos.common.remote.client.RpcClient.request(RpcClient.java:631) ~[nacos-client-2.1.0.jar:na] at com.alibaba.nacos.client.naming.remote.gprc.NamingGrpcClientProxy.requestToServer(NamingGrpcClientProxy.java:278) ~[nacos-client-2.1.0.jar:na] ... 27 common frames omitted 2022-07-08 09:31:29.894 INFO 2880 --- [ restartedMain] o.s.s.concurrent.ThreadPoolTaskExecutor : Shutting down ExecutorService 'applicationTaskExecutor' 2022-07-08 09:31:30.639 INFO 2880 --- [ restartedMain] o.apache.catalina.core.StandardService : Stopping service [Tomcat] 2022-07-08 09:31:30.655 INFO 2880 --- [ restartedMain] ConditionEvaluationReportLoggingListener : Error starting ApplicationContext. To display the conditions report re-run your application with 'debug' enabled. 2022-07-08 09:31:30.668 ERROR 2880 --- [ restartedMain] o.s.boot.SpringApplication : Application run failed org.springframework.context.ApplicationContextException: Failed to start bean 'webServerStartStop'; nested exception is java.lang.reflect.UndeclaredThrowableException at org.springframework.context.support.DefaultLifecycleProcessor.doStart(DefaultLifecycleProcessor.java:185) ~[spring-context-5.2.15.RELEASE.jar:5.2.15.RELEASE] at org.springframework.context.support.DefaultLifecycleProcessor.access$200(DefaultLifecycleProcessor.java:53) ~[spring-context-5.2.15.RELEASE.jar:5.2.15.RELEASE] at org.springframework.context.support.DefaultLifecycleProcessor$LifecycleGroup.start(DefaultLifecycleProcessor.java:360) ~[spring-context-5.2.15.RELEASE.jar:5.2.15.RELEASE] at org.springframework.context.support.DefaultLifecycleProcessor.startBeans(DefaultLifecycleProcessor.java:158) ~[spring-context-5.2.15.RELEASE.jar:5.2.15.RELEASE] at org.springframework.context.support.DefaultLifecycleProcessor.onRefresh(DefaultLifecycleProcessor.java:122) ~[spring-context-5.2.15.RELEASE.jar:5.2.15.RELEASE] at org.springframework.context.support.AbstractApplicationContext.finishRefresh(AbstractApplicationContext.java:895) ~[spring-context-5.2.15.RELEASE.jar:5.2.15.RELEASE] at org.springframework.context.support.AbstractApplicationContext.refresh(AbstractApplicationContext.java:554) ~[spring-context-5.2.15.RELEASE.jar:5.2.15.RELEASE] at org.springframework.boot.web.servlet.context.ServletWebServerApplicationContext.refresh(ServletWebServerApplicationContext.java:143) ~[spring-boot-2.3.12.RELEASE.jar:2.3.12.RELEASE] at org.springframework.boot.SpringApplication.refresh(SpringApplication.java:755) ~[spring-boot-2.3.12.RELEASE.jar:2.3.12.RELEASE] at org.springframework.boot.SpringApplication.refresh(SpringApplication.java:747) ~[spring-boot-2.3.12.RELEASE.jar:2.3.12.RELEASE] at org.springframework.boot.SpringApplication.refreshContext(SpringApplication.java:402) ~[spring-boot-2.3.12.RELEASE.jar:2.3.12.RELEASE] at org.springframework.boot.SpringApplication.run(SpringApplication.java:312) ~[spring-boot-2.3.12.RELEASE.jar:2.3.12.RELEASE] at org.springframework.boot.SpringApplication.run(SpringApplication.java:1247) ~[spring-boot-2.3.12.RELEASE.jar:2.3.12.RELEASE] at org.springframework.boot.SpringApplication.run(SpringApplication.java:1236) ~[spring-boot-2.3.12.RELEASE.jar:2.3.12.RELEASE] at com.ityj.springcloud.NacosProvider9002Starter.main(NacosProvider9002Starter.java:11) ~[classes/:na] at java.base/jdk.internal.reflect.NativeMethodAccessorImpl.invoke0(Native Method) ~[na:na] at java.base/jdk.internal.reflect.NativeMethodAccessorImpl.invoke(NativeMethodAccessorImpl.java:62) ~[na:na] at java.base/jdk.internal.reflect.DelegatingMethodAccessorImpl.invoke(DelegatingMethodAccessorImpl.java:43) ~[na:na] at java.base/java.lang.reflect.Method.invoke(Method.java:566) ~[na:na] at org.springframework.boot.devtools.restart.RestartLauncher.run(RestartLauncher.java:49) ~[spring-boot-devtools-2.3.12.RELEASE.jar:2.3.12.RELEASE] Caused by: java.lang.reflect.UndeclaredThrowableException: null at org.springframework.util.ReflectionUtils.rethrowRuntimeException(ReflectionUtils.java:147) ~[spring-core-5.2.15.RELEASE.jar:5.2.15.RELEASE] at com.alibaba.cloud.nacos.registry.NacosServiceRegistry.register(NacosServiceRegistry.java:82) ~[spring-cloud-starter-alibaba-nacos-discovery-2.2.7.RELEASE.jar:2.2.7.RELEASE] at org.springframework.cloud.client.serviceregistry.AbstractAutoServiceRegistration.register(AbstractAutoServiceRegistration.java:239) ~[spring-cloud-commons-2.2.9.RELEASE.jar:2.2.9.RELEASE] at com.alibaba.cloud.nacos.registry.NacosAutoServiceRegistration.register(NacosAutoServiceRegistration.java:78) ~[spring-cloud-starter-alibaba-nacos-discovery-2.2.7.RELEASE.jar:2.2.7.RELEASE] at org.springframework.cloud.client.serviceregistry.AbstractAutoServiceRegistration.start(AbstractAutoServiceRegistration.java:138) ~[spring-cloud-commons-2.2.9.RELEASE.jar:2.2.9.RELEASE] at org.springframework.cloud.client.serviceregistry.AbstractAutoServiceRegistration.bind(AbstractAutoServiceRegistration.java:101) ~[spring-cloud-commons-2.2.9.RELEASE.jar:2.2.9.RELEASE] at org.springframework.cloud.client.serviceregistry.AbstractAutoServiceRegistration.onApplicationEvent(AbstractAutoServiceRegistration.java:88) ~[spring-cloud-commons-2.2.9.RELEASE.jar:2.2.9.RELEASE] at org.springframework.cloud.client.serviceregistry.AbstractAutoServiceRegistration.onApplicationEvent(AbstractAutoServiceRegistration.java:47) ~[spring-cloud-commons-2.2.9.RELEASE.jar:2.2.9.RELEASE] at org.springframework.context.event.SimpleApplicationEventMulticaster.doInvokeListener(SimpleApplicationEventMulticaster.java:172) ~[spring-context-5.2.15.RELEASE.jar:5.2.15.RELEASE] at org.springframework.context.event.SimpleApplicationEventMulticaster.invokeListener(SimpleApplicationEventMulticaster.java:165) ~[spring-context-5.2.15.RELEASE.jar:5.2.15.RELEASE] at org.springframework.context.event.SimpleApplicationEventMulticaster.multicastEvent(SimpleApplicationEventMulticaster.java:139) ~[spring-context-5.2.15.RELEASE.jar:5.2.15.RELEASE] at org.springframework.context.support.AbstractApplicationContext.publishEvent(AbstractApplicationContext.java:404) ~[spring-context-5.2.15.RELEASE.jar:5.2.15.RELEASE] at org.springframework.context.support.AbstractApplicationContext.publishEvent(AbstractApplicationContext.java:361) ~[spring-context-5.2.15.RELEASE.jar:5.2.15.RELEASE] at org.springframework.boot.web.servlet.context.WebServerStartStopLifecycle.start(WebServerStartStopLifecycle.java:46) ~[spring-boot-2.3.12.RELEASE.jar:2.3.12.RELEASE] at org.springframework.context.support.DefaultLifecycleProcessor.doStart(DefaultLifecycleProcessor.java:182) ~[spring-context-5.2.15.RELEASE.jar:5.2.15.RELEASE] ... 19 common frames omitted Caused by: com.alibaba.nacos.api.exception.NacosException: Request nacos server failed: at com.alibaba.nacos.client.naming.remote.gprc.NamingGrpcClientProxy.requestToServer(NamingGrpcClientProxy.java:288) ~[nacos-client-2.1.0.jar:na] at com.alibaba.nacos.client.naming.remote.gprc.NamingGrpcClientProxy.doRegisterService(NamingGrpcClientProxy.java:128) ~[nacos-client-2.1.0.jar:na] at com.alibaba.nacos.client.naming.remote.gprc.NamingGrpcClientProxy.registerService(NamingGrpcClientProxy.java:114) ~[nacos-client-2.1.0.jar:na] at com.alibaba.nacos.client.naming.remote.NamingClientProxyDelegate.registerService(NamingClientProxyDelegate.java:94) ~[nacos-client-2.1.0.jar:na] at com.alibaba.nacos.client.naming.NacosNamingService.registerInstance(NacosNamingService.java:145) ~[nacos-client-2.1.0.jar:na] at com.alibaba.cloud.nacos.registry.NacosServiceRegistry.register(NacosServiceRegistry.java:74) ~[spring-cloud-starter-alibaba-nacos-discovery-2.2.7.RELEASE.jar:2.2.7.RELEASE] ... 32 common frames omitted Caused by: com.alibaba.nacos.api.exception.NacosException: Client not connected, current status:STARTING at com.alibaba.nacos.common.remote.client.RpcClient.request(RpcClient.java:651) ~[nacos-client-2.1.0.jar:na] at com.alibaba.nacos.common.remote.client.RpcClient.request(RpcClient.java:631) ~[nacos-client-2.1.0.jar:na] at com.alibaba.nacos.client.naming.remote.gprc.NamingGrpcClientProxy.requestToServer(NamingGrpcClientProxy.java:278) ~[nacos-client-2.1.0.jar:na] ... 37 common frames omitted 2022-07-08 09:31:30.671 WARN 2880 --- [ Thread-11] c.a.n.common.http.HttpClientBeanHolder : [HttpClientBeanHolder] Start destroying common HttpClient 2022-07-08 09:31:30.671 WARN 2880 --- [ Thread-8] c.a.nacos.common.notify.NotifyCenter : [NotifyCenter] Start destroying Publisher 2022-07-08 09:31:30.671 WARN 2880 --- [ Thread-8] c.a.nacos.common.notify.NotifyCenter : [NotifyCenter] Destruction of the end 2022-07-08 09:31:30.672 WARN 2880 --- [ Thread-11] c.a.n.common.http.HttpClientBeanHolder : [HttpClientBeanHolder] Destruction of the end- 1
- 2
- 3
- 4
- 5
- 6
- 7
- 8
- 9
- 10
- 11
- 12
- 13
- 14
- 15
- 16
- 17
- 18
- 19
- 20
- 21
- 22
- 23
- 24
- 25
- 26
- 27
- 28
- 29
- 30
- 31
- 32
- 33
- 34
- 35
- 36
- 37
- 38
- 39
- 40
- 41
- 42
- 43
- 44
- 45
- 46
- 47
- 48
- 49
- 50
- 51
- 52
- 53
- 54
- 55
- 56
- 57
- 58
- 59
- 60
- 61
- 62
- 63
- 64
- 65
- 66
- 67
- 68
- 69
- 70
- 71
- 72
- 73
- 74
- 75
- 76
- 77
- 78
- 79
- 80
- 81
- 82
- 83
- 84
- 85
- 86
- 87
- 88
- 89
- 90
- 91
- 92
- 93
- 94
- 95
- 96
- 97
- 98
- 99
- 100
- 101
- 102
- 103
- 104
- 105
- 106
- 107
- 108
- 109
- 110
- 111
- 112
- 113
- 114
- 115
- 116
- 117
- 118
- 119
- 120
- 121
- 122
- 123
- 124
- 125
- 126
- 127
- 128
- 129
- 130
- 131
- 132
- 133
- 134
- 135
- 136
- 137
- 138
- 139
- 140
- 141
- 142
- 143
- 144
- 145
- 146
- 147
- 148
- 149
- 150
- 151
- 152
- 153
- 154
- 155
- 156
- 157
- 158
- 159
- 160
- 161
- 162
- 163
- 164
- 165
- 166
- 167
- 168
- 169
- 170
- 171
- 172
- 173
- 174
- 175
- 176
- 177
- 178
- 179
- 180
- 181
- 182
- 183
- 184
- 185
- 186
- 187
- 188
- 189
- 190
- 191
- 192
- 193
- 194
- 195
- 196
- 197
- 198
- 199
- 200
- 201
- 202
- 203
- 204
- 205
- 206
- 207
- 208
- 209
- 210
- 211
- 212

根据官网的意思2.x后需要暴露两个端口,但是我Linux防火墙已经关掉了,并且页面可以正常访问,很奇怪。还没有完美的解决方案。
https://nacos.io/zh-cn/docs/2.0.0-compatibility.html处理方法:
1. 降低nacos.client版本

2.client还是用2xx版本,不适用nginx代理,直接把nacos集群的IP用逗号隔开
暂时用这种吧

12、Sentinel Dashboard 无法监控配置好的服务
最终发现是pom文件有问题,坐标写错了。IDEA也没有标红
错误:
<dependency> <groupId>com.alibaba.cloudgroupId> <artifactId>sentinel-datasource-nacosartifactId> dependency>- 1
- 2
- 3
- 4
正确:
<dependency> <groupId>com.alibaba.cspgroupId> <artifactId>sentinel-datasource-nacosartifactId> dependency>- 1
- 2
- 3
- 4
-
相关阅读:
一篇文告诉你,当贝超短焦激光投影U1研发“内幕”
kotlin学习笔记记录
R函数optim()最小化或者最大化多参数函数
Golang interface 接口的应用场景 使用细节
做点华为云代理业务,挣点小收入
WEB前端网页设计 网页代码参数(背景、图片)类
leetcode做题笔记203. 移除链表元素
创建QDialog工程
postgresql 安装教程
记一次 .NET某MES自动化桌面程序 卡死分析
- 原文地址:https://blog.csdn.net/weixin_44588243/article/details/126089067
