-
初识二叉搜索树
写在前面
我们今天来谈一个比较简单的话题,算是二叉树的进阶,但是里面的内容我们都是说过了,主要是为了后面的比较难得二叉树做准备,先来看看今天的内容吧.
搜索二叉树
这个是我们学习下面AVL树,红黑树的基础,今天的就比较简单了.
什么是 搜索二叉树
这个也可以叫二叉搜索树,反正名字是不重要的,关键是它的条件要求.二叉搜索树又称二叉排序树,它或者是一棵空树,或者是具有以下性质的二叉树:
- 若它的左子树不为空,则左子树上所有节点的值都小于根节点的值
- 若它的右子树不为空,则右子树上所有节点的值都大于根节点的值
- 它的左右子树也分别为二叉搜索树
可以这么说,一般二叉搜索树的中树节点里面的值是不相等的,当然我们也可以存放相等的,那么就变成的另外的一棵树了,这是在后面谈的.

搜索树的时间复杂度
大家看一次名字你就会发现,二叉搜索树,肯定主要的内容是搜索啊,这里我们看一下他们是如何搜索的.
我们拿到一个值,去和根节点去比,入过比他大,就去右子树中找,比他小,就去左子树中找,相等就找到了,这就是二叉搜索的流程.

那么我想问问,它的时间复杂度是多少?大家一看,这不就是查找树的高度次吗,应该是O(lgN)吧?记住,这是搜索二叉树最大为误区,它的时间复杂度是 O(N),主要是这个树太过正常,如果是一颗不正常的树,你就会发现了.

二叉搜索的遍历
要是仔细的朋友,你就会发现,二叉搜索树的中序遍历就是一个升序的数组,这一点也是二叉搜索树的特点.

实现二叉搜索树
我们先来实现一个简单的二叉搜索树,先来看看它的底层是什么样的,后面来更好的了解它的应用.
准备节点
这个倒是挺简单的,一般而言,想这些节点的都是用struct来声明和定义类的,这里我们还用了模板,不过也没有什么可以说的.
template<class T> struct BSTreeNOde { public: BSTreeNOde(const T& x = T()) :left(nullptr) , right(nullptr) , _key(x) { } BSTreeNOde* left; BSTreeNOde* right; T _key; };- 1
- 2
- 3
- 4
- 5
- 6
- 7
- 8
- 9
- 10
- 11
- 12
- 13
- 14
- 15
二叉搜索树
现在我们就可以开始它的是实现了,我们发现,只需要准备一个成员变量来存放根节点就可以了.
template<class T> class BSTree { public: typedef BSTreeNOde<T> Node; // 名字有点 长 public: BSTree() :_root(nullptr) {} private: Node* _root; };- 1
- 2
- 3
- 4
- 5
- 6
- 7
- 8
- 9
- 10
- 11
- 12
- 13
中序遍历
我们先来一个中序遍历,主要是为了后面的插入删除等好验证.
大家先说一下,下面的代码可以吗?
void inorder(Node* root) { if (root == nullptr) return; inorder(root->left); cout << root->_key << " "; inorder(root->right); }- 1
- 2
- 3
- 4
- 5
- 6
- 7
- 8
看着挺行的,里面的考虑的也比较周全,可惜存在一个问题,我们在类外如何调用这个函数要知道,我们是无法拿到根节点的啊,除非你再写一个得到根节点的函数.
这里我们需要在把这个函数封装一层,这样为了更好的使用,下面的才是很可以的
public: void inorder() { _inorderR(_root); } private: void _inorderR(Node* root) { if (root == nullptr) return; _inorderR(root->left); cout << root->_key << " "; _inorderR(root->right); }- 1
- 2
- 3
- 4
- 5
- 6
- 7
- 8
- 9
- 10
- 11
- 12
- 13
- 14
- 15
插入数据
从这里开始就可以变得难一些了,我们需要考虑的事情就有点多了.
这里面存在一个难点,就是我们找到了一个可以插入的玩位置,如何确定父节点,所以这里需要找一个节点记录夫节点,这样才可以.
bool insert(const T& val) { // 头一次 插入 if (_root == nullptr) { _root = new Node(val); return true; } Node* parent = nullptr; Node* cur = _root; while (cur != nullptr) { if (val > cur->_key) { parent = cur; cur = cur->right; } else if (val < cur->_key) { parent = cur; cur = cur->left; } else { // 这里 我们不允许 插入相同的 值 return false; } } // 判断一些插入 左子树 还是 右子树 if (parent->_key < val) parent->right = new Node(val); else parent->left = new Node(val); return true; }- 1
- 2
- 3
- 4
- 5
- 6
- 7
- 8
- 9
- 10
- 11
- 12
- 13
- 14
- 15
- 16
- 17
- 18
- 19
- 20
- 21
- 22
- 23
- 24
- 25
- 26
- 27
- 28
- 29
- 30
- 31
- 32
- 33
- 34
- 35
- 36
- 37
- 38
我们先来验证一下,看看是不是插入成功了.
int main() { BSTree<int> b; int a[] = { 8, 3, 1, 10, 6, 4, 7, 14, 13 }; int sz = sizeof(a) / sizeof(int); for (int i = 0; i < sz; i++) { b.insert(a[i]); } b.inorder(); cout << endl; // 插入个 相同的 b.insert(8); b.inorder(); return 0; }- 1
- 2
- 3
- 4
- 5
- 6
- 7
- 8
- 9
- 10
- 11
- 12
- 13
- 14
- 15
- 16
- 17
- 18

递归版本
这里面递归版本应该是比较难理解,准确说递归的都很难,我们这里来解释一下吧,这里你就会发现引用的好处.
public: bool insertR(const T& val) { return _insertR(_root, val); } private: bool _insertR(Node*& root, const T& val) { if (root == nullptr) { root = new Node(val); } // if (val > root->_key) _insertR(root->right, val); else if (val < root->_key) _insertR(root->left, val); else return false; return true; }- 1
- 2
- 3
- 4
- 5
- 6
- 7
- 8
- 9
- 10
- 11
- 12
- 13
- 14
- 15
- 16
- 17
- 18
- 19
- 20
- 21
- 22
- 23
- 24
- 25
我来解释一下这个函数,主要是这个递归函数.
首先,我们先看最简单的一种情况,第一次插入数据,那么我们要修改的是_root,递归函数函数里面存在的是root,不过不要担心,要知道,我们传入的是参数的别名,所以这里我们可以直接修改.
那么现在就存在下面的一个问题了,我们在其他位置插入数据,我们看一下过程
我们依次递归,直到我们编译器找到root为空时,这样就可以直接赋值,因为root是引用,而且这个引用还确定;了我们插入的是左子树还是右子树.

这里也来验证一下.
int main() { BSTree<int> b; int a[] = { 8, 3, 1, 10, 6, 4, 7, 14, 13 }; int sz = sizeof(a) / sizeof(int); for (int i = 0; i < sz; i++) { b.insertR(a[i]); } b.inorder(); return 0; }- 1
- 2
- 3
- 4
- 5
- 6
- 7
- 8
- 9
- 10
- 11
- 12
- 13

删除数据
删除数据是这里面最难的,我们先来啃一下这个骨头.删除数据分为下面四种情况,其中有着一种情况可以归到其他两种里面的任何一种.
记住,即使是删除节点后,这棵二叉树也应该是二叉搜索树.
- 删除节点 无左子树 和 右子树
- 删除节点 无左子树
- 删除节点 无右子树
- 删除节点 存在左子树 和 右子树
这里面也就第四种情况比较困难,第一中可以归纳到下面的两种的任意一种,这里我们归纳到了无左子树这种了.我们先解决前三中种情况.
先把函数的框架搭出来,我们需要一个节点记录要删除节点的父亲节点.
bool erase(const T& val) { if (_root == nullptr) return false; Node* parent = nullptr; Node* cur = _root; while (cur != nullptr) { if (val > cur->_key) { parent = cur; cur = cur->right; } else if (val < cur) { parent = cur; cur = cur->left; } // 找到了 要删除的节点了 else { // 左子树 为空 或者 左子树 和 右子树 都为空 if (cur->left == nullptr) { } // cur 一个 右为空 else if (cur->right == nullptr) { } // 左子树 和 右子树 都为空 else { } } } return false; }- 1
- 2
- 3
- 4
- 5
- 6
- 7
- 8
- 9
- 10
- 11
- 12
- 13
- 14
- 15
- 16
- 17
- 18
- 19
- 20
- 21
- 22
- 23
- 24
- 25
- 26
- 27
- 28
- 29
- 30
- 31
- 32
- 33
- 34
- 35
- 36
- 37
- 38
- 39
- 40
没有左子树 或者 没有 左子树 和 右子树
// cur 左 右 左一个 为空 或者 都为空 if (cur->left == nullptr) { // 首先 要判断 删除的节点是 头节点 这样 parent = nullptr if (cur == _root) { _root = cur->left; delete cur; return true; } // 判断 要删除的 节点 是 父节点的左子树 还是 右子树 if (cur == parent->left) { // 主意 这里不能置为空 你不确定 cur 有没有 右子树 parent->left = cur->right; } else { parent->right = cur->right; } delete cur; return true; }- 1
- 2
- 3
- 4
- 5
- 6
- 7
- 8
- 9
- 10
- 11
- 12
- 13
- 14
- 15
- 16
- 17
- 18
- 19
- 20
- 21
- 22
- 23
- 24
存在 右子树 但是 不存在 左子树
else if (cur->right == nullptr) { // 还是 要判断的 if (cur == _root) { _root = cur->right; delete cur; return true; } if (cur == parent->left) { parent->left = cur->right; } else { parent->right = cur->right; } delete cur; return true; }- 1
- 2
- 3
- 4
- 5
- 6
- 7
- 8
- 9
- 10
- 11
- 12
- 13
- 14
- 15
- 16
- 17
- 18
- 19
- 20
- 21
既存在左子树又存在右子树,这个情况是二叉搜索树中最难的了,我们需要现象如何来删除这个节点.这里存在两个方法
- 找到要删除节点中左子树 中最大值的节点 ,交换节点的值 删除它
- 找到要删除节点中右子树 中最小值的节点 ,交换节点的值 删除它
这样我们就可以删除我们想要的值了.我们这里是找右节点中最小的值.
else { Node* minParent = cur; Node* minRight = cur->right; while (minRight->left) { minParent = minRight; minRight = minRight->left; } // 交换 或者 直接覆盖 std::swap(minRight->_key, cur->_key); // 删除 所在的节点 if (minParent->left == minRight) { minParent->left = minRight->right; } else { minParent->right = minRight->right; } delete minRight; }- 1
- 2
- 3
- 4
- 5
- 6
- 7
- 8
- 9
- 10
- 11
- 12
- 13
- 14
- 15
- 16
- 17
- 18
- 19
- 20
- 21
- 22
- 23
到这里我们就把删除给写好了,.我们先来测试一下,后面再说递归的版本.
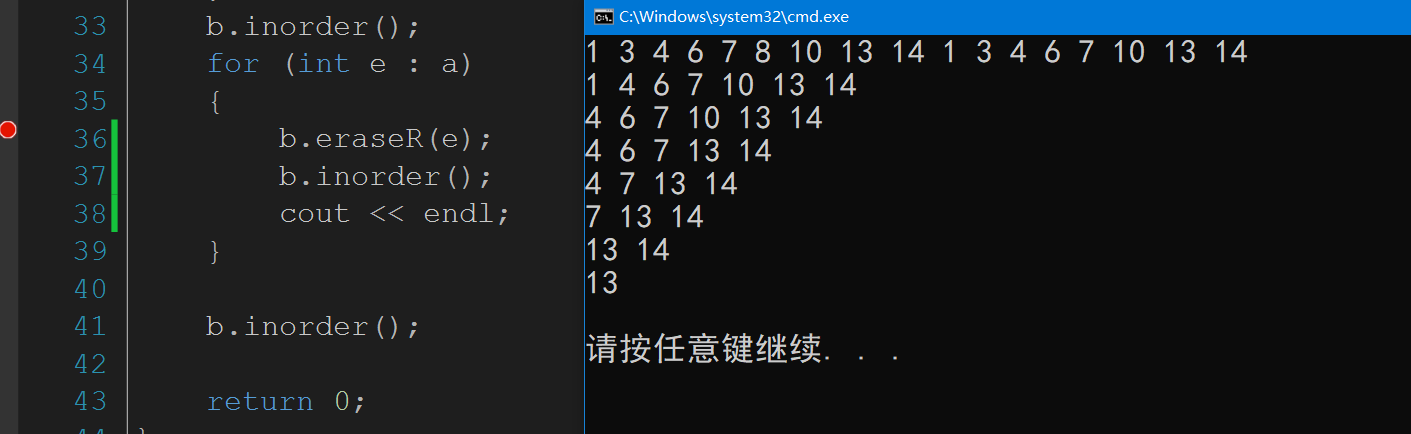
int main() { BSTree<int> b; int a[] = { 8, 3, 1, 10, 6, 4, 7, 14, 13 }; int sz = sizeof(a) / sizeof(int); for (int i = 0; i < sz; i++) { b.insertR(a[i]); } b.inorder(); for (int e : a) { b.erase(e); } b.inorder(); return 0; }- 1
- 2
- 3
- 4
- 5
- 6
- 7
- 8
- 9
- 10
- 11
- 12
- 13
- 14
- 15
- 16
- 17
- 18
- 19
- 20

递归版本
这里面也是一个困难啊,和上面一个递归一样,都使用的引用.这里还需要分为三种情况,不过前提是需要找到删除的节点.
public: bool eraseR(const T& val) { _eraseR(_root, val); } private: bool _eraseR(Node*& root,const T& val) { }- 1
- 2
- 3
- 4
- 5
- 6
- 7
- 8
- 9
- 10
这里面还是分为四种情况,我们直接说吧,都挺简单的,这里面我们可以直接给root赋值原因还是在于我们传入的是引用,这个引用就是父节点的左子树或者右子树,而且还只能唯一确定.

bool _eraseR(Node*& root,const T& val) { if (root == nullptr) { return false; } if (root->_key > val) { _eraseR(root->left, val); } else if (root->_key < val) { _eraseR(root->right, val); } // 找到了 else { // 还分为 四种 情况 if (root->left == nullptr) { Node* cur = root; root = root->right; delete cur; } else if (root->right == nullptr) { Node* cur = root; root = root->left; delete cur; } else { Node* minRight = root->right; while (minRight->left != nullptr) { minRight = minRight->left; } // 这是一个好东西 swap(root->_key, minRight->_key); // 这里 递归 删除 要知道 现在 val所在的节点 一定是 没有左子树的 return _eraseR(root->right, val); } return true; } return false; }- 1
- 2
- 3
- 4
- 5
- 6
- 7
- 8
- 9
- 10
- 11
- 12
- 13
- 14
- 15
- 16
- 17
- 18
- 19
- 20
- 21
- 22
- 23
- 24
- 25
- 26
- 27
- 28
- 29
- 30
- 31
- 32
- 33
- 34
- 35
- 36
- 37
- 38
- 39
- 40
- 41
- 42
- 43
- 44
- 45
- 46
- 47
我们也来验证一下吧.
int main() { BSTree<int> b; int a[] = { 8, 3, 1, 10, 6, 4, 7, 14, 13 }; int sz = sizeof(a) / sizeof(int); for (int i = 0; i < sz; i++) { b.insertR(a[i]); } b.inorder(); for (int e : a) { b.eraseR(e); b.inorder(); cout << endl; } b.inorder(); return 0; }- 1
- 2
- 3
- 4
- 5
- 6
- 7
- 8
- 9
- 10
- 11
- 12
- 13
- 14
- 15
- 16
- 17
- 18
- 19
- 20
- 21
- 22
查找数据
这里的就简单了,我这里也不啰嗦了,直接上代码.
Node* find(const T& key) { if (_root == nullptr) return nullptr; Node* cur = _root; while (cur) { if (key > cur->_key) { cur = cur->right; } else if (key < cur->_key) { cur = cur->left; } else { return cur; } } return nullptr; }- 1
- 2
- 3
- 4
- 5
- 6
- 7
- 8
- 9
- 10
- 11
- 12
- 13
- 14
- 15
- 16
- 17
- 18
- 19
- 20
- 21
- 22
如果你要是这们写这就有问题了,我们拿到了指针,这就意味者我们可以修改节点里面的值,那就麻烦了,因为你不确定你修改过的值还是否构成搜索二叉树.
我们这里改一下节点的值,用const修饰.
template<class T> struct BSTreeNOde { public: BSTreeNOde(const T& x = T()) :left(nullptr) , right(nullptr) , _key(x) { } BSTreeNOde* left; BSTreeNOde* right; const T _key; };- 1
- 2
- 3
- 4
- 5
- 6
- 7
- 8
- 9
- 10
- 11
- 12
- 13
- 14
- 15
但是还是存在问题的 ,想一想,我们在删除数据的时候交换了节点的值,这就出现了另一个问题,因为const修饰的常量就不能被修改了,这里我就不给出解决的代码了,只说下思路.我们还是用const修饰,交换节点的值改成交换节点,当然,他们原本的指向也应该合理的变化.
递归写法
public: Node* findR(const T& key) { return _findR(_root, key); } private: Node* _findR(Node* root,const T& key) { if (root == nullptr) return nullptr; if (key > root->_key) return _findR(root->right,key); else if (key < root->_key) return _findR(root->left, key); else return root; }- 1
- 2
- 3
- 4
- 5
- 6
- 7
- 8
- 9
- 10
- 11
- 12
- 13
- 14
- 15
- 16
- 17
- 18
- 19
- 20
完善一下二叉树搜索树
我们把它的拷贝构造等几个函数给写一下就可以了,这脸都是挺简单的,而且说实话我们也不是太常用.
拷贝构造
我们完善一下代码就可以了
private: Node* CopyTree(Node* root) { if (root == nullptr) { return nullptr; } Node* copyNode = new Node(root->_key); copyNode->left = CopyTree(root->left); copyNode->right = CopyTree(root->right); return copyNode; } public: BSTree(const BSTree<T>& b) :_root(nullptr) { _root = CopyTree(b._root); }- 1
- 2
- 3
- 4
- 5
- 6
- 7
- 8
- 9
- 10
- 11
- 12
- 13
- 14
- 15
- 16
- 17
- 18
- 19
析构函数
private: void DestoryTree(Node* root) { if (root == nullptr) return; DestoryTree(root->left); DestoryTree(root->right); delete root; } public: ~BSTree() { DestoryTree(_root); _root = nullptr; }- 1
- 2
- 3
- 4
- 5
- 6
- 7
- 8
- 9
- 10
- 11
- 12
- 13
- 14
- 15
operator=
BSTree<T>& operator=(BSTree b) { swap(_root, b._root); return *this; }- 1
- 2
- 3
- 4
- 5
我们这里来测试一下就好了,没有什么可以谈的.
int main() { BSTree<int> b1; int a[] = { 8, 3, 1, 10, 6, 4, 7, 14, 13 }; int sz = sizeof(a) / sizeof(int); for (int i = 0; i < sz; i++) { b1.insertR(a[i]); } BSTree<int> b2(b1); // 拷贝构造 BSTree<int> b3; b3 = b1; // operater = b2.inorder(); cout << endl; b3.inorder(); cout << endl; return 0; }- 1
- 2
- 3
- 4
- 5
- 6
- 7
- 8
- 9
- 10
- 11
- 12
- 13
- 14
- 15
- 16
- 17
- 18
- 19
- 20
- 21
- 22
- 23

应用
相比较其他的,我这里更想谈谈它的应用.
K模型
K模型即只有key作为关键码,结构中只需要存储Key即可,关键码即为需要搜索到的值 .我们的英语字典就可以,我们可以把英语字典的词放在一个二叉搜索树中,这样就可以检擦一个单词是不是拼写正确.我们上面实现的就是这个模型,后面的set也是这个模型.
KV模型
每一个关键码key,都有与之对应的值Value,即
比如英汉词典就是英文与中文的对应关系,通过英文可以快速找到与其对应的中文,英文单词与其对应的中文 -
相关阅读:
maya遇到渲染慢渲染卡顿问题怎么办?
[PAT练级笔记] 19 Basic Level 1019 数字黑洞
软件测试用例设计练习
MATLAB——RBF、GRNN和PNN神经网络案例参考程序
创作者基金会 6 月份亮点
当我们写下一个 int a 后计算机发生了什么?
C语言的特点
【实战项目】自主web服务器
【第100题】JAVA高级技术-网络编程19(简易聊天室14:聊天室客户端)
CSS的布局 Day03
- 原文地址:https://blog.csdn.net/m0_61334618/article/details/126064853
