-
10.第十部分 Scrapy框架
文章目录
- 第十部分 Scrapy 框架
- 知识点一 : Scrapy 框架 释义
- 知识点二 : Scrapy 框架 学习目的
- 知识点三 : Scrapy框架 安装
- 知识点四 : Scrapy框架 入门使用
- 知识点五 : Scrapy框架 提取数据
- 知识点六 : Scrapy框架 存储数据
- 知识点七 : Scrapy框架 整体流程
- 知识点八 : Scrapy框架 数据多次下载
- 知识点九 : 案例-GET请求爬取某瓣电影Top250
- 知识点十 : 案例-POST请求爬取蔬菜价格信息
- 知识点十一 : Scrapy框架 暂停和恢复
- 知识点十二 : Scrapy框架 分布式爬虫
- 知识点十三 : Scrapy框架 项目部署
第十部分 Scrapy 框架
知识点一 : Scrapy 框架 释义
1.Scrapy 框架是一个为了爬取网站数据, 提取结构性数据而编写的应用框架, 我们只需要实现少量的代码, 就能快速抓取网站数据.
2.Scrapy 框架使用了 Twisted 异步网络框架, 可以加快我们的下载速度.
知识点二 : Scrapy 框架 学习目的
1.普通爬虫 (requests, Xpath, selenium等) 爬取单一固定页面游刃有余, 但是爬取嵌套页面较为乏力. 而 Scrapy 框架能够满足我们对嵌套页面爬取的需求.
2.Scrapy 框架能够提高我们的爬虫效率, 让开发过程更加方便快速.
知识点三 : Scrapy框架 安装
# Scrapy 框架安装命令 pip install scrapy -i https://pypi.tuna.tsinghua.edu.cn/simple- 1
- 2

知识点四 : Scrapy框架 入门使用
1.需求 : 爬取 百度首页
2.流程 :
2.1 在终端使用命令进入到一个空文件夹:cd ..\..\..
2.2 在空文件夹路径下使用命令新建一个 Scrapy 项目:scrapy startproject <项目名>
2.3 进入新创建的项目:cd <项目名>
2.4 在项目中生成一个爬虫:scrapy genspider <爬虫名> <允许爬取的域名>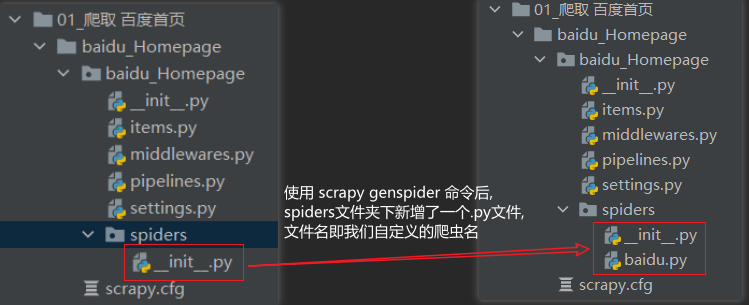

2.5 运行刚刚生成的爬虫:
scrapy crawl <爬虫名>
知识点五 : Scrapy框架 提取数据
1.parse函数 response响应对象的常用属性
属性 作用 response.url 当前响应的 url 地址 response.request.url 当前响应 对应的请求的 url 地址 response.headers 响应头 response.request.headers 当前响应的 请求头 response.body 响应体 ( 即 html 代码, 类型为 byte 类型 ) response.status 响应状态码
import scrapy class BaiduSpider(scrapy.Spider): # 1.name:自定义的爬虫项目名称 name = 'baidu' # 2.allowed_domains:允许爬取的域名 allowed_domains = ['www.baidu.com'] # 3.start_urls:启动时最开始爬取的url start_urls = ['http://www.baidu.com/'] # 4.parse(解析) 函数: 用于数据的处理 def parse(self, response): # 5.response 响应对象的常见属性 print("----------->", response) print("-----------1>", response.url) print("-----------2>", response.headers) # 在响应头中可以提取cookie print("-----------3>", response.body) # 在响应体中国可以提取数据内容 print("-----------4>", response.status)- 1
- 2
- 3
- 4
- 5
- 6
- 7
- 8
- 9
- 10
- 11
- 12
- 13
- 14
- 15
- 16
- 17
- 18
- 19
- 20
- 21
- 22
- 23
- 24
2.parse函数 提取某蜓FM网站排行榜数据
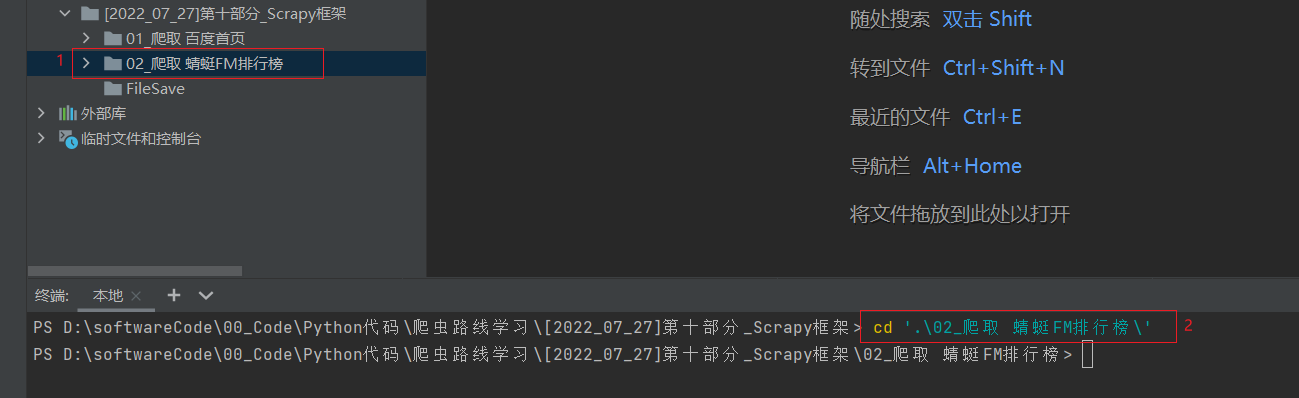
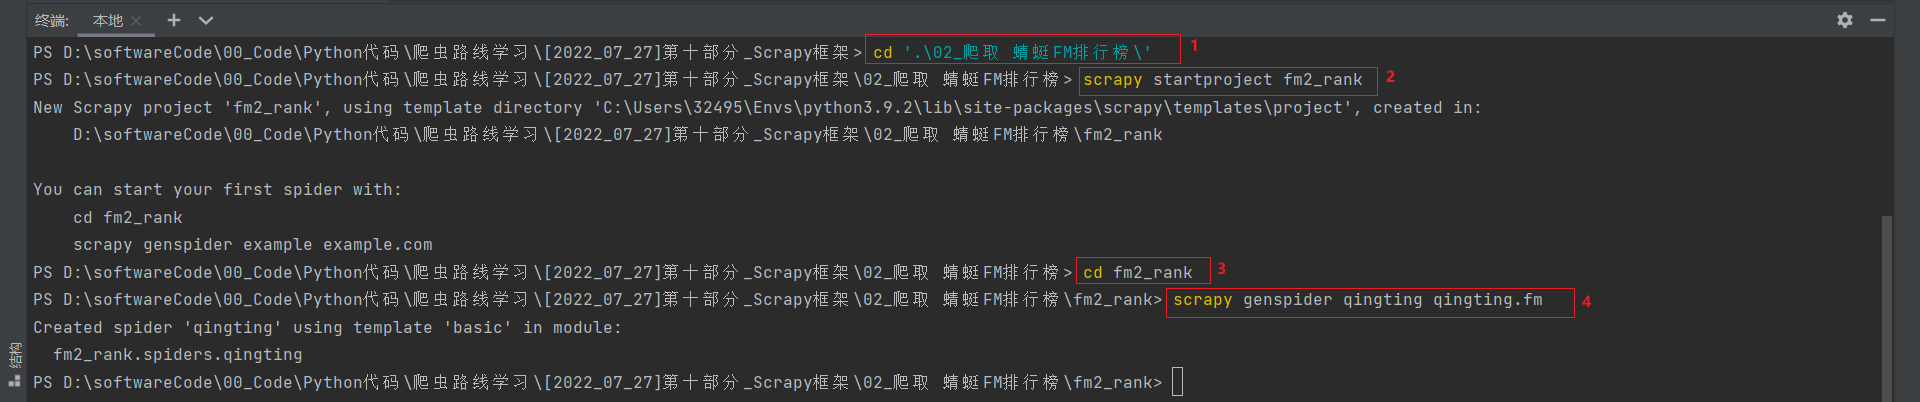
2.1 第一步 : 新建并进入文件夹
在 [2022_07_27]第十部分_Scrapy框架文件夹下创建一个新文件夹, 命名为02_爬取 蜻蜓FM排行榜, 完成之后在终端使用命令进入到02_爬取 蜻蜓FM排行榜文件夹中.
2.2 第二步 : 新建并进入项目

2.3 第三步 : 新建爬虫并修改爬取地址
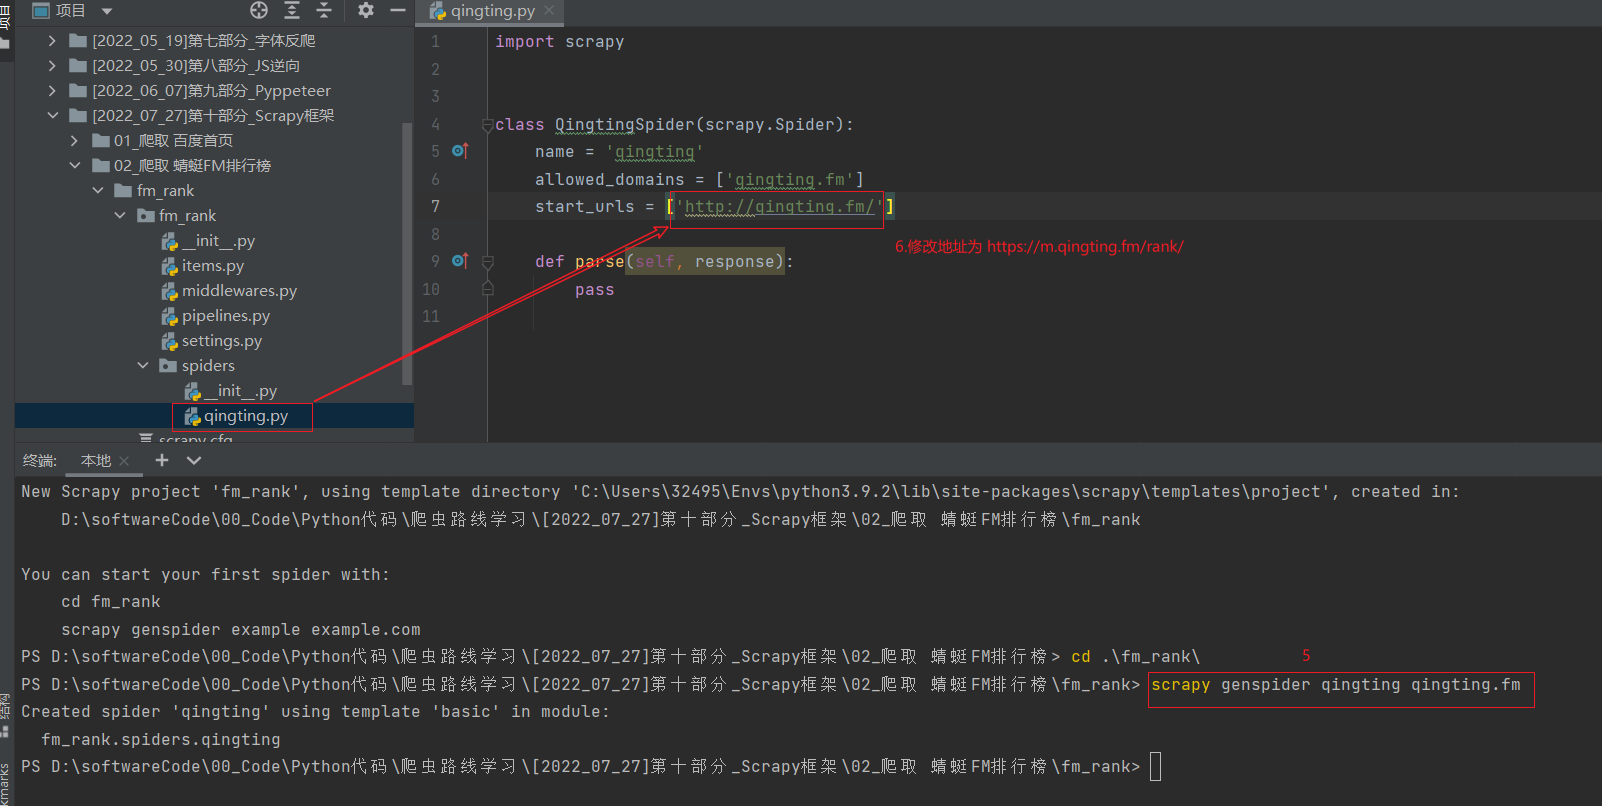
2.4 第四步 : 代码实现提取数据并运行爬虫
import scrapy class QingtingSpider(scrapy.Spider): name = 'qingting' allowed_domains = ['qingting.fm'] start_urls = ['https://m.qingting.fm/rank/'] def parse(self, response): # 1.存储提取到的30个a标签组成的列表对象 a_list = response.xpath("//div[@class='rank-list']/a") # 2.使用for循环依次处理每一个a标签对象 for a_temp in a_list: # 2.1 排名 rank_number = a_temp.xpath("./div[@class='badge']/text()") # 2.2 图片地址 img_src = a_temp.xpath("./img/@src") # 2.3 标题 title = a_temp.xpath(".//div[@class='title']/text()") # 2.4 简介 desc = a_temp.xpath(".//div[@class='desc']/text()") # 2.5 播放量 play_number = a_temp.xpath(".//div[@class='info-item'][1]/span/text()") # 2.6 方法一: 直接返回一个类似 list 的类型 # print("--------------->", rank_number, img_src, title, desc, play_number) # 2.6 方法二: 使用extract(),返回一个含有字符串的列表 # print("--------------->", rank_number.extract(), img_src.extract(), title.extract(), desc.extract(), play_number.extract()) # 2.6 方法三(推荐): 使用extract_first(),返回列表这个的第一个字符串,列表为空则返回None print("--------------->", rank_number.extract_first(), img_src.extract_first(), title.extract_first(), desc.extract_first(), play_number.extract_first())- 1
- 2
- 3
- 4
- 5
- 6
- 7
- 8
- 9
- 10
- 11
- 12
- 13
- 14
- 15
- 16
- 17
- 18
- 19
- 20
- 21
- 22
- 23
- 24
- 25
- 26
- 27
- 28
- 29
- 30
- 31
- 32
- 33
- 34
- 35
- 36

知识点六 : Scrapy框架 存储数据
第一步 : 取消 settings.py 文件中被注释掉的代码

第二步 : 在工程文件中添加上 yield 对象

Q: 为什么使用 yield 而非 return ?
A: 第一个原因是使用 return 则需要用一个列表去接收想要传递的数据,会占用较高的内存;第二个原因是使用return接收,for循环执行时其他任务无法执行,而通过 yield 能够将运行权限交给其他的协程任务去执行, 整个程序效率会更高.Q: yield能传递的对象有哪些?
A: 解析函数中的yield能够传递的对象只能是 : Baseltem, Request, dict, None第三步 : 在管道文件中添加具体存储数据的细节

知识点七 : Scrapy框架 整体流程
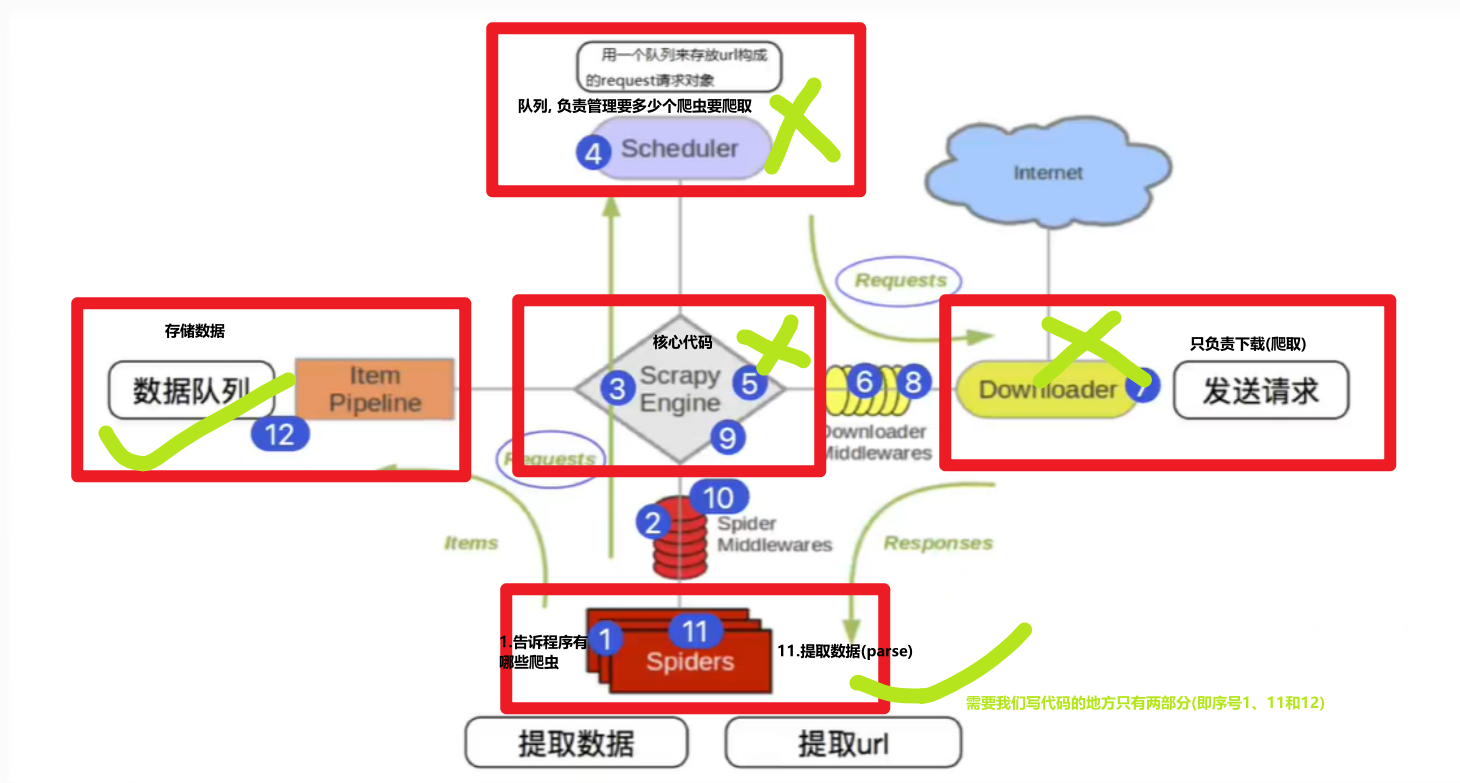
上图1~12序号对应的释义如下:
① Scrapy 从 Spider(蜘蛛) 子类中提取 start_urls, 然后构造为 request 请求对象;
② 将 request 请求对象传递给爬虫中间件
③ 将 request 请求对象传递给 Scrapy 引擎 (即核心代码)
④ 将 request 请求对象传递给调度器 (调度器负责多个request的安排, 好比交警负责交通的指挥, 避免道路拥堵)
⑤ 将 request 请求对象传递给 Scrapy 引擎
⑥ Scrapy 引擎将 request 请求对象传递给下载中间件 (可以更换代理IP, 更换Cookies, 更换User-Agent, 自动重试等)
⑦ request请求对象传给到下载器 (它通过异步的发送HTTP(s)请求), 得到响应封装为 response 对象
⑧ 将 response 对象传递给下载中间件
⑨ 下载中间件将 response 对象传递给 Scrapy 引擎
⑩ Scrapy 引擎将 response 对象传递给爬虫中间件 (这里可以处理异常等情况)
⑪ 爬虫对象中的 parse 函数被调用 (在这里可以对得到的 response 对象进行处理, 例如用 status 得到响应状态码,Xpath表达式提取数据)
⑫ 将提取到的数据传递给 Scrapy 引擎, 它将数据再传递给管道 (在管道中我们可以将数据存储到 csv、MongoDB、MySQL 等)
知识点八 : Scrapy框架 数据多次下载
需求 : 使用 Scrapy 框架爬取 蜻蜓FM听书排行榜前30名书籍相关数据并下载对应的书籍对应封面.
第一步 : 配置 Scrapy 框架所需前置准备
第二步 : 配置 qingting.py 文件
import scrapy class QingtingSpider(scrapy.Spider): name = 'qingting' # 设置起始域名为空,目的是防止yield scrapy.Requeste()不能把数据传到下一个解析函数日志报错:DEBUG: Filtered offsite request to xxx allowed_domains = [] start_urls = ['https://m.qingting.fm/rank/'] def parse(self, response): # 1.存储提取到的30个a标签组成的列表对象 a_list = response.xpath("//div[@class='rank-list']/a") # 2.使用for循环依次处理每一个a标签对象 for a_temp in a_list: # 2.1 排名 rank_number = a_temp.xpath("./div[@class='badge']/text()").extract_first() # 2.2 图片地址 img_src = a_temp.xpath("./img/@src").extract_first() # 2.3 标题 title = a_temp.xpath(".//div[@class='title']/text()").extract_first() # 2.4 简介 desc = a_temp.xpath(".//div[@class='desc']/text()").extract_first() # 2.5 播放量 play_number = a_temp.xpath(".//div[@class='info-item'][1]/span/text()").extract_first() # 2.6 使用extract_first(),返回列表这个的第一个字符串,列表为空则返回None # print("--------------->", rank_number.extract_first(), img_src.extract_first(), title.extract_first(), desc.extract_first(), play_number.extract_first()) # 生成的是信息 (需要在管道中进行处理) yield { "type": "info", "rank_number": rank_number, "img_src": img_src, "title": title, "desc": desc, "play_number": play_number } # 生成了一个请求对象 yield scrapy.Request(url=img_src, callback=self.parse_img, cb_kwargs={"img_name": title}) def parse_img(self, response, img_name): print("---2-->", response.url) # 图片的二进制数据:response.body yield { "type": "img", "img_name": img_name + ".png", "img_bytes": response.body }- 1
- 2
- 3
- 4
- 5
- 6
- 7
- 8
- 9
- 10
- 11
- 12
- 13
- 14
- 15
- 16
- 17
- 18
- 19
- 20
- 21
- 22
- 23
- 24
- 25
- 26
- 27
- 28
- 29
- 30
- 31
- 32
- 33
- 34
- 35
- 36
- 37
- 38
- 39
- 40
- 41
- 42
- 43
- 44
- 45
- 46
- 47
- 48
- 49
- 50
- 51
- 52
- 53
- 54
- 55
Q: 是否可以有多个 parse 函数?
A: 可以, 只要处理的回调函数当中有新的请求发生, 我们将来就可以进行下载.第三步 : 配置 settings.py 文件


第四步 : 配置 pipelines.py 文件
# Define your item pipelines here # # Don't forget to add your pipeline to the ITEM_PIPELINES setting # See: https://docs.scrapy.org/en/latest/topics/item-pipeline.html # useful for handling different item types with a single interface from itemadapter import ItemAdapter class Fm2RankPipeline: def process_item(self, item, spider): # 提取类型 msg_type = item.get("type") if msg_type == "img": # 如果 item 中存储的是图片二进制等数据, 则应创建一个文件,然后将二进制输入写入到文件, 即可完成图片的保存 # "w":文本写入; "wb":二进制写入 print("正在保存到图片文件...") path = item.get("img_name").replace('?', '').replace('*', '').replace('<', '').replace('> ', '').replace('|', ' ') print(path) with open(path, "wb") as fp: fp.write(item.get("img_bytes")) elif msg_type == "info": # 可以将30条信息存储到CSV文件 print("正在存储到文件...") with open("./qingting.csv", "a") as fp: fp.write(item.get("rank_number")) fp.write(item.get("title")) fp.write(item.get("desc")) fp.write(item.get("play_number")) fp.write("\n")- 1
- 2
- 3
- 4
- 5
- 6
- 7
- 8
- 9
- 10
- 11
- 12
- 13
- 14
- 15
- 16
- 17
- 18
- 19
- 20
- 21
- 22
- 23
- 24
- 25
- 26
- 27
- 28
- 29
- 30
- 31
- 32
- 33
第五步 : 运行 Scrapy 框架下的爬虫项目

知识点九 : 案例-GET请求爬取某瓣电影Top250
① (软件) 新建文件夹
创建一个文件夹命名为 03_爬取豆瓣电影Top250
② (终端) 进入文件夹
在终端通过命令进入文件夹03_爬取豆瓣电影Top250
PS D:\...\[2022_07_27]第十部分_Scrapy框架> cd .\03_爬取豆瓣电影Top250\ PS D:\...\[2022_07_27]第十部分_Scrapy框架\03_爬取豆瓣电影Top250>- 1
- 2
③ (终端) 新建项目
在终端通过命令终端新建一个 Scrapy 项目
PS D:\...\[2022_07_27]第十部分_Scrapy框架\03_爬取豆瓣电影Top250> scrapy startproject douban New Scrapy project 'douban', using template directory 'C:\Users\32495\Envs\python3.9.2\lib\site-packages\scrapy\templates\project', created in: D:\softwareCode\00_Code\Python代码\爬虫路线学习\[2022_07_27]第十部分_Scrapy框架\03_爬取豆瓣电影Top250\douban You can start your first spider with: cd douban scrapy genspider example example.com PS D:\...\[2022_07_27]第十部分_Scrapy框架\03_爬取豆瓣电影Top250>- 1
- 2
- 3
- 4
- 5
- 6
- 7
- 8
④ (终端) 进入刚刚新建的 Scrapy 项目
PS D:\...\[2022_07_27]第十部分_Scrapy框架\03_爬取豆瓣电影Top250> cd .\douban\ PS D:\...\[2022_07_27]第十部分_Scrapy框架\03_爬取豆瓣电影Top250\douban>- 1
- 2
⑤ (终端) 在新建的 Scrapy 项目下生成一个爬虫
PS D:\...\[2022_07_27]第十部分_Scrapy框架\03_爬取豆瓣电影Top250\douban> scrapy genspider top250 douban.com Created spider 'top250' using template 'basic' in module: douban.spiders.top250 PS D:\...\[2022_07_27]第十部分_Scrapy框架\03_爬取豆瓣电影Top250\douban>- 1
- 2
- 3
- 4
⑥ (代码) 配置 spiders\top250.py文件 : 提取数据
# -*-coding:utf-8 -*- import scrapy class Top250Spider(scrapy.Spider): name = 'top250' # allowed_domains = [] allowed_domains = ['douban.com', 'doubanio.com'] start_urls = ['https://movie.douban.com/top250?start=0&filter='] # 记录当前要爬取的页数 page = 1 def parse(self, response): print("----回调函数被执行----") # 对start_urls中的url对应的响应进行处理 # response.url/headers/body/request.url/status li_list = response.xpath("//ol[@class='grid_view']/li") for li_temp in li_list: rank = li_temp.xpath(".//div[@class='pic']/em/text()").extract_first() title = li_temp.xpath(".//span[@class='title'][1]/text()").extract_first() rating_num = li_temp.xpath(".//span[@class='rating_num']/text()").extract_first() people_num = li_temp.xpath(".//div[@class='star']/span[4]/text()").extract_first() img_src = li_temp.xpath(".//img/@src").extract_first() print("-------->", rank, title, rating_num, people_num, img_src) # 传递给 pipelines 文件里面的存储代码去执行 # 生成信息,用来传递给管道让其保存到CSV文件 yield { "type": "info", "rank": rank, "title": title, "rating_num": rating_num, "people_num": people_num, "img_src": img_src } # 生成新的Request对象 (实现下载图片) yield scrapy.Request(url=img_src, callback=self.parse_img, cb_kwargs={"img_name": title}) # 翻页操作 (提取下一页URL) # next_page_url = response.xpath("//[@class='next']/a/@href").extract_first() # next_page_url = "https://movie.douban.com/top250" + next_page_url # 生成下一页的地址 self.page += 1 if self.page <= 10: next_page_url = "https://movie.douban.com/top250?start=%d&filter=" % ((self.page-1) * 25) yield scrapy.Request(url=next_page_url, callback=self.parse) def parse_img(self, response, img_name): print("------图片处理的回调函数------") # 生成图片信息 yield { "type": "img", "img_name": img_name + ".jpg", "img_bytes": response.body }- 1
- 2
- 3
- 4
- 5
- 6
- 7
- 8
- 9
- 10
- 11
- 12
- 13
- 14
- 15
- 16
- 17
- 18
- 19
- 20
- 21
- 22
- 23
- 24
- 25
- 26
- 27
- 28
- 29
- 30
- 31
- 32
- 33
- 34
- 35
- 36
- 37
- 38
- 39
- 40
- 41
- 42
- 43
- 44
- 45
- 46
- 47
- 48
- 49
- 50
- 51
- 52
- 53
- 54
- 55
- 56
- 57
- 58
- 59
- 60
- 61
- 62
⑦ (代码) 配置 douban\pipelines.py文件 : 存储数据
# -*-coding:utf-8 -*- # Define your item pipelines here # # Don't forget to add your pipeline to the ITEM_PIPELINES setting # See: https://docs.scrapy.org/en/latest/topics/item-pipeline.html # useful for handling different item types with a single interface import csv import os from itemadapter import ItemAdapter class DoubanPipeline: def process_item(self, item, spider): # 判断是否存在download文件夹,如果没有则创建 download_path = os.getcwd() + "/download/" # 当前文件夹下的download文件夹 if not os.path.exists(download_path): # 判断文件夹或文件 os.makedirs(download_path) msg_type = item.get("type") if msg_type == "info": # 信息 # 如果类型是信息,则保存到csv文件 with open(download_path + "豆瓣电影Top250.csv", "a") as f: # 创建一个csv的DictWriter对象,这样才能够将写入csv格式数据到这个文件 f_csv = csv.DictWriter(f, ["rank", "title", "rating_num", "people_num", "img_src"]) # 写入多行行 (当做数据) item.pop("type") # 删除type 这个key-value f_csv.writerows([item]) print("保存信息到CSV...ok") elif msg_type == "img": # 存储图片 with open(download_path + item.get("img_name"), "wb") as f: f.write(item.get("img_bytes")) print("保存图片到本地...ok") return item- 1
- 2
- 3
- 4
- 5
- 6
- 7
- 8
- 9
- 10
- 11
- 12
- 13
- 14
- 15
- 16
- 17
- 18
- 19
- 20
- 21
- 22
- 23
- 24
- 25
- 26
- 27
- 28
- 29
- 30
- 31
- 32
- 33
- 34
- 35
- 36
- 37
- 38
- 39
- 40
- 41
- 42
⑧ (代码) 配置 douban\middlewares.py文件 : 中间件伪装爬虫
# Define here the models for your spider middleware # # See documentation in: # https://docs.scrapy.org/en/latest/topics/spider-middleware.html import random from scrapy import signals # useful for handling different item types with a single interface from itemadapter import is_item, ItemAdapter class DoubanSpiderMiddleware: # Not all methods need to be defined. If a method is not defined, # scrapy acts as if the spider middleware does not modify the # passed objects. @classmethod def from_crawler(cls, crawler): # This method is used by Scrapy to create your spiders. s = cls() crawler.signals.connect(s.spider_opened, signal=signals.spider_opened) return s def process_spider_input(self, response, spider): # Called for each response that goes through the spider # middleware and into the spider. # Should return None or raise an exception. return None def process_spider_output(self, response, result, spider): # Called with the results returned from the Spider, after # it has processed the response. # Must return an iterable of Request, or item objects. for i in result: yield i def process_spider_exception(self, response, exception, spider): # Called when a spider or process_spider_input() method # (from other spider middleware) raises an exception. # Should return either None or an iterable of Request or item objects. pass def process_start_requests(self, start_requests, spider): # Called with the start requests of the spider, and works # similarly to the process_spider_output() method, except # that it doesn’t have a response associated. # Must return only requests (not items). for r in start_requests: yield r def spider_opened(self, spider): spider.logger.info('Spider opened: %s' % spider.name) class DoubanDownloaderMiddleware: # Not all methods need to be defined. If a method is not defined, # scrapy acts as if the downloader middleware does not modify the # passed objects. @classmethod def from_crawler(cls, crawler): # This method is used by Scrapy to create your spiders. s = cls() crawler.signals.connect(s.spider_opened, signal=signals.spider_opened) return s def process_request(self, request, spider): # Called for each request that goes through the downloader # middleware. # Must either: # - return None: continue processing this request # - or return a Response object # - or return a Request object # - or raise IgnoreRequest: process_exception() methods of # installed downloader middleware will be called return None def process_response(self, request, response, spider): # Called with the response returned from the downloader. # Must either; # - return a Response object # - return a Request object # - or raise IgnoreRequest return response def process_exception(self, request, exception, spider): # Called when a download handler or a process_request() # (from other downloader middleware) raises an exception. # Must either: # - return None: continue processing this exception # - return a Response object: stops process_exception() chain # - return a Request object: stops process_exception() chain pass def spider_opened(self, spider): spider.logger.info('Spider opened: %s' % spider.name) # 操作:自定义User-Agent中间件(中间件:简单来理解即用来伪装Scrapy的一个步骤,用代码来实现) class UserAgentMiddleware(object): # 定义一个列表,其中包含大量浏览器的版本信息(User-Agent池) USER_AGENTS_LIST = [ 'Mozilla/5.0 (Macintosh; Intel Mac OS X 10_6_0) AppleWebKit/537.4 (KHTML, like Gecko) Chrome/22.0.1229.79 Safari/537.4', 'Mozilla/5.0 (Macintosh; U; Intel Mac OS X 10_6_0; en-US) AppleWebKit/532.0 (KHTML, like Gecko) Chrome/4.0.206.1 Safari/532.0', 'Mozilla/5.0 (X11; Linux x86_64) AppleWebKit/537.36 (KHTML, like Gecko) Chrome/62.0.3202.89 Safari/537.36', 'Mozilla/5.0 (Macintosh; Intel Mac OS X 10.6; rv:5.0) Gecko/20100101 Firefox/5.0', 'Mozilla/5.0 (Macintosh; Intel Mac OS X 10.6; rv:9.0) Gecko/20100101 Firefox/9.0', 'Mozilla/5.0 (Macintosh; Intel Mac OS X 10.6; rv:2.0.1) Gecko/20100101 Firefox/4.0.1', 'Mozilla/5.0 (Macintosh; Intel Mac OS X 10.6; rv:5.0) Gecko/20110517 Firefox/5.0 Fennec/5.0', 'Mozilla/5.0 (Macintosh; Intel Mac OS X 10.6; rv:2.0.1) Gecko/20100101 Firefox/4.0.1 Camino/2.2.1', 'Mozilla/5.0 (Macintosh; Intel Mac OS X 10.6; rv:2.1) Gecko/20110318 Firefox/4.0b13pre Fennec/4.0', 'Mozilla/5.0 (Windows NT 6.0; rv:2.1.1) Gecko/20110415 Firefox/4.0.2pre Fennec/4.0.1', 'Mozilla/5.0 (Windows; U; Windows NT 6.0; en-US; rv:1.9.1b2pre) Gecko/20081015 Fennec/1.0a1', 'Mozilla/5.0 (Windows NT 6.0; WOW64) AppleWebKit/535.11 (KHTML, like Gecko) Chrome/17.0.963.66 Safari/535.11 ', 'Chrome/15.0.860.0 (Windows; U; Windows NT 6.0; en-US) AppleWebKit/533.20.25 (KHTML, like Gecko) Version/15.0.860.0', 'Mozilla/5.0 (Windows NT 6.0; WOW64) AppleWebKit/535.1 (KHTML, like Gecko) Chrome/13.0.782.220 Safari/535.1', "Mozilla/5.0 (Linux; U; Android 2.3.6; en-us; Nexus S Build/GRK39F) AppleWebKit/533.1 (KHTML, like Gecko) Version/4.0 Mobile Safari/533.1", "Avant Browser/1.2.789rel1 (http://www.avantbrowser.com)", "Mozilla/5.0 (Windows; U; Windows NT 6.1; en-US) AppleWebKit/532.5 (KHTML, like Gecko) Chrome/4.0.249.0 Safari/532.5", "Mozilla/5.0 (Windows; U; Windows NT 5.2; en-US) AppleWebKit/532.9 (KHTML, like Gecko) Chrome/5.0.310.0 Safari/532.9", "Mozilla/5.0 (Windows; U; Windows NT 5.1; en-US) AppleWebKit/534.7 (KHTML, like Gecko) Chrome/7.0.514.0 Safari/534.7", "Mozilla/5.0 (Windows; U; Windows NT 6.0; en-US) AppleWebKit/534.14 (KHTML, like Gecko) Chrome/9.0.601.0 Safari/534.14", "Mozilla/5.0 (Windows; U; Windows NT 6.1; en-US) AppleWebKit/534.14 (KHTML, like Gecko) Chrome/10.0.601.0 Safari/534.14", "Mozilla/5.0 (Windows; U; Windows NT 6.1; en-US) AppleWebKit/534.20 (KHTML, like Gecko) Chrome/11.0.672.2 Safari/534.20", "Mozilla/5.0 (Windows NT 6.1; WOW64) AppleWebKit/534.27 (KHTML, like Gecko) Chrome/12.0.712.0 Safari/534.27", "Mozilla/5.0 (Windows NT 6.1; WOW64) AppleWebKit/535.1 (KHTML, like Gecko) Chrome/13.0.782.24 Safari/535.1", "Mozilla/5.0 (Windows NT 6.0) AppleWebKit/535.2 (KHTML, like Gecko) Chrome/15.0.874.120 Safari/535.2", "Mozilla/5.0 (Windows NT 6.1; WOW64) AppleWebKit/535.7 (KHTML, like Gecko) Chrome/16.0.912.36 Safari/535.7", "Mozilla/5.0 (Windows; U; Windows NT 6.0 x64; en-US; rv:1.9pre) Gecko/2008072421 Minefield/3.0.2pre", "Mozilla/5.0 (Windows; U; Windows NT 5.1; en-US; rv:1.9.0.10) Gecko/2009042316 Firefox/3.0.10", "Mozilla/5.0 (Windows; U; Windows NT 6.0; en-GB; rv:1.9.0.11) Gecko/2009060215 Firefox/3.0.11 (.NET CLR 3.5.30729)", "Mozilla/5.0 (Windows; U; Windows NT 6.0; en-US; rv:1.9.1.6) Gecko/20091201 Firefox/3.5.6 GTB5", "Mozilla/5.0 (Windows; U; Windows NT 5.1; tr; rv:1.9.2.8) Gecko/20100722 Firefox/3.6.8 ( .NET CLR 3.5.30729; .NET4.0E)", "Mozilla/5.0 (Windows NT 6.1; rv:2.0.1) Gecko/20100101 Firefox/4.0.1", "Mozilla/5.0 (Windows NT 6.1; Win64; x64; rv:2.0.1) Gecko/20100101 Firefox/4.0.1", "Mozilla/5.0 (Windows NT 5.1; rv:5.0) Gecko/20100101 Firefox/5.0", "Mozilla/5.0 (Windows NT 6.1; WOW64; rv:6.0a2) Gecko/20110622 Firefox/6.0a2", "Mozilla/5.0 (Windows NT 6.1; WOW64; rv:7.0.1) Gecko/20100101 Firefox/7.0.1", "Mozilla/5.0 (Windows NT 6.1; WOW64; rv:2.0b4pre) Gecko/20100815 Minefield/4.0b4pre", "HTC_Dream Mozilla/5.0 (Linux; U; Android 1.5; en-ca; Build/CUPCAKE) AppleWebKit/528.5 (KHTML, like Gecko) Version/3.1.2 Mobile Safari/525.20.1", "Mozilla/5.0 (hp-tablet; Linux; hpwOS/3.0.2; U; de-DE) AppleWebKit/534.6 (KHTML, like Gecko) wOSBrowser/234.40.1 Safari/534.6 TouchPad/1.0", "Mozilla/5.0 (Linux; U; Android 1.5; en-us; sdk Build/CUPCAKE) AppleWebkit/528.5 (KHTML, like Gecko) Version/3.1.2 Mobile Safari/525.20.1", "Mozilla/5.0 (Linux; U; Android 2.1; en-us; Nexus One Build/ERD62) AppleWebKit/530.17 (KHTML, like Gecko) Version/4.0 Mobile Safari/530.17", "Mozilla/5.0 (Linux; U; Android 2.2; en-us; Nexus One Build/FRF91) AppleWebKit/533.1 (KHTML, like Gecko) Version/4.0 Mobile Safari/533.1", "Mozilla/5.0 (Linux; U; Android 1.5; en-us; htc_bahamas Build/CRB17) AppleWebKit/528.5 (KHTML, like Gecko) Version/3.1.2 Mobile Safari/525.20.1", "Mozilla/5.0 (Linux; U; Android 2.1-update1; de-de; HTC Desire 1.19.161.5 Build/ERE27) AppleWebKit/530.17 (KHTML, like Gecko) Version/4.0 Mobile Safari/530.17", "Mozilla/5.0 (Linux; U; Android 2.2; en-us; Sprint APA9292KT Build/FRF91) AppleWebKit/533.1 (KHTML, like Gecko) Version/4.0 Mobile Safari/533.1", "Mozilla/5.0 (Linux; U; Android 1.5; de-ch; HTC Hero Build/CUPCAKE) AppleWebKit/528.5 (KHTML, like Gecko) Version/3.1.2 Mobile Safari/525.20.1", "Mozilla/5.0 (Linux; U; Android 2.2; en-us; ADR6300 Build/FRF91) AppleWebKit/533.1 (KHTML, like Gecko) Version/4.0 Mobile Safari/533.1", "Mozilla/5.0 (Linux; U; Android 2.1; en-us; HTC Legend Build/cupcake) AppleWebKit/530.17 (KHTML, like Gecko) Version/4.0 Mobile Safari/530.17", "Mozilla/5.0 (Linux; U; Android 1.5; de-de; HTC Magic Build/PLAT-RC33) AppleWebKit/528.5 (KHTML, like Gecko) Version/3.1.2 Mobile Safari/525.20.1 FirePHP/0.3", "Mozilla/5.0 (Linux; U; Android 1.6; en-us; HTC_TATTOO_A3288 Build/DRC79) AppleWebKit/528.5 (KHTML, like Gecko) Version/3.1.2 Mobile Safari/525.20.1", "Mozilla/5.0 (Linux; U; Android 1.0; en-us; dream) AppleWebKit/525.10 (KHTML, like Gecko) Version/3.0.4 Mobile Safari/523.12.2", "Mozilla/5.0 (Linux; U; Android 1.5; en-us; T-Mobile G1 Build/CRB43) AppleWebKit/528.5 (KHTML, like Gecko) Version/3.1.2 Mobile Safari 525.20.1", "Mozilla/5.0 (Linux; U; Android 1.5; en-gb; T-Mobile_G2_Touch Build/CUPCAKE) AppleWebKit/528.5 (KHTML, like Gecko) Version/3.1.2 Mobile Safari/525.20.1", "Mozilla/5.0 (Linux; U; Android 2.0; en-us; Droid Build/ESD20) AppleWebKit/530.17 (KHTML, like Gecko) Version/4.0 Mobile Safari/530.17", "Mozilla/5.0 (Linux; U; Android 2.2; en-us; Droid Build/FRG22D) AppleWebKit/533.1 (KHTML, like Gecko) Version/4.0 Mobile Safari/533.1", "Mozilla/5.0 (Linux; U; Android 2.0; en-us; Milestone Build/ SHOLS_U2_01.03.1) AppleWebKit/530.17 (KHTML, like Gecko) Version/4.0 Mobile Safari/530.17", "Mozilla/5.0 (Linux; U; Android 2.0.1; de-de; Milestone Build/SHOLS_U2_01.14.0) AppleWebKit/530.17 (KHTML, like Gecko) Version/4.0 Mobile Safari/530.17", "Mozilla/5.0 (Linux; U; Android 3.0; en-us; Xoom Build/HRI39) AppleWebKit/525.10 (KHTML, like Gecko) Version/3.0.4 Mobile Safari/523.12.2", "Mozilla/5.0 (Linux; U; Android 0.5; en-us) AppleWebKit/522 (KHTML, like Gecko) Safari/419.3", "Mozilla/5.0 (Linux; U; Android 1.1; en-gb; dream) AppleWebKit/525.10 (KHTML, like Gecko) Version/3.0.4 Mobile Safari/523.12.2", "Mozilla/5.0 (Linux; U; Android 2.0; en-us; Droid Build/ESD20) AppleWebKit/530.17 (KHTML, like Gecko) Version/4.0 Mobile Safari/530.17", "Mozilla/5.0 (Linux; U; Android 2.1; en-us; Nexus One Build/ERD62) AppleWebKit/530.17 (KHTML, like Gecko) Version/4.0 Mobile Safari/530.17", "Mozilla/5.0 (Linux; U; Android 2.2; en-us; Sprint APA9292KT Build/FRF91) AppleWebKit/533.1 (KHTML, like Gecko) Version/4.0 Mobile Safari/533.1", "Mozilla/5.0 (Linux; U; Android 2.2; en-us; ADR6300 Build/FRF91) AppleWebKit/533.1 (KHTML, like Gecko) Version/4.0 Mobile Safari/533.1", "Mozilla/5.0 (Linux; U; Android 2.2; en-ca; GT-P1000M Build/FROYO) AppleWebKit/533.1 (KHTML, like Gecko) Version/4.0 Mobile Safari/533.1", "Mozilla/5.0 (Linux; U; Android 3.0.1; fr-fr; A500 Build/HRI66) AppleWebKit/534.13 (KHTML, like Gecko) Version/4.0 Safari/534.13", "Mozilla/5.0 (Linux; U; Android 3.0; en-us; Xoom Build/HRI39) AppleWebKit/525.10 (KHTML, like Gecko) Version/3.0.4 Mobile Safari/523.12.2", "Mozilla/5.0 (Linux; U; Android 1.6; es-es; SonyEricssonX10i Build/R1FA016) AppleWebKit/528.5 (KHTML, like Gecko) Version/3.1.2 Mobile Safari/525.20.1", "Mozilla/5.0 (Linux; U; Android 1.6; en-us; SonyEricssonX10i Build/R1AA056) AppleWebKit/528.5 (KHTML, like Gecko) Version/3.1.2 Mobile Safari/525.20.1" ] def process_request(self, request, spider): print("-----下载中间件-----") # 随机挑选一个UA user_agent = random.choice(self.USER_AGENTS_LIST) request.headers['User-Agent'] = user_agent return None # 如果返回为None,那么意味着将request继续传递给下载器去下载 def process_response(self, request, response, spider): print("-----下载中间件---response--") return response- 1
- 2
- 3
- 4
- 5
- 6
- 7
- 8
- 9
- 10
- 11
- 12
- 13
- 14
- 15
- 16
- 17
- 18
- 19
- 20
- 21
- 22
- 23
- 24
- 25
- 26
- 27
- 28
- 29
- 30
- 31
- 32
- 33
- 34
- 35
- 36
- 37
- 38
- 39
- 40
- 41
- 42
- 43
- 44
- 45
- 46
- 47
- 48
- 49
- 50
- 51
- 52
- 53
- 54
- 55
- 56
- 57
- 58
- 59
- 60
- 61
- 62
- 63
- 64
- 65
- 66
- 67
- 68
- 69
- 70
- 71
- 72
- 73
- 74
- 75
- 76
- 77
- 78
- 79
- 80
- 81
- 82
- 83
- 84
- 85
- 86
- 87
- 88
- 89
- 90
- 91
- 92
- 93
- 94
- 95
- 96
- 97
- 98
- 99
- 100
- 101
- 102
- 103
- 104
- 105
- 106
- 107
- 108
- 109
- 110
- 111
- 112
- 113
- 114
- 115
- 116
- 117
- 118
- 119
- 120
- 121
- 122
- 123
- 124
- 125
- 126
- 127
- 128
- 129
- 130
- 131
- 132
- 133
- 134
- 135
- 136
- 137
- 138
- 139
- 140
- 141
- 142
- 143
- 144
- 145
- 146
- 147
- 148
- 149
- 150
- 151
- 152
- 153
- 154
- 155
- 156
- 157
- 158
- 159
- 160
- 161
- 162
- 163
- 164
- 165
- 166
- 167
- 168
- 169
- 170
- 171
- 172
- 173
- 174
- 175
- 176
- 177
- 178
- 179
- 180
- 181
- 182
- 183
- 184
- 185
- 186
- 187
- 188
- 189
- 190
- 191
- 192
- 193
- 194
- 195
⑨ (代码) 配置 douban\settings.py文件 : 整合scrapy框架
# Scrapy settings for douban project # # For simplicity, this file contains only settings considered important or # commonly used. You can find more settings consulting the documentation: # # https://docs.scrapy.org/en/latest/topics/settings.html # https://docs.scrapy.org/en/latest/topics/downloader-middleware.html # https://docs.scrapy.org/en/latest/topics/spider-middleware.html BOT_NAME = 'douban' SPIDER_MODULES = ['douban.spiders'] NEWSPIDER_MODULE = 'douban.spiders' # 操作1:将Scrapylog日志调整为最低级别,即 waring LOG_LEVEL = "WARNING" # 操作2:设置两页下载间的时间间隔 (防止爬取频率过快被网站检测为爬虫) DOWNLOAD_DELAY = 10 # Scrapy不会等待固定的3秒,而是等待它乘以 0.5~1.5 的时间 (5~15秒钟之间随机) # 操作3:设置允许403状态码 (HTTP 403:表示服务器获取到了请求, 但是拒绝提供服务) HTTPERROR_ALLOWED_CODES = [403] # Crawl responsibly by identifying yourself (and your website) on the user-agent #USER_AGENT = 'douban (+http://www.yourdomain.com)' # Obey robots.txt rules # 操作4:设置不遵循robot协议 ROBOTSTXT_OBEY = False # Configure maximum concurrent requests performed by Scrapy (default: 16) #CONCURRENT_REQUESTS = 32 # Configure a delay for requests for the same website (default: 0) # See https://docs.scrapy.org/en/latest/topics/settings.html#download-delay # See also autothrottle settings and docs #DOWNLOAD_DELAY = 3 # The download delay setting will honor only one of: #CONCURRENT_REQUESTS_PER_DOMAIN = 16 #CONCURRENT_REQUESTS_PER_IP = 16 # Disable cookies (enabled by default) #COOKIES_ENABLED = False # Disable Telnet Console (enabled by default) #TELNETCONSOLE_ENABLED = False # Override the default request headers: #DEFAULT_REQUEST_HEADERS = { # 'Accept': 'text/html,application/xhtml+xml,application/xml;q=0.9,*/*;q=0.8', # 'Accept-Language': 'en', #} # Enable or disable spider middlewares # See https://docs.scrapy.org/en/latest/topics/spider-middleware.html # SPIDER_MIDDLEWARES = { # 'douban.middlewares.DoubanSpiderMiddleware': 543, # } # Enable or disable downloader middlewares # See https://docs.scrapy.org/en/latest/topics/downloader-middleware.html # 操作:开启下载器中间件并配置 DOWNLOADER_MIDDLEWARES = { 'douban.middlewares.UserAgentMiddleware': 400, # 这里的数值是权重,可自定义,权重的数值越小权重越大(即数值越小约先执行) 'douban.middlewares.DoubanDownloaderMiddleware': 543 } # Enable or disable extensions # See https://docs.scrapy.org/en/latest/topics/extensions.html # EXTENSIONS = { # 'scrapy.extensions.telnet.TelnetConsole': None, # } # Configure item pipelines # See https://docs.scrapy.org/en/latest/topics/item-pipeline.html # 操作5:开启管道 (即top250.py中提取到的数据可以通过yield传递给pipelines.py文件去执行存储到数据库或者是本地csv) ITEM_PIPELINES = { 'douban.pipelines.DoubanPipeline': 300, } # Enable and configure the AutoThrottle extension (disabled by default) # See https://docs.scrapy.org/en/latest/topics/autothrottle.html #AUTOTHROTTLE_ENABLED = True # The initial download delay #AUTOTHROTTLE_START_DELAY = 5 # The maximum download delay to be set in case of high latencies #AUTOTHROTTLE_MAX_DELAY = 60 # The average number of requests Scrapy should be sending in parallel to # each remote server #AUTOTHROTTLE_TARGET_CONCURRENCY = 1.0 # Enable showing throttling stats for every response received: #AUTOTHROTTLE_DEBUG = False # Enable and configure HTTP caching (disabled by default) # See https://docs.scrapy.org/en/latest/topics/downloader-middleware.html#httpcache-middleware-settings #HTTPCACHE_ENABLED = True #HTTPCACHE_EXPIRATION_SECS = 0 #HTTPCACHE_DIR = 'httpcache' #HTTPCACHE_IGNORE_HTTP_CODES = [] #HTTPCACHE_STORAGE = 'scrapy.extensions.httpcache.FilesystemCacheStorage'- 1
- 2
- 3
- 4
- 5
- 6
- 7
- 8
- 9
- 10
- 11
- 12
- 13
- 14
- 15
- 16
- 17
- 18
- 19
- 20
- 21
- 22
- 23
- 24
- 25
- 26
- 27
- 28
- 29
- 30
- 31
- 32
- 33
- 34
- 35
- 36
- 37
- 38
- 39
- 40
- 41
- 42
- 43
- 44
- 45
- 46
- 47
- 48
- 49
- 50
- 51
- 52
- 53
- 54
- 55
- 56
- 57
- 58
- 59
- 60
- 61
- 62
- 63
- 64
- 65
- 66
- 67
- 68
- 69
- 70
- 71
- 72
- 73
- 74
- 75
- 76
- 77
- 78
- 79
- 80
- 81
- 82
- 83
- 84
- 85
- 86
- 87
- 88
- 89
- 90
- 91
- 92
- 93
- 94
- 95
- 96
- 97
- 98
- 99
- 100
- 101
- 102
- 103
- 104
⑩ (终端) 运行爬虫文件
PS D:\...\[2022_07_27]第十部分_Scrapy框架\03_爬取豆瓣电影Top250\douban> scrapy crawl top250 --nolog- 1
知识点十 : 案例-POST请求爬取蔬菜价格信息
① (软件) 新建文件夹
在**[2022_07_27]第十部分_Scrapy框架**文件夹下新建一个文件夹,并命名为 04_爬取北京新发地蔬菜价格信息
② (终端) 进入新建文件夹
在Pycharm终端通过命令形式进入文件夹04_爬取北京新发地蔬菜价格信息
PS D:\...\[2022_07_27]第十部分_Scrapy框架> cd .\04_爬取北京新发地蔬菜价格信息\ PS D:\...\[2022_07_27]第十部分_Scrapy框架\04_爬取北京新发地蔬菜价格信息>- 1
- 2
③ (终端) 新建Scrapy项目
在Pycharm终端通过命令形式终端新建一个 Scrapy 项目
PS D:\...\[2022_07_27]第十部分_Scrapy框架\04_爬取北京新发地蔬菜价格信息> scrapy startproject xinfadi_1 New Scrapy project 'xinfadi_1', using template directory 'C:\Users\32495\Envs\python3.9.2\lib\site-packages\scrapy\templates\project', created in: D:\softwareCode\00_Code\Python代码\爬虫路线学习\[2022_07_27]第十部分_Scrapy框架\04_爬取北京新发地蔬菜价格信息\xinfadi_1 You can start your first spider with: cd xinfadi_1 scrapy genspider example example.com PS D:\...\[2022_07_27]第十部分_Scrapy框架\04_爬取北京新发地蔬菜价格信息>- 1
- 2
- 3
- 4
- 5
- 6
- 7
- 8
④ (终端) 进入Scrapy项目
在Pycharm终端通过命令形式进入刚刚新建的 Scrapy 项目
PS D:\...\[2022_07_27]第十部分_Scrapy框架\04_爬取北京新发地蔬菜价格信息> cd .\xinfadi_1\ PS D:\...\[2022_07_27]第十部分_Scrapy框架\04_爬取北京新发地蔬菜价格信息\xinfadi_1>- 1
- 2
⑤ (终端) 生成爬虫
在Pycharm终端通过命令形式在新建的 Scrapy 项目下生成一个爬虫
PS D:\...\[2022_07_27]第十部分_Scrapy框架\04_爬取北京新发地蔬菜价格信息\xinfadi_1> scrapy genspider price xinfadi.com.cn Created spider 'price' using template 'basic' in module: xinfadi_1.spiders.price PS D:\...\[2022_07_27]第十部分_Scrapy框架\04_爬取北京新发地蔬菜价格信息\xinfadi_1>- 1
- 2
- 3
- 4
⑥ (代码) 配置 spiders\price.py文件 : 提取数据
# -*- coding: utf-8 -*- import json import scrapy import hashlib from redis import StrictRedis class PriceSpider(scrapy.Spider): name = 'price' allowed_domains = ['xinfadi.com.cn'] # start_urls = ['http://www.xinfadi.com.cn/priceDetail.html'] # 如果要发起post请求,首先要重写一个周期函数(这是一个回调函数) def start_requests(self): # 这个周期函数,下载器开始下载数据的时候被调用 print('下载器开始请求网络.....') post_url = 'http://www.xinfadi.com.cn/getPriceData.html' # 创建表单数据 for num in range(1, 3): print(f"爬取第{num}页") data = { "limit": "20", # 不要写数字,转成字符串 "current": f"{num}", "pubDateStartTime": "", "pubDateEndTime": "", "prodPcatid": "", "prodCatid": "", "prodName": "" } # 现在可以在这个方法中截获调度器的调度,把调度器创建get请求的操作变成创建post请求对象 # scrapy 的下载器常用的有两种,Request对象和FormRequest对象,分别用于处理get和post请求 # 发起post请求 yield scrapy.FormRequest(url=post_url, formdata=data, callback=self.parse) def __init__(self, *args, **kwargs): super().__init__(*args, **kwargs) # 减少CSV文件开关次数和Redis的连接次数 # 连接Redis self.redis_client = StrictRedis(host='localhost', port=6379, db=0) def __del__(self): # 关闭连接 self.redis_client.close() def parse(self, response): # 定义一个变量用来存储在本页中是否找到了之前爬取过的数据 find_exist_data_flag = False # 默认没有 print("回调 parse 函数...", response.url) # 下载器(get下载器和post下载器)的回调函数,都要求传递一个参数去接收响应对象 # 加载json数据,转换为相应的字典对象 dict_1 = json.loads(response.text) # 将字符串格式字典(即json字符串)转换为python中的字典 for dict_2 in dict_1['list']: # 蔬菜名称 prodName = dict_2['prodName'] # 最低价 lowPrice = dict_2['lowPrice'] # 最高价 highPrice = dict_2['highPrice'] # 平均价 avgPrice = dict_2['avgPrice'] # 产地 place = dict_2['place'] # 单位 unitInfo = dict_2['unitInfo'] # 发布日期 pubDate = dict_2['pubDate'] item = { "prodName": prodName, "lowPrice": lowPrice, "highPrice": highPrice, "avgPrice": avgPrice, "place": place, "unitInfo": unitInfo, "pubDate": pubDate, } # 下面代码的作用是数据去重(有没有必要去生成下一页地址) # 计算当前提取到的数据对应的哈希值 item_str = json.dumps(item) md5 = hashlib.md5() md5.update(item_str.encode()) hash_val = md5.hexdigest() # 判断此数据是否在Redis中存储过 if self.redis_client.get(hash_val): # 如果有,则跳过本次的管道处理 print("此数据已存储!") find_exist_data_flag = True continue yield item # 如果在处理本页的20个tr的过程中,没有找到处理过的痕迹,那么就表示本页20个数据都是新的 # 此时,就有必要生成下一页的URL. 开启下一页的爬取 if not find_exist_data_flag: self.start_requests()- 1
- 2
- 3
- 4
- 5
- 6
- 7
- 8
- 9
- 10
- 11
- 12
- 13
- 14
- 15
- 16
- 17
- 18
- 19
- 20
- 21
- 22
- 23
- 24
- 25
- 26
- 27
- 28
- 29
- 30
- 31
- 32
- 33
- 34
- 35
- 36
- 37
- 38
- 39
- 40
- 41
- 42
- 43
- 44
- 45
- 46
- 47
- 48
- 49
- 50
- 51
- 52
- 53
- 54
- 55
- 56
- 57
- 58
- 59
- 60
- 61
- 62
- 63
- 64
- 65
- 66
- 67
- 68
- 69
- 70
- 71
- 72
- 73
- 74
- 75
- 76
- 77
- 78
- 79
- 80
- 81
- 82
- 83
- 84
- 85
- 86
- 87
- 88
- 89
- 90
- 91
- 92
- 93
- 94
- 95
- 96
- 97
- 98
- 99
- 100
- 101
- 102
- 103
- 104
- 105
⑦ (代码) 配置 xinfadi_1\pipelines.py文件 : 存储数据
# -*- coding: utf-8 -*- # Define your item pipelines here # # Don't forget to add your pipeline to the ITEM_PIPELINES setting # See: https://docs.scrapy.org/en/latest/topics/item-pipeline.html # useful for handling different item types with a single interface import os import csv import json import hashlib from redis import StrictRedis from itemadapter import ItemAdapter from scrapy.exceptions import DropItem # 多管道1:检查数据 (检查数据是否已经存在于Redis中) class CheckExist: # open_spider函数 和 close_spider函数只会执行一次 def open_spider(self, spider): # 默认使用的是db0数据库 self.redis_client = StrictRedis(host='localhost', port=6379, db=0) def close_spider(self, spider): self.redis_client.close() def process_item(self, item, spider): # 目的:判断当前要处理的item数据是否已经在Redis中存在,如果存在则丢弃,如果不存在则传递给下一个权重低的process_item """ 1.Python 与 Redis 交互: 1.1 (软件)安装Redis及Redis可视化软件: 详情见 第九部分_知识点十二 1.2 (终端)在Pycharm虚拟环境中安装Redis: pip install redis 1.3 (代码)创建StrictRedis对象方法连接到Redis数据库: redis_client = StrictRedis(host='localhost', port=6379, db=0) """ # json.dumps():字典 转 字符串 item_str = json.dumps(item) # md5加密操作 md5 = hashlib.md5() md5.update(item_str.encode()) hash_val = md5.hexdigest() # 到Redis中查找是否存在这个item对应的哈希值 if self.redis_client.get(hash_val): # 找到相关数据,则抛出异常后丢弃数据 raise DropItem("该数据在Redis中已存在!") else: # 未找到相关数据,存储到redis后将数据传递给下一个权限低的process_item self.redis_client.set(hash_val, item_str) # 键(hash_val),值(item_str) return item # 多管道2:筛选数据 (即数据流进CheckData这个管道进行清洗后,再流进Xinfadi1Pipeline管道进行存储操作) class CheckData: def process_item(self, item, spider): # 目的:实现数据的校验 (清洗数据) print("调用清洗管道...") # 提取产地 place = item.get("place") # 判断是否合法 if len(place) == 0: # 不符合要求,此时对数据进行修复 item["place"] = "略" return item # 多管道3:存储数据 class Xinfadi1Pipeline: # open_spider 和 close_spider函数只会执行一次 def open_spider(self, spider): # 判断是否存在download文件夹,如果没有则创建 download_path = os.getcwd() + "/download/" # 当前文件夹下的download文件夹 if not os.path.exists(download_path): # 判断文件夹或文件 os.makedirs(download_path) # 如果类型是信息,则保存到csv文件 self.fp = open(download_path + "新发地蔬菜信息.csv", "a") def close_spider(self, spider): self.fp.close() def process_item(self, item, spider): print("调用存储管道...") # 创建一个csv的DictWriter对象,这样才能够将写入csv格式数据到这个文件 f_csv = csv.DictWriter(self.fp, ["prodName", "lowPrice", "highPrice", "avgPrice", "place", "unitInfo", "pubDate"]) # 写入多行行 (当做数据) print("保存中...") f_csv.writerows([item]) return item- 1
- 2
- 3
- 4
- 5
- 6
- 7
- 8
- 9
- 10
- 11
- 12
- 13
- 14
- 15
- 16
- 17
- 18
- 19
- 20
- 21
- 22
- 23
- 24
- 25
- 26
- 27
- 28
- 29
- 30
- 31
- 32
- 33
- 34
- 35
- 36
- 37
- 38
- 39
- 40
- 41
- 42
- 43
- 44
- 45
- 46
- 47
- 48
- 49
- 50
- 51
- 52
- 53
- 54
- 55
- 56
- 57
- 58
- 59
- 60
- 61
- 62
- 63
- 64
- 65
- 66
- 67
- 68
- 69
- 70
- 71
- 72
- 73
- 74
- 75
- 76
- 77
- 78
- 79
- 80
- 81
- 82
- 83
- 84
- 85
- 86
- 87
- 88
- 89
- 90
- 91
- 92
- 93
- 94
- 95
- 96
- 97
- 98
- 99
- 100
- 101
- 102
- 103
- 104
- 105
- 106
⑧ (代码) 配置 xinfadi_1\middlewares.py文件 : 中间件伪装爬虫
# Define here the models for your spider middleware # # See documentation in: # https://docs.scrapy.org/en/latest/topics/spider-middleware.html import base64 import random import requests from scrapy import signals # useful for handling different item types with a single interface from itemadapter import is_item, ItemAdapter class Xinfadi1SpiderMiddleware: # Not all methods need to be defined. If a method is not defined, # scrapy acts as if the spider middleware does not modify the # passed objects. @classmethod def from_crawler(cls, crawler): # This method is used by Scrapy to create your spiders. s = cls() crawler.signals.connect(s.spider_opened, signal=signals.spider_opened) return s def process_spider_input(self, response, spider): # Called for each response that goes through the spider # middleware and into the spider. # Should return None or raise an exception. return None def process_spider_output(self, response, result, spider): # Called with the results returned from the Spider, after # it has processed the response. # Must return an iterable of Request, or item objects. for i in result: yield i def process_spider_exception(self, response, exception, spider): # Called when a spider or process_spider_input() method # (from other spider middleware) raises an exception. # Should return either None or an iterable of Request or item objects. pass def process_start_requests(self, start_requests, spider): # Called with the start requests of the spider, and works # similarly to the process_spider_output() method, except # that it doesn’t have a response associated. # Must return only requests (not items). for r in start_requests: yield r def spider_opened(self, spider): spider.logger.info('Spider opened: %s' % spider.name) class Xinfadi1DownloaderMiddleware: # Not all methods need to be defined. If a method is not defined, # scrapy acts as if the downloader middleware does not modify the # passed objects. @classmethod def from_crawler(cls, crawler): # This method is used by Scrapy to create your spiders. s = cls() crawler.signals.connect(s.spider_opened, signal=signals.spider_opened) return s def process_request(self, request, spider): # Called for each request that goes through the downloader # middleware. # Must either: # - return None: continue processing this request # - or return a Response object # - or return a Request object # - or raise IgnoreRequest: process_exception() methods of # installed downloader middleware will be called return None def process_response(self, request, response, spider): # Called with the response returned from the downloader. # Must either; # - return a Response object # - return a Request object # - or raise IgnoreRequest return response def process_exception(self, request, exception, spider): # Called when a download handler or a process_request() # (from other downloader middleware) raises an exception. # Must either: # - return None: continue processing this exception # - return a Response object: stops process_exception() chain # - return a Request object: stops process_exception() chain pass def spider_opened(self, spider): spider.logger.info('Spider opened: %s' % spider.name) # 操作:自定义User-Agent中间件(中间件:简单来理解即用来伪装Scrapy的一个步骤,用代码来实现) class UserAgentMiddleware(object): # 定义一个列表,其中包含大量浏览器的版本信息(User-Agent池) USER_AGENTS_LIST = [ 'Mozilla/5.0 (Macintosh; Intel Mac OS X 10_6_0) AppleWebKit/537.4 (KHTML, like Gecko) Chrome/22.0.1229.79 Safari/537.4', 'Mozilla/5.0 (Macintosh; U; Intel Mac OS X 10_6_0; en-US) AppleWebKit/532.0 (KHTML, like Gecko) Chrome/4.0.206.1 Safari/532.0', 'Mozilla/5.0 (X11; Linux x86_64) AppleWebKit/537.36 (KHTML, like Gecko) Chrome/62.0.3202.89 Safari/537.36', 'Mozilla/5.0 (Macintosh; Intel Mac OS X 10.6; rv:5.0) Gecko/20100101 Firefox/5.0', 'Mozilla/5.0 (Macintosh; Intel Mac OS X 10.6; rv:9.0) Gecko/20100101 Firefox/9.0', 'Mozilla/5.0 (Macintosh; Intel Mac OS X 10.6; rv:2.0.1) Gecko/20100101 Firefox/4.0.1', 'Mozilla/5.0 (Macintosh; Intel Mac OS X 10.6; rv:5.0) Gecko/20110517 Firefox/5.0 Fennec/5.0', 'Mozilla/5.0 (Macintosh; Intel Mac OS X 10.6; rv:2.0.1) Gecko/20100101 Firefox/4.0.1 Camino/2.2.1', 'Mozilla/5.0 (Macintosh; Intel Mac OS X 10.6; rv:2.1) Gecko/20110318 Firefox/4.0b13pre Fennec/4.0', 'Mozilla/5.0 (Windows NT 6.0; rv:2.1.1) Gecko/20110415 Firefox/4.0.2pre Fennec/4.0.1', 'Mozilla/5.0 (Windows; U; Windows NT 6.0; en-US; rv:1.9.1b2pre) Gecko/20081015 Fennec/1.0a1', 'Mozilla/5.0 (Windows NT 6.0; WOW64) AppleWebKit/535.11 (KHTML, like Gecko) Chrome/17.0.963.66 Safari/535.11 ', 'Chrome/15.0.860.0 (Windows; U; Windows NT 6.0; en-US) AppleWebKit/533.20.25 (KHTML, like Gecko) Version/15.0.860.0', 'Mozilla/5.0 (Windows NT 6.0; WOW64) AppleWebKit/535.1 (KHTML, like Gecko) Chrome/13.0.782.220 Safari/535.1', "Mozilla/5.0 (Linux; U; Android 2.3.6; en-us; Nexus S Build/GRK39F) AppleWebKit/533.1 (KHTML, like Gecko) Version/4.0 Mobile Safari/533.1", "Avant Browser/1.2.789rel1 (http://www.avantbrowser.com)", "Mozilla/5.0 (Windows; U; Windows NT 6.1; en-US) AppleWebKit/532.5 (KHTML, like Gecko) Chrome/4.0.249.0 Safari/532.5", "Mozilla/5.0 (Windows; U; Windows NT 5.2; en-US) AppleWebKit/532.9 (KHTML, like Gecko) Chrome/5.0.310.0 Safari/532.9", "Mozilla/5.0 (Windows; U; Windows NT 5.1; en-US) AppleWebKit/534.7 (KHTML, like Gecko) Chrome/7.0.514.0 Safari/534.7", "Mozilla/5.0 (Windows; U; Windows NT 6.0; en-US) AppleWebKit/534.14 (KHTML, like Gecko) Chrome/9.0.601.0 Safari/534.14", "Mozilla/5.0 (Windows; U; Windows NT 6.1; en-US) AppleWebKit/534.14 (KHTML, like Gecko) Chrome/10.0.601.0 Safari/534.14", "Mozilla/5.0 (Windows; U; Windows NT 6.1; en-US) AppleWebKit/534.20 (KHTML, like Gecko) Chrome/11.0.672.2 Safari/534.20", "Mozilla/5.0 (Windows NT 6.1; WOW64) AppleWebKit/534.27 (KHTML, like Gecko) Chrome/12.0.712.0 Safari/534.27", "Mozilla/5.0 (Windows NT 6.1; WOW64) AppleWebKit/535.1 (KHTML, like Gecko) Chrome/13.0.782.24 Safari/535.1", "Mozilla/5.0 (Windows NT 6.0) AppleWebKit/535.2 (KHTML, like Gecko) Chrome/15.0.874.120 Safari/535.2", "Mozilla/5.0 (Windows NT 6.1; WOW64) AppleWebKit/535.7 (KHTML, like Gecko) Chrome/16.0.912.36 Safari/535.7", "Mozilla/5.0 (Windows; U; Windows NT 6.0 x64; en-US; rv:1.9pre) Gecko/2008072421 Minefield/3.0.2pre", "Mozilla/5.0 (Windows; U; Windows NT 5.1; en-US; rv:1.9.0.10) Gecko/2009042316 Firefox/3.0.10", "Mozilla/5.0 (Windows; U; Windows NT 6.0; en-GB; rv:1.9.0.11) Gecko/2009060215 Firefox/3.0.11 (.NET CLR 3.5.30729)", "Mozilla/5.0 (Windows; U; Windows NT 6.0; en-US; rv:1.9.1.6) Gecko/20091201 Firefox/3.5.6 GTB5", "Mozilla/5.0 (Windows; U; Windows NT 5.1; tr; rv:1.9.2.8) Gecko/20100722 Firefox/3.6.8 ( .NET CLR 3.5.30729; .NET4.0E)", "Mozilla/5.0 (Windows NT 6.1; rv:2.0.1) Gecko/20100101 Firefox/4.0.1", "Mozilla/5.0 (Windows NT 6.1; Win64; x64; rv:2.0.1) Gecko/20100101 Firefox/4.0.1", "Mozilla/5.0 (Windows NT 5.1; rv:5.0) Gecko/20100101 Firefox/5.0", "Mozilla/5.0 (Windows NT 6.1; WOW64; rv:6.0a2) Gecko/20110622 Firefox/6.0a2", "Mozilla/5.0 (Windows NT 6.1; WOW64; rv:7.0.1) Gecko/20100101 Firefox/7.0.1", "Mozilla/5.0 (Windows NT 6.1; WOW64; rv:2.0b4pre) Gecko/20100815 Minefield/4.0b4pre", "HTC_Dream Mozilla/5.0 (Linux; U; Android 1.5; en-ca; Build/CUPCAKE) AppleWebKit/528.5 (KHTML, like Gecko) Version/3.1.2 Mobile Safari/525.20.1", "Mozilla/5.0 (hp-tablet; Linux; hpwOS/3.0.2; U; de-DE) AppleWebKit/534.6 (KHTML, like Gecko) wOSBrowser/234.40.1 Safari/534.6 TouchPad/1.0", "Mozilla/5.0 (Linux; U; Android 1.5; en-us; sdk Build/CUPCAKE) AppleWebkit/528.5 (KHTML, like Gecko) Version/3.1.2 Mobile Safari/525.20.1", "Mozilla/5.0 (Linux; U; Android 2.1; en-us; Nexus One Build/ERD62) AppleWebKit/530.17 (KHTML, like Gecko) Version/4.0 Mobile Safari/530.17", "Mozilla/5.0 (Linux; U; Android 2.2; en-us; Nexus One Build/FRF91) AppleWebKit/533.1 (KHTML, like Gecko) Version/4.0 Mobile Safari/533.1", "Mozilla/5.0 (Linux; U; Android 1.5; en-us; htc_bahamas Build/CRB17) AppleWebKit/528.5 (KHTML, like Gecko) Version/3.1.2 Mobile Safari/525.20.1", "Mozilla/5.0 (Linux; U; Android 2.1-update1; de-de; HTC Desire 1.19.161.5 Build/ERE27) AppleWebKit/530.17 (KHTML, like Gecko) Version/4.0 Mobile Safari/530.17", "Mozilla/5.0 (Linux; U; Android 2.2; en-us; Sprint APA9292KT Build/FRF91) AppleWebKit/533.1 (KHTML, like Gecko) Version/4.0 Mobile Safari/533.1", "Mozilla/5.0 (Linux; U; Android 1.5; de-ch; HTC Hero Build/CUPCAKE) AppleWebKit/528.5 (KHTML, like Gecko) Version/3.1.2 Mobile Safari/525.20.1", "Mozilla/5.0 (Linux; U; Android 2.2; en-us; ADR6300 Build/FRF91) AppleWebKit/533.1 (KHTML, like Gecko) Version/4.0 Mobile Safari/533.1", "Mozilla/5.0 (Linux; U; Android 2.1; en-us; HTC Legend Build/cupcake) AppleWebKit/530.17 (KHTML, like Gecko) Version/4.0 Mobile Safari/530.17", "Mozilla/5.0 (Linux; U; Android 1.5; de-de; HTC Magic Build/PLAT-RC33) AppleWebKit/528.5 (KHTML, like Gecko) Version/3.1.2 Mobile Safari/525.20.1 FirePHP/0.3", "Mozilla/5.0 (Linux; U; Android 1.6; en-us; HTC_TATTOO_A3288 Build/DRC79) AppleWebKit/528.5 (KHTML, like Gecko) Version/3.1.2 Mobile Safari/525.20.1", "Mozilla/5.0 (Linux; U; Android 1.0; en-us; dream) AppleWebKit/525.10 (KHTML, like Gecko) Version/3.0.4 Mobile Safari/523.12.2", "Mozilla/5.0 (Linux; U; Android 1.5; en-us; T-Mobile G1 Build/CRB43) AppleWebKit/528.5 (KHTML, like Gecko) Version/3.1.2 Mobile Safari 525.20.1", "Mozilla/5.0 (Linux; U; Android 1.5; en-gb; T-Mobile_G2_Touch Build/CUPCAKE) AppleWebKit/528.5 (KHTML, like Gecko) Version/3.1.2 Mobile Safari/525.20.1", "Mozilla/5.0 (Linux; U; Android 2.0; en-us; Droid Build/ESD20) AppleWebKit/530.17 (KHTML, like Gecko) Version/4.0 Mobile Safari/530.17", "Mozilla/5.0 (Linux; U; Android 2.2; en-us; Droid Build/FRG22D) AppleWebKit/533.1 (KHTML, like Gecko) Version/4.0 Mobile Safari/533.1", "Mozilla/5.0 (Linux; U; Android 2.0; en-us; Milestone Build/ SHOLS_U2_01.03.1) AppleWebKit/530.17 (KHTML, like Gecko) Version/4.0 Mobile Safari/530.17", "Mozilla/5.0 (Linux; U; Android 2.0.1; de-de; Milestone Build/SHOLS_U2_01.14.0) AppleWebKit/530.17 (KHTML, like Gecko) Version/4.0 Mobile Safari/530.17", "Mozilla/5.0 (Linux; U; Android 3.0; en-us; Xoom Build/HRI39) AppleWebKit/525.10 (KHTML, like Gecko) Version/3.0.4 Mobile Safari/523.12.2", "Mozilla/5.0 (Linux; U; Android 0.5; en-us) AppleWebKit/522 (KHTML, like Gecko) Safari/419.3", "Mozilla/5.0 (Linux; U; Android 1.1; en-gb; dream) AppleWebKit/525.10 (KHTML, like Gecko) Version/3.0.4 Mobile Safari/523.12.2", "Mozilla/5.0 (Linux; U; Android 2.0; en-us; Droid Build/ESD20) AppleWebKit/530.17 (KHTML, like Gecko) Version/4.0 Mobile Safari/530.17", "Mozilla/5.0 (Linux; U; Android 2.1; en-us; Nexus One Build/ERD62) AppleWebKit/530.17 (KHTML, like Gecko) Version/4.0 Mobile Safari/530.17", "Mozilla/5.0 (Linux; U; Android 2.2; en-us; Sprint APA9292KT Build/FRF91) AppleWebKit/533.1 (KHTML, like Gecko) Version/4.0 Mobile Safari/533.1", "Mozilla/5.0 (Linux; U; Android 2.2; en-us; ADR6300 Build/FRF91) AppleWebKit/533.1 (KHTML, like Gecko) Version/4.0 Mobile Safari/533.1", "Mozilla/5.0 (Linux; U; Android 2.2; en-ca; GT-P1000M Build/FROYO) AppleWebKit/533.1 (KHTML, like Gecko) Version/4.0 Mobile Safari/533.1", "Mozilla/5.0 (Linux; U; Android 3.0.1; fr-fr; A500 Build/HRI66) AppleWebKit/534.13 (KHTML, like Gecko) Version/4.0 Safari/534.13", "Mozilla/5.0 (Linux; U; Android 3.0; en-us; Xoom Build/HRI39) AppleWebKit/525.10 (KHTML, like Gecko) Version/3.0.4 Mobile Safari/523.12.2", "Mozilla/5.0 (Linux; U; Android 1.6; es-es; SonyEricssonX10i Build/R1FA016) AppleWebKit/528.5 (KHTML, like Gecko) Version/3.1.2 Mobile Safari/525.20.1", "Mozilla/5.0 (Linux; U; Android 1.6; en-us; SonyEricssonX10i Build/R1AA056) AppleWebKit/528.5 (KHTML, like Gecko) Version/3.1.2 Mobile Safari/525.20.1" ] def process_request(self, request, spider): print("下载中间件...request...") # 随机挑选一个UA user_agent = random.choice(self.USER_AGENTS_LIST) request.headers['User-Agent'] = user_agent # 如果返回为None,那么意味着将request继续传递给下载器去下载 return None # 操作:设置IP代理中间件(搭建IP代理池绕过网页反爬检测) class ProxyMiddleware(object): def process_request(self, request, spider): api = 'http://api.hailiangip.com:8422/api/getIp?type=1&num=10&pid=-1&unbindTime=' \ '60&cid=-1&orderId=O22021709413689747721&time=1659172207&sign=db3dcdd25b227877' \ 'f70617f3ad4b5a90&noDuplicate=0&dataType=1&lineSeparator=0&singleIp=' # 提取出我们刚刚通过API生成的10个IP地址 response = requests.get(api).text ip_list = [] for i in response.split("\n")[:-1]: ip_list.append(f'http://{i}') proxy = random.choice(ip_list) print("当前使用的ip代理地址为:", proxy) request.meta["proxy"] = proxy- 1
- 2
- 3
- 4
- 5
- 6
- 7
- 8
- 9
- 10
- 11
- 12
- 13
- 14
- 15
- 16
- 17
- 18
- 19
- 20
- 21
- 22
- 23
- 24
- 25
- 26
- 27
- 28
- 29
- 30
- 31
- 32
- 33
- 34
- 35
- 36
- 37
- 38
- 39
- 40
- 41
- 42
- 43
- 44
- 45
- 46
- 47
- 48
- 49
- 50
- 51
- 52
- 53
- 54
- 55
- 56
- 57
- 58
- 59
- 60
- 61
- 62
- 63
- 64
- 65
- 66
- 67
- 68
- 69
- 70
- 71
- 72
- 73
- 74
- 75
- 76
- 77
- 78
- 79
- 80
- 81
- 82
- 83
- 84
- 85
- 86
- 87
- 88
- 89
- 90
- 91
- 92
- 93
- 94
- 95
- 96
- 97
- 98
- 99
- 100
- 101
- 102
- 103
- 104
- 105
- 106
- 107
- 108
- 109
- 110
- 111
- 112
- 113
- 114
- 115
- 116
- 117
- 118
- 119
- 120
- 121
- 122
- 123
- 124
- 125
- 126
- 127
- 128
- 129
- 130
- 131
- 132
- 133
- 134
- 135
- 136
- 137
- 138
- 139
- 140
- 141
- 142
- 143
- 144
- 145
- 146
- 147
- 148
- 149
- 150
- 151
- 152
- 153
- 154
- 155
- 156
- 157
- 158
- 159
- 160
- 161
- 162
- 163
- 164
- 165
- 166
- 167
- 168
- 169
- 170
- 171
- 172
- 173
- 174
- 175
- 176
- 177
- 178
- 179
- 180
- 181
- 182
- 183
- 184
- 185
- 186
- 187
- 188
- 189
- 190
- 191
- 192
- 193
- 194
- 195
- 196
- 197
- 198
- 199
- 200
- 201
- 202
- 203
- 204
- 205
- 206
- 207
- 208
- 209
- 210
- 211
⑨ (代码) 配置 xinfadi_1\settings.py文件 : 整合scrapy框架
# Scrapy settings for xinfadi_1 project # # For simplicity, this file contains only settings considered important or # commonly used. You can find more settings consulting the documentation: # # https://docs.scrapy.org/en/latest/topics/settings.html # https://docs.scrapy.org/en/latest/topics/downloader-middleware.html # https://docs.scrapy.org/en/latest/topics/spider-middleware.html import requests BOT_NAME = 'xinfadi_1' SPIDER_MODULES = ['xinfadi_1.spiders'] NEWSPIDER_MODULE = 'xinfadi_1.spiders' # 操作:将Scrapylog日志调整为最低级别,即 waring LOG_LEVEL = "WARNING" # 操作:设置两页下载间的时间间隔 (防止爬取频率过快被网站检测为爬虫) DOWNLOAD_DELAY = 5 # Scrapy不会等待固定的3秒,而是等待它乘以 0.5~1.5 的时间 (2.5~7.5秒钟之间随机) # 操作:设置允许403状态码 (HTTP 403:表示服务器获取到了请求, 但是拒绝提供服务) HTTPERROR_ALLOWED_CODES = [403] # Crawl responsibly by identifying yourself (and your website) on the user-agent #USER_AGENT = 'xinfadi_1 (+http://www.yourdomain.com)' # Obey robots.txt rules # 操作:设置不遵循robot协议 ROBOTSTXT_OBEY = False # Configure maximum concurrent requests performed by Scrapy (default: 16) #CONCURRENT_REQUESTS = 32 # Configure a delay for requests for the same website (default: 0) # See https://docs.scrapy.org/en/latest/topics/settings.html#download-delay # See also autothrottle settings and docs #DOWNLOAD_DELAY = 3 # The download delay setting will honor only one of: #CONCURRENT_REQUESTS_PER_DOMAIN = 16 #CONCURRENT_REQUESTS_PER_IP = 16 # Disable cookies (enabled by default) #COOKIES_ENABLED = False # Disable Telnet Console (enabled by default) #TELNETCONSOLE_ENABLED = False # Override the default request headers: #DEFAULT_REQUEST_HEADERS = { # 'Accept': 'text/html,application/xhtml+xml,application/xml;q=0.9,*/*;q=0.8', # 'Accept-Language': 'en', #} # Enable or disable spider middlewares # See https://docs.scrapy.org/en/latest/topics/spider-middleware.html #SPIDER_MIDDLEWARES = { # 'xinfadi_1.middlewares.Xinfadi1SpiderMiddleware': 543, #} # Enable or disable downloader middlewares # See https://docs.scrapy.org/en/latest/topics/downloader-middleware.html # 操作:开启下载器中间件并配置 DOWNLOADER_MIDDLEWARES = { # 使用IP代理需要先注销掉之前scrapy框架使用的Xinfadi1DownloaderMiddleware # 'xinfadi_1.middlewares.Xinfadi1DownloaderMiddleware': 543, 'xinfadi_1.middlewares.ProxyMiddleware': 542, # IP代理 'xinfadi_1.middlewares.UserAgentMiddleware': 543, # UserAgent中间件 } # Enable or disable extensions # See https://docs.scrapy.org/en/latest/topics/extensions.html #EXTENSIONS = { # 'scrapy.extensions.telnet.TelnetConsole': None, #} # Configure item pipelines # See https://docs.scrapy.org/en/latest/topics/item-pipeline.html # 操作:开启管道 ITEM_PIPELINES = { 'xinfadi_1.pipelines.CheckExist': 298, 'xinfadi_1.pipelines.CheckData': 299, 'xinfadi_1.pipelines.Xinfadi1Pipeline': 300, } # Enable and configure the AutoThrottle extension (disabled by default) # See https://docs.scrapy.org/en/latest/topics/autothrottle.html #AUTOTHROTTLE_ENABLED = True # The initial download delay #AUTOTHROTTLE_START_DELAY = 5 # The maximum download delay to be set in case of high latencies #AUTOTHROTTLE_MAX_DELAY = 60 # The average number of requests Scrapy should be sending in parallel to # each remote server #AUTOTHROTTLE_TARGET_CONCURRENCY = 1.0 # Enable showing throttling stats for every response received: #AUTOTHROTTLE_DEBUG = False # Enable and configure HTTP caching (disabled by default) # See https://docs.scrapy.org/en/latest/topics/downloader-middleware.html#httpcache-middleware-settings #HTTPCACHE_ENABLED = True #HTTPCACHE_EXPIRATION_SECS = 0 #HTTPCACHE_DIR = 'httpcache' #HTTPCACHE_IGNORE_HTTP_CODES = [] #HTTPCACHE_STORAGE = 'scrapy.extensions.httpcache.FilesystemCacheStorage'- 1
- 2
- 3
- 4
- 5
- 6
- 7
- 8
- 9
- 10
- 11
- 12
- 13
- 14
- 15
- 16
- 17
- 18
- 19
- 20
- 21
- 22
- 23
- 24
- 25
- 26
- 27
- 28
- 29
- 30
- 31
- 32
- 33
- 34
- 35
- 36
- 37
- 38
- 39
- 40
- 41
- 42
- 43
- 44
- 45
- 46
- 47
- 48
- 49
- 50
- 51
- 52
- 53
- 54
- 55
- 56
- 57
- 58
- 59
- 60
- 61
- 62
- 63
- 64
- 65
- 66
- 67
- 68
- 69
- 70
- 71
- 72
- 73
- 74
- 75
- 76
- 77
- 78
- 79
- 80
- 81
- 82
- 83
- 84
- 85
- 86
- 87
- 88
- 89
- 90
- 91
- 92
- 93
- 94
- 95
- 96
- 97
- 98
- 99
- 100
- 101
- 102
- 103
- 104
- 105
- 106
- 107
- 108
- 109
- 110
⑩ (终端) 运行爬虫文件
PS D:\...\[2022_07_27]第十部分_Scrapy框架\04_爬取北京新发地蔬菜价格信息\xinfadi_1> scrapy crawl price- 1
知识点十一 : Scrapy框架 暂停和恢复
1. (文字) 暂停和恢复的目的
有些情况下, 如爬一些大型的网站, 我们希望能够暂停爬取一段时间之后再恢复运行, 这个时候就需要用到 Scrapy 框架的暂停爬取和恢复爬取的功能.
2. (终端) 暂停爬虫的方式
暂停爬虫不修改Scrapy原本的代码,只需在运行时改动运行命令即可.
2.1 暂停命令: scrapy crawl <爬虫名> -s JOBDIR=<缓存Scrapy信息的路径> 如: scrapy crawl mySpider -s JOBDIR=crawls/top250 2.2 暂停爬虫也可以在爬虫运行时,Ctrl+C暂停- 1
- 2
- 3
- 4
注意 : Ctrl+C按一次即可,但有时候按一次爬虫不停止,因为爬虫正在进行某项操作无法停下来,这种情况按两次Ctrl+C可以强制停止爬虫,但是强制停止爬虫后,2.1的暂停命令失效.
3. (终端) 恢复爬虫的方式
与暂停爬虫类似,恢复爬虫也是运行相同的命令.
3.1 恢复命令: scrapy crawl <爬虫名> -s JOBDIR=<缓存Scrapy信息的路径> 如: scrapy crawl mySpider -s JOBDIR=crawls/top250- 1
- 2
- 3
注意1 : 如果在Scrapy项目中有很多个爬虫, (即在spiders文件夹下有很多其他的爬虫类), 那么在指定 JOBDIR时, 就应该区别对待而不能用同一个路径, 例如myspider1爬虫用 -s JOBDIR=crawls/myspider-1. 第二个爬虫myspider2 用-s JOBDIR=crawls/myspider-2
注意2 : 如果直接在终端使用命令 scrapy crawl <爬虫名> 启动爬虫,此时爬取到的数据缓存在内存中,如果程序关闭则内存就会被删除.
注意3 : 而加上 JOBDIR=crawls/<爬虫名> 能够实现恢复爬取.因为此时数据在文件(硬盘)中, 程序关闭硬盘上的文件也不会被删除, 下一次启动时可以加载.
注意4 : 使用Redis可以实现多台设备共享要爬取的URL. 因为Redis将数据存储在Redis数据库中,又因为Redis支持网络,所以其他的电脑可以通过网络访问到数据库, 从而实现多台设备的数据共享.
4. (代码) 重写 start_request 方法
start_urls默认不使用过滤,即dont_filter=False(开启过滤:dont_filter=True), 所以需要用start_request方法进行重写. 下面以爬取豆瓣排行榜时创建的top250.py文件为例.
# -*-coding:utf-8 -*- import scrapy class Top250Spider(scrapy.Spider): name = 'top250' allowed_domains = ['douban.com', 'doubanio.com'] start_urls = ['https://movie.douban.com/top250?start=0&filter='] # page = 1 # 这里最好不要使用实例属性,因为每次程序重新运行实例属性都会从原来的开始值重新进行,而不是上一次程序暂停的地方 def start_requests(self): # 重写start_request方法(即覆盖父类),其用来实现默认发送的URL请求是过滤的 for url in self.start_urls: yield scrapy.Request(url=url, callback=self.parse) def parse(self, response): # 注意:不要通过类属性、实例属性计算得到下一页的URL, 而是在当前处理的URL基础上得到下一页的URL ret = re.match(r".*start=(\d+).*", response.url) if ret: start_number = int(ret.group(1)) else: start_number = 0 li_list = response.xpath("//ol[@class='grid_view']/li") for li_temp in li_list: rank = li_temp.xpath(".//div[@class='pic']/em/text()").extract_first() title = li_temp.xpath(".//span[@class='title'][1]/text()").extract_first() rating_num = li_temp.xpath(".//span[@class='rating_num']/text()").extract_first() people_num = li_temp.xpath(".//div[@class='star']/span[4]/text()").extract_first() img_src = li_temp.xpath(".//img/@src").extract_first() print(rank, title, rating_num, people_num, img_src) yield { "type": "info", "rank": rank, "title": title, "rating_num": rating_num, "people_num": people_num, "img_src": img_src } # 当我们生成新的Request请求对象时默认过滤 (即只要URL相同则该数据就不再被爬取) yield scrapy.Request(url=img_src, callback=self.parse_img, cb_kwargs={"img_name": title}, dont_filter=True) start_number +=25 print("--------------------->>>>start_num", start_number) if start_number <= 225: next_page_url = "https://movie.douban.com/top250?start=%d&filter=" % start_number yield scrapy.Request(url=next_page_url, callback=self.parse) # 处理图片的回调函数 def parse_img(self, response, img_name): yield { "type": "img", "img_name": img_name + ".jpg", "img_bytes": response.body }- 1
- 2
- 3
- 4
- 5
- 6
- 7
- 8
- 9
- 10
- 11
- 12
- 13
- 14
- 15
- 16
- 17
- 18
- 19
- 20
- 21
- 22
- 23
- 24
- 25
- 26
- 27
- 28
- 29
- 30
- 31
- 32
- 33
- 34
- 35
- 36
- 37
- 38
- 39
- 40
- 41
- 42
- 43
- 44
- 45
- 46
- 47
- 48
- 49
- 50
- 51
- 52
- 53
- 54
- 55
- 56
- 57
- 58
- 59
- 60
- 61
- 62
- 63
- 64
5. (综合) 使用 scrapy_redis 实现爬虫暂停和恢复
5.1 (终端) 安装 scrapy_redis
安装命令: pip install scrapy-redis- 1
5.2 (代码) 配置douban/settings.py文件
在settings.py中随便找个地方插入以下内容
""" scrapy-redis配置 """ # 调度器类 SCHEDULER = "scrapy_redis.scheduler.Scheduler" # 指纹去重类 DUPEFILTER_CLASS = "scrapy_redis.dupefilter.RFPDupeFilter" # 是否在关闭时候保留原来的调度器和去重记录(True=保留,False=清空) SCHEDULER_PERSIST = True # Redis服务器地址(Redis打开有16个数据库,这里设置1则使用的是第一个数据库) REDIS_URL = "redis://127.0.0.1:6379/1"- 1
- 2
- 3
- 4
- 5
- 6
- 7
- 8
- 9
- 10
知识点十二 : Scrapy框架 分布式爬虫
1. (文字) 分布式爬虫 概念解释
使用分布式爬虫, 其目的就是加快爬虫爬取的效率, 如我们想要爬取淘宝、京东等这种大型网站, 它们的数据量特别大, 一时半会儿是爬不完的, 这种情况下我们借助多台设备来实现共同爬取,以此加快爬取的爬取效率.
而使用分布式爬虫时将信息缓存到本地内存下明显是不可取的, 而Scrapy框架借助scrapy_redis将数据直接缓存到Redis中,以此实现分布式爬虫.
就像是藏宝图一样, 有四台设备就相当于是藏宝图被分成了四份, 每一份标示的内容不同, 合在一起才是完整的数据.
2. (文字) 分布式爬虫 架构原理

3. (文字) 分布式爬虫 scrapy_redis 简介
scrapy_redis 是 Scrapy 的一个组件, 它以Redis数据库为基础, 使用它的目的是更方便地让 Scrapy 实现分布式爬取.
分布式爬虫解决了scrapy最初无法做到大规模分布式应用的问题, 分布式爬虫的原理是改变Scrapy的队列调度, 将起始的网址从start_urls中分离后改为从Redis中读取, 使得多个客户端可以同时读取同一个Redis.
scrapy_redis 通过持久化请求队列和请求的指纹集合实现了以下两个功能:
1.断点续爬: 即此次爬取的数据,下次再运行时不会爬取, 只爬取之前没有爬过的数据
2.分布式快速抓取: 多台电脑可以一起爬取数据且不会冲突
4. (文字) 分布式爬虫 配置Redis服务器允许远程连接


5. (综合) 分布式爬虫 scrapy_redis 实现分布式爬虫
5.1 windows 系统下的爬虫项目
5.1.1 (代码) 配置 setting.py 文件
在setting.py文件中找个位置插入以下内容
""" scrapy-redis配置 """ # 调度器类 SCHEDULER = "scrapy_redis.scheduler.Scheduler" # 指纹去重类 DUPEFILTER_CLASS = "scrapy_redis.dupefilter.RFPDupeFilter" # 是否在关闭时候保留原来的调度器和去重记录(True=保留,False=清空) SCHEDULER_PERSIST = True # Redis服务器地址(Redis打开有16个数据库,这里设置1则使用的是第一个数据库) REDIS_URL = "redis://127.0.0.1:6379/1"- 1
- 2
- 3
- 4
- 5
- 6
- 7
- 8
- 9
- 10
5.1.2 (代码) 配置 top250.py 文件
# -*-coding:utf-8 -*- import scrapy # 1.导入 scrapy_redis.spiders scrapy_redis.spiders import RedisSpider class Top250Spider(RedisSpider): name = 'top250' allowed_domains = ['douban.com', 'doubanio.com'] def parse(self, response): ret = re.match(r"https://movie.douban.com/top250\?start=(\d+).*", response.url) if ret: start_number = int(ret.group(1)) else: start_number = 0 li_list = response.xpath("//ol[@class='grid_view']/li") for li_temp in li_list: rank = li_temp.xpath(".//div[@class='pic']/em/text()").extract_first() title = li_temp.xpath(".//span[@class='title'][1]/text()").extract_first() rating_num = li_temp.xpath(".//span[@class='rating_num']/text()").extract_first() people_num = li_temp.xpath(".//div[@class='star']/span[4]/text()").extract_first() img_src = li_temp.xpath(".//img/@src").extract_first() print(rank, title, rating_num, people_num, img_src) yield { "type": "info", "rank": rank, "title": title, "rating_num": rating_num, "people_num": people_num, "img_src": img_src } # 当我们生成新的Request请求对象时默认过滤 (即只要URL相同则该数据就不再被爬取) yield scrapy.Request(url=img_src, callback=self.parse_img, cb_kwargs={"img_name": title}, dont_filter=True) start_number +=25 print("--------------------->>>>start_num", start_number) if start_number <= 225: next_page_url = "https://movie.douban.com/top250?start=%d&filter=" % start_number yield scrapy.Request(url=next_page_url, callback=self.parse) # 处理图片的回调函数 def parse_img(self, response, img_name): yield { "type": "img", "img_name": img_name + ".jpg", "img_bytes": response.body }- 1
- 2
- 3
- 4
- 5
- 6
- 7
- 8
- 9
- 10
- 11
- 12
- 13
- 14
- 15
- 16
- 17
- 18
- 19
- 20
- 21
- 22
- 23
- 24
- 25
- 26
- 27
- 28
- 29
- 30
- 31
- 32
- 33
- 34
- 35
- 36
- 37
- 38
- 39
- 40
- 41
- 42
- 43
- 44
- 45
- 46
- 47
- 48
- 49
- 50
- 51
- 52
- 53
- 54
- 55
- 56
5.1.3 (终端) 将项目打包后传至Linux系统
1.打包命令: tar -zxvf <项目名>.tar.gz <包名> 2.传输命令: scp <包名>.tar.gz <用户名>@IP地址:/<存储路径>- 1
- 2
5.1.4 (终端) 启动Redis客户端 (redis-cli.exe) 并推送一条数据 (这条数据用来开启分布式爬虫)
127.0.0.1:6379> select 4 OK 127.0.0.1:6379[4]> key * (error) ERR unknown command 'key' 127.0.0.1:6379[4]> lpush top250:start_urls https://movie.douban.com/top250?start=0&filter=- 1
- 2
- 3
- 4
- 5
5.2 Linux 系统下的爬虫项目
5.2.1 (终端) 将传到Linux的项目包解压
1.进入路径命令: cd ../../.. 2.解压命令: tar -zxvf <包名>.tar.gz- 1
- 2
5.2.2 (代码) 修改 setting.py 文件中的IP地址
""" scrapy-redis配置 """ # 调度器类 SCHEDULER = "scrapy_redis.scheduler.Scheduler" # 指纹去重类 DUPEFILTER_CLASS = "scrapy_redis.dupefilter.RFPDupeFilter" # 是否在关闭时候保留原来的调度器和去重记录(True=保留,False=清空) SCHEDULER_PERSIST = True # Redis服务器地址(Redis打开有16个数据库,这里设置1则使用的是第一个数据库) REDIS_URL = "redis:///1" - 1
- 2
- 3
- 4
- 5
- 6
- 7
- 8
- 9
- 10
6. (文字) 分布式爬虫 scrapy_redis 使用注意点
1.分布式爬虫继承的类不同, 单设备Scrapy爬虫 [ class Top250Spider(scrapy.Spider) ] 继承的是 scrapy.Spider, 而多设备分布式爬虫 [ class Top250Spider(RedisSpider) ] 继承的是 RedisSpider.
2. 分布式爬虫中不需要 start_urls, 也不需要重写 start_requests 方法, 因为分布式爬虫继承的 RedisSpider 中已经帮我们写好了.我们在Redis客户端输入 lpush <爬虫名>:start_urls <请求网站> 即可开启分布式爬虫, 这时使用 scrapy crawl <爬虫名> 则会卡住, 爬虫不会运行.
7. (综合) 分布式爬虫 scrapy_redis 整合数据并存储到Redis数据库
7.1 (代码) 开启并配置 setting.py 文件中的管道
ITEM_PIPELINES = { # 'douban.pipelines.DoubanPipeline': 300, 'scrapy redis.pipelines.RedisPipeline': 200, # 将信息Item存储到Redis中 }- 1
- 2
- 3
- 4
7.2 (代码) 配置 top250.py 文件
# -*-coding:utf-8 -*- import scrapy scrapy_redis.spiders import RedisSpider class Top250Spider(RedisSpider): name = 'top250' allowed_domains = ['douban.com', 'doubanio.com'] def parse(self, response): ret = re.match(r"https://movie.douban.com/top250\?start=(\d+).*", response.url) if ret: start_number = int(ret.group(1)) else: start_number = 0 li_list = response.xpath("//ol[@class='grid_view']/li") for li_temp in li_list: rank = li_temp.xpath(".//div[@class='pic']/em/text()").extract_first() title = li_temp.xpath(".//span[@class='title'][1]/text()").extract_first() rating_num = li_temp.xpath(".//span[@class='rating_num']/text()").extract_first() people_num = li_temp.xpath(".//div[@class='star']/span[4]/text()").extract_first() img_src = li_temp.xpath(".//img/@src").extract_first() print(rank, title, rating_num, people_num, img_src) yield { "type": "info", "rank": rank, "title": title, "rating_num": rating_num, "people_num": people_num, "img_src": img_src } # 当我们生成新的Request请求对象时默认过滤 (即只要URL相同则该数据就不再被爬取) yield scrapy.Request(url=img_src, callback=self.parse_img, cb_kwargs={"img_name": title}, dont_filter=True) start_number +=25 print("--------------------->>>>start_num", start_number) if start_number <= 225: next_page_url = "https://movie.douban.com/top250?start=%d&filter=" % start_number yield scrapy.Request(url=next_page_url, callback=self.parse) # 处理图片的回调函数 def parse_img(self, response, img_name): # response.body 此时是二进制的图片内容 # 二进制的数据如果放到了字典中的value,从python的语法来讲是可行的 # 打算scrapy_redis的管道将这个信息进行存储到Redis数据库时,不能有二进制的value # 所以我们需要将二进制数据转为base65的字符串,此时将这个字符串当做value值放到字典中 # 此时scrapy_redis就可以成功的将数据存入到Redis数据库 base64_data = base64.b64encode(response.body) s = base64_data.decode() img_str = s yield { "type": "img", "img_name": img_name + ".jpg", "img_bytes": img_str }- 1
- 2
- 3
- 4
- 5
- 6
- 7
- 8
- 9
- 10
- 11
- 12
- 13
- 14
- 15
- 16
- 17
- 18
- 19
- 20
- 21
- 22
- 23
- 24
- 25
- 26
- 27
- 28
- 29
- 30
- 31
- 32
- 33
- 34
- 35
- 36
- 37
- 38
- 39
- 40
- 41
- 42
- 43
- 44
- 45
- 46
- 47
- 48
- 49
- 50
- 51
- 52
- 53
- 54
- 55
- 56
- 57
- 58
- 59
- 60
- 61
- 62
- 63
- 64
- 65
8. (代码) 分布式爬虫 从 Redis 数据库中提取 item 数据
在豆瓣项目下新建一个Python文件,文件名为 get_data_from_redis_and_save.
import os import csv import json import redis def main(): # 1.指定Redis数据库信息 redis_cli = redis.StrictRedis(host='127.0.0.1', port=6379, db=5) # 判断是否存在download文件夹,如果没有则创建 download_path = os.getcwd() + "/download/" # 当前文件夹下的download文件夹 if not os.path.exists(download_path): # 判断文件夹或文件 os.makedirs(download_path) # 2.因为不知道爬取的数据什么时候会结束,所以设置while循环为True值 while True: # 3.获取键值(FIFO模式为blpop,LIFO模式为brpop) # source是key,data是value source, data = redis_cli.blpop(["top250:items"]) # 4.data从Redis中提取到的数据是byte类型, 所以需要用decode()将其转为字符串(即data.decode()) item = json.loads(data.decode()) msg_type = item.get("type") if msg_type == "info": # 如果类型是信息,则保存到csv文件 with open(download_path + "豆瓣电影Top250.csv", "a") as f: # 创建一个csv的DictWriter对象,这样才能够将写入csv格式数据到这个文件 f_csv = csv.DictWriter(f, ["rank", "title", "rating_num", "people_num", "img_src"]) # 写入多行 (当做数据) item.pop("type") # 删除type 这个key-value f_csv.writerows([item]) print("保存信息到CSV...ok") elif msg_type == "img": # 存储图片 with open(download_path + item.get("img_name"), "wb") as f: img_data = base64.b64decode(item.get("img_bytes")) f.write(img_data) print("保存图片到本地...ok") if __name__ == '__main__': main()- 1
- 2
- 3
- 4
- 5
- 6
- 7
- 8
- 9
- 10
- 11
- 12
- 13
- 14
- 15
- 16
- 17
- 18
- 19
- 20
- 21
- 22
- 23
- 24
- 25
- 26
- 27
- 28
- 29
- 30
- 31
- 32
- 33
- 34
- 35
- 36
- 37
- 38
- 39
- 40
- 41
- 42
- 43
- 44
- 45
- 46
- 47
- 48
- 49
- 50
- 51
知识点十三 : Scrapy框架 项目部署
1.项目部署能够快速将爬虫文件部署到服务器上, 能够大幅度提高分布式爬虫的部署效率.
2.三台设备:
2.1 Windows系统IP地址(设备1): 192.168.81.66 , 作为客户端使用
2.2 Linux系统IP地址(设备2): 10.211.55.5, 作为服务端使用
2.3 Linux系统IP地址(设备3): 10.211.55.7, 作为服务端使用
3.注意点:
3.1 保证三台设备之间能够互相Ping通.
1. (综合) 项目部署 Scrapyd 配置使用
1.1 (终端) 服务端安装 Scrapyd
设备2> pip install scrapyd -i https://pypi.tuna.tsinghua.edu.cn/simple 设备3> pip install scrapyd -i https://pypi.tuna.tsinghua.edu.cn/simple- 1
- 2
1.2 (终端) 服务端新建文件夹并启动 Scrapyd (设备2设备3均需配置,下面都以设备2为例)
设备2 ~> cd Desktop/ 设备2 Desktop> mkdir ScrapyDeploy-2 设备2 Desktop> cd ScrapyDeploy-2 设备2 ScrapyDeploy-2> scrapyd- 1
- 2
- 3
- 4
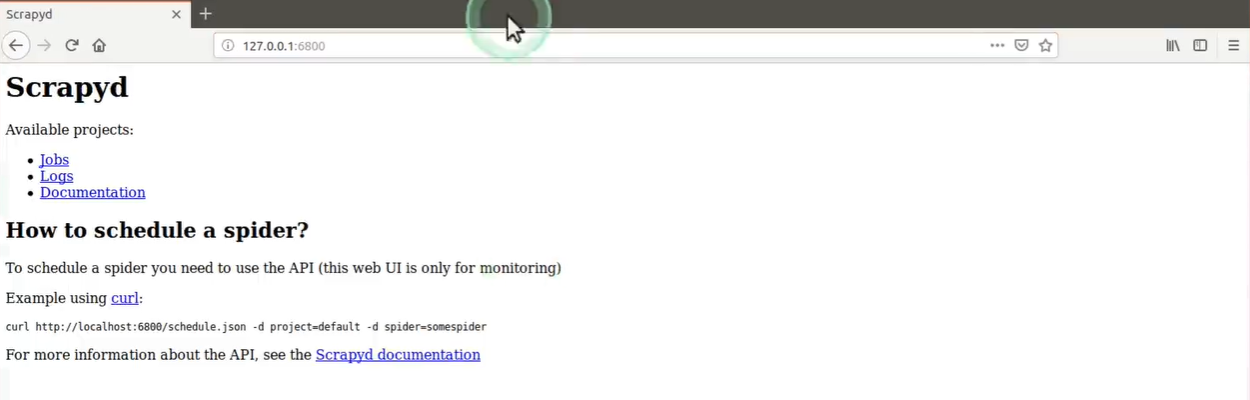
注意点1 : 启动scrapyd后,在设备2的浏览器中输入 http://127.0.0.1:6800 , 出现以下界面表示启动成功.
1.3 (终端) 服务端配置文件设置其他设备连接的Scrapyd的权限(设备2设备3均需配置,这里以设备2为例)
设备2 ScrapyDeploy-2> vim scrapyd.conf 在 scrapyd.conf 中写入的内容如下: ==================================== [scrapyd] # 网页和Json服务器监听的IP地址, 默认为127.0.0.1 (只有修改为0.0.0.0才能在其他设备上访问scrapyd运行之后的服务器) bind_address =0.0.0.0 # 监听的端口默认为6800 http_port = 6800 # 是否打开debug模式,默认为off debug = off ==================================== :wq 设备2 ScrapyDeploy-2> scrapyd- 1
- 2
- 3
- 4
- 5
- 6
- 7
- 8
- 9
- 10
- 11
- 12
- 13
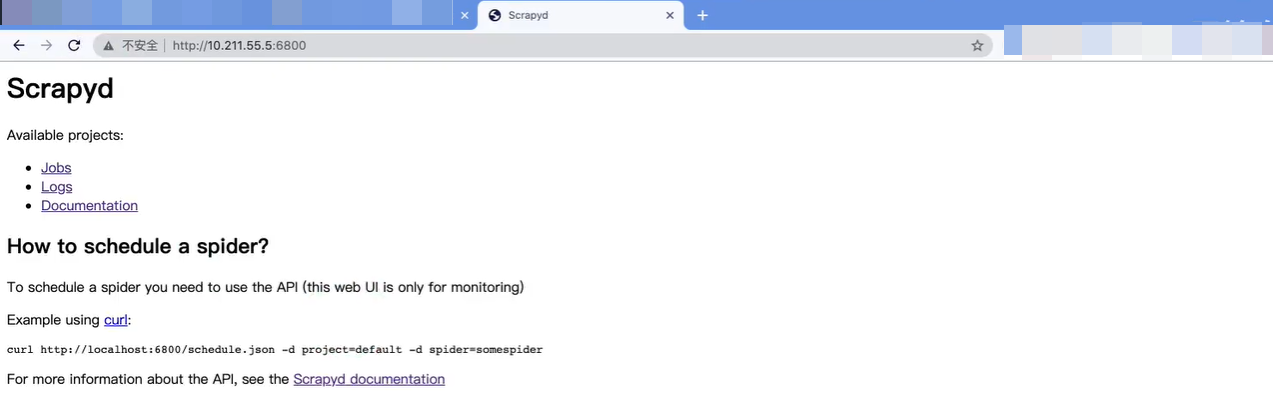
注意点1 : 在客户端 (设备1) 的浏览器中使用地址 http://10.211.55.5:6800 连接到 scrapyd 即表示文件配置成功.
1.4 (终端) 客户端安装 scrapyd-client
设备1 pycharm> pip install scrapyd-client -i https://pypi.tuna.tsinghua.edu.cn/simple- 1
1.5 (终端) 客户端配置 scrapy.cfg 文件
# Automatically created by: scrapy startproject # # For more information about the [deploy] section see: # https://scrapyd.readthedocs.io/en/latest/deploy.html [settings] default = douban.settings [deploy:ubuntu-1] #url = http://10.211.55.5:6800/ project = douban [deploy:ubuntu-2] #url = http://10.211.55.7:6800/ project = douban- 1
- 2
- 3
- 4
- 5
- 6
- 7
- 8
- 9
- 10
- 11
- 12
- 13
- 14
- 15
注意点1 : 配置完成后在scrapy项目路径下执行命令
scrapy-deploy -l(这是小写的L)来检查scrapy配置, 如下图所示则表示成功.
1.6 (终端) 客户端发布 scrapy 项目到scrapyd所在的服务器 (此时爬虫未运行)
scrapy-deploy -p --version
- target:前面配置文件里deploy后面的target名字,如ubuntu-1
- project: 可自定义,与爬虫的工程名字无关, 一般建议与scrapy爬虫项目名相同
- version: 自定义版本号,不写的话默认当前时间戳(一般不写)
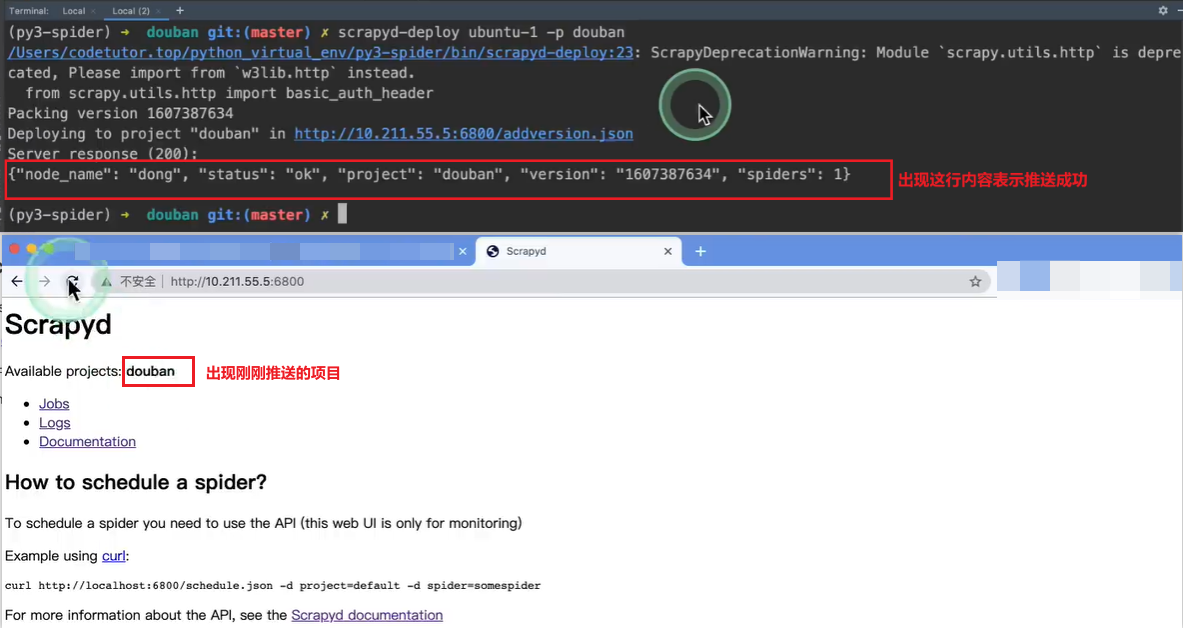
设备1 pycharm> scrapy-deploy ubuntu-1 -p douban- 1
注意点1 : 出现下图内容表示发布成功.
注意点2 : 推送后发现推送的代码有误, 只需要修改后再推送一次即可.
1.7 (终端) 客户端中运行发布到服务端的爬虫代码
设备1 pycharm> curl http://10.211.55.5:6800/schedule.json -d project=douban -d spider=top250- 1
注意点1 : 出现下图内容表示执行成功.

注意点2 : 想要停止爬虫运行, 使用命令
curl http://10.211.55.5:6800/schedule.json -d project=douban -d job=xxx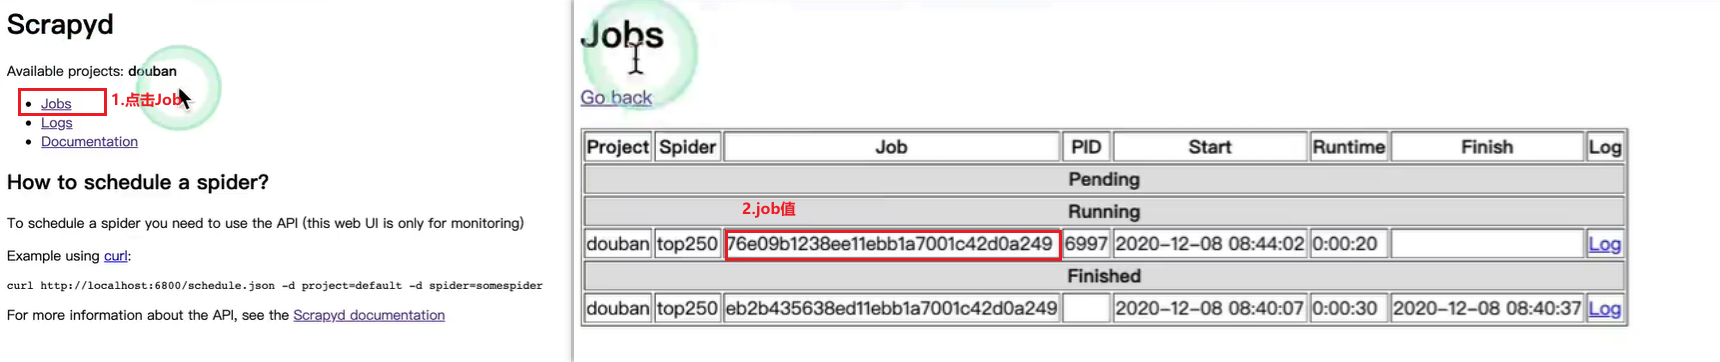
2. (综合) 项目部署 ScrapydWeb 配置使用
ScrapydWeb 是 基于 Scrapyd 的一个可视化部署组件,集成并且提供了更多可视化功能和更优美的界面.
2.1 (终端) 服务端安装并启动 ScrapydWeb
设备2 ScrapyDeploy-2> pip install scrapydweb -i https://pypi.tuna.tsinghua.edu.cn/simple 设备2 Desktop> cd Desktop 设备2 Desktop> mkdir ScrapydWeb-2 设备2 Desktop> cd ScrapydWeb-2 设备2 ScrapydWeb-2> scrapydweb 设备2 ScrapydWeb-2> scrapydweb- 1
- 2
- 3
- 4
- 5
- 6
注意点1 : scrapydweb想要成功运行, scrapyd必须先成功启动.
注意点2 : 运行着scrapydweb的终端不用关, 另起一个终端进行操作.
注意点3 : 首次启动ScrapydWeb挂掉是正常的, 因为我们之前没有在本地配置ScrapydWeb,挂掉之后再起一次即可.
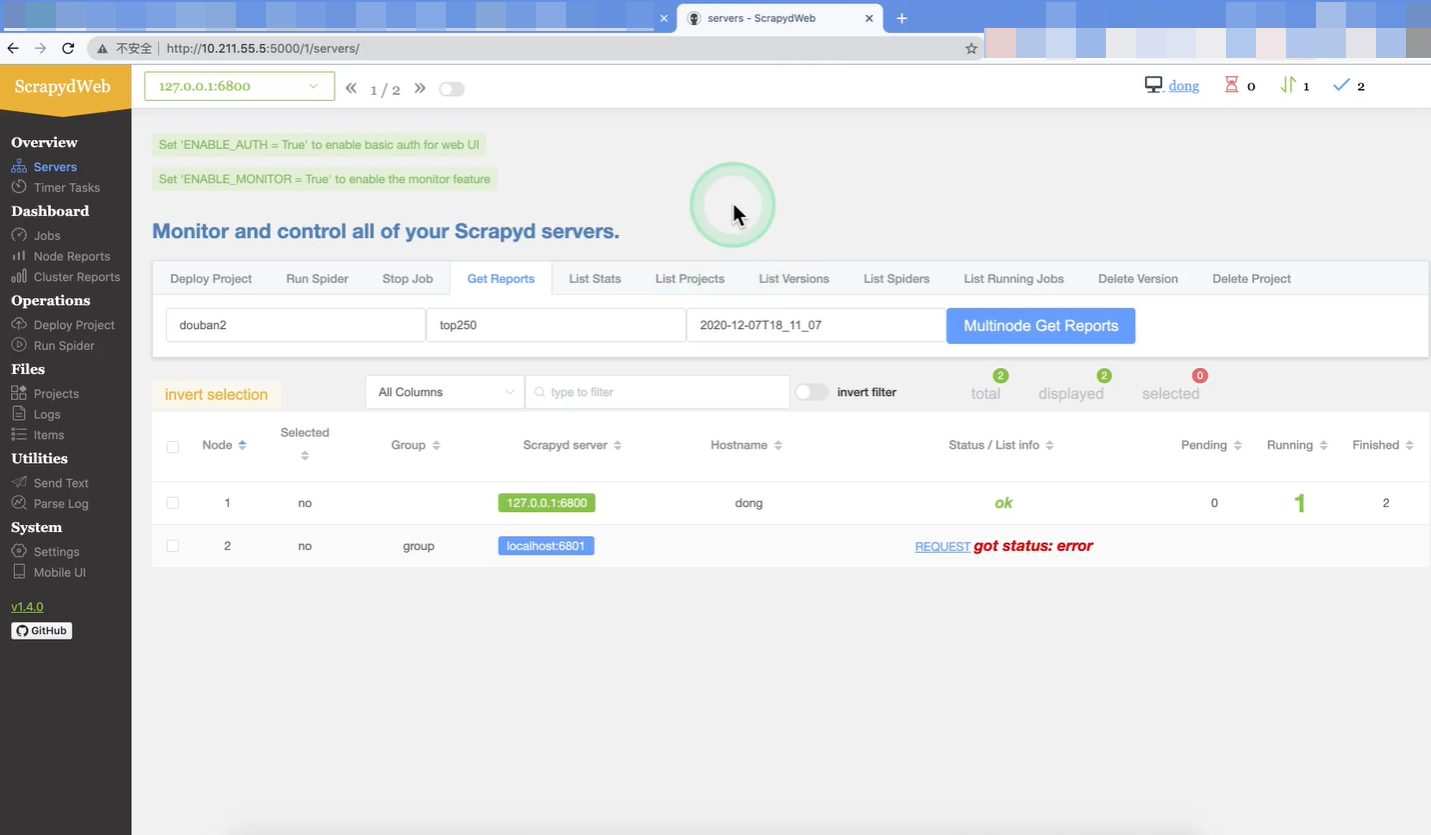
注意点4 : 在客户端的浏览器中输入http://10.211.55.5:5000/1/servers 出现下图表示ScrapydWeb启动成功.
注意点5 : ScrapydWeb有汉化版本, 需要的可自行搜索下载.
2.2 (软件) 客户端使用 ScrapydWeb 上传项目
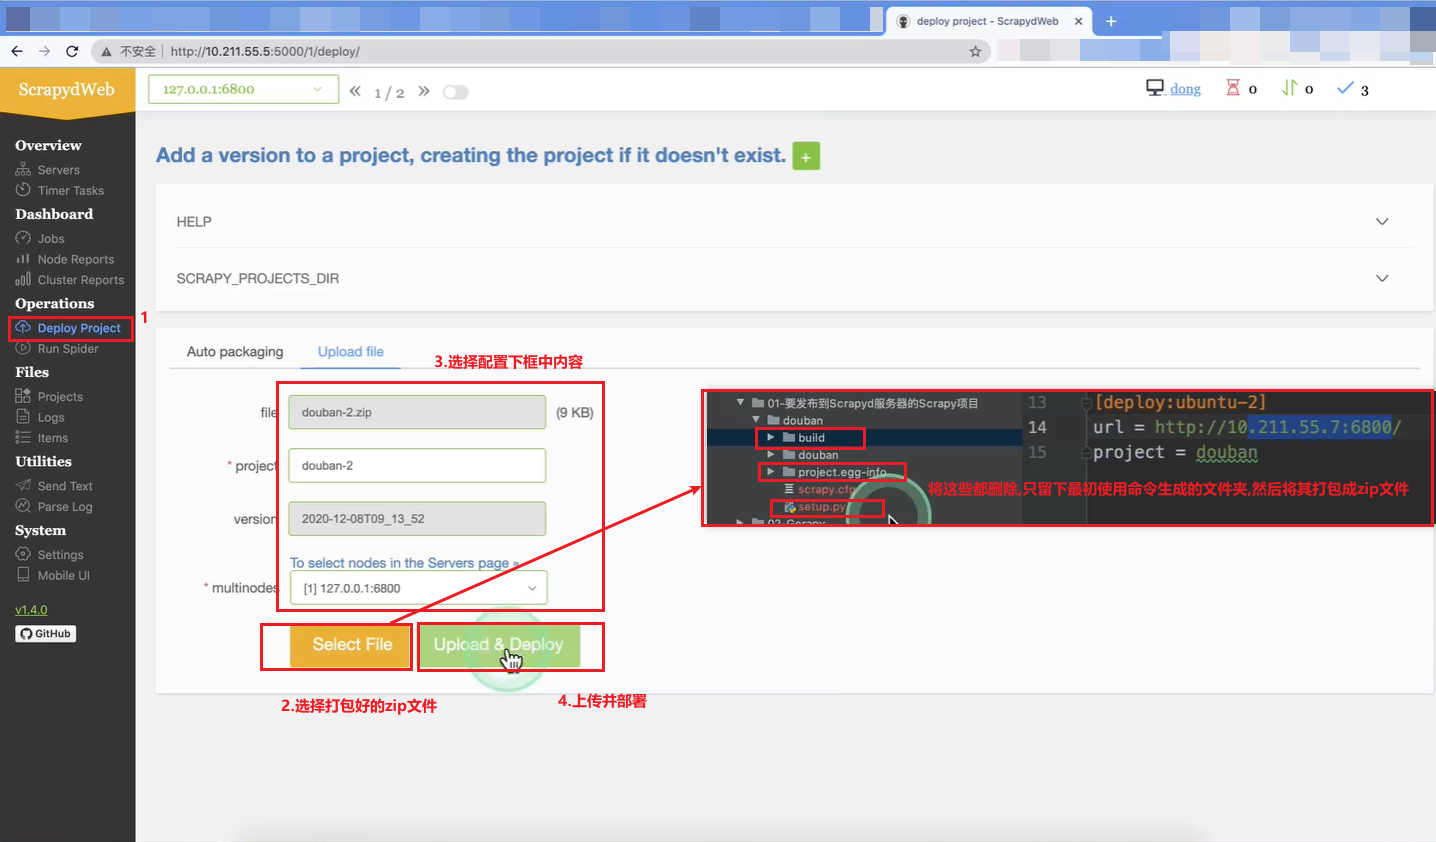
注意点1 : 出现下图内容表示上传部署成功
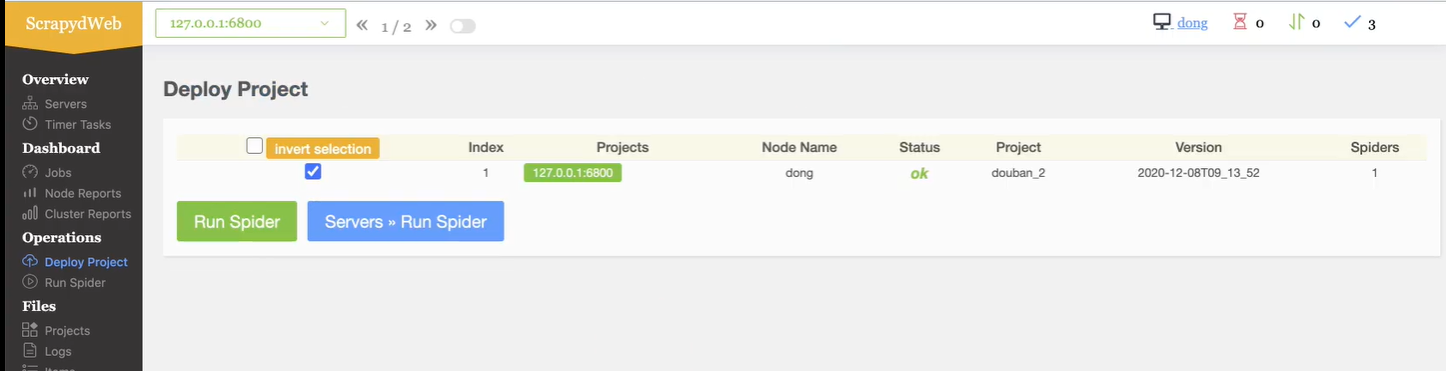
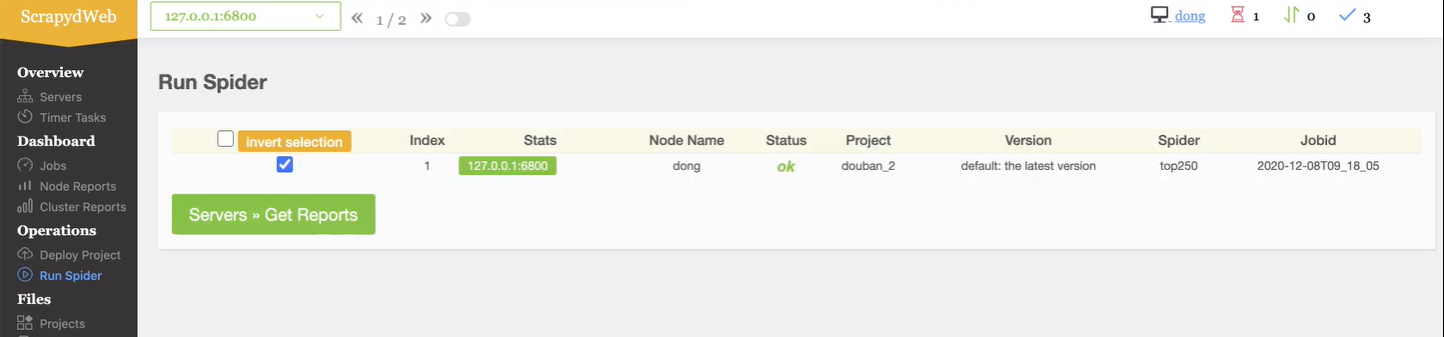
2.3 (软件) 客户端使用 ScrapydWeb 运行项目
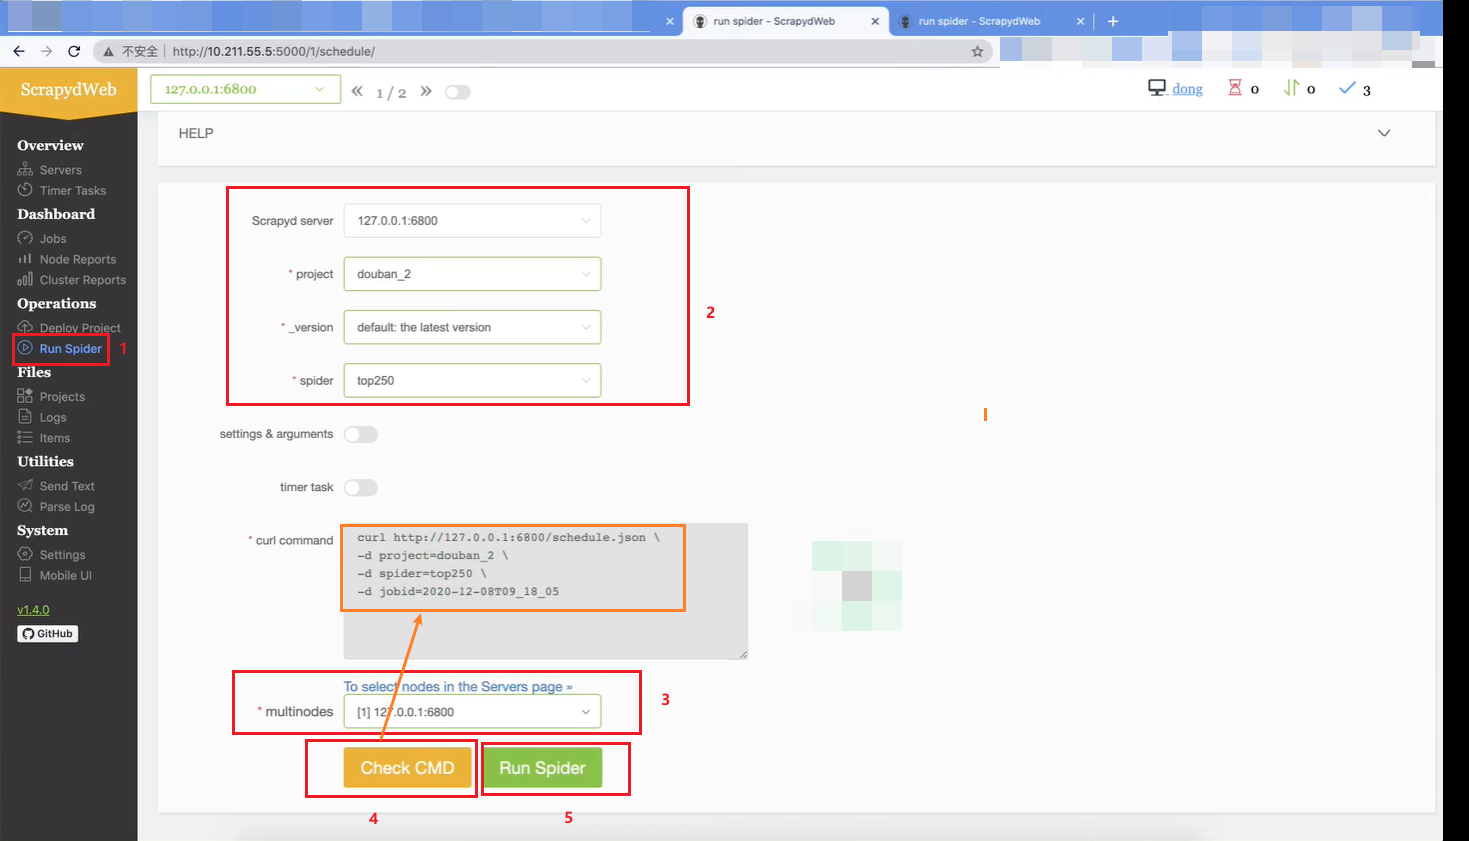
注意点1 : 出现下图内容表示运行项目成功
2.4 (软件) 客户端使用 ScrapydWeb 查看项目

2.5 (终端) 服务端设置 ScrapydWeb 登录密码
设备2 ScrapydWeb-2> vim scrapydweb_settings_v10.py 需要修改的设置如下图所示 ===========================================- 1
- 2
- 3

=========================================== :wq 设备2 ScrapydWeb-2> scrapydweb- 1
- 2
- 3

-
相关阅读:
java基本数据类型Char
时序分解 | Matlab实现CEEMD互补集合经验模态分解时间序列信号分解
CASIO4850万能程序
SparkSQL入门
澜沧古茶在港交所上市申请失效:收入不及八马茶业,股东提前套现
java计算机毕业设计ssm+vue招标投标系统
【嵌入式软件-STM32】按键控制LED & 光敏传感器控制蜂鸣器
【C】(笔试题)指针与数组,指针
DjangoRestFramework框架三种分页功能的实现 - 在DjangoStarter项目模板中封装
YOLOv8改进:HIC-YOLOv8复现魔改HIC-YOLOv5,助力小目标检测(Small Object Detection)
- 原文地址:https://blog.csdn.net/m0_56126722/article/details/126065535
