-
Redis(十) - Redission原理与实践
一、Redission分布式锁原理
基于setnx实现的分布式锁存在下面的问题:

1. Redission介绍
Redisson是一个在Redis的基础上实现的Java驻内存数据网格(In-Memory Data Grid)。它不仅提供了一系列的分布式的Java常用对象,还提供了许多分布式服务。其中包括(BitSet, Set, Multimap, SortedSet, Map, List, Queue, BlockingQueue, Deque, BlockingDeque, Semaphore, Lock, AtomicLong, CountDownLatch, Publish / Subscribe, Bloom filter, Remote service, Spring cache, Executor service, Live Object service, Scheduler service) Redisson提供了使用Redis的最简单和最便捷的方法。Redisson的宗旨是促进使用者对Redis的关注分离(Separation of Concern),从而让使用者能够将精力更集中地放在处理业务逻辑上。

官网地址: https://redisson.org
GitHub地址: https://github.com/redisson/redisson2. Redission基本使用
(1)引入依赖
<dependency> <groupId>org.redisson</groupId> <artifactId>redisson</artifactId> <version>3.13.6</version> </dependency>- 1
- 2
- 3
- 4
- 5
(2)配置Redisson客户端
@Configuration public class RedissonConfig { @Bean public RedissonClient redissonClient(){ // 配置类 Config config = new Config(); // 添加redis地址,这里添加了单点的地址,也可以使用config.useClusterServers()添加集群地址 config.useSingleServer().setAddress("redis://192.168.150.101:6379") .setPassword("123321"); // 创建客户端 return Redisson.create(config); } }- 1
- 2
- 3
- 4
- 5
- 6
- 7
- 8
- 9
- 10
- 11
- 12
- 13
(3)使用Redission的分布式锁
@Resource private RedissionClient redissonClient; @Test void testRedisson() throws Exception{ //获取锁(可重入),指定锁的名称 RLock lock = redissonClient.getLock("anyLock"); //尝试获取锁,参数分别是:获取锁的最大等待时间(期间会重试),锁自动释放时间,时间单位 boolean isLock = lock.tryLock(1, 10, TimeUnit.SECONDS); //判断获取锁成功 if(isLock){ try{ System.out.println("执行业务"); }finally{ //释放锁 lock.unlock(); } } }- 1
- 2
- 3
- 4
- 5
- 6
- 7
- 8
- 9
- 10
- 11
- 12
- 13
- 14
- 15
- 16
- 17
- 18
- 19
改造上一章中的VoucherOrderServiceImpl,使用Redisson分布式锁:
@Service public class VoucherOrderServiceImpl extends ServiceImpl<VoucherOrderMapper, VoucherOrder> implements IVoucherOrderService { @Resource private ISeckillVoucherService seckillVoucherService; @Resource private RedisIdWorker redisIdWorker; @Resource private StringRedisTemplate stringRedisTemplate; @Resource private RedissonClient redissonClient; @Override public Result seckillVoucher(Long voucherId) { // 1.查询优惠券 SeckillVoucher voucher = seckillVoucherService.getById(voucherId); // 2.判断秒杀是否开始 if (voucher.getBeginTime().isAfter(LocalDateTime.now())) { // 尚未开始 return Result.fail("秒杀尚未开始!"); } // 3.判断秒杀是否已经结束 if (voucher.getEndTime().isBefore(LocalDateTime.now())) { // 尚未开始 return Result.fail("秒杀已经结束!"); } // 4.判断库存是否充足 if (voucher.getStock() < 1) { // 库存不足 return Result.fail("库存不足!"); } Long userId = UserHolder.getUser().getId(); // 使用Redis分布式锁 // 创建锁对象 // SimpleRedisLock lock = new SimpleRedisLock("order:" + userId, stringRedisTemplate); // 使用Redisson分布式锁 RLock lock = redissonClient.getLock("lock:order:" + userId); // 获取锁对象 // 无参的tryLock(),默认等待时间是-1表示一直等待,过期时间默认是30s boolean isLock = lock.tryLock(); // 加锁失败 if (!isLock) { return Result.fail("不允许重复下单"); } try { // 获取代理对象(事务) IVoucherOrderService proxy = (IVoucherOrderService) AopContext.currentProxy(); return proxy.createVoucherOrder(voucherId); } finally { // 释放锁 lock.unlock(); } } }- 1
- 2
- 3
- 4
- 5
- 6
- 7
- 8
- 9
- 10
- 11
- 12
- 13
- 14
- 15
- 16
- 17
- 18
- 19
- 20
- 21
- 22
- 23
- 24
- 25
- 26
- 27
- 28
- 29
- 30
- 31
- 32
- 33
- 34
- 35
- 36
- 37
- 38
- 39
- 40
- 41
- 42
- 43
- 44
- 45
- 46
- 47
- 48
- 49
- 50
- 51
- 52
- 53
- 54
- 55
- 56
- 57
- 58
- 59
- 60
- 61
经测试后,Redisson分布式锁也可以防止一人多单场景
3. Redission可重入锁原理
(1)可重入锁流程分析

注意:这里的存放锁的数据结构是Hash结构,因为多了一个字段value存重入次数为了保证获取锁和释放锁的原子性,需要分别通过Lua脚本进行获取锁和释放锁:
- 获取锁的Lua脚本

- 释放锁的Lua脚本

(2)演示可重入锁
编写测试方法:
@Slf4j @SpringBootTest class RedissonTest { @Resource private RedissonClient redissonClient; private RLock lock; @BeforeEach void setUp() { lock = redissonClient.getLock("order"); } @Test void method1() throws InterruptedException { // 尝试获取锁 boolean isLock = lock.tryLock(1L, TimeUnit.SECONDS); if (!isLock) { log.error("获取锁失败 .... 1"); return; } try { log.info("获取锁成功 .... 1"); method2(); log.info("开始执行业务 ... 1"); } finally { log.warn("准备释放锁 .... 1"); lock.unlock(); } } void method2() { // 尝试获取锁 boolean isLock = lock.tryLock(); if (!isLock) { log.error("获取锁失败 .... 2"); return; } try { log.info("获取锁成功 .... 2"); log.info("开始执行业务 ... 2"); } finally { log.warn("准备释放锁 .... 2"); lock.unlock(); } } }- 1
- 2
- 3
- 4
- 5
- 6
- 7
- 8
- 9
- 10
- 11
- 12
- 13
- 14
- 15
- 16
- 17
- 18
- 19
- 20
- 21
- 22
- 23
- 24
- 25
- 26
- 27
- 28
- 29
- 30
- 31
- 32
- 33
- 34
- 35
- 36
- 37
- 38
- 39
- 40
- 41
- 42
- 43
- 44
- 45
- 46
- 47
2022-07-29 11:04:38.030 INFO 3244 --- [ main] com.hmdp.RedissonTest : 获取锁成功 .... 1 2022-07-29 11:04:44.859 INFO 3244 --- [ main] com.hmdp.RedissonTest : 获取锁成功 .... 2 2022-07-29 11:04:45.343 INFO 3244 --- [ main] com.hmdp.RedissonTest : 开始执行业务 ... 2 2022-07-29 11:04:47.307 WARN 3244 --- [ main] com.hmdp.RedissonTest : 准备释放锁 .... 2 2022-07-29 11:04:52.796 INFO 3244 --- [ main] com.hmdp.RedissonTest : 开始执行业务 ... 1 2022-07-29 11:04:53.309 WARN 3244 --- [ main] com.hmdp.RedissonTest : 准备释放锁 .... 1- 1
- 2
- 3
- 4
- 5
- 6
(3)Redisson源码分析
Redisson锁的接口:
public interface RLock extends Lock, RLockAsync { String getName(); void lockInterruptibly(long leaseTime, TimeUnit unit) throws InterruptedException; boolean tryLock(long waitTime, long leaseTime, TimeUnit unit) throws InterruptedException; void lock(long leaseTime, TimeUnit unit); boolean forceUnlock(); boolean isLocked(); boolean isHeldByThread(long threadId); boolean isHeldByCurrentThread(); int getHoldCount(); long remainTimeToLive(); }- 1
- 2
- 3
- 4
- 5
- 6
- 7
- 8
- 9
- 10
- 11
- 12
- 13
- 14
- 15
- 16
- 17
- 18
- 19
- 20
- 21
- 22
- 23
调用Redisson锁的尝试加锁、释放锁的方法:
private RLock lock; // 尝试获取锁 boolean isLock = lock.tryLock(); // 释放锁 lock.unlock();- 1
- 2
- 3
- 4
- 5
RedissonLock尝试加锁源码:
public class RedissonLock extends RedissonExpirable implements RLock { // 1 @Override public boolean tryLock() { return get(tryLockAsync()); } // 2 @Override public RFuture<Boolean> tryLockAsync() { return tryLockAsync(Thread.currentThread().getId()); } // 3 @Override public RFuture<Boolean> tryLockAsync(long threadId) { // 由此可知,调用无参的tryLock()方法时,waitTime默认等待时间是-1 return tryAcquireOnceAsync(-1, -1, null, threadId); } // 4 private RFuture<Boolean> tryAcquireOnceAsync(long waitTime, long leaseTime, TimeUnit unit, long threadId) { if (leaseTime != -1) { return tryLockInnerAsync(waitTime, leaseTime, unit, threadId, RedisCommands.EVAL_NULL_BOOLEAN); } // 调用无参的tryLock()方法时,leaseTime会被赋值为-1,所以执行到这里 // 最终将leaseTime默认设置为30s(long lockWatchdogTimeout = 30 * 1000;) // 该方法是异步Future方法 RFuture<Boolean> ttlRemainingFuture = tryLockInnerAsync(waitTime, commandExecutor.getConnectionManager().getCfg().getLockWatchdogTimeout(), TimeUnit.MILLISECONDS, threadId, RedisCommands.EVAL_NULL_BOOLEAN); ttlRemainingFuture.onComplete((ttlRemaining, e) -> { if (e != null) { return; } // lock acquired if (ttlRemaining) { scheduleExpirationRenewal(threadId); } }); return ttlRemainingFuture; } // 5 此处就是底层源码尝试加锁的lua脚本 <T> RFuture<T> tryLockInnerAsync(long waitTime, long leaseTime, TimeUnit unit, long threadId, RedisStrictCommand<T> command) { internalLockLeaseTime = unit.toMillis(leaseTime); return evalWriteAsync(getName(), LongCodec.INSTANCE, command, "if (redis.call('exists', KEYS[1]) == 0) then " + "redis.call('hincrby', KEYS[1], ARGV[2], 1); " + "redis.call('pexpire', KEYS[1], ARGV[1]); " + "return nil; " + // 获取锁成功返回nil "end; " + "if (redis.call('hexists', KEYS[1], ARGV[2]) == 1) then " + "redis.call('hincrby', KEYS[1], ARGV[2], 1); " + "redis.call('pexpire', KEYS[1], ARGV[1]); " + "return nil; " + // 获取锁成功返回nil "end; " + "return redis.call('pttl', KEYS[1]);", // 获取锁失败返回锁的剩余有效时间,pttl表示以毫秒为单位 Collections.singletonList(getName()), internalLockLeaseTime, getLockName(threadId)); } }- 1
- 2
- 3
- 4
- 5
- 6
- 7
- 8
- 9
- 10
- 11
- 12
- 13
- 14
- 15
- 16
- 17
- 18
- 19
- 20
- 21
- 22
- 23
- 24
- 25
- 26
- 27
- 28
- 29
- 30
- 31
- 32
- 33
- 34
- 35
- 36
- 37
- 38
- 39
- 40
- 41
- 42
- 43
- 44
- 45
- 46
- 47
- 48
- 49
- 50
- 51
- 52
- 53
- 54
- 55
- 56
- 57
- 58
- 59
- 60
- 61
- 62
- 63
RedissonLock释放锁源码:
// 1 @Override public void unlock() { try { get(unlockAsync(Thread.currentThread().getId())); } catch (RedisException e) { if (e.getCause() instanceof IllegalMonitorStateException) { throw (IllegalMonitorStateException) e.getCause(); } else { throw e; } } } // 2 @Override public RFuture<Void> unlockAsync(long threadId) { RPromise<Void> result = new RedissonPromise<Void>(); RFuture<Boolean> future = unlockInnerAsync(threadId); future.onComplete((opStatus, e) -> { cancelExpirationRenewal(threadId); if (e != null) { result.tryFailure(e); return; } if (opStatus == null) { IllegalMonitorStateException cause = new IllegalMonitorStateException("attempt to unlock lock, not locked by current thread by node id: " + id + " thread-id: " + threadId); result.tryFailure(cause); return; } result.trySuccess(null); }); return result; } // 3 此处就是底层源码释放锁的lua脚本 protected RFuture<Boolean> unlockInnerAsync(long threadId) { return evalWriteAsync(getName(), LongCodec.INSTANCE, RedisCommands.EVAL_BOOLEAN, "if (redis.call('hexists', KEYS[1], ARGV[3]) == 0) then " + "return nil;" + "end; " + "local counter = redis.call('hincrby', KEYS[1], ARGV[3], -1); " + "if (counter > 0) then " + "redis.call('pexpire', KEYS[1], ARGV[2]); " + "return 0; " + "else " + "redis.call('del', KEYS[1]); " + "redis.call('publish', KEYS[2], ARGV[1]); " + // 释放锁后,会publish发送通知 "return 1; " + "end; " + "return nil;", Arrays.asList(getName(), getChannelName()), LockPubSub.UNLOCK_MESSAGE, internalLockLeaseTime, getLockName(threadId)); }- 1
- 2
- 3
- 4
- 5
- 6
- 7
- 8
- 9
- 10
- 11
- 12
- 13
- 14
- 15
- 16
- 17
- 18
- 19
- 20
- 21
- 22
- 23
- 24
- 25
- 26
- 27
- 28
- 29
- 30
- 31
- 32
- 33
- 34
- 35
- 36
- 37
- 38
- 39
- 40
- 41
- 42
- 43
- 44
- 45
- 46
- 47
- 48
- 49
- 50
- 51
- 52
- 53
- 54
- 55
- 56
- 57
- 58
- 59
- 60
4. Redisson可重试原理
调用Redisson锁的带等待时间的尝试加锁方法:
private RLock lock; // 尝试获取锁,传入等待时间 boolean isLock = lock.tryLock(1L, TimeUtil.SECONDS);- 1
- 2
- 3
Redisson带等待时间的尝试加锁源码:
// 1 @Override public boolean tryLock(long waitTime, TimeUnit unit) throws InterruptedException { return tryLock(waitTime, -1, unit); } // 2 @Override public boolean tryLock(long waitTime, long leaseTime, TimeUnit unit) throws InterruptedException { // 将等待时间转为毫秒 long time = unit.toMillis(waitTime); long current = System.currentTimeMillis(); long threadId = Thread.currentThread().getId(); // 尝试获取锁,最终会调到尝试获取锁的lua脚本 Long ttl = tryAcquire(waitTime, leaseTime, unit, threadId); // lock acquired if (ttl == null) { // 返回nil表示获取锁成功 return true; } // System.currentTimeMillis() - current 表示前面代码执行的时间 // time -= System.currentTimeMillis() - current 表示剩余等待时间 time -= System.currentTimeMillis() - current; if (time <= 0) { // 没有剩余等待时间,则直接返回获取锁失败 acquireFailed(waitTime, unit, threadId); return false; } current = System.currentTimeMillis(); // 上一步获取锁失败后,则会在此等待并订阅其他线程释放锁的通知 RFuture<RedissonLockEntry> subscribeFuture = subscribe(threadId); // 在剩余等待时间内还没收到释放锁的通知,则会取消订阅并返回获取锁失败 if (!subscribeFuture.await(time, TimeUnit.MILLISECONDS)) { if (!subscribeFuture.cancel(false)) { subscribeFuture.onComplete((res, e) -> { if (e == null) { // 取消订阅 unsubscribe(subscribeFuture, threadId); } }); } acquireFailed(waitTime, unit, threadId); // 返回失败 return false; } try { // 继续计算剩余等待时间 time -= System.currentTimeMillis() - current; if (time <= 0) { acquireFailed(waitTime, unit, threadId); return false; } while (true) { long currentTime = System.currentTimeMillis(); // 再次重试获取锁 ttl = tryAcquire(waitTime, leaseTime, unit, threadId); // lock acquired if (ttl == null) { return true; } time -= System.currentTimeMillis() - currentTime; if (time <= 0) { acquireFailed(waitTime, unit, threadId); return false; } // waiting for message currentTime = System.currentTimeMillis(); // 通过信号量getLatch(),再次等待其他线程释放锁 if (ttl >= 0 && ttl < time) { subscribeFuture.getNow().getLatch().tryAcquire(ttl, TimeUnit.MILLISECONDS); } else { subscribeFuture.getNow().getLatch().tryAcquire(time, TimeUnit.MILLISECONDS); } time -= System.currentTimeMillis() - currentTime; if (time <= 0) { acquireFailed(waitTime, unit, threadId); return false; } } } finally { unsubscribe(subscribeFuture, threadId); } // return get(tryLockAsync(waitTime, leaseTime, unit)); }- 1
- 2
- 3
- 4
- 5
- 6
- 7
- 8
- 9
- 10
- 11
- 12
- 13
- 14
- 15
- 16
- 17
- 18
- 19
- 20
- 21
- 22
- 23
- 24
- 25
- 26
- 27
- 28
- 29
- 30
- 31
- 32
- 33
- 34
- 35
- 36
- 37
- 38
- 39
- 40
- 41
- 42
- 43
- 44
- 45
- 46
- 47
- 48
- 49
- 50
- 51
- 52
- 53
- 54
- 55
- 56
- 57
- 58
- 59
- 60
- 61
- 62
- 63
- 64
- 65
- 66
- 67
- 68
- 69
- 70
- 71
- 72
- 73
- 74
- 75
- 76
- 77
- 78
- 79
- 80
- 81
- 82
- 83
- 84
- 85
- 86
- 87
- 88
- 89
5. Redisson的WatchDog机制
- WatchDog机制(看门狗机制),主要是给锁续期,防止业务没执行完而将锁错误释放
- 注意:当自己不设置有效期时,leaseTime会被默认设为-1时,此时才有WatchDog机制;如果自己设置了有效期,则没有WatchDog机制
WatchDog机制源码:
private <T> RFuture<Long> tryAcquireAsync(long waitTime, long leaseTime, TimeUnit unit, long threadId) { if (leaseTime != -1) { return tryLockInnerAsync(waitTime, leaseTime, unit, threadId, RedisCommands.EVAL_LONG); } // 异步Future方法 RFuture<Long> ttlRemainingFuture = tryLockInnerAsync(waitTime, commandExecutor.getConnectionManager().getCfg().getLockWatchdogTimeout(), TimeUnit.MILLISECONDS, threadId, RedisCommands.EVAL_LONG); // 当tryLockInnerAsync回调完成后,执行该方法 // ttlRemaining表示剩余有效期,e表示异常 ttlRemainingFuture.onComplete((ttlRemaining, e) -> { // 有异常时,直接返回 if (e != null) { return; } // lock acquired if (ttlRemaining == null) { // 执行加锁lua脚本返回nil时,表示加锁成功 // 自动给锁续期 scheduleExpirationRenewal(threadId); } }); return ttlRemainingFuture; } private void scheduleExpirationRenewal(long threadId) { ExpirationEntry entry = new ExpirationEntry(); // EXPIRATION_RENEWAL_MAP是ConcurrentHashMap(private static final ConcurrentMap- 1
- 2
- 3
- 4
- 5
- 6
- 7
- 8
- 9
- 10
- 11
- 12
- 13
- 14
- 15
- 16
- 17
- 18
- 19
- 20
- 21
- 22
- 23
- 24
- 25
- 26
- 27
- 28
- 29
- 30
- 31
- 32
- 33
- 34
- 35
- 36
- 37
- 38
- 39
- 40
- 41
- 42
- 43
- 44
- 45
- 46
- 47
- 48
- 49
- 50
- 51
- 52
- 53
- 54
- 55
- 56
- 57
- 58
- 59
- 60
- 61
- 62
- 63
- 64
- 65
- 66
- 67
- 68
- 69
- 70
- 71
- 72
- 73
- 74
- 75
- 76
- 77
- 78
- 79
- 80
- 81
- 82
- 83
- 84
- 85
- 86
- 87
- 88
- 89
- 90
- 91
- 92
- 93
- 94
- 95
- 96
- 97
释放锁时,取消定时续期任务:
lock.unlock() -> unlockAsync(Thread.currentThread().getId()) -> cancelExpirationRenewal(threadId)- 1
void cancelExpirationRenewal(Long threadId) { // 通过锁的名称获取该锁的定时任务并移除掉 ExpirationEntry task = EXPIRATION_RENEWAL_MAP.get(getEntryName()); if (task == null) { return; } if (threadId != null) { task.removeThreadId(threadId); } if (threadId == null || task.hasNoThreads()) { Timeout timeout = task.getTimeout(); if (timeout != null) { timeout.cancel(); } EXPIRATION_RENEWAL_MAP.remove(getEntryName()); } }- 1
- 2
- 3
- 4
- 5
- 6
- 7
- 8
- 9
- 10
- 11
- 12
- 13
- 14
- 15
- 16
- 17
- 18
- 19
6. 小结:Redisson分布式锁原理
Redisson分布式锁原理:
- 可重入:利用hash结构记录线程id和重入次数
- 可重试:利用信号量和PubSub功能实现等待、唤醒,获取锁失败的重试机制(使用等待唤醒机制,避免过多占用CPU,提高性能)
- 超时续约:利用watchDog,每隔一段时间(releaseTime / 3),重置超时时间

二、Redission锁的MutiLock原理
1. Redisson分布式锁主从一致性问题
- 如果只有一台redis服务器,当redis挂掉后,依赖redis的业务都会受影响,所以为了提高redis的可用性,则需要搭建redis的主从模式
- 一般会通过一主多从,实现读写分离;主节点处理所有写操作,从节点处理所有读操作;
- 从节点需要通过主从同步后,才会有数据,但是主从同步时,存在延时,有延时就会导致主从一致性问题
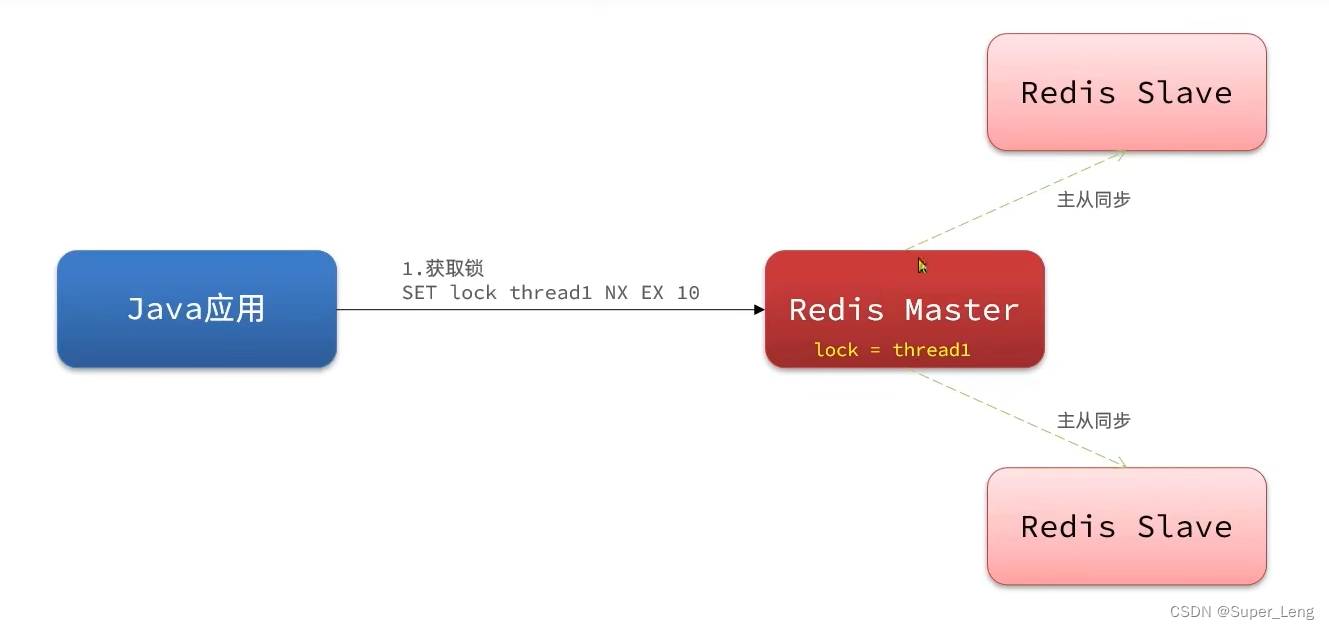
- 当主节点挂掉时,会选一个从节点作为新的主节点
- 当新主节点没来得及同步之前挂掉的旧主节点的锁数据时,此时新主节点没有锁数据,所以相当于之前获取的锁都将失效
- 这时,其他线程就会获取锁成功,造成并发安全问题

2. Redisson使用MutiLock解决主从一致性问题
- MutiLock表示联锁,将多个节点的锁联合在一起
- 由于主从模式会导致一致性问题,所以Redisson将每个节点都视为主节点,所有节点都是独立的,每个节点都能进行读写操作
- 此时获取锁的方式是:依次从每个节点获取锁,都获取成功才算成功
- 如果想提高可用性,每个主节点可以再创建各自的从节点

- 就算有一个主节点挂掉,造成锁失效,但是只要其他任意一个主节点的锁没失效,新来的线程就会加锁失败,这样就避免了并发安全问题

(1)演示MutiLock
配置3个节点6379、6380、6381,演示MutiLock:
@Configuration public class RedissonConfig { @Bean public RedissonClient redissonClient(){ // 配置类 Config config = new Config(); // 添加redis地址,这里添加了单点的地址,也可以使用config.useClusterServers()添加集群地址 config.useSingleServer().setAddress("redis://127.0.0.1:6379").setPassword("123321"); // 创建客户端 return Redisson.create(config); } @Bean public RedissonClient redissonClient2(){ Config config = new Config(); config.useSingleServer().setAddress("redis://127.0.0.1:6380").setPassword("123321"); return Redisson.create(config); } @Bean public RedissonClient redissonClient3(){ Config config = new Config(); config.useSingleServer().setAddress("redis://127.0.0.1:6381").setPassword("123321"); return Redisson.create(config); } }- 1
- 2
- 3
- 4
- 5
- 6
- 7
- 8
- 9
- 10
- 11
- 12
- 13
- 14
- 15
- 16
- 17
- 18
- 19
- 20
- 21
- 22
- 23
- 24
- 25
- 26
编写测试方法:
@Slf4j @SpringBootTest class RedissonTest { @Resource private RedissonClient redissonClient; @Resource private RedissonClient redissonClient2; @Resource private RedissonClient redissonClient3; private RLock lock; @BeforeEach void setUp() { RLock lock1 = redissonClient.getLock("order"); RLock lock2 = redissonClient2.getLock("order"); RLock lock3 = redissonClient3.getLock("order"); // 创建联锁,MultiLock lock = redissonClient.getMultiLock(lock1, lock2, lock3); } @Test void method1() throws InterruptedException { // 尝试获取锁 boolean isLock = lock.tryLock(1L, TimeUnit.SECONDS); if (!isLock) { log.error("获取锁失败 .... 1"); return; } try { log.info("获取锁成功 .... 1"); method2(); log.info("开始执行业务 ... 1"); } finally { log.warn("准备释放锁 .... 1"); lock.unlock(); } } void method2() { // 尝试获取锁 boolean isLock = lock.tryLock(); if (!isLock) { log.error("获取锁失败 .... 2"); return; } try { log.info("获取锁成功 .... 2"); log.info("开始执行业务 ... 2"); } finally { log.warn("准备释放锁 .... 2"); lock.unlock(); } } }- 1
- 2
- 3
- 4
- 5
- 6
- 7
- 8
- 9
- 10
- 11
- 12
- 13
- 14
- 15
- 16
- 17
- 18
- 19
- 20
- 21
- 22
- 23
- 24
- 25
- 26
- 27
- 28
- 29
- 30
- 31
- 32
- 33
- 34
- 35
- 36
- 37
- 38
- 39
- 40
- 41
- 42
- 43
- 44
- 45
- 46
- 47
- 48
- 49
- 50
- 51
- 52
- 53
- 54
- 55
- 56
测试结果:
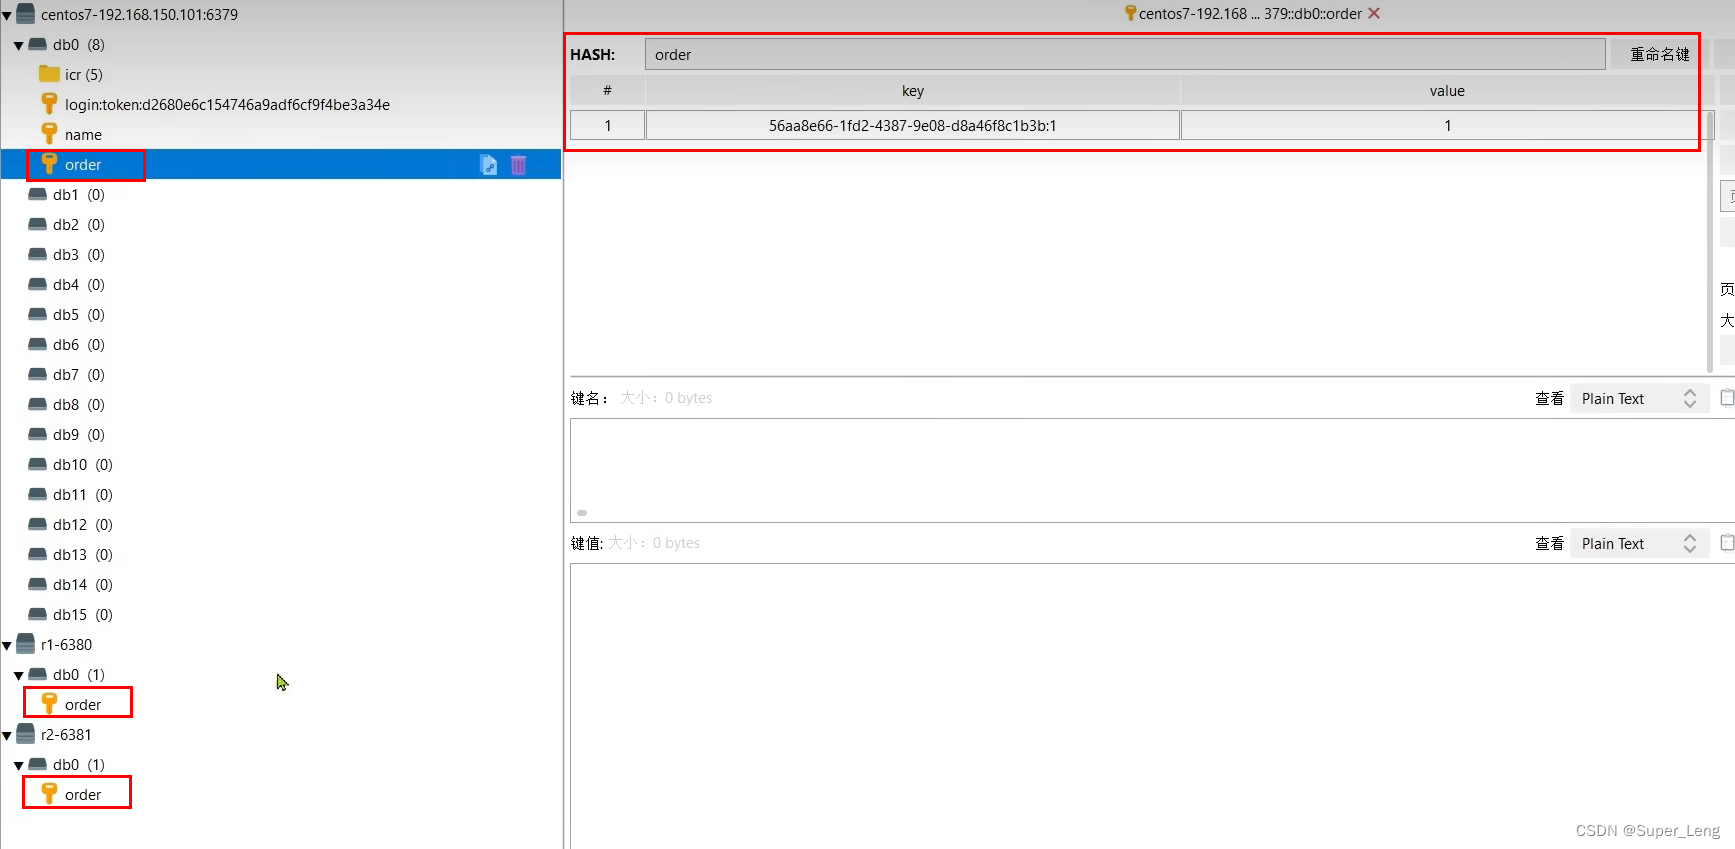
- 联锁就是将每个独立的锁联合在一起,每个独立的锁加锁原理跟Redisson分布式锁原理相同,只是每个独立的锁都加锁成功后,才表示加锁成功
(2)RedissonMultiLock 原理
RedissonMultiLock源码:
public class RedissonMultiLock implements RLock { @Override public boolean tryLock(long waitTime, TimeUnit unit) throws InterruptedException { return tryLock(waitTime, -1, unit); } @Override public boolean tryLock(long waitTime, long leaseTime, TimeUnit unit) throws InterruptedException { long newLeaseTime = -1; // 如果自己设置了有效期leaseTime,则执行这里;如果没设置有效期,则leaseTime默认为-1,不执行这里 if (leaseTime != -1) { // 等待时间waitTime为-1表示只会等待锁释放,不会去重试获取锁 if (waitTime == -1) { newLeaseTime = unit.toMillis(leaseTime); } else { // 等待时间waitTime不为-1表示锁获取失败后,想要继续重试获取锁 // 并且将有效期重新设置为waitTime的2倍,防止等待重试期间,锁到达有效期而被释放,所以有效时间需要比等待时间长才行 newLeaseTime = unit.toMillis(waitTime)*2; } } long time = System.currentTimeMillis(); long remainTime = -1; if (waitTime != -1) { // 当传入了自己设置的等待时间时,将会使用自己设置的等待时间作为剩余等待时间 remainTime = unit.toMillis(waitTime); } // 锁等待的时间lockWaitTime 就是剩余等待时间remainTime long lockWaitTime = calcLockWaitTime(remainTime); // failedLocksLimit()这个值是0,即failedLocksLimit = 0 int failedLocksLimit = failedLocksLimit(); // 获取锁成功的集合,locks是所有独立锁的集合(final Listlocks = new ArrayList<>();) List<RLock> acquiredLocks = new ArrayList<>(locks.size()); // 遍历locks联锁中每个独立的锁 for (ListIterator<RLock> iterator = locks.listIterator(); iterator.hasNext();) { RLock lock = iterator.next(); boolean lockAcquired; try { // lock.tryLock()就是RedissonLock中尝试获取锁的方法 if (waitTime == -1 && leaseTime == -1) { lockAcquired = lock.tryLock(); } else { long awaitTime = Math.min(lockWaitTime, remainTime); lockAcquired = lock.tryLock(awaitTime, newLeaseTime, TimeUnit.MILLISECONDS); } } catch (RedisResponseTimeoutException e) { unlockInner(Arrays.asList(lock)); lockAcquired = false; } catch (Exception e) { lockAcquired = false; } if (lockAcquired) { // 每个独立的锁获取成功后,都会加入到获取锁成功的集合中 acquiredLocks.add(lock); } else { // 获取锁失败后,执行else里面逻辑 // 这里是跳出for循环的条件 if (locks.size() - acquiredLocks.size() == failedLocksLimit()) { break; } // failedLocksLimit初始值就是0,所以满足该条件 if (failedLocksLimit == 0) { // 先释放成功获取锁的集合 unlockInner(acquiredLocks); // waitTime为-1表示不会进行重试,则第一次失败,就直接返回失败 if (waitTime == -1) { return false; } // waitTime不为-1表示获取锁失败后,想继续重试获取锁 failedLocksLimit = failedLocksLimit(); // 先清空成功获取锁的集合 acquiredLocks.clear(); // reset iterator // 重新从独立锁集合的第一个锁开始遍历 while (iterator.hasPrevious()) { iterator.previous(); } // 继续进入for循环重试获取锁,直到获取锁成功或者没有剩余等待时间后,退出循环 } else { failedLocksLimit--; } } // 判断剩余时间 if (remainTime != -1) { remainTime -= System.currentTimeMillis() - time; time = System.currentTimeMillis(); if (remainTime <= 0) { // 获取锁超时后,先将之前获取锁成功的集合释放,然后再返回失败 unlockInner(acquiredLocks); return false; } } // 如果还有剩余时间,则继续执行for循环,遍历下一个独立锁 } // 如果自己设置了锁的有效期leaseTime,则会执行这里; // 否则leaseTime默认为-1,不会执行这里,而是通过WatchDog机制续期 if (leaseTime != -1) { List<RFuture<Boolean>> futures = new ArrayList<>(acquiredLocks.size()); // 所有锁获取成功后,遍历每个成功获取的锁,重新设置有效期 // 因为每个独立锁是依次获取的, // 例如:第一个锁获取成功后,还需要等最后一个锁也获取成功,等待的过程中,前面的锁的有效期提前倒计时消耗了一部分 // 所以,当所有锁获取成功后,需要重新设置有效期,保证所有锁的有效期从头开始倒计时 for (RLock rLock : acquiredLocks) { RFuture<Boolean> future = ((RedissonLock) rLock).expireAsync(unit.toMillis(leaseTime), TimeUnit.MILLISECONDS); futures.add(future); } for (RFuture<Boolean> rFuture : futures) { rFuture.syncUninterruptibly(); } } return true; } }- 1
- 2
- 3
- 4
- 5
- 6
- 7
- 8
- 9
- 10
- 11
- 12
- 13
- 14
- 15
- 16
- 17
- 18
- 19
- 20
- 21
- 22
- 23
- 24
- 25
- 26
- 27
- 28
- 29
- 30
- 31
- 32
- 33
- 34
- 35
- 36
- 37
- 38
- 39
- 40
- 41
- 42
- 43
- 44
- 45
- 46
- 47
- 48
- 49
- 50
- 51
- 52
- 53
- 54
- 55
- 56
- 57
- 58
- 59
- 60
- 61
- 62
- 63
- 64
- 65
- 66
- 67
- 68
- 69
- 70
- 71
- 72
- 73
- 74
- 75
- 76
- 77
- 78
- 79
- 80
- 81
- 82
- 83
- 84
- 85
- 86
- 87
- 88
- 89
- 90
- 91
- 92
- 93
- 94
- 95
- 96
- 97
- 98
- 99
- 100
- 101
- 102
- 103
- 104
- 105
- 106
- 107
- 108
- 109
- 110
- 111
- 112
- 113
- 114
- 115
- 116
- 117
- 118
- 119
- 120
三、分布式锁总结
1. 不可重入Redis分布式锁:
- 原理:利用setnx的互斥性;利用ex避免死锁;释放锁时判断线程标识
- 缺陷:不可重入、无法重试、锁超时失效
2. 可重入的Redis分布式锁:
- 原理:利用hash结构,记录线程标识和重入次数;利用watchDog延续锁时间;利用信号量控制锁重试等待
- 缺陷:redis宕机引起锁失效问题
3. Redisson的multiLock:
- 原理:多个独立的Redis节点,必须在所有节点都获取重入锁,才算获取锁成功
- 缺陷:运维成本高、实现复杂
-
相关阅读:
53 打家劫舍
如何在GitHub正确提PR(Pull Requests),给喜欢的开源项目贡献代码
数据可视化——使用echars图表展示
超好用的IDEA插件推荐
CDN的基本概念
笔记:Android 应用启动流程
【学习笔记】MySQL死锁及热点行问题
SqlServer--get 和 post 请求 http接口
招投标系统简介 企业电子招投标采购系统源码之电子招投标系统 —降低企业采购成本
汽车大灯尾灯划痕裂缝破洞破损掉角崩角等如何修复?根本没必要换车灯换总成,使用无痕修UV树脂胶液即可轻松搞定。
- 原文地址:https://blog.csdn.net/qq_36602071/article/details/126039824
