-
引入redis缓存出现的问题以及解决方式
概述
1.适合放入缓存的数据
1.即时性、数据一致性要求不高的
2.访问量大且更新频率不高的数据(读多,写少)
举例:
    1.电商类应用,商品分类,商品列表等适合缓存并加一个失效时间(根据数据更新频率来定)
    2.后台如果发布一个商品,买家需要5分钟才能看到新的商品一般还是可以接受的
    3.物流信息
2.读模式缓存使用流程


3.本地缓存与局限性
1.集群情况下,每个节点的本地缓存可能会不一致(数据一致性)

4.分布式缓存
使用缓存中间件:
    redis(集群、分片)
整合redis
把redis看做Map
1.使用springboot整合redis
- 1.在需要使用redis的模块导入依赖,启动器
- <dependency>
- <groupId>org.springframework.bootgroupId>
- <artifactId>spring-boot-starter-data-redisartifactId>
- dependency>
-
- 2.RedisAutoConfiguration查看自动配置
- 在.yml增加以下配置
- spring:
- redis:
- host: 192.168.56.10
- port: 6379
3.使用SpringBoot自动配置好的RedisTemplate或者StringRedisTemplate即可操作redis 【一般使用StringRedisTemplate】
2.测试用例
- @Autowired
- StringRedisTemplate stringRedisTemplate;
-
- /**
- * 测试redis
- */
- @Test
- void testRedis() {
- // 获取操作对象
- ValueOperations
-
- // 存储
- ops.set("hello", "world" + UUID.randomUUID());
-
- // 获取
- System.out.println(ops.get("hello"));
- }

3.lettuce堆外内存溢出(springboot2.3.2已解决)
3.1.lettuce、jedis、redistemplate
三者分别是什么?
    lettuce:redis的客户端,对redis操作进行封装,内部使用netty进行网络通信,性能很强
    jedis:redis的客户端,对redis操作进行封装,停止更新了
    redistemplate:是springboot对redis客户端的再封装
3.2.原因
异常描述: 当进行压力测试时后期出现堆外内存溢出OutOfDirectMemoryError(压力测试指查询缓存数据) 原因: 1)springboot2.0以后默认使用lettuce作为操作redis的客户端,它使用netty进行网络通信,使用netty创建连接时未及时释放连接 2)如果没有为netty指定对外内存,默认使用Xms的值(使用-Dio.netty.maxDirectMemory设置值) 解决:(只是调大堆外内存治标不治本) 方法1:升级lettuce客户端(2.3.2已解决) 方法2:切换使用jedis3.3.解决方法:切换jedis
- 步骤:
- 排除lettuce依赖,导入jedis
- <dependency>
- <groupId>org.springframework.bootgroupId>
- <artifactId>spring-boot-starter-data-redisartifactId>
- <exclusions>
- <exclusion>
- <groupId>io.lettucegroupId>
- <artifactId>lettuce-coreartifactId>
- exclusion>
- exclusions>
- dependency>
- <dependency>
- <groupId>redis.clientsgroupId>
- <artifactId>jedisartifactId>
- dependency>
4.缓存失效问题
读模式,会存在缓存失效问题:
    缓存穿透、雪崩、击穿
4.1.缓存穿透(不存在的数据)
缓存穿透: 查询一个一定不存在的数据,导致一定会查询缓存+查询DB,缓存失去意义(大并发过来时任然会查询db) 风险: 利用不存在的数据进行攻击,数据库顺时压力增大,最终导致崩溃 解决: 方法1:将null结果缓存,并加入短暂过期时间 弊端:查询条件使用UUID生成,仍然出现缓存穿透问题,并且redis存满了null 方法2:布隆过滤器,不放行不存在的查询 在redis维护id的hash表过滤掉id不存在的查询(不到达DB层查询)4.2.缓存雪崩(大面积失效)
缓存雪崩: 高并发状态下,大面积redis数据失效,导致所有查询到达DB,DB瞬时压力过重雪崩 解决: 方法1:规避雪崩,设置随机的有效时间(实际上无需设置随机时间,因为每个缓存放入库中的时间本身就不固定) 让每一个缓存过期时间重复率降低, 方法2:永不失效 方法3: 事前:尽量保证整个 redis 集群的高可用性,发现机器宕机尽快补上。选择合适的内存淘汰策略。 事中:本地ehcache缓存 + hystrix限流&降级,避免MySQL崩掉 事后:利用 redis 持久化机制保存的数据尽快恢复缓存 问题:如果已经出现了缓存雪崩,如何解决? 方法1:熔断、降级4.3.缓存击穿(一条失效)
缓存击穿: 高并发状态下,一条数据过期,所有请求到达DB 解决: 方法1:加分布式锁 例原子操作(Redis的SETNX或者Memcache的ADD) 流程:查询cache失败,竞争锁,竞争成功查询cache,查询成功返回释放锁 查询失败则查询DB,并set缓存,并释放锁 方法2:永不失效4.4.锁时效问题
结果放入缓存的操作,应该放在同步代码块内,否则会造成重复查询DB的情况

4.5.模拟分布式本地锁失效
1.启动多份配置 2.修改压测配置 gulimall.com 80 /index/catalog.json 3.开始压测 100个线程 循环5次 4.本地锁失效,多次查询数据库
5.分布式锁
分布式锁就是只有一个坑位,使用redis的分布式锁
http://redis.cn/commands/set.html
赋值多个shell窗口,模拟redis抢占锁的操作
文档1:http://redisdoc.com/string/set.html 文档2:http://www.redis.cn/commands/set.html
docker exec -it redis redis-cli 最下边的数据,右下角的发送给全部回话,每个窗口都执行了前边的命令,进入到了redis:6379的服务
使用占锁的命令:set lock haha NX 全部发送;
-
返回nil
-
OK
-
返回nil

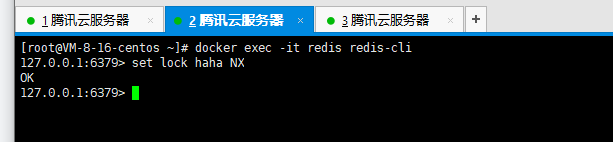

由此可见,第二把锁抢占成功。

5.1.演示分布式锁SETNX

- 代码占用分布式锁:去redis占坑
- Boolean lock = redisTemplate.opsForValue().setIfAbsent("lock","111");
- if(lock){
- //加锁成功
- redisTemplate.delete("lock");//删除分布式锁
- }else{
- //等待上100ms后,再获取下分布式锁重试synchronized()自旋的方式重试
- //休眠100ms之后,再重试
- return 方法();
- }
- set lock 111 EX 300 NX
- ttl lock
- 把一段代码指定成为方法,选中,右键,refactor,Extract,Method Object
5.2.问题合集
问题1:(删除锁)
	未执行删除锁逻辑,会导致其他线程无法获得锁,出现死锁
问题2:(设置过期时间)
    锁释放操作可能失败(服务宕机),所以需要设置过期时间
问题3:(设置过期时间的原子性)
    设置过期时间的代码必须在setnx抢占锁的同时设置,保证原子性
问题4:(仅可以删除当前线程占用的锁)
    删除锁时,可能锁已过期删除了其他线程的锁,占锁时设置值为uuid,删除时判断当前uuid是否相等
    并且需要使用lua脚本执行原子删除操作
如果加锁成功执行业务的时候,getDataFromDb()的时候报错了,锁一直没释放咋整,造成了死锁的问题。所以加了锁,一定要考虑死锁的问题。
如果将删除锁放到了finally代码块中,那么程序执行到finally突然断电了,也会造成死锁的问题。
解决:我们可以给锁设置一个自动过期的时间。即使没有删除或业务崩了,redis也会把锁进行删除。
- if(lock){
- redisTemplate.expire("lock",30,TimeUnits.Second);
- //getdb();
- }
//但是这样又会出现一个问题,如果没有执行过期时间这行代码就断电了?????
占锁的同时设置过期时间,这个操作必须是原子性的操作。
set lock 111 EX 300 NX //300秒ttl lock 观察这个lock还剩下多少的生命周期
Boolean lock = redisTemplate.opsForValue().setIfAbsent("lock","111",300,TimeUnit.SECONDS);
设置过期时间又出现了个问题
加锁业务运行的时间过长,超过了锁的过期时间,此时再进行删除锁,删除的可能就是别人占用的锁了。
解决:占锁的时候,指定uuid,
set("lock",uuid);
if(redisTemplate.opsForValue().get("lock").equals(uuid)){
//删除自己的锁
redisTemplate.delete("lock");
}
//又又又出现了个问题,redis获取锁的时候,时间过长(业务时间+获取锁的时间)超过了锁的过期时间了,获取第一把锁,传递给服务的时候,锁过期了,进来了第二把锁,由于微服务获取的是第一把锁,一对比,一样,就把锁给删除了,实际上删除的是第二把锁。
//先获取值对比+对比成功后删除==原子操作。 lua脚本解锁。
- String script = "if redis.call('get',KEYS[1]) == ARGS[1] then return redis.call('del',KEYS[1]) else return 0 end";
- Long i = redisTemplate.execute(new DefaultRedisScript<Long>(scirpt,Long.class),Arrays.asList("lock"),uuid);
//核心:加锁保证原子性,解锁保证原子性
- public Map<String, List<Catelog2Vo>> getCatalogJsonFromDbWithRedisLock() throws InterruptedException {
- //抢占分布式锁,去redis占坑
- UUID uuid = UUID.randomUUID();
- Boolean flag = stringRedisTemplate.opsForValue().setIfAbsent("lock", uuid.toString(),30L,TimeUnit.SECONDS);
- if(flag){
- //加锁成功
- // stringRedisTemplate.expire("lock",30L,TimeUnit.SECONDS);
- Map<String, List<Catelog2Vo>> dataFromDb = getDataFromDb();
- //本实例的锁执行到这里过期了,它会删除其他实例抢占的锁
- //加了UUID还是不行,由于网络交互,虽然返回的是自己的锁,但是在返回的过程中,自己的锁过期了,来了别的实例的锁,
- // 这里删除的就是别人的锁了。所以删除所,也得是原子操作
- // if(uuid.toString().equals(stringRedisTemplate.opsForValue().get("lock"))){
- // stringRedisTemplate.delete("lock"); //解锁【如果没有删除锁,那么就造成了死锁问题,一直循环等待,程序废了】
- // }
- /**
- * 使用lua脚本,进行原子业务删除锁
- *http://redis.cn/commands/set.html
- */
- String script = "if redis.call(\"get\",KEYS[1]) == ARGV[1]\n" +
- "then\n" +
- " return redis.call(\"del\",KEYS[1])\n" +
- "else\n" +
- " return 0\n" +
- "end";
- Long lock = stringRedisTemplate.execute(new DefaultRedisScript<Long>(script, Long.class), Arrays.asList("lock"), uuid.toString());
- System.out.println("lock == 0,删除失败;lock==1 删除成功");
- return dataFromDb;
- }else{
- //加锁失败。。。重试机制 自旋转
- Thread.sleep(1000);
- return getCatalogJsonFromDbWithRedisLock();
- }
- }
5.3.redis分布式锁版本
- /**
- * 查询三级分类(原生版redis分布式锁版本)
- */
- public Map<String, List<Catalog2VO>> getCatalogJsonFromDBWithRedisLock() {
- // 1.抢占分布式锁,同时设置过期时间
- String uuid = UUID.randomUUID().toString();
- // 使用setnx占锁(setIfAbsent)
- Boolean isLock = redisTemplate.opsForValue().setIfAbsent(CategoryConstant.LOCK_KEY_CATALOG_JSON, uuid, 300, TimeUnit.SECONDS);
- if (isLock) {
- // 2.抢占成功
- Map<String, List<Catalog2VO>> result = null;
- try {
- // 查询DB
- return getCatalogJsonFromDB();
- } finally {
- // 3.查询UUID是否是自己,是自己的lock就删除
- // 封装lua脚本(原子操作解锁)
- // 查询+删除(当前值与目标值是否相等,相等执行删除,不等返回0)
- String luaScript = "if redis.call('get',KEYS[1]) == ARGV[1]\n" +
- "then\n" +
- " return redis.call('del',KEYS[1])\n" +
- "else\n" +
- " return 0\n" +
- "end";
- // 删除锁
- redisTemplate.execute(new DefaultRedisScript<Long>(luaScript, Long.class), Arrays.asList(CategoryConstant.LOCK_KEY_CATALOG_JSON), uuid);
- }
- } else {
- // 4.加锁失败,自旋重试
- try {
- Thread.sleep(200);
- } catch (InterruptedException e) {
- e.printStackTrace();
- }
- return getCatalogJsonFromDBWithRedisLock();
- }
- }
Redisson
文档:
https://github.com/redisson/redisson/wiki/Table-of-Content


1.概述
1.不推荐直接使用SETNX实现分布式锁,应该使用Redisson
因为根据锁的实现会分为
	读写锁、可重入锁、闭锁、信号量、

2.封装了分布式Map、List等类型

3.Redisson与lettuce、jedis一样都是redis的客户端,代替了redisTemplate
2.使用原生redisson(看门狗)
- 步骤:
- 1.引入依赖
- <dependency>
- <groupId>org.redissongroupId>
- <artifactId>redissonartifactId>
- <version>3.13.3version>
- dependency>
- 2.配置类
- import org.redisson.Redisson;
- import org.redisson.api.RedissonClient;
- import org.redisson.config.Config;
- import org.springframework.beans.factory.annotation.Value;
- import org.springframework.context.annotation.Bean;
- import org.springframework.context.annotation.Configuration;
- import java.io.IOException;
- @Configuration
- public class MyRedissonConfig {
- /**
- * 注入客户端实例对象
- */
- @Bean(destroyMethod="shutdown")
- public RedissonClient redisson(@Value("${spring.redis.host}") String host, @Value("${spring.redis.port}")String port) throws IOException {
- // 1.创建配置
- Config config = new Config();
- config.useSingleServer().setAddress("redis://" + host + ":" + port);// 单节点模式
- // config.useSingleServer().setAddress("rediss://" + host + ":" + port);// 使用安全连接
- // config.useClusterServers().addNodeAddress("127.0.0.1:7004", "127.0.0.1:7001");// 集群模式
- // 2.创建redisson客户端实例
- RedissonClient redissonClient = Redisson.create(config);
- return redissonClient;
- }
- }
2、配置redisson
单Redis节点模式
程序化配置方法:
- package com.atguigu.gulimall.product.config;
- import org.redisson.Redisson;
- import org.redisson.api.RedissonClient;
- import org.redisson.config.Config;
- import org.redisson.config.SingleServerConfig;
- import org.springframework.context.annotation.Bean;
- import org.springframework.context.annotation.Configuration;
- import java.io.IOException;
- /**
- * @author pshdhx
- * @date 2022-04-24 14:53
- */
- @Configuration
- public class RedissonConfig {
- /**
- * 所有对Redisson的使用都是通过RedissonClient
- * @return
- * @throws IOException
- */
- @Bean(destroyMethod="shutdown")
- public RedissonClient redisson() throws IOException {
- //1、创建配置
- Config config = new Config();
- config.useSingleServer().setAddress("redis://82.157.206.41:6379");
- //2、根据Config创建出RedissonClient实例
- //Redis url should start with redis:// or rediss://
- RedissonClient redissonClient = Redisson.create(config);
- return redissonClient;
- }
- }
2.1.可重入锁
redisson实现了JUC包下的可重入锁 RLock lock = redissonClient.getLock("redisson_lock");- @ResponseBody
- @GetMapping("/hello")
- public String hello(){
- //1、获取一把锁,只要锁的名字一样,就是同一把锁
- RLock lock = redisson.getLock("my-lock");
- //2、加锁
- lock.lock();//阻塞式等待,可以理解为同步,默认加的锁都是30s后过期。
- //锁的自动续期,如果业务超长,运行期间自动给锁续为30s。不用担心业务时间长,锁自动过期被删除。
- //加锁的业务只要完成,就不会给当前的锁进行续期,即使不手动解锁,锁默认都会在30s后进行自动删除。
- try{
- System.out.println("加锁成功,执行业务..."+Thread.currentThread().getId());
- Thread.sleep(30000);
- }Catch(Exception e){
- }finally{
- //3、解锁,假设解锁的代码没有运行,redisson也不会出现死锁。
- System.out.println("释放锁。。。"+Thread.currentThread().getId());
- lock.unlock();
- }
- return "hello world";
- }
- @ResponseBody
- @GetMapping(value = "/hello")
- public String hello() {
- //1、获取一把锁,只要锁的名字一样,就是同一把锁
- RLock myLock = redisson.getLock("my-lock");
- //2、加锁
- myLock.lock(); //阻塞式等待。默认加的锁都是30s
- //1)、锁的自动续期,如果业务超长,运行期间自动锁上新的30s。不用担心业务时间长,锁自动过期被删掉
- //2)、加锁的业务只要运行完成,就不会给当前锁续期,即使不手动解锁,锁默认会在30s内自动过期,不会产生死锁问题
- // myLock.lock(10,TimeUnit.SECONDS); //10秒钟自动解锁,自动解锁时间一定要大于业务执行时间
- //问题:在锁时间到了以后,不会自动续期
- //1、如果我们传递了锁的超时时间,就发送给redis执行脚本,进行占锁,默认超时就是 我们制定的时间
- //2、如果我们指定锁的超时时间,就使用 lockWatchdogTimeout = 30 * 1000 【看门狗默认时间】
- //只要占锁成功,就会启动一个定时任务【重新给锁设置过期时间,新的过期时间就是看门狗的默认时间】,每隔10秒都会自动的再次续期,续成30秒
- // internalLockLeaseTime 【看门狗时间】 / 3, 10s
- /**
- * 最佳实战
- * lock.lock(40,TimeUnit.SECONDS); //省掉了续期操作,手动解锁。【指定时间大于业务执行时间即可】
- */
- try {
- System.out.println("加锁成功,执行业务..." + Thread.currentThread().getId());
- try {
- TimeUnit.SECONDS.sleep(20);
- } catch (InterruptedException e) {
- e.printStackTrace();
- }
- } catch (Exception ex) {
- ex.printStackTrace();
- } finally {
- //3、解锁 假设解锁代码没有运行,Redisson会不会出现死锁
- System.out.println("释放锁..." + Thread.currentThread().getId());
- myLock.unlock();
- }
- return "hello";
- }
三、lock的看门狗原理,redisson是如何解决死锁
如果说:
lock.lock(10,TimeUnit.SECONDS);//10秒之后自动解锁,自动解锁的时间一定要大于业务的执行时间。
//如果我们传递了锁的超时时间,就发送给redis执行脚本,进行占锁,默认时间就是我们指定的时间。
//如果我们未指定锁的超时时间,获取连接管理器的配置,获取看门狗的时间,30*1000毫秒。
lock.lock()是无限期等待的方法;只有获取锁以后,才会执行业务代码;
lock.tryLock(100,10,TimeUnit.SECONDS); 我们最多等待100秒,如果还没有等待到,那就算了。
RLock fairLock = redisson.getFairLock("anyLock");
fairLock.lock();
公平锁:锁一旦被释放,最先排队的请求会先获取到锁,默认是非公平锁,一起抢占。
2.2.过期时间、自动续期、手动释放(lua原子操作)
原理: // 1)默认过期时间30S // 2)锁自动续期+30S,业务超长情况下(看门狗) // 3)如果线程宕机,看门狗不会自动续期,锁会自动过期 // 4)unlock使用lua脚本释放锁,不会出现误删锁- 代码案例:
- /**
- * 测试redisson实现分布式锁
- */
- @ResponseBody
- @GetMapping("/testRedisson")
- public String test() {
- // 1.获取锁
- RLock lock = redissonClient.getLock("redisson_lock");
- // 2.加锁
- // 1)锁自动续期+30S,业务超长情况下(看门狗)
- // 2)如果线程宕机,看门狗不会自动续期,锁会自动过期
- // 3)unlock使用lua脚本释放锁,不会出现误删锁
- lock.lock();
- try {
- // 加锁成功,执行业务
- System.out.println("加锁成功,执行业务..." + Thread.currentThread().getId());
- Thread.sleep(30000);
- } catch (Exception e) {
- } finally {
- // 3.解锁
- System.out.println("解锁..." + Thread.currentThread().getId());
- lock.unlock();
- }
- return "testRedisson";
- }
2.3.指定超时不自动续期
1.查看源码
	1)当不指定超时时间时,默认30S过期,且启动一个定时任务【自动续期任务】
		续期时间点=默认过期时间/3,没隔10S执行一次续期
	2)当指定超时时间时,不会自动续期

2.推荐设置过期时间
	1)可以省略自动续期操作
	2)若真的超时未完成,则很有可能是数据库宕机,即使续期也无法完成,不应该无限续期下去
/**
 * 测试redisson实现分布式锁
 */
@ResponseBody
@GetMapping("/testRedisson")
public String test() {
    // 1.获取锁
    RLock lock = redissonClient.getLock("redisson_lock");

    // 2.加锁
    // 1)锁自动续期+30S,业务超长情况下(看门狗)
    // 2)如果线程宕机,看门狗不会自动续期,锁会自动过期
    // 3)unlock使用lua脚本释放锁,不会出现误删锁
    lock.lock();

    try {
        // 加锁成功,执行业务
        System.out.println("加锁成功,执行业务..." + Thread.currentThread().getId());
        Thread.sleep(30000);
    } catch (Exception e) {

    } finally {
        // 3.解锁
        System.out.println("解锁..." + Thread.currentThread().getId());
        lock.unlock();
    }

    return "testRedisson";
}
2.4.tryLock
// 尝试加锁,最多等待100秒
// 超时时间30秒
lock.tryLock(100, 30, TimeUnit.SECONDS);
2.5.公平锁
// 有顺序进行加锁操作,按照请求的顺序
RLock lock = redisson.getFairLock("fair-lock");
2.6.读写锁
写+读:读阻塞 写+写:阻塞 读+写:写阻塞 RReadWriteLock rwlock = redisson.getReadWriteLock("lock"); // 读锁 rwlock.readLock().lock(10, TimeUnit.SECONDS); // 写锁 rwlock.writeLock().lock(10, TimeUnit.SECONDS);- //保证能够读到最新数据,修改期间,我们的写锁是一个排他锁(互斥) ,读锁是一个共享锁。
- //只要写锁没有释放,读就必须等待。
- //读+读:都加了读锁,相当于无锁的状态;
- //读+写:有读锁,写需要要等待读锁释放;
- //写+读 :有写锁,读锁需要等待写锁释放;
- //写+写:阻塞方式;
- //总结:只要有写的状态,都必须等待。
- @GetMapping("/write")
- @ResponseBody
- public String writeValue(){
- RReadWriteLock readWriteLock = redissonClient.getReadWriteLock("rw-lock");
- String s = "";
- RLock rLock = readWriteLock.writeLock();
- try{
- //改数据加锁
- rLock.lock();
- s = UUID.randomUUID().toString();
- Thread.sleep(300000);
- redisTemplate.opsForValue().set("writeValue",s);
- }catch (Exception e){
- e.printStackTrace();
- }finally {
- rLock.unlock();
- }
- return s;
- }
- @GetMapping("/read")
- @ResponseBody
- public String reavValue(){
- RReadWriteLock readWriteLock = redissonClient.getReadWriteLock("rw-lock");
- String s = "";
- //加读锁
- RLock rLock = readWriteLock.readLock();
- rLock.lock();
- try{
- s = (String) redisTemplate.opsForValue().get("writeValue");
- }catch (Exception e){
- e.printStackTrace();
- }finally {
- rLock.unlock();
- }
- return s;
- }
2.7.信号量Semphore
先设置一个值
	"park" 3

acquire:获取一个信号量,为0阻塞
release:释放一个信号量,+1
tryacquire:尝试获取一个信号量,不阻塞

作用:【限流】
	所有服务上来了去获取一个信号量,一个一个放行(最多只能n个线程同时执行)
- /**
- * 车库停车
- * 3车位
- * 信号量也可以做分布式限流!!!!!!!!!!!!!!!!
- */
- @GetMapping(value = "/park")
- @ResponseBody
- public String park() throws InterruptedException {
- RSemaphore park = redisson.getSemaphore("park");
- park.acquire(); //获取一个信号、获取一个值,占一个车位
- /**
- * 防止阻塞 tryAcquire
- */
- boolean flag = park.tryAcquire();
- if (flag) {
- //执行业务
- } else {
- return "error";
- }
- return "ok=>" + flag;
- }
- @GetMapping(value = "/go")
- @ResponseBody
- public String go() {
- RSemaphore park = redisson.getSemaphore("park");
- park.release(); //释放一个车位
- return "ok";
- }
2.8.闭锁CountDownLatch
// 等待一组操作执行完毕,统一执行
- /**
- * 5个班级全部走完了,我们才可以锁大门。
- */
- @GetMapping("/lockDoor")
- @ResponseBody
- public String lockDoor() throws InterruptedException {
- RCountDownLatch door = redissonClient.getCountDownLatch("door");
- door.trySetCount(5);
- door.await(); //等待闭锁完成
- return "放假了";
- }
- @GetMapping("/gogogo/{id}")
- @ResponseBody
- public String gogogo(@PathVariable("id") String id){
- RCountDownLatch door = redissonClient.getCountDownLatch("door");
- door.countDown();//计数器-1
- return id+"班级的人都走了";
- }
2.9.锁的粒度
锁的粒度一定要小,例如不应该锁整个商品操作,应该带上商品ID
2.10.redisson分布式锁版本
/** * 查询三级分类(redisson分布式锁版本) */ public Map
数据一致性
写模式,会存在数据一致性问题:
	1.加读写锁实现(所以对一致性高的数据不要放在缓存里)
	2.引入canal,感知mysql更新去更新缓存
	3.读多写多,直接查数据库
1.双写模式和失效模式与最终一致性(指修改数据方案)
注:双写模式和失效模式都会导致数据一致性问题(写和读操作并发时导致,解决,读与写操作加读写锁)

双写模式:
	描述:同时写
	漏洞:缓存有脏数据。操作1写缓存慢于操作2写缓存,导致缓存与DB数据不一致
	解决:
		方案1:写数据库+写缓存整个加锁
		方案2:业务是否允许暂时性数据不一致问题,若允许则给数据设置一个过期时间即可

失效模式:
	描述:DB写完,删除缓存
	注:下图有错误,用户3先读db-1,然后用户2再写db-2,用户2删缓存,用户3写缓存【写入脏数据1】
	漏洞:缓存有脏数据。用户3将db-1写入了缓存
	解决:
		方案1:写数据库+写缓存整个加锁
		方案2:业务是否允许暂时性数据不一致问题,若允许则给数据设置一个过期时间即可
- /**
- * 缓存里边的数据如何和数据库保持一致
- * 1、双写模式
- * 2、失效模式
- * @return
- * @throws InterruptedException
- */
- public Map<String, List
> getCatalogJsonFromDbWithRedissonLock() throws InterruptedException { - //抢占分布式锁,去redis占坑
- /**
- * 锁的粒度越细,速度越快
- */
- RLock lock = redissonClient.getLock("catalogJson-lock");
- //加锁成功
- lock.lock();
- Map<String, List
> dataFromDb = null; - try{
- dataFromDb = getDataFromDb();
- return dataFromDb;
- }catch (Exception e){
- }finally {
- lock.unlock();
- }
- return dataFromDb;
- }
如果是分类的数据修改了,那咋整?
双写模式与失效模式带来的问题


2.解决方案(选用失效模式)

/**
* 缓存一致性的解决
* 锁的粒度越细,越快;
* //粒度约定:具体缓存的是某个数据,锁的粒度是product-11-lock;如果锁的粒度是product-lock ,11号商品是小并发,12号商品是大并发,、
* 用的同一把锁,本来查询11号商品会很快的,但是现在需要等待12号锁的释放后再查询11号商品,会导致查询11号商品速度变慢。
* 1、缓存里边的数据如何和数据库保持一致
* 双写模式:更新数据库后,再更新缓存。问题:缓存读到的数据库可能有延迟,无法达到最终的一致性。
* 1号机器 将记录改为1---->写入数据库------------------------------->将1写入缓存
* 2号机器 将记录改为2-------------->写入数据库--->将2写入缓存
* 由于2号数据来的晚,但是更新缓存较快,1号数据来得早,但是更新缓存慢,最终数据库写入的是2,缓存中写入的是1,有了脏数据的问题。
* 姐解决方法:加锁(在写数据库和写缓存的时候,加锁,全部完成之后,再进行解锁)
* 如果说对数据一致性要求不高,可以在redis设置数据过期时间,进行解决。
*
*
* 失效模式:更新数据库后,删除掉缓存,等待下次主动查询进行更新。
* 1号机器:写数据1-->删除缓存
* 2号机器 写数据2----------------->删除缓存
* 3号机器 读缓存->读的db数据1--------->更新缓存
* 此时,缓存中存取的是数据1,db中存取的是数据2,数据不一致。
* 解决方式:加入读写锁
* 经常修改的数据,不能加缓存。
*
*/
三种方案:
	1.仅加过期时间即可(首先考虑业务造成脏数据的概率,例如用户维度数据(订单数据、用户数据)并发几率很小,每过一段时间触发读的主动更新)
	2.canal订阅binlog的方式(菜单、商品介绍等基础数据)【完美解决】
	3.加读写锁
	4.实时性、一致性要求高的数据,应该直接查数据库

最终方案:
    1.所有数据加上过期时间
    2.读写数据加分布式读写锁(经常写的数据不要放在缓存里)
2.1.canal
canal:
    阿里开源的中间件,可以作为数据库的从服务器,订阅数据库的binlog日志,数据更新canal也同步更新redis

另一作用:
    解析不同的表日志分析计算生成一张新的表记录
    案例:
    	根据用户访问的商品记录、订单记录 + 商品记录表共同生成一张用户推荐表,展示首页的数据(每个用户的首页推荐数据是不一样的)
缓存一致性最终的解决方案:
-
缓存的所有数据都有过期时间,数据过期下一次查询触发主动更新缓存
-
读写数据的时候,加上分布式的读写锁,写的时候排队,读的时候相当于共享锁=无锁。

SpringCache
简介:
    通过注解实现缓存;属于spring内容不是springboot

文档:
    https://docs.spring.io/spring/docs/current/spring-framework-reference/integration.html#spring-integration
开启缓存功能,在方法上:
@EnableCaching
@Cacheable({"category","product"})
//当前结果是可缓存的。如果缓存中有,方法就不用调用;如果缓存中没有,就需要调用,就方法的结果放入到缓存。
//每一个需要缓存的数据,都需要指定到放入到哪个名字的缓存。【实际上是个分区,按照业务类型分区。】
只需要使用注解就能完成缓存操作。
1.整合
- 注:name::key,缓存区域化指name,key是键
- 1.引入SpringCache依赖
org.springframework.boot spring-boot-starter-cache - 2.引入redis依赖
org.springframework.boot spring-boot-starter-data-redis - 3.这一步只是查看一下自动配置类+属性类,没有实际编码动作
- 1)自动配置以下内容:
- 属性类:CacheProperties.java【属性以spring.cache开头】
- 自动配置类:CacheAutoConfiguration.java【会导入RedisCacheConfiguration配置】
- redis自动配置类:RedisCacheConfiguration.java【往IOC注入了redis缓存管理器】
- redis缓存管理器:RedisCacheManager【会初始化所有缓存(决定每个缓存使用什么配置)】
- 【如果RedisCacheConfiguration有就使用,没有就使用默认的(导致缓存使用默认配置,默认配置值来自于this.cacheProperties.getRedis())】
- 注:缓存区域化只是springcache的内容,在redis里数据存放没有区域化的概念,体现为 name::key
- 4.注解解释:
- @Cacheable:更新缓存【读操作:如果当前缓存存在方法不被执行,不存在则执行get方法并更新缓存】
- @CacheEvict:删除缓存【写操作:失效模式,方法执行完删除缓存】
- @CachePut:更新缓存【写操作:双写模式,方法执行完更新缓存】
- @Caching:组合以上多个缓存操作
- @CacheConfig:在类级别共享缓存的相同配置
- 5.属性
- spring:
- redis:
- host: 192.168.56.10
- port: 6379
- cache:
- type: redis # 使用redis作为缓存
- redis:
- time-to-live: 3600s # 过期时间
- # key-prefix: CACHE_ # 会导致自己在@Cacheable里设置的名字失效,所以这里不指定
- use-key-prefix: true # key值加前缀
- cache-null-values: true # 缓存控制
- 6.默认行为:
- key自动生成:缓存名字::key值
- 默认过期时间:-1
- value值默认序列化方式:jdk序列化【值使用jdk序列化后存放到redis】
- 7.自定义行为
- 缓存名字:value = {"category"}【区域划分】
- key值:key = "'levelCategorys'"
- 【接收一个SpEl表达式,可以获取当前方法名,参数列表,单引号表字符串】
- 【使用方法名作为key:"#root.method.name"】
- 过期时间:在application.yml中指定
- 修改序列化方式要在配置类中修改
- 8.配置类【添加@EnableCache使用springcache】
- @EnableConfigurationProperties(CacheProperties.class)
- @EnableCaching
- @Configuration
- public class MyCacheConfig {
- // @Autowired
- // CacheProperties cacheProperties;
- /**
- * 需要将配置文件中的配置设置上
- * 1、使配置类生效
- * 1)开启配置类与属性绑定功能EnableConfigurationProperties
- *
- * @ConfigurationProperties(prefix = "spring.cache") public class CacheProperties
- * 2)注入就可以使用了
- * @Autowired CacheProperties cacheProperties;
- * 3)直接在方法参数上加入属性参数redisCacheConfiguration(CacheProperties redisProperties)
- * 自动从IOC容器中找
- *
- * 2、给config设置上
- */
- @Bean
- RedisCacheConfiguration redisCacheConfiguration(CacheProperties cacheProperties) {
- RedisCacheConfiguration config = RedisCacheConfiguration.defaultCacheConfig();
- config = config.serializeKeysWith(RedisSerializationContext.SerializationPair.fromSerializer(new StringRedisSerializer()));
- config = config.serializeValuesWith(RedisSerializationContext.SerializationPair.fromSerializer(new GenericJackson2JsonRedisSerializer()));
- // 当自己往IOC注入了RedisCacheConfiguration配置类时,以下参数全都失效,需要手动设置
- CacheProperties.Redis redisProperties = cacheProperties.getRedis();
- if (redisProperties.getTimeToLive() != null) {
- config = config.entryTtl(redisProperties.getTimeToLive());
- }
- if (redisProperties.getKeyPrefix() != null) {
- config = config.prefixCacheNameWith(redisProperties.getKeyPrefix());
- }
- if (!redisProperties.isCacheNullValues()) {
- config = config.disableCachingNullValues();
- }
- if (!redisProperties.isUseKeyPrefix()) {
- config = config.disableKeyPrefix();
- }
- return config;
- }
- }
- 9.使用案例:在service层代码上添加注解
- /**
- * 查出所有1级分类
- */
- @Cacheable(value = {"category"}, key = "'level1Categorys'")
- @Override
- public List
getLevel1Categorys() { - System.out.println("调用了getLevel1Categorys...");
- // 查询父id=0
- return baseMapper.selectList(new QueryWrapper
().eq("parent_cid", 0)); - }
redis缓存管理器源码,会初始化过期时间、key前缀、空数据是否缓存、是否使用缓存前缀
- * 整合SpringCache,简化缓存开发
- * 1、引入依赖 cache redis
- * 2、写配置
- * 1、自动配置了那些 CacheAutoConfiguration RedisCacheConfiguration
- * 自动配置好了缓存管理器:RedisCacheManager
- * 2、编写配置文件
- * spring:
- * cache:
- * type: redis
- * 3、测试使用缓存
- * @Cacheable:触发将数据保存到缓存的操作,在serviceImpl中将返回值保存的缓存
- * @CacheEvict:触发将数据库从缓存中进行删除的操作
- * @CachePut:不影响方法,执行缓存
- * @Caching:组合以上的多个操作
- * @CacheConfig:在类级别共享缓存的相同配置
- * 开启缓存功能,在方法上:
- * @EnableCaching
- * @Cacheable({"category","product"})
- * //当前结果是可缓存的。如果缓存中有,方法就不用调用;如果缓存中没有,就需要调用,就方法的结果放入到缓存。
- * //每一个需要缓存的数据,都需要指定到放入到哪个名字的缓存。【实际上是个分区,按照业务类型分区。】
- * 只需要使用注解就能完成缓存操作。
- * 默认行为:
- * 1、如果缓存中有,方法不调用
- * 2、key默认是自动生成,缓存的名字:simpleKey 自动生成的key值
- * 3、缓存的value值,默认使用的jdk序列化机制,将序列化的机制存取到redis
- * 4、默认的ttl时间:-1:默认永久存在
- *
- *
- *
- * 开启自定义缓存:
- * 1、指定我们生成的缓存使用的key :用SPEL表达式指定key属性;@Cacheable(value={"category"},key="'levelCategory'" | key="#root.method.name")
- * SPEL的语法:https://docs.spring.io/spring-framework/docs/current/reference/html/integration.html#cache-spel-context
- * 2、指定缓存数据的存活时间 //spring.cache.redis.ttl = 300000 #30s
- * 3、将value值存取为json格式,方便其他语言的方法能够跨平台调用 : 全局配置configuration bean 但是ttl不是我们指定的了
- *
Spring Cache的配置
在基于redis的配置基础上,配置
1、引入包
- <dependency>
- <groupId>org.springframework.bootgroupId>
- <artifactId>spring-boot-starter-cacheartifactId>
- dependency>
2、application.properties
spring.cache.type=redis3、主启动类中开启cache缓存
- @EnableRedisHttpSession //开启springsession
- @EnableCaching //开启缓存功能
- @EnableFeignClients(basePackages = "com.xunqi.gulimall.product.feign")
- @EnableDiscoveryClient
- @MapperScan("com.xunqi.gulimall.product.dao")
- @SpringBootApplication //(exclude = GlobalTransactionAutoConfiguration.class)
- public class GulimallProductApplication {
- public static void main(String[] args) {
- SpringApplication.run(GulimallProductApplication.class, args);
- }
- }
初次使用Spring Cache的@Cacheable接口
- //每一个需要缓存的数据我们都来指定需要放到哪个名字下的缓存【缓存的分区(按照业务类型进行分区)】
- @Override
- @Cacheable({"category","product"}) //代表当前方法的结果需要缓存,如果缓存中有,那么就方法不用调用了。如果缓存中没有,则会调用方法,将方法的返回结果放入到缓存。
- public List
getLevel1Categorys() { - System.out.println("测试cacheable的缓存");
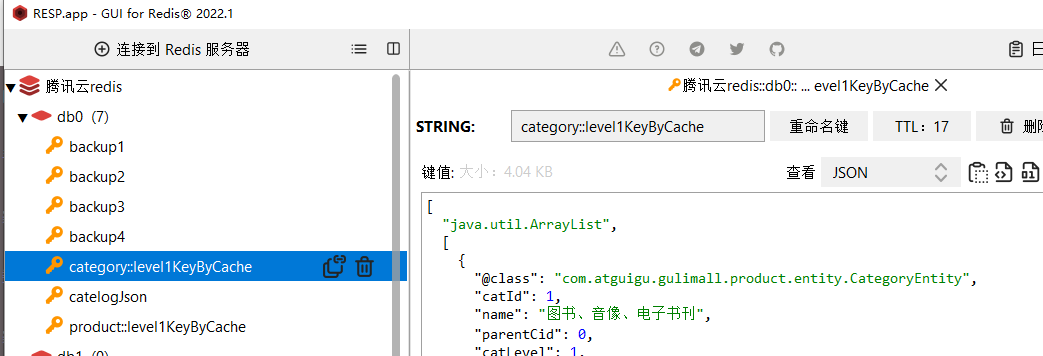
第一次访问页面,控制台打印:

redis的缓存情况:

第二次,第三次访问页面,控制台打印

可见,确实将缓存的结果加载到了redis的缓存,以后访问不直接调用Impl的方法了,直接从redis的缓存中获取数据。
- /**
- * 默认行为:
- * 1、如果缓存中有,方法则不会调用
- * 2、key,默认是自动生成的。category::SimpleKey[]
- * 3、默认使用jdk的序列化机制,将结果缓存到redis
- * 4、默认时间TTL=-1 永不过期,不符合规范
- *
- * 自定义操作:
- * 1、指定缓存的key,使用key属性,接收SPEL表达式,相关语法见
- * https://docs.spring.io/spring-framework/docs/5.2.22.RELEASE/spring-framework-reference/integration.html#cache
- * 直接搜索 root.即可找到 #root.methodName #root.method.name key = "#root.method.name"
- * 2、存活时间
- * 3、如果使用序列化机制,其他语言获取缓存不兼容,需要保存为json模式
- * 4、
- * @return
- */
- @Override
- @Cacheable(value = {"category","product"},key = "'level1KeyByCache'")
- spring.cache.type=redis
- #20 秒
- spring.cache.redis.time-to-live=20000
4、自定义缓存配置
- package com.atguigu.gulimall.product.config;
- import org.springframework.beans.factory.annotation.Autowired;
- import org.springframework.boot.autoconfigure.cache.CacheProperties;
- import org.springframework.boot.context.properties.EnableConfigurationProperties;
- import org.springframework.cache.annotation.EnableCaching;
- import org.springframework.context.annotation.Bean;
- import org.springframework.context.annotation.Configuration;
- import org.springframework.data.redis.cache.RedisCacheConfiguration;
- import org.springframework.data.redis.serializer.GenericJackson2JsonRedisSerializer;
- import org.springframework.data.redis.serializer.RedisSerializationContext;
- import org.springframework.data.redis.serializer.StringRedisSerializer;
- /**
- * @author pshdhx
- * @date 2022-07-25 9:56
- */
- @Configuration
- @EnableCaching
- @EnableConfigurationProperties(CacheProperties.class)
- public class MyCacheConfig {
- /**
- * 配置Cache的源码跟踪
- *
- * CacheAutoConfiguration-->
- * {
- * public String[] selectImports(AnnotationMetadata importingClassMetadata) {
- * CacheType[] types = CacheType.values();
- * String[] imports = new String[types.length];
- *
- * for(int i = 0; i < types.length; ++i) {
- * imports[i] = CacheConfigurations.getConfigurationClass(types[i]);
- * }
- *
- * return imports;
- * }
- * }
- *
- * --->getConfigurationClass 继续获取缓存的配置类型
- * {
- * static {
- * mappings.put(CacheType.REDIS, RedisCacheConfiguration.class);
- *
- * }
- * }
- * --> RedisCacheConfiguration 里边有redis的缓存配置
- * {
- * private org.springframework.data.redis.cache.RedisCacheConfiguration createConfiguration(CacheProperties cacheProperties, ClassLoader classLoader) {
- * Redis redisProperties = cacheProperties.getRedis();
- * org.springframework.data.redis.cache.RedisCacheConfiguration config = org.springframework.data.redis.cache.RedisCacheConfiguration.defaultCacheConfig();
- * config = config.serializeValuesWith(SerializationPair.fromSerializer(new JdkSerializationRedisSerializer(classLoader)));
- * if (redisProperties.getTimeToLive() != null) {
- * config = config.entryTtl(redisProperties.getTimeToLive());
- * }
- *
- * if (redisProperties.getKeyPrefix() != null) {
- * config = config.prefixKeysWith(redisProperties.getKeyPrefix());
- * }
- *
- * if (!redisProperties.isCacheNullValues()) {
- * config = config.disableCachingNullValues();
- * }
- *
- * if (!redisProperties.isUseKeyPrefix()) {
- * config = config.disableKeyPrefix();
- * }
- *
- * return config;
- * }
- * }
- * defaultCacheConfig 里边有默认的配置,拿出来看看
- * {
- * public static RedisCacheConfiguration defaultCacheConfig(@Nullable ClassLoader classLoader) {
- *
- * DefaultFormattingConversionService conversionService = new DefaultFormattingConversionService();
- *
- * registerDefaultConverters(conversionService);
- *
- * return new RedisCacheConfiguration(Duration.ZERO, true, true, CacheKeyPrefix.simple(),
- * SerializationPair.fromSerializer(RedisSerializer.string()),
- * SerializationPair.fromSerializer(RedisSerializer.java(classLoader)), conversionService);
- * }
- * }
- * 可以看到这两个序列化器
- * SerializationPair.fromSerializer(RedisSerializer.string()),
- * SerializationPair.fromSerializer(RedisSerializer.java(classLoader)), conversionService);
- *
- * 下载了Source后,上边的注释
- * *
- {@link org.springframework.data.redis.serializer.StringRedisSerializer}
- * *
- value serializer
- * *
- {@link org.springframework.data.redis.serializer.JdkSerializationRedisSerializer}
- *
- * 所以,value的序列化器要改;
- */
- @Autowired
- CacheProperties cacheProperties;
- @Bean
- RedisCacheConfiguration redisCacheConfiguration(){
- RedisCacheConfiguration config = RedisCacheConfiguration.defaultCacheConfig();
- /**
- * 修改源码中的value的序列化器,这样redis中的value就不会使用jdk的序列化了,防止别的语言拿不到值,所以转为json结构
- */
- config = config.serializeKeysWith(RedisSerializationContext.SerializationPair.fromSerializer(new StringRedisSerializer()));
- config = config.serializeValuesWith(RedisSerializationContext.SerializationPair.fromSerializer(new GenericJackson2JsonRedisSerializer()));
- //让class中的配置文件生效
- /**
- * 1、第一种方法是直接引入到注解@EnableConfigurationProperties(CacheProperties.class)后,直接注入,把源码中的代码拿过来即可。
- * 2、第一种方法是直接引入到注解@EnableConfigurationProperties(CacheProperties.class)后,仿照源码,作为入参,把源码中的代码拿过来即可。
- *
- */
- CacheProperties.Redis redisProperties = cacheProperties.getRedis();
- if (redisProperties.getTimeToLive() != null) {
- config = config.entryTtl(redisProperties.getTimeToLive());
- }
- if (redisProperties.getKeyPrefix() != null) {
- // config = config.prefixCacheNameWith(redisProperties.getKeyPrefix());
- config = config.prefixKeysWith(redisProperties.getKeyPrefix());
- }
- if (!redisProperties.isCacheNullValues()) {
- config = config.disableCachingNullValues();
- }
- if (!redisProperties.isUseKeyPrefix()) {
- config = config.disableKeyPrefix();
- }
- return config;
- }
- }
2.读模式与写模式
2.1.读模式
- 直接在get方法上添加@Cacheable即可
- /**
- * 查出所有1级分类
- */
- @Cacheable(value = {"category"}, key = "'level1Categorys'")
- @Override
- public List
getLevel1Categorys() { - System.out.println("调用了getLevel1Categorys...");
- // 查询父id=0
- return baseMapper.selectList(new QueryWrapper
().eq("parent_cid", 0)); - }
2.2.写模式
- 失效模式
- /**
- * 级联更新
- * 缓存策略:失效模式,方法执行完删除缓存
- */
- @CacheEvict(value = "category", key = "'level1Categorys'")
- @Transactional
- @Override
- public void updateCascade(CategoryEntity category) {
- this.updateById(category);
- if (!StringUtils.isEmpty(category.getName())) {
- // 更新冗余表
- categoryBrandRelationService.updateCategory(category.getCatId(), category.getName());
- // TODO 更新其他冗余表
- }
- }
双写模式
- /**
- * 级联更新
- * 缓存策略:双写模式,方法执行完更新缓存
- */
- @CachePut(value = "category", key = "'level1Categorys'")
- @Transactional
- @Override
- public void updateCascade(CategoryEntity category) {
- this.updateById(category);
- if (!StringUtils.isEmpty(category.getName())) {
- // 更新冗余表
- categoryBrandRelationService.updateCategory(category.getCatId(), category.getName());
- // TODO 更新其他冗余表
- }
- }
2.3.@Caching+失效模式+解决击穿、雪崩、穿透(分布式锁)
- 失效模式,级联更新类型时,删除与类型相关的所有缓存
- 两种方式:
- 方式1:指定每个key
- @Caching(evict = {
- @CacheEvict(value = "category", key = "'getLevel1Categorys'"),
- @CacheEvict(value = "category", key = "'getCatalogJson'")
- })
- 方式2:直接删除区域化内所有缓存
- @CacheEvict(value = {"category"}, allEntries = true)
- /**
- * 级联更新所有关联表的冗余数据
- * 缓存策略:失效模式,方法执行完删除缓存
- */
- @CacheEvict(value = {"category"}, allEntries = true)
- @Transactional
- @Override
- public void updateCascade(CategoryEntity category) {
- this.updateById(category);
- if (!StringUtils.isEmpty(category.getName())) {
- // 更新冗余表
- categoryBrandRelationService.updateCategory(category.getCatId(), category.getName());
- // TODO 更新其他冗余表
- }
- }
- /**
- * 查出所有1级分类
- */
- @Cacheable(value = {"category"}, key = "'getLevel1Categorys'")
- @Override
- public List<CategoryEntity> getLevel1Categorys() {
- System.out.println("调用了getLevel1Categorys...");
- // 查询父id=0
- return baseMapper.selectList(new QueryWrapper<CategoryEntity>().eq("parent_cid", 0));
- }
- /**
- * 查询三级分类并封装成Map返回
- * 使用SpringCache注解方式简化缓存设置
- */
- @Cacheable(value = {"category"}, key = "'getCatalogJson'")
- @Override
- public Map<String, List<Catalog2VO>> getCatalogJsonWithSpringCache() {
- // 未命中缓存
- // 1.抢占分布式锁,同时设置过期时间【不使用读写锁,因为就是为了防止缓存击穿】
- RLock lock = redisson.getLock(CategoryConstant.LOCK_KEY_CATALOG_JSON);
- lock.lock(30, TimeUnit.SECONDS);
- try {
- // 2.double check,占锁成功需要再次检查缓存
- // 查询非空即返回
- String catlogJSON = redisTemplate.opsForValue().get("getCatalogJson");
- if (!StringUtils.isEmpty(catlogJSON)) {
- // 查询成功直接返回不需要查询DB
- Map<String, List<Catalog2VO>> result = JSON.parseObject(catlogJSON, new TypeReference<Map<String, List<Catalog2VO>>>() {
- });
- return result;
- }
- // 3.查询所有分类,按照parentCid分组
- Map<Long, List<CategoryEntity>> categoryMap = baseMapper.selectList(null).stream()
- .collect(Collectors.groupingBy(key -> key.getParentCid()));
- // 4.获取1级分类
- List<CategoryEntity> level1Categorys = categoryMap.get(0L);
- // 5.封装数据
- Map<String, List<Catalog2VO>> result = level1Categorys.stream().collect(Collectors.toMap(key -> key.getCatId().toString(), l1Category -> {
- // 6.查询2级分类,并封装成List
- List<Catalog2VO> catalog2VOS = categoryMap.get(l1Category.getCatId())
- .stream().map(l2Category -> {
- // 7.查询3级分类,并封装成List
- List<Catalog2VO.Catalog3Vo> catalog3Vos = categoryMap.get(l2Category.getCatId())
- .stream().map(l3Category -> {
- // 封装3级分类VO
- Catalog2VO.Catalog3Vo catalog3Vo = new Catalog2VO.Catalog3Vo(l2Category.getCatId().toString(), l3Category.getCatId().toString(), l3Category.getName());
- return catalog3Vo;
- }).collect(Collectors.toList());
- // 封装2级分类VO返回
- Catalog2VO catalog2VO = new Catalog2VO(l1Category.getCatId().toString(), catalog3Vos, l2Category.getCatId().toString(), l2Category.getName());
- return catalog2VO;
- }).collect(Collectors.toList());
- return catalog2VOS;
- }));
- return result;
- } finally {
- // 8.释放锁
- lock.unlock();
- }
- }
4.细节
2.1.@ConfigurationProperties标注方法上使用
- 使用@ConfigurationProperties标注在方法上使用时必须配合@Bean + @Configuration使用
- @Configuration
- public class DruidDataSourceConfig {
- /**
- * DataSource 配置
- * @return
- */
- @ConfigurationProperties(prefix = "spring.datasource.druid.read")
- @Bean(name = "readDruidDataSource")
- public DataSource readDruidDataSource() {
- return new DruidDataSource();
- }
- /**
- * DataSource 配置
- * @return
- */
- @ConfigurationProperties(prefix = "spring.datasource.druid.write")
- @Bean(name = "writeDruidDataSource")
- @Primary
- public DataSource writeDruidDataSource() {
- return new DruidDataSource();
- }
- }
- spring.datasource.druid.write.username=root
- spring.datasource.druid.write.password=1
- spring.datasource.druid.write.driver-class-name=com.mysql.jdbc.Driver
- spring.datasource.druid.read.url=jdbc:mysql://localhost:3306/jpa
- spring.datasource.druid.read.username=root
- spring.datasource.druid.read.password=1
- spring.datasource.druid.read.driver-class-name=com.mysql.jdbc.Driver
2.2.@ConfigurationProperties标注类上使用
- @ConfigurationProperties(prefix = "spring.datasource")
- @Component
- @Setter
- @Getter
- public class DatasourcePro {
- private String url;
- private String username;
- private String password;
- // 配置文件中是driver-class-name, 转驼峰命名便可以绑定成
- private String driverClassName;
- private String type;
- }
- @Controller
- @RequestMapping(value = "/config")
- public class ConfigurationPropertiesController {
- @Autowired
- private DatasourcePro datasourcePro;
- @RequestMapping("/test")
- @ResponseBody
- public Map<String, Object> test(){
- Map<String, Object> map = new HashMap<>();
- map.put("url", datasourcePro.getUrl());
- map.put("userName", datasourcePro.getUsername());
- map.put("password", datasourcePro.getPassword());
- map.put("className", datasourcePro.getDriverClassName());
- map.put("type", datasourcePro.getType());
- return map;
- }
- }
- spring.datasource.url=jdbc:mysql://127.0.0.1:8888/test?useUnicode=false&autoReconnect=true&characterEncoding=utf-8
- spring.datasource.username=root
- spring.datasource.password=root
- spring.datasource.driver-class-name=com.mysql.jdbc.Driver
- spring.datasource.type=com.alibaba.druid.pool.DruidDataSource
2.3. @EnableConfigurationProperties标注在类上使用
- @EnableConfigurationProperties(prefix = "spring.datasource.druid.read")
- @Configuration
- public class DruidDataSourceConfig {
- /**
- * DataSource 配置
- * @return
- */
- @ConfigurationProperties(prefix = "spring.datasource.druid.read")
- @Bean(name = "readDruidDataSource")
- public DataSource readDruidDataSource(JDBCProperties properties) {
- DruidDataSource dataSource = new DruidDataSource();
- // dataSource.setUrl(properties.getXX)
- return dataSource;
- }
- /**
- * DataSource 配置
- * @return
- */
- @ConfigurationProperties(prefix = "spring.datasource.druid.write")
- @Bean(name = "writeDruidDataSource")
- @Primary
- public DataSource writeDruidDataSource() {
- return new DruidDataSource();
- }
- }
5.spring-cache不足
1、读模式:
	缓存穿透:查询一个DB不存在的数据。解决:缓存空数据;ache-null-values=true【布隆过滤器】
	缓存击穿:大量并发进来同时查询一个正好过期的数据。解决:加锁; 默认未加锁【sync = true】只是本地锁
	缓存雪崩:大量的key同时过期。解决:加上过期时间。: spring.cache.redis.time-to-live= 360000s
2、写模式:(缓存与数据库一致)(没有解决)
	1)、手动读写加锁。
	2)、引入canal,感知mysql的更新去更新缓存
	3)、读多写多,直接去查询数据库就行

总结:
	常规数据(读多写少,即时性,一致性要求不高的数据)﹔完全可以使用Spring-Cache,写模式(只要缓存的数据有过期时间就可以)
	特殊数据:特殊设计(canal、读写锁)


在RedisCache里面打断点查看get同步方法
最终版:失效模式+解决击穿、雪崩、穿透(本地锁)
- /**
- * 级联更新所有关联表的冗余数据
- * 缓存策略:失效模式,方法执行完删除缓存
- */
- @CacheEvict(value = {"category"}, allEntries = true)
- @Transactional
- @Override
- public void updateCascade(CategoryEntity category) {
- this.updateById(category);
- if (!StringUtils.isEmpty(category.getName())) {
- // 更新冗余表
- categoryBrandRelationService.updateCategory(category.getCatId(), category.getName());
- // TODO 更新其他冗余表
- }
- }
- /**
- * 查出所有1级分类
- */
- @Cacheable(value = {"category"}, key = "'getLevel1Categorys'", sync = true)
- @Override
- public List<CategoryEntity> getLevel1Categorys() {
- System.out.println("调用了getLevel1Categorys...");
- // 查询父id=0
- return baseMapper.selectList(new QueryWrapper<CategoryEntity>().eq("parent_cid", 0));
- }
- /**
- * 查询三级分类并封装成Map返回
- * 使用SpringCache注解方式简化缓存设置
- */
- @Cacheable(value = {"category"}, key = "'getCatalogJson'", sync = true)
- @Override
- public Map<String, List<Catalog2VO>> getCatalogJsonWithSpringCache() {
- // 未命中缓存
- // 1.double check,占锁成功需要再次检查缓存(springcache使用本地锁)
- // 查询非空即返回
- String catlogJSON = redisTemplate.opsForValue().get("getCatalogJson");
- if (!StringUtils.isEmpty(catlogJSON)) {
- // 查询成功直接返回不需要查询DB
- Map<String, List<Catalog2VO>> result = JSON.parseObject(catlogJSON, new TypeReference<Map<String, List<Catalog2VO>>>() {
- });
- return result;
- }
- // 2.查询所有分类,按照parentCid分组
- Map<Long, List<CategoryEntity>> categoryMap = baseMapper.selectList(null).stream()
- .collect(Collectors.groupingBy(key -> key.getParentCid()));
- // 3.获取1级分类
- List<CategoryEntity> level1Categorys = categoryMap.get(0L);
- // 4.封装数据
- Map<String, List<Catalog2VO>> result = level1Categorys.stream().collect(Collectors.toMap(key -> key.getCatId().toString(), l1Category -> {
- // 5.查询2级分类,并封装成List
- List<Catalog2VO> catalog2VOS = categoryMap.get(l1Category.getCatId())
- .stream().map(l2Category -> {
- // 7.查询3级分类,并封装成List
- List<Catalog2VO.Catalog3Vo> catalog3Vos = categoryMap.get(l2Category.getCatId())
- .stream().map(l3Category -> {
- // 封装3级分类VO
- Catalog2VO.Catalog3Vo catalog3Vo = new Catalog2VO.Catalog3Vo(l2Category.getCatId().toString(), l3Category.getCatId().toString(), l3Category.getName());
- return catalog3Vo;
- }).collect(Collectors.toList());
- // 封装2级分类VO返回
- Catalog2VO catalog2VO = new Catalog2VO(l1Category.getCatId().toString(), catalog3Vos, l2Category.getCatId().toString(), l2Category.getName());
- return catalog2VO;
- }).collect(Collectors.toList());
- return catalog2VOS;
- }));
- return result;
- }
StringRedisTemplate
1.一些使用案例
1.1.BoundHashOperations
- /**
- * 根据用户信息获取购物车redis操作对象
- */
- private BoundHashOperations<String, Object, Object> getCartOps() {
- // 获取用户登录信息
- UserInfoTO userInfo = CartInterceptor.threadLocal.get();
- String cartKey = "";
- if (userInfo.getUserId() != null) {
- // 登录态,使用用户购物车
- cartKey = CartConstant.CART_PREFIX + userInfo.getUserId();
- } else {
- // 非登录态,使用游客购物车
- cartKey = CartConstant.CART_PREFIX + userInfo.getUserKey();
- }
- // 绑定购物车的key操作Redis
- BoundHashOperations<String, Object, Object> operations = redisTemplate.boundHashOps(cartKey);
- return operations;
- }
- get方法:
- /**
- * 根据skuId获取购物车商品信息
- */
- @Override
- public CartItemVO getCartItem(Long skuId) {
- // 获取购物车redis操作对象
- BoundHashOperations<String, Object, Object> cartOps = getCartOps();
- String cartItemJSONString = (String) cartOps.get(skuId.toString());
- CartItemVO cartItemVo = JSON.parseObject(cartItemJSONString, CartItemVO.class);
- return cartItemVo;
- }
- put方法:
- /**
- * 添加sku商品到购物车
- */
- @Override
- public CartItemVO addToCart(Long skuId, Integer num) throws ExecutionException, InterruptedException {
- // 获取购物车redis操作对象
- BoundHashOperations<String, Object, Object> operations = getCartOps();
- // 获取商品
- String cartItemJSONString = (String) operations.get(skuId.toString());
- if (StringUtils.isEmpty(cartItemJSONString)) {
- // 购物车不存在此商品,需要将当前商品添加到购物车中
- CartItemVO cartItem = new CartItemVO();
- CompletableFuture<Void> getSkuInfoFuture = CompletableFuture.runAsync(() -> {
- // 远程查询当前商品信息
- R r = productFeignService.getInfo(skuId);
- SkuInfoVO skuInfo = r.getData("skuInfo", new TypeReference<SkuInfoVO>() {
- });
- cartItem.setSkuId(skuInfo.getSkuId());// 商品ID
- cartItem.setTitle(skuInfo.getSkuTitle());// 商品标题
- cartItem.setImage(skuInfo.getSkuDefaultImg());// 商品默认图片
- cartItem.setPrice(skuInfo.getPrice());// 商品单价
- cartItem.setCount(num);// 商品件数
- cartItem.setCheck(true);// 是否选中
- }, executor);
- CompletableFuture<Void> getSkuAttrValuesFuture = CompletableFuture.runAsync(() -> {
- // 远程查询attrName:attrValue信息
- List<String> skuSaleAttrValues = productFeignService.getSkuSaleAttrValues(skuId);
- cartItem.setSkuAttrValues(skuSaleAttrValues);
- }, executor);
- CompletableFuture.allOf(getSkuInfoFuture, getSkuAttrValuesFuture).get();
- operations.put(skuId.toString(), JSON.toJSONString(cartItem));
- return cartItem;
- } else {
- // 当前购物车已存在此商品,修改当前商品数量
- CartItemVO cartItem = JSON.parseObject(cartItemJSONString, CartItemVO.class);
- cartItem.setCount(cartItem.getCount() + num);
- operations.put(skuId.toString(), JSON.toJSONString(cartItem));
- return cartItem;
- }
- }
-
相关阅读:
SQL:from、where、group by、having、order by的书写与执行顺序
Spring创建复杂对象
数据预处理&降维&主成分分析
解决SpringBoot项目配置文件自动提示功能消失解决方案
[python] 基于diagrams库绘制系统架构图
HCIA学习笔记(6)-ACL+NAT
华为python面试题目
java - 数据结构,双向链表 - LinkedList
Java-1201
【AI视野·今日CV 计算机视觉论文速览 第259期】Tue, 3 Oct 2023
- 原文地址:https://blog.csdn.net/pshdhx/article/details/126035908
