-
element ui富文本编辑器的使用(quill-editor)
element ui富文本编辑器的使用(quill-editor)
效果展示:(可以上传图片及其视频)
可以拖拽图片大小及其位置

第一步、首先安装富文本编辑器插件
cnpm install vue-quill-editor --save cnpm install quill-image-drop-module --save cnpm install quill-image-resize-module --save- 1
- 2
- 3
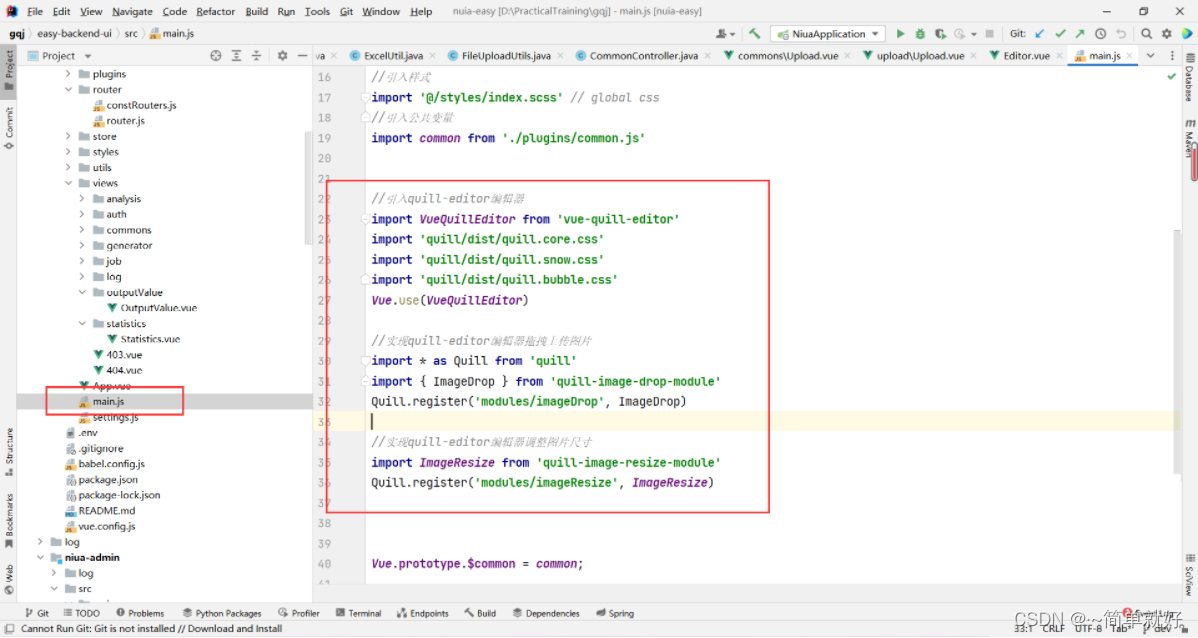
第二步、然后在main.js文件中,全局注册
//引入quill-editor编辑器 import VueQuillEditor from 'vue-quill-editor' import 'quill/dist/quill.core.css' import 'quill/dist/quill.snow.css' import 'quill/dist/quill.bubble.css' Vue.use(VueQuillEditor) //实现quill-editor编辑器拖拽上传图片 import * as Quill from 'quill' import { ImageDrop } from 'quill-image-drop-module' Quill.register('modules/imageDrop', ImageDrop) //实现quill-editor编辑器调整图片尺寸 import ImageResize from 'quill-image-resize-module' Quill.register('modules/imageResize', ImageResize)- 1
- 2
- 3
- 4
- 5
- 6
- 7
- 8
- 9
- 10
- 11
- 12
- 13
- 14
- 15
第三步、在vue界面中使用quill-editor
为了便于大家直接使用,直接把script以及css放在一个页面里,之际copy就可以使用
查看元素 - 1
- 2
- 3
- 4
- 5
- 6
- 7
- 8
- 9
- 10
- 11
- 12
- 13
- 14
- 15
- 16
- 17
- 18
- 19
- 20
- 21
- 22
- 23
- 24
- 25
- 26
- 27
- 28
- 29
- 30
- 31
- 32
- 33
- 34
- 35
- 36
- 37
- 38
- 39
- 40
- 41
- 42
- 43
- 44
- 45
- 46
- 47
- 48
- 49
- 50
- 51
- 52
- 53
- 54
- 55
- 56
- 57
- 58
- 59
- 60
- 61
- 62
- 63
- 64
- 65
- 66
- 67
- 68
- 69
- 70
- 71
- 72
- 73
- 74
- 75
- 76
- 77
- 78
- 79
- 80
- 81
- 82
- 83
- 84
- 85
- 86
- 87
- 88
- 89
- 90
- 91
- 92
- 93
- 94
- 95
- 96
- 97
- 98
- 99
- 100
- 101
- 102
- 103
- 104
- 105
- 106
- 107
- 108
- 109
- 110
- 111
- 112
- 113
- 114
- 115
- 116
- 117
- 118
- 119
- 120
- 121
- 122
- 123
- 124
- 125
- 126
- 127
- 128
- 129
- 130
- 131
- 132
- 133
- 134
- 135
- 136
- 137
- 138
- 139
- 140
- 141
- 142
- 143
- 144
- 145
- 146
- 147
- 148
- 149
- 150
- 151
- 152
- 153
- 154
- 155
- 156
- 157
- 158
- 159
- 160
- 161
- 162
- 163
- 164
- 165
- 166
- 167
- 168
- 169
- 170
- 171
- 172
- 173
- 174
- 175
- 176
- 177
- 178
- 179
- 180
- 181
- 182
- 183
- 184
- 185
- 186
- 187
- 188
- 189
- 190
- 191
- 192
- 193
- 194
- 195
- 196
- 197
- 198
- 199
- 200
- 201
- 202
- 203
- 204
- 205
- 206
- 207
- 208
- 209
- 210
- 211
- 212
- 213
- 214
- 215
- 216
- 217
- 218
- 219
- 220
- 221
- 222
- 223
- 224
- 225
- 226
- 227
- 228
- 229
- 230
- 231
- 232
- 233
- 234
- 235
- 236
- 237
- 238
- 239
- 240
- 241
- 242
- 243
- 244
- 245
- 246
- 247
- 248
- 249
注意:
1、我是在elementUi使用的,上传图片以及页面的访问需要有登录权限,所以我的上传图片视频的组件里有:headers=“headers”,携带登录权限
2、需要更改自己的上传文件的路径(改成自己的)

展示:
此时就quill-editor富文本编辑器就能使用了,除了基本功能之外也能够上传图片


第四步:配置video.js(要有上传视频且回显的功能需要配置)
因为quill-editor富文本编辑器当我们上传mp4等视频类型的文件时,quill-editor会自动的用iframe标签来创建,此时视频文件将不能显示出来,我们需要改写quill-editor提供能video.js文件,更改为video的标签来展示视频
------>此时视频链接已经生成,但是因为iframe标签将不能展示

当我们手动的把页面iframe标签改为video标签时视频就显示出来了,找到问题,开搞

1、创建video.js的空文件
为了方便讲解,我这里放在了页面同一目录下

video.js内容
import { Quill } from 'vue-quill-editor' // 源码中是import直接倒入,这里要用Quill.import引入 const BlockEmbed = Quill.import('blots/block/embed') // const Link = Quill.import('formats/link') const ATTRIBUTES = ['height', 'width'] class Video extends BlockEmbed { static create (value) { const node = super.create(value) // console.log("js文件"+ window.jsValue) // 添加video标签所需的属性 node.setAttribute('controls', 'controls') // 控制播放器 //删除原生video的控制条的下载或者全屏按钮的方法 // //不用哪个在下面加上哪个 node.setAttribute('controlsList', 'nofullscreen') // 控制删除 node.setAttribute('type', 'video/mp4') node.setAttribute('style', 'object-fit:fill;width: 100%;') node.setAttribute('preload', 'auto') // auto - 当页面加载后载入整个视频 meta - 当页面加载后只载入元数据 none - 当页面加载后不载入视频 node.setAttribute('playsinline', 'true') node.setAttribute('x-webkit-airplay', 'allow') // node.setAttribute('x5-video-player-type', 'h5') // 启用H5播放器,是wechat安卓版特性 node.setAttribute('x5-video-orientation', 'portraint') // 竖屏播放 声明了h5才能使用 播放器支付的方向,landscape横屏,portraint竖屏,默认值为竖屏 node.setAttribute('x5-playsinline', 'true') // 兼容安卓 不全屏播放 node.setAttribute('x5-video-player-fullscreen', 'true') // 全屏设置,设置为 true 是防止横屏 node.setAttribute('src', window.jsValue) return node } static formats (domNode) { return ATTRIBUTES.reduce((formats, attribute) => { if (domNode.hasAttribute(attribute)) { formats[attribute] = domNode.getAttribute(attribute) } return formats }, {}) } // static sanitize (url) { // // // eslint-disable-line import/no-named-as-default-member // } static value (domNode) { return domNode.getAttribute('src') } format (name, value) { if (ATTRIBUTES.indexOf(name) > -1) { if (value) { this.domNode.setAttribute(name, value) } else { this.domNode.removeAttribute(name) } } else { super.format(name, value) } } html () { const { video } = this.value() return `${video}">${video}` } } Video.blotName = 'video' // 这里不用改,楼主不用iframe,直接替换掉原来,如果需要也可以保留原来的,这里用个新的blot Video.className = 'ql-video' Video.tagName = 'video' // 用video标签替换iframe export default Video- 1
- 2
- 3
- 4
- 5
- 6
- 7
- 8
- 9
- 10
- 11
- 12
- 13
- 14
- 15
- 16
- 17
- 18
- 19
- 20
- 21
- 22
- 23
- 24
- 25
- 26
- 27
- 28
- 29
- 30
- 31
- 32
- 33
- 34
- 35
- 36
- 37
- 38
- 39
- 40
- 41
- 42
- 43
- 44
- 45
- 46
- 47
- 48
- 49
- 50
- 51
- 52
- 53
- 54
- 55
- 56
- 57
- 58
- 59
- 60
- 61
- 62
- 63
- 64
- 65
- 66
- 67
- 68
- 69
- 70
- 71
2、更改vue界面(引入video.js文件)
(1) 引入video.js
import * as Quill from 'quill' // 这里引入修改过的video模块并注册 import Video from './video' Quill.register(Video, true)- 1
- 2
- 3
- 4

(2) 引入全局变量(供video.js调用)
window.jsValue=imgUrl;- 1

更好好后的vue文件:
查看元素 - 1
- 2
- 3
- 4
- 5
- 6
- 7
- 8
- 9
- 10
- 11
- 12
- 13
- 14
- 15
- 16
- 17
- 18
- 19
- 20
- 21
- 22
- 23
- 24
- 25
- 26
- 27
- 28
- 29
- 30
- 31
- 32
- 33
- 34
- 35
- 36
- 37
- 38
- 39
- 40
- 41
- 42
- 43
- 44
- 45
- 46
- 47
- 48
- 49
- 50
- 51
- 52
- 53
- 54
- 55
- 56
- 57
- 58
- 59
- 60
- 61
- 62
- 63
- 64
- 65
- 66
- 67
- 68
- 69
- 70
- 71
- 72
- 73
- 74
- 75
- 76
- 77
- 78
- 79
- 80
- 81
- 82
- 83
- 84
- 85
- 86
- 87
- 88
- 89
- 90
- 91
- 92
- 93
- 94
- 95
- 96
- 97
- 98
- 99
- 100
- 101
- 102
- 103
- 104
- 105
- 106
- 107
- 108
- 109
- 110
- 111
- 112
- 113
- 114
- 115
- 116
- 117
- 118
- 119
- 120
- 121
- 122
- 123
- 124
- 125
- 126
- 127
- 128
- 129
- 130
- 131
- 132
- 133
- 134
- 135
- 136
- 137
- 138
- 139
- 140
- 141
- 142
- 143
- 144
- 145
- 146
- 147
- 148
- 149
- 150
- 151
- 152
- 153
- 154
- 155
- 156
- 157
- 158
- 159
- 160
- 161
- 162
- 163
- 164
- 165
- 166
- 167
- 168
- 169
- 170
- 171
- 172
- 173
- 174
- 175
- 176
- 177
- 178
- 179
- 180
- 181
- 182
- 183
- 184
- 185
- 186
- 187
- 188
- 189
- 190
- 191
- 192
- 193
- 194
- 195
- 196
- 197
- 198
- 199
- 200
- 201
- 202
- 203
- 204
- 205
- 206
- 207
- 208
- 209
- 210
- 211
- 212
- 213
- 214
- 215
- 216
- 217
- 218
- 219
- 220
- 221
- 222
- 223
- 224
- 225
- 226
- 227
- 228
- 229
- 230
- 231
- 232
- 233
- 234
- 235
- 236
- 237
- 238
- 239
- 240
- 241
- 242
- 243
- 244
- 245
- 246
- 247
- 248
- 249
- 250
- 251
功能展示

-
相关阅读:
深入理解Java虚拟机(第3版)学习笔记——线程安全与锁优化(超详细)
Mosaic数据增强
清洁机器人--沿边测距传感器 sharp psd红外传感器的FOV角度分析
聊一聊 Rust 的 stack overflow
微秒级 TCP 时间戳
docker搭建kafka
设计模式学习(二十一):命令模式
RabbitMQ详解及其特性
lv3 嵌入式开发-4 linux shell命令(文件搜索、文件处理、压缩)
http和https请求总结
- 原文地址:https://blog.csdn.net/qq_45830276/article/details/126021692
