-
Koa框架的基本使用
前言(来自官网)
ES6/7 带来的变革
自ES6确定和ES7的async/await开始普及,node.js的发展变得更加迅速,可以预见到JavaScript中令人“头疼”的多层嵌套回调(注意是”多层嵌套回调“)将会使用Promise + async/await的方式逐渐替代(不是完全替代,多层嵌套回调也有其特殊的应用场景)。
koa2 大势所趋的前景
基于async/await实现中间体系的koa2框架将会是是node.js web开发方向大势所趋的普及框架。基于generator/yield的koa1将会逐渐被koa2替代,毕竟使用co.js来处理generator是一种过渡的方式,虽然有其特定的应用场景,但是用async/await会更加优雅地实现同步写法。
一、Koa是什么?
Koa2 是基于 node.js web serve 框架
koa注册的中间件提供两个参数,即ctx/next。ctx是req和res的集合;next()是执行下一个中间件。二、Koa的安装
1.项目初始化
npm init -y // 生成package.json文件- 1
2.安装Koa2
npm install koa --save- 1
3.Hello world
const Koa = require('koa') // 导入Koa const app = new Koa() // 实例化app对象 app.use( async ( ctx ) => { // 编写中间件 ctx.body = 'Hello world' }) app.listen(3000) // 启动服务 console.log('[demo] start-quick is starting at port 3000')- 1
- 2
- 3
- 4
- 5
- 6
- 7
- 8
- 9
4.启动Demo
node index.js // 访问http:localhost:3000- 1

三、中间件
一个流程上独立的业务模块,可扩展、可插拔。简单来说,就是将复杂的业务拆分成独立的函数,就是中间件。
包含但不限于:
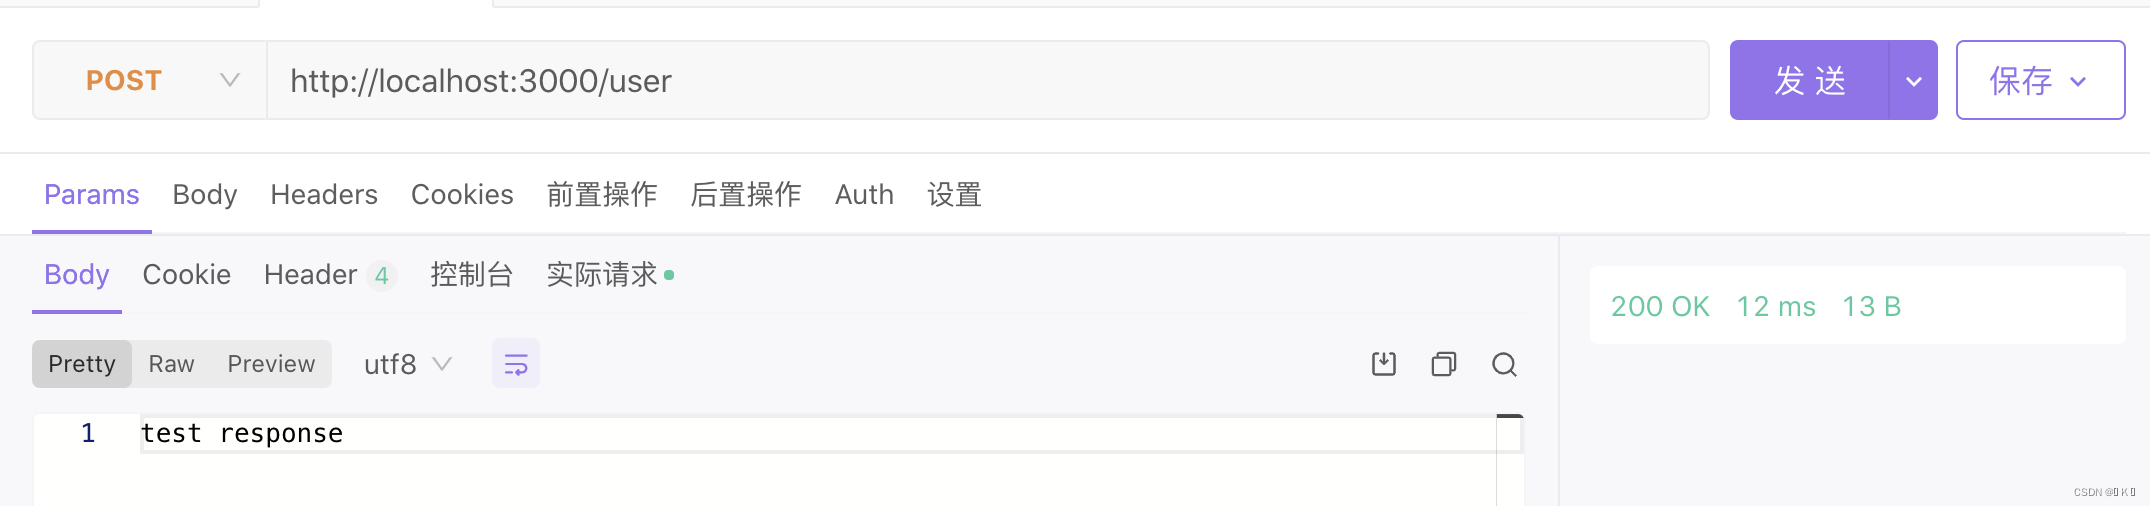
1、npm install koa-router 路由库const Koa = require('koa'); const Router = require('koa-router'); // 导入koa-router中间件 const app = new Koa(); const userRouter = new Router({ prefix: '/user' }); // 属性前缀 userRouter.get('/test', (ctx, next) => { ctx.response.body = "test request" // console.log(ctx.params.id) }); userRouter.post('/', (ctx, next) => { ctx.response.body = "test response" }); app // .use((ctx, next) => { // ctx.body = ctx.request.query // }) .use(userRouter.routes()) //注册为中间件 .use(userRouter.allowedMethods()) //用于判断某一个 method 是否支持,Method Not Allowed app.listen(3000, () => { console.log("dome is start") })- 1
- 2
- 3
- 4
- 5
- 6
- 7
- 8
- 9
- 10
- 11
- 12
- 13
- 14
- 15
- 16
- 17
- 18
- 19
- 20
- 21
- 22
- 23
- 24
- 25

获取params参数:userRouter.get('/test/:id', (ctx, next) => { ctx.response.body = "test request" console.log(ctx.params.id) });- 1
- 2
- 3
- 4


获取query参数:
.use((ctx, next) => { ctx.body = ctx.request.query })- 1
- 2
- 3

实现二级路由:const Koa = require('koa') const fs = require('fs') const app = new Koa() const Router = require('koa-router') let home = new Router() // 子路由1 home.get('/', async ( ctx )=>{ let html = ` ` ctx.body = html }) // 子路由2 let page = new Router() page.get('/404', async ( ctx )=>{ ctx.body = '404 page!' }).get('/helloworld', async ( ctx )=>{ ctx.body = 'helloworld page!' }) // 装载所有子路由 let router = new Router() router.use('/', home.routes(), home.allowedMethods()) router.use('/page', page.routes(), page.allowedMethods()) // 加载路由中间件 app.use(router.routes()).use(router.allowedMethods()) app.listen(3000, () => { console.log('[demo] route-use-middleware is starting at port 3000') })- 1
- 2
- 3
- 4
- 5
- 6
- 7
- 8
- 9
- 10
- 11
- 12
- 13
- 14
- 15
- 16
- 17
- 18
- 19
- 20
- 21
- 22
- 23
- 24
- 25
- 26
- 27
- 28
- 29
- 30
- 31
- 32
- 33
- 34
- 35
- 36
- 37
- 38


2、npm install koa-bodyparser 解析json数据
const Koa = require('koa') const bodyParser = require('koa-bodyparser') // 导入koa-bodyparser中间件 const app = new Koa() app.use(bodyParser()) // 使用ctx.body解析中间件 app.use(async (ctx) => { if (ctx.url === '/' && ctx.method === 'GET') { const html = ` ` ctx.body = html } else if (ctx.url === '/' && ctx.method === 'POST') { ctx.body = ctx.request.body //关键句,koa-bodyparser解析POST表单里的数据,为json类型 } else { ctx.body = "404 Not Found
" } }) app.listen(3000) console.log('[demo] start-quick is starting at port 3000')- 1
- 2
- 3
- 4
- 5
- 6
- 7
- 8
- 9
- 10
- 11
- 12
- 13
- 14
- 15
- 16
- 17
- 18
- 19
- 20
- 21
- 22
- 23
- 24
- 25

四、洋葱模式
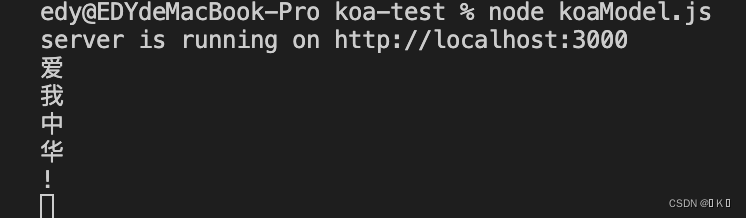
在洋葱模型中,当我们执行第一个中间件时,首先输出爱,然后调用next(),那么此时它会等第二个中间件执行完毕才会继续执行第一个中间件。然后执行第二个中间件,输出我,调用next(),执行第三中间件,输出中.此时第三个中间件执行完毕,返回到第二个中间件,输出华,然后返回到第一个中间件,输出!。
// 1. 导入koa包 const Koa = require('koa') // 2. 实例化对象 const app = new Koa() // 3. 编写中间件 app.use((ctx, next) => { console.log('爱') next() console.log('!') }) app.use((ctx, next) => { console.log('我') next() console.log('华') }) app.use((ctx) => { console.log('中') }) // 4. 监听端口, 启动服务 app.listen(3000) console.log('server is running on http://localhost:3000')- 1
- 2
- 3
- 4
- 5
- 6
- 7
- 8
- 9
- 10
- 11
- 12
- 13
- 14
- 15
- 16
- 17
- 18
- 19
- 20
- 21
- 22
- 23
- 24
总结
以上就是今天要讲的内容,本文仅仅简单介绍了Koa的基本使用,koa还提供了其他许多强大的中间件,能使我们快速便捷地进行开发。
-
相关阅读:
金字塔原理
基于springboot的家政系统毕业设计源码201524
(三)Redis 线程与IO模型
TCP/IP五层协议栈(1)
Room源码分析
Golang Web框架fiber
【面试题】Vue2为什么能通过this访问到data、methods的属性或方法
GD32f103系列教程—(时钟篇)
Nhanes临床数据库挖掘教程2—基线表绘制(table1)
【微机原理笔记】第 7 章 - 常用数字接口电路
- 原文地址:https://blog.csdn.net/weixin_44887137/article/details/125970896
