-
Kubernetes(K8s)使用 kubeadm 方式搭建多 master 高可用 K8s 集群
本篇主要针对上篇文章的单 master 节点的 K8s 集群上搭建多 master 节点集群 和 LB 负载均衡服务器。
Kubernetes(K8S)集群搭建基础入门教程多 master 节点集群搭建示意图

虚拟机 IP 地址:IP 操作系统 主机名称 192.168.2.121 centos7.9 k8s-master01 192.168.2.124 centos7.9 k8s-master02 192.168.2.125 centos7.9 k8s-node01 192.168.2.126 centos7.9 k8s-node02 192.168.2.122 centos7.9 k8s-nginx01 192.168.2.123 centos7.9 k8s-nginx02 192.168.2.100 centos7.9 vip 环境准备
配置机器主机名
所有节点执行
master1节点执行: hostnamectl set-hostname k8s-master01 master02节点执行: hostnamectl set-hostname k8s-master02 node01节点执行: hostnamectl set-hostname k8s-node01 node02节点执行: hostnamectl set-hostname k8s-node01 nginx01节点执行: hostnamectl set-hostname k8s-nginx01 nginx02节点执行: hostnamectl set-hostname k8s-nginx02 vip节点执行: hostnamectl set-hostname k8s-vip- 1
- 2
- 3
- 4
- 5
- 6
- 7
- 8
- 9
- 10
- 11
- 12
- 13
- 14
- 15
- 16
- 17
- 18
- 19
- 20
设置 /etc/hosts 保证主机名能够解析
在 k8s-master01 k8s-master02 k8s-node01 k8s-node02 节点执行
cat >>/etc/hosts<<EOF 192.168.1.26 k8s-master01 192.168.1.27 k8s-master02 192.168.1.28 k8s-node01 192.168.1.28 k8s-node02 EOF- 1
- 2
- 3
- 4
- 5
- 6
设置部署节点到其它所有节点的SSH免密码登录
在 k8s-master01 节点执行 [root@k8s-master01 ~]# ssh-keygen -t rsa Generating public/private rsa key pair. Enter file in which to save the key (/root/.ssh/id_rsa): /root/.ssh/id_rsa already exists. Overwrite (y/n)? y Enter passphrase (empty for no passphrase): Enter same passphrase again: Your identification has been saved in /root/.ssh/id_rsa. Your public key has been saved in /root/.ssh/id_rsa.pub. The key fingerprint is: SHA256:QL3aapM8r8kv0pKabhogqUh/Rx9VwiZlwYbnNcLTUTU root@k8s-master01 The key's randomart image is: +---[RSA 2048]----+ | .. *=oooEo| | . .o.Xo+ .| | . .*.+ . | | . .. .. | |+. +S. | |* . o o . | |+ . = + . | | ...=.@. | |.++. ++Bo | +----[SHA256]-----+ [root@k8s-master01 ~]# [root@k8s-master01 ~]# scp -p ~/.ssh/id_rsa.pub root@192.168.2.121:/root/.ssh/authorized_keys root@192.168.2.121's password: id_rsa.pub 100% 399 183.7KB/s 00:00 [root@k8s-master01 ~]# scp -p ~/.ssh/id_rsa.pub root@192.168.2.124:/root/.ssh/authorized_keys root@192.168.2.125's password: Permission denied, please try again. root@192.168.2.125's password: id_rsa.pub 100% 399 281.9KB/s 00:00 [root@k8s-master01 ~]# scp -p ~/.ssh/id_rsa.pub root@192.168.2.125:/root/.ssh/authorized_keys root@192.168.2.126's password: id_rsa.pub 100% 399 165.6KB/s 00:00 [root@k8s-master01 ~]# scp -p ~/.ssh/id_rsa.pub root@192.168.2.126:/root/.ssh/authorized_keys id_rsa.pub 100% 399 231.4KB/s 00:00 [root@k8s-master01 ~]# # 检验测试 k8s-master01 节点是否可以免密登录所有集群 ssh root@192.168.2.125(修改ip登录)- 1
- 2
- 3
- 4
- 5
- 6
- 7
- 8
- 9
- 10
- 11
- 12
- 13
- 14
- 15
- 16
- 17
- 18
- 19
- 20
- 21
- 22
- 23
- 24
- 25
- 26
- 27
- 28
- 29
- 30
- 31
- 32
- 33
- 34
- 35
- 36
- 37
- 38
- 39
- 40
- 41
- 42
- 43
关闭交换分区 swap,提升性能
所有节点中执行
# 临时 swapoff -a # 永久 vi /etc/fstab //注释或删除swap的行 #/dev/mapper/cs-swap none swap defaults 0 0 # 查看是否关闭 free -h Swap 是交换分区,如果机器内存不够,会使用 swap 分区,但是 swap 分区的性能较低,k8s 设计的 时候为了能提升性能,默认是不允许使用姜欢分区的。Kubeadm 初始化的时候会检测 swap 是否关闭,如果没关闭,那就初始化失败。如果不想要关闭交换分区,安装 k8s 的时候可以指定--ignorepreflight-errors=Swap 来解决。- 1
- 2
- 3
- 4
- 5
- 6
- 7
- 8
- 9
- 10
- 11
关闭所有节点的Slinux/防火墙
[root@k8s-master01 ~]# setenforce 0 \ && sed -i 's/^SELINUX=.*$/SELINUX=disabled/' /etc/selinux/config \ && getenforce [root@k8s-master01 ~]# systemctl stop firewalld \ && systemctl daemon-reload \ && systemctl disable firewalld \ && systemctl daemon-reload \ && systemctl status firewalld- 1
- 2
- 3
- 4
- 5
- 6
- 7
- 8
- 9
- 10
同步节点系统时间
所有节点中执行
yum install ntp ntpdate cn.pool.ntp.org timedatectl set-timezone Asia/Shanghai timedatectl set-local-rtc 1 timedatectl set-ntp 1- 1
- 2
- 3
- 4
- 5
修改机器内核参数
# 所有节点都要执行 modprobe br_netfilter echo "modprobe br_netfilter" >> /etc/profile cat >/etc/sysctl.d/k8s.conf <<EOF net.bridge.bridge-nf-call-ip6tables = 1 net.bridge.bridge-nf-call-iptables = 1 net.ipv4.ip_forward = 1 EOF sysctl -p /etc/sysctl.d/k8s.conf- 1
- 2
- 3
- 4
- 5
- 6
- 7
- 8
- 9
配置阿里云yum仓库
所有节点都要执行
rm -f /etc/yum.repos.d/*.repo curl -o /etc/yum.repos.d/CentOS-Base.repo http://mirrors.aliyun.com/repo/Centos-7.repo curl -o /etc/yum.repos.d/epel.repo http://mirrors.aliyun.com/repo/epel-7.repo sed -i "/mirrors.aliyuncs.com/d" /etc/yum.repos.d/CentOS-Base.repo sed -i "/mirrors.cloud.aliyuncs.com/d" /etc/yum.repos.d/CentOS-Base.repo yum clean all- 1
- 2
- 3
- 4
- 5
- 6
配置docker组件需要的阿里云的 repo 源
所有节点都要执行
cat >/etc/yum.repos.d/docker-ce.repo<<\EOF [docker-ce-stable] name=Docker CE Stable - $basearch baseurl=https://mirrors.aliyun.com/docker-ce/linux/centos/$releasever/$basearch/stable enabled=1 gpgcheck=0 gpgkey=https://mirrors.aliyun.com/docker-ce/linux/centos/gpg EOF yum repolist- 1
- 2
- 3
- 4
- 5
- 6
- 7
- 8
- 9
- 10
配置安装 k8s 组件需要的阿里云的 repo 源
cat <<EOF >/etc/yum.repos.d/kubernetes.repo [kubernetes] name=Kubernetes baseurl=http://mirrors.aliyun.com/kubernetes/yum/repos/kubernetes-el7-x86_64 enabled=1 gpgcheck=0 repo_gpgcheck=0 gpgkey=http://mirrors.aliyun.com/kubernetes/yum/doc/yum-key.gpg http://mirrors.aliyun.com/kubernetes/yum/doc/rpm-package-key.gpg EOF yum repolist- 1
- 2
- 3
- 4
- 5
- 6
- 7
- 8
- 9
- 10
开启 ipvs功能
cat >/etc/sysconfig/modules/ipvs.modules<<\EOF #!/bin/bash ipvs_modules="ip_vs ip_vs_lc ip_vs_wlc ip_vs_rr ip_vs_wrr ip_vs_lblc ip_vs_lblcr ip_vs_dh ip_vs_sh ip_vs_nq ip_vs_sed ip_vs_ftp nf_conntrack" for kernel_module in ${ipvs_modules}; do /sbin/modinfo -F filename ${kernel_module} > /dev/null 2>&1 if [ 0 -eq 0 ]; then /sbin/modprobe ${kernel_module} fi done EOF chmod 755 /etc/sysconfig/modules/ipvs.modules && bash /etc/sysconfig/modules/ipvs.modules && lsmod | grep ip_vs- 1
- 2
- 3
- 4
- 5
- 6
- 7
- 8
- 9
- 10
- 11
安装基本工具包
所有节点都要执行
yum -y install ipvsadm conntrack ntpdate telnet vim- 1
- 2
安装docker
所有节点都要执行
yum install docker-ce-20.10.6 docker-ce-cli-20.10.6 containerd.io -y- 1
启动 docker-ce
所有节点都要执行
systemctl start docker && systemctl enable docker; systemctl status docker- 1
设置Docker镜像源和Cgroup驱动
所有节点都要执行
cat >/etc/docker/daemon.json<<\EOF { "registry-mirrors":["https://rsbud4vc.mirror.aliyuncs.com","https://registry.docker-cn.com","https://docker.mirrors.ustc.edu.cn","https://dockerhub.azk8s.cn","http://hub-mirror.c.163.com","http://qtid6917.mirror.aliyuncs.com", "https://rncxm540.mirror.aliyuncs.com"], "exec-opts": ["native.cgroupdriver=systemd"] } EOF systemctl daemon-reload systemctl restart docker systemctl status docker- 1
- 2
- 3
- 4
- 5
- 6
- 7
- 8
- 9
安装master
所有节点都要执行
yum install -y kubelet-1.20.6 kubeadm-1.20.6 kubectl-1.20.6- 1
- Kubeadm: kubeadm 是一个工具,用来初始化 k8s 集群的
- kubelet: 安装在集群所有节点上,用于启动 Pod 的
- kubectl: 通过 kubectl 可以部署和管理应用,查看各种资源,创建、删除和更新各种组件
启动 kubelet,并设置自启动
所有节点都要执行
systemctl enable kubelet systemctl start kubelet- 1
- 2
初始化集群
cat > /root/kubeadm-config.yaml << EOF apiVersion: kubeadm.k8s.io/v1beta2 kind: ClusterConfiguration kubernetesVersion: v1.20.6 controlPlaneEndpoint: 192.168.1.31:16443 imageRepository: registry.aliyuncs.com/google_containers apiServer: certSANs: - 192.168.2.121 - 192.168.2.124 - 192.168.2.125 - 192.168.2.126 networking: podSubnet: 10.244.0.0/16 serviceSubnet: 10.10.0.0/16 --- apiVersion: kubeproxy.config.k8s.io/v1alpha1 kind: KubeProxyConfiguration mode: ipvs EOF- 1
- 2
- 3
- 4
- 5
- 6
- 7
- 8
- 9
- 10
- 11
- 12
- 13
- 14
- 15
- 16
- 17
- 18
- 19
- 20
开始初始化集群
kubeadm init --config /root/kubeadm-config.yaml --ignore-preflight-errors=SystemVerification- 1
kubeadm init主要执行了以下操作:
- [init]:指定版本进行初始化操作
- [preflight] :初始化前的检查和下载所需要的 Docker 镜像文件
- [kubelet-start] :生成 kubelet 的配置文件 ”/var/lib/kubelet/config.yaml”,没有这个文件 kubelet 无法启动,所以初始化之前的 kubelet 实际上启动失败。
- [certificates]:生成Kubernetes使用的证书,存放在 /etc/kubernetes/pki 目录中。
- [kubeconfig] :生成 KubeConfig 文件,存放在 /etc/kubernetes目录中,组件之间通信需要使用对应文件。
- [control-plane]:使用 /etc/kubernetes/manifest 目录下的 YAML 文件,安装 Master 组件。
- [etcd]:使用 /etc/kubernetes/manifest/etcd.yaml 安装 Etcd 服务。
- [wait-control-plane]:等待 control-plan 部署的 Master 组件启动。
- [apiclient]:检查 Master 组件服务状态。
- [uploadconfig]:更新配置。
- [kubelet]:使用 configMap 配置 kubelet。
- [patchnode]:更新 CNI 信息到 Node上,通过注释的方式记录。
- [mark-control-plane]:为当前节点打标签,打了角色 Master,和不可调度标签,这样默认就不会使用 Master 节点来运行 Pod。
- [bootstrap-token]:生成 token 记录下来,后边使用 kubeadm join 往集群中添加节点时会用到。
- [addons]:安装附加组件 CoreDNS 和 kube-proxy。
下面是初始化master节点成功后的信息
Your Kubernetes control-plane has initialized successfully! To start using your cluster, you need to run the following as a regular user: mkdir -p $HOME/.kube sudo cp -i /etc/kubernetes/admin.conf $HOME/.kube/config sudo chown $(id -u):$(id -g) $HOME/.kube/config Alternatively, if you are the root user, you can run: export KUBECONFIG=/etc/kubernetes/admin.conf You should now deploy a pod network to the cluster. Run "kubectl apply -f [podnetwork].yaml" with one of the options listed at: https://kubernetes.io/docs/concepts/cluster-administration/addons/ Then you can join any number of worker nodes by running the following on each as root: kubeadm join 192.168.1.26:6443 --token 95k0et.9c4uitzqasdx5axa \ --discovery-token-ca-cert-hash sha256:9495462d474420d5e4ee3b39bb8a258997f7dfb9d76926baa4aaeaba167b436d- 1
- 2
- 3
- 4
- 5
- 6
- 7
- 8
- 9
- 10
- 11
- 12
- 13
- 14
- 15
- 16
- 17
- 18
- 19
- 20
配置 kubectl 的配置文件 config,相当于对 kubectl 进行授权,这样 kubectl 命令可以使用这个证书对 k8s 集群进行管理
mkdir -p $HOME/.kube sudo cp -i /etc/kubernetes/admin.conf $HOME/.kube/config sudo chown $(id -u):$(id -g) $HOME/.kube/config- 1
- 2
- 3
查看集群信息
kubectl get node # 如果集群状态还是 NotReady 状态,因为没有安装网络插件。- 1
- 2
- 3
将证书分配至其它 master 节点
把 k8s-master01 节点的证书拷贝到 k8s-master02 上
ssh k8s-master02 "cd /root && mkdir -p /etc/kubernetes/pki/etcd &&mkdir -p ~/.kube/" scp /etc/kubernetes/pki/ca.crt k8s-master02:/etc/kubernetes/pki/ scp /etc/kubernetes/pki/ca.key k8s-master02:/etc/kubernetes/pki/ scp /etc/kubernetes/pki/sa.key k8s-master02:/etc/kubernetes/pki/ scp /etc/kubernetes/pki/sa.pub k8s-master02:/etc/kubernetes/pki/ scp /etc/kubernetes/pki/front-proxy-ca.crt k8s-master02:/etc/kubernetes/pki/ scp /etc/kubernetes/pki/front-proxy-ca.key k8s-master02:/etc/kubernetes/pki/ scp /etc/kubernetes/pki/etcd/ca.crt k8s-master02:/etc/kubernetes/pki/etcd/ scp /etc/kubernetes/pki/etcd/ca.key k8s-master02:/etc/kubernetes/pki/etcd/- 1
- 2
- 3
- 4
- 5
- 6
- 7
- 8
- 9
在 master01 上查看加入节点的命令
[root@k8s-master01 srv]# kubeadm token create --print-join-command kubeadm join 192.168.2.124:6443 --token 0nlw6z.oxjj0igkmyowqxcu --discovery-token-ca-cert-hash sha256:c28890784e52f5720669d2d750c81b9c3ba603d8fce07d76b8213a0599a98a31- 1
- 2
- 3
在 master02 节点上开始扩容 master
kubeadm join 192.168.2.124:6443 --token 0nlw6z.oxjj0igkmyowqxcu --discovery-token-ca-cert-hash sha256:c28890784e52f5720669d2d750c81b9c3ba603d8fce07d76b8213a0599a98a31 --control-plane- 1
第一次加入集群的时候会有以下报错
[preflight] Running pre-flight checks [WARNING SystemVerification]: this Docker version is not on the list of validated versions: 20.10.6. Latest validated version: 19.03 [preflight] Reading configuration from the cluster... [preflight] FYI: You can look at this config file with 'kubectl -n kube-system get cm kubeadm-config -o yaml' error execution phase preflight: One or more conditions for hosting a new control plane instance is not satisfied. unable to add a new control plane instance a cluster that doesn't have a stable controlPlaneEndpoint address Please ensure that: * The cluster has a stable controlPlaneEndpoint address. * The certificates that must be shared among control plane instances are provided. To see the stack trace of this error execute with --v=5 or higher- 1
- 2
- 3
- 4
- 5
- 6
- 7
- 8
- 9
- 10
- 11
- 12
- 13
- 14
- 15
解决办法如下:
查看kubeadm-config.yaml
kubectl -n kube-system get cm kubeadm-config -oyaml- 1
发现没有controlPlaneEndpoint
添加controlPlaneEndpoint
kubectl -n kube-system edit cm kubeadm-config- 1
大概在这么个位置:
kind: ClusterConfiguration kubernetesVersion: v1.18.0 controlPlaneEndpoint: 192.168.2.124:6443//添加这个- 1
- 2
- 3
出现如下信息则表示扩容成功
To start administering your cluster from this node, you need to run the following as a regular user: mkdir -p $HOME/.kube sudo cp -i /etc/kubernetes/admin.conf $HOME/.kube/config sudo chown $(id -u):$(id -g) $HOME/.kube/config Run 'kubectl get nodes' to see this node join the cluster.- 1
- 2
- 3
- 4
- 5
- 6
- 7
配置 kubectl 的配置文件 config,相当于对 kubectl 进行授权,这样 kubectl 命令可以使用这个证书对 k8s 集群进行管理
mkdir -p $HOME/.kube sudo cp -i /etc/kubernetes/admin.conf $HOME/.kube/config sudo chown $(id -u):$(id -g) $HOME/.kube/config- 1
- 2
- 3
可以查看一下集群状态
[root@k8s-master01 ~]# kubectl get nodes NAME STATUS ROLES AGE VERSION k8s-master01 Ready control-plane,master 7h53m v1.20.6 k8s-master02 Ready control-plane,master 4m7s v1.20.6 k8s-node01 Ready <none> 7h14m v1.20.6 k8s-node02 Ready <none> 7h14m v1.20.6- 1
- 2
- 3
- 4
- 5
- 6
配置网络插件
如果集群状态不是 Ready,是因为没有安装网络插件,执行以下命令,然后检查集群状态为 Ready 则表示部署成功
kubectl apply -f https://raw.githubusercontent.com/coreos/flannel/master/Documentation/kube-flannel.yml- 1
安装node
在 master01 上查看加入节点的命令
[root@k8s-master01 ~]# kubeadm token create --print-join-command kubeadm join 192.168.2.124:6443 --token y2ug8f.dk4pj1dh7ms885m3 --discovery-token-ca-cert-hash sha256:c28890784e52f5720669d2d750c81b9c3ba603d8fce07d76b8213a0599a98a31- 1
- 2
k8s-node01节点执行如下命令
kubeadm join 192.168.2.124:6443 --token y2ug8f.dk4pj1dh7ms885m3 --discovery-token-ca-cert-hash sha256:c28890784e52f5720669d2d750c81b9c3ba603d8fce07d76b8213a0599a98a31- 1
看到下面说明 k8s-node01 节点已经加入到集群了,充当工作节点
This node has joined the cluster: * Certificate signing request was sent to apiserver and a response was received. * The Kubelet was informed of the new secure connection details. Run 'kubectl get nodes' on the control-plane to see this node join the cluster.- 1
- 2
- 3
- 4
- 5
在 master1 上查看集群节点状况
[root@k8s-master01 ~]# kubectl get nodes NAME STATUS ROLES AGE VERSION k8s-master01 Ready control-plane,master 7h59m v1.20.6 k8s-master02 Ready control-plane,master 10m v1.20.6 k8s-node01 Ready <none> 7h20m v1.20.6- 1
- 2
- 3
- 4
- 5
搭建 Nginx 负载均衡
这里我们准备两台虚拟机,搭建 Nginx 的高可用集群
IP 操作系统 主机名称 192.168.2.122 centos7.9 k8s-nginx01 192.168.2.123 centos7.9 k8s-nginx02 关闭防火墙和 selinux
systemctl stop firewalld.service setenforce 0- 1
- 2
建立本地yum官方Nginx源
cat > /etc/yum.repos.d/nginx.repo << 'EOF' [nginx] name=nginx repo baseurl=http://nginx.org/packages/centos/7/$basearch/ gpgcheck=0 EOF yum install nginx -y- 1
- 2
- 3
- 4
- 5
- 6
- 7
- 8
接下来在配置文件设置 Nginx 的四层负载均衡,指定 k8s 群集 2 台 master 的节点 ip 和 6443 端口
vi /etc/nginx/nginx.conf- 1
events { worker_connections 1024; } # 添加这个 stream { # 日志格式 log_format main '$remote_addr $upstream_addr - [$time_local] $status $upstream_bytes_sent'; # 日志存放路径 access_log /var/log/nginx/k8s-access.log main; # master 调度资源池 upstream k8s-apiserver { server 192.168.80.10:6443; server 192.168.80.20:6443; } server { listen 6443; proxy_pass k8s-apiserver;# 做反向代理到资源池 } } http { include /etc/nginx/mime.types; default_type application/octet-stream; log_format main '$remote_addr - $remote_user [$time_local] "$request" ' '$status $body_bytes_sent "$http_referer" ' '"$http_user_agent" "$http_x_forwarded_for"'; access_log /var/log/nginx/access.log main; sendfile on; #tcp_nopush on; keepalive_timeout 65; #gzip on; include /etc/nginx/conf.d/*.conf; }- 1
- 2
- 3
- 4
- 5
- 6
- 7
- 8
- 9
- 10
- 11
- 12
- 13
- 14
- 15
- 16
- 17
- 18
- 19
- 20
- 21
- 22
- 23
- 24
- 25
- 26
- 27
- 28
- 29
- 30
- 31
- 32
- 33
- 34
- 35
- 36
- 37
- 38
检查配置文件语法,启动nginx服务,查看已监听6443端口
[root@k8s-nginx01 ~]# nginx -t nginx: the configuration file /etc/nginx/nginx.conf syntax is ok nginx: configuration file /etc/nginx/nginx.conf test is successful [root@k8s-nginx01 ~]# systemctl start nginx [root@k8s-nginx01 ~]# netstat -natp | grep nginx tcp 0 0 0.0.0.0:80 0.0.0.0:* LISTEN 994/nginx: master p- 1
- 2
- 3
- 4
- 5
- 6
- 7
搭建 keepalived 高可用服务
yum 安装 keepalived 软件
k8s-nginx01 和 k8s-nginx02 上面操作
yum install keepalived -y- 1
修改 k8s-nginx01 和 k8s-nginx02 的keepalived配置文件
k8s-nginx01 节点作为 master
vi /etc/keepalived/keepalived.conf- 1
/删除配置文件全部内容,添加以下内容:
! Configuration File for keepalived global_defs { # 接收邮件地址 notification_email { acassen@firewall.loc failover@firewall.loc sysadmin@firewall.loc } # 邮件发送地址 notification_email_from Alexandre.Cassen@firewall.loc smtp_server 127.0.0.1 smtp_connect_timeout 30 router_id NGINX_MASTER #lb01节点的为 NGINX_MASTER,lb02节点的为 NGINX_BACKUP } #添加一个周期性执行的脚本 vrrp_script check_nginx { script "/etc/nginx/check_nginx.sh" #指定检查nginx存活的脚本路径 } vrrp_instance VI_1 { state MASTER #lb01节点的为 MASTER,lb02节点的为 BACKUP interface ens33 #指定网卡名称 ens33 virtual_router_id 51 #指定vrid,两个节点要一致 priority 100 #指定 k8s-nginx01 节点的为 100,k8s-nginx02 节点的为 90 advert_int 1 authentication { auth_type PASS auth_pass 1111 } virtual_ipaddress { 192.168.2.100/24 #指定 VIP } track_script { check_nginx #指定vrrp_script配置的脚本 } }- 1
- 2
- 3
- 4
- 5
- 6
- 7
- 8
- 9
- 10
- 11
- 12
- 13
- 14
- 15
- 16
- 17
- 18
- 19
- 20
- 21
- 22
- 23
- 24
- 25
- 26
- 27
- 28
- 29
- 30
- 31
- 32
- 33
- 34
- 35
- 36
- 37
- 38
k8s-nginx02 节点作为 backup
vi /etc/keepalived/keepalived.conf- 1
/删除配置文件全部内容,添加以下内容:
! Configuration File for keepalived global_defs { # 接收邮件地址 notification_email { acassen@firewall.loc failover@firewall.loc sysadmin@firewall.loc } # 邮件发送地址 notification_email_from Alexandre.Cassen@firewall.loc smtp_server 127.0.0.1 smtp_connect_timeout 30 router_id NGINX_MASTER #lb01节点的为 NGINX_MASTER,lb02节点的为 NGINX_BACKUP } #添加一个周期性执行的脚本 vrrp_script check_nginx { script "/etc/nginx/check_nginx.sh" #指定检查nginx存活的脚本路径 } vrrp_instance VI_1 { state BACKUP #k8s-nginx01 节点的为 MASTER,k8s-nginx02节点的为 BACKUP interface ens33 #指定网卡名称 ens33 virtual_router_id 51 #指定vrid,两个节点要一致 priority 90 #指定 k8s-nginx01 节点的为 100,k8s-nginx02 节点的为 90 advert_int 1 authentication { auth_type PASS auth_pass 1111 } virtual_ipaddress { 192.168.2.100/24 #指定 VIP } track_script { check_nginx #指定vrrp_script配置的脚本 } }- 1
- 2
- 3
- 4
- 5
- 6
- 7
- 8
- 9
- 10
- 11
- 12
- 13
- 14
- 15
- 16
- 17
- 18
- 19
- 20
- 21
- 22
- 23
- 24
- 25
- 26
- 27
- 28
- 29
- 30
- 31
- 32
- 33
- 34
- 35
- 36
- 37
- 38
创建 nginx 状态检查脚本
k8s-nginx01 和 k8s-nginx02 上面操作
vi /etc/nginx/check_nginx.sh- 1
#!/bin/bash #egrep -cv "grep|$$" 用于过滤掉包含grep 或者 $$ 表示的当前Shell进程ID count=$(ps -ef | grep nginx | egrep -cv "grep|$$") if [ "$count" -eq 0 ];then systemctl stop keepalived fi- 1
- 2
- 3
- 4
- 5
- 6
- 7
授权
k8s-nginx01 和 k8s-nginx02 上面操作
chmod +x /etc/nginx/check_nginx.sh- 1
- 2
启动 keepalived 服务
k8s-nginx01 和 k8s-nginx02 上面操作
这里一定要先启动 nginx 服务,再启动 keepalived 服务
systemctl start keepalived- 1
查看 VIP 是否生成
k8s-nginx01 和 k8s-nginx02 上面操作
ip a- 1

vip 出现在 k8s-nginx01 上面,说明 keepalived 启动成功验证高可用功能
此时虚拟 ip 在 k8s-nginx01 上,我们在 k8s-nginx01 中使用 pkill nginx 停止 nginx 服务,再在 k8s-nginx02 上使用 ip a 命令查看地址是否进行了漂移。

我们看到地址漂移到了 k8s-nginx02 节点上面我们先重启 nginx 在重启 keepalived ,使用 ip a命令查看,k8s-nginx01 节点看是否会漂移回来


可以看到漂移回 k8s-nginx01,而 k8s-nginx02 上面是没有的,说明 keepalived + nginx 高可用配置正常
访问负载均衡器测试
找到 k8s 集群中任意一个节点,使用 curl +vip的ip+端口(6433)服务
这个是我 vip 服务器的地址:192.168.2.100- 1
[root@k8s-master01 kubernetes]# curl https://192.168.2.100:6443 curl: (60) Peer's Certificate issuer is not recognized. More details here: http://curl.haxx.se/docs/sslcerts.html curl performs SSL certificate verification by default, using a "bundle" of Certificate Authority (CA) public keys (CA certs). If the default bundle file isn't adequate, you can specify an alternate file using the --cacert option. If this HTTPS server uses a certificate signed by a CA represented in the bundle, the certificate verification probably failed due to a problem with the certificate (it might be expired, or the name might not match the domain name in the URL). If you'd like to turn off curl's verification of the certificate, use the -k (or --insecure) option.- 1
- 2
- 3
- 4
- 5
- 6
- 7
- 8
- 9
- 10
- 11
- 12
- 13
- 14
通过以下命令在 nginx 节点查看日志
tail /var/log/nginx/k8s-access.log -f- 1
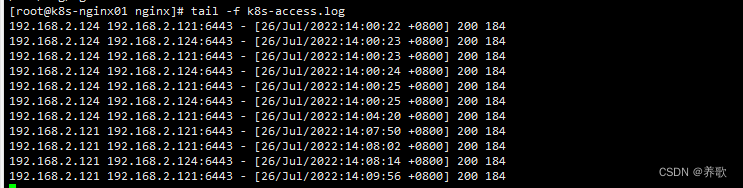
可以看到轮询调度把请求流量分发给两台 master,k8s-master01(192.168.2.124) 和 k8s-master02(192.168.2.121)如果这时我们在 k8s-nginx01 中使用 pkill nginx 停止 nginx 服务,看是否会在 k8s-nginx02 中打印日志呢?


从上面可以看出 k8s-nginx02 节点和虚拟 ip 绑定,并且请求到 k8s-nginx02 中,轮询调度把请求流量分发给两台 master,k8s-master01(192.168.2.124) 和 k8s-master02(192.168.2.121)总结
以上就是搭建高可用 k8s 集群全部的内容,步骤讲解得非常详细,比较适合初学者学习,我们一起共同学习,共同进步。
-
相关阅读:
swoole cURL error 1014: SSL verify failed
【敬伟ps教程】制图操作
【机器学习实战】对加州住房价格数据集进行数据探索(读书笔记)
【数仓】kafka软件安装及集群配置
惠普战99移动工作站: 第十三代英特尔酷睿处理器和惠普一站式AI应用开发方案的完美融合
【开题报告】基于SpringBoot的校园周边攻略平台的设计与实现
谁能赢下全屋智能这场“超级马拉松”?专业性成为硬指标
不同时代下的中秋之美--python学习应用心得
给出一个数组,如 [7864, 284, 347, 7732, 8498],现在需要将数组中的数字拼接起来,返回「最大的可能拼出的数字」
app在线客服系统怎么对接
- 原文地址:https://blog.csdn.net/wuhuayangs/article/details/125995743