-
hand_springboot
SpringBoot
SpringBoot功能特点
- 内嵌Servlet容器,可以直接打成jar包,通过java-jar xx.jar运行项目。
- 支持自动化配置,如下图。application.properties文件在引入springboot和未引入springboot时,是不一样的。
- 提供starter pom系列,简化maven的依赖加载,减少依赖冲突的发生。
- springboot 是 spring 家族的一个项目,继承了spring的 IOC 和 AOP,他的目标是提高使用者的开发效率。
IOC 控制反转
- IOC 控制反转,指的是将对象的创建权交给 Spring容器。
- Spring Bean就是Spring容器创建管理的Java 对象;
- Spring 通过读取 XML 或 Java 注解中的信息(bean)来获取哪些对象需要实例化
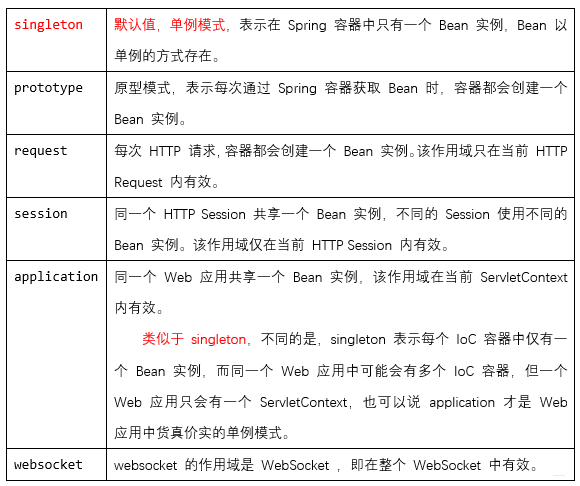
bean的作用域
- Spring 容器在初始化一个 Bean 实例时,同时会指定该实例的作用域。
注解
- 注解是代码的特殊标记,格式:@注解名(属性名=属性值,属性名=属性值,属性名=属性值…)
- 注解可作用在类上面、属性上面、方法上面。
- 使用注解的目的:简化xml配置。
- IOC容器会自动扫描包路径下的所有被@Controller、@Service、 @Repository、@Component四个注解声明的类,并为其创建对象。
- 类名上被这四个注解修饰,就等价于在xml文件中定义了这个类的bean。
- @Controller一般声明controller层的类
- @Service一般声明Service层的类
- @Repository一般声明dao层的类
- @Component其他没有特殊要求的层用该注解修饰
- 以@Component为例,其他三个注解同理:
/* 1.只有一个属性值时默认是value的值,可以省略 value= 2.如果不指定value,默认为匈牙利命名的类名或大驼峰命名的类名的小驼峰。 3.此处的value值即xml配置文件中bean的id */ @Component(value="student") //同@Component("student"),同@Component public class Student { @Autowired //byType private Class class; @Autowired @Qualifier(value="group") //byName private Group group; @Resource(name="time") //byName、byType private Time time; @Value(value="wang") //普通数据类型注入 private String name; public Student() { } }- 1
- 2
- 3
- 4
- 5
- 6
- 7
- 8
- 9
- 10
- 11
- 12
- 13
- 14
- 15
- 16
- 17
- 18
- 19
- 20
- 注入属性注解有四个:
@Autowired、@Qualifier、@Resource、@Value - 加了注入属性注解后就不需要提供setter方法了。
- @Autowired用在接口类型的成员变量上时会查找接口的实现类来注入,如果该接口有多个实现类则报错。该注解不设置属性。
- @Resource找不到会再按类型找,@Qualifier找不到会报异常且要与@Autowired联用。这两个一般用在有多个实现类的情况。
- @Qualifier使用属性value,可以省略 “value=”,@Resource使用属性name,但不可省略 “name=”,注解有value属性时才可以简写省略。
依赖注入
- DI(Dependency Injection) 依赖注入,从容器中获取指定类的对象,主要指属性注入。
@Autowired //根据类型从容器中注入对象
@Resource //默认根据变量名称(对象名)注入,当找不到与名称匹配的bean时才会按类型注入
AOP 面向切面编程
- AOP将应用中的一些非业务的通用功能封装起来单独维护,然后通过xml配置或者注解的方式来定义这些功能的使用方式,而不是在业务逻辑代码中直接调用。
- 应用场景:日志记录,事务管理,权限验证,效率检查。
常用概念
-
连接点:程序执行期间的某个点,类里面可以被增强的方法。
-
切入点:一个匹配连接点(Join point)的谓词表达式,指定实际真正被增强的方法。
-
通知:指一个切面在特定的连接点要做的事情。
-
切面:它是通知和切点合起来的抽象。
-
织入:把通知应用到切入点的过程。
实现代码
- 导入依赖 pom.xml
<dependency> <groupId>org.springframeworkgroupId> <artifactId>spring-aopartifactId> <version>${spring.version}version> dependency> <dependency> <groupId>org.springframeworkgroupId> <artifactId>spring-expressionartifactId> <version>${spring.version}version> dependency> <dependency> <groupId>org.springframeworkgroupId> <artifactId>spring-contextartifactId> <version>${spring.version}version> dependency> <dependency> <groupId>org.aspectjgroupId> <artifactId>aspectjweaverartifactId> <version>1.8.13version> dependency> <dependency> <groupId>commons-logginggroupId> <artifactId>commons-loggingartifactId> <version>1.2version> dependency>- 1
- 2
- 3
- 4
- 5
- 6
- 7
- 8
- 9
- 10
- 11
- 12
- 13
- 14
- 15
- 16
- 17
- 18
- 19
- 20
- 21
- 22
- 23
- 24
- 25
- 26
- 27
- 28
xml配置实现
- web.xml配置
<context-param> <param-name>contextConfigLocationparam-name> <param-value>classpath:spring.xmlparam-value> context-param> <listener> <listener-class> org.springframework.web.context.ContextLoaderListener listener-class> listener>- 1
- 2
- 3
- 4
- 5
- 6
- 7
- 8
- 9
- 10
- 11
- 12
- 13
- spring配置 spring.xml
<beans xmlns="http://www.springframework.org/schema/beans" xmlns:xsi="http://www.w3.org/2001/XMLSchema-instance" xmlns:context="http://www.springframework.org/schema/context" xmlns:aop="http://www.springframework.org/schema/aop" xsi:schemaLocation="http://www.springframework.org/schema/beans http://www.springframework.org/schema/beans/spring-beans-3.0.xsd http://www.springframework.org/schema/context http://www.springframework.org/schema/context/spring-context.xsd http://www.springframework.org/schema/aop http://www.springframework.org/schema/aop/spring-aop.xsd"> <context:component-scan base-package="com.st.service" /> <context:component-scan base-package="com.st.dao" /> <context:component-scan base-package="com.st.model" /> <bean name="aopUtil" class="com.st.util.AopUtil">bean> <aop:config> <aop:aspect id="myAspect" ref="aopUtil"> <aop:pointcut id="myPointCut" expression="execution(* com.st.service.*.get*(..))"/> <aop:before pointcut-ref="myPointCut" method="speakBefore" /> aop:aspect> aop:config> beans>- 1
- 2
- 3
- 4
- 5
- 6
- 7
- 8
- 9
- 10
- 11
- 12
- 13
- 14
- 15
- 16
- 17
- 18
- 19
- 20
- 21
- 22
- 23
- 24
- 25
- 26
- 27
- 28
- 29
- 30
- 31
- 32
- 33
- 34
- 35
- 36
- 37
- 38
- 39
- 40
- 41
- 42
- 43
- 44
- 45
- 46
- 47
- 48
- 49
- 50
- 51
- 52
- 53
- 54
- 55
- 56
- 57
- 58
- 59
- 60
- 61
- 62
- 63
- 64
- 65
- 切面类
package com.st.util; import org.aspectj.lang.JoinPoint; import org.aspectj.lang.ProceedingJoinPoint; import org.aspectj.lang.Signature; public class AopUtil { /* 环绕通知 around 1 作用:在目标方法执行之前和之后都可以执行额外代码的通知 2 用法: 环绕通知需要有返回值,否则真正调用者将拿不到返回值,只能得到一个null; 在环绕通知中必须显式的调用目标方法,目标方法才会执行,这个显式调用是通过ProceedingJoinPoint来实现的; 环绕通知有控制目标方法是否执行、有控制是否返回值、有改变返回值的能力。 3 应用场景:控制事务 权限控制 */ public String speakAround(ProceedingJoinPoint joinPoint) { System.out.println("aop-----around-----before"); //开启事务 try { //执行目标方法 Object obj = joinPoint.proceed(); System.out.println(obj); //提交事务 } catch (Throwable e) { e.printStackTrace(); //回滚事务 } System.out.println("aop-----around-----after"); return "@@@@@aop@@@@@"; } /* 前置通知 before 1 作用:在目标方法执行之前执行的通知 2 用法: 前置通知方法,可以没有参数; 也可以额外接收一个JoinPoint类型参数,通过该对象可以获取目标对象 和 目标方法相关的信息; 如果接收JoinPoint,必须保证其为方法的第一个参数,否则报错 3 应用场景:日志 */ public void speakBefore(){ System.out.println("aop-----before"); } /* 后置通知 after-returning 1 作用:在目标方法执行成功(即不报异常)之后执行的通知。 2 用法: 后置通知方法,可以没有参数; 也可以接收一个JoinPoint参数,通过该对象可以获取目标对象 和 目标方法相关的信息; 如果接收JoinPoint,必须保证其为方法的第一个参数,否则报错 3 应用场景:日志 */ public void speakAfterReturn(JoinPoint jp){ //获取对象Class类 Class clz = jp.getTarget().getClass(); System.out.println(clz.getName()); //获取切入点对象信息 Signature signature = jp.getSignature(); //获取切入点名称 String name = signature.getName(); System.out.println(name); System.out.println("aop-----after-returning"); } /* 最终通知 after 1 作用:在目标方法执行之后(无论执行成功还是异常)执行的通知 2 应用场景:日志 */ public void speakAfter(){ System.out.println("aop-----after"); } /* 异常通知 after-throwing 1 作用:在目标方法抛出异常时执行的通知 2 用法: 可以配置传入JoinPoint获取目标对象和目标方法相关信息,但必须处在参数列表第一位 还可以配置参数,让异常通知可以接收到目标方法抛出的异常对象。 3 应用场景:异常处理、控制事务 */ public void speakException(JoinPoint jp,Throwable e){ Class clz = jp.getTarget().getClass(); String name = jp.getSignature().getName(); System.out.println("aop-----after-throwing..["+clz+"]..["+name+"].."+e.getMessage()); } }- 1
- 2
- 3
- 4
- 5
- 6
- 7
- 8
- 9
- 10
- 11
- 12
- 13
- 14
- 15
- 16
- 17
- 18
- 19
- 20
- 21
- 22
- 23
- 24
- 25
- 26
- 27
- 28
- 29
- 30
- 31
- 32
- 33
- 34
- 35
- 36
- 37
- 38
- 39
- 40
- 41
- 42
- 43
- 44
- 45
- 46
- 47
- 48
- 49
- 50
- 51
- 52
- 53
- 54
- 55
- 56
- 57
- 58
- 59
- 60
- 61
- 62
- 63
- 64
- 65
- 66
- 67
- 68
- 69
- 70
- 71
- 72
- 73
- 74
- 75
- 76
- 77
- 78
- 79
- 80
- 81
- 82
- 83
- 84
- 85
- 86
- 87
- 88
SpringBoot自动装配原理
- Spring Boot在启动的时候从类路径下的META-INF/spring.factories中获取需要自动装配的类(一些配置组件)。
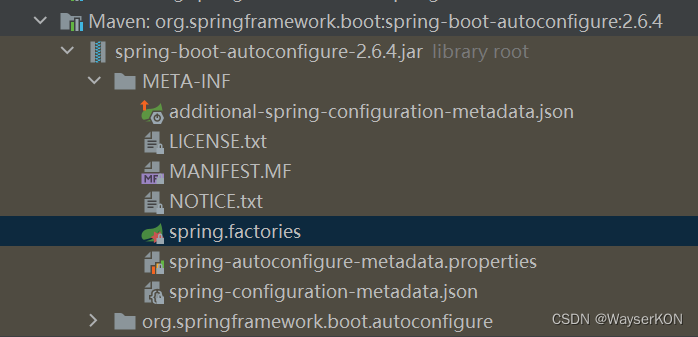
- 找到这些类(XXXAutoConfiguration)后,通过SpringFactoriesLoader机制创建对应的bean,注入到容器中。
- 这样就完成了自动注入spring容器,本来需要在spring的xml配置文件中去配置bean的操作就免去了 ,也就是springboot完成了自动装配。
- 自动装配注解讲解1
- Spring Boot启动的时候会通过@EnableAutoConfiguration注解找到META-INF/spring.factories配置文件中的所有自动配置类,并对其进行加载,而这些自动配置类都是以AutoConfiguration结尾来命名的,它实际上就是一个JavaConfig形式的Spring容器配置类,它能通过以Properties结尾命名的类中取得在全局配置文件中配置的属性如:server.port,而XxxxProperties类是通过@ConfigurationProperties注解与全局配置文件中对应的属性进行绑定的。
- 自动装配原理讲解2
SpringBoot版本对应关系

Restful
- REST全称是Representational State Transfer,即表征性状态转移。
- RESTful是一种定义Web API接口的设计风格,尤其适用于前后端分离的应用模式中。这种风格的理念认为后端开发任务就是提供数据的,对外提供的是数据资源的访问接口,所以在定义接口时,客户端访问的URL路径就表示这种要操作的数据资源。
Restful特点
1、每个资源都使用 URI (Universal Resource Identifier) 得到一个唯一的地址。资源的例子有:应用程序对象、数据库记录、算法等等。
2、客户端使用GET、POST、PUT、DELETE 4个标准的HTTP方法对服务端资源进行操作,其中GET用来获取资源,POST用来新建资源(也可以用于更新资源),PUT用来更新资源,DELETE用来删除资源;
3、客户端与服务端之间的交互在请求之间是无状态的,从客户端到服务端的每个请求都必须包含理解请求所必需的信息。
4、资源的表现形式有XML、HTML,客户端通过操作资源的表现形式来操作资源;
Restful接口规范
-
数据的安全保障:
url链接一般都采用https协议进行传输 注:采用https协议,可以提高数据交互过程中的安全性 -
接口特征表现,一看就知道是个api接口
- 用api关键字标识接口url:
- https://api.baidu.com
- https://www.baidu.com/api
注:看到api字眼,就代表该请求url链接是完成前后台数据交互的
-路飞的接口:https://api.luffycity.com/api/v1/course/free/ -
多数据版本共存
- 在url链接中标识数据版本
- https://api.baidu.com/v1
- https://api.baidu.com/v2
注:url链接中的v1、v2就是不同数据版本的体现(只有在一种数据资源有多版本情况下:例如在原有版本上增加接口,类似改版,也需要保证老版本可以使用) -
数据即资源(均使用名词)
接口一般都是完成前后台数据的交互,交互的数据我们称之为资源
https://api.baidu.com/users
https://api.baidu.com/books
https://api.baidu.com/book
注:一般提倡用资源的复数形式,在url链接中、不要出现操作资源的动词,错误示范:https://api.baidu.com/delete-user
特殊的接口可以出现动词,因为这些接口一般没有一个明确的资源,或是动词就是接口的核心含义
https://api.baidu.com/place/search
https://api.baidu.com/login -
资源操作由请求方式决定(method)
- 操作资源一般都会涉及到增删改查,我们提供请求方式来标识增删改查动作
- https://api.baidu.com/books - get请求:获取所有书
- https://api.baidu.com/books/1 - get请求:获取主键为1的书
- https://api.baidu.com/books - post请求:新增一本书书
- https://api.baidu.com/books/1 - put请求:整体修改主键为1的书
- https://api.baidu.com/books/1 - patch请求:局部修改主键为1的书
- https://api.baidu.com/books/1 - delete请求:删除主键为1的书 -
过滤,通过在url上传参的形式传递搜索条件
- https://api.example.com/v1/zoos?limit=10:指定返回记录的数量
- https://api.example.com/v1/zoos?offset=10:指定返回记录的开始位置
- https://api.example.com/v1/zoos?page=2&per_page=100:指定第几页,以及每页的记录数
- https://api.example.com/v1/zoos?sortby=name&order=asc:指定返回结果按照哪个属性排序,以及排序顺序
- https://api.example.com/v1/zoos?animal_type_id=1:指定筛选条件
- https://api.example.com/v1/zoos?limit=10:指定返回记录的数量
-
响应状态码
7.1 正常响应
- 响应状态码2xx
- 200:常规请求
- 201:创建成功
7.2 重定向响应
- 响应状态码3xx
- 301:永久重定向
- 302:暂时重定向
7.3 客户端异常
- 响应状态码4xx
- 403:请求无权限
- 404:请求路径不存在
- 405:请求方法不存在
7.4 服务器异常
- 响应状态码5xx
- 500:服务器异常 -
错误处理,应返回错误信息,error当做key
{
error: “无权限操作”
} -
返回结果,针对不同操作,服务器向用户返回的结果应该符合以下规范
GET /collection:返回资源对象的列表(数组)
GET /collection/resource:返回单个资源对象
POST /collection:返回新生成的资源对象
PUT /collection/resource:返回完整的资源对象
PATCH /collection/resource:返回完整的资源对象
DELETE /collection/resource:返回一个空文档 -
需要url请求的资源:需要访问资源的请求链接
// Hypermedia API,RESTful API最好做到Hypermedia,即返回结果中提供链接,连向其他API方法,使得用户不查文档,也知道下一步应该做什么 { "status": 0, "msg": "ok", "results":[ { "name":"肯德基(罗餐厅)", "img": "https://image.baidu.com/kfc/001.png" } ... ] }- 1
- 2
- 3
- 4
- 5
- 6
- 7
- 8
- 9
- 10
- 11
- 12
Maven
生命周期
- Maven的生命周期就是对所有的构建过程进行抽象和统一。包含了项目的清理、初始化、编译、测试、打包、集成测试、验证、部署和站点生成等几乎所有的构建步骤。
- Maven的生命周期是抽象的,即生命周期不做任何实际的工作,实际任务由插件完成,类似于设计模式中的模板方法。
- Maven有三套相互独立的生命周期,分别是clean、default和site。每个生命周期包含一些阶段(phase),阶段是有顺序的,后面的阶段依赖于前面的阶段。
clean 生命周期
- 清理项目,包含三个phase:
1)pre-clean:执行清理前需要完成的工作
2)clean:清理上一次构建生成的文件
3)post-clean:执行清理后需要完成的工作
default 生命周期
- 构建项目,重要的phase如下:
1)validate:验证工程是否正确,所有需要的资源是否可用。
2)compile:编译项目的源代码。
3)test:使用合适的单元测试框架来测试已编译的源代码。这些测试不需要已打包和布署。
4)Package:把已编译的代码打包成可发布的格式,比如jar。
5)integration-test:如有需要,将包处理和发布到一个能够进行集成测试的环境。
6)verify:运行所有检查,验证包是否有效且达到质量标准。
7)install:把包安装到maven本地仓库,可以被其他工程作为依赖来使用。
8)Deploy:在集成或者发布环境下执行,将最终版本的包拷贝到远程的repository,使得其他的开发者或者工程可以共享。site 生命周期
- 建立和发布项目站点,phase如下:
1)pre-site:生成项目站点之前需要完成的工作
2)site:生成项目站点文档
3)post-site:生成项目站点之后需要完成的工作
4)site-deploy:将项目站点发布到服务器
常用命令
mvn clean
- 调用clean生命周期的clean阶段,实际执行pre-clean和clean阶段
mvn test
- 调用default生命周期的test阶段,实际执行test以及之前所有阶段
mvn clean install
- 调用clean生命周期的clean阶段和default的install阶段,实际执行pre-clean和clean,install以及之前所有阶段
mvn clean deploy site-deploy
- 调用 clean 生命周期中的 pre-clean、clean 阶段,default 生命周期中从 validate 到 deploy 的所有阶段,以及 site 生命周期中的 pre-site、site、post-site 和 site-deploy 阶段。
常用注解
含Component的注解
- 这些注解修饰的类会被IOC接管。
- @Component
泛指组件,当组件不好归类的时候,我们可以使用这个注解进行标注。 - @Controller
- @RestController
即 ResponseBody + Controller - @Service
- @Repository
用于标注数据访问组件,即DAO组件。
使用@Repository注解可以确保DAO或者repositories提供异常转译,这个注解修饰的DAO或者repositories类会被ComponetScan发现并配置,同时也不需要为它们提供XML配置项。 - @Configuration
用于定义配置类,指出该类是 Bean 配置的信息源,相当于传统的xml配置文件,一般加在主类上。如果有些第三方库需要用到xml文件,建议仍然通过@Configuration类作为项目的配置主类——可以使用@ImportResource注解加载xml配置文件。
@ComponentScan
组件扫描。让spring Boot扫描到Configuration类并把它加入到程序上下文。
@ComponentScan注解会默认装配标识了@Controller、@Service、@Repository、@Component注解的类到spring容器中。
@ResponseBody
表示该方法的返回结果直接写入HTTP response body中
一般在异步获取数据时使用,在使用@RequestMapping后,返回值通常解析为跳转路径,添加@responsebody后返回结果不会被解析为跳转路径,而是直接写入HTTP response body中。比如异步获取json数据,加上@responsebody后,会直接返回json数据。
@Bean
放在方法的上面,意思是产生一个id为方法名的bean,并交给spring管理。
@AutoWired
byType方式。把配置好的Bean拿来用,完成属性、方法的组装,它可以对类成员变量、方法及构造函数进行标注,完成自动装配的工作。
当加上(required=false)时,就算找不到bean也不报错。
@Qualifier
当有多个同一类型的Bean时,可以用@Qualifier(“name”)来指定。与@Autowired配合使用
@Resource(name=“name”,type=“type”)
没有括号内内容的话,默认byName。与@Autowired干类似的事。
@RequestMapping
RequestMapping是一个用来处理请求地址映射的注解;提供路由信息,负责URL到Controller中的具体函数的映射,可用于类或方法上。用于类上,表示类中的所有响应请求的方法都是以该地址作为父路径。
- 默认post请求和get请求都支持。
@RequestParam
用在方法的参数前面。例如:
public void function(@RequestParam String a =request.getParameter("a")){ //do something; }- 1
- 2
- 3
@RequestBody
- 主要用来接收前端传递给后端的json字符串中的数据的(请求体中的数据的);而最常用的使用请求体传参的无疑是POST请求了,所以使用@RequestBody接收数据时,一般都用POST方式进行提交。在后端的同一个接收方法里,@RequestBody与@RequestParam()可以同时使用,@RequestBody最多只能有一个,而@RequestParam()可以有多个。
- 一个请求,只有一个RequestBody;一个请求,可以有多个RequestParam。
@PathVariable
- 获取请求路径中的变量
@RequestMapping("show5/{id}/{name}") public ModelAndView test5(@PathVariable("id") Long ids ,@PathVariable("name") String names){ ModelAndView mv = new ModelAndView(); mv.addObject("msg","占位符映射:id:"+ids+";name:"+names); mv.setViewName("hello2"); return mv; }- 1
- 2
- 3
- 4
- 5
- 6
- 7
@Param
- @Param是MyBatis所提供的(org.apache.ibatis.annotations.Param),作为Dao层的注解,作用是用于传递参数,从而可以与SQL中的的字段名相对应,一般在2=<参数数<=5时使用最佳。
@Repository public interface StudentRespository { StudentPo selectByStudentNo(@Param("stuNo") Long stuId); }- 1
- 2
- 3
- 4

@PathVariable
获取路径变量。参数与大括号里的名字一样要相同。例如:
@RequestMapping("user/get/mac/{macAddress}") public String getByMacAddress(@PathVariable String macAddress){ //do something; }- 1
- 2
- 3
- 4
@Profiles
Spring Profiles提供了一种隔离应用程序配置的方式,并让这些配置只能在特定的环境下生效。
任何@Component或@Configuration都能被@Profile标记,从而限制加载它的时机。
@Configuration @Profile("prod") public class ProductionConfiguration { // ... }- 1
- 2
- 3
- 4
- 5
- @ConfigurationProperties
Spring Boot可使用注解的方式将自定义的properties文件映射到实体bean中。
@Data @Configuration @ConfigurationProperties(prefix = "mail") public class ConfigProperties { private String hostName; private int port; private String from; }- 1
- 2
- 3
- 4
- 5
- 6
- 7
- 8
springboot将会读取properties文件中所有以mail开头的属性,并和bean中的字段进行匹配
# A simple .properties file mail.hostname=host@mail.com mail.port=9000 mail.from=mailer@mail.com- 1
- 2
- 3
- 4
@PropertySource

Lombok注解
- @Data
- @AllArgsConstructor
- @NoArgsConstructor
Log
日志级别
- 级别排列如下:
- OFF | 关闭:最高级别,不打印日志。
- FATAL | 致命:指明非常严重的可能会导致应用终止执行错误事件。
- ERROR | 错误:指明错误事件,但应用可能还能继续运行。
- WARN | 警告:指明可能潜在的危险状况。
- INFO | 信息:指明描述信息,从粗粒度上描述了应用运行过程。
- DEBUG | 调试:指明细致的事件信息,对调试应用最有用。
- TRACE | 跟踪:指明程序运行轨迹,比DEBUG级别的粒度更细。
- ALL | 所有:所有日志级别,包括定制级别。
日志配置
- 更改SpringBoot默认日志级别为debug还可以指定某个包下的日志级别
logging: level: root: debug- 1
- 2
- 3
- 更改com.hand包下的日志级别为trace
logging: level: com.hand: trace- 1
- 2
- 3
- 设置日志文件
logging: level: root: debug com.hand: trace file: name: myLog.log- 1
- 2
- 3
- 4
- 5
- 6
Slf4J和Logback
-
Slf4J和Logback一个负责充当日志API接口,一个负责实现日志底层
-
依赖导入
<dependency> <groupId>org.slf4jgroupId> <artifactId>slf4j-apiartifactId> dependency> <dependency> <groupId>ch.qos.logbackgroupId> <artifactId>logback-classicartifactId> dependency> <dependency> <groupId>ch.qos.logbackgroupId> <artifactId>logback-coreartifactId> dependency>- 1
- 2
- 3
- 4
- 5
- 6
- 7
- 8
- 9
- 10
- 11
- 12
- 13
- 日志使用
@RestController public class UserController { private final Logger logger = LoggerFactory.getLogger(UserController.class); @RequestMapping("/getName") public String getName(){ logger.debug("||| debug log test ================="); logger.trace("||| trace log test ================="); logger.info("||| info log test ================="); return "李四"; } }- 1
- 2
- 3
- 4
- 5
- 6
- 7
- 8
- 9
- 10
- 11
- 12
Entity类
VO
- 用来封装来自前端的数据
- 视图对象,用于展示层,它的作用是把某个指定页面(或组件)的所有数据封装起来。
DTO
- 用来封装要发给前端的数据
- 数据传输对象,这个概念来源于J2EE的设计模式,原来的目的是为了EJB的分布式应用提供粗粒度的数据实体,以减少分布式调用的次数,从而提高分布式调用的性能和降低网络负载,但在这里,我泛指用于展示层与服务层之间的数据传输对象。
DO
- 领域对象,就是从现实世界中抽象出来的有形或无形的业务实体。
PO
- 持久化对象,它跟持久层(通常是关系型数据库)的数据结构形成一一对应的映射关系,如果持久层是关系型数据库,那么,数据表中的每个字段(或若干个)就对应PO的一个(或若干个)属性。
Mybatis
Mapper映射配置文件
- 即用来写 sql 的Mapper.xml
- mapper文件顶级元素(标签):
- resultMap – 描述如何从数据库结果集中加载对象,是最复杂也是最强大的元素
- select – 映射查询语句
- insert – 映射插入语句
- update – 映射更新语句
- delete – 映射删除语句
- sql – 可被其它语句引用的可重用语句块
- cache – 该命名空间的缓存配置
- cache-ref – 引用其它命名空间的缓存配置
select标签


insert、update 和 delete标签

resultMap标签
- 实例
<resultMap type="com.hand.demo01.domain.entity.po.StudentPo" id="studentMap"> <result property="studentNo" column="student_no"/> <result property="studentName" column="student_name"/> <result property="studentAge" column="student_age"/> <result property="studentGender" column="student_gender"/> resultMap> <select id="selectByStudentNo" resultMap="studentMap"> select student_no, student_name, student_age, student_gender from hand_student <if test="stuNo != null"> where student_no = #{stuNo} if> select>- 1
- 2
- 3
- 4
- 5
- 6
- 7
- 8
- 9
- 10
- 11
- 12
- 13
- 14
- 15
- ResultMap支持一对一和一对多的关联关系。
一对一结果映射
一对一结果映射需要association标签的支持
- 连表查询实例:


- 以关联select查询实例:

- 可以延迟加载
一对多结果映射
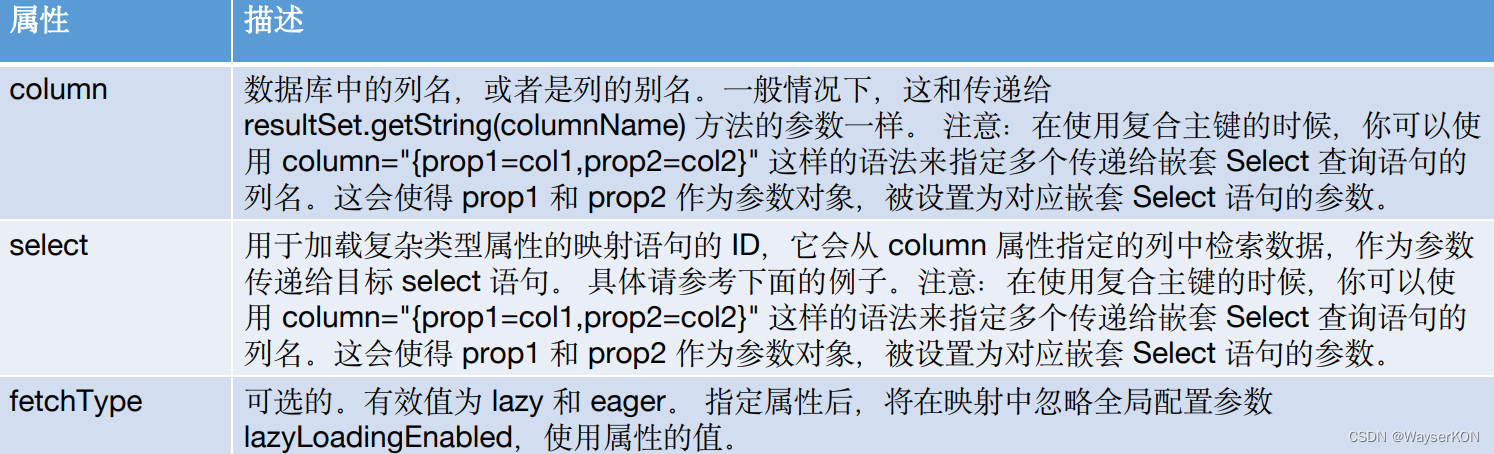
- 这里会使用到collection标签,属性如下:

- 实例:

- 同样支持延时加载
sql标签
- sql代码复用
<include refid="all_columns" /> <sql id="all_columns"> sql... <sql>- 1
- 2
selectKey标签
- 对于不支持自动生成主键列的数据库和可能不支持自动生成主键的 JDBC 驱动,MyBatis 有另外一种方法来生成主键。


字符串替换
- #{}与${}都是从Mapper接口的参数列表中取值。
- #{}是编译好SQL语句再填值,而${}是填值以后再去编译SQL语句。
- #{}是经过预编译的,是安全的。#{}引用参数的时候,Mybatis会把这个参数认为是一个字符串,并自动加上单引号。
- ${}是未经过预编译的,变量的值直接填入sql,是非安全的,存在SQL注入的风险。
动态SQL
相关标签:
- if 标签
条件成立则填入中间内容
-- test中使用接口的参数来判断 <if test="stuNo != null"> where student_no = #{stuNo} if>- 1
- 2
- 3
- 4
- choose (when, otherwise) 标签
同switch语句
<choose> <when test=" name != null and name != '' "> AND C_NAME LIKE #{name,jdbcType=VARCHAR} when> <when test=" sex != null and sex != '' "> AND C_SEX != #{sex,jdbcType=VARCHAR} when> <otherwise> AND B_FACE IS NULL otherwise> choose>- 1
- 2
- 3
- 4
- 5
- 6
- 7
- 8
- 9
- 10
- 11
- where 标签
where”标签会知道如果它包含的标签中有返回值的话,它就插入一个‘where’。此外,如果标签返回的内容是以 AND 或OR 开头的,则它会剔除掉。
SELECT u.user_id, u.username, u.sex, u.birthday FROM User u <where> <if test="username !=null "> u.username LIKE CONCAT(CONCAT('%', #{username, jdbcType=VARCHAR}),'%') if> <if test="sex != null and sex != '' "> AND u.sex = #{sex, jdbcType=INTEGER} if> <if test="birthday != null "> AND u.birthday = #{birthday, jdbcType=DATE} if> where>- 1
- 2
- 3
- 4
- 5
- 6
- 7
- 8
- 9
- 10
- 11
- 12
- 13
- 14
- 15
- 16
- set 标签
set标签可以将动态的配置 SET 关键字,并剔除追加到条件末尾的任何不相关的逗号。
UPDATE user <set> <if test="username!= null and username != '' "> username = #{username}, if> <if test="sex!= null and sex!= '' "> sex = #{sex}, if> <if test="birthday != null "> birthday = #{birthday}, if> set> WHERE user_id = #{userid};- 1
- 2
- 3
- 4
- 5
- 6
- 7
- 8
- 9
- 10
- 11
- 12
- 13
- trim 标签
-
trim 元素的主要功能是可以在自己包含的内容前加上某些前缀,也可以在其后加上某些后缀,与之对应的属性是 prefix 和 suffix;可以把包含内容的首部某些内容忽略,也可以把尾部的某些内容忽略,对应的属性是 prefixOverrides 和 suffixOverrides.
-
trim 是更灵活用来去处多余关键字的标签,它可以用来实现 where 和 set 的效果。
<select id="getUsertList_if_trim" resultMap="resultMap_User"> SELECT * FROM user u <trim prefix="WHERE" prefixOverrides="AND|OR"> <if test="username !=null "> u.username LIKE CONCAT(CONCAT('%', #{username, jdbcType=VARCHAR}),'%') if> <if test="sex != null and sex != '' "> AND u.sex = #{sex, jdbcType=INTEGER} if> <if test="birthday != null "> AND u.birthday = #{birthday, jdbcType=DATE} if> trim> select> <update id="updateUser_if_trim" parameterType="com.yiibai.pojo.User"> UPDATE user <trim prefix="SET" suffixOverrides=","> <if test="username != null and username != '' "> username = #{username}, if> <if test="sex != null and sex != '' "> sex = #{sex}, if> <if test="birthday != null "> birthday = #{birthday}, if> trim> WHERE user_id = #{user_id} update>- 1
- 2
- 3
- 4
- 5
- 6
- 7
- 8
- 9
- 10
- 11
- 12
- 13
- 14
- 15
- 16
- 17
- 18
- 19
- 20
- 21
- 22
- 23
- 24
- 25
- 26
- 27
- 28
- 29
- 30
- 31
- 32
- 33
- 34
- foreach 标签
- 可以指定一个集合,声明可以用在元素体内的集合项和索引变量。还可以指定开闭匹配的字符串以及在迭代中间放置的分隔符。
- 通常是在构建 IN 条件语句的时候使用
<select id="selectPostIn" resultType="domain.blog.Post"> SELECT * FROM POST P WHERE ID in <foreach item="item" index="index" collection="list" open="(" separator="," close=")"> #{item} foreach> select>- 1
- 2
- 3
- 4
- 5
- 6
- 7
- 8
- 9
开启sql日志打印
- application.yml
mybatis-plus: configuration: log-impl: org.apache.ibatis.logging.stdout.StdOutImpl- 1
- 2
- 3
TO DO
-
相关阅读:
线性回归模型(OLS)1
【吞噬星空4】鸽了那么多次,吞噬终于开始预热,火星场景公布
基于GRU的 电影评论情感分析 - python 深度学习 情感分类 计算机竞赛
每日一题(两数相加)
Webpack常见的插件和模式
JS使用Vue自定义组件实现动态多层数据渲染+递归+踩坑
Java线程通信
Spring实战之有条件的加载bean/按某个条件加载bean
【Reinforcement Learning】强化学习基础内容有哪些?
狂掷20亿自造电池!蔚来在等多远的未来?
- 原文地址:https://blog.csdn.net/langkeyring/article/details/126001038
