-
四种bean拷贝工具对比
前言
在日常编码中,经常会遇到DO、DTO对象之间的转换,如果对象本身的属性比较少的时候,那么我们采用硬编码手工setter也还ok,但如果对象的属性比较多的情况下,手工setter就显得又low又效率又低。这个时候我们就考虑采用一些工具类来进行对象属性的拷贝了。
我们常用的对象属性拷贝的方式有:- Hard Code 也可以使用MapStruct,编译生成转换类,效率不差于硬编码
- net.sf.cglib.beans.BeanCopier#copy
- org.springframework.beans.BeanUtils.copyProperties
- org.apache.commons.beanutils.BeanUtils.copyProperties

结论:从测试结果中很明显可以看出采用Hard Code方式进行对象属性Copy性能最佳;采用net.sf.cglib.beans.BeanCopier#copy方式进行对象属性copy性能最稳定;而org.apache.commons.beanutils.BeanUtils.copyProperties 方式在数据量大时性能下降最厉害。所以在日常编程中遇到具有较多属性的对象进行属性复制时优先考虑采用net.sf.cglib.beans.BeanCopier#copy。
以上的数据之所产生巨大差距的原因在于其实现原理与方式的不同而导致的,Hard Code直接调用getter & setter方法值,cglib采用的是字节码技术,而后三种均采用反射的方式。前两者性能优异众所周知,但为何同样采用反射的方式进行属性Copy时产生的差异如此巨大呢? 这正是本文我们想要去探究的内容。org.springframework.beans.BeanUtils
BeanUtils 位于spring-beans模块中,暴露出静态方法copyProperties用以进行属性copy,每个copyProperties最终均调用一个私有静态方法实现属性copy:
获取Bean的PropertyDescriptor
spring.BeanUtils中对于bean的PropertyDescriptor处理以及缓存均是由CachedIntrospectionResults类来进行处理。 CacheIntrospectionResults将数据缓存在静态集合中,使用了工厂方法的设计模式,通过forClass(Class)方法暴露缓存:
static CachedIntrospectionResults forClass(Class<?> beanClass) throws BeansException { // 从缓存中获取CachedIntrospectionResults CachedIntrospectionResults results = strongClassCache.get(beanClass); if (results != null) { return results; } // 从缓存中获取CachedIntrospectionResults results = softClassCache.get(beanClass); if (results != null) { return results; } // 构造CachedIntrospectionResults results = new CachedIntrospectionResults(beanClass); ConcurrentMap<Class<?>, CachedIntrospectionResults> classCacheToUse; // 选取对应的缓存 if (ClassUtils.isCacheSafe(beanClass, CachedIntrospectionResults.class.getClassLoader()) || isClassLoaderAccepted(beanClass.getClassLoader())) { classCacheToUse = strongClassCache; } else { if (logger.isDebugEnabled()) { logger.debug("Not strongly caching class [" + beanClass.getName() + "] because it is not cache-safe"); } classCacheToUse = softClassCache; } CachedIntrospectionResults existing = classCacheToUse.putIfAbsent(beanClass, results); return (existing != null ? existing : results); }- 1
- 2
- 3
- 4
- 5
- 6
- 7
- 8
- 9
- 10
- 11
- 12
- 13
- 14
- 15
- 16
- 17
- 18
- 19
- 20
- 21
- 22
- 23
- 24
- 25
- 26
- 27
- 28
我们可以看到此处具有两个缓存:strongClassCache与softClassCache,那他俩什么区别呢?
首先我们看他们的定义:static final ConcurrentMap<Class<?>, CachedIntrospectionResults> strongClassCache = new ConcurrentHashMap<Class<?>, CachedIntrospectionResults>(64); static final ConcurrentMap<Class<?>, CachedIntrospectionResults> softClassCache = new ConcurrentReferenceHashMap<Class<?>, CachedIntrospectionResults>(64);- 1
- 2
- 3
- 4
可以看出来都是静态属性,类加载时就被创建的缓存实例,如果类加载器关闭,加载器对应的资源也会被释放
ConcurrentReferenceHashMap可以指定对应的引用级别,其内部采用分段锁实现,与jdk1.7的ConcurrentMap的实现原理类似。
strongClassCache中持有的缓存是强引用,而softClassCache持有的缓存是软引用 (JDK有4中引用级别,分别是强引用,软引用,弱引用以及虚引用,引用级别体现在决定GC的时候持有的实例被回收的时机)。
strongClassCache用于缓存cache-safe的bean class数据,而softClassCache用于缓存none-cache-safe bean class数据;strongClassCache中的数据与spring application的生命周期一致,而softClassCache的生命周期则不由spring进行管理,因此为了防止因classloader提前关闭导致内存泄漏,此处采用软引用进行缓存.
那什么样的数据会被cache在strongClassCache中呢?beanClass的ClassLoader与当前相同时或者与程序指定的ClassLoader相同时会被存储于strongClassCache,其余均为存储于softClassCache中。
如果从以上cache中没有拿到数据,那么会new CachedIntrospectionResults(Class),相应的调用Java Introspector的相关API均在此构造函数中:// omit some logger code ... private CachedIntrospectionResults(Class<?> beanClass) throws BeansException { try { BeanInfo beanInfo = null; // 对一些特殊的set方法(setA(int index, Object a))或者list的set方法进行处理 for (BeanInfoFactory beanInfoFactory : beanInfoFactories) { beanInfo = beanInfoFactory.getBeanInfo(beanClass); if (beanInfo != null) { break; } } if (beanInfo == null) { // fall back到默认获取BeanInfo的方式 beanInfo = (shouldIntrospectorIgnoreBeaninfoClasses ? Introspector.getBeanInfo(beanClass, Introspector.IGNORE_ALL_BEANINFO) : Introspector.getBeanInfo(beanClass)); } this.beanInfo = beanInfo; // propertyDescriptor缓存 this.propertyDescriptorCache = new LinkedHashMap<String, PropertyDescriptor>(); // 考虑到性能原因,对于每个PropertyDescriptor只处理一次 PropertyDescriptor[] pds = this.beanInfo.getPropertyDescriptors(); for (PropertyDescriptor pd : pds) { if (Class.class == beanClass && ("classLoader".equals(pd.getName()) || "protectionDomain".equals(pd.getName()))) { continue; } // 重新包装为GenericTypeAwarePropertyDescriptor pd = buildGenericTypeAwarePropertyDescriptor(beanClass, pd); this.propertyDescriptorCache.put(pd.getName(), pd); } // 检查Java 8在接口中的默认实现方法 Class<?> clazz = beanClass; while (clazz != null) { Class<?>[] ifcs = clazz.getInterfaces(); for (Class<?> ifc : ifcs) { BeanInfo ifcInfo = Introspector.getBeanInfo(ifc, Introspector.IGNORE_ALL_BEANINFO); PropertyDescriptor[] ifcPds = ifcInfo.getPropertyDescriptors(); for (PropertyDescriptor pd : ifcPds) { if (!this.propertyDescriptorCache.containsKey(pd.getName())) { pd = buildGenericTypeAwarePropertyDescriptor(beanClass, pd); this.propertyDescriptorCache.put(pd.getName(), pd); } } } clazz = clazz.getSuperclass(); } this.typeDescriptorCache = new ConcurrentReferenceHashMap<PropertyDescriptor, TypeDescriptor>(); } catch (IntrospectionException ex) { throw new FatalBeanException("Failed to obtain BeanInfo for class [" + beanClass.getName() + "]", ex); } }- 1
- 2
- 3
- 4
- 5
- 6
- 7
- 8
- 9
- 10
- 11
- 12
- 13
- 14
- 15
- 16
- 17
- 18
- 19
- 20
- 21
- 22
- 23
- 24
- 25
- 26
- 27
- 28
- 29
- 30
- 31
- 32
- 33
- 34
- 35
- 36
- 37
- 38
- 39
- 40
- 41
- 42
- 43
- 44
- 45
- 46
- 47
- 48
- 49
- 50
- 51
- 52
- 53
- 54
- 55
这段代码主要的作用就是通过内省接口得到BeanInfo,然后将PropertyDescriptor缓存起来。具体流程:
- 首先通过BeanInfoFactory获取BeanInfo; 这里默认注册时BeanInfoFactory是ExtendedBeanInfoFactory, 此类主要处理包含一些特殊set方法的bean:
public static boolean isCandidateWriteMethod(Method method) { String methodName = method.getName(); Class<?>[] parameterTypes = method.getParameterTypes(); int nParams = parameterTypes.length; return (methodName.length() > 3 && methodName.startsWith("set") && Modifier.isPublic(method.getModifiers()) && (!void.class.isAssignableFrom(method.getReturnType()) || Modifier.isStatic(method.getModifiers())) && (nParams == 1 || (nParams == 2 && int.class == parameterTypes[0]))); }- 1
- 2
- 3
- 4
- 5
- 6
- 7
- 8
如果一个bean中包含这么一个方法:以set开头 &&(返回值不为void || 是静态方法) && (具有一个参数 || 有两个参数其中第一个参数是int), 形如:
// void.class.isAssignableFrom(method.getReturnType()) 方法返回值不为void public Bean setFoo(Foo foo) { this.foo = foo; return this; } public static void setFoos(Foo foo) { Bean.foo = foo; } public Bean setFoos(int index, Foo foo) { this.foos.set(index, foo); return this; }- 1
- 2
- 3
- 4
- 5
- 6
- 7
- 8
- 9
- 10
- 11
- 12
- 如果该bean不包含以上的方法,则直接采用Java的内省API获取BeanInfo
- 当获取到BeanInfo之后就可以对PropertyDescriptor进行缓存了;这里会将PropertyDescriptor重新包装为GenericTypeAwarePropertyDescriptor, 进行这样封装的原因是为了重新处理BridgeMethod, 通俗点讲,就是处理当前类继承了泛型类或者实现泛型接口,那怎么识别这些方法呢?
Bridge Method: 桥接方法是jdk引入泛型后为了与之前的jdk版本兼容,在编译时自动生成的方法。桥接方法的字节码Flag会被标记为ACC_BRIDGE (桥接方法)和ACC_SYNTHETIC (由编译器生成)。通过Method.isBridge()来判断一个方法是否为BridgeMethod。如果一个方法覆写了泛型父类或者实现了泛型接口则会生成bridge method.
题外话-什么要生成桥接方法
在java1.5以前,比如声明一个集合类型:
List list = new ArrayList();
那么往list中可以添加任何类型的对象,但是在从集合中获取对象时,无法确定获取到的对象是什么具体的类型,所以在1.5的时候引入了泛型,在声明集合的时候就指定集合中存放的是什么类型的对象:
List list = new ArrayList();
使用泛型之后,在获取时就不必担心类型的问题,因为泛型在编译时编译器会检查往集合中添加的对象的类型是否匹配泛型类型,如果不正确会在编译时就会发现错误,而不必等到运行时才发现错误。
因为泛型是在1.5引入的,为了向前兼容,所以会在编译时去掉泛型(泛型擦除),产生桥接方法。
桥接方法的产生:- 实现 泛型接口 的类,编译器会为 这个类生成 桥接方法
- 继承 超类的 方法,并且升级方法的返回类型(即子类 覆写 超类方法 时,返回类型 升级为 原返回类型的父类)
为什么需要生成桥接方法?
- 因为泛型是在1.5引入的,为了向前兼容,所以会在编译时去掉泛型(泛型擦除),产生桥接方法用来限制子类的类型。
- 例如
Consumer 是 JDK 1.8 出现的接口方法:
public interface Consumer { void accept(T t); }
我们来实现该接口
public class StringConsumer implements Consumer { @Override public void accept(String s) { System.out.println("i consumed " + s); } }
编译源代码后,查看字节码。- 使用 IDEA: View -> Show Bytecode
我们发现:
StringConsumer 类的字节码中包含 桥接方法
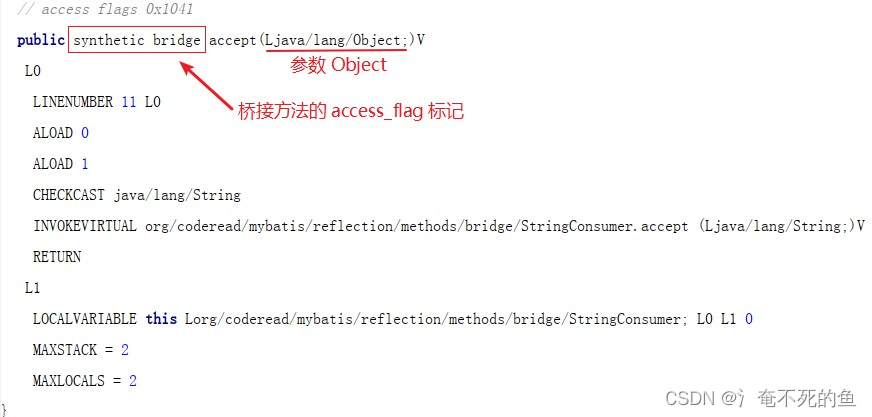
tringConsumer 类的字节码中还包含我们覆写后的 public void accept(String s) 方法

属性值copy
从缓存中获取到了目标类的PropertyDescriptor后,就要轮询其每一个PropertyDescriptor赋值了。
赋值的过程相对比较简单一点:- 获取目标类的写方法(setter)
- 如果目标类的写方法不为空且此方法对应的属性并不在配置的igonreList(忽略属性列表)中,则获取源类对应属性的读方法(getter)
- 获取到读方法之后,需要判断读方法的返回值是否与写方法的参数是同一个类型,不同类型当然无法copy了
- 判断读方法是否public,如果不是,则需要设置访问权限method.setAccessible(true);(非public方法在反射访问时需要设置setAccessible(true)获取访问权限),然后调用反射执行此方法,invoke(source);
- 判断写方法是否public,如果不是则设置访问权限,然后将读到的值,通过放射赋给目标类invoke(taget, value);
至此,类的属性copy完成。
注意点
- editable不为空的话,限制 editable是target的 子类
- 对于source的get方法和set方法,要求get的返回值是set参数类型的子类
- 基本类型,的自动装箱还拆箱做的到,基本类型和引用类型的不同依然可以复制
- 是一个浅拷贝
int a = 123; Integer b = 11; System.out.println(b.getClass().isInstance(a));//true- 1
- 2
- 3
org.apache.commons.beanutils
apache.BeanUtils是一个包含了很多静态方法的工具类,而几乎所有的静态方法均是BeanUtilsBean的单例对象提供的实现。BeanUtilsBean是进行JavaBean属性操作的入口方法,它以单实例对外提供功能。但这里有一个不同于普通单例的地方:不同的类加载器拥有不同的实例,每一个类加载器只有一个实例 ,所以这里的单例其实是一个伪单例pseudo-singletion 。
// ContextClassLoaderLocal对象管理了BeanUtilsBean的所有实例 private static final ContextClassLoaderLocal<BeanUtilsBean> BEANS_BY_CLASSLOADER = new ContextClassLoaderLocal<BeanUtilsBean>() { @Override protected BeanUtilsBean initialValue() { return new BeanUtilsBean(); } }; public static BeanUtilsBean getInstance() { return BEANS_BY_CLASSLOADER.get(); } // {@link ContextClassLoaderLocal#get} public synchronized T get() { valueByClassLoader.isEmpty(); try { final ClassLoader contextClassLoader = Thread.currentThread().getContextClassLoader(); // 获取当前线程的类加载器 if (contextClassLoader != null) { T value = valueByClassLoader.get(contextClassLoader); if ((value == null) && !valueByClassLoader.containsKey(contextClassLoader)) { value = initialValue(); // 初始化BeanUtilsBean,即 new BeanUtilsBean(); valueByClassLoader.put(contextClassLoader, value); } return value; } } catch (final SecurityException e) { /* SWALLOW - should we log this? */ } if (!globalValueInitialized) { globalValue = initialValue(); globalValueInitialized = true; } return globalValue; }- 1
- 2
- 3
- 4
- 5
- 6
- 7
- 8
- 9
- 10
- 11
- 12
- 13
- 14
- 15
- 16
- 17
- 18
- 19
- 20
- 21
- 22
- 23
- 24
- 25
- 26
- 27
- 28
- 29
- 30
- 31
- 32
当获取到了BeanUtilsBean的实例之后,接下来就是我们进行对象属性拷贝的时候了
// omit exception public static void copyProperties(final Object dest, final Object orig){ BeanUtilsBean.getInstance().copyProperties(dest, orig); }- 1
- 2
- 3
- 4
在copyProperties方法中,针对原始对象的类型分别采用了不同的逻辑:
- Map : 通过Map的Key与dest中的属性进行匹配,然后赋值;可以作为source但是不能作为target
- DynaBean :DynaBean顾名思义,它是一种可以形成动态java bean的对象,也就是说它内部会存储属性名称、类型以及对应的值,在copy属性时也是将其内部的属性名称与dest对象的属性名称对应后赋值;
- 标准Java Bean :这个是我们主要进行分析的类型,它是标准的JavaBean对象;与前两者的差异只是在于对原始bean的取值的处理上.
针对标准JavaBean进行属性copy时的步骤
public void copyProperties(final Object dest, final Object orig) { // omit some code (省略一部分代码) ... final PropertyDescriptor[] origDescriptors = getPropertyUtils().getPropertyDescriptors(orig); for (PropertyDescriptor origDescriptor : origDescriptors) { final String name = origDescriptor.getName(); if ("class".equals(name)) { continue; // No point in trying to set an object's class } if (getPropertyUtils().isReadable(orig, name) && getPropertyUtils().isWriteable(dest, name)) { try { final Object value = getPropertyUtils().getSimpleProperty(orig, name); copyProperty(dest, name, value); } catch (final NoSuchMethodException e) { // Should not happen } } } }- 1
- 2
- 3
- 4
- 5
- 6
- 7
- 8
- 9
- 10
- 11
- 12
- 13
- 14
- 15
- 16
- 17
- 18
- 19
- 20
- 根据原始bean的类型解析、缓存其PropertyDescriptor
- 轮询原始bean的每一个PropertyDescriptor ,判断PropertyDescriptor在原始bean中是否可读、在目标bean中是否可写,只有这两个条件都成立时才具备copy的资格
- 根据PropertyDescriptor从原始bean中获取对应的值,将值copy至目标bean的对应属性上
获取Bean的PropertyDescriptor
final PropertyDescriptor[] origDescriptors = getPropertyUtils().getPropertyDescriptors(orig);- 1
- 2
获取PropertyDescriptor委托给PropertyUtilsBean对象来实现:
public BeanUtilsBean() { this(new ConvertUtilsBean(), new PropertyUtilsBean()); }- 1
- 2
- 3
PropertyUtilsBean 是用于使用java 反射API来操作Java Bean上getter和setter方法的,此类中的代码原先是位于BeanUtilsBean中的,但是考虑到代码量的原因进行了分离(Much of this code was originally included in BeanUtils, but has been separated because of the volume of code involved)。
在PropertyUtilsBean中,每个Bean的PropertyDescriptor 会存储于BeanIntrospectionData对象中,当每次需要获取PropertyDescriptor时,会先从cahche中获取BeanIntrospectionData ;如果不存在,则通过内省API获取BeanIntrospectionData并将其置于缓存中:private BeanIntrospectionData getIntrospectionData(final Class<?> beanClass) { // omit some check code ... BeanIntrospectionData data = descriptorsCache.get(beanClass); if (data == null) { data = fetchIntrospectionData(beanClass); descriptorsCache.put(beanClass, data); } return data; } private BeanIntrospectionData fetchIntrospectionData(final Class<?> beanClass) { final DefaultIntrospectionContext ictx = new DefaultIntrospectionContext(beanClass); for (final BeanIntrospector bi : introspectors) { try { bi.introspect(ictx); } catch (final IntrospectionException iex) { log.error("Exception during introspection", iex); } } return new BeanIntrospectionData(ictx.getPropertyDescriptors()); }- 1
- 2
- 3
- 4
- 5
- 6
- 7
- 8
- 9
- 10
- 11
- 12
- 13
- 14
- 15
- 16
- 17
- 18
- 19
- 20
- 21
在fetchIntrospectionData()方法中,通过内置的内省器DefaultBeanIntrospector使用java的内省API将获取的信息传递给DefaultIntrospectionContext, 在通过DefaultIntrospectionContext构造BeanIntrospectionData。DefaultBeanIntrospector具体的代码:
public void introspect(final IntrospectionContext icontext) { BeanInfo beanInfo = null; try { // JAVA 的 Instrospector beanInfo = Introspector.getBeanInfo(icontext.getTargetClass()); } catch (final IntrospectionException e) { return; } PropertyDescriptor[] descriptors = beanInfo.getPropertyDescriptors(); if (descriptors == null) { descriptors = new PropertyDescriptor[0]; } // 解决IndexedPropertyDescriptor在不同版本的JDK下的差异 handleIndexedPropertyDescriptors(icontext.getTargetClass(), descriptors); icontext.addPropertyDescriptors(descriptors); }- 1
- 2
- 3
- 4
- 5
- 6
- 7
- 8
- 9
- 10
- 11
- 12
- 13
- 14
- 15
- 16
Introspector java.beans下的包
** Introspector 是操作 javaBean 的 API,用来访问某个属性的 getter/setter 方法。**
对于一个标准的 javaBean 来说,它包括属性、get 方法和 set 方法,这是一个约定俗成的规范。为此 sun 提供了 Introspector 工具包,来使开发者更好或者更灵活的操作 javaBean。判断属性是否可读/可写
要进行属性copy,那么首先得确保原始对象的属性可读、目标对象属性可写。在PropertyUtilsBean中通过isWriteable(); isReadable()方法,这两个方法看上去比较长,我们把关于exception的处理省略掉拿出来看下:
public boolean isReadable(Object bean, String name) { // Omit Validate method parameters // Resolve nested references, 解析内嵌的属性,形如 student.name while (resolver.hasNested(name)) { final String next = resolver.next(name); Object nestedBean = nestedBean = getProperty(bean, next); if (nestedBean == null) { throw new NestedNullException("Null property value for); } bean = nestedBean; name = resolver.remove(name); } // Remove any subscript from the final name value, 在最终的方法名中移除所有的下标 name = resolver.getProperty(name); if (bean instanceof WrapDynaBean) { bean = ((WrapDynaBean)bean).getInstance(); } if (bean instanceof DynaBean) { // All DynaBean properties are readable,所有DynaBean的属性均是可读的 return (((DynaBean) bean).getDynaClass().getDynaProperty(name) != null); } else { final PropertyDescriptor desc = getPropertyDescriptor(bean, name); if (desc != null) { Method readMethod = getReadMethod(bean.getClass(), desc); if (readMethod == null) { if (desc instanceof IndexedPropertyDescriptor) { readMethod = ((IndexedPropertyDescriptor) desc).getIndexedReadMethod(); } else if (desc instanceof MappedPropertyDescriptor) { readMethod = ((MappedPropertyDescriptor) desc).getMappedReadMethod(); } readMethod = MethodUtils.getAccessibleMethod(bean.getClass(), readMethod); } return (readMethod != null); } else { return (false); } } }- 1
- 2
- 3
- 4
- 5
- 6
- 7
- 8
- 9
- 10
- 11
- 12
- 13
- 14
- 15
- 16
- 17
- 18
- 19
- 20
- 21
- 22
- 23
- 24
- 25
- 26
- 27
- 28
- 29
- 30
- 31
- 32
- 33
- 34
- 35
- 36
- 37
- 38
从以上代码我们可以得知,每个属性的可读、可写在每次使用时都需要获取Method,然后进行判断,并且还需要处理DynaBean、Nested的逻辑;当我们进行批量的属性copy时,依然需要执行以上步骤,并未将method的判断结果进行缓存,这也是其相比于其他的jar低效的原因.
读取原始Bean的属性值、设置目标Bean的属性值
我们还是省略掉其中的有效性判断和异常的代码:
public Object getSimpleProperty(final Object bean, final String name) throws IllegalAccessException, InvocationTargetException, NoSuchMethodException { // omit check null code ... // 校验属性 if (resolver.hasNested(name)) { throw new IllegalArgumentException ("Nested property names are not allowed: Property '" + name + "' on bean class '" + bean.getClass() + "'"); } else if (resolver.isIndexed(name)) { throw new IllegalArgumentException ("Indexed property names are not allowed: Property '" + name + "' on bean class '" + bean.getClass() + "'"); } else if (resolver.isMapped(name)) { throw new IllegalArgumentException ("Mapped property names are not allowed: Property '" + name + "' on bean class '" + bean.getClass() + "'"); } // DynaBean的特殊逻辑 if (bean instanceof DynaBean) { final DynaProperty descriptor = ((DynaBean) bean).getDynaClass().getDynaProperty(name); if (descriptor == null) { throw new NoSuchMethodException("Unknown property '" + name + "' on dynaclass '" + ((DynaBean) bean).getDynaClass() + "'" ); } return (((DynaBean) bean).get(name)); } final PropertyDescriptor descriptor = getPropertyDescriptor(bean, name); if (descriptor == null) { throw new NoSuchMethodException("Unknown property '" + name + "' on class '" + bean.getClass() + "'" ); } // 获取getter方法 final Method readMethod = getReadMethod(bean.getClass(), descriptor); if (readMethod == null) { throw new NoSuchMethodException("Property '" + name + "' has no getter method in class '" + bean.getClass() + "'"); } // 调用getter方法读取值 final Object value = invokeMethod(readMethod, bean, EMPTY_OBJECT_ARRAY); return (value); }- 1
- 2
- 3
- 4
- 5
- 6
- 7
- 8
- 9
- 10
- 11
- 12
- 13
- 14
- 15
- 16
- 17
- 18
- 19
- 20
- 21
- 22
- 23
- 24
- 25
- 26
- 27
- 28
- 29
- 30
- 31
- 32
- 33
- 34
- 35
- 36
- 37
- 38
- 39
- 40
- 41
- 42
- 43
- 44
- 45
- 46
- 47
以上是读取属性值的方法。 读取到属性值之后,就是设置值到目标bean上了。 在BeanUtilsBean的实现中,又重复的处理了属性的内嵌逻辑与DynaBean逻辑,最终获取到其setter方法将值赋予目标Bean.
convertForCopy
protected Object convert(final Object value, final Class<?> type) { final Converter converter = getConvertUtils().lookup(type); if (converter != null) { log.trace(" USING CONVERTER " + converter); return converter.convert(type, value); } else { return value; } }- 1
- 2
- 3
- 4
- 5
- 6
- 7
- 8
- 9
可见,对于字段名称相同,类型却不同,提供了类型的转换方案
看下这个Convert接口public interface Converter { public <T> T convert(Class<T> type, Object value); }- 1
- 2
- 3
- 4
重要的实现类
AbstractConverter
看些类型转换的过程private Object convertForCopy(final Object value, final Class<?> type) { return (value != null) ? convert(value, type) : value; }- 1
- 2
- 3
如果为空,不再进行类型转换。不为空,进入类型convert
public <T> T convert(final Class<T> type, Object value) { if (type == null) { return convertToDefaultType(type, value); } Class<?> sourceType = value == null ? null : value.getClass(); final Class<T> targetType = ConvertUtils.primitiveToWrapper(type); if (log().isDebugEnabled()) { log().debug("Converting" + (value == null ? "" : " '" + toString(sourceType) + "'") + " value '" + value + "' to type '" + toString(targetType) + "'"); } value = convertArray(value); // Missing Value if (value == null) { return handleMissing(targetType); } sourceType = value.getClass(); try { // Convert --> String if (targetType.equals(String.class)) { return targetType.cast(convertToString(value)); // No conversion necessary } else if (targetType.equals(sourceType)) { if (log().isDebugEnabled()) { log().debug(" No conversion required, value is already a " + toString(targetType)); } return targetType.cast(value); // Convert --> Type } else { final Object result = convertToType(targetType, value); if (log().isDebugEnabled()) { log().debug(" Converted to " + toString(targetType) + " value '" + result + "'"); } return targetType.cast(result); } } catch (final Throwable t) { return handleError(targetType, value, t); } }- 1
- 2
- 3
- 4
- 5
- 6
- 7
- 8
- 9
- 10
- 11
- 12
- 13
- 14
- 15
- 16
- 17
- 18
- 19
- 20
- 21
- 22
- 23
- 24
- 25
- 26
- 27
- 28
- 29
- 30
- 31
- 32
- 33
- 34
- 35
- 36
- 37
- 38
- 39
- 40
- 41
- 42
- 43
- 44
- 45
- 46
- 47
- 48
- 49
- 50
- 51
- 52
首先进入抽象类的convert
首先处理了数组情况,convertArray
convertArray有两种实现- 目标类型非数组/类型,如果原类型是数组/集合,返回第一个元素进行设置
protected Object convertArray(final Object value) { if (value == null) { return null; } if (value.getClass().isArray()) { if (Array.getLength(value) > 0) { return Array.get(value, 0); } else { return null; } } if (value instanceof Collection) { final Collection<?> collection = (Collection<?>)value; if (collection.size() > 0) { return collection.iterator().next(); } else { return null; } } return value; }- 1
- 2
- 3
- 4
- 5
- 6
- 7
- 8
- 9
- 10
- 11
- 12
- 13
- 14
- 15
- 16
- 17
- 18
- 19
- 20
- 21
- 原类型是集合,目标类型是也是数组/集合类型,直接返回,整个数组
@Override protected Object convertArray(final Object value) { return value; }- 1
- 2
- 3
- 4
使用的是ConvertUtilsBeans
public void register(final boolean throwException, final boolean defaultNull, final int defaultArraySize) { //基本类型 registerPrimitives(throwException); //数字处理类型 registerStandard(throwException, defaultNull); //日期等类型 registerOther(throwException); //数组类型 registerArrays(throwException, defaultArraySize); }- 1
- 2
- 3
- 4
- 5
- 6
- 7
- 8
- 9
- 10
可以看出来注册了很多convert
后面继续,如果目标类型是String,直接调用toString
目标和原类型相同,无需处理
如果不同那么需要调用对应的converType方法进行转换,得到结果
那么可以转换那些类型private void registerArrays(final boolean throwException, final int defaultArraySize) { // Primitives registerArrayConverter(Boolean.TYPE, new BooleanConverter(), throwException, defaultArraySize); registerArrayConverter(Byte.TYPE, new ByteConverter(), throwException, defaultArraySize); registerArrayConverter(Character.TYPE, new CharacterConverter(), throwException, defaultArraySize); registerArrayConverter(Double.TYPE, new DoubleConverter(), throwException, defaultArraySize); registerArrayConverter(Float.TYPE, new FloatConverter(), throwException, defaultArraySize); registerArrayConverter(Integer.TYPE, new IntegerConverter(), throwException, defaultArraySize); registerArrayConverter(Long.TYPE, new LongConverter(), throwException, defaultArraySize); registerArrayConverter(Short.TYPE, new ShortConverter(), throwException, defaultArraySize); // Standard registerArrayConverter(BigDecimal.class, new BigDecimalConverter(), throwException, defaultArraySize); registerArrayConverter(BigInteger.class, new BigIntegerConverter(), throwException, defaultArraySize); registerArrayConverter(Boolean.class, new BooleanConverter(), throwException, defaultArraySize); registerArrayConverter(Byte.class, new ByteConverter(), throwException, defaultArraySize); registerArrayConverter(Character.class, new CharacterConverter(), throwException, defaultArraySize); registerArrayConverter(Double.class, new DoubleConverter(), throwException, defaultArraySize); registerArrayConverter(Float.class, new FloatConverter(), throwException, defaultArraySize); registerArrayConverter(Integer.class, new IntegerConverter(), throwException, defaultArraySize); registerArrayConverter(Long.class, new LongConverter(), throwException, defaultArraySize); registerArrayConverter(Short.class, new ShortConverter(), throwException, defaultArraySize); registerArrayConverter(String.class, new StringConverter(), throwException, defaultArraySize); // Other registerArrayConverter(Class.class, new ClassConverter(), throwException, defaultArraySize); registerArrayConverter(java.util.Date.class, new DateConverter(), throwException, defaultArraySize); registerArrayConverter(Calendar.class, new DateConverter(), throwException, defaultArraySize); registerArrayConverter(File.class, new FileConverter(), throwException, defaultArraySize); registerArrayConverter(java.sql.Date.class, new SqlDateConverter(), throwException, defaultArraySize); registerArrayConverter(java.sql.Time.class, new SqlTimeConverter(), throwException, defaultArraySize); registerArrayConverter(Timestamp.class, new SqlTimestampConverter(), throwException, defaultArraySize); registerArrayConverter(URL.class, new URLConverter(), throwException, defaultArraySize); }- 1
- 2
- 3
- 4
- 5
- 6
- 7
- 8
- 9
- 10
- 11
- 12
- 13
- 14
- 15
- 16
- 17
- 18
- 19
- 20
- 21
- 22
- 23
- 24
- 25
- 26
- 27
- 28
- 29
- 30
- 31
- 32
- 33
- 34
- 35
- 36
对于以上类型的数组作为目标类型时如果和源类型不同,同样可以处理
那么对类型转换进行自定义吗?比如实现一个List的转换,当然是可以的,例如默认没有对list进行的转换,可以,自定义一个进行处理,这个实现比较简单BeanUtilsBean.getInstance().getConvertUtils().register( new Converter() { @Override public Object convert(Class type, Object value) { return Arrays.asList(value); } }, List.class );- 1
- 2
- 3
- 4
- 5
- 6
- 7
- 8
- 9
为什么使用dynamicBean
看起来dynamicBean和map并没什么区别,那么为什么还需要使用
ps:在上面的代码中用到了org.apache.commons.beanutils.DynaProperty,这个类很重要,要创建一个真正有用的BasicDynaClass,肯定需要使用DynaProperty,但是用法非常简单。总结一下:要使用BasicDynaBean,就首先要构造一个BasicDynaClass来包含期望的数据结构。
org.apache.commons.beanutils.LazyDynaBean
LazyDynaBean和BasicDynaBean相比,LazyDynaBean不需要首先创建一个包含期望的数据结构的DynaClass,就能向LazyDynaBean中填充我们任意想填充的数据。LazyDynaBean内部会根据我们填充进的数据(即使是一个map中的一个key-value pair,LazyDynaBean也会创建一个map的metadata),创建metadata的。
另外,在我练习的过程中,发现向LazyDynaBean中填充一个含indexed的数据时,LazyDynaBean创建的metadata的数据类型是list。org.apache.commons.beanutils.WrapDynaBean
以一个存在的Javabean为基础,创建一个WrapDynaBean,可以用WrapDynaBean中的setter和getter方法访问这个基础javabean。说白了就是用一个业已存在的javabean构造一个WrapDynaBean并初始化数据,然后我们就认为它是WrapDynaBean,可以向其中添加新的数据结构。注意,这个不是decorator模式的应用,decorator是对已经存在的组件添加功能,而WrapDynaBean是添加数据结构,是有区别的。
可以看出来,dynaBean对数据结构做了要求,也就是说,dynaBean种的数据可以做到总是符合预期
例如LazyDynaClass dynaClass = new LazyDynaClass(); dynaClass.getDynaProperty("list").getContentType(); (dynaClass).add("list",List.class); LazyDynaBean dynaBean = new LazyDynaBean(dynaClass); dynaBean.set("list",111);- 1
- 2
- 3
- 4
- 5
会抛出ConversionException
org.apache.commons.beanutils.ConversionException: Cannot assign value of type 'java.lang.Integer' to property 'list' of type 'java.util.List'- 1
也因此,apach的beanUtil在copy时目标为map时,不会拷贝,知会拷贝DynaBean,因为dynaBean对类型有预期,可以进行响应类型的处理。可以作为copy的目标实例
两种反射进行copy的不同点
- apache.BeanUtils在实现了对每个类加载器缓存了一份BeanUtilsBean的实例,在获取此实例时会加锁(synchronized)
- apache.BeanUtils支持了DynaBean和Map映射到Object的能力,但其在后期对于PropertyDescriptor处理时,即使我采用的是简单的Object,也会去判断DynaBean和Map,此处如果采用策略模式将其分离应该会减少很多判断的时间
- apache.BeanUtils在每次执行属性copy时,会重新从PropertyDescriptor获取读写方法,虽然对PropertyDescriptor进行了缓存,但每次获取readMethod/writeMethod也是非常耗时的尤其是在对象实例数量较多时,此处如果对于readMethod/writeMethod进行缓存,性能应该会提升很多
- apache.BeanUtils支持类型转换,DynaBean等功能,提供了更强大的功能,代价是效率相对较低。
net.sf.cglib.beans.BeanCopier
使用示例
Person1 p1 = new Person1(); Person2 p2 = new Person2(); // 给p1赋值 p1.setName("鲁智深"); p1.setBirthday(new Date(834012360000L)); BeanCopier copier = BeanCopier.create(Person1.class, Person2.class, true); // 根据需求编写的DateConverter类, 需要实现Converter接口. copier.copy(p1, p2, new DateConverter());- 1
- 2
- 3
- 4
- 5
- 6
- 7
- 8
- 9
- 10
- 11
注意到:
第三个参数userConverter,是否开启Convert,默认BeanCopier只会做同名,同类型属性的copier,否则就会报错.
举个栗子:在两对象复制过程中,难免会有某些字段属性名相同,但类型不同的情况,例如 Date time,String time, long time.这三种,在转换的时候如何处理。就需要自己写方法对相应的类型进行修改.
简单案例:public class Test02 { public static void main(String[] args) { Person1 p1 = new Person1(); Person2 p2 = new Person2(); // 给p1赋值 p1.setName("鲁智深"); p1.setBirthday(new Date(834012360000L)); BeanCopier copier = BeanCopier.create(Person1.class, Person2.class, true); // 根据需求编写的DateConverter类, 需要实现Converter接口. copier.copy(p1, p2, new DateConverter()); System.out.println(p1); System.out.println(p2); } } ---------- import org.springframework.cglib.core.Converter; import java.text.SimpleDateFormat; import java.util.Date; public class DateConverter implements Converter { @Override public Object convert(Object value, Class target, Object context) { // a.isAssignableFrom(b), 查资料:即a是b的父类或接口 || a和b为同一个类或同一个接口 则返回true. // SimpleDateFormat("yyyy-MM-dd HH:mm:ss").format(value), 设置pattern并转换时间格式. return value.getClass().isAssignableFrom(Date.class) ? new SimpleDateFormat("yyyy-MM-dd HH:mm:ss").format(value) : value; } } ---------- import lombok.Data; @Data public class Person1 { private String name; private Date birthday; } ---------- import lombok.Data; @Data public class Person2 { private String name; private String birthday; }- 1
- 2
- 3
- 4
- 5
- 6
- 7
- 8
- 9
- 10
- 11
- 12
- 13
- 14
- 15
- 16
- 17
- 18
- 19
- 20
- 21
- 22
- 23
- 24
- 25
- 26
- 27
- 28
- 29
- 30
- 31
- 32
- 33
- 34
- 35
- 36
- 37
- 38
- 39
- 40
- 41
- 42
- 43
- 44
- 45
- 46
- 47
- 48
- 49
- 50
- 51
- 52
- 53
实现原理,利用cglib生成字节码文件,查看其生成字节码文件就知道了
不适用自定义转换器public class Object$$BeanCopierByCGLIB$$cdf980b3 extends BeanCopier { public Object$$BeanCopierByCGLIB$$cdf980b3() { } public void copy(Object var1, Object var2, Converter var3) { Person2 var10000 = (Person2)var2; Person1 var10001 = (Person1)var1; var10000.setAaa(((Person1)var1).getAaa()); var10000.setName(var10001.getName()); } }- 1
- 2
- 3
- 4
- 5
- 6
- 7
- 8
- 9
- 10
- 11
- 12
使用自定义转换器
public class Object$$BeanCopierByCGLIB$$cdf980b2 extends BeanCopier { private static final Class CGLIB$load_class$java$2Elang$2EInteger; private static final Class CGLIB$load_class$java$2Elang$2EString; public Object$$BeanCopierByCGLIB$$cdf980b2() { } public void copy(Object var1, Object var2, Converter var3) { Person2 var4 = (Person2)var2; Person1 var5 = (Person1)var1; var4.setAaa((Integer)var3.convert(var5.getAaa(), CGLIB$load_class$java$2Elang$2EInteger, "setAaa")); var4.setBirthday((String)var3.convert(var5.getBirthday(), CGLIB$load_class$java$2Elang$2EString, "setBirthday")); var4.setName((String)var3.convert(var5.getName(), CGLIB$load_class$java$2Elang$2EString, "setName")); } static void CGLIB$STATICHOOK1() { CGLIB$load_class$java$2Elang$2EInteger = Class.forName("java.lang.Integer"); CGLIB$load_class$java$2Elang$2EString = Class.forName("java.lang.String"); } static { CGLIB$STATICHOOK1(); } }- 1
- 2
- 3
- 4
- 5
- 6
- 7
- 8
- 9
- 10
- 11
- 12
- 13
- 14
- 15
- 16
- 17
- 18
- 19
- 20
- 21
- 22
- 23
- 24
- 25
可见cglib直接生成了字节码进行copy操作,但是生成字节码比较耗时因此,cglib对生成的copy对象进行缓存,再次调用create,直接从缓冲中取出
protected Object create(Object key) { Class gen = null; synchronized (source) { ClassLoader loader = getClassLoader(); Map cache2 = null; cache2 = (Map) source.cache.get(loader); /** 1.尝试加载缓存 **/ // 如果缓存不存在,则新建空的缓存 if (cache2 == null) { cache2 = new HashMap(); cache2.put(NAME_KEY, new HashSet()); // NAME_KEY对应的Set集合用于去重 source.cache.put(loader, cache2); } // 如果缓存存在,且要求使用缓存 else if (useCache) { // 通过key获取缓存中的生成类(拿到的是引用[WeakReference],调用ref.get()拿到类本身) Reference ref = (Reference) cache2.get(key); gen = (Class) ((ref == null) ? null : ref.get()); } this.key = key; /** 2.如果不能从缓存中查找到生成类,则新建类 **/ if (gen == null) { // strategy.generate中调用了子类里的generateClass函数 // 并返回生成的字节码 byte[] b = strategy.generate(this); String className = ClassNameReader.getClassName(new ClassReader(b)); // 将className放入NAME_KEY对应的Set中 getClassNameCache(loader).add(className); // 根据返回的字节码生成类 gen = ReflectUtils.defineClass(className, b, loader); } if (useCache) { // 在缓存中放入新生成的类 cache2.put(key, new WeakReference(gen)); } /** 3.根据生成类,创建实例并返回 **/ return firstInstance(gen); } /** 3.根据生成类,创建实例并返回 **/ return firstInstance(gen); }- 1
- 2
- 3
- 4
- 5
- 6
- 7
- 8
- 9
- 10
- 11
- 12
- 13
- 14
- 15
- 16
- 17
- 18
- 19
- 20
- 21
- 22
- 23
- 24
- 25
- 26
- 27
- 28
- 29
- 30
- 31
- 32
- 33
- 34
- 35
- 36
- 37
- 38
- 39
- 40
- 41
- 42
- 43
- 44
- 45
- 46
- 47
- 48
- 49
结合代码,分析下具体流程。
- 尝试加载缓存,大致流程代码已经交代得很清楚,这里简单介绍几个实现细节
- 关于source.cache
- source.cache用于缓存生成类,是一个两层嵌套Map,第一层key值为classloader,第二层key值为生成类对应的唯一索引名(在这里就是"BeanCopierKey"啦)
- source.cache使用了 WeakHashMap
- WeakHashMap的key值为弱引用(WeakReference)。如果一个WeakHashMap的key被回收,那么它对应用的value也将被自动的被移除。这也是为什么要使用classloader作为key,当classloader被回收,使用这个classloader加载的类也应该被回收,在这时将这个键值对移除是合理的。
- 在第二层Map中,出现了唯一一个不和谐的key值:NAME_KEY。它对应的Set存储了当前缓存的所有生成类的类名,用于检测生成类的类名是否重复。
- 关于source.cache
- 如果不能从缓存中查找到生成类,则新建类
Mapstruct(编译期间生成转换类,运行效率几乎等于硬编码)
效率堪比硬编码
MapStruct是一个Java注释处理器,用于生成类型安全的bean映射类。
您要做的就是定义一个映射器接口,该接口声明任何必需的映射方法。在编译期间,MapStruct将生成此接口的实现。此实现使用简单的Java方法调用在源对象和目标对象之间进行映射,即没有反射类似内容。
与手动编写映射代码相比,MapStruct通过生成繁琐且易于出错的代码来节省时间。遵循配置方法上的约定,MapStruct使用合理的默认值,但在配置或实现特殊行为时不加理会。
与动态映射框架相比,MapStruct具有以下优点:- 通过使用普通方法调用(settter/getter)而不是反射来快速执行
- 编译时类型安全性:只能映射相互映射的对象和属性,不能将order实体意外映射到customer DTO等。
- 如果有如下问题,编译时会抛出异常
3.1 映射不完整(并非所有目标属性都被映射)
3.2 映射不正确(找不到正确的映射方法或类型转换) - 可以通过freemarker定制化开发
maven,需要和lombok一起使用
<!--mapStruct依赖 高性能对象映射--> <!--mapstruct核心--> <dependency> <groupId>org.mapstruct</groupId> <artifactId>mapstruct</artifactId> <version>1.5.0.Beta1</version> </dependency> <!--mapstruct编译--> <dependency> <groupId>org.mapstruct</groupId> <artifactId>mapstruct-processor</artifactId> <version>1.5.0.Beta1</version> </dependency>- 1
- 2
- 3
- 4
- 5
- 6
- 7
- 8
- 9
- 10
- 11
- 12
- 13
- 14
使用实例
@Data public class Person { String describe; private String id; private String name; private int age; private BigDecimal source; private double height; private Date createTime; } @Data public class PersonDTO { String describe; private Long id; private String personName; private String age; private String source; private String height; } // mapper @Mapper public interface PersonMapper { PersonMapper INSTANCT = Mappers.getMapper(PersonMapper.class); @Mapping(target = "name", source = "personName") @Mapping(target = "id", ignore = true) // 忽略id,不进行映射 PersonDTO conver(Person person); }- 1
- 2
- 3
- 4
- 5
- 6
- 7
- 8
- 9
- 10
- 11
- 12
- 13
- 14
- 15
- 16
- 17
- 18
- 19
- 20
- 21
- 22
- 23
- 24
- 25
- 26
- 27
- 28
- 29
- 30
- 31
- 32
- 33
- 34
- 35
- 36
- 37
- 38
- 39
- 40
- 41
- 42
- 43
- 44
- 45
- 46
- 47
- 48
编译后自动生成转换类
public class PersonMapperImpl implements PersonMapper { public PersonMapperImpl() { } public PersonDTO conver(Person person) { if (person == null) { return null; } else { PersonDTO personDTO = new PersonDTO(); personDTO.setDescribe(person.getDescribe()); if (person.getId() != null) { personDTO.setId(Long.parseLong(person.getId())); } personDTO.setPersonName(person.getName()); personDTO.setAge(String.valueOf(person.getAge())); if (person.getSource() != null) { personDTO.setSource(person.getSource().toString()); } personDTO.setHeight(String.valueOf(person.getHeight())); return personDTO; } } }- 1
- 2
- 3
- 4
- 5
- 6
- 7
- 8
- 9
- 10
- 11
- 12
- 13
- 14
- 15
- 16
- 17
- 18
- 19
- 20
- 21
- 22
- 23
- 24
- 25
- 26
- 27
调用
Person person = new Person(); person.setDescribe("测试"); person.setAge(18); person.setName("张三"); person.setHeight(170.5); person.setSource(new BigDecimal("100")); PersonDTO dto = PersonMapper.INSTANCT.conver(person); System.out.println(dto);- 1
- 2
- 3
- 4
- 5
- 6
- 7
- 8
- 9
- 10
-
相关阅读:
【FATE联邦学习】FATE框架的大坑,使用6个月有感
数据可视化:地图
JavaWeb搭建学生管理系统(手把手)
c语言socket 客户端
计算机毕业设计Java垂钓分享交流网的设计与实现(源码+系统+mysql数据库+lw文档)
PaddleOCR识别框架解读[14] OCR数据集
jar -jar运行原理
洛谷-Directed Roads-(基环树总结)
前端js反爬虫技术总结
设计模式_spring框架中常用的8种设计模式
- 原文地址:https://blog.csdn.net/qq_37436172/article/details/125901664
