-
九、ELK安装ElastAlert 2插件钉钉机器人告警
5.0版本之后Elastic将一些重要的插件整合成了X-Pack(需要收费)
这里安装开源的ElastAlert 2来告警
需要Python3.10的支持

安装依赖
yum -y groupinstall "Development tools" yum install -y ncurses-devel gdbm-devel xz-devel sqlite-devel tk-devel uuid-devel readline-devel bzip2-devel libffi-devel yum install -y openssl-devel openssl11 openssl11-devel export CFLAGS=$(pkg-config --cflags openssl11) export LDFLAGS=$(pkg-config --libs openssl11)- 1
- 2
- 3
- 4
- 5
下载并安装Python3.10.4,elastalert2需要最低Python3.10版本支持
wget https://www.python.org/ftp/python/3.10.4/Python-3.10.4.tgz tar zxvf Python-3.10.4.tgz cd Python-3.10.4 ./configure --enable-optimizations && make altinstall- 1
- 2
- 3
- 4
克隆 ElastAlert2 存储库获取最新更改
git clone https://github.com/jertel/elastalert2.git- 1
安装模块
cd elastalert2/ pip install "setuptools>=11.3" python3.10 setup.py install- 1
- 2
- 3
安装钉钉插件
cd wget https://github.com/xuyaoqiang/elastalert-dingtalk-plugin/archive/master.zip unzip master.zip mv elastalert-dingtalk-plugin-master dingtalk cd dingtalk/ cp -r elastalert_modules /root/elastalert2/ cd /root/elastalert2/ ll- 1
- 2
- 3
- 4
- 5
- 6
- 7
- 8
复制配置文件config.yaml.example将文件另存为config.yaml
cd examples/ cp config.yaml.example config.yaml- 1
- 2
编辑复制出来的config.yaml
rules_folder: examples/rules【存放规则文件的目录】
run_every【多久查询一次】
buffer_time【查询在此之前多久多少时间以内的】
es_host【es地址】
es_port【es端口】
es_username【连接的基本身份验证用户名】
es_password【连接的基本身份验证密码】我这7.17.5版本的没有设置用户和密码所以下面配置是注释的
writeback_index【ElastAlert 2 将存储数据的索引的名称】
alert_time_limit【失败警报的重试窗口】vim config.yaml 1 # This is the folder that contains the rule yaml files 2 # This can also be a list of directories 3 # Any .yaml file will be loaded as a rule 4 rules_folder: examples/rules 5 6 # How often ElastAlert will query Elasticsearch 7 # The unit can be anything from weeks to seconds 8 run_every: 9 minutes: 1 10 11 # ElastAlert will buffer results from the most recent 12 # period of time, in case some log sources are not in real time 13 buffer_time: 14 minutes: 1 15 16 # The Elasticsearch hostname for metadata writeback 17 # Note that every rule can have its own Elasticsearch host 18 es_host: 192.168.170.15 19 20 # The Elasticsearch port 21 es_port: 9200 22 23 # The AWS region to use. Set this when using AWS-managed elasticsearch 24 #aws_region: us-east-1 25 26 # The AWS profile to use. Use this if you are using an aws-cli profile. 27 # See http://docs.aws.amazon.com/cli/latest/userguide/cli-chap-getting-started.html 28 # for details 29 #profile: test 30 31 # Optional URL prefix for Elasticsearch 32 #es_url_prefix: elasticsearch 33 34 # Optional prefix for statsd metrics 35 #statsd_instance_tag: elastalert 36 37 # Optional statsd host 38 #statsd_host: dogstatsd 39 40 # Connect with TLS to Elasticsearch 41 #use_ssl: True 42 43 # Verify TLS certificates 44 #verify_certs: True 45 46 # Show TLS or certificate related warnings 47 #ssl_show_warn: True 48 49 # GET request with body is the default option for Elasticsearch. 50 # If it fails for some reason, you can pass 'GET', 'POST' or 'source'. 51 # See https://elasticsearch-py.readthedocs.io/en/master/connection.html?highlight=send_get_body_as#transport 52 # for details 53 #es_send_get_body_as: GET 54 55 # Option basic-auth username and password for Elasticsearch 56 #es_username: someusername 57 #es_password: somepassword 58 59 # Use SSL authentication with client certificates client_cert must be 60 # a pem file containing both cert and key for client 61 #ca_certs: /path/to/cacert.pem 62 #client_cert: /path/to/client_cert.pem 63 #client_key: /path/to/client_key.key 64 65 # The index on es_host which is used for metadata storage 66 # This can be a unmapped index, but it is recommended that you run 67 # elastalert-create-index to set a mapping 68 writeback_index: elastalert_status 69 70 # If an alert fails for some reason, ElastAlert will retry 71 # sending the alert until this time period has elapsed 72 alert_time_limit: 73 days: 2 74 75 # Optional timestamp format. 76 # ElastAlert will print timestamps in alert messages and in log messages using this format. 77 #custom_pretty_ts_format: '%Y-%m-%d %H:%M' 78 79 # Custom logging configuration 80 # If you want to setup your own logging configuration to log into 81 # files as well or to Logstash and/or modify log levels, use 82 # the configuration below and adjust to your needs. 83 # Note: if you run ElastAlert with --verbose/--debug, the log level of 84 # the "elastalert" logger is changed to INFO, if not already INFO/DEBUG. 85 #logging: 86 # version: 1 87 # incremental: false 88 # disable_existing_loggers: false 89 # formatters: 90 # logline: 91 # format: '%(asctime)s %(levelname)+8s %(name)+20s %(message)s' 92 # 93 # handlers: 94 # console: 95 # class: logging.StreamHandler 96 # formatter: logline 97 # level: DEBUG 98 # stream: ext://sys.stderr 99 # 100 # file: 101 # class : logging.FileHandler 102 # formatter: logline 103 # level: DEBUG 104 # filename: elastalert.log 105 # 106 # loggers: 107 # elastalert: 108 # level: WARN 109 # handlers: [] 110 # propagate: true 111 # 112 # elasticsearch: 113 # level: WARN 114 # handlers: [] 115 # propagate: true 116 # 117 # elasticsearch.trace: 118 # level: WARN 119 # handlers: [] 120 # propagate: true 121 # 122 # '': # root logger 123 # level: WARN 124 # handlers: 125 # - console 126 # - file 127 # propagate: false- 1
- 2
- 3
- 4
- 5
- 6
- 7
- 8
- 9
- 10
- 11
- 12
- 13
- 14
- 15
- 16
- 17
- 18
- 19
- 20
- 21
- 22
- 23
- 24
- 25
- 26
- 27
- 28
- 29
- 30
- 31
- 32
- 33
- 34
- 35
- 36
- 37
- 38
- 39
- 40
- 41
- 42
- 43
- 44
- 45
- 46
- 47
- 48
- 49
- 50
- 51
- 52
- 53
- 54
- 55
- 56
- 57
- 58
- 59
- 60
- 61
- 62
- 63
- 64
- 65
- 66
- 67
- 68
- 69
- 70
- 71
- 72
- 73
- 74
- 75
- 76
- 77
- 78
- 79
- 80
- 81
- 82
- 83
- 84
- 85
- 86
- 87
- 88
- 89
- 90
- 91
- 92
- 93
- 94
- 95
- 96
- 97
- 98
- 99
- 100
- 101
- 102
- 103
- 104
- 105
- 106
- 107
- 108
- 109
- 110
- 111
- 112
- 113
- 114
- 115
- 116
- 117
- 118
- 119
- 120
- 121
- 122
- 123
- 124
- 125
- 126
- 127
- 128
- 129
进入规则目录rules,以example_frequency.yaml为例复制一个新的规则文件并命令
cd rules/ cp example_frequency.yaml example_Warn.yaml- 1
- 2
编辑规则文件example_Warn.yaml
name: Warn【此规则的唯一名称。如果两个规则共享相同的名称,ElastAlert 2 将不会启动】
type: frequency【每个规则都有不同的类型,可以采用不同的参数。该frequency类型的意思是“当超过】
index: easyspeed-cloud-logs-【要查询的索引的名称。如果您使用 Logstash,默认情况下索引将匹配"logstash-"】
num_events: 1【此参数特定于frequency类型,是触发警报的阈值】
timeframe:【timeframe是num_events必须发生的时间段】
filter【用于过滤结果的 Elasticsearch 过滤器列表】
alert【警报列表】
email【将警报发送到的地址列表】
dingtalk_webhook【钉钉机器人hook地址】
dingtalk_msgtype【推送信息类型】
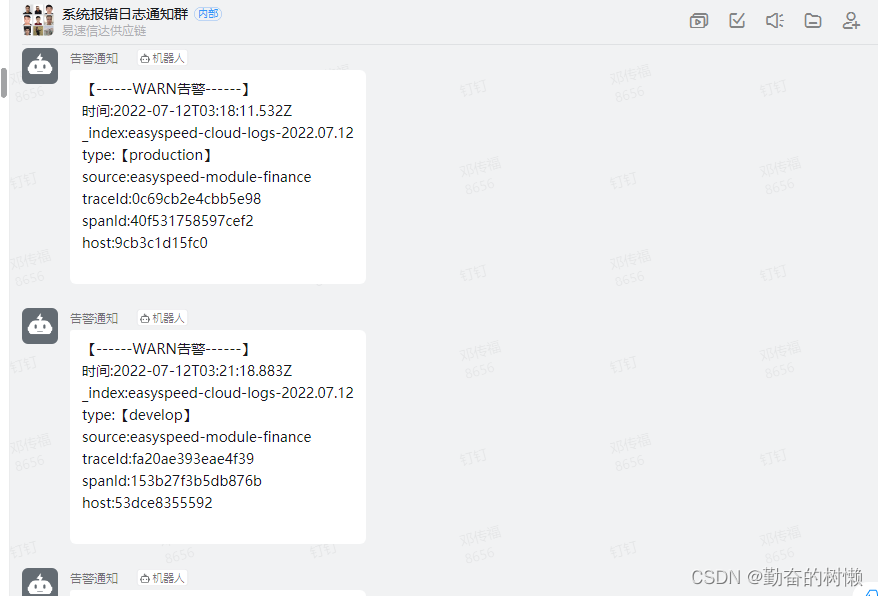
alert_text:【推送信息内容】
alert_text_type: alert_text_only【因为我们要自定义邮件内容,所以使用alert_text_only】
alert_text_args【对应alert_text的内容】# Alert when the rate of events exceeds a threshold # (Optional) # Elasticsearch host #es_host: 192.168.170.15 # (Optional) # Elasticsearch port #es_port: 9200 # (OptionaL) Connect with SSL to Elasticsearch #use_ssl: True # (Optional) basic-auth username and password for Elasticsearch #es_username: someusername #es_password: somepassword # (Required) # Rule name, must be unique name: Warn # (Required) # Type of alert. # the frequency rule type alerts when num_events events occur with timeframe time type: frequency # (Required) # Index to search, wildcard supported index: easyspeed-cloud-logs-* # (Required, frequency specific) # Alert when this many documents matching the query occur within a timeframe #发生的次数 num_events: 1 # (Required, frequency specific) # num_events must occur within this amount of time to trigger an alert #设置几分钟内 timeframe: minutes: 1 # (Required) # A list of Elasticsearch filters used for find events # These filters are joined with AND and nested in a filtered query # For more info: https://www.elastic.co/guide/en/elasticsearch/reference/current/query-dsl.html filter: - query: query_string: query: "level: WARN" # (Required) # The alert is use when a match is found alert: - "elastalert_modules.dingtalk_alert.DingTalkAlerter" dingtalk_webhook: "https://oapi.dingtalk.com/robot/send?access_token=xxxxxxxxxxxxxxxxxxxxxxxxxxxxxxxxxxxx" dingtalk_msgtype: text #smtp_host: smtp.exmail.qq.com #smtp_port: 25 #这个是用来发送的邮箱的账号和认证密码存放文件的绝对路径 #smtp_auth_file: /root/elastalert2/example/rules/emailauth.yaml #用来接收邮件的邮箱地址 #email_reply_to: monster@sz-ysxd.com #用来发送邮件的邮箱地址 #from_addr: monster@sz-ysxd.com alert_text: "【------WARN告警------】\n时间:{}\n_index:{}\ntype:【{}】\nsource:{}\ntraceId:{}\nspanId:{}\nhost:{}" alert_text_type: alert_text_only alert_text_args: - "@timestamp" - _index - type - source - traceId - spanId - host #- message # (required, email specific) # a list of email addresses to send alerts to #哪些邮箱需要收到告警的邮箱列表 #email: #- "monster@sz-ysxd.com" #- "767267711@qq.com"- 1
- 2
- 3
- 4
- 5
- 6
- 7
- 8
- 9
- 10
- 11
- 12
- 13
- 14
- 15
- 16
- 17
- 18
- 19
- 20
- 21
- 22
- 23
- 24
- 25
- 26
- 27
- 28
- 29
- 30
- 31
- 32
- 33
- 34
- 35
- 36
- 37
- 38
- 39
- 40
- 41
- 42
- 43
- 44
- 45
- 46
- 47
- 48
- 49
- 50
- 51
- 52
- 53
- 54
- 55
- 56
- 57
- 58
- 59
- 60
- 61
- 62
- 63
- 64
- 65
- 66
- 67
- 68
- 69
- 70
- 71
- 72
- 73
- 74
- 75
- 76
- 77
- 78
- 79
- 80
- 81
- 82
- 83
- 84
测试规则
测试命令会一直占用窗口输出信息,测试没问题待会后台运行
cd /root/elastalert2/ python3.10 -m elastalert.elastalert --verbose --config examples/config.yaml --rule examples/rules/example_Warn.yaml- 1
- 2
后台运行 ElastAlert 2
nohup python3.10 -m elastalert.elastalert --verbose --config examples/config.yaml --rule examples/rules/example_Warn.yaml >> examples/nohup.out 2>&1 &- 1
告警效果
-
相关阅读:
华为OD:0019-0020:-最小步骤数—删除字符串中出现次数最少的字符
spring boot加mybatis puls实现,在新增/修改时,对某些字段进行处理,使用的@TableField()或者AOP @Before
[附源码]计算机毕业设计JAVA基于Java的护肤品网站
云安全之信息内容安全
【JavaSE专栏90】用最简单的方法,使用 JDBC 连接 MySQL 数据库
axios get/post/delete上传下载及springboot后端示例
2021-03-11 51蛋骗鸡串口中断流水灯回复
如何使用Vcluster实现Kubernetes中的多租户
WebUI文件拖拽上传与下载文件
【JavaEE】多线程进阶(一)饿汉模式和懒汉模式
- 原文地址:https://blog.csdn.net/qq_42259469/article/details/125738006