-
Swagger2的使用和springboot的集成
1、什么是swagger2
swagger是一个在线文档工具,在前后端分离的情况下作用愈加突出,使用swagger我们可以针对我们在后端的接口做一个在线测试。
编写和维护接口文档是每个程序员的职责,根据Swagger2可以快速帮助我们编写最新的API接口文档,再也不用担心开会前仍忙于整理各种资料了,间接提升了团队开发的沟通效率。
2、简单地使用swagger2只需要三步:
第一步,配置pom文件。在pom文件中引入swagger的相关依赖,2.9.2版本使用的比较多
io.springfox springfox-swagger2 2.9.2 io.springfox springfox-swagger-ui 2.9.2 com.github.xiaoymin swagger-bootstrap-ui 1.9.2 - 1
- 2
- 3
- 4
- 5
- 6
- 7
- 8
- 9
- 10
- 11
- 12
- 13
- 14
- 15
- 16
- 17
- 18
注意:swagger的访问地址有两种样式,此处将两种样式的依赖都进行了导入,样式如下图:
第二步,配置pom文件创建Swagger的配置类,并进行配置
此类放在config包下:
package com.fan.mybatis_plus1.config; import io.swagger.annotations.ApiOperation; import org.springframework.context.annotation.Bean; import org.springframework.context.annotation.Configuration; import springfox.documentation.builders.ApiInfoBuilder; import springfox.documentation.builders.RequestHandlerSelectors; import springfox.documentation.service.ApiInfo; import springfox.documentation.service.Contact; import springfox.documentation.spi.DocumentationType; import springfox.documentation.spring.web.plugins.Docket; import springfox.documentation.swagger2.annotations.EnableSwagger2; /** * @Author: zq * @Date 2020-08-24 10:55 * @Description swagger 配置类,swagger基本信息和接口的权限 * @ClassName SwaggerConfig * @PackageName com.zq.springboot.common.config */ @Configuration @EnableSwagger2 public class SwaggerConfig { /** * 创建api实例 * @return */ @Bean public Docket createRestAoi(){ return new Docket(DocumentationType.SWAGGER_2) //用来创建该API的基本信息,展示在文档的页面中(自定义展示的信息) .apiInfo(apiInfo()) //设置哪些接口暴露给Swagger展示 .select() //扫描所有有注解的api,用这种方式更灵活,指定为ApiOperation.class .apis(RequestHandlerSelectors.withMethodAnnotation(ApiOperation.class)) //构建 .build(); } /** * 添加摘要信息 * @return */ private ApiInfo apiInfo(){ //用ApiInfoBuilder进行定制,可以设置不同的属性,比较方便 return new ApiInfoBuilder() //设置标题 .title("标题:springboot集成swagger测试") //描述 .description("描述:用于测试集成swagger接口") //作者信息 .contact(new Contact("zq",null,null)) //版本 .version("版本号:1.0") //构建 .build(); } }- 1
- 2
- 3
- 4
- 5
- 6
- 7
- 8
- 9
- 10
- 11
- 12
- 13
- 14
- 15
- 16
- 17
- 18
- 19
- 20
- 21
- 22
- 23
- 24
- 25
- 26
- 27
- 28
- 29
- 30
- 31
- 32
- 33
- 34
- 35
- 36
- 37
- 38
- 39
- 40
- 41
- 42
- 43
- 44
- 45
- 46
- 47
- 48
- 49
- 50
- 51
- 52
- 53
- 54
- 55
- 56
- 57
- 58
- 59
- 60
- 61
- 62
- 63
- 64
第三步、使用注解
@Api 标识一个java类型是文档类,用controller类的类名上
@ApiModel 表示一个实体类/模型文档,用在类名上;
@ApiModelProperty 作用在属性上,添加属性描述;
@ApiOperation 作用在接口类的方法上,控制方法的相关描述;
@ApiImplicitParam 作用在接口方法上,描述单个参数信息,只能作用在方法上;
@ApiImplicitParams 作用在接口方法上,@ApiImplicitParam参数组;
@ApiParam 作用在接口方法上,描述单个参数信息,属性基本与@ApiImplicitParam一样,但可以作用在方法、参数、属性上;
3、SpringBoot整合Swagger实战
(1)创建springboot项目:


其他都是下一步即可。
(2)修改pom:增加web依赖和swagger相关依赖
org.springframework.boot spring-boot-starter-web mysql mysql-connector-java 8.0.22 com.baomidou mybatis-plus-boot-starter 3.4.2 com.baomidou mybatis-plus-generator 3.4.1 org.apache.velocity velocity-engine-core 2.2 io.springfox springfox-swagger2 2.9.2 io.springfox springfox-swagger-ui 2.9.2 com.github.xiaoymin swagger-bootstrap-ui 1.9.2 org.projectlombok lombok - 1
- 2
- 3
- 4
- 5
- 6
- 7
- 8
- 9
- 10
- 11
- 12
- 13
- 14
- 15
- 16
- 17
- 18
- 19
- 20
- 21
- 22
- 23
- 24
- 25
- 26
- 27
- 28
- 29
- 30
- 31
- 32
- 33
- 34
- 35
- 36
- 37
- 38
- 39
- 40
- 41
- 42
- 43
- 44
- 45
- 46
- 47
- 48
- 49
- 50
- 51
创建数据库的表:stutest

(3)编写yml:
server: port: 8080 spring: datasource: driver-class-name: com.mysql.cj.jdbc.Driver url: jdbc:mysql://127.0.0.1:3306/mybatis_plus?useUnicode=true&characterEncoding=utf-8&allowMultiQueries=true&useSSL=false&serverTimezone=UTC username: root password: root mvc: pathmatch: matching-strategy: ant_path_matcher #sql输出日志 mybatis-plus: configuration: log-impl: org.apache.ibatis.logging.stdout.StdOutImpl- 1
- 2
- 3
- 4
- 5
- 6
- 7
- 8
- 9
- 10
- 11
- 12
- 13
- 14
- 15
- 16
- 17
(4)编写代码生成器的类:类路径util.CodeGenerator,
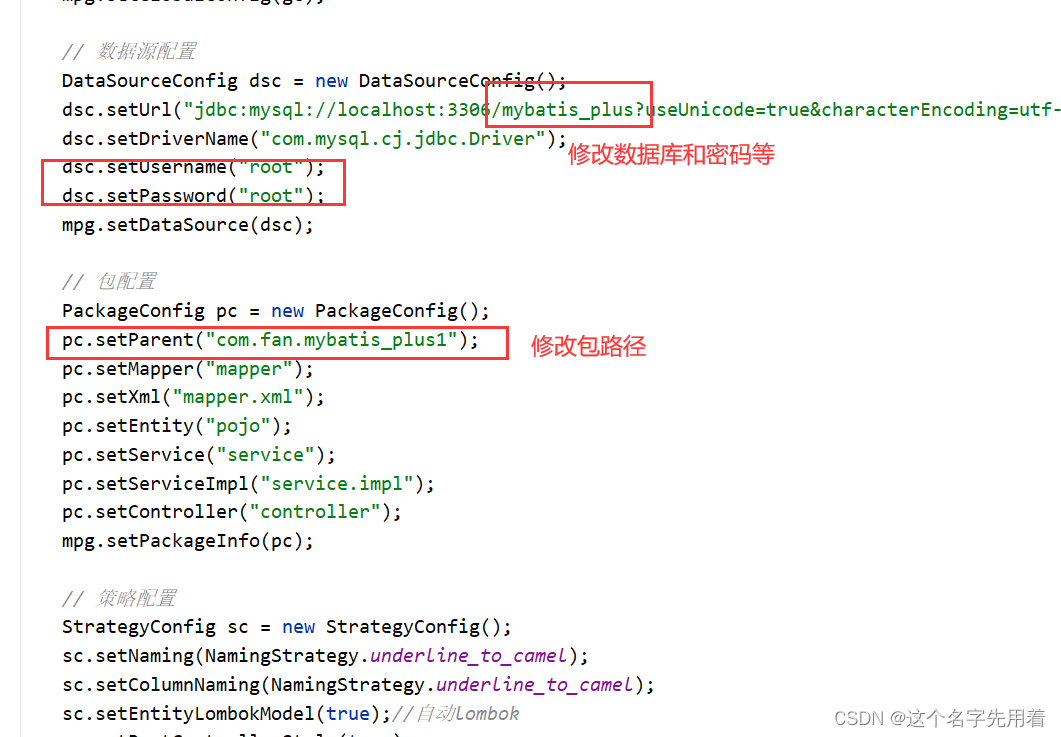
如果不用MP的代码生成器,也可以自己创建controller,mapper,server,entity等。package com.fan.springboot_swagger.util; import com.baomidou.mybatisplus.annotation.FieldFill; import com.baomidou.mybatisplus.annotation.IdType; import com.baomidou.mybatisplus.core.exceptions.MybatisPlusException; import com.baomidou.mybatisplus.generator.AutoGenerator; import com.baomidou.mybatisplus.generator.config.DataSourceConfig; import com.baomidou.mybatisplus.generator.config.GlobalConfig; import com.baomidou.mybatisplus.generator.config.PackageConfig; import com.baomidou.mybatisplus.generator.config.StrategyConfig; import com.baomidou.mybatisplus.generator.config.po.TableFill; import com.baomidou.mybatisplus.generator.config.rules.DateType; import com.baomidou.mybatisplus.generator.config.rules.NamingStrategy; import org.apache.commons.lang3.StringUtils; import java.util.ArrayList; import java.util.Scanner; public class CodeGenerator { public static String scanner(String tip) { Scanner scanner = new Scanner(System.in); StringBuilder help = new StringBuilder(); help.append("请输入" + tip + ":"); System.out.println(help.toString()); if (scanner.hasNext()) { String ipt = scanner.next(); if (StringUtils.isNotBlank(ipt)) { return ipt; } } throw new MybatisPlusException("请输入正确的" + tip + "!"); } public static void main(String[] args) { // 代码生成器 AutoGenerator mpg = new AutoGenerator(); // 全局配置 GlobalConfig gc = new GlobalConfig(); String projectPath = System.getProperty("user.dir");//用户路径,不用修改 gc.setOutputDir(projectPath + "/src/main/java");//设置代码生成路径:用户路径+/src/main/java gc.setFileOverride(true);//是否覆盖以前文件 gc.setOpen(false);//是否打开生成目录 gc.setAuthor("fan");//设置项目作者名称 gc.setIdType(IdType.ASSIGN_ID);//设置主键策略,IdType.ASSIGN_ID使用了雪花算法,比较好 gc.setBaseResultMap(true);//生成基本ResultMap gc.setBaseColumnList(true);//生成基本ColumnList gc.setServiceName("%sService");//去掉服务默认前缀 gc.setDateType(DateType.ONLY_DATE);//设置时间类型 mpg.setGlobalConfig(gc); // 数据源配置 DataSourceConfig dsc = new DataSourceConfig(); dsc.setUrl("jdbc:mysql://localhost:3306/mybatis_plus?useUnicode=true&characterEncoding=utf-8&serverTimezone=GMT%2B8"); dsc.setDriverName("com.mysql.cj.jdbc.Driver"); dsc.setUsername("root"); dsc.setPassword("root"); mpg.setDataSource(dsc); // 包配置 PackageConfig pc = new PackageConfig(); pc.setParent("com.fan.mybatis_plus1"); pc.setMapper("mapper"); pc.setXml("mapper.xml"); pc.setEntity("pojo"); pc.setService("service"); pc.setServiceImpl("service.impl"); pc.setController("controller"); mpg.setPackageInfo(pc); // 策略配置 StrategyConfig sc = new StrategyConfig(); sc.setNaming(NamingStrategy.underline_to_camel); sc.setColumnNaming(NamingStrategy.underline_to_camel); sc.setEntityLombokModel(true);//自动lombok sc.setRestControllerStyle(true); sc.setControllerMappingHyphenStyle(true); sc.setLogicDeleteFieldName("deleted");//设置逻辑删除 //设置自动填充配置 TableFill gmt_create = new TableFill("create_time", FieldFill.INSERT); TableFill gmt_modified = new TableFill("update_time", FieldFill.INSERT_UPDATE); ArrayListtableFills=new ArrayList<>(); tableFills.add(gmt_create); tableFills.add(gmt_modified); sc.setTableFillList(tableFills); //乐观锁 sc.setVersionFieldName("version"); sc.setRestControllerStyle(true);//驼峰命名 // sc.setTablePrefix("tbl_"); 设置表名前缀 sc.setInclude(scanner("表名,多个英文逗号分割").split(",")); mpg.setStrategy(sc); // 生成代码 mpg.execute(); } } - 1
- 2
- 3
- 4
- 5
- 6
- 7
- 8
- 9
- 10
- 11
- 12
- 13
- 14
- 15
- 16
- 17
- 18
- 19
- 20
- 21
- 22
- 23
- 24
- 25
- 26
- 27
- 28
- 29
- 30
- 31
- 32
- 33
- 34
- 35
- 36
- 37
- 38
- 39
- 40
- 41
- 42
- 43
- 44
- 45
- 46
- 47
- 48
- 49
- 50
- 51
- 52
- 53
- 54
- 55
- 56
- 57
- 58
- 59
- 60
- 61
- 62
- 63
- 64
- 65
- 66
- 67
- 68
- 69
- 70
- 71
- 72
- 73
- 74
- 75
- 76
- 77
- 78
- 79
- 80
- 81
- 82
- 83
- 84
- 85
- 86
- 87
- 88
- 89
- 90
- 91
- 92
- 93
- 94
- 95
- 96
- 97
- 98
- 99
- 100
- 101
- 102
- 103
- 104
- 105
- 106
- 107
- 108
- 109
(5)修改代码生成器部分代码:
(6)运行main方法,输入表名即可,生成效果:
(7)swagger配置类:
package com.fan.mybatis_plus1.config; import io.swagger.annotations.ApiOperation; import org.springframework.context.annotation.Bean; import org.springframework.context.annotation.Configuration; import springfox.documentation.builders.ApiInfoBuilder; import springfox.documentation.builders.RequestHandlerSelectors; import springfox.documentation.service.ApiInfo; import springfox.documentation.service.Contact; import springfox.documentation.spi.DocumentationType; import springfox.documentation.spring.web.plugins.Docket; import springfox.documentation.swagger2.annotations.EnableSwagger2; /** * @Author: zq * @Date 2020-08-24 10:55 * @Description swagger 配置类,swagger基本信息和接口的权限 * @ClassName SwaggerConfig * @PackageName com.zq.springboot.common.config */ @Configuration @EnableSwagger2 @MapperScan("com.fan.springboot_swagger.mapper") //增加mapper包的扫描 public class SwaggerConfig { /** * 创建api实例 * @return */ @Bean public Docket createRestAoi(){ return new Docket(DocumentationType.SWAGGER_2) //用来创建该API的基本信息,展示在文档的页面中(自定义展示的信息) .apiInfo(apiInfo()) //设置哪些接口暴露给Swagger展示 .select() //扫描所有有注解的api,用这种方式更灵活,指定为ApiOperation.class .apis(RequestHandlerSelectors.withMethodAnnotation(ApiOperation.class)) //构建 .build(); } /** * 添加摘要信息 * @return */ private ApiInfo apiInfo(){ //用ApiInfoBuilder进行定制,可以设置不同的属性,比较方便 return new ApiInfoBuilder() //设置标题 .title("标题:springboot集成swagger测试") //描述 .description("描述:用于测试集成swagger接口") //作者信息 .contact(new Contact("zq",null,null)) //版本 .version("版本号:1.0") //构建 .build(); } }- 1
- 2
- 3
- 4
- 5
- 6
- 7
- 8
- 9
- 10
- 11
- 12
- 13
- 14
- 15
- 16
- 17
- 18
- 19
- 20
- 21
- 22
- 23
- 24
- 25
- 26
- 27
- 28
- 29
- 30
- 31
- 32
- 33
- 34
- 35
- 36
- 37
- 38
- 39
- 40
- 41
- 42
- 43
- 44
- 45
- 46
- 47
- 48
- 49
- 50
- 51
- 52
- 53
- 54
- 55
- 56
- 57
- 58
- 59
- 60
- 61
- 62
- 63
- 64
- 65
然后启动项目,看是否报错。
测试swagger:注意修改成自己的端口号:
浏览器输入:http://localhost:8080/swagger-ui.html

测试:
给数据库增加数据进行测试:

4、swagger常用注解详解:
@Api 标识一个java类型是文档类,用controller类的类名上
@ApiModel 表示一个实体类/模型文档,用在类名上;
@ApiModelProperty 作用在属性上,添加属性描述;
@ApiOperation 作用在接口类的方法上,控制方法的相关描述;
@ApiImplicitParam 作用在接口方法上,描述单个参数信息,只能作用在方法上;
@ApiImplicitParams 作用在接口方法上,@ApiImplicitParam参数组;
@ApiParam 作用在接口方法上,描述单个参数信息,属性基本与@ApiImplicitParam一样,但可以作用在方法、参数、属性上;
@Api(tags = "学生管理相关接口") @RestController //@Controller + @ResponseBody @RequestMapping("/student") public class StudentAction { @Autowired private StudentService studentService; @ApiOperation("添加一名学生")// 为每个handler添加方法功能描述 @PostMapping("/add_student.action") @ApiImplicitParam(name = "student", value = "所添加的学生", dataTypeClass = Student.class) public ResponseVoaddOneStudent(Student student) { return studentService.addOneStudent(student); } @ApiOperation("根据studentId删除一名学生") @DeleteMapping("/delete_student/{studentId}.action") public ResponseVo deleteOneStudentByStudentId(@PathVariable Integer studentId) { return studentService.deleteOneStudentByStudentId(studentId); } @ApiOperation("修改一名学生") @PutMapping("/update_student.action") @ApiImplicitParams({ @ApiImplicitParam(name = "studentId", value = "学号", required = true), //required为是否必填项 @ApiImplicitParam(name = "studentName", value = "学生姓名", required = false), @ApiImplicitParam(name = "studentSex", value = "学生性别", required = false), @ApiImplicitParam(name = "studentScore", value = "学生分数", required = false) }) public ResponseVo updateOneStudent(Student student) { return studentService.updateOneStudent(student); } @ApiOperation("根据id获取一名学生") @GetMapping("/get_ont_student/{studentId}.action") public ResponseVo getOntStudentByStudentId(@PathVariable Integer studentId) { return studentService.getOneStudentByStudentId(studentId); } @ApiOperation("获取全部学生") @GetMapping("/get_all_student.action") public ResponseVo - 1
- 2
- 3
- 4
- 5
- 6
- 7
- 8
- 9
- 10
- 11
- 12
- 13
- 14
- 15
- 16
- 17
- 18
- 19
- 20
- 21
- 22
- 23
- 24
- 25
- 26
- 27
- 28
- 29
- 30
- 31
- 32
- 33
- 34
- 35
- 36
- 37
- 38
- 39
- 40
- 41
- 42
- 43

(8)我自己的controller测试:
package com.fan.springboot_swagger.controller; import com.fan.springboot_swagger.pojo.Stutest; import com.fan.springboot_swagger.service.StutestService; import io.swagger.annotations.Api; import io.swagger.annotations.ApiOperation; import io.swagger.annotations.ApiParam; import org.springframework.web.bind.annotation.*; import javax.annotation.Resource; /** ** 前端控制器 *
* * @author fan * @since 2022-07-20 */ @RestController @RequestMapping("/stutest") @Api("控制器类") public class StutestController { @Resource private StutestService stutestService; @ApiOperation("根据id查询") @GetMapping("/getById/{id}") public Stutest getById(@ApiParam(name = "id",required = true) @PathVariable("id") Long id){ Stutest byId = stutestService.getById(id); return byId; } }- 1
- 2
- 3
- 4
- 5
- 6
- 7
- 8
- 9
- 10
- 11
- 12
- 13
- 14
- 15
- 16
- 17
- 18
- 19
- 20
- 21
- 22
- 23
- 24
- 25
- 26
- 27
- 28
- 29
- 30
- 31
- 32
- 33
- 34
- 35
- 36
- 37
测试:


或者使用这个:http://localhost:8080/doc.html

5、遇到问题总结


-
相关阅读:
Android开发基础——广播机制
pnpm入门教程
python版本高,使用虚拟环境降版本
Machine Vision Technology:Lecture5 Local feature:Corners角点
使用 PowerShell 将 Windows 转发事件导入 SQL Server
解决ModuleNotFoundError: No module named ‘tensorboardX‘问题
佳兆业深陷债务围城,重组方案悬而未定
iview table 表格合并单元格
安全学习_开发相关_JNDI介绍(注入)&RMI&LDAP服务
Joe 主题 Halo 移植版搭建部署教程
- 原文地址:https://blog.csdn.net/weixin_38568503/article/details/125873876
