-
WebService 接口的发布调试与调用
背景介绍:内网,调用他方服务接口;基于WebService引擎Axis2.
老项目环境:tomcat 8.5 + Servlet + JSP + Mysql
注:Springboot环境下的Axis2 集成及其WebService 注解方式集成 另附,可自行百度。
(一)利用postman调试对外提供的WebService接口
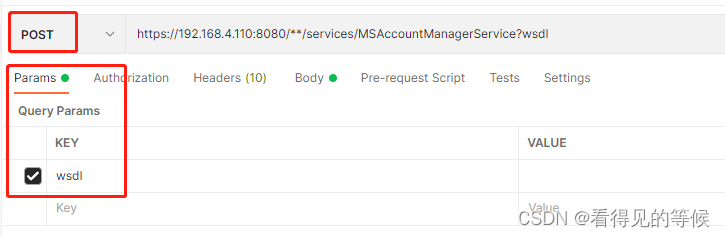
此处以调试以本地接口为例:
https://192.168.4.110:8080/**/services/MSAccountManagerService?wsdl然后再对postman进行以下设置:
(1)复制连接,自动添加 Params项
(2)重写Headers项的Content-Type为text/xml

此处若不设置,将会出错:
<html><body><h2>Please enable REST support in WEB-INF/conf/axis2.xml and WEB-INF/web.xml</h2></body></html>(3)构建参数

- <?xml version="1.0" encoding="utf-8" ?>
- <soapevn:Envelope xmlns:soapevn="http://schemas.xmlsoap.org/soap/envelope/" xmlns:test="http://pojo.axis.**.com">
- <soapevn:Body>
- <test:delUser xmlns="http://www.w3.org/2001/XMLSchema">
- <userIDs><![CDATA[<accounts><accId>lei000</accId><accId>lei111</accId></accounts>]]></userIDs>
- <test:delUser>
- </soapevn:Body>
- </soapenv:Envelope>
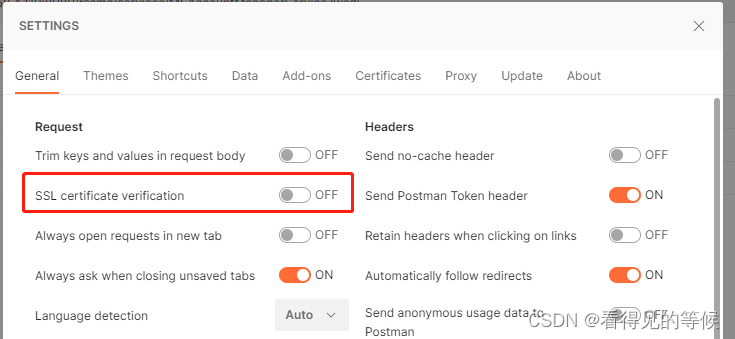
(4)由于是https 可进行 SSL 绕过认证:
(二)调用服务
此处以调用以下面接口为例:
http://10.102.102.136:9080/JKService/webservices/BussinessSupportService?wsdl查看提供的接口地址是否可用:
wget -o x.wsdl http://10.102.102.136:9080/JKService/webservices/BussinessSupportService?wsdl使用eclipse自带的WebService生成工具,根据以上客户提供的WebService接口,生成对应代码:
(1)右键点击项目名称——>“NEW”——>“Other”——>输入web service client 如下:


(2)因为是内网环境,无法输入上述接口地址直接生成,因此:
将客户提供的静态 BussinessSupportService.xml 直接更改文件后缀名为.wsdl,然后再Browser
更改好的.wsdl文件

即可生成以下文件:

注意:axis2的高版本jar生成的文件内容可能会有所不同,比如多实现了个别方法。
(3)生成后就如同调用本地方法一般:
- /**
- * 调用第三方webservice接口
- *
- * @throws AxisFault
- * @throws ServiceException
- */
- private static String todoWebService(String methodName, String paramXml) throws AxisFault, ServiceException {
- BussinessSupportServicePortTypeProxy proxy = new BussinessSupportServicePortTypeProxy();
- proxy.setEndpoint(URL);
- BussinessSupportServicePortType wrapper = proxy.getBussinessSupportServicePortType();
- String result = "";
- try {
- if ("queryAppOperJKStatus".equals(methodName)) {
- result = wrapper.queryAppOperJKStatus(paramXml);
- } else if ("createAppRequest".equals(methodName)) {
- result = wrapper.createAppRequest(paramXml);
- } else if ("remoteAuth".equals(methodName)) {
- result = wrapper.remoteAuth(paramXml);
- } else if ("reSendJKPass".equals(methodName)) {
- result = wrapper.reSendJKPass(paramXml);
- } else if ("queryJKStatusByID".equals(methodName)) {
- result = wrapper.queryJKStatusByID(paramXml);
- }
- } catch (RemoteException e) {
- e.printStackTrace();
- }
- return result;
- }
(4)获取到的结果为字符串:结合业务利用AXIOMUtil.stringToOM(result) 解析即可。
- import org.apache.axiom.om.util.AXIOMUtil;
- /**
- * 将接口返回结果解析成实体
- *
- * @param result
- * @return
- * @throws Exception
- */
- @SuppressWarnings("rawtypes")
- private static JkResendPassResult parseResendPassResult(String result) {
- // 结果数据
- JkResendPassResult jkresult = new JkResendPassResult();
- OMElement accElement = null;
- try {
- accElement = AXIOMUtil.stringToOM(result);
- } catch (XMLStreamException e) {
- logger.error(e.getCause().toString());
- return jkresult;
- }
- logger.info(accElement.toString());
- // Iterator childElements = accElement.getChildElements();
- Iterator children = accElement.getChildren();
- while (children.hasNext()) {
- OMElement info = (OMElement) children.next();
- logger.info(info.toString());
- String localName = info.getLocalName();
- String text = info.getText().trim();
- if ("resultCode".equals(localName)) {
- jkresult.setResultCode(text);
- } else if ("requestID".equals(localName)) {
- jkresult.setRequestID(text);
- } else if ("resendResult".equals(localName)) {
- jkresult.setResendResult(text);
- }
- }
- return jkresult;
- }
(5)调用接口前构建xml参数,自己简单封装的适用于本业务场景一个小工具类:主要是因为项目中的axis2 版本比较低,市面官方jar包中封装的方法无法适用,在次记录而已,可自行百度。
- import java.lang.reflect.Field;
- import java.lang.reflect.Method;
- import java.text.DecimalFormat;
- import java.text.SimpleDateFormat;
- import java.util.Date;
- import java.util.List;
- import javax.xml.bind.annotation.XmlElement;
- import org.apache.axiom.om.OMAbstractFactory;
- import org.apache.axiom.om.OMElement;
- import org.apache.axiom.om.OMFactory;
- import org.apache.axiom.om.OMNamespace;
- import org.apache.commons.lang.StringUtils;
- /**
- * 将实体类转换成xml格式(OMElement)
- *
- * @author shilei
- * @date 2017-08-16
- *
- */
- public class OMElementUtils {
- public static final String FORMAT_DATETIME = "yyyy-MM-dd HH:mm:ss";
- public static String convertListToXml(List<Object> list, String objRootName, String listRootName) throws Exception {
- StringBuffer result = new StringBuffer();
- result.append("<").append(listRootName).append(">");
- for (Object object : list) {
- String subXmlStr = convertSingle(object, objRootName);
- result.append(subXmlStr);
- }
- result.append("</").append(listRootName).append(">");
- return result.toString();
- }
- public static String convertSingle(Object t, String rootName) throws Exception {
- OMFactory fac = OMAbstractFactory.getOMFactory();
- OMNamespace ns1 = fac.createOMNamespace("", "");
- String root = rootName;
- OMElement rootEle = fac.createOMElement(root, ns1);
- Field[] fields = t.getClass().getDeclaredFields();
- for (Field field : fields) {
- XmlElement xmlElement = field.getAnnotation(XmlElement.class);
- if (xmlElement == null) {
- continue;
- }
- String eleName = xmlElement.name();
- if (StringUtils.isEmpty(eleName) || "##default".equals(eleName)) {
- eleName = field.getName();
- }
- OMElement eleId = fac.createOMElement(eleName, ns1, rootEle);
- String fieldValue = getFieldValue(t, eleName);
- if (StringUtils.isNotBlank(fieldValue))
- eleId.setText(fieldValue);
- else
- eleId.setText("**");
- }
- String paramStr = rootEle.toString();
- paramStr = paramStr.replace("**", "");
- return paramStr;
- }
- public static <T> String getFieldValue(T t, String fieldName) throws Exception {
- Method method = t.getClass().getMethod("get" + StringUtils.capitalize(fieldName));
- if (method == null) {
- return null;
- }
- Object obj = method.invoke(t);
- if (obj != null) {
- if (Date.class.isInstance(obj)) {
- return new SimpleDateFormat(FORMAT_DATETIME).format((Date) obj);
- } else if (String.class.isInstance(obj)) {
- return obj.toString();
- } else if (Double.class.isInstance(obj)) {
- DecimalFormat df = new DecimalFormat("0.00");
- return df.format((Double) obj);
- } else if (Integer.class.isInstance(obj)) {
- return obj.toString();
- }
- }
- return null;
- }
- }
(三)总结
在客户调用我方发布的接口时产生以下问题:
javax.net.ssl.SSLHandshakeException: Received fatal alert: handshake_failure起初认为是keystore文件的原因,查看后排除:
keytool -list -v -keystore D:\Workspaces\rssmcINT\src\tomcat.keystore -storepass pwd**确定原因:我方环境是JDK8 TLSv1.2、对方为JDK6 TLSv1.1,以至于低版本无法调用高版本(公司要求我方不能兼容 TLSv1.1)

- <Connector port="8080" maxHttpHeaderSize="8192" protocol="HTTP/1.1" SSLEnabled="true"
- connectionTimeout="5000" maxThreads="150" minSpareThreads="25" maxSpareThreads="75"
- enableLookups="false" disableUploadTimeout="true" ConnectionTimeout="3000"
- acceptCount="100" scheme="https" secure="true"
- keystoreFile="D:\Workspaces\rssmcINT\src\tomcat.keystore"
- keystorePass="runstone"
- clientAuth="false"
- sslProtocol="TLS" sslEnabledProtocols="TLSv1.2"
- allowUnsafeLegacyRenegotiation="false"
- ciphers="TLS_ECDHE_RSA_WITAES_128_CBC_SHA256,TLS_ECDHE_RSA_WITH_AES_128_CBC_SHA,TLS_ECDHE_RSA_WITH_AES_256_CBC_SHA384,TLS_ECDHE_RSA_WITH_AE
- S_256_CBC_SHA,TLS_RSA_WITH_AES_128_CBC_SHA256,TLS_RSA_WITH_AES_128_CBC_SHA,TLS_RSA_WITH_AES_256_CBC_SHA256,TLS_RSA_WITH_AES_256_CBC_SHA"/>
解决方案:
(1)调用方升级JDK 8
(2)做证书认证绕过
-
相关阅读:
win10 GTX 1650 版本517(需要降级到441.22) 安装Tensorflow-GPU
Redis
【Plus】三、BaseMapper
记录下跑VUE+webpack-dev-server安装使用的问题
Python第四次作业
关于设置MySQL中create_time和update_time默认值和实时更新
JavaScript设计模式(五)——发布订阅模式、桥接模式、组合模式
在Ubuntu上安装LibRaw
软考中级系统集成项目管理工程师自学好不好过,怎么备考,给点经验
内衣洗衣机有必要买吗?口碑好的小型洗衣机测评
- 原文地址:https://blog.csdn.net/qq_39028580/article/details/125564600
