-
Java Springboot项⽬部署到linux任意文件夹或tomcat,并使用nginx实现域名访问
Springboot项⽬部署到linux文件夹或tomcat
1. springboot以jar包直接运行在linux任意文件夹
dea默认jar打包⽅式,直接使⽤maven⼯具按照步骤点击就可以直接打包
ps:打包前数据库相关的连接信息要修改,不能⽤本地

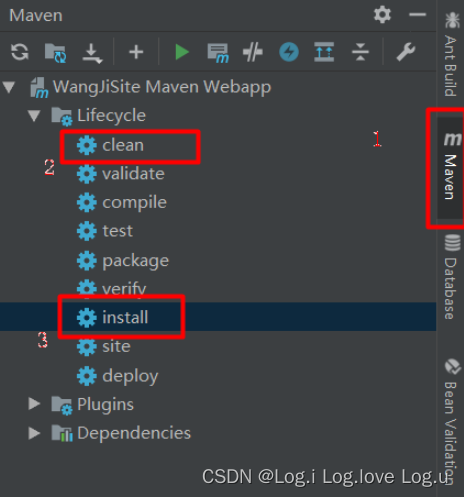
- 第一步:打开Maven
- 第二步:Maven clean :清除编译后的⽬录,默认是target⽬录
- 第三步:Maven package:打包
- 第四步:到target⽬录下找到 jar包

- 第五步:将jar包放到linux的任意⽂件夹(可访问)下
- 输⼊ java -jar ⽂件名.jar
不足在于终端关闭后,就不能访问了,隔⼀段时间后不能访问
1.1实现nohub方式运行
nohup java -jar ⽂件名.jar &- 1
- nohup的意思不挂服务,常驻的意思,除⾮云服务器重启,那就没法了;
- 最后⼀个&表⽰执⾏命令后要⽣成⽇志⽂件
- nohup.out=出现:nohup: ignoring input and appending output to ‘nohup.out’
正常情况,项目启动成功
2.spring boot 项目配置域名访问
- 其实刚开始是我把这个想复杂了,域名解析直接解析到服务器公网就行了,然后域名加项目设定的端口号就可以访问了,
- 我一直在想域名解析过来,服务器怎么绑定到项目的事,但是到这里好像瞬间懂了,域名解析前,公网ip加端口号是可以直接访问项目的,域名解析后域名加端口号也可以访问,那就说明这里域名代替了ip,通过不同端口实现访问不同项目,不加端口号是访问不到的。
- 现在我不希望端口显示,我希望可以直接用域名就能访问到项目,剩下的可以用nginx做反向代理来实现了
2.1 nginx安装
- 在/usr/local文件夹下创建nginx文件夹,用来存放安装包
yum -y install make zlib zlib-devel gcc-c++ libtool openssl openssl-devel- 1
- 安装c++
yum install gcc-c++- 1
- 安装ssl
yum install -y openssl openssl-devel- 1
- 安装pcre
yum install -y pcre pcre-devel- 1
- 安装zlib
yum install -y zlib zlib-devel- 1
- 安装nginx
wget https://nginx.org/download/nginx-1.19.9.tar.gz- 1
- 安装过程依次执行下面命令
tar -zxvf nginx-1.19.9.tar.gz cd nginx-1.19.9 make && make install- 1
- 2
- 3
- 运行ngins
#首先查找路径 whereis nginx # 之后cd到nginx目录 ./nginx # 查看是否启动成功 ps -ef | grep nginx- 1
- 2
- 3
- 4
- 5
- 6
- 7
- 然后在网页上访问IP,默认端口为80
出现下图

不成功,是nginx默认端口80没有开启
#查看80端口是否打开: firewall-cmd --zone=public --query-port=80/tcp # 开启80端口 firewall-cmd --zone=public --add-port=80/tcp --permanent # 重启 firewall firewall-cmd --reload- 1
- 2
- 3
- 4
- 5
- 6
2.2开启自启动nginx
修改 /etc/rc.d/rc.local文件
vim /etc/rc.d/rc.local- 1
添加如下内容
user/local/nginx/sbin/nginx- 1
退出保存
使/etc/rc.d/rc.local变成可执行文件chmod +x /etc/rc.d/rc.local- 1
重启服务
shutdown -r now- 1
项目本地访问是localhost:8080,隐藏端口后就成了localhost,再用域名访问就是www.xxx.com,后面就不再出现端口号,nginx安装后默认就是隐藏端口号的,所以不需要修改,然后就是代理域名,这里我依旧遇到了问题,此时我们需要配置nginx
2.4 配置nginx
配置nginx的方法:首先要打开“/etc/nginx/conf.d/”文件夹;然后创建配置文件;接着在“/etc/nginx/nginx.conf”文件中修改配置项;最后重新启动nginx即可。
Nginx是一款轻量级的Web 服务器/反向代理服务器及电子邮件(IMAP/POP3)代理服务器
Nginx (engine x) 也是一个高性能的HTTP和反向代理服务,也是一个IMAP/POP3/SMTP服务。Nginx是由伊戈尔·赛索耶夫为俄罗斯访问量第二的Rambler.ru站点(俄文:Рамблер)开发的
2.5 前后端nginx配置
- 打开 /etc/nginx/conf.d/文件夹,创建配置文件xxx.conf,内容如下:
server { listen 80; server_name **.106.2**.175; location / { root /public/app/dist; index index.php index.html index.htm; } location /sell { proxy_set_header X-Real-IP $remote_addr; proxy_set_header X-Forwarded-For $proxy_add_x_forwarded_for; proxy_set_header Host $http_host; proxy_set_header X-NginX-Proxy true; proxy_pass http://127.0.0.1:8080; proxy_redirect off; }}- 1
- 2
- 3
- 4
- 5
- 6
- 7
- 8
- 9
- 10
- 11
- 12
- 13
- 14
- 15
- 在 /etc/nginx/nginx.conf文件中有一行就是把刚刚配置的引进总的nginx配置中
include /etc/nginx/conf.d/*.conf;...- 1
- 配置完成后重新启动nginx
nginx -t # 查看nginx状态 nginx -s reload # 重新载入配置文件 nginx -s reopen # 重启 Nginx nginx -s stop # 停止 Nginx- 1
- 2
- 3
- 4
- 5
- 6
- 7
- 8
- 配置https
server { listen 443; server_name xx.name.com; ssl on; index index.html index.htm; ssl_certificate cert/215079423330181.cert; ssl_certificate_key cert/215079423330181.key; ssl_session_timeout 5m; ssl_ciphers ECDHE-RSA-AES128-GCM-SHA256:ECDHE:ECDH:AES:HIGH:!NULL:!aNULL:!MD5:!ADH:!RC4; ssl_protocols TLSv1 TLSv1.1 TLSv1.2; ssl_prefer_server_ciphers on; location / { root /public/app/dist; index index.php index.html index.htm; } location /sell { proxy_set_header X-Real-IP $remote_addr; proxy_set_header X-Forwarded-For $proxy_add_x_forwarded_for; proxy_set_header Host $http_host; proxy_set_header X-NginX-Proxy true; proxy_pass http://127.0.0.1:8080; proxy_redirect off; } }- 1
- 2
- 3
- 4
- 5
- 6
- 7
- 8
- 9
- 10
- 11
- 12
- 13
- 14
- 15
- 16
- 17
- 18
- 19
- 20
- 21
- 22
- 23
- 24
- 25
- 26
- 27
nginx.conf 默认文件
# For more information on configuration, see: # * Official English Documentation: http://nginx.org/en/docs/ # * Official Russian Documentation: http://nginx.org/ru/docs/ user nginx; worker_processes auto; error_log /var/log/nginx/error.log; pid /run/nginx.pid; # Load dynamic modules. See /usr/share/nginx/README.dynamic. include /usr/share/nginx/modules/*.conf; events { worker_connections 1024; } http { log_format main '$remote_addr - $remote_user [$time_local] "$request" ' '$status $body_bytes_sent "$http_referer" ' '"$http_user_agent" "$http_x_forwarded_for"'; access_log /var/log/nginx/access.log main; sendfile on; tcp_nopush on; tcp_nodelay on; keepalive_timeout 65; types_hash_max_size 2048; gzip on; gzip_static on; gzip_min_length 1024; gzip_buffers 4 16k; gzip_comp_level 2; gzip_types text/plain application/javascript application/x-javascript text/css application/xml text/javascript application/x-httpd-php application/vnd.ms-fontobject font/ttf font/opentype font/x-woff image/svg+xml; gzip_vary off; gzip_disable "MSIE [1-6]\."; include /etc/nginx/mime.types; default_type application/octet-stream; # Load modular configuration files from the /etc/nginx/conf.d directory. # See http://nginx.org/en/docs/ngx_core_module.html#include # for more information. include /etc/nginx/conf.d/*.conf; server { listen 80 default_server; listen [::]:80 default_server; server_name _; root /usr/share/nginx/html; # Load configuration files for the default server block. include /etc/nginx/default.d/*.conf; location / { } error_page 404 /404.html; location = /40x.html { } error_page 500 502 503 504 /50x.html; location = /50x.html { } } server { listen 443; server_name mp.hanxing.store; ssl on; index index.html index.htm; ssl_certificate cert/cert_mp.hanxing.store.crt; ssl_certificate_key cert/cert_mp.hanxing.store.key; ssl_session_timeout 5m; ssl_ciphers ECDHE-RSA-AES128-GCM-SHA256:ECDHE:ECDH:AES:HIGH:!NULL:!aNULL:!MD5:!ADH:!RC4; ssl_protocols TLSv1 TLSv1.1 TLSv1.2; ssl_prefer_server_ciphers on; location / { root /public/sell/app/dist; index index.php index.html index.htm; } location /sell { proxy_set_header X-Real-IP $remote_addr; proxy_set_header X-Forwarded-For $proxy_add_x_forwarded_for; proxy_set_header Host $http_host; proxy_set_header X-NginX-Proxy true; proxy_pass http://127.0.0.1:8080; proxy_redirect off; } error_page 404 /404.html; location = /40x.html { } error_page 500 502 503 504 /50x.html; location = /50x.html { } } }- 1
- 2
- 3
- 4
- 5
- 6
- 7
- 8
- 9
- 10
- 11
- 12
- 13
- 14
- 15
- 16
- 17
- 18
- 19
- 20
- 21
- 22
- 23
- 24
- 25
- 26
- 27
- 28
- 29
- 30
- 31
- 32
- 33
- 34
- 35
- 36
- 37
- 38
- 39
- 40
- 41
- 42
- 43
- 44
- 45
- 46
- 47
- 48
- 49
- 50
- 51
- 52
- 53
- 54
- 55
- 56
- 57
- 58
- 59
- 60
- 61
- 62
- 63
- 64
- 65
- 66
- 67
- 68
- 69
- 70
- 71
- 72
- 73
- 74
- 75
- 76
- 77
- 78
- 79
- 80
- 81
- 82
- 83
- 84
- 85
- 86
- 87
3.部署到Linux下Tomcat服务器
1-2 介绍的部署方法使用Spring内置集成的tomcat环境,在一些情况:已经安装运行了tomcat,我们需要将项目部署到该tomcat服务器
运行环境 打包方式 任意文件夹(内置tomcat) jar tomcat文件夹 war 3.1 maven-install-war包:
- 在pom.xml中声明为war打包:
<packaging>war</packaging>- 1
- 禁用springboot中内置的tomcat,部署到外部的tomcat中
<!-- 排除内置tomcat容器,导出成war包可以让外部容器运行spring-boot项目--> <dependency> <groupId>org.springframework.boot</groupId> <artifactId>spring-boot-starter-web</artifactId> <exclusions> <exclusion> <groupId>org.springframework.boot</groupId> <artifactId>spring-boot-starter-tomcat</artifactId> </exclusion> </exclusions> </dependency>- 1
- 2
- 3
- 4
- 5
- 6
- 7
- 8
- 9
- 10
- 11
-
clean、install项目
-
控制台会输出路径,然后我们找到war包,然后复制
-
将war包上传服务器
-
修改config下的server.xm
修改内容:将默认的8080端口改成80端口,这样就不需要输入访问端口了(80端口默认隐藏)

修改内容:2.localhost其改为域名(例如:liuyinian.wang)红色框为springboot应用在服务器上的绝对路径地址值
需要自己加<Context docBase="/usr/***/software/tomcat/apache-tomcat-8.5.50/webapps/****your_project-0.0.1-SNAPSHOT" path="" reloadable="true" crossContext="true"/>- 1

然后就可以重启服务器用域名进行访问了
参考1:百度文库
参考2:spring boot 域名访问
参考3:Linux配置tomcat、springboot 开机自启
-
相关阅读:
唯品会关键词搜索API接口(item_search-按关键字搜索唯品会商品API接口),唯品会API接口
启动uniapp小程序报错:Error:app.json:在项目根目录中未找到app.json
【python】linux下安装chromedriver
树莓派CM4安装系统
使用 HTML、CSS 和 JavaScript 的简单模拟时钟
Beelzebub过程记录及工具集
软件定制APP开发步骤分析|小程序
Docker之最全使用基础命令(帮助启动类命令、镜像类命令、容器类命令)
vue-element-admin后台前端解决方案(基于 vue 和 element-ui)
cesium切片底图正常出来但控制台一直报错的方法
- 原文地址:https://blog.csdn.net/gao511147456/article/details/125534225
