-
【数学建模学习笔记【集训十天】之第三天】
数模学习目录
欢迎访问:我的主页
之前在哔哩哔哩和菜鸟教程学习Numpy和Pandas,发现上面讲的很细【不过上面讲的是真好!】,或许数模用不了这么多细的知识吧,今天结合相关书做了一些调整,当然,之前学的也不会就此落下!!!今天我看到线性规划模型开头的介绍,特别不错,因此,我把它记录下来了,分享给大家!!
在工程技术、经济管理、科学研究、军事作战训练及日常生活等众多领域,人们常常会遇到各种优化问题。例如,在生产经营中,我们总是希望制定最优的生产计划,充分利用已有的人力、物力资源,获得最大的经济效益;在运输问题中,我们总是希望设计最优的运输方案,在完成运输任务的前提下,力求运输成本最小等。【针对优化问题的数学建模问题也是数学建模竞赛中一类比较常见的问题,这样的问题常常可以使用数学规划模型进行研究。】
数学规划是运筹学的一个重要分支,而线性规划又是数学规划中的一部分主要内容。很多实际问题都可以归结为“线性规划”问题。线性规划有比较完善的理论基础和有效的求解方法,在实际问题中有极其广泛地应用。特别是随着计算机技术的飞速发展,线性规划的应用在深度和广度上有了极大的提高。
Numpy 学习(续)
# -*- coding = utf-8 -*- # @Time : 2022/6/29 9:50 # @Author : lxw_pro # @File : Numpy库学习-1.py # @Software : PyCharm # Numpy的基本使用 ''' Numpy提供了两种基本的对象:ndarray存储单一数据类型的多维数组; ufunc是能够对数组进行处理的函数 1-导入函数 import numpy as np 2-数组创建 2-1 array 可将列表或元组转化为ndarray数组 2-2 arange 在给定区间内创建等差数组,格式: arange(start=None, stop=None, step=None,dtype=None) 【step表示步长间隔】 2-3 linspace 在给定区间内创建间隔相等的数组,格式: linspace(start, stop, num=50, endpoint=True) 【间隔相等的num个数据,其num默认值是50】 2-4 logspace 在给定区间内生成等比数组,格式: logspace(start, stop, num=50, endpoint=True, base=10.0) 【默认生成区间[10start(次方), 10stop()次方]上的num个数据的等比数组】 以及 ones、zeros、empty和ones_like等系列函数的运用: '''- 1
- 2
- 3
- 4
- 5
- 6
- 7
- 8
- 9
- 10
- 11
- 12
- 13
- 14
- 15
- 16
- 17
- 18
- 19
- 20
- 21
- 22
- 23
- 24
- 25
- 26
- 27
- 28
- 29
- 30
- 31
1-numpy.array
# numpy.array # array()函数,括号内可以是列表、元组、数组、迭代对象、生成器 import numpy as np print(np.array([6, 6, 6])) # 列表 print(np.array((8, 8, 8))) # 元组 print(np.array(np.array([9, 9, 9]))) # 数组 print(np.array(range(10))) # 迭代对象 / 整型 print(np.array([i**2 for i in range(10)])) # 生成器 # 创建10以内的奇数的数组: print(np.array([i for i in range(1, 10, 2)])) print(np.array([i for i in range(10) if i % 2 != 0])) # 创建10以内的偶数的数组: print(np.array([i for i in range(0, 10, 2)])) print(np.array([i for i in range(10) if i % 2 == 0])) # 列表中元素类型不相同 print(np.array([5, 2, '0'])) # ['5' '2' '0'] # 浮点型 print(np.array([3, 4, 5.2])) # 二维数组:【嵌套序列(列表、元组均可)】 print(np.array([[6, 7, 8], ('lxw', 'cw', 'wl')])) print(np.array([[6, 7, 8], ('lxw', 'cw', 'wl')]).ndim) # ndim(维度): 2 # 嵌套数量不一致:【强制转化为一维,推荐不用】 print(np.array([[6, 7, 8], ('lxw', 'cw', 'wl', 'npy')], dtype=object)) print(np.array([[6, 7, 8], ('lxw', 'cw', 'wl', 'npy')], dtype=object).ndim) # ndim(维度):1 print(np.array([[6, 7, 8], ('lxw', 'cw', 'wl', 'npy')], dtype=object).shape) # 运行结果:(2,) print(np.array([[6, 7, 8], [9, 9, 6, 9]], dtype=object)) print(np.array([[6, 7, 8], [9, 9, 6, 9]], dtype=object).ndim) # ndim(维度):1 print(np.array([[6, 7, 8], [9, 9, 6, 9]], dtype=object).shape) # 运行结果:(2,) -> 代表两行一列- 1
- 2
- 3
- 4
- 5
- 6
- 7
- 8
- 9
- 10
- 11
- 12
- 13
- 14
- 15
- 16
- 17
- 18
- 19
- 20
- 21
- 22
- 23
- 24
- 25
- 26
- 27
- 28
- 29
- 30
- 31
- 32
- 33
- 34
- 35
- 36
- 37
- 38
- 39
- 40
- 41
- 42
- 43
- 44
- 45
- 46
- 47
2-numpy.empty
# numpy.empty ''' numpy.empty 方法用来创建一个指定形状(shape)、数据类型(dtype)且未初始化的数组 numpy.empty(shape, dtype = float, order = 'C') 参数说明: 参数 描述 shape 数组形状 dtype 数据类型,可选 order 有"C"和"F"两个选项,分别代表,行优先和列优先,在计算机内存中的存储元素的顺序 ''' import numpy as np lxw = np.empty([3, 4], dtype=int) print(lxw) # 注意:数组元素为随机值,因为它们未初始化- 1
- 2
- 3
- 4
- 5
- 6
- 7
- 8
- 9
- 10
- 11
- 12
- 13
- 14
- 15
- 16
- 17
- 18
- 19
- 20
- 21
3-numpy.zeros
# numpy.zeros ''' 创建指定大小的数组,数组元素以 0 来填充: numpy.zeros(shape, dtype = float, order = 'C') 参数说明: order : 'C' 用于 C 的行数组,或者 'F' 用于 FORTRAN 的列数组 ''' import numpy as np lxw = np.zeros(6) # 默认为浮点数 print(lxw) lxw2 = np.zeros((6, ), dtype=int) # 设置类型为整数 print(lxw2) # 自定义类型 lxw3 = np.zeros((2, 2), dtype=[('lxw', 'i2'), ('lxw2', 'i4')]) print(lxw3)- 1
- 2
- 3
- 4
- 5
- 6
- 7
- 8
- 9
- 10
- 11
- 12
- 13
- 14
- 15
- 16
- 17
- 18
- 19
- 20
- 21
- 22
- 23
- 24
4-numpy.ones
# numpy.ones '''创建指定形状的数组,数组元素以 1 来填充: numpy.ones(shape, dtype = None, order = 'C') ''' import numpy as np lxw4 = np.ones(8) # 默认浮点数 print(lxw4) lxw5 = np.ones([2, 2], dtype=int) print(lxw5)- 1
- 2
- 3
- 4
- 5
- 6
- 7
- 8
- 9
- 10
- 11
- 12
- 13
- 14
- 15
- 16
1 NumPy 从已有的数组创建数组
1-numpy.asarray
# numpy.asarray ''' numpy.asarray 类似 numpy.array,但 numpy.asarray 参数只有三个,比 numpy.array 少两个。 numpy.asarray(a, dtype = None, order = None) 参数说明: 参数 描述 a 任意形式的输入参数,可以是,列表, 列表的元组, 元组, 元组的元组, 元组的列表,多维数组 ''' # 将列表转换为 ndarray: import numpy as np x = [5, 2, 0] lxw6 = np.asarray(x) print(lxw6) # 将元组转换为 ndarray import numpy as np x2 = (1, 3, 1, 4) lxw7 = np.asarray(x2) print(lxw7) # 设置了 dtype 参数 import numpy as np x4 = [6, 6, 9] lxw9 = np.asarray(x4, dtype=float) print(lxw9)- 1
- 2
- 3
- 4
- 5
- 6
- 7
- 8
- 9
- 10
- 11
- 12
- 13
- 14
- 15
- 16
- 17
- 18
- 19
- 20
- 21
- 22
- 23
- 24
- 25
- 26
- 27
- 28
- 29
- 30
- 31
- 32
- 33
- 34
- 35
- 36
- 37
- 38
2-numpy.frombuffer
# numpy.frombuffer ''' numpy.frombuffer 用于实现动态数组;接受 buffer 输入参数,以流的形式读入转化成 ndarray 对象。 格式如下: numpy.frombuffer(buffer, dtype = float, count = -1, offset = 0) 注:buffer 是字符串的时候,Python3 默认 str 是 Unicode 类型,所以要转成 bytestring 在原 str 前加上 b。 参数说明: 参数 描述 buffer 可以是任意对象,会以流的形式读入。 dtype 返回数组的数据类型,可选 count 读取的数据数量,默认为-1,读取所有数据。 offset 读取的起始位置,默认为0 ''' import numpy as np s = b'lxw_pro' lxw10 = np.frombuffer(s, dtype='S1') print(lxw10)- 1
- 2
- 3
- 4
- 5
- 6
- 7
- 8
- 9
- 10
- 11
- 12
- 13
- 14
- 15
- 16
- 17
- 18
- 19
- 20
- 21
- 22
- 23
- 24
- 25
- 26
3-numpy.fromiter
# numpy.fromiter ''' numpy.fromiter 方法从可迭代对象中建立 ndarray 对象,返回一维数组。 numpy.fromiter(iterable, dtype, count=-1) ''' import numpy as np lst = range(6) it = iter(lst) lxw11 = np.fromiter(it, dtype=float) print(lxw11)- 1
- 2
- 3
- 4
- 5
- 6
- 7
- 8
- 9
- 10
- 11
- 12
- 13
- 14
- 15
- 16
- 17
2 NumPy 从数值范围创建数组
1-numpy.arange
# numpy.arange ''' numpy 包中的使用 arange 函数创建数值范围并返回 ndarray 对象,函数格式如下: numpy.arange(start, stop, step, dtype) 根据 start 与 stop 指定的范围以及 step 设定的步长,生成一个 ndarray。 参数说明: 参数 描述 start 起始值,默认为0 stop 终止值(不包含) step 步长,默认为1 dtype 返回ndarray的数据类型,如果没有提供,则会使用输入数据的类型 ''' # 生成0和5的数组 import numpy as np a = np.arange(6) print(a) # 设置返回类型位 float import numpy as np a2 = np.arange(6, dtype=float) print(a2) # 设置了起始值、终止值及步长 import numpy as np a3 = np.arange(20, 52, 5) print(a3)- 1
- 2
- 3
- 4
- 5
- 6
- 7
- 8
- 9
- 10
- 11
- 12
- 13
- 14
- 15
- 16
- 17
- 18
- 19
- 20
- 21
- 22
- 23
- 24
- 25
- 26
- 27
- 28
- 29
- 30
- 31
- 32
- 33
- 34
- 35
- 36
- 37
- 38
2-numpy.linspace
# numpy.linspace ''' numpy.linspace 函数用于创建一个一维数组,数组是一个等差数列构成的,格式如下: np.linspace(start, stop, num=50, endpoint=True, retstep=False, dtype=None) 参数说明: 参数 描述 start 序列的起始值 stop 序列的终止值,如果endpoint为true,该值包含于数列中 num 要生成的等步长的样本数量,默认为50 endpoint 该值为 true 时,数列中包含stop值,反之不包含,默认是True。 retstep 如果为 True 时,生成的数组中会显示间距,反之不显示。 dtype ndarray 的数据类型 ''' # 类似等差数列 import numpy as np a4 = np.linspace(1, 10, 5) print(a4) # 设置元素全部是1的等差数列 import numpy as np a5 = np.linspace(1, 1, 10) print(a5) # 将 endpoint 设为 false,不包含终止值 import numpy as np a6 = np.linspace(8, 22, 4, endpoint=False) print(a6) # 注:将 endpoint 设为 true,则会包含 22 a6 = np.linspace(8, 22, 4, endpoint=True) print(a6) # 设置间距 import numpy as np a7 = np.linspace(5, 10, 5).reshape([5, 1]) print(a7)- 1
- 2
- 3
- 4
- 5
- 6
- 7
- 8
- 9
- 10
- 11
- 12
- 13
- 14
- 15
- 16
- 17
- 18
- 19
- 20
- 21
- 22
- 23
- 24
- 25
- 26
- 27
- 28
- 29
- 30
- 31
- 32
- 33
- 34
- 35
- 36
- 37
- 38
- 39
- 40
- 41
- 42
- 43
- 44
- 45
- 46
- 47
3-numpy.logspace
# numpy.logspace ''' numpy.logspace 函数用于创建一个于等比数列。格式如下: np.logspace(start, stop, num=50, endpoint=True, base=10.0, dtype=None) base 参数意思是取对数的时候 log 的下标。 参数 描述 start 序列的起始值为:base ** start stop 序列的终止值为:base ** stop。如果endpoint为true,该值包含于数列中 num 要生成的等步长的样本数量,默认为50 endpoint 该值为 true 时,数列中中包含stop值,反之不包含,默认是True。 base 对数 log 的底数。 dtype ndarray 的数据类型 ''' import numpy as np a8 = np.logspace(1, 2, num=10) # 默认底数是 10 print(a8) # 将对数的底数设置为 2 import numpy as np a9 = np.logspace(0, 8, 9, base=2) print(a9)- 1
- 2
- 3
- 4
- 5
- 6
- 7
- 8
- 9
- 10
- 11
- 12
- 13
- 14
- 15
- 16
- 17
- 18
- 19
- 20
- 21
- 22
- 23
- 24
- 25
- 26
- 27
- 28
- 29
- 30
综合运用【array、arange、linspace、lonspace】:
# 综合运用 import numpy as np ltw = np.array([3, 3, 4, 4]) # 生成整型数组 ltw2 = ltw.astype(float) # 转为浮点数 ltw3 = np.array([5, 2, 1], dtype=float) # 浮点数 print(ltw) print(ltw2) print(ltw3) # 比较类型 print(ltw.dtype, ltw2.dtype, ltw3.dtype) aa = np.array([ [2, 5, 8], [9, 6, 2] ]) print(aa) bb = np.arange(2, 9) print(bb) # 运行结果为:[2 3 4 5 6 7 8] cc = np.linspace(2, 5, 4) print(cc) # 运行结果为:[2. 3. 4. 5.] dd = np.logspace(1, 4, 4, base=2) # base控制的是几次方 print(dd) # 运行结果为:[ 2. 4. 8. 16.]- 1
- 2
- 3
- 4
- 5
- 6
- 7
- 8
- 9
- 10
- 11
- 12
- 13
- 14
- 15
- 16
- 17
- 18
- 19
- 20
- 21
- 22
- 23
- 24
- 25
- 26
- 27
- 28
- 29
- 30
- 31
- 32
- 33
综合运用【ones、zeros、empty、ones_like】
# 综合运用【ones、zeros、empty、ones_like】 import numpy as np a = np.ones(6, dtype=int) print(a) # 运行结果为:[1 1 1 1 1 1] b = np.ones((6,), dtype=int) print(b) # 运行结果为:[1 1 1 1 1 1] c = np.ones((3, 1)) print(c) # 输出3行一列的数组 # 运行结果为: # [[1.] # [1.] # [1.]] d = np.zeros(4) print(d) # 运行结果为:[0. 0. 0. 0.] e = np.empty(3) print(e) # 生成3个元素的空数组行向量 # 运行结果为:[1. 1. 1.] f = np.eye(3) print(f) # 生成3阶单位阵 # 运行结果为: # [[1. 0. 0.] # [0. 1. 0.] # [0. 0. 1.]] g = np.eye(3, k=1) print(g) # 生成第k对角线的元素为1,其他元素为0的3阶方阵 # 运行结果为: # [[0. 1. 0.] # [0. 0. 1.] # [0. 0. 0.]] h = np.zeros_like(b) print(h) # 生成与a同维数的全0数组 # 运行结果为:[0 0 0 0 0 0]- 1
- 2
- 3
- 4
- 5
- 6
- 7
- 8
- 9
- 10
- 11
- 12
- 13
- 14
- 15
- 16
- 17
- 18
- 19
- 20
- 21
- 22
- 23
- 24
- 25
- 26
- 27
- 28
- 29
- 30
- 31
- 32
- 33
- 34
- 35
- 36
- 37
- 38
- 39
- 40
- 41
- 42
- 43
3 NumPy 切片和索引
# -*- coding = utf-8 -*- # @Time : 2022/6/29 14:30 # @Author : lxw_pro # @File : Numpy 切片和索引-6.py # @Software : PyCharm # NumPy 切片和索引 ''' ndarray对象的内容可以通过索引或切片来访问和修改,与 Python 中 list 的切片操作一样。 ndarray 数组可以基于 0 - n 的下标进行索引, 切片对象可以通过内置的 slice 函数,并设置 start, stop 及 step 参数进行,从原数组中切割出一个新数组 ''' import numpy as np # 通过 arange() 函数创建 ndarray 对象 a = np.arange(10) lxw = slice(2, 9, 3) # 索引从2到9,间隔为3 print(a[lxw]) # [2 5 8] # 通过切片操作 a = np.arange(10) lxw2 = a[2:9:3] # 这里的切片操作和Python中list的操作是一样的 print(lxw2) # [2 5 8] # 比如: import numpy as np lxw3 = np.arange(10) print(lxw3[6]) # 6 print(lxw3[6:]) # [6 7 8 9] print(lxw3[2:7]) # [2 3 4 5 6] # 多维数组同样适用上述索引提取方法 import numpy as np lxw4 = np.array([ [6, 6, 6], [5, 2, 0], [5, 8, 9] ]) print(lxw4) print(lxw4[1:]) # 切片还可以包括省略号 …,来使选择元组的长度与数组的维度相同。 # 如果在行位置使用省略号,它将返回包含行中元素的 ndarray import numpy as np lxw5 = np.array([ [1, 2, 9], [2, 5, 4], [3, 4, 8] ]) print(lxw5[1, ...]) # [2 5 4] 第二行元素 print(lxw5[..., 2]) # [9 4 8] 第三列元素 print(lxw5[1:, ...]) # 第二行及剩下元素 print(lxw5[..., 1:]) # 第二列及剩下元素- 1
- 2
- 3
- 4
- 5
- 6
- 7
- 8
- 9
- 10
- 11
- 12
- 13
- 14
- 15
- 16
- 17
- 18
- 19
- 20
- 21
- 22
- 23
- 24
- 25
- 26
- 27
- 28
- 29
- 30
- 31
- 32
- 33
- 34
- 35
- 36
- 37
- 38
- 39
- 40
- 41
- 42
- 43
- 44
- 45
- 46
- 47
- 48
- 49
- 50
- 51
- 52
- 53
- 54
- 55
- 56
- 57
- 58
- 59
- 60
- 61
- 62
- 63
- 64
- 65
- 66
- 67
- 68
- 69
- 70
- 71
- 72
- 73
- 74
- 75
4 NumPy 高级索引
Numpy中的
array数组与Python基础数据结构列表(list)的区别是:- 列表中的元素可以是不同的数据类型
- array数组只允许存储相同的数据类型
NumPy 比一般的 Python 序列提供更多的索引方式。
除了之前看到的用整数和切片的索引外,数组可以由
- 整数数组索引
- 布尔索引
- 花式索引
1-整数数组索引
# 1-整数数组索引 import numpy as np b = np.array([ [6, 2, 9], [4, 3, 9], [5, 2, 3] ]) lxw6 = b[ [0, 1, 2], [1, 2, 1] ] print(lxw6) # 输出 [2 9 2] # 获取四个角元素 import numpy as np aq = np.array([ [1, 2, 3, 4], [2, 3, 4, 5], [3, 4, 5, 6], [4, 5, 6, 7] ]) print(aq) hj = np.array([[0, 0], [3, 3]]) lj = np.array([[0, 3], [0, 3]]) yq = aq[hj, lj] print(yq) print() # 可借助切片 : 或 … 与索引数组组合: import numpy as np jz = np.array([ [3, 5, 9], [5, 2, 6], [2, 9, 8] ]) jz1 = jz[:2, :2] print(jz1) jz2 = jz[:2, [0, 1]] print(jz2) jz3 = jz[..., 1:] print(jz3)- 1
- 2
- 3
- 4
- 5
- 6
- 7
- 8
- 9
- 10
- 11
- 12
- 13
- 14
- 15
- 16
- 17
- 18
- 19
- 20
- 21
- 22
- 23
- 24
- 25
- 26
- 27
- 28
- 29
- 30
- 31
- 32
- 33
- 34
- 35
- 36
- 37
- 38
- 39
- 40
- 41
- 42
- 43
- 44
- 45
- 46
- 47
- 48
- 49
- 50
- 51
- 52
- 53
- 54
- 55
- 56
- 57
2-布尔索引
# 布尔索引 # 布尔索引可通过布尔运算(如:比较运算符)来获取符合指定条件的元素的数组 # 获取大于5的元素: import numpy as np br = np.array([ [6, 7, 8], [5, 2, 1], [6, 6, 9], [2, 4, 5] ]) print(br) print(br[br > 5]) # 输出 [6 7 8 6 6 9] # 使用 ~(取补运算符)来过滤 NaN: import numpy as np bu = np.array([5, np.nan, 2, 0, np.nan, np.nan, 5, 8]) print(bu[~np.isnan(bu)]) # 输出 [5. 2. 0. 5. 8.] # 从数组中过滤掉非复数元素: import numpy as np lv = np.array([2+2.9j, 4, 9, 2+8.2j, 8]) print(lv[np.iscomplex(lv)]) # 输出 [2.+2.9j 2.+8.2j]- 1
- 2
- 3
- 4
- 5
- 6
- 7
- 8
- 9
- 10
- 11
- 12
- 13
- 14
- 15
- 16
- 17
- 18
- 19
- 20
- 21
- 22
- 23
- 24
- 25
- 26
- 27
- 28
- 29
- 30
- 31
- 32
3-花式索引
# 花式索引【利用整数数组进行索引】 # 花式索引根据索引数组的值作为目标数组的某个轴的下标来取值。 # 对于使用一维整型数组作为索引,如果目标是一维数组,那么索引的结果就是对应下标的行, # 如果目标是二维数组,那么就是对应位置的元素。 # 注:花式索引跟切片不一样,它总是将数据复制到新数组中。 # 1.传入顺序索引数组 import numpy as np sx = np.arange(32).reshape(8, 4) print(sx[[5, 2, 1, 6]]) # 2.传入倒序索引数组 import numpy as np dx = np.arange(32).reshape(8, 4) print(dx[[-5, -2, -1, -6]]) # 3.传入多个索引数组(要使用np.ix_) import numpy as np dg = np.arange(32).reshape(8, 4) print(dg[np.ix_([2, 3, 5, 1], [3, 2, 0, 1])])- 1
- 2
- 3
- 4
- 5
- 6
- 7
- 8
- 9
- 10
- 11
- 12
- 13
- 14
- 15
- 16
- 17
- 18
- 19
- 20
- 21
- 22
- 23
- 24
- 25
- 26
三个实用小方法:
- 条件加小括号
- 使用np.logical_and方法
- 使用np.all方法
import numpy as np sy = np.array([ [3, 5, 6], [2, 6, 2], [5, 2, 0], [3, 3, 4] ]) # 原数组 print(sy) # 1- print(sy[(sy > 3) & (sy < 6)]) # 条件记得加小括号 # 2- print(sy[np.logical_and(sy > 3, sy < 6)]) # 3- print(sy[np.all([sy > 3, sy < 6], axis=0)])- 1
- 2
- 3
- 4
- 5
- 6
- 7
- 8
- 9
- 10
- 11
- 12
- 13
- 14
- 15
- 16
- 17
- 18
- 19
- 20
- 21
- 22
综合运用【数组元素的索引】:
相关代码如下:
import numpy as np x = np.arange(16).reshape(4, 4) print(x) # 生成4行4列的数组 x2 = x[2][1] print(x2) # 输出 9 x3 = x[2, 1] print(x3) # 输出 9 x4 = x[1:2, 2:4] print(x4) # 输出 [[6 7]] xx = np.array([0, 1, 2, 1]) print(x[xx == 1]) # 输出x的第2、4行元素- 1
- 2
- 3
- 4
- 5
- 6
- 7
- 8
- 9
- 10
- 11
- 12
- 13
- 14
- 15
- 16
- 17
- 18
—————————————————————————————————
Pandas学习(续)
# -*- coding = utf-8 -*- # @Time : 2022/6/29 18:19 # @Author : lxw_pro # @File : Pandas库学习.py # @Software : PyCharm # Pandas学习(续) # Pandas库是在Numpy库基础上开发的一种数据分析工具 ''' Pandas主要提供了三种数据结构: 1-Series: 带标签的一维数组 2-DataFrame: 带标签且大小可变得二维表格结构 3-Panel: 带标签且大小可变得三维数组 ''' # 生成二维数组 # 生成服从标准正态分布的24*4随机数矩阵,并保存为DataFrame数据结构。 import pandas as pd import numpy as np dates = pd.date_range(start='20220622', end='20220707', freq='D') print(dates)- 1
- 2
- 3
- 4
- 5
- 6
- 7
- 8
- 9
- 10
- 11
- 12
- 13
- 14
- 15
- 16
- 17
- 18
- 19
- 20
- 21
- 22
- 23
- 24
- 25
运行效果如下:

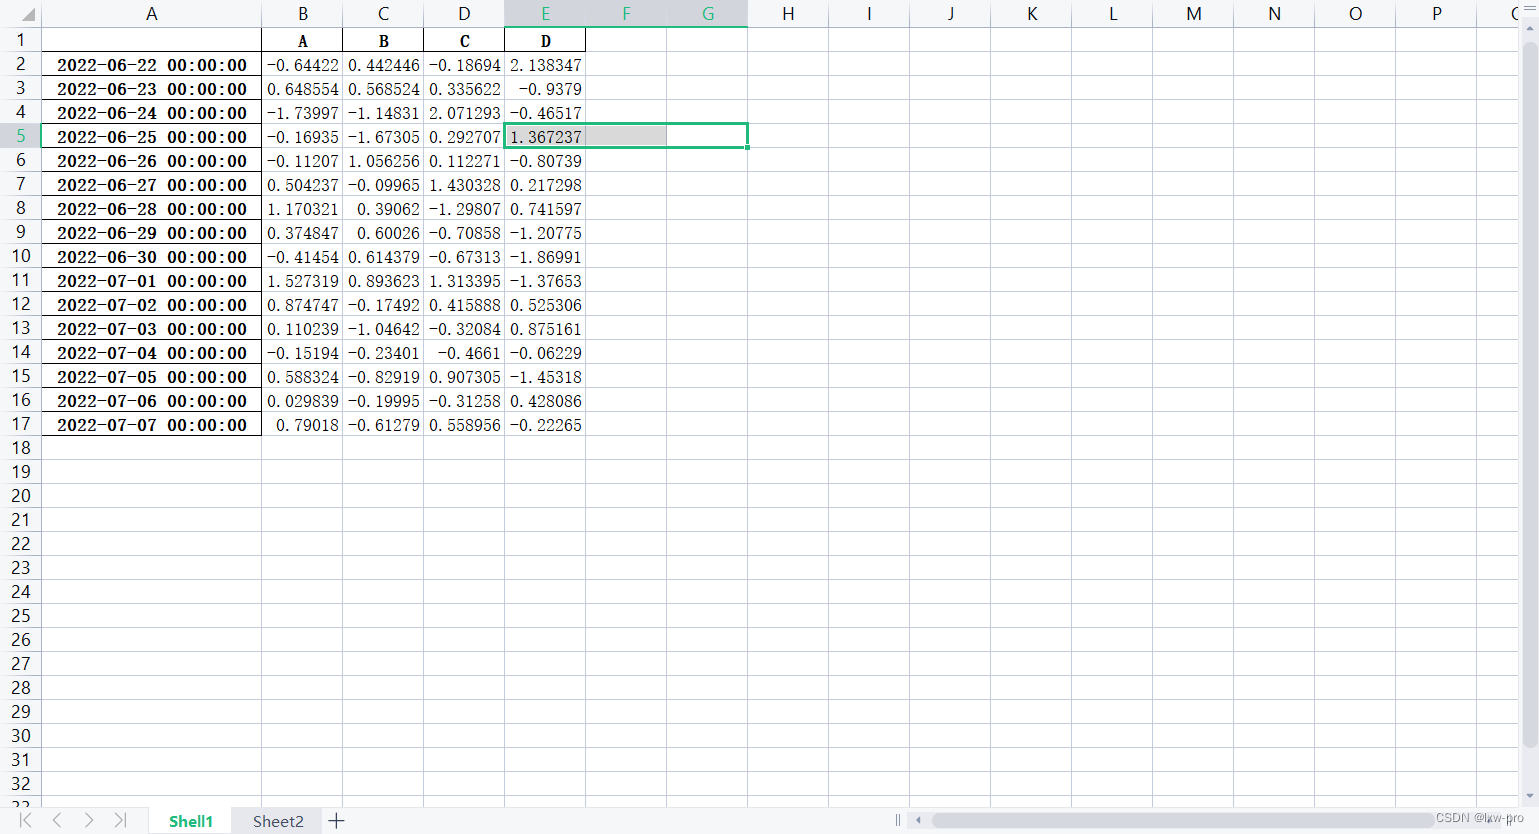
lxw1 = pd.DataFrame(np.random.randn(16, 4), index=dates, columns=list('ABCD')) lxw2 = pd.DataFrame(np.random.randn(16, 4)) print(lxw1) print(lxw2)- 1
- 2
- 3
- 4
运行结果如下:


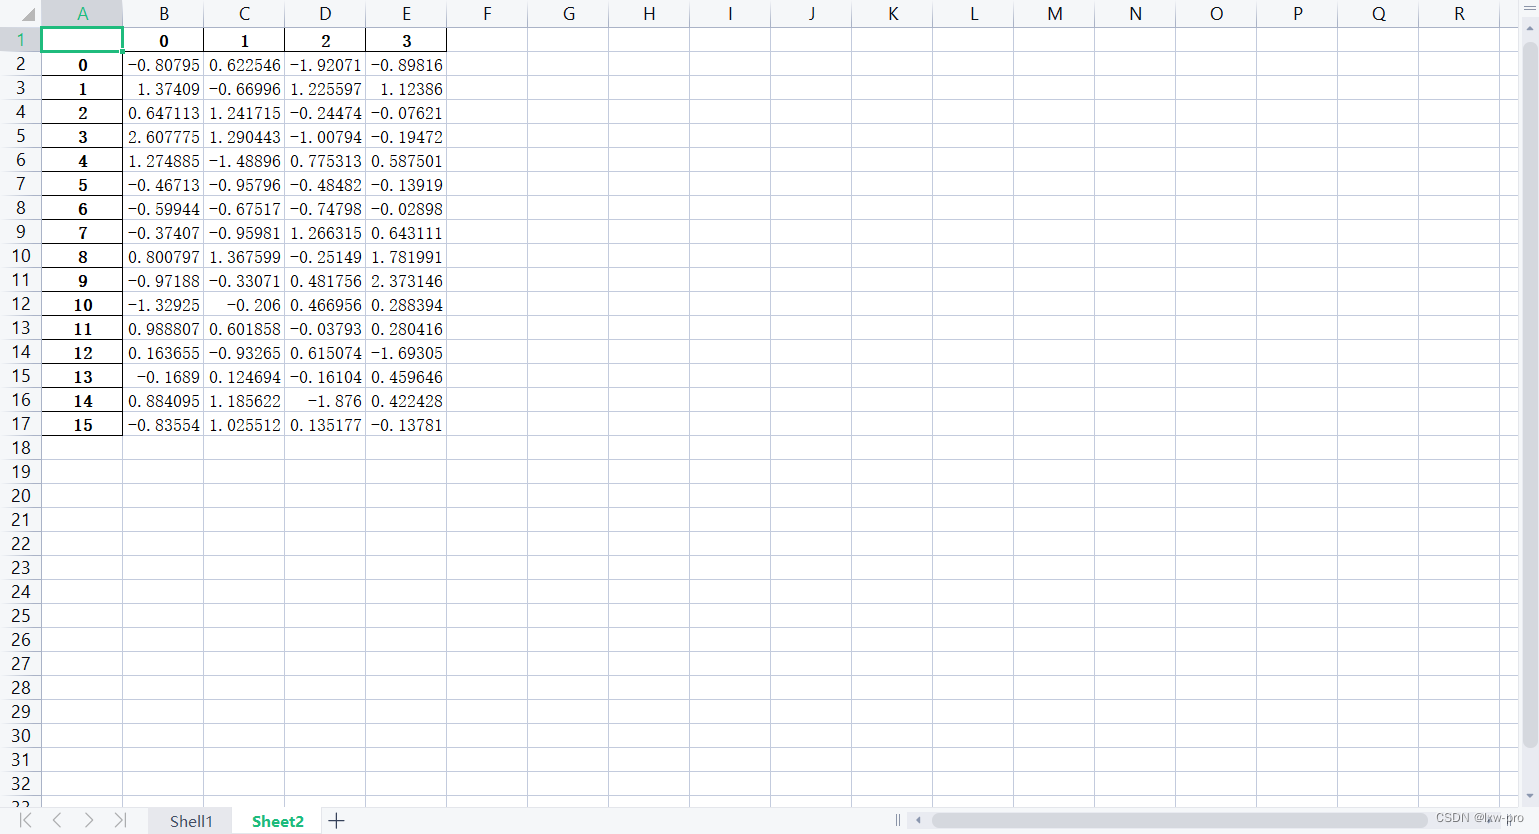
1 将数据写入excel、csv文件
# 将lxw1的数据写入excel文件 lxw1.to_excel('假期培训时间.xlsx') lxw1.to_excel("时间任意.xlsx", index=False) # 不包含行索引 # 将lxw2的数据写入csv文件 lxw2.to_csv('假期培训时间.csv') lxw2.to_csv("时间随意.csv", index=False) # 不包含行索引 # 创建文件对象 f = pd.ExcelWriter('培训时间(格式).xlsx') # 把lxw1写入Excel文件 lxw1.to_excel(f, "Shell1") # 把lxw2写入Excel文件 lxw2.to_excel(f, "Sheet2") f.save()- 1
- 2
- 3
- 4
- 5
- 6
- 7
- 8
- 9
- 10
- 11
- 12
- 13
- 14
- 15
- 16
- 17
- 18
- 19
- 20
部分效果图如下:
# 从文件中读入数据: import pandas as pd lxw3 = pd.read_csv("假期培训时间.csv", usecols=range(1, 4)) print(lxw3)- 1
- 2
- 3
- 4
- 5
运行结果如下:

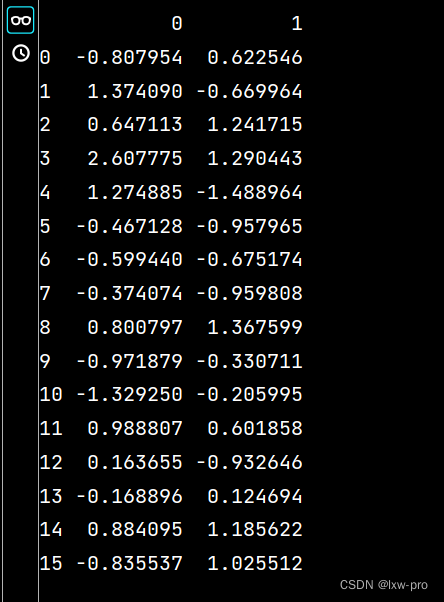
lxw4 = pd.read_excel("培训时间(格式).xlsx", "Sheet2", usecols=range(1, 3)) print(lxw4)- 1
- 2
2 数据的一些预处理
# 数据的一些预处理 # DataFrame数据的拆分、合并和分组计算: import pandas as pd import numpy as np lxw5 = pd.DataFrame(np.random.randint(1, 6, (10, 4)), columns=list('ABCD')) print(lxw5)- 1
- 2
- 3
- 4
- 5
- 6
- 7
- 8

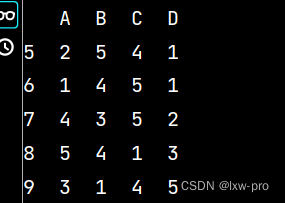
lxww = lxw5[:5] # 获取前五行数据 print(lxww)- 1
- 2

lxwy = lxw5[5:] # 获取第六行以后的数据 print(lxwy)- 1
- 2
wy = pd.concat([lxww, lxwy]) # 数据行合并 print(wy)- 1
- 2

q1 = lxw5.groupby('A').mean() # 数据分组求均值 print(np.around(q1, decimals=2)) # decimals表示保留几位小数- 1
- 2

q2 = lxw5.groupby('A').apply(sum) # 数据分组求和 print(q2)- 1
- 2

3 数据的选取与操作
# 数据的选取与操作 ''' 对DataFrame进行选取,要从3个层次考虑:行列、区域、单元格 1-选用中括号[]选取行列 2-使用行和列的名称进行标签定位的df.loc[] 3-使用整型索引(绝对位置索引)的df.iloc[] 当然,在数据预处理中,需要对缺失值等进行一些特殊处理 ''' # 数据操作: import pandas as pd import numpy as np qq = pd.DataFrame(np.random.randint(1, 5, (6, 4)), index=['a', 'b', 'c', 'd', 'e', 'f'], columns=['one', 'two', 'three', 'four']) qq.loc['c', 'two'] = np.nan # 修改第三行第二列的数据 print(qq)- 1
- 2
- 3
- 4
- 5
- 6
- 7
- 8
- 9
- 10
- 11
- 12
- 13
- 14
- 15
- 16
- 17
- 18
- 19
- 20

ww = qq.iloc[1:4, 0:2] # 提取第二、三、四行,第一、二列数据 print(ww)- 1
- 2

qq['five'] = 'lxw' # 增加第五列数据 print(qq)- 1
- 2

qq2 = qq.reindex(['a', 'b', 'c', 'd', 'e', 'f', 'g']) # 增加行名 print(qq2)- 1
- 2

qq3 = qq2.dropna() # 删除有不确定值的行 print(qq3) # 从输出不难看出,删除了c行和g行- 1
- 2

遇到的问题:
1-代码运行错误是很正常的事,只要自己能解决,那迟早也是对的,是吧!每次运行错误,我都会自己先找找原因,要么多看几眼代码,要么直接复制运行报错的代码,去百度翻译自己查查是什么意思,在结合意思查询相关资料以修正代码!
2-后面再去看看【模型与算法】,发现 自己所存储的知识不够,所以还得继续学习新的知识,一次一次地突破!
总结:
面临着一次次的运行错误,一次又一次的解决,或许解决的难题越多,你懂的就会越来越多吧,就如同你经历的一样,你经历的越多,知道的就越多!
上一章链接:【数学建模学习笔记【集训十天】之第二天】
每日一言
当你紧握双手,里面什么也没有。当你打开双手,世界都在你手中。很多时候我们都应该懂得舍弃,紧握双手,肯定是什么也没有,打开双手,至少还有希望。勇于放弃者精明,乐于放弃者聪明,善于放弃者高明!!!
持续更新中…
-
相关阅读:
vue + video.js 加载多种视频流(HLS、FLV、RTMP、RTSP)
Java高级-stream流
【阿里云】任务2-OSS对象存储教程(找我参加活动可获得京东卡奖励)
Windows Docker Desktop安装K8S
【Docker】企业中 Docker 的 Dockerfile 用法及作用详解
阿里云直播推流和播流地址的生成方法PHP
计算机原理-数据
计算机毕业论文微信小程序毕业设计SSM校园生活小助手+后台管理系统|前后分离VUE校园网站[包运行成功]
成功上岸,刚转行自学Python的小姑娘,每个月入1W+......
固态硬盘跟机械硬盘有什么区别?
- 原文地址:https://blog.csdn.net/m0_66318554/article/details/125515355
