-
YYGH-9-预约下单
预约下单
之前我们做到了

分析
下单参数:就诊人id与排班id
1、下单我们要获取就诊人信息
2、获取排班下单信息与规则信息
3、获取医院签名信息,然后通过接口去医院预约下单
4、下单成功更新排班信息与发送短信
封装Feign
现在到了点击确认挂号,我们就需要,在订单表生成订单
先来看一下订单表结构

我们发现现在这个订单交易号肯定是订单模块自己生成,有一些数据是需要从hosp模块取得,还有一部分就诊人信息是需要在user模块获得我们先来写这2个模块的Feign
userFeign
操作模块:service-user
controller
//通过feign根据id获取就诊人信息 @GetMapping("/inner/get/{id}") public Patient innerFindByid(@PathVariable("id") Long id){ return patientService.getPatientId(id); }- 1
- 2
- 3
- 4
- 5
service
@Override public Patient getPatientId(Long id) { Patient patient = baseMapper.selectById(id); this.packPatient(patient); return patient; }- 1
- 2
- 3
- 4
- 5
- 6
搭建service-user-client模块
@FeignClient(value = "service-user") @Repository public interface PatientFeignClient { //根据就诊人id获取就诊人信息 @GetMapping("/api/user/patient/inner/get/{id}") public Patient getPatientOrder(@PathVariable("id") Long id); }- 1
- 2
- 3
- 4
- 5
- 6
- 7
- 8
- 9
hospFeign
操作模块:service-hosp
controller
@GetMapping("inner/getScheduleOrderVo/{scheduleId}") public ScheduleOrderVo getScheduleOrderVo(@PathVariable String scheduleId) { return scheduleService.getScheduleOrderVo(scheduleId); } @GetMapping("inner/getSignInfoVo/{hoscode}") public SignInfoVo getSignInfoVo( @ApiParam(name = "hoscode", value = "医院code", required = true) @PathVariable("hoscode") String hoscode) { return hospitalSetService.getSignInfoVo(hoscode); }- 1
- 2
- 3
- 4
- 5
- 6
- 7
- 8
- 9
- 10
- 11
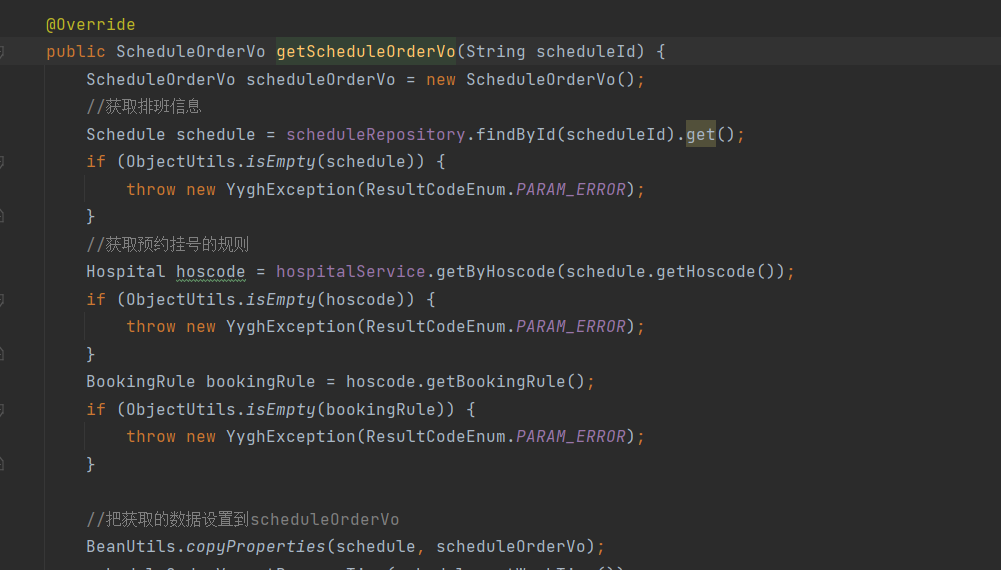
service
@Override public ScheduleOrderVo getScheduleOrderVo(String scheduleId) { ScheduleOrderVo scheduleOrderVo = new ScheduleOrderVo(); //获取排班信息 Schedule schedule = scheduleRepository.findById(scheduleId).get(); if (ObjectUtils.isEmpty(schedule)) { throw new YyghException(ResultCodeEnum.PARAM_ERROR); } //获取预约挂号的规则 Hospital hoscode = hospitalService.getByHoscode(schedule.getHoscode()); if (ObjectUtils.isEmpty(hoscode)) { throw new YyghException(ResultCodeEnum.PARAM_ERROR); } BookingRule bookingRule = hoscode.getBookingRule(); if (ObjectUtils.isEmpty(bookingRule)) { throw new YyghException(ResultCodeEnum.PARAM_ERROR); } //把获取的数据设置到scheduleOrderVo BeanUtils.copyProperties(schedule, scheduleOrderVo); scheduleOrderVo.setHosname(hospitalService.getHospName(schedule.getHoscode())); scheduleOrderVo.setDepname(departmentService.getDepName(schedule.getHoscode(), schedule.getDepcode())); //退号截止天数(如:就诊前一天为-1,当天为0) int quitDay = bookingRule.getQuitDay(); DateTime startTime = getDateTime(scheduleOrderVo, schedule, bookingRule, quitDay); scheduleOrderVo.setStartTime(startTime.toDate()); return scheduleOrderVo; }- 1
- 2
- 3
- 4
- 5
- 6
- 7
- 8
- 9
- 10
- 11
- 12
- 13
- 14
- 15
- 16
- 17
- 18
- 19
- 20
- 21
- 22
- 23
- 24
- 25
- 26
- 27
- 28
@Override public SignInfoVo getSignInfoVo(String hoscode) { QueryWrapper<HospitalSet> queryWrapper = new QueryWrapper(); queryWrapper.eq("hoscode", hoscode); HospitalSet hospitalSet = baseMapper.selectOne(queryWrapper); SignInfoVo signInfoVo = new SignInfoVo(); signInfoVo.setApiUrl(hospitalSet.getApiUrl()); signInfoVo.setSignKey(hospitalSet.getSignKey()); return signInfoVo; }- 1
- 2
- 3
- 4
- 5
- 6
- 7
- 8
- 9
- 10
搭建service-hosp-client模块
@FeignClient(value = "service-hosp") @Repository public interface HospitalFeignClient { /** * 根据排班id获取预约下单数据 */ @GetMapping("/api/hosp/hospital/inner/getScheduleOrderVo/{scheduleId}") ScheduleOrderVo getScheduleOrderVo(@PathVariable("scheduleId") String scheduleId); /** * 获取医院签名信息 */ @GetMapping("/api/hosp/hospital/inner/getSignInfoVo/{hoscode}") SignInfoVo getSignInfoVo(@PathVariable("hoscode") String hoscode); }- 1
- 2
- 3
- 4
- 5
- 6
- 7
- 8
- 9
- 10
- 11
- 12
- 13
- 14
- 15
- 16
- 17
构建Order模块
搭建service-order
pom.xml引入依赖
<dependency> <groupId>com.example</groupId> <artifactId>service_cmn_client</artifactId> <version>0.0.1-SNAPSHOT</version> </dependency> <dependency> <groupId>com.example</groupId> <artifactId>service_user_client</artifactId> <version>0.0.1-SNAPSHOT</version> </dependency> <dependency> <groupId>com.example</groupId> <artifactId>service_hosp_client</artifactId> <version>0.0.1-SNAPSHOT</version> </dependency>- 1
- 2
- 3
- 4
- 5
- 6
- 7
- 8
- 9
- 10
- 11
- 12
- 13
- 14
- 15
添加配置文件
# 服务端口 server.port=8206 # 服务名 spring.application.name=service-order # 环境设置:dev、test、prod spring.profiles.active=dev # mysql数据库连接 spring.datasource.driver-class-name=com.mysql.jdbc.Driver spring.datasource.url=jdbc:mysql: spring.datasource.username= spring.datasource.password= #返回json的全局时间格式 spring.jackson.date-format=yyyy-MM-dd HH:mm:ss spring.jackson.time-zone=GMT+8 spring.data.mongodb.uri=mongodb: # nacos服务地址 spring.cloud.nacos.discovery.server-addr=127.0.0.1:8848 #rabbitmq地址 spring.rabbitmq.host=192.168.44.165 spring.rabbitmq.port=5672 spring.rabbitmq.username=guest spring.rabbitmq.password=guest- 1
- 2
- 3
- 4
- 5
- 6
- 7
- 8
- 9
- 10
- 11
- 12
- 13
- 14
- 15
- 16
- 17
- 18
- 19
- 20
- 21
- 22
- 23
- 24
- 25
- 26
- 27
启动类
@EnableDiscoveryClient//注册服务 @SpringBootApplication @ComponentScan(basePackages = "com.example") //swagger扫描文件 @EnableFeignClients(basePackages = "com.example") public class ServiceOrderApplication { public static void main(String[] args) { SpringApplication.run(ServiceOrderApplication.class,args); } }- 1
- 2
- 3
- 4
- 5
- 6
- 7
- 8
- 9
配置网关
#设置路由id spring.cloud.gateway.routes[6].id=service-order #设置路由的uri spring.cloud.gateway.routes[6].uri=lb://service-order #设置路由断言,代理servicerId为auth-service的/auth/路径 spring.cloud.gateway.routes[6].predicates= Path=/*/order/**- 1
- 2
- 3
- 4
- 5
- 6
这是我们的项目目录

controller
@RestController @RequestMapping("/api/order/orderInfo") public class OrderApiController { @Autowired private OrderService orderService; //生成挂号订单 @PostMapping("auth/submitOrder/{scheduleId}/{patientId}") public Result saveOrder(@PathVariable String scheduleId, @PathVariable Long patientId) { Long orderId = orderService.saveOrder(scheduleId,patientId); return Result.ok(orderId); } }- 1
- 2
- 3
- 4
- 5
- 6
- 7
- 8
- 9
- 10
- 11
- 12
- 13
- 14
- 15
service
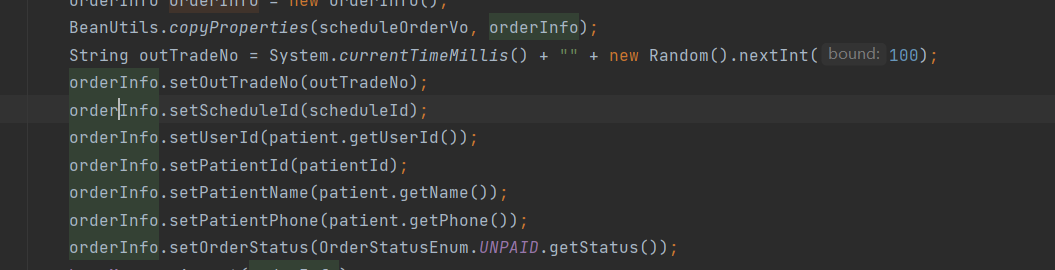
@Service public class OrderInfoImpl extends ServiceImpl<OrderMapper, OrderInfo> implements OrderService { @Autowired private PatientFeignClient patientFeignClient; @Autowired private HospitalFeignClient hospitalFeignClient; @Override public Long saveOrder(String scheduleId, Long patientId) { //获取就诊人信息 Patient patient = patientFeignClient.getPatientOrder(patientId); //获取排班相关信息 ScheduleOrderVo scheduleOrderVo = hospitalFeignClient.getScheduleOrderVo(scheduleId); //判断时间是否可以预约 if (new DateTime(scheduleOrderVo.getStartTime()).isAfterNow() || new DateTime(scheduleOrderVo.getEndTime()).isBeforeNow()) { throw new YyghException(ResultCodeEnum.TIME_NO); } //获取签名信息 SignInfoVo signInfoVo = hospitalFeignClient.getSignInfoVo(scheduleOrderVo.getHoscode()); //添加到订单表 OrderInfo orderInfo = new OrderInfo(); BeanUtils.copyProperties(scheduleOrderVo, orderInfo); String outTradeNo = System.currentTimeMillis() + "" + new Random().nextInt(100); orderInfo.setOutTradeNo(outTradeNo); orderInfo.setScheduleId(scheduleId); orderInfo.setUserId(patient.getUserId()); orderInfo.setPatientId(patientId); orderInfo.setPatientName(patient.getName()); orderInfo.setPatientPhone(patient.getPhone()); orderInfo.setOrderStatus(OrderStatusEnum.UNPAID.getStatus()); baseMapper.insert(orderInfo); //调用医院接口,实现预约挂号操作 //先设置调用医院接口需要参数,添加放到map集合 Map<String, Object> paramMap = hospParameter(patient, signInfoVo, orderInfo); //请求医院系统接口 JSONObject result = HttpRequestHelper.sendRequest(paramMap, signInfoVo.getApiUrl() + "/order/submitOrder"); //如果成功 if (result.getInteger("code") == 200) { updateOrder(orderInfo, result); } else { throw new YyghException(result.getString("message"), ResultCodeEnum.FAIL.getCode()); } return orderInfo.getId(); } private void updateOrder(OrderInfo orderInfo, JSONObject result) { JSONObject jsonObject = result.getJSONObject("data"); //预约记录唯一标识(医院预约记录主键) String hosRecordId = jsonObject.getString("hosRecordId"); //预约序号 Integer number = jsonObject.getInteger("number"); //取号时间 String fetchTime = jsonObject.getString("fetchTime"); //取号地址 String fetchAddress = jsonObject.getString("fetchAddress"); //更新订单 orderInfo.setHosRecordId(hosRecordId); orderInfo.setNumber(number); orderInfo.setFetchTime(fetchTime); orderInfo.setFetchAddress(fetchAddress); baseMapper.updateById(orderInfo); //排班可预约数 Integer reservedNumber = jsonObject.getInteger("reservedNumber"); //排班剩余预约数 Integer availableNumber = jsonObject.getInteger("availableNumber"); //发送mq信息更新号源和短信通知 } //设置医院请求参数 private Map<String, Object> hospParameter(Patient patient, SignInfoVo signInfoVo, OrderInfo orderInfo) { Map<String, Object> paramMap = new HashMap<>(); paramMap.put("hoscode", orderInfo.getHoscode()); paramMap.put("depcode", orderInfo.getDepcode()); paramMap.put("hosScheduleId", orderInfo.getScheduleId()); paramMap.put("reserveDate", new DateTime(orderInfo.getReserveDate()).toString("yyyy-MM-dd")); paramMap.put("reserveTime", orderInfo.getReserveTime()); paramMap.put("amount", orderInfo.getAmount()); paramMap.put("name", patient.getName()); paramMap.put("certificatesType", patient.getCertificatesType()); paramMap.put("certificatesNo", patient.getCertificatesNo()); paramMap.put("sex", patient.getSex()); paramMap.put("birthdate", patient.getBirthdate()); paramMap.put("phone", patient.getPhone()); paramMap.put("isMarry", patient.getIsMarry()); paramMap.put("provinceCode", patient.getProvinceCode()); paramMap.put("cityCode", patient.getCityCode()); paramMap.put("districtCode", patient.getDistrictCode()); paramMap.put("address", patient.getAddress()); //联系人 paramMap.put("contactsName", patient.getContactsName()); paramMap.put("contactsCertificatesType", patient.getContactsCertificatesType()); paramMap.put("contactsCertificatesNo", patient.getContactsCertificatesNo()); paramMap.put("contactsPhone", patient.getContactsPhone()); paramMap.put("timestamp", HttpRequestHelper.getTimestamp()); String sign = HttpRequestHelper.getSign(paramMap, signInfoVo.getSignKey()); paramMap.put("sign", sign); return paramMap; } }- 1
- 2
- 3
- 4
- 5
- 6
- 7
- 8
- 9
- 10
- 11
- 12
- 13
- 14
- 15
- 16
- 17
- 18
- 19
- 20
- 21
- 22
- 23
- 24
- 25
- 26
- 27
- 28
- 29
- 30
- 31
- 32
- 33
- 34
- 35
- 36
- 37
- 38
- 39
- 40
- 41
- 42
- 43
- 44
- 45
- 46
- 47
- 48
- 49
- 50
- 51
- 52
- 53
- 54
- 55
- 56
- 57
- 58
- 59
- 60
- 61
- 62
- 63
- 64
- 65
- 66
- 67
- 68
- 69
- 70
- 71
- 72
- 73
- 74
- 75
- 76
- 77
- 78
- 79
- 80
- 81
- 82
- 83
- 84
- 85
- 86
- 87
- 88
- 89
- 90
- 91
- 92
- 93
- 94
- 95
- 96
- 97
- 98
- 99
- 100
- 101
- 102
- 103
- 104
- 105
- 106
- 107
前端
封装api请求
添加/api/order/orderInfo.js文件,定义下单接口
import request from '@/utils/request' const api_name = `/api/order/orderInfo` export default { submitOrder(scheduleId, patientId) { return request({ url: `${api_name}/auth/submitOrder/${scheduleId}/${patientId}`, method: 'post' }) } }- 1
- 2
- 3
- 4
- 5
- 6
- 7
- 8
- 9
- 10
- 11
- 12
在/pages/hosp/booking.vue组件完善下单方法
submitOrder() { if(this.patient.id == null) { this.$message.error('请选择就诊人') return } // 防止重复提交 if(this.submitBnt == '正在提交...') { this.$message.error('重复提交') return } this.submitBnt = '正在提交...' orderInfoApi.submitOrder(this.scheduleId, this.patient.id).then(response => { let orderId = response.data window.location.href = '/order/show?orderId=' + orderId }).catch(e => { this.submitBnt = '确认挂号' }) },- 1
- 2
- 3
- 4
- 5
- 6
- 7
- 8
- 9
- 10
- 11
- 12
- 13
- 14
- 15
- 16
- 17
- 18
- 19
整合RabbitMQ
这里我们的思路是
1.构建一个rabbit-util,方便其他模块调用
2.在order模块中,当订单更新完之后,推送rabbit消息
3.在hosp模块中添加一个rabbit的消费者,当接受到order模块的消息之后更新hosp系统的库存同时给邮件发送模块推送rabbit消息
4.在msm模块中添加一个rabbit的消费者,当接受到hosp模块的消息之后,发送给预约人邮件
构建rabbit-util
由于之后有很多模块会用的mq所以我们建立一个rabbit-uitl的模块方便其他微服务调用,这是结构

配置文件
<!--rabbitmq消息队列--> <dependency> <groupId>org.springframework.boot</groupId> <artifactId>spring-boot-starter-actuator</artifactId> </dependency> <dependency> <groupId>org.springframework.cloud</groupId> <artifactId>spring-cloud-starter-bus-amqp</artifactId> </dependency> <dependency> <groupId>com.alibaba</groupId> <artifactId>fastjson</artifactId> </dependency>- 1
- 2
- 3
- 4
- 5
- 6
- 7
- 8
- 9
- 10
- 11
- 12
- 13
service
@Service public class RabbitService { @Autowired private RabbitTemplate rabbitTemplate; /** * 发送消息 * * @param exchange 交换机 * @param routingKey 路由键 * @param message 消息 */ public boolean sendMessage(String exchange, String routingKey, Object message) { rabbitTemplate.convertAndSend(exchange, routingKey, message); return true; } }- 1
- 2
- 3
- 4
- 5
- 6
- 7
- 8
- 9
- 10
- 11
- 12
- 13
- 14
- 15
- 16
- 17
const
public class MqConst { /** * 预约下单 */ public static final String EXCHANGE_DIRECT_ORDER = "exchange.direct.order"; public static final String ROUTING_ORDER = "order"; //队列 public static final String QUEUE_ORDER = "queue.order"; /** * 短信 */ public static final String EXCHANGE_DIRECT_MSM = "exchange.direct.msm"; public static final String ROUTING_MSM_ITEM = "msm.item"; //队列 public static final String QUEUE_MSM_ITEM = "queue.msm.item"; }- 1
- 2
- 3
- 4
- 5
- 6
- 7
- 8
- 9
- 10
- 11
- 12
- 13
- 14
- 15
- 16
- 17
- 18
config
@Configuration public class MQConfig { @Bean public MessageConverter messageConverter(){ return new Jackson2JsonMessageConverter(); } }- 1
- 2
- 3
- 4
- 5
- 6
- 7
service-order

之前我们的模块做到这个地方了,补全我们的方法
OrderMqVo orderMqVo = new OrderMqVo(); orderMqVo.setScheduleId(scheduleId); orderMqVo.setReservedNumber(reservedNumber); orderMqVo.setAvailableNumber(availableNumber); //邮件提示 MsmVo msmVo = new MsmVo(); msmVo.setPhone(orderInfo.getPatientPhone()); String reserveDate = new DateTime(orderInfo.getReserveDate()).toString("yyyy-MM-dd") + (orderInfo.getReserveTime() == 0 ? "上午" : "下午"); Map<String, Object> param = new HashMap<String, Object>() {{ put("title", orderInfo.getHosname() + "|" + orderInfo.getDepname() + "|" + orderInfo.getTitle()); put("amount", orderInfo.getAmount()); put("reserveDate", reserveDate); put("name", orderInfo.getPatientName()); put("quitTime", new DateTime(orderInfo.getQuitTime()).toString("yyyy-MM-dd HH:mm")); }}; msmVo.setParam(param); orderMqVo.setMsmVo(msmVo); rabbitService.sendMessage(MqConst.EXCHANGE_DIRECT_ORDER, MqConst.ROUTING_ORDER, orderMqVo);- 1
- 2
- 3
- 4
- 5
- 6
- 7
- 8
- 9
- 10
- 11
- 12
- 13
- 14
- 15
- 16
- 17
- 18
- 19
- 20
- 21
service-hosp
hosp的监听器
@Component @Slf4j public class HospitalReceiver { @Autowired private ScheduleService scheduleService; @Autowired private RabbitService rabbitService; @RabbitListener(bindings = @QueueBinding( value = @Queue(value = MqConst.QUEUE_ORDER, durable = "true"), exchange = @Exchange(value = MqConst.EXCHANGE_DIRECT_ORDER), key = {MqConst.ROUTING_ORDER} )) public void receive(OrderMqVo orderMqVo, Message message, Channel channel) { log.info("接受到rabbitmq的消息开始更新下单数" + orderMqVo.toString()); //下单成功更新预约数 Schedule schedule = scheduleService.getSchedule(orderMqVo.getScheduleId()); schedule.setAvailableNumber(orderMqVo.getAvailableNumber()); schedule.setReservedNumber(orderMqVo.getReservedNumber()); scheduleService.update(schedule); //发送邮件 MsmVo msmVo = orderMqVo.getMsmVo(); if (!ObjectUtils.isEmpty(msmVo)) { rabbitService.sendMessage(MqConst.EXCHANGE_DIRECT_MSM, MqConst.ROUTING_MSM_ITEM, msmVo); } } }- 1
- 2
- 3
- 4
- 5
- 6
- 7
- 8
- 9
- 10
- 11
- 12
- 13
- 14
- 15
- 16
- 17
- 18
- 19
- 20
- 21
- 22
- 23
- 24
- 25
- 26
- 27
- 28
- 29
- 30
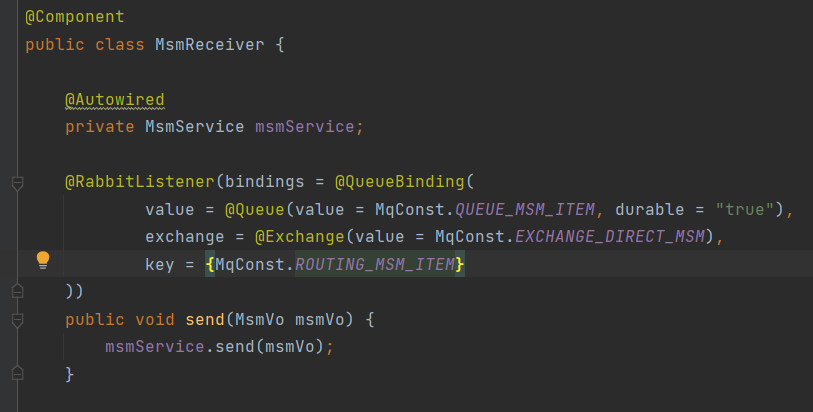
service-msm
@Component public class MsmReceiver { @Autowired private MsmService msmService; @RabbitListener(bindings = @QueueBinding( value = @Queue(value = MqConst.QUEUE_MSM_ITEM, durable = "true"), exchange = @Exchange(value = MqConst.EXCHANGE_DIRECT_MSM), key = {MqConst.ROUTING_MSM_ITEM} )) public void send(MsmVo msmVo) { msmService.send(msmVo); } }- 1
- 2
- 3
- 4
- 5
- 6
- 7
- 8
- 9
- 10
- 11
- 12
- 13
- 14
- 15
- 16
send方法
//关于mq发送短信的封装 @Override @Async public void send(MsmVo msmVo) { log.info(msmVo.getPhone()); //判断邮箱是否为空 if (StringUtils.isEmpty(msmVo.getPhone())) { return; } //1.创建一个简单的的消息邮件 SimpleMailMessage simpleMailMessage = new SimpleMailMessage(); simpleMailMessage.setSubject(msmVo.getParam().get("title") + "预约成功"); simpleMailMessage.setText(msmVo.getParam().get("name") + "的预约成功请于" + msmVo.getParam().get("reserveDate") + "到医院就诊" ); simpleMailMessage.setTo(msmVo.getPhone()); simpleMailMessage.setFrom("2590416618@qq.com"); javaMailSenderImpl.send(simpleMailMessage); }- 1
- 2
- 3
- 4
- 5
- 6
- 7
- 8
- 9
- 10
- 11
- 12
- 13
- 14
- 15
- 16
- 17
前端
添加/api/order/orderInfo.js文件,定义下单接口
import request from '@/utils/request' const api_name = `/api/order/orderInfo` export default { submitOrder(scheduleId, patientId) { return request({ url: `${api_name}/auth/submitOrder/${scheduleId}/${patientId}`, method: 'post' }) } }- 1
- 2
- 3
- 4
- 5
- 6
- 7
- 8
- 9
- 10
- 11
- 12
在/pages/hosp/booking.vue组件完善下单方法
submitOrder() { if(this.patient.id == null) { this.$message.error('请选择就诊人') return } // 防止重复提交 if(this.submitBnt == '正在提交...') { this.$message.error('重复提交') return } this.submitBnt = '正在提交...' orderInfoApi.submitOrder(this.scheduleId, this.patient.id).then(response => { let orderId = response.data window.location.href = '/order/show?orderId=' + orderId }).catch(e => { this.submitBnt = '确认挂号' }) },- 1
- 2
- 3
- 4
- 5
- 6
- 7
- 8
- 9
- 10
- 11
- 12
- 13
- 14
- 15
- 16
- 17
- 18
- 19
- 20
功能展示
点击确认后,可预约数减1,同时发送邮件


预约下单功能BUG
数据表设计
之前改用邮箱的坑因为手机字段位数问题
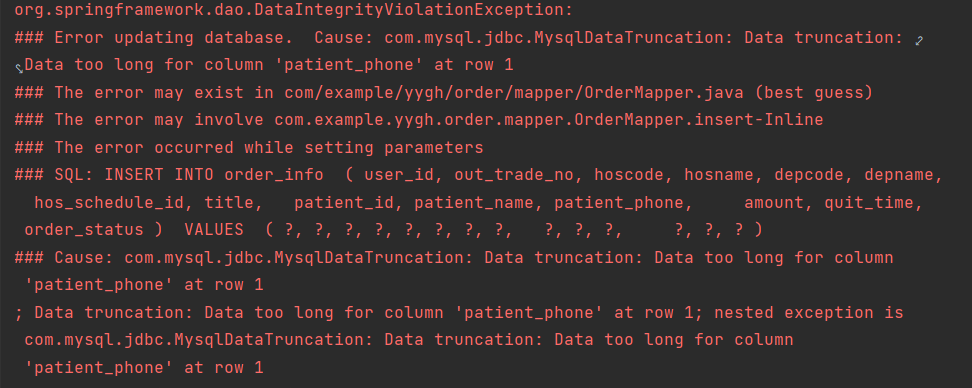
格式错误
在测试的过程中遇到这样一个问题
不要慌先看问题格式错误,然后这个是一个排班的id,检查排班id是否有异常的格式转换

发现把一个Stirng转换成Long肯定是有问题的

改掉
空指针异常
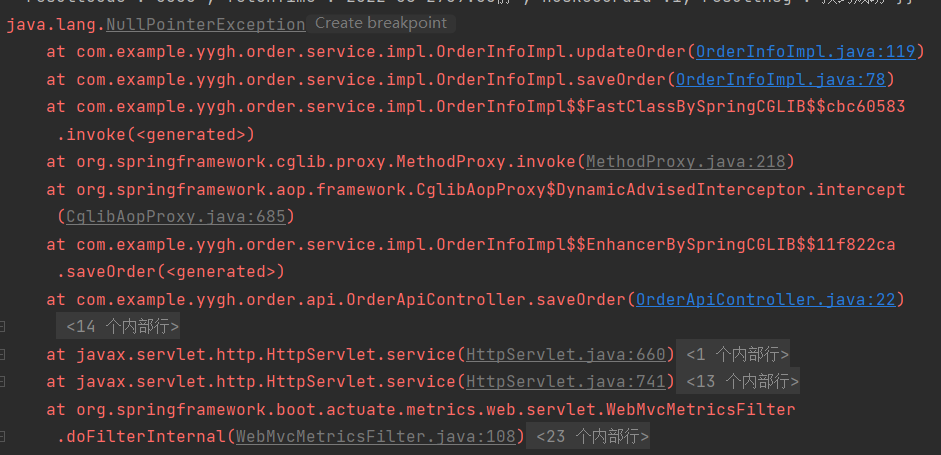
这里有一个空指针问题,我们点进去这个方法

发现是ReserviceTimeget不到
找一下orderInfo的来源
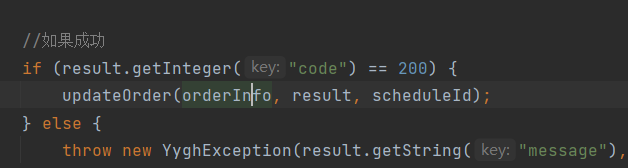
发现它是从这里来的
这时我们注意到在向医院模块发送请求的时候
reservice就是空的
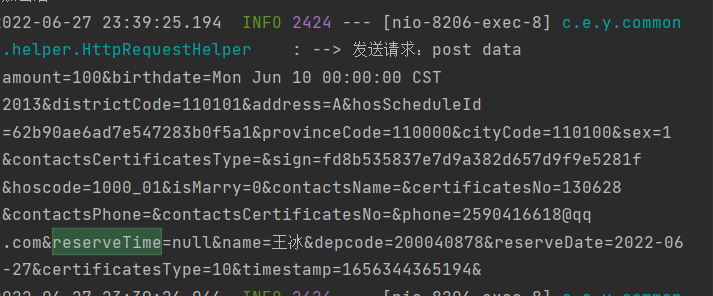
说明在这之前就已经是空了

可以看到orderInfo的属性来自于scheduleOrderVo
而这个Vo又是通过Feign调用得来的

找到这个方法

可能找到问题了
这里直接通过
BeanUtils.copyProperties(schedule, scheduleOrderVo);- 1
属性名可能不同


果然
添加上这个再次进行测试
Rabbit监听错误
在msm模块
Cannot convert from [com.example.yygh.vo.msm.MsmVo] to [javax.mail.Message] for GenericMessage
报错这个,可以看出是类型转换有问题

这时我把方法后面的参数删除就解决了
-
相关阅读:
视频剪辑调色软件推荐—DaVinlve Studio 18(达芬奇18)
KO88冲销内部订单结算的操作参考
软件测试/测试开发丨python 多态与super 学习笔记
【事故】记一次意外把企业项目放到GitHub并被fork,如何使用DMCA下架政策保障隐私
【21天打卡】前端攻城狮重学算法之-直接选择排序
网络参考模型与标准协议(二)-TCP/IP对等模型详细介绍
【异构知识蒸馏:IVIF】
一起看 I/O | Android 开发工具最新更新
MQTT协议详解
信噪比和比特误码率之间的关系通过matlab仿真计算出
- 原文地址:https://blog.csdn.net/weixin_53227758/article/details/125498935
