-
Android的六大布局详解
安卓六大布局
线性布局(LinearLayout)
在线性布局中,每一行(针对垂直排列)或每一列(针对水平排列)中只能放一个组件,Android的线性布局不会换行,当组件排列到窗体边缘后,后面的组件不会被显示出来。
线性布局常用的属性
属性 说明 可选值 android:orientation 用于设置布局管理器内组件的排列方式 horizontal(水平排列)和vertical(垂直排列)默认值为verticalandroid:gravity 设置布局管理器内组件的对齐方式 top、bottom、left、right、center_vertical、fill_ vertical、center_horizontal、fill horizontal、center、fill、clip_vertical和clip_ horizontal;支持组合属性(要指定组件靠右下角对齐,可以使用属性值rightlbottom)android:layout_width 用于设置组件的基本宽度 fill_parent(该组件的宽度与父容器的宽度相同)、match_parent(该组件的宽度与父容器的宽度相同) 和wrap_content(该组件的宽度恰好能包裹它的内容)android:layout_height 用于设置组件的基本高度 fill_ parent(该组件的高度与父容器的高度相同)、match parent(该组件的高度与父容器的高度相同)和wrap_content(该组件的高度恰好能包裹它的内容)android:layout_gravity 该组件在父容器里的对齐方式 同gravity android:id 用于为当前组件指定一个 id属性,在Java代码中可以应用该属性单独引用这个组件。为组件指定id属性后,在R.java文件中,会自动派生一个对应的属性,在Java代码中,可以通过findViewById()方法来获取它。 android:background 用于为组件设置背景,可以是背景图片,也可以是背景颜色。 android:layout_weight 用于等比例划分区域 整数(0,1,2等) android:divider 为布局设置分割线,一般为一张分割线图片 android:showDividers 设置分割线的位置 none(无),beginning(开始),end(结束),middle(每两个组件间)android:dividerPadding 设置分割线的Padding 其中
android:layout_width、android:layout_height、android:layout_weight是ViewGroup.LayoutParams所支持的XML属性,因此在Java代码中设置这些属性值时,一般需要这样声明:setLayoutParams(new LayoutParams(LayoutParams.FILL_PARENT, LayoutParams.WRAP_CONTENT, 1));- 1
- 2
android:layout_weight 属性的一些说明
- 设置
android:layout_width="0dp"和android:layout_width="wrap_content"属性下
如果在设置这个属性的情况下,即自适应和无宽度情况下再设置android:layout_weight属性时使用是比较容易理解的,我们设置比重值后,组件会根据自身的大小结合我们的比重值加上 LinearLayout的orientation是水平还是竖直,决定哪个方向等比例划分
<LinearLayout xmlns:android="http://schemas.android.com/apk/res/android" xmlns:tools="http://schemas.android.com/tools" android:id="@+id/LinearLayout1" android:layout_width="match_parent" android:layout_height="match_parent" android:orientation="horizontal"> <LinearLayout android:layout_width="0dp" android:layout_height="fill_parent" android:background="#ADFF2F" android:layout_weight="1"/> <LinearLayout android:layout_width="0dp" android:layout_height="fill_parent" android:background="#DA70D6" android:layout_weight="2"/> </LinearLayout>- 1
- 2
- 3
- 4
- 5
- 6
- 7
- 8
- 9
- 10
- 11
- 12
- 13
- 14
- 15
- 16
- 17
- 18
- 19
- 20
- 21


2. 而在设置android:layout_width="match_parent"后,则需要进行计算,为什么需要计算呢?我们来看这个例子<LinearLayout xmlns:android="http://schemas.android.com/apk/res/android" android:id="@+id/LinearLayout1" android:layout_width="match_parent" android:layout_height="match_parent" > <TextView android:layout_weight="1" android:layout_width="fill_parent" android:layout_height="fill_parent" android:text="梧枝绿" android:background="#69a794" /> <TextView android:layout_weight="2" android:layout_width="fill_parent" android:layout_height="fill_parent" android:text="石绿" android:background="#57c3c2" /> <TextView android:layout_weight="3" android:layout_width="fill_parent" android:layout_height="fill_parent" android:text="three" android:background="#FF00FF" /> </LinearLayout>- 1
- 2
- 3
- 4
- 5
- 6
- 7
- 8
- 9
- 10
- 11
- 12
- 13
- 14
- 15
- 16
- 17
- 18
- 19
- 20
- 21
- 22
- 23
- 24
- 25
- 26
- 27
- 28

看到这里您应该就明白了为什么要计算,明明设置了三个组件按1:2:3划分的为什么只出现了一个?这里其实没那么简单的,还是需要我们计算的,这里给出一个算法:- 个个组件都是fill_parent,但是屏幕只有一个,那么1 - 3 = - 2 fill_parent
- 依次比例是1/6,2/6,3/6
- 先到先得,先分给one,计算: 1 - 2 * (1/6) = 2/3 fill_parent 接着到two,计算: 1 - 2 * (2/6) = 1/3 fill_parent 最后到three,计算 1 - 2 * (3/6) = 0 fill_parent
- 所以最后的结果是:one占了两份,two占了一份,three什么都木有 以上就是为什么three没有出现的原因了
可能你还有点懵,我们再来看一个例子,这次我们按照2:3:4比例划分,按照上述步骤计算:
2-4=-2 fill_parent,每个部分比例依次为:2/9,3/9,4/9,第一部分应得1-2*(2/9)=5/9fill_parent,同理第二部分为3/9fill_parent,第三部分为1/9fill_parent,实际划分效果为5:3:1
分割线设置
- 直接设置
直接在布局中添加一个view,这个view的作用仅仅是显示出一条线
<View android:layout_width="match_parent" android:layout_height="1px" android:background="#000000" />- 1
- 2
- 3
- 4

- 使用LinearLayout的一个divider属性,直接为LinearLayout设置分割线
<LinearLayout xmlns:android="http://schemas.android.com/apk/res/android" android:id="@+id/LinearLayout1" android:layout_width="match_parent" android:layout_height="match_parent" android:divider="@drawable/ktv_line_div" android:orientation="vertical" android:showDividers="middle" android:dividerPadding="10dp" > <Button android:layout_width="wrap_content" android:layout_height="wrap_content" android:text="按钮1" /> <Button android:layout_width="wrap_content" android:layout_height="wrap_content" android:text="按钮2" /> <Button android:layout_width="wrap_content" android:layout_height="wrap_content" android:text="按钮3" /> </LinearLayout>- 1
- 2
- 3
- 4
- 5
- 6
- 7
- 8
- 9
- 10
- 11
- 12
- 13
- 14
- 15
- 16
- 17
- 18
- 19
- 20
- 21
- 22
- 23
- 24
- 25
- 26

线性布局示例
<?xml version="1.0" encoding="utf-8" ?> <LinearLayout xmlns:android="http://schemas.android.com/apk/res/android" xmlns:tools="http://schemas.android.com/tools" android:layout_width="match_parent" android:layout_height="match_parent" android:orientation="vertical" android:id="@+id/layout" tools:context=".MainActivity" > <Button android:text="按钮1" android:id="@+id/bt1" android:layout_width="match_parent" android:layout_height="wrap_content"/> <Button android:text="按钮2" android:id="@+id/bt2" android:layout_width="match_parent" android:layout_height="wrap_content"/> <Button android:text="按钮3" android:id="@+id/bt3" android:layout_width="match_parent" android:layout_height="wrap_content"/> <Button android:text="按钮4" android:id="@+id/bt4" android:layout_width="match_parent" android:layout_height="wrap_content"/> </LinearLayout>- 1
- 2
- 3
- 4
- 5
- 6
- 7
- 8
- 9
- 10
- 11
- 12
- 13
- 14
- 15
- 16
- 17
- 18
- 19
- 20
- 21
- 22
- 23
- 24
- 25
- 26
- 27
- 28
- 29
- 30
- 31
- 32
- 33
- 34

线性布局的优势是它的weight(权重)属性,等比例划分,对屏幕适配还是帮助蛮大的;但是使用LinearLayout的时候也有一个问题,就是当界面比较复杂的时候,需要嵌套多层的 LinearLayout,这样就会降低UI Render的效率(渲染速度),而且如果是listview或者GridView上的 item,效率会更低,另外太多层LinearLayout嵌套会占用更多的系统资源,还有可能引发stackoverflow
以上这些说明了线性布局的局限性,如果需要更灵活的布局建议采用相对布局(RelativeLayout)
一般来说在实际的开发中,线性布局单独使用较少,因为它对于屏幕的适配不够灵活,通常用作一些简单的布局或者是其他布局中的嵌入布局。当 android:orientation=“vertical” 时, 只有水平方向的设置才起作用,垂直方向的设置不起作用。 即:left,right,center_horizontal 是生效的。 当 android:orientation=“horizontal” 时, 只有垂直方向的设置才起作用,水平方向的设置不起作用。 即:top,bottom,center_vertical 是生效的。
相对布局(RelativeLayout)
相对布局是指按照组件之间的相对位置来进行布局,如某个组件在另一个组件的左边、右边、上方或下方等。
相对布局的一些常用属性有:
基本属性
属性 描述 android:gravity设置容器内组件的对齐方式 android:ignoreGravity设置了该属性为true的属性的组件,将不受gravity属性的影响 根据父容器定位
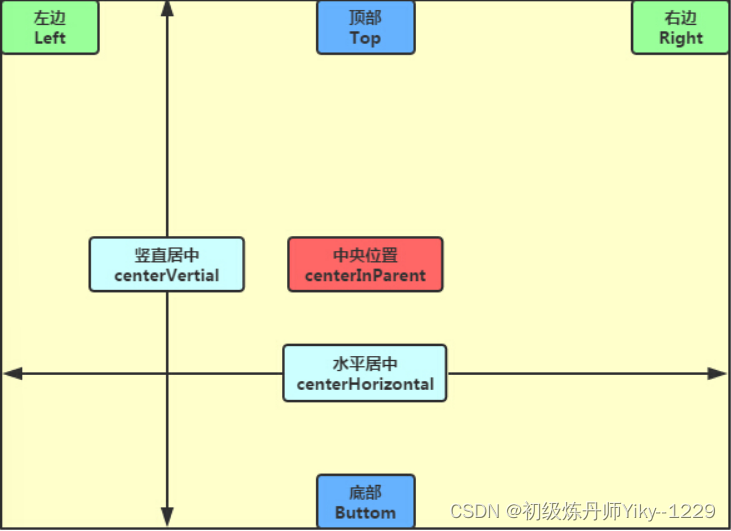
属性 描述 android:layout_alignParentleft其属性值为boolean值,用于指定该组件是否与布局管理器左边对齐 android:layout_alignParentRight其属性值为boolean值,用于指定该组件是否与布局管理器右边对齐 android:layout_alignParentTop其属性值为boolean值,用于指定该组件是否与布局管理器顶端对齐 android: layout_alignParentBottom其属性值为boolean值,用于指定该组件是否与布局管理器底端对齐 android:layout_centerHorizontal其属性值为boolean值,用于指定该组件是否位于布局管理器水平居中的位置 android:layout_centerVertical其属性值为boolean值,用于指定该组件是否位于布局管理器垂直居中的位置 android:layout_centerInParent其属性值为boolean值,用于指定该组件是否位于布局管理器的中央位置 根据兄弟组件定位
属性 描述 android:layout_toLeftOf其属性值为其他UI组件的id属性,用于指定该组件位于哪个组件的左侧 android:layout_toRightOf其属性值为其他UI组件的id属性,用于指定该组件位于哪个组件的右侧 android:layout_above其属性值为其他UI组件的id属性,用于指定该组件位于哪个组件的上方 android:layout_below其属性值为其他UI组件的id属性,用于指定该组件位于哪个组件的下方 android:layout _alignTop其属性值为其他UI组件的id属性,用于指定该组件与哪个组件的上边界对齐 android:layout_alignBottom其属性值为其他UI组件的id属性,用于指定该组件与哪个组件的下边界对齐 android:layout_alignLeft其属性值为其他UI组件的id属性,用于指定该组件与哪个组件的左边界对齐 android:layout_alignRight其属性值为其他UI组件的id属性,用于指定该组件与哪个组件的右边界对齐 margin(设置组件与父容器的边距又称为偏移)
属性 描述 android:layout_margin设置组件上下左右的偏移量 android:layout_marginLeft设置组件离左边的偏移量 android:layout_marginRight设置组件离右边的偏移量 android:layout_ marginTop设置组件离上面的偏移量 android:layout_ marginBottom设置组件离下面的偏移量 padding(设置组件内部元素间的间距)
属性 描述 android:padding往内部元素的上下左右填充一定边距 android:paddingLeft往内部元素的左边填充一定边距 android:paddingRight往内部元素的右边填充一定边距 android:paddingTop往内部元素的上方填充一定边距 android:paddingBottom往内部元素的下方填充一定边距 按父容器定位示意图
按兄弟组件定位示意图
所谓的兄弟组件就是处于同一层次容器的组件,如图中的组件1,2就是兄弟组件了,而组件3与组件1或组件2并不是兄弟组件,所以组件3不能通过 组件1或2来进行定位,比如layout_toleftof = "组件1"这样是会报错的!

margin与padding的区别
首先margin代表的是偏移,比如marginleft = "5dp"表示组件离容器左边缘偏移5dp; 而padding代表的则是填充,而填充的对象针对的是组件中的元素,比如TextView中的文字 比如为TextView设置paddingleft = “5dp”,则是在组件里的元素的左边填充5dp的空间! margin针对的是容器中的组件,而padding针对的是组件中的元素,要区分开来!

设置margin的时候都习惯了是正数的, 其实是可以用负数的,代表相反的偏移
相对布局示例
<?xml version="1.0" encoding="utf-8" ?> <RelativeLayout xmlns:android="http://schemas.android.com/apk/res/android" android:id="@+id/relativelayout" android:layout_width="match_parent" android:layout_height="match_parent" android:foregroundGravity="bottom|right" > <!--一个居中显示的文本视图textView1--> <TextView android:text="发现新版本,您想现在就进行安装吗?" android:id="@+id/textView01" android:textSize="24px" android:layout_width="wrap_content" android:layout_height="wrap_content" android:layout_centerInParent="true"/> <!--一个在button2左侧显示的按钮button1--> <Button android:text="立即更新" android:id="@+id/btn1" android:layout_width="wrap_content" android:layout_height="wrap_content" android:layout_below="@+id/textView01" android:layout_toLeftOf="@+id/btn2" /> <Button android:text="稍后再说" android:id="@+id/btn2" android:layout_width="wrap_content" android:layout_height="wrap_content" android:layout_alignRight="@+id/textView01" android:layout_below="@+id/textView01" /> </RelativeLayout>- 1
- 2
- 3
- 4
- 5
- 6
- 7
- 8
- 9
- 10
- 11
- 12
- 13
- 14
- 15
- 16
- 17
- 18
- 19
- 20
- 21
- 22
- 23
- 24
- 25
- 26
- 27
- 28
- 29
- 30
- 31
- 32
- 33
- 34
- 35

线性布局和相对布局是最常用的两种布局方式了,一定要多了解使用
表格布局 (TableLayout)
表格布局以行、列的形式来管理放入其中的UI组件。表格布局使用使用标记定义,在表格布局中,可以添加多个标记,每个 标记占用一行。由于标记也是容器,所以还可在该标记中添加其他组件,每添加一个组件,表格就会增加一列。在表格布局中,列可以被隐藏,也可以被设置为伸展的,从而填充可利用的屏幕空间,还可以设置为强制收缩,直到表格匹配屏幕大小。
老规矩先来看常用属性
常用属性
属性 描述 android:collapseColumns 设置需要被隐藏的列的列序号(序号从0开始),多个列序号之间用逗号“,”"分隔 android:shrinkColumns 设置允许被收缩的列的列序号(序号从0开始),多个列序号之间用逗号“,”分隔 android:stretchColumn 设置允许被拉伸的列的列序号(序号从0开始),多个列序号之间用逗号“,”分隔 android:layout_column=“2” 表示的就是跳过第二个,直接显示到第三个格子处,从1开始算的! android:layout_span=“4” 表示合并4个单元格,也就说这个组件占4个单元格 如何确定所需的行数和列数
- 如果我们直接往TableLayout中添加组件的话,那么这个组件将占满一行!!!
- 如果我们想一行上有多个组件的话,就要添加一个TableRow的容器,把组件都丢到里面!
- tablerow中的组件个数就决定了该行有多少列,而列的宽度由该列中最宽的单元格决定
- tablerow的layout_width属性,默认是fill_parent的,我们自己设置成其他的值也不会生效!!! 但是
layout_height默认是wrap_content的,我们却可以自己设置大小! - 整个表格布局的宽度取决于父容器的宽度(占满父容器本身)
- 有多少行就要自己数啦,一个tablerow一行,一个单独的组件也一行!多少列则是看tableRow中 的组件个数,组件最多的就是TableLayout的列数
表格布局的示例
<?xml version="1.0" encoding="utf-8" ?> <TableLayout xmlns:android="http://schemas.android.com/apk/res/android" android:id="@+id/tablelayout" android:layout_width="match_parent" android:layout_height="match_parent" android:orientation="vertical" android:gravity="center_vertical" android:stretchColumns="0,3" > <TableRow android:id="@+id/tableRow01" android:layout_width="wrap_content" android:layout_height="wrap_content" > <TextView/> <TextView android:text="用户名" android:id="@+id/textView1" android:textSize="24px" android:layout_height="wrap_content" android:layout_width="wrap_content" /> <EditText android:id="@+id/editText1" android:textSize="24px" android:layout_height="wrap_content" android:layout_width="wrap_content" android:minWidth="200px" /> <TextView/> </TableRow> <TableRow android:id="@+id/tableRow02" android:layout_width="wrap_content" android:layout_height="wrap_content" > <TextView/> <TextView android:text="密码" android:id="@+id/textView2" android:textSize="24px" android:layout_height="wrap_content" /> <EditText android:id="@+id/editText2" android:textSize="24px" android:layout_height="wrap_content" android:layout_width="wrap_content" android:inputType="textPassword" /> <TextView/> </TableRow> <TableRow android:id="@+id/tableRow03" android:layout_width="wrap_content" android:layout_height="wrap_content" > <TextView/> <Button android:text="登录" android:id="@+id/btn02" android:layout_height="wrap_content" android:layout_width="wrap_content" /> <Button android:text="退出" android:id="@+id/btn01" android:layout_height="wrap_content" android:layout_width="wrap_content" /> <TextView/> </TableRow> </TableLayout>- 1
- 2
- 3
- 4
- 5
- 6
- 7
- 8
- 9
- 10
- 11
- 12
- 13
- 14
- 15
- 16
- 17
- 18
- 19
- 20
- 21
- 22
- 23
- 24
- 25
- 26
- 27
- 28
- 29
- 30
- 31
- 32
- 33
- 34
- 35
- 36
- 37
- 38
- 39
- 40
- 41
- 42
- 43
- 44
- 45
- 46
- 47
- 48
- 49
- 50
- 51
- 52
- 53
- 54
- 55
- 56
- 57
- 58
- 59
- 60
- 61
- 62
- 63
- 64
- 65
- 66
- 67
- 68
- 69
- 70
- 71
- 72
- 73
- 74
- 75
- 76
- 77

实际开发中表格布局的使用较少,了解一些基本的几个属性即可帧布局(FrameLayout)
帧布局可以说是六大布局中最为简单的一个布局,这个布局直接在屏幕上开辟出一块空白的区域,通常称为一帧,当我们往里面添加控件的时候,会默认把他们放到这块区域的左上角,而这种布局方式却没有任何的定位方式,所以它应用的场景并不多;帧布局的大小由控件中最大的子控件决定,如果控件的大小一样大的话,那么同一时刻就只能看到最上面的那个组件!后续添加的控件会覆盖前一个!虽然默认会将控件放置在左上角,但是我们也可以通过layout_gravity属性,指定到其他的位置
常用属性
属性 描述 android:foreground I设置该帧布局容器的前景图像 android:foregroundGravity 定义绘制前景图像的gravity属性,即前景图像显示的位置 帧布局示例
<?xml version="1.0" encoding="utf-8" ?> <FrameLayout xmlns:android="http://schemas.android.com/apk/res/android" android:id="@+id/framelayout" android:layout_width="match_parent" android:layout_height="match_parent" android:foregroundGravity="bottom|right" > <TextView android:text="红色背景的TextView" android:id="@+id/textView01" android:background="#FFF00000" android:layout_gravity="center" android:layout_width="400px" android:layout_height="400px"/> <TextView android:text="橙色背景的TextView" android:id="@+id/textView02" android:background="#FFFF6600" android:layout_gravity="center" android:layout_width="300px" android:layout_height="300px"/> <TextView android:text="黄色背景的TextView" android:id="@+id/textView03" android:background="#FFFFEE00" android:layout_gravity="center" android:layout_width="200px" android:layout_height="200px"/> </FrameLayout>- 1
- 2
- 3
- 4
- 5
- 6
- 7
- 8
- 9
- 10
- 11
- 12
- 13
- 14
- 15
- 16
- 17
- 18
- 19
- 20
- 21
- 22
- 23
- 24
- 25
- 26
- 27
- 28
- 29
- 30
- 31
- 32
- 33

帧布局在实际开发中使用也就比表格布局多一点,也是不常用的布局网格布局(GridLayout)
网格布局是Android 4.0以后引入的一个新的布局,相较于表格布局更加灵活,我个人认为网格布局才更像表格布局这一概念:可以自己设置布局中组件的排列方式、自定义网格布局有多少行,多少列、直接设置组件位于某行某列、设置组件横跨几行或者几列。
常用属性
属性 描述 android:orientation设置排列方式 android:layout_gravity设置对齐方式 android:rowCount设置行数 android:columnCount设置列数 android:layout_row组件位于第几行(从0开始计算) android:layout_column组件位于第几列(同样从0开始计算) android:layout_rowSpan组件横跨几行 android:layout_columnSpan组件横跨几列 用法归纳
- 先定义组件的对其方式 android:orientation 水平或者竖直,设置多少行与多少列
- 设置组件所在的行或者列,记得是从0开始算的,不设置默认每个组件占一行一列
- 设置组件横跨几行或者几列;设置完毕后,需要在设置一个填充:android:layout_gravity = “fill”
如果直接将组件添加到网格布局中,则默认每个组件都是 占一行一列
如果需要让组件填满横越过的行或列的话,需要添加下面这个属性: android:layout_gravity = “fill”
网格布局示例
<GridLayout xmlns:android="http://schemas.android.com/apk/res/android" android:id="@+id/GridLayout1" android:layout_width="wrap_content" android:layout_height="wrap_content" android:columnCount="4" android:orientation="horizontal" android:rowCount="6" > <TextView android:layout_columnSpan="4" android:layout_gravity="fill" android:layout_marginLeft="5dp" android:layout_marginRight="5dp" android:background="#FFCCCC" android:text="0" android:textSize="50sp" /> <Button android:layout_columnSpan="2" android:layout_gravity="fill" android:text="回退" /> <Button android:layout_columnSpan="2" android:layout_gravity="fill" android:text="清空" /> <Button android:text="+" /> <Button android:text="1" /> <Button android:text="2" /> <Button android:text="3" /> <Button android:text="-" /> <Button android:text="4" /> <Button android:text="5" /> <Button android:text="6" /> <Button android:text="*" /> <Button android:text="7" /> <Button android:text="8" /> <Button android:text="9" /> <Button android:text="/" /> <Button android:layout_width="wrap_content" android:text="." /> <Button android:text="0" /> <Button android:text="=" /> </GridLayout>- 1
- 2
- 3
- 4
- 5
- 6
- 7
- 8
- 9
- 10
- 11
- 12
- 13
- 14
- 15
- 16
- 17
- 18
- 19
- 20
- 21
- 22
- 23
- 24
- 25
- 26
- 27
- 28
- 29
- 30
- 31
- 32
- 33
- 34
- 35
- 36
- 37
- 38
- 39
- 40
- 41
- 42
- 43
- 44
- 45
- 46
- 47
- 48
- 49
- 50
- 51
- 52
- 53
- 54
- 55
- 56
- 57
- 58
- 59
- 60
- 61
- 62

绝对布局(AbsoluteLayout)
绝对布局比起前面的五个布局可以说是最冷门的布局了,说是被淘汰的布局也不为过,相较于相对布局它实在是太不灵活了。举个例子,假如我们在一个4.4英寸的设备上开发了一款适合于这个屏幕比例的APP,然后我们将它部署到5英寸的设备上后,布局会变得混乱,有些组件会产生偏移和变形的现象,而相对布局则不会这样,所以在实际开发中还是建议使用相对布局多一点比较好,绝对布局你就当额外的技术了解一下即可。
常用属性
属性 描述 android:layout_width组件宽度 android:layout_height组件高度 android:layout_x设置组件的X坐标 android:layout_y设置组件的Y坐标 -
相关阅读:
按最少次数开关点亮所有灯
windows11家庭版安装docker desktop
CUDA By Example(三)——CUDA C并行编程
Cisdem Video Player for mac(高清视频播放器) v5.6.0中文版
Uniapp And Taro一些小测评
canvas制作签名版
Day26:内部类的详解
TIPC Service and Topology Tracking4
还在用饼状图?来瞧瞧这些炫酷的百分比可视化新图形(附代码实现)⛵
leetcode - 1980. Find Unique Binary String
- 原文地址:https://blog.csdn.net/weixin_44524687/article/details/125483660
