-
Vue 组件及组件间的通信
一、什么是组件?
组件 (Component) 是 Vue.js 最强大的功能之一。组件可以扩展 HTML 元素,封装可重用的代码。在较高层面上,组件是自定义元素,Vue.js 的编译器为它添加特殊功能。在有些情况下,组件也可以表现为用 is 特性进行了扩展的原生 HTML 元素。
二、创建全局组件:
(一)Vue2.0的创建方式
方式一:
1、使用Vue.extend创建组件
var com1 = Vue.extend({
// 通过 template 属性,指定了组件要展示的HTML结构
template: '<h3>这是使用 Vue.extend 创建的组件</h3>'
})
2、使用 Vue.component('组件的名称', 创建出来的组件模板对象) 注册组件
Vue.component('myCom1', com1)
注意:如果使用Vue.Component 注册全局组件的时候,组件的名称使用了驼峰命名,则在引用组件的时候需要把大写的驼峰改为小写的字母,同时,两个单词之前,使用 “–” 链接。如果不使用则直接拿名称来使用即可。
示例:

方式二:
直接使用Vue.component的方式创建
- Vue.component('mycom2', {
- template: '<div>
- <h3>这是直接使用 Vue.component 创建出来的组件</h3>
- <span>123</span>
- </div>'
- })
示例:

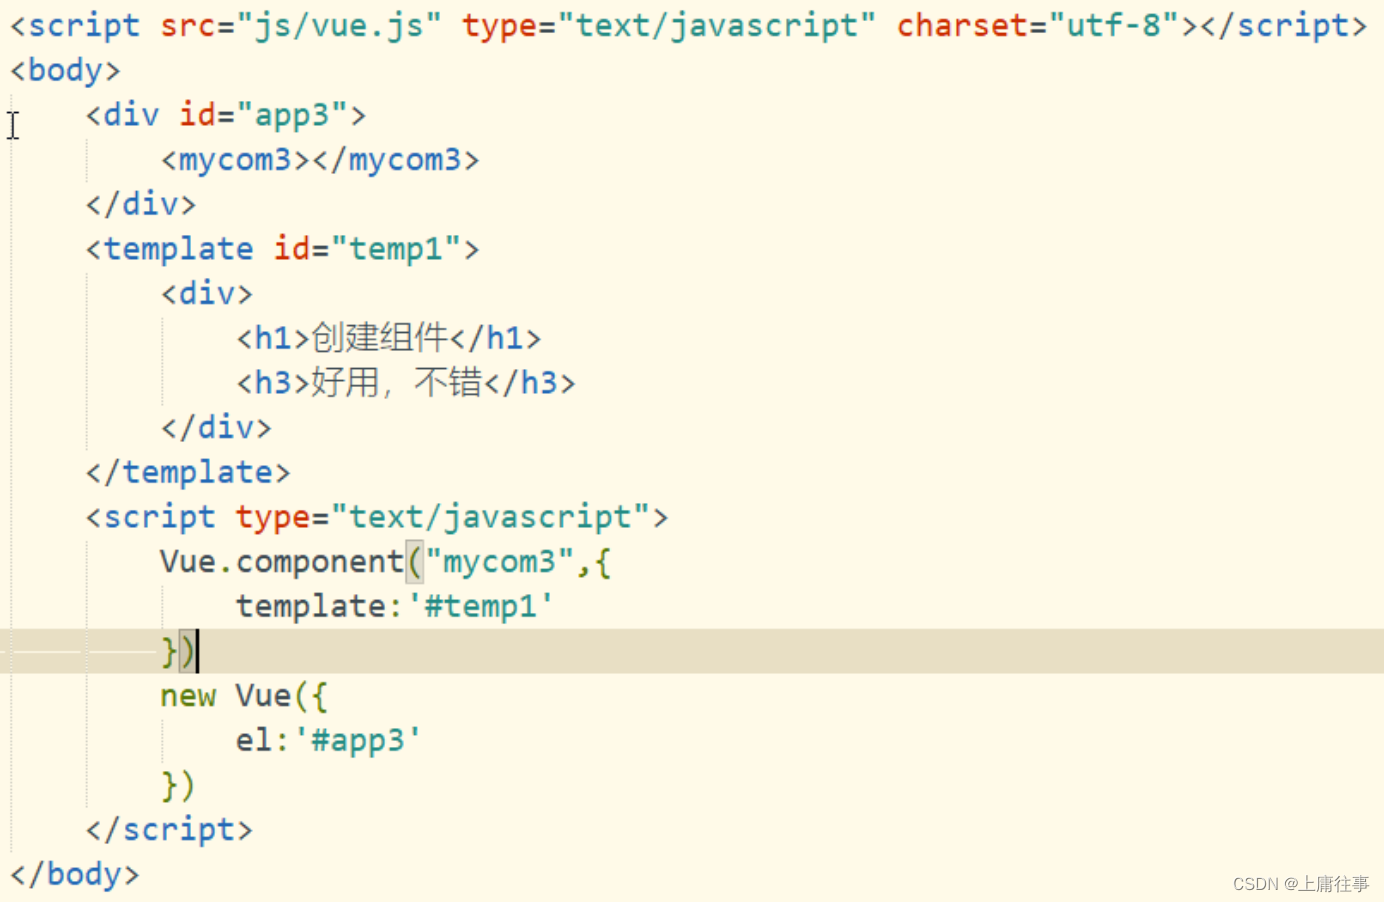
方式三
1、被控制的 #app 外面,使用 template 元素,定义组件的HTML模板结构
- <template id="tmpl">
- <div>
- <h1>这是通过 template 元素,在外部定义的组件结构</h1>
- <h4>好用,不错!</h4>
- </div>
- </template>
2、使用id注册组件
- Vue.component('mycom3', {
- template: '#tmpl'
- })
示例:
(二)Vue3.0中的创建方式:在main.js文件中注册
app.Component(“标签名”,组件名)
三、创建局部组件
局部组件的创建和全局组件的创建方法一样。唯一区别的是,局部组件是在Vue实例中定义的

四、组件中的data 和 methods:
1、组件可以拥有自己的数据
2、组件中的data 和实例中的data 有点不一样,实例中的data 可以为一个对象。但是组件中的data必须是一个方法
3、组件中的data除了是一个方法,还必须返回一个对象。
4、组件中的data 的使用方式和 实例中的data 使用方式一样
5、组件中的Methods 的定义和使用与实例中一样

五、组件间的通信方式

【组件间的关系】:A 和 B、B 和 C、B 和 D 都是父子关系,C 和 D 是兄弟关系,A 和 C 是隔代关系(可能隔多代)
(一)父子间通信(props/$emit):父组件A通过props的方式向子组件B传递,B to A 通过在 B 组件中 $emit, A 组件中 v-on 的方式实现。
1、父组件向子组件传值
(1)子组件users.vue
- <template>
- <div class="hello">
- <ul>
- <li v-for="(user,index) in users" v-bind:key="index">{{ user }}</li>
- </ul>
- </div>
- </template>
- <script>
- export default {
- name: "users",
- props: {
- users: { //父组件中子标签自定义的名字
- type: Array,
- require: true
- }
- }
- }
- </script>
- <style scoped>
- li{
- list-style-position: inside;
- }
- </style>
(2)父组件App.vue
- <template>
- <div id="app">
- <img alt="Vue logo" src="./assets/logo.png">
- <Users v-bind:users="users"> </Users>
- </div>
- </template>
- <script>
- import Users from "@/components/users";
- export default {
- name: 'App',
- data(){
- return {
- users: ['西安邮电','西安石油','西北政法','西安工业','西安财经']
- }
- },
- components: {
- Users,
- }
- }
- </script>
【总结】父组件通过props向下传递数据给子组件。
【注】组件中的数据共有三种形式:data、props、computed
2、子组件向父组件传值(通过事件形式)
(1)子组件
- <template>
- <header>
- <h1 @click="changeTitle">{{ title }}</h1>
- </header>
- </template>
- <script>
- export default {
- name: "Son",
- data(){
- return {
- title: 'Vue.js Demo'
- }
- },
- methods: {
- changeTitle(){
- this.$emit('titleChanged','西安邮电大学');
- }
- }
- }
- </script>
- <style scoped>
- h1{
- background-color: greenyellow;
- }
- </style>
(2)父组件
- <template>
- <div id="app">
- <Son v-on:titleChanged="updateTitle"></Son>
- <h2>{{ title }}</h2>
- </div>
- </template>
- <script>
- import Son from "@/components/Son";
- export default {
- name: "Father",
- data(){
- return {
- title: '传递的是一个值'
- }
- },
- methods: {
- updateTitle(e){
- this.title = e
- }
- },
- components:{
- Son,
- }
- }
- </script>
【总结】子组件通过events(事件)给父组件发送消息,实际上就是子组件把自己的数据发送到父组件。
(二)兄弟间通信:使用第三方库mitt创建一个中央事件总线(事件中心),用它来触发(emit)事件和监听(on)事件,巧妙而轻量地实现了任何组件间的通信,包括父子、兄弟、跨级。当我们的项目比较大时,可以选择更好的状态管理解决方案vuex。
示例:
(1)安装mitt库:
npm install mitt
(2)创建事件中心(event.js)
- import mitt from "mitt";
- const emitter = mitt();
- export default emitter;
(3)创建兄弟组件
Brother1.vue
- <template>
- <div class="Brother1">
- <h2>兄弟---关羽</h2>
- <p>{{ data1 }} {{ data2 }}</p>
- <button @click="sendData">将美酒送给三弟</button>
- </div>
- </template>
- <script>
- import emitter from "@/event";
- export default {
- name: "Brother1",
- data(){
- return {
- data1: "美酒",
- data2: ''
- }
- },
- methods:{
- //接收数据的方法
- receive: function () {
- emitter.on('two-to-one',(data)=>{
- console.log(data);
- this.data2 = data;
- })
- },
- sendData:function () {
- emitter.emit('one-to-two',this.data1);
- }
- },
- mounted() {
- //执行该方法
- this.receive();
- }
- }
- </script>
- <style scoped>
- .Brother1{
- color: blueviolet;
- font-size: 20px;
- border: 1px solid #bbb;
- margin-bottom: 10px;
- }
- </style>
Brother2.vue
- <template>
- <div class="Brother12">
- <h2>兄弟---张飞</h2>
- <h3>{{ data1 }} {{ data2 }}</h3>
- <button @click="sendData">将宝剑送给二哥</button>
- </div>
- </template>
- <script>
- import emitter from '@/event.js';
- export default {
- name: "Brother12",
- data(){
- return {
- data1: "宝剑",
- data2: ''
- }
- },
- methods:{
- //发送数据的方法
- sendData: function () {
- emitter.emit('two-to-one',this.data1)
- },
- receive: function (){
- emitter.on('one-to-two',(data)=>{
- this.data2= data;
- })
- }
- },
- mounted() {
- this.receive();
- }
- }
- </script>
- <style scoped>
- .Brother12{
- color: yellowgreen;
- font-size: 20px;
- border: 1px solid #ccc;
- }
- </style>
App.vue
- <template>
- <img alt="Vue logo" src="./assets/logo.png">
- <Brother1></Brother1>
- <Brother2></Brother2>
- </template>
- <script>
- import Brother1 from "@/components/Brother1";
- import Brother2 from "@/components/Brother2";
- export default {
- name: 'App',
- components: {
- Brother1,
- Brother2
- }
- }
- </script>
运行结果

(三)跨级通信(provide/inject)
provide / inject 类似于消息的订阅和发布。provide 提供或发送数据, inject 接收数据。
Vue3 的 provide / inject 只能在 setup 期间调用,使用之前,必须从 vue 显示导入 provide/inject 方法。
provide( name,value ):函数接收两个参数
name:定义提供 property 的 name 。
value :property 的值。
inject(name,default):函数有两个参数
name:接收 provide 提供的属性名。
default:设置默认值,可以不写,是可选参数。
附:setup钩子函数位于created 和beforeCreated之前,用于代替created 和beforeCreated
(1)在setup函数中定义的变量和方法最后都是需要 return 出去的 不然无法再模板中使用
(2)由于在执行 setup函数的时候,还没有执行 Created 生命周期方法,所以在 setup 函数中,无法使用 data 和 methods 的变量和方法
(3)在setup函数里不能访问到this。由于我们不能在 setup函数中使用 data 和 methods,所以 Vue 为了避免我们错误的使用,直接将 setup函数中的this修改成了 undefined
(4)setup函数只能是同步的不能是异步的
(5)provide/inject 只能写在setup中
示例:
QianLong.vue
- <template>
- <div>
- <h2>孙子:乾隆</h2>
- <div>爷爷:{{ getYeYeData }}</div>
- </div>
- </template>
- <script>
- import { inject } from "vue";
- export default {
- name: "QianLong",
- setup(){
- let getYeYeData = inject('giveLastWords')
- return {
- getYeYeData
- }
- }
- }
- </script>
YongZheng.vue
- <template>
- <h2>儿子:雍正</h2>
- <div>父亲:{{ getFatherData}}</div>
- <hr/>
- <ql-com></ql-com>
- </template>
- <script>
- import { inject } from "vue";
- import QianLong from "@/components/QianLong";
- export default {
- name: "YongZheng",
- components: {
- "ql-com": QianLong
- },
- setup() {
- let getFatherData = inject('giveLastWords')
- return {
- getFatherData
- }
- }
- }
- </script>
KangXi.vue
- <template>
- <h2>康熙:{{ lastWords }}</h2>
- <yz-com></yz-com>
- </template>
- <script>
- import YongZheng from "@/components/YongZheng";
- import { provide } from "vue";
- export default {
- name: "KangXi",
- components: {
- "yz-com": YongZheng
- },
- setup(){
- let lastWords = "整顿吏治"
- provide('giveLastWords',lastWords)
- return {
- lastWords
- }
- }
- }
- </script>
App.vue
- <template>
- <img alt="Vue logo" src="./assets/logo.png">
- <KangXi></KangXi>
- </template>
- <script>
- import KangXi from "@/components/KangXi";
- export default {
- name: 'App',
- components: {
- KangXi
- }
- }
- </script>
运行结果:

六、总结
组件间通信常见使用场景可以分为三类:
- 父子通信:
父向子传递数据是通过 props,子向父是通过 events($emit);
- 兄弟通信:
Bus(mitt);Vuex
- 跨级通信:
Bus(mitt);Vuex;provide / inject
-
相关阅读:
使用序列化技术保存数据 改进 IO流完成项目实战水果库存系统
SoftwareTest3 - 要了人命的Bug
MySQL数据库索引和事务详解
Xcode14.3.1 真机调试iOS17的方法(无iOS17 DeviceSupport)
【已验证-直接用】微信小程序wx.request请求服务器json数据并渲染到页面
基于http的身份验证手段(cookie,session,token)
新版Java面试专题视频教程——多线程篇②
知识提取-属性抽取-学习笔记
【Java SE】封装的详解
关于数据库优化你知道多少?
- 原文地址:https://blog.csdn.net/m0_37911706/article/details/125491745
