-
初学Vue(全家桶)-第19天(vue3):计算属性、监视属性、vue3生命周期
初学vue
1、vue3中计算属性computed的基本使用
功能和vue2中的一样,只是写法上有些许区别,但vue3目前仍可以使用vue2中的写法,不过不推荐。
vue3中计算属性的使用具体看例子,不赘述了<template> 姓:<input type="text" v-model="person.firstName"> <br> 名:<input type="text" v-model="person.lastName"> <br> <span>全名:{{person.fullName}}</span> <br> 直接修改计算属性计算出的全名:<br> <input type="text" v-model="person.fullName"> </template> <script> // 引入计算属性的组合API import {reactive,computed} from "vue" export default { name:"ComputedTest", setup(){ // 定义一个数据(对象类型) let person = reactive({ firstName:"张", lastName:"三" }) // 计算属性 // 简写形式(这样就没有考虑计算属性被修改的情况 // person.fullName = computed(()=>{ // return person.firstName + "-" + person.lastName // }) // 完整写法(这样可以对计算属性进行读写操作 person.fullName = computed({ get(){ return person.firstName + "-" + person.lastName }, set(value){ const nameArr = value.split("-") // 按照”-“拆分全名 person.firstName = nameArr[0] person.lastName = nameArr[1] } }) return { person } }, } </script>- 1
- 2
- 3
- 4
- 5
- 6
- 7
- 8
- 9
- 10
- 11
- 12
- 13
- 14
- 15
- 16
- 17
- 18
- 19
- 20
- 21
- 22
- 23
- 24
- 25
- 26
- 27
- 28
- 29
- 30
- 31
- 32
- 33
- 34
- 35
- 36
- 37
- 38
- 39
- 40
- 41
- 42
- 43
- 44
- 45
- 46

2、vue3中监视属性watch的基本使用
2.1 监视ref定义的数据
vue3中watch和vue2中的使用方式很相似。
<template> <h2>当前求和为:{{sum}}</h2> <button @click="sum++">点我加1</button> <hr> <h2>当前的信息为:{{msg}}</h2> <button @click="msg+='!'">添加感叹号</button> </template> <script> // 引入ref的组合API import {ref,watch} from "vue" export default { name:"WatchTest01", setup(){ let sum = ref(0) let msg = ref("你好呀") // 情况一:监视ref所定义的一个响应式数据 watch(sum,(newValue,oldValue)=>{ console.log("sum变了",newValue,oldValue) }) // 传入第三个参数{immediate:true},用于页面刷新后立即监视 // watch(sum,(newValue,oldValue)=>{ // console.log("sum变了",newValue,oldValue) // },{immediate:true}) // 情况二:监视ref所定义的多个响应式数据 watch([sum,msg],(newValue,oldValue)=>{ console.log("sum或msg变了",newValue,oldValue); }) // 返回一个对象 return { sum, msg } } } </script> <style> </style>- 1
- 2
- 3
- 4
- 5
- 6
- 7
- 8
- 9
- 10
- 11
- 12
- 13
- 14
- 15
- 16
- 17
- 18
- 19
- 20
- 21
- 22
- 23
- 24
- 25
- 26
- 27
- 28
- 29
- 30
- 31
- 32
- 33
- 34
- 35
- 36
- 37
- 38
- 39
- 40
- 41
- 42

关于watch监视ref定义的数据是否要用到
.value的问题:
(1)当ref定义的是一个基本数据类型时,如下:<h2>当前求和为:{{sum}}</h2> <button @click="sum++">点我加1</button> ---------------------------------------------------------- let sum = ref(0) watch(sum,(newValue,oldValue)=>{ console.log("sum的值改变了",newValue,oldValue) })- 1
- 2
- 3
- 4
- 5
- 6
- 7
- 8
分析:watch这里第一个参数必须是sum而不能是sum.value,因为ref中定义的是一个基本类型数据,如果用sum.value的话,就相当于直接监视0这个数字,而使用sum的话就是在监视sum这个结构,打印出sum,
console.log(sum),可以看到结果是一个refImpl对象,而这个对象下就包括value值,所以要监视整个sum。
(2)当ref定义的是一个引用数据类型时,如下:<h3>姓名:{{person.name}}</h3> <h3>年龄:{{person.age}}</h3> <h3>薪资:{{person.job.salary}}</h3> <button @click="person.name += '!'">修改姓名</button> <button @click="person.age += 1">增长年龄</button> <button @click="person.job.salary += 3">涨薪</button> ----------------------------------------------------------- let person = ref({ name:"张三", age:18, job:{ salary:20 } }) // 第一种方式实现监视到对象中的所有属性 watch(person.value,(newValue,oldValue)=>{ console.log("person中的属性改变了”,newValue,oldValue) }) // 第二种方式实现监视到对象中的所有属性 watch(person,(newValue,oldValue)=>{ console.log("person中的属性改变了”,newValue,oldValue) },{{deep:true}})- 1
- 2
- 3
- 4
- 5
- 6
- 7
- 8
- 9
- 10
- 11
- 12
- 13
- 14
- 15
- 16
- 17
- 18
- 19
- 20
- 21
- 22
- 23
分析:如果这里不使用这两种方式来对对象进行监视,那么就无法起到监视效果。
- 对于方式一,利用的是使用ref对引用类型进行定义时,底层会自动转换成reactive函数对对象进行定义,那么此时
console.log(person)可以看到结果如下,person是一个refimpl对象
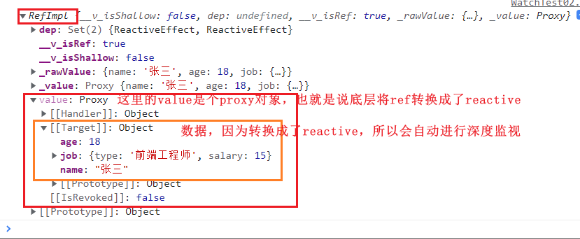
- 对于方式二,直接利用{{deep:true}}配置项进行深度监视,监视的时person.value,当person.value下面的数据发生改变时,深度监视到就会立即更新页面。
2.2 监视reactive定义的数据
<template> <h3>姓名:{{person.name}}</h3> <h3>年龄:{{person.age}}</h3> <h3>薪资:{{person.job.salary}}</h3> <button @click="person.name += '!'">修改姓名</button> <button @click="person.age += 1">增长年龄</button> <button @click="person.job.salary += 3">涨薪</button> </template> <script> import {reactive,watch} from "vue" export default { name:"WatchTest02", setup(){ let person = reactive({ name:"张三", age:18, job:{ type:"前端工程师", salary:15 } }) // 监视reactive中的数据 // 情况一:监视reactive所定义的一个响应式数据的全部属性 // 1、此处无法正确的获取oldValue // 2、reactive的监视是强制深度监视,关不了 /* watch(person,(newValue,oldValue)=>{ console.log("person变化了",newValue,oldValue) },{deep:false}) // 此处的deep配置无效 */ // 情况二:监视reactive所定义的一个响应式数据中的某个属性 /* watch(()=>person.name,(newValue,oldValue)=>{ console.log("person变化了",newValue,oldValue) }) */ // 情况三:监视reactive所定义的一个响应式数据中的某些属性 /* watch([()=>person.name,()=>person.age],(newValue,oldValue)=>{ console.log("person中的name或age变化了",newValue,oldValue) }) */ // 情况四:监视reactive所定义的对象中的某个属性(如果这个属性依然是个对象),那么deep配置有效 watch(()=>person.job,(newValue,oldValue)=>{ console.log("person的job属性变化了",newValue,oldValue) },{deep:true}) // 此处deep配置有效 return { person } } } </script>- 1
- 2
- 3
- 4
- 5
- 6
- 7
- 8
- 9
- 10
- 11
- 12
- 13
- 14
- 15
- 16
- 17
- 18
- 19
- 20
- 21
- 22
- 23
- 24
- 25
- 26
- 27
- 28
- 29
- 30
- 31
- 32
- 33
- 34
- 35
- 36
- 37
- 38
- 39
- 40
- 41
- 42
- 43
- 44
- 45
- 46
- 47
- 48
- 49
- 50
- 51
- 52
- 53
- 54
- 55
- 56
- 57
- 58
- 59
2.3 watchEffect函数
- watch的套路是既要指名监视的属性,也要指明监视的回调
- watchEffect的套路是:不用指明监视哪个属性,监视的回调中用到哪个属性,那就监视哪个属性。
- watchEffect有点像computed:
- 区别在于computed注重的是计算出来的值(回调函数的返回值),所以必须要写返回值
- 而watchEffect更注重的是过程(回调函数的函数体),所以不用写返回值。
<template> <h3>姓名:{{person.name}}</h3> <h3>年龄:{{person.age}}</h3> <h3>薪资:{{person.job.salary}}</h3> <button @click="person.name += '!'">修改姓名</button> <button @click="person.age += 1">增长年龄</button> <button @click="person.job.salary += 3">涨薪</button> </template> <script> import {reactive,ref,watchEffect} from "vue" export default { name:"WatchTest02", setup(){ let sum = ref(0) let person = reactive({ name:"张三", age:18, job:{ type:"前端工程师", salary:15 } }) watchEffect(()=>{ // watchEffect所指定的回调中用到的数据只要发生变化,则直接重新执行回调 // 使用sum和person对象中的age const x1 = sum.value const x2 = person.age console.log("watchEffect配置的回调执行了!",x1,x2) }) return { sum, person } } } </script>- 1
- 2
- 3
- 4
- 5
- 6
- 7
- 8
- 9
- 10
- 11
- 12
- 13
- 14
- 15
- 16
- 17
- 18
- 19
- 20
- 21
- 22
- 23
- 24
- 25
- 26
- 27
- 28
- 29
- 30
- 31
- 32
- 33
- 34
- 35
- 36
- 37
- 38

可以看到只有在watchEffect中用到的对象才会被监视到,并且页面刷新时watchEffect就会自动执行一次
3、Vue3生命周期

和vue2的区别
(1)和vue2一样,主要是8个生命周期钩子,但有两个钩子又和vue2不一样,vue3将vue2中的beforeDestroy和destroyed换成了beforeUnmonted和unmounted
(2)在创建组件对象时,vue2是直接new Vue(),之后是走一步算一步,哪里需要挂载东西再挂载东西,例如会进行对象上是否有el的判断,没有则自动挂载上,;而vue3是Vue.create(option).mount(el),直接把需要的东西准备好,甚至提前把el直接挂载到对象上。两种方式使用生命周期钩子
- 第一种方式:通过配置项的形式使用生命周期钩子
setup(){ ... }, beforeCreate(){......}, created(){......}, beforeMounted(){......}, mounted(){......}, beforeDestroy(){......}, destroyed(){......}, beforeUnmounted(){......}, unmounted(){......}- 1
- 2
- 3
- 4
- 5
- 6
- 7
- 8
- 9
- 10
- 11
- 第二种方式:通过组合式API的形式去使用生命周期钩子(也就是将生命周期钩子放到setup配置项中)
// 引入API import {} from "vue" -------------------- setup(){ ...... onBeforeMounted(()=>{...}) onMounted(()=>{...}) onBeforeDestroy(()=>{...}) onDestroyed(()=>{...}) onBeforeUnmounted(()=>{...}) onUnmounted(()=>{...}) }- 1
- 2
- 3
- 4
- 5
- 6
- 7
- 8
- 9
- 10
- 11
- 12
注意点:
(1)原来vue2中的beforeDestroy和destroyed不能使用,取而代之的是beforeUnmounted和unmounted
(2)将生命周期钩子放到setup配置项中时,需要注意生命周期钩子的形式变了,并且不支持beforeCreate和created写入setup中,因为setup会在这两个钩子执行之前执行.
(3)如果同时使用了这两中方式,那么会有执行先后顺序问题,写在setup中的钩子的优先级会更高,例如:onBeforeMounted会比BeforeMounted先执行。(建议只是用其中一种方式)4、自定义hook函数
- 定义
本质是一个函数,把setup函数中使用的CompositionAPI进行了封装,类似于vue2中的mixin。 - 优势
可以复用代码,让setup中的逻辑更加清楚易懂
例如,实现这么一个功能,鼠标点击屏幕,显示鼠标点击时的坐标。

如果只是一个人要用到这个功能,那么这个功能就可以直接写在组件中,如下:
<template> <h1>鼠标点击屏幕,显示鼠标点击时的坐标</h1> <h2>鼠标横坐标:{{point.x}}</h2> <h2>鼠标纵坐标:{{point.y}}</h2> </template> <script> import { reactive,onMounted,onBeforeUnmount} from "vue" export default { name:"HookTest", setup() { // 定义变量:表示点的坐标 const point = reactive({ x:0, y:0 }) // 定义函数:获取坐标 function usePoint(event){ point.x = event.pageX point.y = event.pageY console.log("横坐标:"+ point.x,"纵坐标:"+ point.y); } // 在onMounted钩子中给window绑定事件 onMounted(() => { window.addEventListener("click",usePoint) }) // 在onBeforeUnmount钩子中给window解绑事件 onBeforeUnmount(()=>{ window.removeEventListener("click",usePoint) }) // 返回一个对象 return { point } } } </script>- 1
- 2
- 3
- 4
- 5
- 6
- 7
- 8
- 9
- 10
- 11
- 12
- 13
- 14
- 15
- 16
- 17
- 18
- 19
- 20
- 21
- 22
- 23
- 24
- 25
- 26
- 27
- 28
- 29
- 30
- 31
- 32
- 33
- 34
- 35
- 36
- 37
- 38
- 39
- 40
- 41
如果想要让这个功能做到随引随用,那么可以使用自定义hook函数进行封装,如下:
- src/hooks/usePoint.js
import {reactive,onMounted,onBeforeUnmount} from "vue" export default function usePoint(){ // 定义变量:表示点的坐标 const point = reactive({ x:0, y:0 }) // 定义函数:获取坐标 function usePoint(event){ point.x = event.pageX point.y = event.pageY console.log("横坐标:"+ point.x,"纵坐标:"+ point.y); } // 在onMounted钩子中给window绑定事件 onMounted(() => { window.addEventListener("click",usePoint) }) // 在onBeforeUnmount钩子中给window解绑事件 onBeforeUnmount(()=>{ window.removeEventListener("click",usePoint) }) // 返回一个获取到的对象 return point }- 1
- 2
- 3
- 4
- 5
- 6
- 7
- 8
- 9
- 10
- 11
- 12
- 13
- 14
- 15
- 16
- 17
- 18
- 19
- 20
- 21
- 22
- 23
- 24
- 25
- 26
- 27
- 28
- 29
- HookTest.vue
<template> <h1>鼠标点击屏幕,显示鼠标点击时的坐标</h1> <h2>鼠标横坐标:{{point.x}}</h2> <h2>鼠标纵坐标:{{point.y}}</h2> </template> <script> // 引入hook函数 import usePoint from "../hooks/usePoint" export default { name:"HookTest", setup() { // 调用hook函数 const point = usePoint() // 接收usePoint()方法return过来的对象 // 返回point对象 return { point } } } </script>- 1
- 2
- 3
- 4
- 5
- 6
- 7
- 8
- 9
- 10
- 11
- 12
- 13
- 14
- 15
- 16
- 17
- 18
- 19
- 20
- 21
- 22
- 23
通过hook函数,无论哪个组件想要使用这个功能,那么只需要引入并调用即可
-
相关阅读:
微信小程序 | 动手实现双十一红包雨
Java版本spring cloud + spring boot企业电子招投标系统源代码
Python 命令行参数:Argparse 与 Click
微擎模块 维修店3.4.2 公众号+小程序双端共用版源码
基于C++11的数据库连接池(推荐)
Mysql一对多列转行拼接函数GROUP_CONCAT
SI522国产13.56MHz读卡NFC芯片QFN32兼容替代RC522
【单片机】UART、I2C、SPI、TTL、RS232、RS422、RS485、CAN、USB、SD卡、1-WIRE、Ethernet等常见通信方式
ArcGIS实验教程——实验四十六:地图概括功能实验教程
Android MVVM LiveData postValue 吞消息
- 原文地址:https://blog.csdn.net/lalala_dxf/article/details/125391754
