-
Redis系列——Java客户端(Jedis,SpringDataRedis)day2-1
Java客户端
打开官网

个人推荐这三个

对比
Redission
Redisson - 具有内存数据网格功能的 Redis Java 客户端。 超过 50 个基于 Redis 的 Java 对象和服务:Set、Multimap、SortedSet、Map、List、Queue、Deque、Semaphore、Lock、AtomicLong、Map Reduce、发布/订阅、Bloom filter、Spring Cache、Tomcat、Scheduler、JCache API、Hibernate , MyBatis, RPC, 本地缓存… (分布式环境推荐)
Jedis
Redis Java 客户端专为提高性能和易用性而设计。 以Redis命令作为方法名称,学习成本低,简单实用。但是Jedis实例是线程不安全的,多线程环境下需要基于连接池来使用(简单使用推荐)
lettuce
用于线程安全同步、异步和反应式使用的高级 Java Redis 客户端。 支持集群、哨兵、流水线和编解码器。 基于Netty实现,spring官方推荐并兼容(官方推荐)
其实这三个是各有各的用处,没有最好,只有最合适!!!
Jedis
https://github.com/redis/jedis
quickstart
引入依赖
<dependency> <groupId>redis.clients</groupId> <artifactId>jedis</artifactId> <version>4.2.0</version> </dependency>- 1
- 2
- 3
- 4
- 5
编写代码
package com.example.jedis.config; import redis.clients.jedis.Jedis; public class JedisDone { public static void main(String[] args) { //连接 Jedis jedis = new Jedis("192.168.112.135",6379); //设置密码 jedis.auth("syf20020816"); //选择库 jedis.select(0); //存数据(string) String set = jedis.set("name", "zhangsan"); System.out.println(set); //获取 String name = jedis.get("name"); System.out.println(name); System.out.println("-----------------"); //hash jedis.hset("User:1","name","zhangsan"); jedis.hset("User:1","age","20"); String age = jedis.hget("User:1", "age"); System.out.println(age); jedis.close(); } }- 1
- 2
- 3
- 4
- 5
- 6
- 7
- 8
- 9
- 10
- 11
- 12
- 13
- 14
- 15
- 16
- 17
- 18
- 19
- 20
- 21
- 22
- 23
- 24
- 25
- 26
- 27
- 28
- 29
Jedis连接池
Jedis本身是线程不安全的,并且频繁的创建和销毁连接会有性能损耗,因此我们要使用到连接池
package com.example.jedis.config; import redis.clients.jedis.Jedis; import redis.clients.jedis.JedisPool; import redis.clients.jedis.JedisPoolConfig; import java.time.Duration; public class JedisPoolFactory { private static JedisPool jedispool; static { //配置连接池 JedisPoolConfig jedisPoolConfig = new JedisPoolConfig(); //设置最大连接数 jedisPoolConfig.setMaxTotal(10); //设置最大空闲连接 jedisPoolConfig.setMaxIdle(8); //设置最小空闲连接 jedisPoolConfig.setMinIdle(0); //设置最长等待时间 jedisPoolConfig.setMaxWait(Duration.ofDays(5)); //创建连接池对象 jedispool = new JedisPool(jedisPoolConfig, "192.168.112.135", 6379, 1000, "syf20020816"); } public static Jedis getJedis() { return jedispool.getResource(); } public static void main(String[] args) { Jedis jedis = JedisPoolFactory.getJedis(); //存数据(string) String set = jedis.set("name", "zhangsan"); System.out.println(set); //获取 String name = jedis.get("name"); System.out.println(name); System.out.println("-----------------"); //hash jedis.hset("User:1","name","zhangsan"); jedis.hset("User:1","age","20"); String age = jedis.hget("User:1", "age"); System.out.println(age); jedis.close(); } }- 1
- 2
- 3
- 4
- 5
- 6
- 7
- 8
- 9
- 10
- 11
- 12
- 13
- 14
- 15
- 16
- 17
- 18
- 19
- 20
- 21
- 22
- 23
- 24
- 25
- 26
- 27
- 28
- 29
- 30
- 31
- 32
- 33
- 34
- 35
- 36
- 37
- 38
- 39
- 40
- 41
- 42
- 43
- 44
- 45
- 46
- 47
- 48
- 49
- 50
- 51
- 52
- 53
- 54
- 55
SpringDataRedis
Spring Data Redis 是更大的 Spring Data 系列的一部分,它提供了从 Spring 应用程序对 Redis 的轻松配置和访问。 它提供了与商店交互的低级和高级抽象,使用户摆脱了对基础设施的担忧。
特征
- 连接包作为跨多个 Redis 驱动程序(Lettuce 和 Jedis)的低级抽象。
- 异常转换为 Spring 的可移植数据访问异常层次结构,用于 Redis 驱动程序异常。
- RedisTemplate 为执行各种 Redis 操作、异常翻译和序列化支持提供高级抽象。
- Pubsub 支持(例如用于消息驱动的 POJO 的MessageListenerContainer)。
- Redis Sentinel 和 Redis 集群支持。
- 使用 Lettuce 驱动程序的反应式 API。
- JDK、String、JSON 和 Spring Object/XML 映射序列化程序。
- Redis 之上的 JDK 集合实现。
- 原子计数器支持类。
- 排序和流水线功能。
- 专门支持 SORT、SORT/GET 模式和返回的批量值。
- Spring 3.1 缓存抽象的 Redis 实现。
- Repository 接口的自动实现,包括使用 @EnableRedisRepositories 支持自定义查询方法。
- CDI 对存储库的支持。
RedisTemplate工具类

quickstart
依赖
<dependency> <groupId>org.springframework.boot</groupId> <artifactId>spring-boot-starter-data-redis</artifactId> </dependency> <dependency> <groupId>org.apache.commons</groupId> <artifactId>commons-pool2</artifactId> </dependency>- 1
- 2
- 3
- 4
- 5
- 6
- 7
- 8
配置yaml
spring: redis: port: 6379 host: 192.168.112.135 password: syf20020816 lettuce: pool: max-active: 8 max-idle: 8 min-idle: 0 max-wait: 1000- 1
- 2
- 3
- 4
- 5
- 6
- 7
- 8
- 9
- 10
- 11
- 12
使用
package com.example.jedis; import org.junit.jupiter.api.Test; import org.springframework.beans.factory.annotation.Autowired; import org.springframework.boot.test.context.SpringBootTest; import org.springframework.data.redis.core.RedisTemplate; @SpringBootTest class JedisApplicationTests { @Autowired private RedisTemplate redisTemplate; @Test void contextLoads() { redisTemplate.opsForValue().set("name","zhangsan"); Object name = redisTemplate.opsForValue().get("name"); System.out.println(name); } }- 1
- 2
- 3
- 4
- 5
- 6
- 7
- 8
- 9
- 10
- 11
- 12
- 13
- 14
- 15
- 16
- 17
- 18
- 19
- 20
- 21
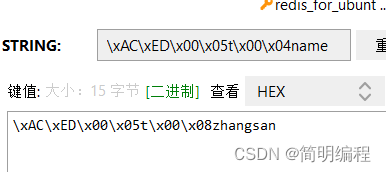
如上图所示,实际设置的key和value是通过序列化后的结果,序列化是通过RedisTemplate中的afterPropertiesSet()方法进行的
若直接使用这种方式就会产生两个问题- 可读性差
- 内存占用多
解决
我们可以应用到两个类
- GenericJackson2JsonRedisSerializer
- StringRedisSerializer
增加jaskson依赖
<dependency> <groupId>com.fasterxml.jackson.core</groupId> <artifactId>jackson-databind</artifactId> </dependency>- 1
- 2
- 3
- 4
编写配置类
package com.example.jedis.define; import org.springframework.context.annotation.Bean; import org.springframework.context.annotation.Configuration; import org.springframework.data.redis.connection.RedisConnectionFactory; import org.springframework.data.redis.core.RedisTemplate; import org.springframework.data.redis.serializer.GenericJackson2JsonRedisSerializer; import org.springframework.data.redis.serializer.RedisSerializer; @Configuration public class SelfDefineRedisTem { @Bean public RedisTemplate<String, Object> selfRedisTemplate(RedisConnectionFactory redisConnectionFactory){ //创建redisTemplate RedisTemplate<String, Object> redisTemplate = new RedisTemplate<>(); //设置连接工厂 redisTemplate.setConnectionFactory(redisConnectionFactory); //设置序列化工具 GenericJackson2JsonRedisSerializer jsonRedisSerializer = new GenericJackson2JsonRedisSerializer(); //key和hash key使用string序列化 redisTemplate.setKeySerializer(RedisSerializer.string()); redisTemplate.setHashValueSerializer(RedisSerializer.string()); //value和hash value使用Json序列化 redisTemplate.setValueSerializer(jsonRedisSerializer); redisTemplate.setHashValueSerializer(jsonRedisSerializer); return redisTemplate; } }- 1
- 2
- 3
- 4
- 5
- 6
- 7
- 8
- 9
- 10
- 11
- 12
- 13
- 14
- 15
- 16
- 17
- 18
- 19
- 20
- 21
- 22
- 23
- 24
- 25
- 26
- 27
- 28
- 29
- 30
测试
增加泛型
RedisTemplate<String, Object>package com.example.jedis; import org.junit.jupiter.api.Test; import org.springframework.beans.factory.annotation.Autowired; import org.springframework.boot.test.context.SpringBootTest; import org.springframework.data.redis.core.RedisTemplate; @SpringBootTest class JedisApplicationTests { @Autowired private RedisTemplate<String, Object> redisTemplate; @Test void contextLoads() { redisTemplate.opsForValue().set("name","zhangsan"); Object name = redisTemplate.opsForValue().get("name"); System.out.println(name); } }- 1
- 2
- 3
- 4
- 5
- 6
- 7
- 8
- 9
- 10
- 11
- 12
- 13
- 14
- 15
- 16
- 17
- 18
- 19
- 20
- 21
问题
虽然帮我们实现了序列化和反序列化但是若我们直接存储对象时,就会多出一个”@Class“的键值对,十分消耗内存空间
解决对象序列化@Class占用空间
需要我们自己进行手动序列化和反序列化
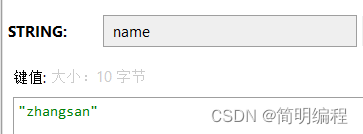
使用StringRedisTemplate类帮助解决
它的key,value的序列化方式就是String方式
省去自己定义RedisTemplate的过程实体类
package com.example.jedis.entity; import lombok.AllArgsConstructor; import lombok.Data; import lombok.NoArgsConstructor; import lombok.ToString; @Data @AllArgsConstructor @NoArgsConstructor @ToString public class Stu { private String name; private Integer age; }- 1
- 2
- 3
- 4
- 5
- 6
- 7
- 8
- 9
- 10
- 11
- 12
- 13
- 14
- 15
- 16
测试
package com.example.jedis; import com.example.jedis.entity.Stu; import com.fasterxml.jackson.core.JsonProcessingException; import com.fasterxml.jackson.databind.ObjectMapper; import org.junit.jupiter.api.Test; import org.springframework.beans.factory.annotation.Autowired; import org.springframework.boot.test.context.SpringBootTest; import org.springframework.data.redis.core.StringRedisTemplate; @SpringBootTest public class RedisTest2 { @Autowired private StringRedisTemplate redisTemplate; //JSON序列化工具 private ObjectMapper mapper =new ObjectMapper(); @Test public void test() throws JsonProcessingException { Stu zhangsan = new Stu("zhangsan", 30); //进行手动序列化 String s = mapper.writeValueAsString(zhangsan); redisTemplate.opsForValue().set("stu:1",s); //读取 String s1 = redisTemplate.opsForValue().get("stu:1"); //手动反序列化 Stu stu = mapper.readValue(s1, Stu.class); System.out.println(stu.toString()); } }- 1
- 2
- 3
- 4
- 5
- 6
- 7
- 8
- 9
- 10
- 11
- 12
- 13
- 14
- 15
- 16
- 17
- 18
- 19
- 20
- 21
- 22
- 23
- 24
- 25
- 26
- 27
- 28
- 29
- 30
- 31
- 32


-
相关阅读:
[SQL开发笔记]LIKE操作符:在 WHERE 子句中搜索列中的指定模式
windiws docker 部署jar window部署docker 转载
在WPF应用程序集中添加新文件时,Page和Window有什么区别
阿袍的思考
内置属性-top栏切换
SOLIDWORKS® 2024 新功能 - 3D CAD
JS奇淫技巧:挑战前端黑科技,数值的七种写法,能全看懂的一定是高手
计算机毕业设计node+vue基于微信小程序的乐团团购系统的设计与实现
二维多孔介质图像的粒度分布研究(Matlab代码实现)
router4x 路由配置(多种方案)
- 原文地址:https://blog.csdn.net/qq_51553982/article/details/125465743
