-
SpringCloud-06-Config
Config
SpringCloud Config的背景
总之,微服务架构中的微服务运行离不开配置文件,配置文件是以.properties或.yml的形式保存在各个微服务的类路径下并由各个服务管理。
配置文件交给各个微服务自行管理,会存在以下问题:
- 管理难度大:配置文件交给各个微服务中,难以管理。
- 安全性低: 配置文件和源代码一起保存在代码库中,容易造成配置泄露。
- 时效性差:修改配置文件必须重新启动服务才会生效。
- 局限性明显: 无法支持动态调整,例如日志开关,功能开关
为了解决这些问题,通常使用配置中心对配置统一管理,市面上开源的配置中心有百度的Disconf,淘宝的diamond,360的Qconf,携程的Apollo等。SpringCloud也有自己的分布式配置中心:Spring Cloud Config
SpringCloud Config简介
Spring Cloud Config 是由Spring Cloud团队开发的项目,它可以为微服务架构的各个微服务提供集中化的外部配置支持。
简言之,Spring Cloud把各个微服务的配置文件集中存储在一个外部存储仓库或系统(例如Git,SVN等)中,进而对这些配置文件进行统一管理,以支持各个微服务正常运行。
SpringCloud Config的组成
Spring Cloud Config 分为两部分:
- Config Server: 分布式配置中心,它是独立运行的微服务应用,用来连接配置仓库并为客户端提供获取配置信息、加密信息、和解密信息的访问接口。
- Config Client: 指的是微服务架构中的各个微服务,它们通过ConfigServer对配置进行管理,并从Config Server中获取和加载配置信息。
Spring Cloud Config默认使用Git
Spring Cloiud Config默认使用Git仓库存储配置信息,因此使用Spring Cloud Config构建的项目能支持微服务配置的版本管理,还可以使用Git客户端工具对配置内容进行管理和访问。除了Git外,Spring还支持对SVN、本地化文件系统等存储方式。
SpringCloud Config运行原理
工作流程如下图所示

Spring Cloud Config的工作原理如下:
1.开发人员负责把配置文件提交到远程Git仓库。
2.Config服务端(分布式配置中心)连接配置仓库Git,并对Config客户端暴露获取配置的接口。
3.Config客户端通过Config服务端暴露的配置信息的接口,获取配置仓库中的配置。
4.Config客户端获取到配置信息,以支持服务的运行。Spring Cloud Config的特点:
有以下特点:
- Spring Cloud Config由Spring Cloud团队开发,可以和Spring的生态体系无缝集成。
- Spring Cloud Config将所有的配置文件都集中存储在一个外部的存储仓库或系统,统一管理。
- Spring Cloud Config 配置中心将配置以 REST 接口的形式暴露给各个微服务,以方便各个微服务获取。
- 当配置发生变化时,微服务不需要重启即可感知到配置的变化,并自动获取和应用最新配置。
- 一个应用可能有多个环境,例如开发(dev)环境、测试(test)环境、生产(prod)环境等等,开发人员可以通过 Spring Cloud Config 对不同环境的各配置进行管理,且能够确保应用在环境迁移后,仍然有完整的配置支持其正常运行。
Spring Cloud Config实现
config的配置基于服务端和客户端,服务端配置是去连接外部远程仓库,并把
配置以REST接口的形式暴露给客户端。
Config Server实现
1.环境准备
Spring Cloud Config默认使用Git作为远程仓库,这里也使用Git来提交配置到远程仓库。
-
在Gitee创建一个自己的私有仓库

-
在自己指定的某个文件夹中,选中Git Bash Here选项

-
使用git clone “远程仓库的http地址” 把远程仓库的内容下载下来到本地项目。
-
使用 touch(Linux指令) 创建一个application.yml文件,并配置以下内容
spring: profiles: active: dev --- # 开发环境 spring: profiles: dev application: name: springcloud-config-dev --- # 测试环境 spring: profiles: test application: name: springcloud-config-test- 1
- 2
- 3
- 4
- 5
- 6
- 7
- 8
- 9
- 10
- 11
- 12
- 13
- 14
- 15
- 16
- 17
-
使用 git add . 把最近做的修改提交到暂存区
-
可以使用 git status 进行查看暂存区的文件
-
使用 git commit -m “提交信息” 提交到本地仓库
-
使用 git push origin master 提交到远程仓库
注意:
若提交到远程仓库出错,原因是我们创建仓库时初始了README文件并配置了忽略条件,然后我们把本地项目关联到这个仓库,并把项目推送到仓库,我们在关联本地与远程时,两端都是有内容的,这两端无实际联系,当我们推送到远程或者从远程拉取内容时,都会有没有被跟踪的内容,于是Git需要先拉取再推送。 出错解决两步: 1.git pull --rebase origin master 2.git push origin master
2.添加子模块导入依赖
新建一个springcloud-config-server-3344的配置文件,并在pom.xml添加如下配置
<dependencies> <!-- web环境 --> <dependency> <groupId>org.springframework.boot</groupId> <artifactId>spring-boot-starter-web</artifactId> </dependency> <!-- config-server --> <dependency> <groupId>org.springframework.cloud</groupId> <artifactId>spring-cloud-config-server</artifactId> </dependency> </dependencies>- 1
- 2
- 3
- 4
- 5
- 6
- 7
- 8
- 9
- 10
- 11
- 12
- 13
- 14
- 15
- 16
3.application.yml
在resource下的application.yml文件添加以下配置
server: port: 3344 spring: # 服务名 application: name: springcloud-config-server # Spring Cloud配置 cloud: config: server: # 连接git远程仓库,访问其中的资源和配置 git: # Git 地址,这里使用Gitee,不用ssh的 uri: https://gitee.com/liang-xuanze/springcloud-config.git # 仓库名 search-paths: /spring-config #搜索路径 # 如果仓库是公开仓库,则不用填写用户名和密码。私有仓库才要填写 force-pull: true #设置强行pull拉取 username: # Gitee账户 password: #Gitee密码 default-label: master # 主分支- 1
- 2
- 3
- 4
- 5
- 6
- 7
- 8
- 9
- 10
- 11
- 12
- 13
- 14
- 15
- 16
- 17
- 18
- 19
- 20
- 21
- 22
- 23
- 24
- 25
- 主启动类
在org.liang包下创建一个主启动类Config_Server_3344
package org.liang; import org.springframework.boot.SpringApplication; import org.springframework.boot.autoconfigure.SpringBootApplication; import org.springframework.cloud.config.server.EnableConfigServer; @EnableConfigServer //开启spring cloud config server 客户端 @SpringBootApplication public class Config_Server_3344 { public static void main(String[] args) { SpringApplication.run(Config_Server_3344.class,args); } }- 1
- 2
- 3
- 4
- 5
- 6
- 7
- 8
- 9
- 10
- 11
- 12
- 13
- 14
- 15
- 16
- 17
- 测试查看
看spring cloud config是否连接到远程仓库,查看的方式有以下三种配置文件访问规则
访问规则 示例 /{application}/{profile}/{lable} /application/dev/master /{application}-{profile}.{suffix} /application-dev.yml {label}/{application}-{profile}.{suffix} /master/application-dev.yml 访问成功
 切换配置环境

完成了Config Server的搭建和测试Config Client 实现
1.在之前的git本地项目中添加config-client.yml文件,配置内容如下
spring: profiles: active: test --- server: port: 3355 eureka: client: service-url: defaultZone: http:localhost:7001/eureka/ spring: application: name: spring-config-provider profiles: dev --- server: port: 3366 eureka: client: service-url: defaultZone: http:localhost:7001/eureka/ spring: application: name: spring-config-provider profiles: test- 1
- 2
- 3
- 4
- 5
- 6
- 7
- 8
- 9
- 10
- 11
- 12
- 13
- 14
- 15
- 16
- 17
- 18
- 19
- 20
- 21
- 22
- 23
- 24
- 25
- 26
- 27
- 28
- 29
- 30
- 31
- 32
- 33
- 34
- 35
然后使用上面服务端相同的操作,把文件提交到远程仓库
2.创建一个名叫spring-config-client-user的子模块,并添加如下依赖
<dependencies> <dependency> <groupId>org.springframework.cloud</groupId> <artifactId>spring-cloud-starter-config</artifactId> </dependency> <!-- 完善监控信息,监控配置更改--> <dependency> <groupId>org.springframework.boot</groupId> <artifactId>spring-boot-actuator</artifactId> </dependency> <dependency> <groupId>org.springframework.boot</groupId> <artifactId>spring-boot-starter-web</artifactId> </dependency> </dependencies>- 1
- 2
- 3
- 4
- 5
- 6
- 7
- 8
- 9
- 10
- 11
- 12
- 13
- 14
- 15
- 16
3.配置文件配置
分为两种级别的配置:
- 系统级别的配置
# 系统级别的配置 spring: cloud: config: name: config-client # 需要从git读取的文件,不要后缀 # 环境 profile: test # 分支 label: master #uri,获取服务配置中心暴露的接口 uri: http://localhost:3344- 1
- 2
- 3
- 4
- 5
- 6
- 7
- 8
- 9
- 10
- 11
- 12
- 用户级别的配置(配置个服务名即可)
# 用户级别的配置 spring: application: name: spring-config-client-3355- 1
- 2
- 3
- 4
- 5
3.主启动类编写
@SpringBootApplication public class Config_Client{ public static void main(String[] args) { SpringApplication.run(Config_Client.class,args); } }- 1
- 2
- 3
- 4
- 5
- 6
- 7
4.编写一个controller类来测试是否获取到了远程配置
在org.liang.controller包下创建一个ConfigController的类,并添加以下内容
package org.liang.controller; import org.springframework.beans.factory.annotation.Value; import org.springframework.web.bind.annotation.RequestMapping; import org.springframework.web.bind.annotation.RestController; @RestController //以json格式返回响应结果 public class ConfigController { @Value("${spring.application.name}") private String applicationName; //获取微服务名称 @Value("${eureka.client.service-url.defaultZone}") private String eurekaName; //获取Eureka的服务信息 @Value("${server.port}") private String port; //获取服务端的端口号 @RequestMapping("/config") public String getConfig() { return "(微服务名称"+applicationName+ "),(eureka服务信息"+eurekaName+ "),(服务端端口号"+port+")"; } }- 1
- 2
- 3
- 4
- 5
- 6
- 7
- 8
- 9
- 10
- 11
- 12
- 13
- 14
- 15
- 16
- 17
- 18
- 19
- 20
- 21
- 22
- 23
- 24
- 25
- 26
- 27
- 28
- 启动测试
在Idea中开启同一个项目能启动多个窗口,在edit Configuration下开启allow paraller run。

测试,发现都可以访问。

实际使用Spring Cloud Config
这里演示一下Eureka和Provider通过Config Server获取到远程仓库的配置文件。
Eureka获取远程配置文件
1.新建一个springcloud-config-eureka-7001子模块,并将springcloud-user-eureka-7001的代码和配置一份复制一份当前子模块,并添加如下配置
<dependency> <groupId>org.springframework.cloud</groupId> <artifactId>spring-cloud-starter-config</artifactId> </dependency>- 1
- 2
- 3
- 4
- 5
2.在之前的git本地项目中添加一个config-eureka.yml配置文件。
- 把application.yml内的配置copy并清空
- 把copy的代码放入到config-eurekal.yml,并添加不同的环境如下所示
spring: profiles: active: dev --- # Eureka服务器配置 server: port: 7001 # 配置Eureka服务器实例名字 eureka: instance: hostname: eureka7001.com #127.0.0.1 # 显示自己是服务器的配置 client: register-with-eureka: false # 是否向eureka注册自己,默认为true fetch-registry: false # 如果fetch-registry为false,则代表自己为注册中心,默认为true # Eureka监控页面 DEFAULT_URL = "http://localhost:8761/eureka/ service-url: #defaultZone: http://${eureka.instance.hostname}/${server.port}/eureka/ # 单机 defaultZone: http://eureka7002.com:7002/eureka/,http://eureka7003.com:7003/eureka/ # 集群关联 spring: application: name: spring-cloud-config-eureka profiles: dev --- # Eureka服务器配置 server: port: 7002 # 配置Eureka服务器实例名字 eureka: instance: hostname: eureka7002.com #127.0.0.1 # 显示自己是服务器的配置 client: register-with-eureka: false # 是否向eureka注册自己,默认为true fetch-registry: false # 如果fetch-registry为false,则代表自己为注册中心,默认为true # Eureka监控页面 DEFAULT_URL = "http://localhost:8761/eureka/ service-url: #defaultZone: http://${eureka.instance.hostname}/${server.port}/eureka/ # 单机 defaultZone: http://eureka7001.com:7001/eureka/,http://eureka7003.com:7003/eureka/ # 集群关联 spring: application: name: spring-cloud-config-eureka profiles: test- 1
- 2
- 3
- 4
- 5
- 6
- 7
- 8
- 9
- 10
- 11
- 12
- 13
- 14
- 15
- 16
- 17
- 18
- 19
- 20
- 21
- 22
- 23
- 24
- 25
- 26
- 27
- 28
- 29
- 30
- 31
- 32
- 33
- 34
- 35
- 36
- 37
- 38
- 39
- 40
- 41
- 42
- 43
- 44
- 45
- 46
- 47
- 48
- 49
- 50
- 51
- 52
- 53
- 54
- 55
- 提交到远程仓库。
3.配置文件
配置文件添加一个名叫bootstrap.yml的配置文件并配置bootstrap.yml
spring: cloud: config: name: config-eureka # 仓库中配置文件的名称 profile: dev label: master uri: http://localhost:3344- 1
- 2
- 3
- 4
- 5
- 6
- 7
application.yml
spring: application: name: springcloud-config-eureka-7001- 1
- 2
- 3
4.添加自己的配置文件,并测试。
成功访问7001则说明拿到了远程配置

provider获取远程配置文件
1.新建一个springcloud-config-provider-8081子模块,并将springcloud-user-provider-8081的代码和配置一份复制一份当前子模块,并添加如下配置
<dependency> <groupId>org.springframework.cloud</groupId> <artifactId>spring-cloud-starter-config</artifactId> </dependency>- 1
- 2
- 3
- 4
- 5
2.同理,在之前本地git创建一个名叫config-user.yml文件,添加下面配置提交远程仓库
spring: profiles: active: dev --- spring: application: name: springcloud-user-provider-8081 profiles: dev datasource: # 连接数据源配置 type: com.alibaba.druid.pool.DruidDataSource driver-class-name: com.mysql.cj.jdbc.Driver url: jdbc:mysql://localhost:3306/test?useSSL=false&serverTimezone=UTC username: root password: root server: port: 8081 #mybatis配置 mybatis: type-aliases-package: org.liang.pojo mapper-locations: mapper/*.xml # 注册服务到eureka eureka: client: service-url: defaultZone: http://localhost:7001/eureka/ # 配置eureka上服务的默认描述信息 instance: instance-id: springcloud-user-provider-8081 #info配置服务的具体描述信息 info: app.name: springcloud-provider funcation: description service --- spring: application: name: springcloud-user-provider-8081 profiles: test datasource: # 连接数据源配置 type: com.alibaba.druid.pool.DruidDataSource driver-class-name: com.mysql.cj.jdbc.Driver url: jdbc:mysql://localhost:3306/test?useSSL=false&serverTimezone=UTC username: root password: root server: port: 8081 #mybatis配置 mybatis: type-aliases-package: org.liang.pojo mapper-locations: mapper/*.xml # 注册服务到eureka eureka: client: service-url: defaultZone: http://localhost:7001/eureka/ # 配置eureka上服务的默认描述信息 instance: instance-id: springcloud-user-provider-8081 #info配置服务的具体描述信息 info: app.name: springcloud-provider funcation: description service- 1
- 2
- 3
- 4
- 5
- 6
- 7
- 8
- 9
- 10
- 11
- 12
- 13
- 14
- 15
- 16
- 17
- 18
- 19
- 20
- 21
- 22
- 23
- 24
- 25
- 26
- 27
- 28
- 29
- 30
- 31
- 32
- 33
- 34
- 35
- 36
- 37
- 38
- 39
- 40
- 41
- 42
- 43
- 44
- 45
- 46
- 47
- 48
- 49
- 50
- 51
- 52
- 53
- 54
- 55
- 56
- 57
- 58
- 59
- 60
- 61
- 62
- 63
- 64
- 65
- 66
- 67
- 68
- 69
- 70
- 71
- 72
- 73
3.配置文件
application.yml内的清空
bootstrap.ymlspring: cloud: config: name: config-user # 仓库配置文件名,不需要后缀 label: master uri: http://localhost:3344 profile: dev- 1
- 2
- 3
- 4
- 5
- 6
- 7
4.启动测试

结论
- 配置更新后,Spring Cloud Config Server(配置中心)可直接从Git仓库中获取最新配置。
- 除非重启Spring Cloud Config Client(客户端),否则无法通过Spring Cloud Config 服务端获取最新的配置。
解决客户端获取最新配置问题
通过上面我们知道可以通过重启的方式解决问题,但重启不是解决问题的好方法,解决这个问题分为两种: 1.手动刷新配置 2. Spring Cloud Bus(动态刷新配置)
手动刷新
1.基于之前的springcloud-config-client-user模块进行改造,我们导入了Spring Boot actuator模块,来完善监控。
2.在配置文件bootstrap.yml添加以下配置化,对外暴露Spring Boot actuator的监控节点。
# 给actuator暴露所有的节点,不只暴露health的节点(服务端也要加上) management: endpoints: web: exposure: include: "*"- 1
- 2
- 3
- 4
- 5
- 6
- 7
3.在ConfigController类上添加@RefeshScope注解,表示开启配置刷新。
@RefreshScope // 手动获取最新git配置,在actuator监控条件下加载RefreshScope- 1
4.启动测试

修改Git里面配置文件,发现Config客户端并没有变化查看一下http://localhost:3344/actuator

查看已经暴露了节点5.打开命令行窗口,然后发送一个POST请求刷新springcloud-config-client-user,通知客户端配置已经修改,需要重新拉去配置
curl -X POST "http://localhost:3355/actuator/refresh"- 1
6.使用浏览器访问,发现客户端已经拉取到了最新的配置

手动刷新配置讲解:
在Config 客户端(端口号:3355)中引入Spring Boot actuator监控组件来监控配置的变化,以无需重启Config客户端而获取最新的配置。

原理就是:当配置仓库发生改变时,由运维人员对每个Config客户端发送POST请求,通知它们去拉取最新配置。这种手动的方式虽然在一定程度上解决了问题,但不灵活,无法自动的去获取最新配置,不能满足需求。
于是就出现了Spring Cloud Config 结合Bus实现配置的动态刷新。(实现了一次通知,处处生效)。
Confige和Bus实现动态刷新
Bus介绍
Spring Cloud Bus 被称为消息总线,它能够通过轻量级的消息代理(RabbitMQ,Kafka等)将微服务架构的各个服务连接起来,实现广播状态更改、事件推送的功能。
Spring Cloud Bus支持的消息代理: RabbitMQ和Kafka。
Bus基本原理
Spring Cloud Bus会使用一个轻量级的消息代理来构建一个公共的消息主题Topic(默认为"SpringCloudBus"),这个Topic中的消息会被所有服务实例监听和消费。当其中的一个服务刷新数据时,Spring Cloud Bus 会把信息保存在Topic中,使得监听这个Topic的服务收取到消息并自动消费。
Bus动态刷新配置基本原理
Spring Cloud Bus 的特殊机制可以实现很多功能,其中动态刷新配置文件就是一大重要功能。
原理如下图:
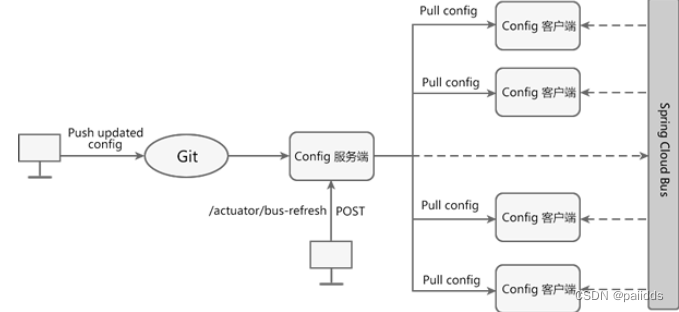
当Git仓库配置发生了改变,我们只需要向某一个服务(Config客户端或者Config服务端)发送一个POST请求,Spring Cloud Bus 就可以通过消息代理通知其他服务重新拉取最新配置文件,以实现服务的动态刷新。
实现步骤:
1.当Git仓库中配置发生改变后,运维人员向Config服务端发送一个POST请求,请求路径为:“端口号:请求路径//actuator/refresh”。
2.Config 服务端接收到请求后,会将请求转发给消息总线Spring Cloud Bus。
3.Spring Cloud Bus接到消息后,会通知所有Config客户端。
4.Config客户端接收到通知,请求Config服务端拉取最新配置。
5.所有Config客户端都获取到最新的配置。动态刷新配置实现(使用RibbitMQ)
首先需要安装电脑上安装RibbitMQ ,安装RibbitMQ之前需要安装ErLang,RabbitMQ服务器是用Erlang语言编写的,所以需要安装ErLang。
ErLang安装
- 下载地址: http://www.erlang.org/downloads
根据自己电脑配置下载相应的版本,然后选择合适的路径安装即可 - 环境变量配置
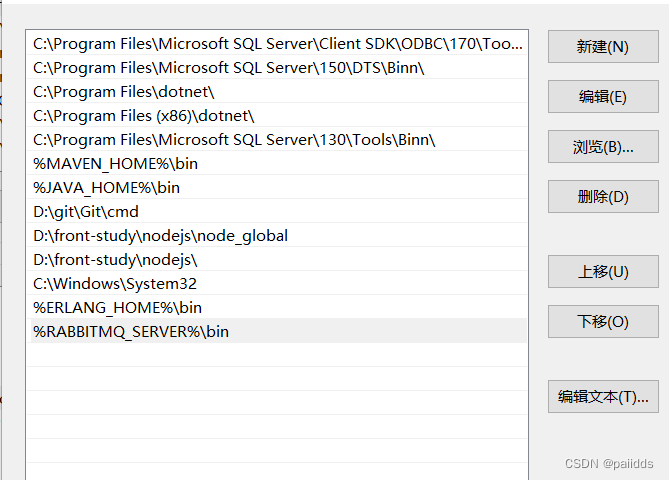
找到自己的安装路径,配置相应的环境变量,新建环境变量ERLANG_HOME

在path添加环境变量

RabbitMQ安装
-
下载地址: http://www.rabbitmq.com/install-windows.html
选择合适的版本,要与Erlang的版本对应一致(个人安装的都是最新的,所以没有版本问题) -
配置环境变量
新建一个RABBITMQ_SERVER的环境变量,和在path新建一个路径
RabbitMQ

path
- 测试环境安装
实现测试,在命令行窗口
net start RabbitMQ 启动RabbitMQ服务- 1
net stop RabbitMQ 关闭RabbitMQ服务- 1
然后开启测试: 在浏览中输入http://localhost:15672/,进入RabbitMQ页面
输入登录信息,用户名和密码都为guest,说明RabbitMQ安装成功。服务端
- 首先导入SpringCloud-Bus 消息总线的RabbitMQ的依赖
<!-- 添加消息总线(Bus)对RabbitMQ的支持--> <dependency> <groupId>org.springframework.cloud</groupId> <artifactId>spring-cloud-starter-bus-amqp</artifactId> </dependency> </dependencies>- 1
- 2
- 3
- 4
- 5
- 6
- 编写配置文件
# RabbitMQ的配置 rabbitmq: host: 127.0.0.1 port: 5672 # 5672是rabbitMQ默认端口号 username: guest # 默认配置 password: guest # 暴露bus-refresh节点 management: endpoints: web: exposure: include: "*" #'bus-refresh'- 1
- 2
- 3
- 4
- 5
- 6
- 7
- 8
- 9
- 10
- 11
- 12
客户端
创建- 首先导入SpringCloud-Bus 消息总线的RabbitMQ的依赖
<!-- 添加消息总线(Bus)对RabbitMQ的支持--> <dependency> <groupId>org.springframework.cloud</groupId> <artifactId>spring-cloud-starter-bus-amqp</artifactId> </dependency> </dependencies>- 1
- 2
- 3
- 4
- 5
- 6
- 编写配置文件
rabbitmq: #添加RabbitMQ相关支持 host: 127.0.0.1 port: 5672 username: guest password: guest # 给actuator暴露所有的节点,不只暴露health的节点 management: endpoints: web: exposure: include: "*"- 1
- 2
- 3
- 4
- 5
- 6
- 7
- 8
- 9
- 10
- 11
- 12
测试
完成了配置文件的动态刷新,配置文件修改后通过在电脑上控制台发送
curl -X POST "http://localhost:3344/actuator/bus-refresh/spring-cloud-config-client:3355"- 1
然后查看客户端获取到了最新的配置文件。
-
相关阅读:
Linux 设置快捷命令
anylogic 学习(3)—— 智能体相关操作
解决npm安装n模块报错,执行以下命令
Java语言高级-05异常与多线程-第2节线程实现方式
动态配置开发模式的落地实践
ubuntu cv2.imshow显示图片问题
kernel驱动配置文件的编写的记录
力扣——位运算系列
Flink保证exactly-once机制介绍:checkpoint及TwoPhaseCommitSinkFunction
CSDN 编程竞赛·第六期总结
- 原文地址:https://blog.csdn.net/paiidds/article/details/125192828