-
Swin-Transformer(2021-08)
简介
一直到写下这篇笔记开始,基于Swin的模型仍然霸榜Object Detection等多个榜单。
很多博客都已经介绍的非常详细了,这里只记录一下自己学习过程中遇到的困惑。
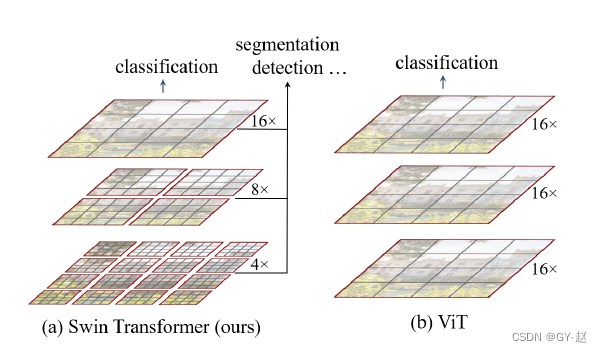
Swin与ViT的对比,ViT将image划分为固定大小的patch,以patch为单位进行attention计算,计算过程中的feature map 分辨率是保持不变的,并且ViT为了保持与NLP的一致性,添加了一个额外的class token,最后用于分类。因此ViT不太适用于检测等下游任务,无法提取多尺度特征。想要transformer用于检测等视觉任务,一种就是模仿CNN,将transformer改造为层级机构,一种就是使用纯transformer结构进行探索。
Swin显然属于前者,采用局部窗口自注意力和shift window的方式巧妙构造出了层级结构,可以作为视觉领域的通用backbone使用。
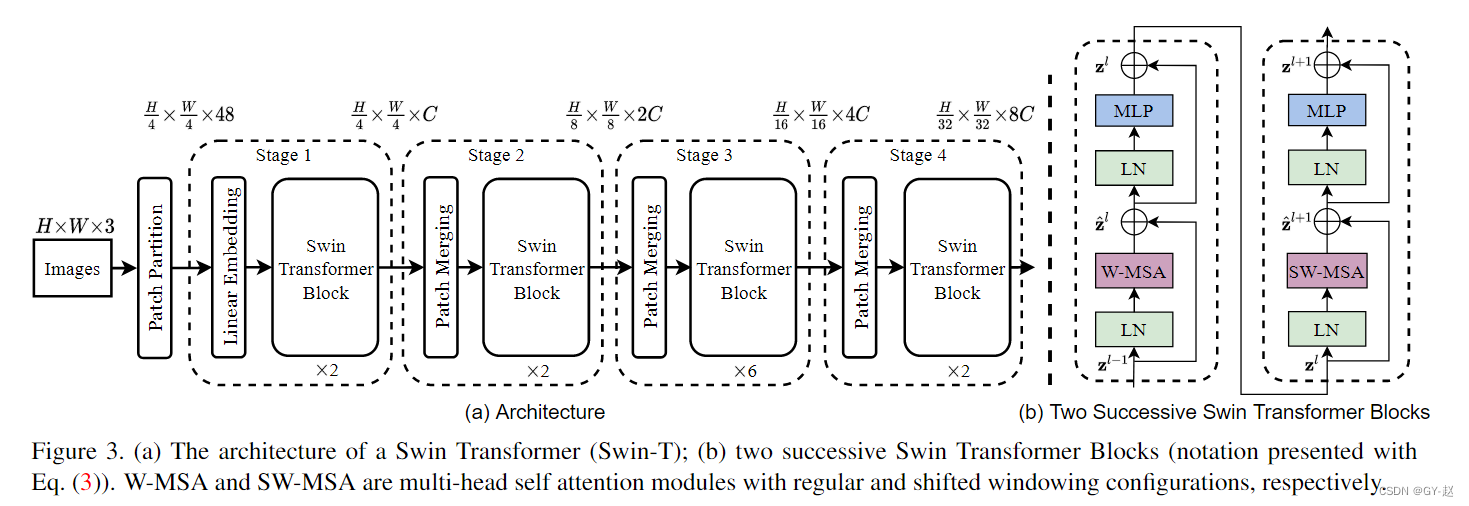
上图是Swin-T的结构图,输入图像首先通过Patch Partitiion 和Linear Embedding 转化为token形式的向量序列,然后输入Swin Transformer Block中,每个Block都是由一个window–Multi-Head self Attention 和Shift-Window Multi-head self-attention 组成,因此总是偶数。window partition 窗口划分
将(B, H, W, C) 划分为(num_windows*B, window_size, window_size, C)的windows
def window_partition(x, window_size): """ Args: x: (B, H, W, C) window_size (int): window size Returns: windows: (num_windows*B, window_size, window_size, C) """ B, H, W, C = x.shape x = x.view(B, H // window_size, window_size, W // window_size, window_size, C) #view() 必须针对contiguous数据存放格式 windows = x.permute(0, 1, 3, 2, 4, 5).contiguous().view(-1, window_size, window_size, C) return windows #恢复原始输入 x def window_reverse(windows, window_size, H, W): """ Args: windows: (num_windows*B, window_size, window_size, C) window_size (int): Window size H (int): Height of image W (int): Width of image Returns: x: (B, H, W, C) """ B = int(windows.shape[0] / (H * W / window_size / window_size)) x = windows.view(B, H // window_size, W // window_size, window_size, window_size, -1) x = x.permute(0, 1, 3, 2, 4, 5).contiguous().view(B, H, W, -1) return x- 1
- 2
- 3
- 4
- 5
- 6
- 7
- 8
- 9
- 10
- 11
- 12
- 13
- 14
- 15
- 16
- 17
- 18
- 19
- 20
- 21
- 22
- 23
- 24
- 25
- 26
- 27
- 28
- 29
- 30
- 31
测试运行如下
x = torch.randn(1,224,224,3) p =window_partition(x,7) print(p.size()) o = window_reverse(p,7,224,224) print(o.size())- 1
- 2
- 3
- 4
- 5
- 6
output
torch.Size([1024, 7, 7, 3])
torch.Size([1, 224, 224, 3])partition就是将输入image转换为指定window size的patch向量,这里就是将(1 ,224,224,3)的batch转换为1024个窗口尺寸为(7,7)的patch。
reverse函数是partition的反函数
PatchEmbedding
import torch from torch import nn from timm.models.layers import to_2tuple class PatchEmbed(nn.Module): r""" Image to Patch Embedding Args: img_size (int): Image size. Default: 224. patch_size (int): Patch token size. Default: 4. in_chans (int): Number of input image channels. Default: 3. embed_dim (int): Number of linear projection output channels. Default: 96. norm_layer (nn.Module, optional): Normalization layer. Default: None """ def __init__(self, img_size=224, patch_size=4, in_chans=3, embed_dim=96, norm_layer=None): super().__init__() img_size = to_2tuple(img_size) #(224,224) patch_size = to_2tuple(patch_size) #patch size (4,4) patches_resolution = [img_size[0] // patch_size[0], img_size[1] // patch_size[1]] #(56,56) self.img_size = img_size self.patch_size = patch_size self.patches_resolution = patches_resolution #分辨率指patch数 self.num_patches = patches_resolution[0] * patches_resolution[1] #56*56=3136 self.in_chans = in_chans self.embed_dim = embed_dim #使用2d卷积进行patch 划分,输入channe默认为3 self.proj = nn.Conv2d(in_chans, embed_dim, kernel_size=patch_size, stride=patch_size) #output:(batch,96,56,56) if norm_layer is not None: self.norm = norm_layer(embed_dim) else: self.norm = None def forward(self, x): B, C, H, W = x.shape # FIXME look at relaxing size constraints #限制图像尺寸必须为224*224 assert H == self.img_size[0] and W == self.img_size[1], \ f"Input image size ({H}*{W}) doesn't match model ({self.img_size[0]}*{self.img_size[1]})." #B C h W -> b embed h*w ->b h*W embed 得到 Patch Embeding 形状 x = self.proj(x).flatten(2).transpose(1, 2) # B Ph*Pw C if self.norm is not None: x = self.norm(x) return x def flops(self): Ho, Wo = self.patches_resolution flops = Ho * Wo * self.embed_dim * self.in_chans * (self.patch_size[0] * self.patch_size[1]) if self.norm is not None: flops += Ho * Wo * self.embed_dim return flops x = torch.randn(1,3,224,224) PM = PatchEmbed() out = PM(x) print(out.shape)- 1
- 2
- 3
- 4
- 5
- 6
- 7
- 8
- 9
- 10
- 11
- 12
- 13
- 14
- 15
- 16
- 17
- 18
- 19
- 20
- 21
- 22
- 23
- 24
- 25
- 26
- 27
- 28
- 29
- 30
- 31
- 32
- 33
- 34
- 35
- 36
- 37
- 38
- 39
- 40
- 41
- 42
- 43
- 44
- 45
- 46
- 47
- 48
- 49
- 50
- 51
- 52
- 53
- 54
- 55
- 56
- 57
- 58
output
torch.Size([1, 3136, 96])PatchMerging
PatchMerging 相当于卷积中的下采样,降低feature map的分辨率,同时增加channel的维度,这里分辨率H,W都降为原来的一半(整体减少4倍),channel数变为原来的两倍。
class PatchMerging(nn.Module): r""" Patch Merging Layer. Args: input_resolution (tuple[int]): Resolution of input feature. dim (int): Number of input channels. norm_layer (nn.Module, optional): Normalization layer. Default: nn.LayerNorm """ def __init__(self, input_resolution, dim, norm_layer=nn.LayerNorm): super().__init__() self.input_resolution = input_resolution self.dim = dim self.reduction = nn.Linear(4 * dim, 2 * dim, bias=False) self.norm = norm_layer(4 * dim) def forward(self, x): """ x: B, H*W, C """ H, W = self.input_resolution B, L, C = x.shape assert L == H * W, "input feature has wrong size" #限制输入x的第二个维度与H,W匹配 assert H % 2 == 0 and W % 2 == 0, f"x size ({H}*{W}) are not even." x = x.view(B, H, W, C) #按照 H W 前后二等分 ,两两组合 共4组 x0 = x[:, 0::2, 0::2, :] # B H/2 W/2 C x1 = x[:, 1::2, 0::2, :] # B H/2 W/2 C x2 = x[:, 0::2, 1::2, :] # B H/2 W/2 C x3 = x[:, 1::2, 1::2, :] # B H/2 W/2 C print("\n",x0,"\n",x1,"\n",x2,"\n",x3) x = torch.cat([x0, x1, x2, x3], -1) # B H/2 W/2 4*C #特征图分辨率降低一半 x = x.view(B, -1, 4 * C) # B H/2*W/2 4*C 此时通道维度变为原来的4倍 x = self.norm(x) x = self.reduction(x) #4C -> 2C 通过linear 通道维度由4倍变为原来的2倍 return x def extra_repr(self) -> str: return f"input_resolution={self.input_resolution}, dim={self.dim}" def flops(self): H, W = self.input_resolution flops = H * W * self.dim flops += (H // 2) * (W // 2) * 4 * self.dim * 2 * self.dim return flops PM = PatchMerging(input_resolution=(4,4),dim=3) x = torch.arange(48,dtype=torch.float).view(1,16,3) o=PM(x) print(o.shape)- 1
- 2
- 3
- 4
- 5
- 6
- 7
- 8
- 9
- 10
- 11
- 12
- 13
- 14
- 15
- 16
- 17
- 18
- 19
- 20
- 21
- 22
- 23
- 24
- 25
- 26
- 27
- 28
- 29
- 30
- 31
- 32
- 33
- 34
- 35
- 36
- 37
- 38
- 39
- 40
- 41
- 42
- 43
- 44
- 45
- 46
- 47
- 48
- 49
- 50
- 51
- 52
- 53
- 54
- 55
- 56
- 57
- 58
output:
tensor([[[[ 0., 1., 2.],
[ 6., 7., 8.]],
[[24., 25., 26.],
[30., 31., 32.]]]])tensor([[[[12., 13., 14.],
[18., 19., 20.]],
[[36., 37., 38.],
[42., 43., 44.]]]])tensor([[[[ 3., 4., 5.],
[ 9., 10., 11.]],
[[27., 28., 29.],
[33., 34., 35.]]]])tensor([[[[15., 16., 17.],
[21., 22., 23.]],
[[39., 40., 41.],
[45., 46., 47.]]]])torch.Size([1, 4, 6])
Window Attention

窗口自注意力计算,限制在一个window中,公式相比与之前的attention添加了一个额外的B-相对位置偏移(relative postional bias)
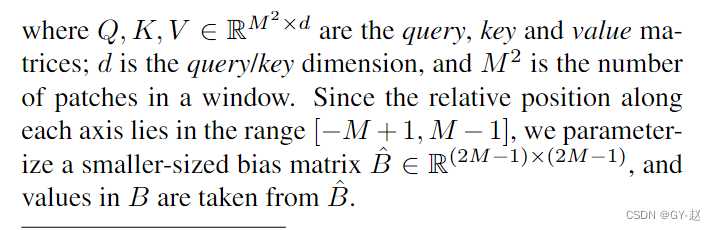
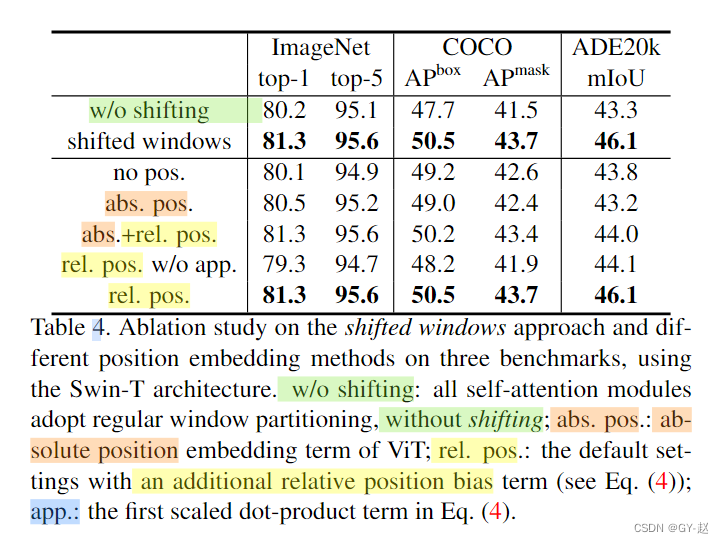
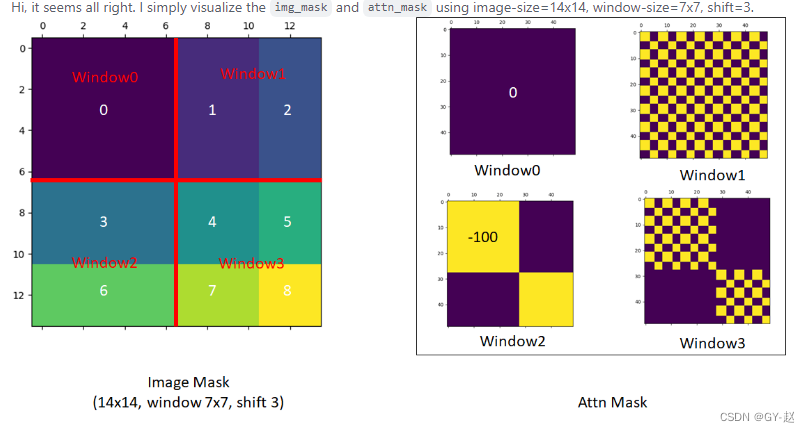
从论文给出的结果来看,采用相对位置偏置后的结果要比其它方法更好。mask shift-window 可视化


#mask shift window 可视化代码 import torch import matplotlib.pyplot as plt def window_partition(x, window_size): """ Args: x: (B, H, W, C) window_size (int): window size Returns: windows: (num_windows*B, window_size, window_size, C) """ B, H, W, C = x.shape x = x.view(B, H // window_size, window_size, W // window_size, window_size, C) windows = x.permute(0, 1, 3, 2, 4, 5).contiguous().view(-1, window_size, window_size, C) return windows window_size = 7 shift_size = 3 H, W = 14, 14 img_mask = torch.zeros((1, H, W, 1)) # 1 H W 1 h_slices = (slice(0, -window_size), slice(-window_size, -shift_size), slice(-shift_size, None)) w_slices = (slice(0, -window_size), slice(-window_size, -shift_size), slice(-shift_size, None)) cnt = 0 for h in h_slices: for w in w_slices: img_mask[:, h, w, :] = cnt cnt += 1 mask_windows = window_partition(img_mask, window_size) # nW, window_size, window_size, 1 mask_windows = mask_windows.view(-1, window_size * window_size) attn_mask = mask_windows.unsqueeze(1) - mask_windows.unsqueeze(2) attn_mask = attn_mask.masked_fill(attn_mask != 0, float(-100.0)).masked_fill(attn_mask == 0, float(0.0)) plt.matshow(img_mask[0, :, :, 0].numpy()) plt.matshow(attn_mask[0].numpy()) plt.matshow(attn_mask[1].numpy()) plt.matshow(attn_mask[2].numpy()) plt.matshow(attn_mask[3].numpy()) plt.show()- 1
- 2
- 3
- 4
- 5
- 6
- 7
- 8
- 9
- 10
- 11
- 12
- 13
- 14
- 15
- 16
- 17
- 18
- 19
- 20
- 21
- 22
- 23
- 24
- 25
- 26
- 27
- 28
- 29
- 30
- 31
- 32
- 33
- 34
- 35
- 36
- 37
- 38
- 39
- 40
- 41
- 42
- 43
- 44
- 45
- 46
- 47
- 48
- 49
- 50
- 51
Swin-X 参数配置列表
 包含关系:Swin_transformer(Basic_layer(Swin_Block))
reference(推荐阅读):
1.https://zhuanlan.zhihu.com/p/367111046
2. https://hub.fastgit.xyz/microsoft/Swin-Transformer/issues/38
3. https://zhuanlan.zhihu.com/p/430047908 -很清楚
4. https://blog.csdn.net/qq_37541097/article/details/121119988
5. https://blog.csdn.net/qq_39478403/article/details/120042232 -
相关阅读:
专项技能训练五《云计算网络技术与应用》实训6-1:安装OpenDayLight控制器
模板进阶&&模板分离编译的问题与解决
[uni-app] scroll-view中吸顶的简单做法 - overflow-y: auto;
STM32H5开发(6)----SPI驱动TFT-LCD屏
【C】程序环境和预处理
Chrome 跨域问题CORS 分析
mybatis-plus 3.5.2 自动生成代码
GPT引领前沿与应用突破之GPT4科研实践技术与AI绘图
SuperMap iDesktop如何将地图瓦片加密切图到MongoDB 4.X版本
《Effective C++》知识点(7)--模板与范型编程
- 原文地址:https://blog.csdn.net/xiaoxiaomo_/article/details/125409340