-
Request&Response有这一篇就够了
Request和Response的概述
Request是请求对象,Response是响应对象。 这两个对象在我们使用Servlet的时候有看到:
 此时,我们就需要思考一个问题request和response这两个参数的作用是什么?
-
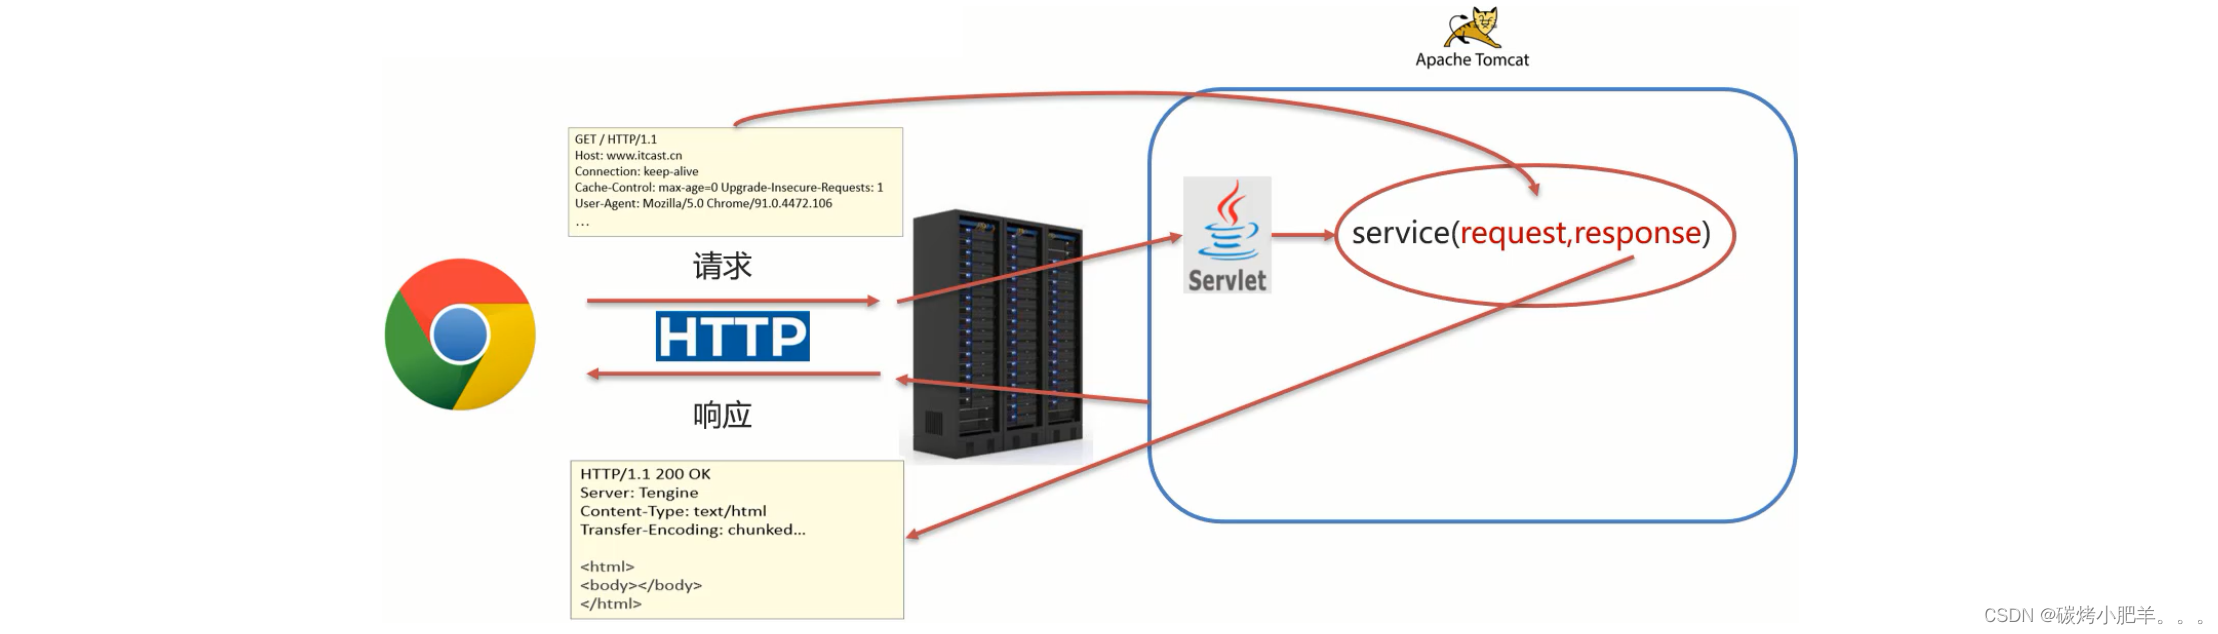
request:获取请求数据
- 浏览器会发送HTTP请求到后台服务器[Tomcat]
- HTTP的请求中会包含很多请求数据[请求行+请求头+请求体]
- 后台服务器[Tomcat]会对HTTP请求中的数据进行解析并把解析结果存入到一个对象中
- 所存入的对象即为request对象,所以我们可以从request对象中获取请求的相关参数
- 获取到数据后就可以继续后续的业务,比如获取用户名和密码就可以实现登录操作的相关业务
-
response:设置响应数据
- 业务处理完后,后台就需要给前端返回业务处理的结果即响应数据
- 把响应数据封装到response对象中
- 后台服务器[Tomcat]会解析response对象,按照[响应行+响应头+响应体]格式拼接结果
- 浏览器最终解析结果,把内容展示在浏览器给用户浏览
对于上述所讲的内容,我们通过一个案例来初步体验下request和response对象的使用
@WebServlet(urlPatterns = "/demo1") public class ServletDemo1 extends HttpServlet { @Override protected void doGet(HttpServletRequest req, HttpServletResponse resp) throws ServletException, IOException { // 1. 使用request对象 获取请求数据 String username = req.getParameter("username"); // 2. 使用response对象 设置响应数据 resp.setContentType("text/html;charset=utf-8"); resp.getWriter().write("<h1>" + username +", 欢迎你!</h1>"); } @Override protected void doPost(HttpServletRequest req, HttpServletResponse resp) throws ServletException, IOException { System.out.println("post..."); } }- 1
- 2
- 3
- 4
- 5
- 6
- 7
- 8
- 9
- 10
- 11
- 12
- 13
- 14
- 15
- 16
- 17
- 18

Request对象
Request继承体系
前面在介绍Request和Reponse对象的时候,我们发现:
- 当我们的Servlet类实现的是Servlet接口的时候,service方法中的参数是ServletRequest和ServletResponse
- 当我们的Servlet类继承的是HttpServlet类的时候,doGet和doPost方法中的参数就变成HttpServletRequest和HttpServletReponse
那么,
- ServletRequest和HttpServletRequest的关系是什么?
- request对象是有谁来创建的?
- request提供了哪些API,这些API从哪里查?
首先,我们先来看下Request的继承体系:

从上图中可以看出,ServletRequest 和 HttpServletRequest都是Java提供的,所以我们可以打开JavaEE提供的API文档,打开后可以看到:

 所以ServletRequest和HttpServletRequest是继承关系,并且两个都是接口,
接口是无法创建对象,这个时候就引发了下面这个问题:
 这个时候,我们就需要用到Request继承体系中的
RequestFacade:- 该类实现了HttpServletRequest接口,也间接实现了ServletRequest接口。
- Servlet类中的service方法、doGet方法或者是doPost方法最终都是由Web服务器[Tomcat]来调用的,
所以Tomcat提供了方法参数接口的具体实现类,并完成了对象的创建。 - 要想了解RequestFacade中都提供了哪些方法,我们可以直接查看JavaEE的API文档中关于ServletRequest和HttpServletRequest的接口文档,因为RequestFacade实现了其接口就需要重写接口中的方法
对于上述结论,要想验证,可以编写一个Servlet,在方法中把request对象打印下,就能看到最终的对象是不是RequestFacade,代码如下:
@WebServlet(urlPatterns = "/demo2") public class ServletDemo2 extends HttpServlet { @Override protected void doGet(HttpServletRequest request, HttpServletResponse response) throws ServletException, IOException { System.out.println(request); // org.apache.catalina.connector.RequestFacade@35fa5740 } @Override protected void doPost(HttpServletRequest request, HttpServletResponse response) throws ServletException, IOException { this.doGet(request, response); } }- 1
- 2
- 3
- 4
- 5
- 6
- 7
- 8
- 9
- 10
- 11
- 12
- 13

小结:-
Request的继承体系为ServletRequest–>HttpServletRequest–>RequestFacade;
-
Tomcat需要解析请求数据,封装为request对象,并且创建request对象传递到service方法;
-
使用request对象,可以查阅JavaEE API文档的HttpServletRequest接口中方法说明.
Request获取请求数据
HTTP请求数据总共分为三部分内容,分别是请求行、请求头、请求体,对于这三部分内容的数据,分别该如何获取,首先我们先来学习请求行数据如何获取?
想要了解更多的HTTP信息可以参考链接:https://blog.csdn.net/qq_43751200/article/details/125219277获取请求行数据
GET请求行包含三块内容,分别是
请求方式、请求资源路径、请求参数信息、HTTP协议及版本, 对应的POST请求方式不含请求参数信息,请求参数信息在请求体中。
 对于这四部分内容,request对象都提供了对应的API方法来获取,具体如下:
- 获取请求方式:
GETString getMethod()- 1
- 获取虚拟目录(项目访问路径):
/request-demoString getContextPath()- 1
- 获取URL(统一资源定位符):
http://localhost:8080/request-demo/req1StringBuffer getRequestURL()- 1
- 获取URI(统一资源标识符):
/request-demo/req1String getRequestURI()- 1
- 获取请求参数(GET方式):
username=lushimeng&password=123String getQueryString()- 1
介绍完上述方法后,咱们通过代码把上述方法都使用下:
@WebServlet(urlPatterns = "/req1") public class RequestDemo1 extends HttpServlet { @Override protected void doGet(HttpServletRequest req, HttpServletResponse resp) throws ServletException, IOException { // 获取请求行方式 // 1. 获取请求方式 String method = req.getMethod(); System.out.println(method); // GET // 2. 获取虚拟目录(项目访问路径): String contextPath = req.getContextPath(); System.out.println(contextPath); // /request-demo // 3. 获取URL(统一资源定位符) StringBuffer requestURL = req.getRequestURL(); System.out.println(requestURL.toString()); // http://localhost:8080http://localhost:8080/request-demo/req1 // 4. 获取URI(统一资源标识符) String requestURI = req.getRequestURI(); System.out.println(requestURI); // /request-demo/req1 // 5. 获取请求参数(GET方式) String param = req.getQueryString(); System.out.println(param); // username=lushimeng&password=123 } @Override protected void doPost(HttpServletRequest req, HttpServletResponse resp) throws ServletException, IOException { } }- 1
- 2
- 3
- 4
- 5
- 6
- 7
- 8
- 9
- 10
- 11
- 12
- 13
- 14
- 15
- 16
- 17
- 18
- 19
- 20
- 21
- 22
- 23
- 24
- 25
- 26
- 27
- 28
- 29
- 30
- 31
启动服务器,访问
http://localhost:8080/request-demo/req1?username=zhangsan&passwrod=123,获取的结果如下:

获取请求头数据
对于请求头的数据,格式为
key: value如下:

所以根据请求头名称获取对应值的方法为:String getHeader(String name)- 1
接下来,在代码中如果想要获取客户端浏览器的版本信息,则可以使用
@WebServlet(urlPatterns = "/req1") public class RequestDemo1 extends HttpServlet { @Override protected void doGet(HttpServletRequest req, HttpServletResponse resp) throws ServletException, IOException { // 获取请求头方式: key - value形式, 可以在浏览器中按F12进行查看 // 获取请求头方式: key - value形式, 可以在浏览器中按F12进行查看 String agent = req.getHeader("User-Agent"); System.out.println("User-Agent : " + agent); // User-Agent : Mozilla/5.0 (Windows NT 10.0; Win64; x64) AppleWebKit/537.36 (KHTML, like Gecko) Chrome/102.0.0.0 Safari/537.36 String connection = req.getHeader("Connection"); System.out.println("Connection : " + connection); // Connection : keep-alive String host = req.getHeader("Host"); System.out.println("Host : " + host); // Host : localhost:8080 String platform = req.getHeader("sec-ch-ua-platform"); System.out.println("sec-ch-ua-platform : " + platform); // sec-ch-ua-platform : "Windows" } @Override protected void doPost(HttpServletRequest req, HttpServletResponse resp) throws ServletException, IOException { } }- 1
- 2
- 3
- 4
- 5
- 6
- 7
- 8
- 9
- 10
- 11
- 12
- 13
- 14
- 15
- 16
- 17
- 18
- 19
- 20
- 21
重新启动服务器后,http://localhost:8080/request-demo/req1?username=lushimeng&passwrod=123456,获取的结果如下:

获取请求体数据
浏览器在发送GET请求的时候是没有请求体的,所以需要把请求方式变更为POST,请求体中的数据格式如下:
对于请求体中的数据,Request对象提供了如下两种方式来获取其中的数据,分别是:- 获取字节输入流,如果前端发送的是字节数据,比如传递的是文件数据,则使用该方法
ServletInputStream getInputStream(): 该方法可以获取字节- 1
- 获取字符输入流,如果前端发送的是纯文本数据,则使用该方法
BufferedReader getReader()- 1
接下来,大家需要思考,要想获取到请求体的内容该如何实现?
具体实现的步骤如下:
- 准备一个页面,在页面中添加form表单,用来发送post请求
- 在Servlet的doPost方法中获取请求体数据
- 在doPost方法中使用request的getReader()或者getInputStream()来获取
- 访问测试
测试案例:
- 在项目的webapp目录下添加一个html页面,名称为:
req.html
<!DOCTYPE html> <html lang="en"> <head> <meta charset="UTF-8"> <title>Title</title> </head> <body> <!-- action:form表单提交的请求地址 method:请求方式,指定为post --> <form action="/request-demo/req1" method="post"> <input type="text" name="username"><br> <input type="text" name="password"><br> <input type="checkbox" name="hobby" value="1">游泳 <input type="checkbox" name="hobby" value="2">爬山 <br> <input type="submit"> </form> </body> </html>- 1
- 2
- 3
- 4
- 5
- 6
- 7
- 8
- 9
- 10
- 11
- 12
- 13
- 14
- 15
- 16
- 17
- 18
- 19
- 20
- 21
- 22

- 调用getReader()或者getInputStream()方法,因为目前前端传递的是纯文本数据,所以我们采用getReader()方法来获取
@WebServlet(urlPatterns = "/req1") public class RequestDemo1 extends HttpServlet { @Override protected void doGet(HttpServletRequest req, HttpServletResponse resp) throws ServletException, IOException { } @Override protected void doPost(HttpServletRequest req, HttpServletResponse resp) throws ServletException, IOException { // 1. 获取post请求体参数 BufferedReader reader = req.getReader(); // 2. 读取数据 String param = reader.readLine(); System.out.println(param); // username=lushimeng&password=123456 } }- 1
- 2
- 3
- 4
- 5
- 6
- 7
- 8
- 9
- 10
- 11
- 12
- 13
- 14
- 15
- 16
- 17
注意
BufferedReader流是通过request对象来获取的,当请求完成后request对象就会被销毁,request对象被销毁后,BufferedReader流就会自动关闭,所以此处就不需要手动关闭流了。- 启动服务器,通过浏览器访问
http://localhost:8080/request-demo/req.html

小结
HTTP请求数据中包含了
请求行、请求头和请求体,针对这三部分内容,Request对象都提供了对应的API方法来获取对应的值:- 请求行
- getMethod():获取请求方式
- getContextPath():获取项目访问路径(虚拟目录)
- getRequestURL():获取请求URL(统一资源定位符)
- getRequestURI():获取请求URI(统一资源标识符)
- getQueryString():获取GET请求方式的请求参数
- 请求头
- getHeader(String name):根据请求头名称获取其对应的值
- 请求体
- 注意: 浏览器发送的POST请求才有请求体
- 如果是纯文本数据:getReader()
- 如果是字节数据如文件数据:getInputStream()
获取请求参数的通用方式
在学习下面内容之前,我们先提出两个问题:
- 什么是请求参数?
- 请求参数和请求数据的关系是什么?
1.什么是请求参数?
为了能更好的回答上述两个问题,我们拿用户登录的例子来说明
1.1 想要登录网址,需要进入登录页面
1.2 在登录页面输入用户名和密码
1.3 将用户名和密码提交到后台
1.4 后台校验用户名和密码是否正确
1.5 如果正确,则正常登录,如果不正确,则提示用户名或密码错误
上述例子中,用户名和密码其实就是我们所说的请求参数。
2.什么是请求数据?
请求数据则是包含请求行、请求头和请求体的所有数据
3.请求参数和请求数据的关系是什么?
3.1 请求参数是请求数据中的部分内容
3.2 如果是GET请求,请求参数在请求行中
3.3 如果是POST请求,请求参数一般在请求体中
对于请求参数的获取,常用的有以下两种:
- GET方式:
String getQueryString()- 1
- POST方式:
BufferedReader getReader();- 1
有了上述的知识储备,我们来实现一个案例需求:
(1)发送一个GET请求并携带用户名,后台接收后打印到控制台
(2)发送一个POST请求并携带用户名,后台接收后打印到控制台
此处大家需要注意的是GET请求和POST请求接收参数的方式不一样,具体实现的代码如下:
@WebServlet("/req1") public class RequestDemo1 extends HttpServlet { @Override protected void doGet(HttpServletRequest req, HttpServletResponse resp) throws ServletException, IOException { String result = req.getQueryString(); System.out.println(result); } @Override protected void doPost(HttpServletRequest req, HttpServletResponse resp) throws ServletException, IOException { BufferedReader br = req.getReader(); String result = br.readLine(); System.out.println(result); } }- 1
- 2
- 3
- 4
- 5
- 6
- 7
- 8
- 9
- 10
- 11
- 12
- 13
- 14
- 15
- 16
- 对于上述的代码,会存在什么问题呢?

- 如何解决上述重复代码的问题呢?
 当然,也可以在doGet中调用doPost, 在doPost中完成参数的获取和打印,另外需要注意的是,doGet和doPost方法都必须存在,不能删除任意一个。
GET请求和POST请求获取请求参数的方式不一样,在获取请求参数这块该如何实现呢?
要想实现,我们就需要思考:
GET请求方式和POST请求方式区别主要在于获取请求参数的方式不一样,是否可以提供一种统一获取请求参数的方式,从而统一doGet和doPost方法内的代码?
解决方案一:
@WebServlet("/req1") public class RequestDemo1 extends HttpServlet { @Override protected void doGet(HttpServletRequest req, HttpServletResponse resp) throws ServletException, IOException { //获取请求方式 String method = req.getMethod(); //获取请求参数 String params = ""; if("GET".equals(method)){ params = req.getQueryString(); }else if("POST".equals(method)){ BufferedReader reader = req.getReader(); params = reader.readLine(); } //将请求参数进行打印控制台 System.out.println(params); } @Override protected void doPost(HttpServletRequest req, HttpServletResponse resp) throws ServletException, IOException { this.doGet(req,resp); } }- 1
- 2
- 3
- 4
- 5
- 6
- 7
- 8
- 9
- 10
- 11
- 12
- 13
- 14
- 15
- 16
- 17
- 18
- 19
- 20
- 21
- 22
- 23
使用request的getMethod()来获取请求方式,根据请求方式的不同分别获取请求参数值,这样就可以解决上述问题,
但是以后每个Servlet都需要这样写代码,实现起来比较麻烦,这种方案不推荐不采用。解决方案二:
request对象已经将上述获取请求参数的方法进行了封装,并且request提供的方法实现的功能更强大,以后只需要调用request提供的方法即可,在request的方法中都实现了哪些操作?(1) 根据不同的请求方式获取请求参数,获取的内容如下:
 (2) 把获取到的内容进行分割,内容如下:
 (3) 把分割后端数据,存入到一个Map集合中:
 注意:因为参数的值可能是一个,也可能有多个,所以Map的值的类型为String数组。
基于上述理论,request对象为我们提供了如下方法:
- 获取所有参数Map集合
Map<String,String[]> getParameterMap()- 1
- 根据名称获取参数值(数组)
String[] getParameterValues(String name)- 1
- 根据名称获取参数值(单个值)
String getParameter(String name)- 1
接下来,我们通过案例来把上述的三个方法进行实例演示:
- 修改req.html页面,添加爱好选项,爱好可以同时选多个
<!DOCTYPE html> <html lang="en"> <head> <meta charset="UTF-8"> <title>Title</title> </head> <body> <form action="/request-demo/req3" method="get"> <input type="text" name="username"><br> <input type="password" name="password"><br> <input type="checkbox" name="hobby" value="1"> 游泳 <input type="checkbox" name="hobby" value="2"> 爬山 <br> <input type="submit"> </form> </body> </html>- 1
- 2
- 3
- 4
- 5
- 6
- 7
- 8
- 9
- 10
- 11
- 12
- 13
- 14
- 15
- 16
- 17

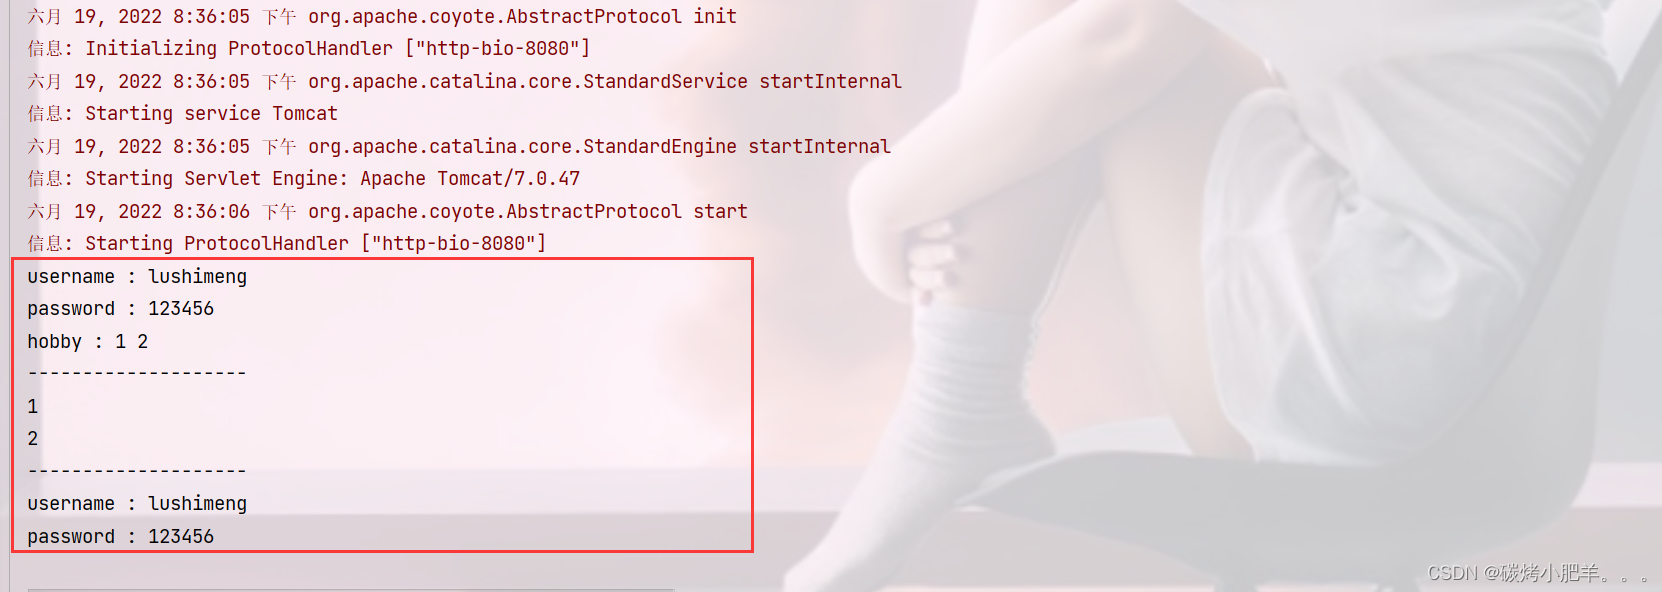
- 在Servlet代码中获取页面传递GET/POST请求的参数值
/** * request 通用方式获取请求参数 */ @WebServlet(urlPatterns = "/req3") public class RequestDemo3 extends HttpServlet { @Override protected void doGet(HttpServletRequest req, HttpServletResponse resp) throws ServletException, IOException { // 1. 获取所有参数的Map集合 Map<String, String[]> map = req.getParameterMap(); Set<String> keys = map.keySet(); // 获取键的集合 for(String key : keys){ System.out.print(key + " : "); String[] stringValues = map.get(key); // 根据key获取对应的value for(String str : stringValues){ System.out.print(str + " "); } System.out.println(); } System.out.println("--------------------"); // 2. 根据名称获取参数值(数组) String[] hobbies = req.getParameterValues("hobby"); for(String hobby : hobbies){ System.out.println(hobby); // 1, 2 } System.out.println("--------------------"); // 3. 根据名称获取参数值 String username = req.getParameter("username"); System.out.println("username : " + username); // username : lushimeng String password = req.getParameter("password"); System.out.println("password : " + password); // password : 123456 } @Override protected void doPost(HttpServletRequest req, HttpServletResponse resp) throws ServletException, IOException { this.doGet(req, resp); } }- 1
- 2
- 3
- 4
- 5
- 6
- 7
- 8
- 9
- 10
- 11
- 12
- 13
- 14
- 15
- 16
- 17
- 18
- 19
- 20
- 21
- 22
- 23
- 24
- 25
- 26
- 27
- 28
- 29
- 30
- 31
- 32
- 33
- 34
- 35
- 36
- 37
- 38
- 39
- 40
- 41
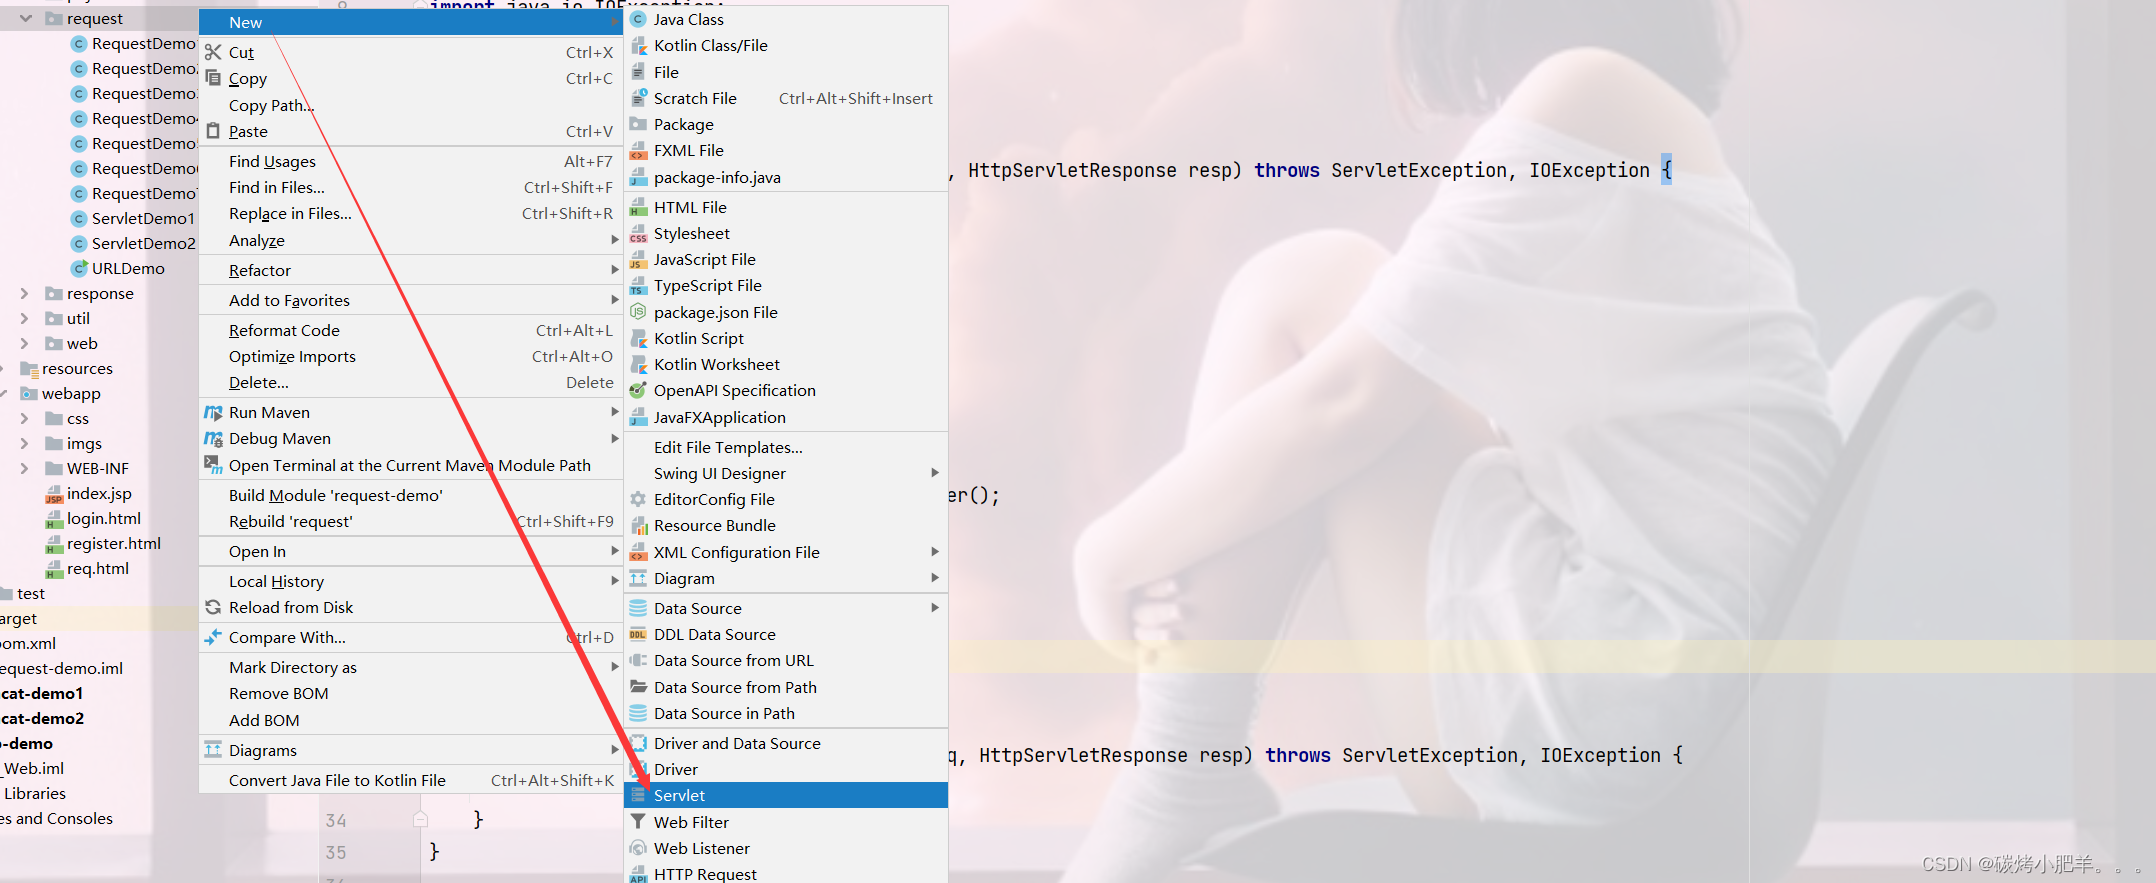
IDEA快速创建Servlet
使用通用方式获取请求参数后,屏蔽了GET和POST的请求方式代码的不同,则代码可以定义如下格式:

由于格式固定,所以我们可以使用IDEA提供的模板来制作一个Servlet的模板,这样我们后期在创建Servlet的时候就会更高效,具体如何实现:(1) 按照自己的需求,修改Servlet创建的模板内容

(2) 使用servlet模板创建Servlet类
请求参数中文乱码问题
问题展示:
(1)将req.html页面的请求方式修改为get
<!DOCTYPE html> <html lang="en"> <head> <meta charset="UTF-8"> <title>Title</title> </head> <body> <form action="/request-demo/req2" method="get"> <input type="text" name="username"><br> <input type="password" name="password"><br> <input type="checkbox" name="hobby" value="1"> 游泳 <input type="checkbox" name="hobby" value="2"> 爬山 <br> <input type="submit"> </form> </body> </html>- 1
- 2
- 3
- 4
- 5
- 6
- 7
- 8
- 9
- 10
- 11
- 12
- 13
- 14
- 15
- 16
- 17
(2)在Servlet方法中获取参数,并打印
/** * 中文乱码问题解决方案 */ @WebServlet("/req2") public class RequestDemo4 extends HttpServlet { @Override protected void doGet(HttpServletRequest request, HttpServletResponse response) throws ServletException, IOException { //1. 获取username String username = request.getParameter("username"); System.out.println(username); } @Override protected void doPost(HttpServletRequest request, HttpServletResponse response) throws ServletException, IOException { this.doGet(request, response); } }- 1
- 2
- 3
- 4
- 5
- 6
- 7
- 8
- 9
- 10
- 11
- 12
- 13
- 14
- 15
- 16
- 17
(3)启动服务器,页面上输入中文参数

(4)查看控制台打印内容

(5)把req.html页面的请求方式改成post,再次发送请求和中文参数

(6)查看控制台打印内容,依然为乱码

通过上面的案例,会发现,不管是GET还是POST请求,在发送的请求参数中如果有中文,在后台接收的时候,都会出现中文乱码的问题。具体该如何解决呢?
POST请求解决方案
- 分析出现中文乱码的原因:
- POST的请求参数是通过request的getReader()来获取流中的数据
TOMCAT在获取流的时候采用的编码是ISO-8859-1ISO-8859-1编码是不支持中文的,所以会出现乱码
- 解决方案:
- 页面设置的编码格式为UTF-8
- 把TOMCAT在获取流数据之前的编码设置为UTF-8(也就是把Tomcat服务器默认的ISO-8859-1编码转换为UTF-编码集)
- 通过request.setCharacterEncoding(“UTF-8”)设置编码(这里的UTF-8也可以进行小写)
修改后的代码为:
@WebServlet(urlPatterns = "/req2") public class RequestDemo2 extends HttpServlet { @Override protected void doGet(HttpServletRequest req, HttpServletResponse resp) throws ServletException, IOException { // 解决乱码: POST getReader() // 1. 设置字符输入流的编码,设置的字符集要和页面保持一致 req.setCharacterEncoding("UTF-8"); // 2. 获取username String username = req.getParameter("username"); System.out.println(username); } @Override protected void doPost(HttpServletRequest req, HttpServletResponse resp) throws ServletException, IOException { this.doGet(req, resp); } }- 1
- 2
- 3
- 4
- 5
- 6
- 7
- 8
- 9
- 10
- 11
- 12
- 13
- 14
- 15
- 16
- 17
- 18
- 19
重新发送POST请求,就会在控制台看到正常展示的中文结果。

GET请求解决方案
刚才提到一个问题是
POST请求的中文乱码解决方案为什么不适用GET请求?- GET请求获取请求参数的方式是
request.getQueryString() - POST请求获取请求参数的方式是
request.getReader() - request.setCharacterEncoding(“utf-8”)是设置request处理流的编码
- getQueryString方法并没有通过流的方式获取数据
所以GET请求不能用设置编码的方式来解决中文乱码问题,那问题又来了,如何解决GET请求的中文乱码呢?
- 首先我们需要先分析下GET请求出现乱码的原因:

(1)浏览器通过HTTP协议发送请求和数据给后台服务器(Tomcat)
(2)浏览器在发送HTTP的过程中会对中文数据进行URL编码
(3)在进行URL编码的时候会采用页面
<meta>标签指定的UTF-8的方式进行编码,张三编码后的结果为%E5%BC%A0%E4%B8%89(4)后台服务器(Tomcat)接收到
%E5%BC%A0%E4%B8%89后会默认按照ISO-8859-1进行URL解码(5)由于前后编码与解码采用的格式不一样,就会导致后台获取到的数据为乱码。
思考: 如果把
req.html页面的<meta>标签的charset属性改成ISO-8859-1,后台不做操作,能解决中文乱码问题么?答案是否定的,因为
ISO-8859-1本身是不支持中文展示的,所以改了标签的charset属性后,会导致页面上的中文内容都无法正常展示。分析完上面的问题后,我们会发现,其中有两个我们不熟悉的内容就是URL编码和URL解码,什么是URL编码,什么又是URL解码呢?
URL编码
这块知识我们只需要了解下即可,具体编码过程分两步,分别是:
(1)将字符串按照编码方式转为二进制
(2)每个字节转为2个16进制数并在前边加上%
张三按照UTF-8的方式转换成二进制的结果为:1110 0101 1011 1100 1010 0000 1110 0100 1011 1000 1000 1001- 1
在计算的十六进制结果中,每两位前面加一个%,就可以获取到
%E5%BC%A0%E4%B8%89。在Java中已经为我们提供了编码和解码的API工具类可以让我们更快速的进行编码和解码:
编码:
java.net.URLEncoder.encode("需要被编码的内容","字符集(UTF-8)")- 1
解码:
java.net.URLDecoder.decode("需要被解码的内容","字符集(UTF-8)")- 1
接下来咱们对
张三来进行编码和解码/** * @Author Mr.Lu * @Date 2022/6/18 21:09 * @ClassName URLDemo * @Version 1.0 */ public class URLDemo { public static void main(String[] args) throws UnsupportedEncodingException { String name = "张三"; // 1. URL编码 String encode = URLEncoder.encode(name, "UTF-8"); // 不可以换成ISO-8859-1编码,因为该编码不支持汉字,所以使用Unicode码表编码(统一码、万国马码) System.out.println(encode); // %E5%BC%A0%E4%B8%89 // 2. URL解码 String decode = URLDecoder.decode(encode, "UTF-8"); System.out.println(decode); // 张三 // 3. 转换为字节数据, 编码 byte[] bytes = decode.getBytes(); for( byte bt : bytes){ System.out.print(bt + " "); // -27 -68 -96 -28 -72 -119 } // 4. 解码 String s = new String(bytes, "UTF-8"); System.out.println(s); // 张三 } }- 1
- 2
- 3
- 4
- 5
- 6
- 7
- 8
- 9
- 10
- 11
- 12
- 13
- 14
- 15
- 16
- 17
- 18
- 19
- 20
- 21
- 22
- 23
- 24
- 25
- 26
- 27
- 28
- 29
到这,我们就可以分析出GET请求中文参数出现乱码的原因了,
- 浏览器把中文参数按照
UTF-8进行URL编码 - Tomcat对获取到的内容进行了
ISO-8859-1的URL解码 - 在控制台就会出现类上
å¼ ä¸‰的乱码,最后一位是个空格
- 清楚了出现乱码的原因,接下来我们就需要想办法进行解决\
具体的实现步骤为: 1.按照ISO-8859-1编码获取乱码`å¼ ä¸‰`对应的字节数组 2.按照UTF-8编码获取字节数组对应的字符串- 1
- 2
- 3
- 4
- 5
@WebServlet(urlPatterns = "/req2") public class RequestDemo2 extends HttpServlet { @Override protected void doGet(HttpServletRequest req, HttpServletResponse resp) throws ServletException, IOException { // 1. 获取username String username = req.getParameter("username"); System.out.println("解决乱码前 : " + username); // 乱码原因:tomcat进行URL解码,默认的字符集ISO-8859-1 // 2. 先对乱码数据进行编码:转为字节数组 byte[] bytes = username.getBytes(StandardCharsets.ISO_8859_1); // 字节数组解码 String targetUserName = new String(bytes, "UTF-8"); // String targetUserName = new String(username.getBytes(StandardCharsets.ISO_8859_1), "UTF-8"); // 上面两句可以合成一句 System.out.println("解决乱码后 : " + targetUserName); } @Override protected void doPost(HttpServletRequest req, HttpServletResponse resp) throws ServletException, IOException { this.doGet(req, resp); } }- 1
- 2
- 3
- 4
- 5
- 6
- 7
- 8
- 9
- 10
- 11
- 12
- 13
- 14
- 15
- 16
- 17
- 18
- 19
- 20
- 21
- 22
- 23
- 24
- 25
- 26
 注意
注意- 把
request.setCharacterEncoding("UTF-8")代码注释掉后,会发现GET请求参数乱码解决方案同时也可也把POST请求参数乱码的问题也解决了 - 只不过对于POST请求参数一般都会比较多,采用这种方式解决乱码起来比较麻烦,所以对于POST请求还是建议使用设置编码的方式进行。
另外需要说明一点的是Tomcat8.0之后,已将GET请求乱码问题解决,设置默认的解码方式为UTF-8
小结
- 中文乱码解决方案
-
POST请求和GET请求的参数中如果有中文,后台接收数据就会出现中文乱码问题
GET请求在Tomcat8.0以后的版本就不会出现了
-
POST请求解决方案是:设置输入流的编码
request.setCharacterEncoding("UTF-8"); 注意:设置的字符集要和页面保持一致- 1
- 2
-
通用方式(GET/POST):需要先解码,再编码
new String(username.getBytes("ISO-8859-1"),"UTF-8");- 1
- URL编码实现方式:
-
编码:
URLEncoder.encode(str,"UTF-8");- 1
-
解码:
URLDecoder.decode(s,"ISO-8859-1");- 1
Request请求转发
-
请求转发(forward):一种在服务器内部的资源跳转方式。

(1)浏览器发送请求给服务器,服务器中对应的资源A接收到请求(2)资源A处理完请求后将请求发给资源B
(3)资源B处理完后将结果响应给浏览器
(4)请求从资源A到资源B的过程就叫请求转发
-
请求转发的实现方式:
req.getRequestDispatcher("资源B路径").forward(req,resp);- 1
-
请求转发资源间共享数据: 使用Request对象,这里需要使用request对象提供的三个方法:
-
存储数据到request域[范围,数据是存储在request对象]中
void setAttribute(String name,Object o);- 1
-
根据key获取值
Object getAttribute(String name);- 1
-
根据key删除该键值对
void removeAttribute(String name);- 1
针对上述需求,具体的实现步骤为:
1.创建一个RequestDemo6类,接收/req6的请求,在doGet方法中打印
demo62.创建一个RequestDemo7类,接收/req7的请求,在doGet方法中打印
demo73.在RequestDemo6的方法中存储数据,并使用req.getRequestDispatcher(“/req7”).forward(req,resp)进行请求转发
4.启动测试
RequestDemo6类:
@WebServlet(urlPatterns = "/req6") public class RequestDemo6 extends HttpServlet { @Override protected void doGet(HttpServletRequest req, HttpServletResponse resp) throws ServletException, IOException { System.out.println("demo6..."); // 存储数据 req.setAttribute("msg", "日志信息"); // 重定向, 特别注意资源路径 req.getRequestDispatcher("/req7").forward(req, resp); } @Override protected void doPost(HttpServletRequest req, HttpServletResponse resp) throws ServletException, IOException { this.doGet(req, resp); } }- 1
- 2
- 3
- 4
- 5
- 6
- 7
- 8
- 9
- 10
- 11
- 12
- 13
- 14
- 15
- 16
- 17
RequestDemo7类:
@WebServlet(urlPatterns = "/req7") public class RequestDemo7 extends HttpServlet { @Override protected void doGet(HttpServletRequest req, HttpServletResponse resp) throws ServletException, IOException { System.out.println("demo7..."); // 获取数据 Object msg = req.getAttribute("msg"); System.out.println(msg); } @Override protected void doPost(HttpServletRequest req, HttpServletResponse resp) throws ServletException, IOException { this.doGet(req, resp); } }- 1
- 2
- 3
- 4
- 5
- 6
- 7
- 8
- 9
- 10
- 11
- 12
- 13
- 14
- 15
- 16
启动测试, 访问
http://localhost:8080/request-demo/req6,就可以在控制台看到如下内容:

请求转发的特点(要与重定向区分开):- 浏览器地址栏路径不发生变化, 虽然后台从
/req6转发到/req7,但是浏览器的地址一直是/req6,未发生变化 - 只能转发到当前服务器的内部资源,不能从一个服务器通过转发访问另一台服务器
- 只有一次请求,可以在转发资源间使用request共享数据,虽然后台从
/req6转发到/req7,但是这个只有一次请求
Response对象
Request: 使用request对象来获取请求数据
Response: 使用response对象来设置响应数据
 Reponse的继承体系和Request的继承体系也非常相似:

Response设置响应数据功能介绍
HTTP响应数据总共分为三部分内容,分别是响应行、响应头、响应体,对于这三部分内容的数据,respone对象都提供了哪些方法来进行设置?
响应行

对于响应头,比较常用的就是设置响应状态码:void setStatus(int sc);- 1
响应头

设置响应头键值对:void setHeader(String name,String value);- 1
响应体

对于响应体,是通过字符、字节输出流的方式往浏览器写,获取字符输出流:
PrintWriter getWriter();- 1
获取字节输出流
ServletOutputStream getOutputStream();- 1
Respones请求重定向
- Response重定向(redirect): 一种资源跳转方式。

(1)浏览器发送请求给服务器,服务器中对应的资源A接收到请求
(2)资源A现在无法处理该请求,就会给浏览器响应一个302的状态码 + Location的一个访问资源B的路径
(3)浏览器接收到响应状态码为302就会重新发送请求到Location对应的访问地址去访问资源B
关于响应状态码,我们先主要认识三个状态码,其余的等后期用到了再去掌握:
- 200 ok 客户端请求成功
- 404 Not Found 请求资源不存在
- 500 Internal Server Error 服务端发生不可预期的错误
状态码分类 说明 1xx 响应中——临时状态码,表示请求已经接受,告诉客户端应该继续请求或者如果它已经完成则忽略它 2xx 成功——表示请求已经被成功接收,处理已完成 3xx 重定向——重定向到其它地方:它让客户端再发起一个请求以完成整个处理。 4xx 客户端错误——处理发生错误,责任在客户端,如:客户端的请求一个不存在的资源,客户端未被授权,禁止访问等 5xx 服务器端错误——处理发生错误,责任在服务端,如:服务端抛出异常,路由出错,HTTP版本不支持等 状态码大全:https://cloud.tencent.com/developer/chapter/13553
状态码 英文描述 解释 200 OK客户端请求成功,即处理成功,这是我们最想看到的状态码 302 Found指示所请求的资源已移动到由 Location响应头给定的 URL,浏览器会自动重新访问到这个页面304 Not Modified告诉客户端,你请求的资源至上次取得后,服务端并未更改,你直接用你本地缓存吧。隐式重定向 400 Bad Request客户端请求有语法错误,不能被服务器所理解 403 Forbidden服务器收到请求,但是拒绝提供服务,比如:没有权限访问相关资源 404 Not Found请求资源不存在,一般是URL输入有误,或者网站资源被删除了 428 Precondition Required服务器要求有条件的请求,告诉客户端要想访问该资源,必须携带特定的请求头 429 Too Many Requests太多请求,可以限制客户端请求某个资源的数量,配合 Retry-After(多长时间后可以请求)响应头一起使用 431 Request Header Fields Too Large请求头太大,服务器不愿意处理请求,因为它的头部字段太大。请求可以在减少请求头域的大小后重新提交。 405 Method Not Allowed请求方式有误,比如应该用GET请求方式的资源,用了POST 500 Internal Server Error服务器发生不可预期的错误。服务器出异常了,赶紧看日志去吧 503 Service Unavailable服务器尚未准备好处理请求,服务器刚刚启动,还未初始化好 511 Network Authentication Required客户端需要进行身份验证才能获得网络访问权限 (4)资源B接收到请求后进行处理并最终给浏览器响应结果,这整个过程就叫重定向
- 重定向的实现方式:
resp.setStatus(302); resp.setHeader("location","资源B的访问路径");- 1
- 2

具体如何来使用,我们先来看下需求:
针对上述需求,具体的实现步骤为:
1.创建一个ResponseDemo1类,接收/resp1的请求,在doGet方法中打印
resp1....2.创建一个ResponseDemo2类,接收/resp2的请求,在doGet方法中打印
resp2....3.在ResponseDemo1的方法中使用
response.setStatus(302);
response.setHeader(“Location”,“/request-demo/resp2”) 来给前端响应结果数据
4.启动测试
创建ResponseDemo1类
/** * @Author Mr.Lu * @Date 2022/6/19 10:00 * @ClassName ResponseDemo1 * @Version 1.0 */ @WebServlet(urlPatterns = "/resp1") public class ResponseDemo1 extends HttpServlet { @Override protected void doGet(HttpServletRequest req, HttpServletResponse resp) throws ServletException, IOException { System.out.println("resp1...."); // 重定向 // 1. 设置响应状态码 resp.setStatus(302); // 2. 设置响应头 Location String contextPath = req.getContextPath(); // 获取虚拟目录(项目访问路径): `/request-demo` resp.setHeader("Location", contextPath + "/resp2"); } @Override protected void doPost(HttpServletRequest req, HttpServletResponse resp) throws ServletException, IOException { this.doGet(req, resp); } }- 1
- 2
- 3
- 4
- 5
- 6
- 7
- 8
- 9
- 10
- 11
- 12
- 13
- 14
- 15
- 16
- 17
- 18
- 19
- 20
- 21
- 22
- 23
- 24
创建ResponseDemo2类
/** * @Author Mr.Lu * @Date 2022/6/19 10:00 * @ClassName ResponseDemo2 * @Version 1.0 */ @WebServlet(urlPatterns = "/resp2") public class ResponseDemo2 extends HttpServlet { @Override protected void doGet(HttpServletRequest req, HttpServletResponse resp) throws ServletException, IOException { System.out.println("resp2..."); } @Override protected void doPost(HttpServletRequest req, HttpServletResponse resp) throws ServletException, IOException { this.doGet(req, resp); } }- 1
- 2
- 3
- 4
- 5
- 6
- 7
- 8
- 9
- 10
- 11
- 12
- 13
- 14
- 15
- 16
- 17
- 18
启动测试访问
http://localhost:8080/request-demo/resp1,就可以在控制台看到如下内容:
 虽然功能已经实现,但是从设置重定向的两行代码来看,会发现除了重定向的地址不一样,其他的内容都是一模一样,所以request对象给我们提供了简化的编写方式为:
resposne.sendRedirect("/request-demo/resp2")- 1
改进ResponseDemo2类
@WebServlet("/resp1") public class ResponseDemo1 extends HttpServlet { @Override protected void doGet(HttpServletRequest request, HttpServletResponse response) throws ServletException, IOException { System.out.println("resp1...."); //重定向 resposne.sendRedirect("/request-demo/resp2"); } @Override protected void doPost(HttpServletRequest request, HttpServletResponse response) throws ServletException, IOException { this.doGet(request, response); } }- 1
- 2
- 3
- 4
- 5
- 6
- 7
- 8
- 9
- 10
- 11
- 12
- 13
- 14
重定向的特点
- 浏览器地址栏路径发送变化,当进行重定向访问的时候,由于是由浏览器发送的两次请求,所以地址会发生变化
- 可以重定向到任何位置的资源(服务内容、外部均可),因为第一次响应结果中包含了浏览器下次要跳转的路径,所以这个路径是可以任意位置资源。
- 两次请求,不能在多个资源使用request共享数据,因为浏览器发送了两次请求,是两个不同的request对象,就无法通过request对象进行共享数据
对比请求重定向和请求转发:

路径问题
问题1:转发的时候路径上没有加
/request-demo而重定向加了,那么到底什么时候需要加,什么时候不需要加呢?其实判断的依据很简单,只需要记住下面的规则即可:
- 浏览器使用: 需要加虚拟目录(项目访问路径)
- 服务端使用: 不需要加虚拟目录
对于转发来说,因为是在服务端进行的,所以不需要加虚拟目录
对于重定向来说,路径最终是由浏览器来发送请求,就需要添加虚拟目录。
下面是一些常用路径:
<a href='路径'>// 需要添加虚拟目录<form action='路径'>// 需要添加虚拟目录req.getRequestDispatcher("路径")// 不需要添加虚拟目录resp.sendRedirect("路径")// 需要添加虚拟目录
问题2:在重定向的代码中,
/request-demo是固定编码的,如果后期通过Tomcat插件配置了项目的访问路径,那么所有需要重定向的地方都需要重新修改,该如何优化?
 我们可以在代码中动态去获取项目访问的虚拟目录,
通过request对象中的getContextPath()方法获取虚拟目录,修改后的代码如下:@WebServlet("/resp1") public class ResponseDemo1 extends HttpServlet { @Override protected void doGet(HttpServletRequest request, HttpServletResponse response) throws ServletException, IOException { System.out.println("resp1...."); //简化方式完成重定向 //动态获取虚拟目录 String contextPath = request.getContextPath(); response.sendRedirect(contextPath+"/resp2"); } @Override protected void doPost(HttpServletRequest request, HttpServletResponse response) throws ServletException, IOException { this.doGet(request, response); } }- 1
- 2
- 3
- 4
- 5
- 6
- 7
- 8
- 9
- 10
- 11
- 12
- 13
- 14
- 15
- 16
- 17
Response响应字符数据
要想将字符数据写回到浏览器,我们需要两个步骤:
- 通过Response对象获取字符输出流:
PrintWriter writer = resp.getWriter(); - 通过字符输出流写数据:
writer.write("aaa");
- 返回一个简单的字符串
aaa
package response; /** * @Author Mr.Lu * @Date 2022/6/19 10:42 * @ClassName ${NAME} * @Version 1.0 */ import javax.servlet.*; import javax.servlet.http.*; import javax.servlet.annotation.*; import java.io.IOException; import java.io.PrintWriter; @WebServlet(urlPatterns = "/resp4") public class ResponseDemo4 extends HttpServlet { @Override protected void doGet(HttpServletRequest request, HttpServletResponse response) throws ServletException, IOException { response.setContentType("text/html;charset=utf-8"); // 可以使用该行统一进行设置content-type, 在其中顺便设置编码为utf-8方式,因为ISO-8859-1字符集不支持中文 // 1. 获取字符输出流 PrintWriter writer = response.getWriter(); writer.write("aaaa"); } @Override protected void doPost(HttpServletRequest request, HttpServletResponse response) throws ServletException, IOException { this.doGet(request, response); } }- 1
- 2
- 3
- 4
- 5
- 6
- 7
- 8
- 9
- 10
- 11
- 12
- 13
- 14
- 15
- 16
- 17
- 18
- 19
- 20
- 21
- 22
- 23
- 24
- 25
- 26
- 27
- 28

- 返回一串html字符串,并且能被浏览器解析
@WebServlet(urlPatterns = "/resp4") public class ResponseDemo4 extends HttpServlet { @Override protected void doGet(HttpServletRequest request, HttpServletResponse response) throws ServletException, IOException { PrintWriter writer = response.getWriter(); // content-type,告诉浏览器返回的数据类型是HTML类型数据,这样浏览器才会解析HTML标签 response.setHeader("content-type", "text/html"); // 后面统一进行设置response.setContentType("text/html;charset=utf-8");即可,这样既可以解决返回的数据类型又可以对中文进行解析 writer.write("<h1>aaaa</h1>"); } @Override protected void doPost(HttpServletRequest request, HttpServletResponse response) throws ServletException, IOException { this.doGet(request, response); } }- 1
- 2
- 3
- 4
- 5
- 6
- 7
- 8
- 9
- 10
- 11
- 12
- 13
- 14
- 15
 ==注意:==一次请求响应结束后,response对象就会被销毁掉,所以不要手动关闭流。
- 返回一个中文的字符串
你好,需要注意设置响应数据的编码为utf-8
package response; /** * @Author Mr.Lu * @Date 2022/6/19 10:42 * @ClassName ${NAME} * @Version 1.0 */ @WebServlet(urlPatterns = "/resp4") public class ResponseDemo4 extends HttpServlet { @Override protected void doGet(HttpServletRequest request, HttpServletResponse response) throws ServletException, IOException { // // 可以使用该行统一进行设置content-type, 在其中顺便设置编码为utf-8方式,因为ISO-8859-1字符集不支持中文 response.setContentType("text/html;charset=utf-8"); PrintWriter writer = response.getWriter(); writer.write("你好啊!!!"); } @Override protected void doPost(HttpServletRequest request, HttpServletResponse response) throws ServletException, IOException { this.doGet(request, response); } }- 1
- 2
- 3
- 4
- 5
- 6
- 7
- 8
- 9
- 10
- 11
- 12
- 13
- 14
- 15
- 16
- 17
- 18
- 19
- 20
- 21
- 22

Response响应字节数据
要想将字节数据写回到浏览器,我们需要两个步骤:
-
通过Response对象获取字节输出流:ServletOutputStream outputStream = resp.getOutputStream();
-
通过字节输出流写数据: outputStream.write(字节数据);
接下来,我们实现通过些案例把响应字符数据给实际应用下:
- 返回一个图片文件到浏览器
@WebServlet(urlPatterns = "/resp5") public class ResponseDemo5 extends HttpServlet { @Override protected void doGet(HttpServletRequest request, HttpServletResponse response) throws ServletException, IOException { // 1. 读取文件 FileInputStream fis = new FileInputStream("D:\\javaAPI_picture\\5.jpg"); // 2. 获取response字节输出流 ServletOutputStream os = response.getOutputStream(); // 系统自动释放资源 // 3. 完成流的copy byte[] buffer = new byte[1024]; int len = 0; while ((len = fis.read(buffer)) != -1){ os.write(buffer, 0, len); } fis.close(); // 关闭流 } @Override protected void doPost(HttpServletRequest request, HttpServletResponse response) throws ServletException, IOException { this.doGet(request, response); } }- 1
- 2
- 3
- 4
- 5
- 6
- 7
- 8
- 9
- 10
- 11
- 12
- 13
- 14
- 15
- 16
- 17
- 18
- 19
- 20
- 21
- 22
- 23
- 24
- 25
 上述代码中,对于流的copy的代码还是比较复杂的,所以我们可以使用别人提供好的方法来简化代码的开发,具体的步骤是:
(1) pom.xml添加依赖
<dependency><!-- 导入IO流依赖 --> <groupId>commons-io</groupId> <artifactId>commons-io</artifactId> <version>2.6</version> </dependency>- 1
- 2
- 3
- 4
- 5
(2) 调用工具类方法


-
-
相关阅读:
企业电子招投标采购系统——功能模块&功能描述+数字化采购管理 采购招投标
车牌自动识别-matlab
在Linux中安装docker全过程
冰狐智能辅助相对脚本精灵有哪些优势
亚马逊国际按关键字搜索商品 API
首1标准型和尾1标准型
【国科大——矩阵分析与应用】使用高斯消元法,测试二元一次方程系数产生的误差
jsp美食管理系统Myeclipse开发mysql数据库web结构java编程计算机网页项目
idea 新建文件模板
电动尾门驱动芯片TMI8720-Q1,越来越多的电机已被应用到汽车上
- 原文地址:https://blog.csdn.net/qq_43751200/article/details/125357013