-
1. 封装自己的脚手架 2.创建代码模块
使用node脚本封装
使用yeoman-generator封装自己的脚手架
-
mkdir generator-ai-cli
-
npm init -y
-
npm install yeoman-generator --save
-
目录结构

-
mkdir generators/app/index.js
// generators/app/index.js const Generator = require('yeoman-generator') module.exports = class extends Generator { prompting () { // 命令行交互模式 return this.prompt([ { type: 'input', name: 'name', message: 'Your project name', default: this.appname } ]) .then(answers => { this.answers = answers }) } writing () { // 把每一个文件都通过模板转换到目标路径 const templates = [ '.browserslistrc', '.editorconfig', '.env.development', '.env.production', '.eslintrc.js', '.gitignore', 'babel.config.js', 'package.json', 'postcss.config.js', 'README.md', 'public/favicon.ico', 'public/index.html', 'src/App.vue', 'src/main.js', 'src/router.js', 'src/assets/logo.png', 'src/components/HelloWorld.vue', 'src/store/actions.js', 'src/store/getters.js', 'src/store/index.js', 'src/store/mutations.js', 'src/store/state.js', 'src/utils/request.js', 'src/views/About.vue', 'src/views/Home.vue' ] templates.forEach(item => { // item => 每个文件路径 this.fs.copyTpl( this.templatePath(item), this.destinationPath(item), this.answers ) }) } }- 1
- 2
- 3
- 4
- 5
- 6
- 7
- 8
- 9
- 10
- 11
- 12
- 13
- 14
- 15
- 16
- 17
- 18
- 19
- 20
- 21
- 22
- 23
- 24
- 25
- 26
- 27
- 28
- 29
- 30
- 31
- 32
- 33
- 34
- 35
- 36
- 37
- 38
- 39
- 40
- 41
- 42
- 43
- 44
- 45
- 46
- 47
- 48
- 49
- 50
- 51
- 52
- 53
- 54
- 55
- 56
- 57
- 58
- 59
- 60
package.json
{ "name": "generator-ai-cli", "version": "0.1.0", "main": "index.js", "author": "", "license": "MIT", "dependencies": { "yeoman-generator": "^4.0.1" } }- 1
- 2
- 3
- 4
- 5
- 6
- 7
- 8
- 9
- 10
- 11
- 准备模版文件,模版文件的存放路径:generators/app/templates
generators/app/templates 文件- 1
- 2
- yarn link
- yo ai-cli
plop:使用plop创建代码模块
1.场景:使用plop创建代码模块
必须是用yarn,使用npm好像生成不成功。- yarn install plop --save
- touch plopfile.js
plop的入口文件:
// Plop 入口文件,需要导出一个函数
// 此函数接收一个 plop 对象,用于创建生成器任务
module.exports = plop => { /** setGenerator参数: component: 生成器的名字 {}: 生成器的配置 */ plop.setGenerator('component', { description: 'create a component', prompts: [ { type: 'input', // // 输入方式 name: 'name', // 问题返回值的键 message: 'component name', // 屏幕上给出的提示 default: 'MyComponent', // 问题的默认答案 } ], actions: [ { type: 'add', // 代表添加文件 path: 'src/components/{{name}}/{{name}}.js', // 添加文件的具体路径 templateFile: 'plop-templates/component.hbs' // 添加文件的模版文件路径 }, { type: 'add', // 代表添加文件 path: 'src/components/{{name}}/{{name}}.css', templateFile: 'plop-templates/component.css.hbs' }, { type: 'add', // 代表添加文件 path: 'src/components/{{name}}/{{name}}.test.js', templateFile: 'plop-templates/component.test.hbs' } ] }) }- 1
- 2
- 3
- 4
- 5
- 6
- 7
- 8
- 9
- 10
- 11
- 12
- 13
- 14
- 15
- 16
- 17
- 18
- 19
- 20
- 21
- 22
- 23
- 24
- 25
- 26
- 27
- 28
- 29
- 30
- 31
- 32
- 33
- 34
- 35
- 36
模版文件:
// plop-templates/component.css.hbs import React from 'react'; export default () => ( <div className="{{name}}"> <h1>{{name}} Component</h1> </div> )- 1
- 2
- 3
- 4
- 5
- 6
- 7
- 8
- 9
// plop-templates/component.css.hbs .{{name}} { }- 1
- 2
- 3
- 4
- 5
// plop-templates/component.test.hbs import React from 'react'; import ReactDOM from 'react-dom'; import {{name}} from './{{name}}'; it('renders without crashing', () => { const div = document.createElement('div'); ReactDOM.render(<{{name}} />, div); ReactDOM.unmountComponentAtNode(div); });- 1
- 2
- 3
- 4
- 5
- 6
- 7
- 8
- 9
- 10
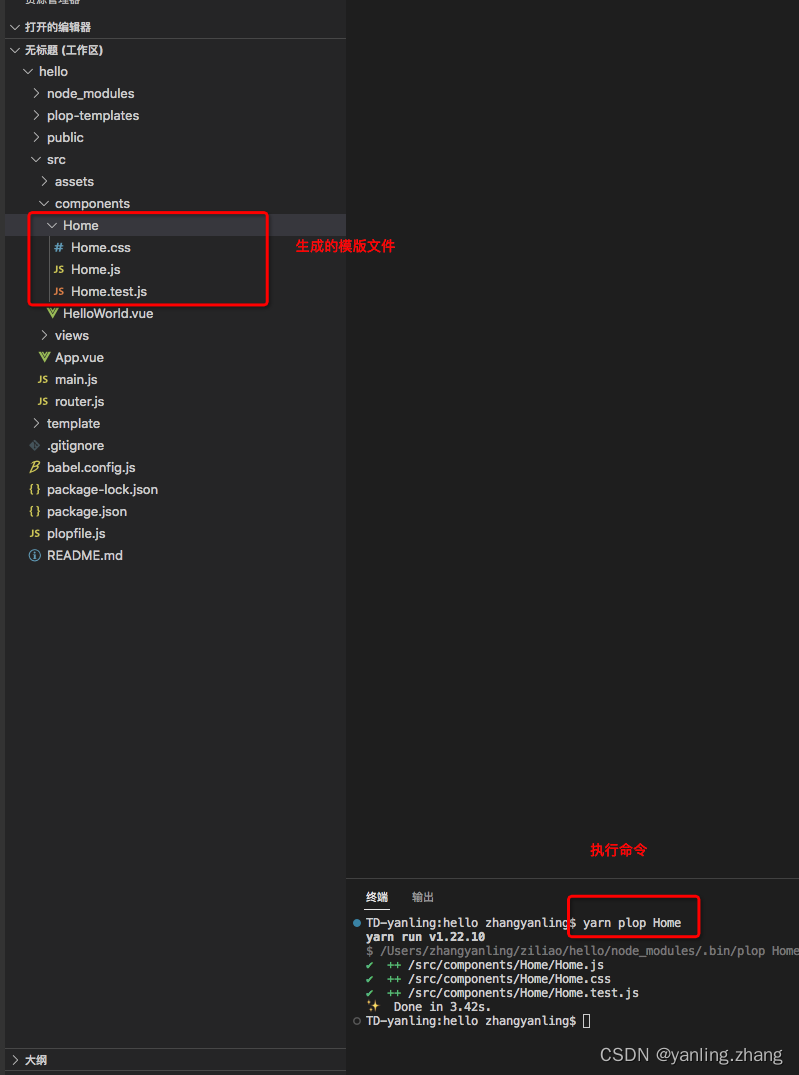
yarn plop component (生成器的名字)
执行命令:yarn plop component
效果:
-
-
相关阅读:
【算法面试必刷Java版九】删除链表的倒数第n个节点
人工神经网络的三个要素,神经网络三要素是指
SpringBoot 封装 HBase 操作工具类
如何使用vs code调试python程序
什么是泄放电阻器:您应该知道的 11 个重要事实?
el-table表格变更前后根据数据值改变背景颜色
车载语音交互「停摆」
AI教程视频 - 零基础玩转illustrator科研绘图-内容介绍-目录
ICC2: secondary pg pin的作用与连接
抽象类和接口
- 原文地址:https://blog.csdn.net/weixin_38245947/article/details/125444352