-
SpringCloud 学习笔记总结 (三)
文章目录
- 1. zookeeper 之 支付服务注册(服务提供者注册)
- 2. zookeeper 之 临时节点和持久节点
- 3. zookeeper 之 服务消费者注册
- 4. Consul 之 简介
- 5. Consul 之 安装运行Consul
- 6. Consul 之 服务提供者注册进consul
- 7. Consul 之 服务消费者注册进Consul
- 8. 三个注册中心的异同点
- 9. Ribbon 之 介绍
- 10. Ribbon 之 负载均衡和Rest调用
- 11. Ribbon 之 默认自带的负载均衡策略
- 12. Ribbon 之 负载均衡规则替换
- 13. Ribbon 默认负载均衡轮询算法原理
- 14. 手写 Ribbon 的轮询算法
1. zookeeper 之 支付服务注册(服务提供者注册)

zookeeper官方下载:
第一步:创建一个新的业务逻辑项目方便测试,导入对应的zookeeper依赖:
<!--SpringBoot整合zookeeper客户端--> <dependency> <groupId>org.springframework.cloud</groupId> <artifactId>spring-cloud-starter-zookeeper-discovery</artifactId> </dependency>- 1
- 2
- 3
- 4
- 5
第二步:配置application.yml:
server: port: 8004 # 服务别名--注册zookeeper到注册中心名称 spring: application: name: cloud-provider-payment cloud: # 注册到zookeeper zookeeper: connect-string: 150.158.199.52:2181- 1
- 2
- 3
- 4
- 5
- 6
- 7
- 8
- 9
- 10
- 11
第三步:添加SpringBoot 启动类:
package com.itholmes.springcloud; import org.springframework.boot.SpringApplication; import org.springframework.boot.autoconfigure.SpringBootApplication; import org.springframework.cloud.client.discovery.EnableDiscoveryClient; @SpringBootApplication /** * 注解@EnableDiscoveryClient: * 用于像使用consul或者zookeeper作为注册中心时注册服务。 */ @EnableDiscoveryClient public class PaymentMain8004 { public static void main(String[] args) { SpringApplication.run(PaymentMain8004.class,args); } }- 1
- 2
- 3
- 4
- 5
- 6
- 7
- 8
- 9
- 10
- 11
- 12
- 13
- 14
- 15
- 16
- 17
第四步:进入zookeeper的bin目录下,通过./zkServer.sh start 启动zookeeper:
- ./zkServer.sh start 启动zookeeper。
- ./zkCli.sh 进入zookeeper客户端。
- 启动之前
一定要看看conf目录下面的zoo.cfg文件,一般会有一个zoo.sample.cfg,需要将其复制出一份zoo.cfg文件才能正常启动zookeeper。

注意:

第五步:启动业务逻辑项目。
-
可能遇到jar冲突!zookeeper的依赖jar包与服务器安装的zookeeper版本不一致就会出现jar包冲突的问题!

怎样解决zookeeper版本jar包与服务器的版本冲突的问题? -
可以通过exclusions排除jar包自带的zookeeper3.5.3版本呢,添加其他版本的依赖。
<!--SpringBoot整合zookeeper客户端--> <dependency> <groupId>org.springframework.cloud</groupId> <artifactId>spring-cloud-starter-zookeeper-discovery</artifactId> <exclusions> <!--排除自身版本的zookeeper--> <exclusion> <groupId>org.apache.zookeeper</groupId> <artifactId>zookeeper</artifactId> </exclusion> </exclusions> </dependency> <!--添加新版本的zookeeper。--> <dependency> <groupId>org.apache.zookeeper</groupId> <artifactId>zookeeper</artifactId> <version>3.4.9</version> </dependency>- 1
- 2
- 3
- 4
- 5
- 6
- 7
- 8
- 9
- 10
- 11
- 12
- 13
- 14
- 15
- 16
- 17
- 18
第六步:启动项目,查看zookeeper服务是否注册进去了。
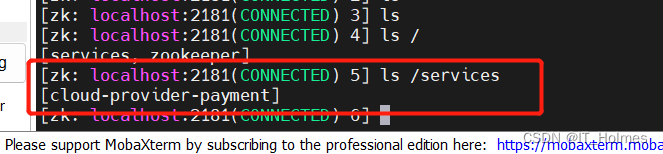

2. zookeeper 之 临时节点和持久节点
zookeeper可以分为临时节点和持久节点。
还可以细分为无序号的临时节点,带序号的临时节点,无序号的持久节点,带序号的持久节点。
当前服务器上zookeeper,当我们关闭业务逻辑系统时,zookeeper一定时间内接收不到心跳就会立刻将服务注册的信息删除掉,表明这台zookeeper服务器是临时节点。
3. zookeeper 之 服务消费者注册
将消费者系统注册到zookeeper中,并且从zookeeper中拿到提供者的信息。
第一步:同样项目创建服务消费者,配置pom,创建springboot启动类。
package com.itholmes.springcloud; import org.springframework.boot.SpringApplication; import org.springframework.boot.autoconfigure.SpringBootApplication; import org.springframework.cloud.client.discovery.EnableDiscoveryClient; @SpringBootApplication // 不要忘记添加!!! @EnableDiscoveryClient public class OrderZKMain { public static void main(String[] args) { SpringApplication.run(OrderZKMain.class,args); } }- 1
- 2
- 3
- 4
- 5
- 6
- 7
- 8
- 9
- 10
- 11
- 12
- 13
- 14
- 15
第二步:将服务消费者,注册到zookeeper当中。
server: port: 80 # 服务别名--注册zookeeper到注册中心名称 spring: application: name: cloud-consumer-order cloud: # 注册到zookeeper zookeeper: connect-string: 150.158.199.52:2181- 1
- 2
- 3
- 4
- 5
- 6
- 7
- 8
- 9
- 10
- 11
- 12
第三步:添加RestTemplate对象到容器中,同时不要忘记添加@LoadBalanced注解:
package com.itholmes.springcloud.config; import org.springframework.cloud.client.loadbalancer.LoadBalanced; import org.springframework.context.annotation.Bean; import org.springframework.context.annotation.Configuration; import org.springframework.web.client.RestTemplate; @Configuration public class ApplicationContextConfig { @Bean //添加@LoadBalanced负载均衡注解 @LoadBalanced public RestTemplate getRestTemplate(){ return new RestTemplate(); } }- 1
- 2
- 3
- 4
- 5
- 6
- 7
- 8
- 9
- 10
- 11
- 12
- 13
- 14
- 15
- 16
- 17
第四步:添加一个controller层,通过服务注册的微服务名称,使用RestTemplate来进行访问即可:
package com.itholmes.springcloud.controller; import lombok.extern.slf4j.Slf4j; import org.springframework.web.bind.annotation.GetMapping; import org.springframework.web.bind.annotation.RestController; import org.springframework.web.client.RestTemplate; import javax.annotation.Resource; @RestController @Slf4j public class OrderZKController { public static final String INVOKE_URL = "http://cloud-provider-payment"; @Resource private RestTemplate restTemplate; @GetMapping("/consumer/payment/zk") public String paymentInfo(){ String result = restTemplate.getForObject(INVOKE_URL + "/payment/zk", String.class); return result; } }- 1
- 2
- 3
- 4
- 5
- 6
- 7
- 8
- 9
- 10
- 11
- 12
- 13
- 14
- 15
- 16
- 17
- 18
- 19
- 20
- 21
- 22
- 23
- 24
在这我依然还是遇到了域名不能包含下划线的问题!
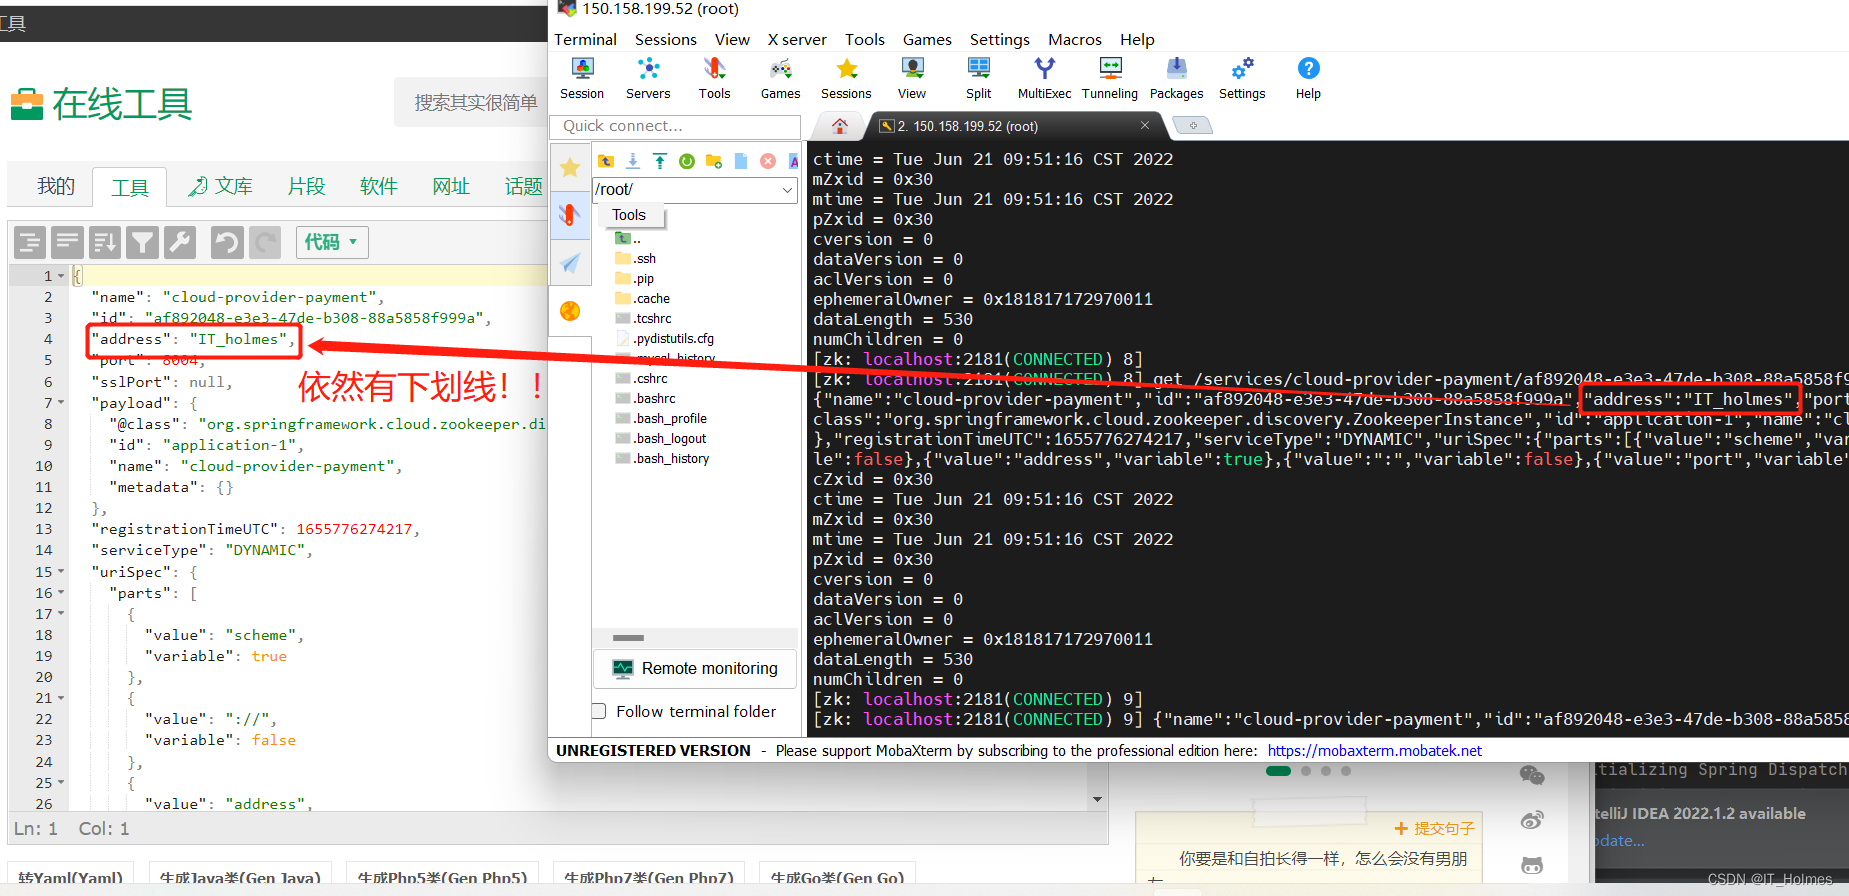
所以最后还是被折服了,决定修改计算机主机名字。。。

4. Consul 之 简介
Consul是一套开源的分布式服务发现和配置管理系统,由HahsiCorp公司用go语言开发的。
Consul的优势:

下载地址:https://learn.hashicorp.com/tutorials/consul/get-started-install
5. Consul 之 安装运行Consul
去官方下载Consul的压缩包,传到服务器中:
- 对于zip文件,使用unzip命令来解压。
使用consul --version来查看consul版本:

通过consul agent -dev 通过开发模式启动consul:
- 注意:如果是云端访问,还需要加-client 0.0.0.0参数。
consul agent -dev # 该命令启动只能允许本机访问 consul agent -dev -client 0.0.0.0 # 加上-client 0.0.0.0就可以其他机器进行访问了- 1
- 2

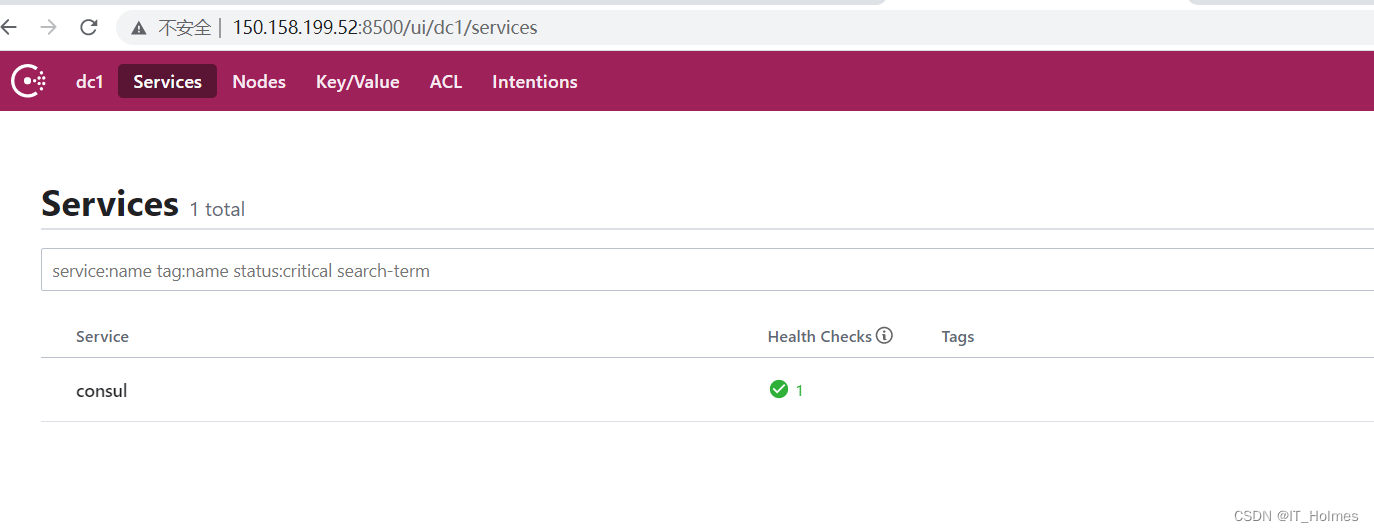
这样我们访问页面就可以进入consul的web页面:
6. Consul 之 服务提供者注册进consul
同样创建服务提供者项目,改pom导依赖,添加配置文件和启动类。
第一步:对应consul的重要依赖:
<!--SpringCloud consul-server的客户端--> <dependency> <groupId>org.springframework.cloud</groupId> <artifactId>spring-cloud-starter-consul-discovery</artifactId> </dependency> <dependency> <groupId>org.springframework.boot</groupId> <artifactId>spring-boot-starter-web</artifactId> </dependency> <dependency> <groupId>org.springframework.boot</groupId> <artifactId>spring-boot-starter-actuator</artifactId> </dependency>- 1
- 2
- 3
- 4
- 5
- 6
- 7
- 8
- 9
- 10
- 11
- 12
- 13
- 14
- 15
第二步:SpringBoot对consul,application.yml的整合。
server: port: 8006 spring: application: # 微服务名称 name: consul-provider-payment # consul注册中心地址 cloud: consul: host: 150.158.199.52 port: 8500 discovery: # hostname: 127.0.0.1 service-name: ${spring.application.name} # healthbeat.enable 为 true 就是打开心跳机制,重新启动服务就不会再出现前面的问题了。 heartbeat: enabled: true- 1
- 2
- 3
- 4
- 5
- 6
- 7
- 8
- 9
- 10
- 11
- 12
- 13
- 14
- 15
- 16
- 17
- 18
第三步:添加主启动类。
package com.itholmes.springcloud; import org.springframework.boot.SpringApplication; import org.springframework.boot.autoconfigure.SpringBootApplication; import org.springframework.cloud.client.discovery.EnableDiscoveryClient; @SpringBootApplication @EnableDiscoveryClient public class PaymentMain8006 { public static void main(String[] args) { SpringApplication.run(PaymentMain8006.class,args); } }- 1
- 2
- 3
- 4
- 5
- 6
- 7
- 8
- 9
- 10
- 11
- 12
- 13
第四步:就可以在consul web页面查看到。

(注意如果没有开启心跳检测就会出现上面的红叉。)7. Consul 之 服务消费者注册进Consul
同样创建服务提供者项目,改pom导依赖,添加配置文件和启动类。
application.yml配置:
server: port: 80 spring: application: # 微服务名称 name: consul-consumer-order # consul注册中心地址 cloud: consul: host: 150.158.199.52 port: 8500 discovery: # hostname: 127.0.0.1 service-name: ${spring.application.name} # healthbeat.enable 为 true 就是打开心跳机制,重新启动服务就不会再出现前面的问题了。 heartbeat: enabled: true- 1
- 2
- 3
- 4
- 5
- 6
- 7
- 8
- 9
- 10
- 11
- 12
- 13
- 14
- 15
- 16
- 17
- 18
配置类RestTemplate不要忘记添加@LoadBalanced注解:
package com.itholmes.springcloud.config; import org.springframework.cloud.client.loadbalancer.LoadBalanced; import org.springframework.context.annotation.Bean; import org.springframework.context.annotation.Configuration; import org.springframework.web.client.RestTemplate; @Configuration public class ApplicationContextConfig { @Bean //添加@LoadBalanced负载均衡注解 @LoadBalanced public RestTemplate getRestTemplate(){ return new RestTemplate(); } }- 1
- 2
- 3
- 4
- 5
- 6
- 7
- 8
- 9
- 10
- 11
- 12
- 13
- 14
- 15
- 16
启动配置类:
package com.itholmes.springcloud; import org.springframework.boot.SpringApplication; import org.springframework.boot.autoconfigure.SpringBootApplication; import org.springframework.cloud.client.discovery.EnableDiscoveryClient; @SpringBootApplication @EnableDiscoveryClient//该注解用于向使用consul或者zookeeper作为注册中心注册服务 public class OrderConsulMain80 { public static void main(String[] args) { SpringApplication.run(OrderConsulMain80.class,args); } }- 1
- 2
- 3
- 4
- 5
- 6
- 7
- 8
- 9
- 10
- 11
- 12
- 13
8. 三个注册中心的异同点
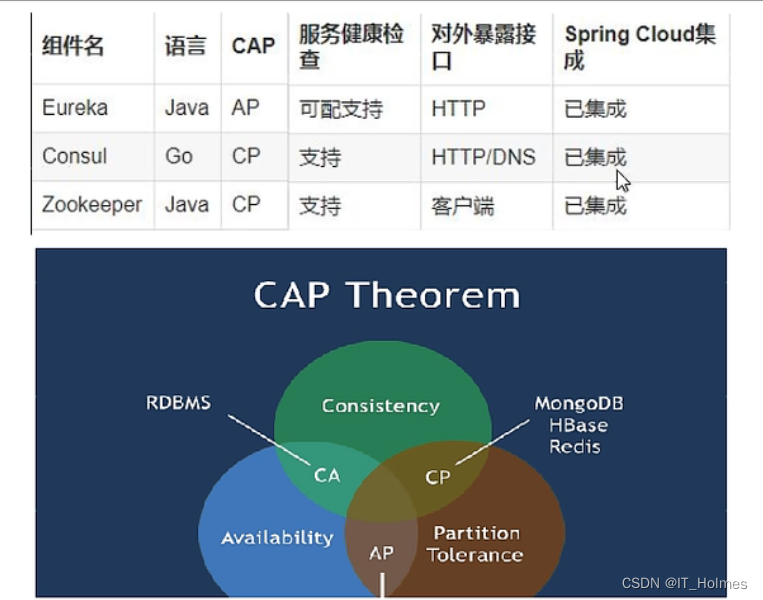
CAP理念:

由于是分布式微服务,所以P是要永远保证的,要么是CP,要么是AP。- eureka分支是AP。
- zoo keeper和consul分支是CP。
9. Ribbon 之 介绍
SpringCloud Ribbon 是基于Netflix Ribbon实现的一套客户端 负载均衡的工具。
Ribbon的作用:主要功能是提供客户端的软件负载均衡算法和服务调用。
Ribbon客户端组件提供一系列完善项如连接超时,重试等。简单说,就是在配置文件中列出Load Balancer(简称LB,负载均衡)后面所有的机器,Ribbon会自动的帮助你基于某种规则(如简单轮询,随机连接等) 去连接这些机器。
Ribbon的github地址:https://github.com/Netflix/ribbon
ribbon目前已经维护,但是仍然有很多项目中使用!
常见的负载均衡的软件有:Nginx,LVS,硬件F5等。
LB负载均衡有两种:集中式LB 和 进程内LB。
- Nginx是服务器负载均衡,属于集中式LB。
- Ribbon是本地负载均衡,属于进程式LB。

所以说Ribbon本质上就是RestTemplate + 负载均衡调用。
10. Ribbon 之 负载均衡和Rest调用
10.1 Ribbon 环境引入
Ribbon就是一个软负载均衡的客户端组件。
下图就是一个Ribbon与Eureka Server结合的架构图:

Ribbon有多种策略:比如轮询,随机和根据相应时间加权。
正常情况下,我们需要引入:
<dependency> <groupId>org.springframework.cloud</groupId> <artifactId>spring-cloud-starter-ribbon</artifactId> </dependency>- 1
- 2
- 3
- 4
但是新版的spring-cloud-starter-netflix-eureka-client里面已经整合了ribbon!因此我们使用eureka的时候就有了负载均衡的效果。

10.2 RestTemplate 使用
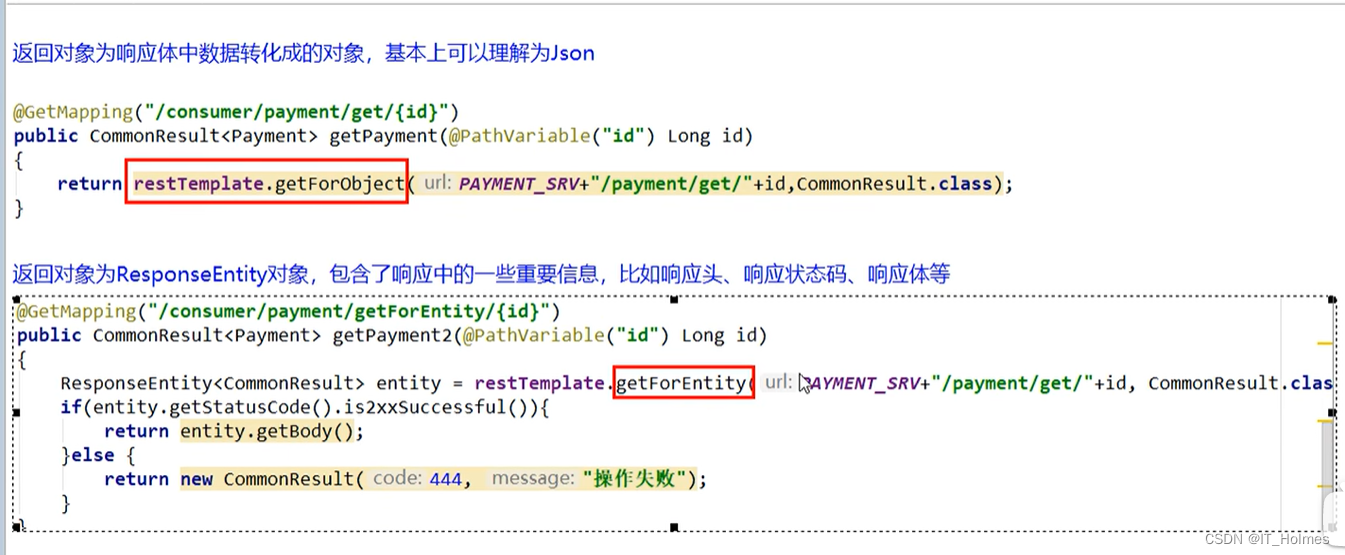
RestTemplate主要有两种object和entity:
- object返回对象为响应体中数据转化的对象,就是json样子。
- entity返回对象为ResponseEntity对象,包含了一些响应的重要信息,响应头,响应状态码,响应体等等。(最近写过的一个项目,就恰好用到了配置响应头传递token)。
11. Ribbon 之 默认自带的负载均衡策略
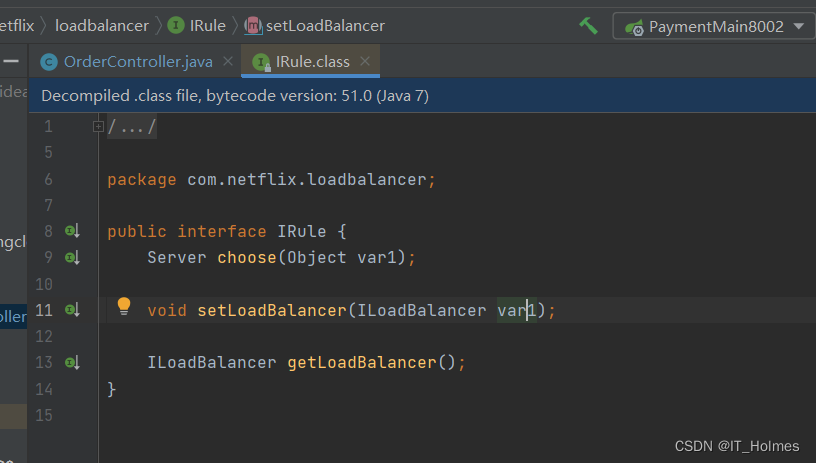
ribbon自带的几个默认负载均衡策略:

Ribbon的核心组件iRule接口:
- 上面几个默认的都是实现iRule接口的实现类中实现的。


12. Ribbon 之 负载均衡规则替换
配置前,官方文档明确给出警告配置Ribbon的自定义配置类不能放到@ComponentScan所扫描当前包下以及子包下!!

设置自定义配置类:
- 还是要注意这个类不能设置在@ComponentScan所扫描当前包下以及子包下!!
package com.itholmes.myrule; import com.netflix.loadbalancer.IRule; import com.netflix.loadbalancer.RandomRule; import org.springframework.context.annotation.Bean; import org.springframework.context.annotation.Configuration; //还是要注意这个类不能设置在@ComponentScan所扫描当前包下以及子包下!! @Configuration public class MySelfRule { //注入IRule接口对应的一些实现类 @Bean public IRule myRule(){ //随机规则 return new RandomRule(); } }- 1
- 2
- 3
- 4
- 5
- 6
- 7
- 8
- 9
- 10
- 11
- 12
- 13
- 14
- 15
- 16
- 17
- 18
- 19
SpringBoot启动类:
- 需要添加@RibbonClient注解,指定微服务名称和配置类。
package com.itholmes.springcloud; import com.itholmes.myrule.MySelfRule; import org.springframework.boot.SpringApplication; import org.springframework.boot.autoconfigure.SpringBootApplication; import org.springframework.cloud.netflix.eureka.EnableEurekaClient; import org.springframework.cloud.netflix.ribbon.RibbonClient; @SpringBootApplication @EnableEurekaClient //在这指定好,这里的name是要访问那个微服务的名称;configuration来指定负载均衡的规则的配置类。 @RibbonClient(name = "CLOUD-PAYMENT-SERVICE",configuration = MySelfRule.class) public class OrderMain80 { public static void main(String[] args) { SpringApplication.run(OrderMain80.class,args); } }- 1
- 2
- 3
- 4
- 5
- 6
- 7
- 8
- 9
- 10
- 11
- 12
- 13
- 14
- 15
- 16
- 17
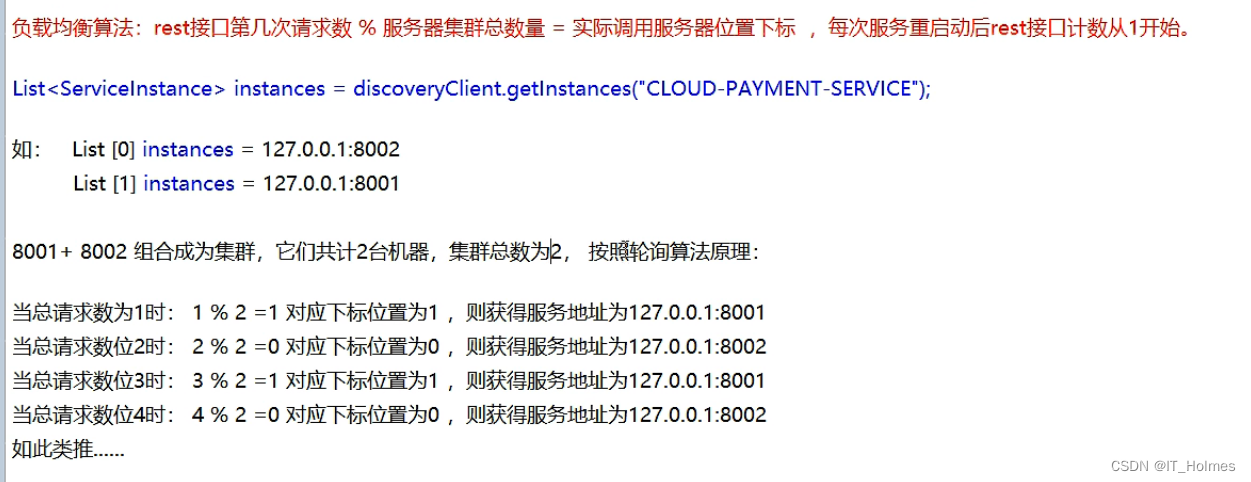
13. Ribbon 默认负载均衡轮询算法原理
负载均衡算法:
- rest接口第几次请求数 % 服务器集群总数量 = 实际调用服务器位置下标。
- 每次服务重启动后rest接口计数从1开始。
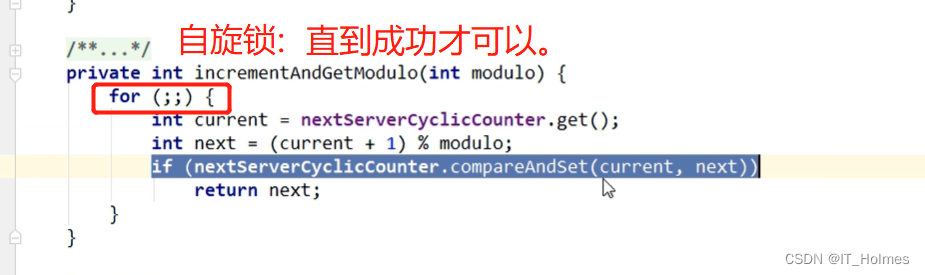
使用到了自旋锁:
什么是自旋锁?
- 自旋锁是指当一个线程尝试获取某个锁时,如果该锁已被其他线程占用,就一直循环检测锁是否被释放,而不是进入线程挂起或睡眠状态。
14. 手写 Ribbon 的轮询算法
定义一个LoadBalancer接口:
package com.itholmes.springcloud.lb; import org.springframework.cloud.client.ServiceInstance; import java.util.List; public interface LoadBalancer { ServiceInstance instances(List<ServiceInstance> serviceInstances); }- 1
- 2
- 3
- 4
- 5
- 6
- 7
- 8
MyLB类,设置轮询算法:
package com.itholmes.springcloud.lb; import org.springframework.cloud.client.ServiceInstance; import org.springframework.stereotype.Component; import java.util.List; import java.util.concurrent.atomic.AtomicInteger; @Component public class MyLB implements LoadBalancer{ /** * AtomicInteger类是系统底层保护的int类型,通过提供执行方法的控制进行值的原子操作。 * AtomicInteger它不能当作Integer来使用 * */ private AtomicInteger atomicInteger = new AtomicInteger(0); public final int getAndIncrement(){ int current; int next; do { current = this.atomicInteger.get(); //2147483647是integer的最大值。 next = current >= 2147483647 ? 0 : current + 1; /** * java.util.concurrent.atomic.AtomicInteger.compareAndSet()是Java中的一种内置方法, * 如果当前值等于参数给定的期望值,则将值设置为参数中的传递值。该函数返回一个布尔值,该布尔值使我们了解更新是否完成。 */ }while (!this.atomicInteger.compareAndSet(current,next)); System.out.println("*****第几次访问次数,next:"+next); return next; } @Override public ServiceInstance instances(List<ServiceInstance> serviceInstances) { //轮询算法 int index = getAndIncrement() % serviceInstances.size(); return serviceInstances.get(index); } }- 1
- 2
- 3
- 4
- 5
- 6
- 7
- 8
- 9
- 10
- 11
- 12
- 13
- 14
- 15
- 16
- 17
- 18
- 19
- 20
- 21
- 22
- 23
- 24
- 25
- 26
- 27
- 28
- 29
- 30
- 31
- 32
- 33
- 34
- 35
- 36
- 37
- 38
- 39
- 40
- 41
- 42
controller层验证:
@Resource RestTemplate restTemplate; @Resource private DiscoveryClient discoveryClient; @Resource private LoadBalancer loadBalancer; @GetMapping("/consumer/payment/lb") public String getPaymentLB(){ List<ServiceInstance> instances = discoveryClient.getInstances("CLOUD-PAYMENT-SERVICE"); if (instances == null || instances.size()<=0){ return null; } ServiceInstance instance = loadBalancer.instances(instances); URI uri = instance.getUri(); return restTemplate.getForObject(uri+"/payment/lb",String.class); }- 1
- 2
- 3
- 4
- 5
- 6
- 7
- 8
- 9
- 10
- 11
- 12
- 13
- 14
- 15
- 16
- 17
- 18
- 19
-
相关阅读:
Linux:web服务基于IP和域名部署
springboot+vue+java企业客户售后反馈系统
【linux C】绑定任务到特定CPU(CPU亲和性)
《无与伦比》Centos7 安装git
pytorch代码实现之SAConv卷积
Go学习笔记1
小程序中使用分包
ES(Elasticsearch)安装教程
tensorflow张量运算
Unsafe概述
- 原文地址:https://blog.csdn.net/IT_Holmes/article/details/125370800