-
Vue + Flask 实现单页面应用
今天使用我们一起来尝试,使用 Vue + Flask 搭建一个简单的单页面应用。
前端环境配置
首先安装 vue
1npm install vue- 1
创建 vue 工程
1# 使用 webpack 打包工具初始化一个名为 frontend 的工程 2vue init webpack frontend- 1
- 2
安装依赖
1# 进入工程目录 2cd frontend 3# 安装 vue-router 4npm install vue-router --save-dev 5# 安装 element-ui 6npm i element-ui -S 7# 安装 SASS 加载器 8npm install sass-loader node-sass --save-dev 9# 安装依赖 10npm install- 1
- 2
- 3
- 4
- 5
- 6
- 7
- 8
- 9
- 10
启动工程
1npm run dev- 1
此时,一个最简 vue 应用就完成了。
我们看一下 src 文件夹,这里就是我们写前端代码的地方了
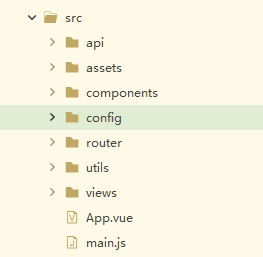
如下文件的作用
assets:用于存放资源文件
components:用于存放 Vue 功能组件
views:用于存放 Vue 视图组件
router:用于存放 vue-router 配置
api:存放编写的 api 调用代码
config:用于存放一些公共配置,如后端 url 等
utils:公共方法
App.vue:组件模板
main.js:项目的入口文件
下面我们就简单实现一个登陆功能,来进一步理解下各个文件的作用。
添加代码
首先处理配置信息,在 config 文件夹中创建 url.js 文件
1const devUrl = 'http://127.0.0.1:9980'; 2//const proUrl = 'http://apiUrl.com'; 3 4export default{ 5 apiUrl: devUrl, 6 apiPrefix: 'api', 7 gitHub: '' 8}- 1
- 2
- 3
- 4
- 5
- 6
- 7
- 8
在 api 文件夹中创建 https.js 文件
1import axios from 'axios' 2import qs from 'qs' 3import Config from '../config'; 4 5axios.defaults.timeout = 5000; 6axios.defaults.headers.post['Content-Type'] = 'application/x-www-form-urlencoded;charset=UTF-8'; 7axios.defaults.baseURL = ''; 8 9function buildApiUrl(url) { 10 return `${Config.apiUrl}/${Config.apiPrefix}/${url}`; 11} 12 13axios.interceptors.request.use((config) => { 14 if(config.method == 'post'){ 15 config.data = qs.stringify(config.data); 16 } 17 return config; 18}, (error) => { 19 console.log('error params') 20 return Promise.reject(error); 21} 22); 23 24axios.interceptors.response.use((res) => { 25 if(!res.data.success) { 26 return Promise.resolve(res); 27 } 28 return res; 29}, (error) => { 30 console.log('Network error') 31 return Promise.reject(error); 32} 33); 34 35//返回一个Promise(发送post请求) 36export function fetchPost(url, params) { 37 let apiUrl = buildApiUrl(url); 38 return new Promise((resolve, reject) => { 39 axios.post(apiUrl, params) 40 .then(response => { 41 resolve(response); 42 }, err => { 43 reject(err); 44 }) 45 .catch((error) => { 46 reject(error) 47 }) 48 }) 49} 50返回一个Promise(发送get请求) 51export function fetchGet(url, param) { 52 let apiUrl = buildApiUrl(url); 53 return new Promise((resolve, reject) => { 54 axios.get(apiUrl, {params: param}) 55 .then(response => { 56 resolve(response) 57 }, err => { 58 reject(err) 59 }) 60 .catch((error) => { 61 reject(error) 62 }) 63 }) 64} 65 66export default { 67 fetchGet, 68 fetchPost 69}- 1
- 2
- 3
- 4
- 5
- 6
- 7
- 8
- 9
- 10
- 11
- 12
- 13
- 14
- 15
- 16
- 17
- 18
- 19
- 20
- 21
- 22
- 23
- 24
- 25
- 26
- 27
- 28
- 29
- 30
- 31
- 32
- 33
- 34
- 35
- 36
- 37
- 38
- 39
- 40
- 41
- 42
- 43
- 44
- 45
- 46
- 47
- 48
- 49
- 50
- 51
- 52
- 53
- 54
- 55
- 56
- 57
- 58
- 59
- 60
- 61
- 62
- 63
- 64
- 65
- 66
- 67
- 68
- 69
这里封装了 axios 的 post 和 get 请求。
在 views 下面创建首页视图 Main.vue
1<template> 2 <div> 3 首页 4 </div> 5</template> 6 7<script> 8 export default{ 9 name: "Main" 10 } 11</script> 12 13<style> 14</style>- 1
- 2
- 3
- 4
- 5
- 6
- 7
- 8
- 9
- 10
- 11
- 12
- 13
- 14
在 views 下面创建登陆视图 Login.vue
1<template> 2 <div> 3 <el-form ref="loginForm" :model="form" :rules="rules" label-width="80px" class="login-box"> 4 <h3 class="login-title">欢迎登录</h3> 5 <el-form-item label="账号" prop="username"> 6 <el-input type="text" placeholder="请输入账号" v-model="form.username"/> 7 </el-form-item> 8 <el-form-item label="密码" prop="password"> 9 <el-input type="password" placeholder="请输入密码" v-model="form.password"/> 10 </el-form-item> 11 <el-form-item> 12 <el-button class="login-button" type="primary" v-on:click="onSubmit('loginForm')">登录</el-button> 13 </el-form-item> 14 </el-form> 15 16 <el-dialog 17 title="温馨提示" 18 :visible.sync="dialogVisible" 19 width="30%" 20 :before-close="handleClose"> 21 <span>请输入账号和密码</span> 22 <span slot="footer" class="dialog-footer"> 23 <el-button type="primary" @click="dialogVisible = false">确 定</el-button> 24 </span> 25 </el-dialog> 26 27 <el-dialog 28 title="温馨提示" 29 :visible.sync="dialogVisible1" 30 width="30%" 31 :before-close="handleClose"> 32 <span>错误的账号或密码</span> 33 <span slot="footer" class="dialog-footer"> 34 <el-button type="primary" @click="dialogVisible1 = false">确 定</el-button> 35 </span> 36 </el-dialog> 37 </div> 38</template> 39 40<script> 41import https from '../api/https.js' 42 export default { 43 name: "Login", 44 data() { 45 return { 46 form: { 47 username: '', 48 password: '' 49 }, 50 51 // 表单验证,需要在 el-form-item 元素中增加 prop 属性 52 rules: { 53 username: [ 54 {required: true, message: '账号不可为空', trigger: 'blur'} 55 ], 56 password: [ 57 {required: true, message: '密码不可为空', trigger: 'blur'} 58 ] 59 }, 60 61 // 对话框显示和隐藏 62 dialogVisible: false, 63 dialogVisible1: false, 64 } 65 }, 66 methods: { 67 onSubmit(formName) { 68 // 为表单绑定验证功能 69 this.$refs[formName].validate((valid) => { 70 var username = this.form['username']; 71 var pwd = this.form['password']; 72 var login_info = {username: username, password: pwd}; 73 74 if (valid) { 75 https.fetchPost('login', login_info).then((data) => { 76 console.log(data.data['code']) 77 if (data.data['code'] == 200) { 78 this.$router.push("/home"); 79 } else { 80 this.dialogVisible1 = true; 81 return false; 82 } 83 }) 84 // 使用 vue-router 路由到指定页面,该方式称之为编程式导航 85 //this.$router.push("/main"); 86 } else { 87 this.dialogVisible = true; 88 return false; 89 } 90 }); 91 }, 92 handleClose() { 93 94 } 95 } 96 } 97</script> 98 99<style lang="scss" scoped> 100 .login-button { 101 text-align: center; 102 } 103 .login-box { 104 border: 1px solid #DCDFE6; 105 width: 350px; 106 margin: 180px auto; 107 padding: 35px 35px 15px 35px; 108 border-radius: 5px; 109 -webkit-border-radius: 5px; 110 -moz-border-radius: 5px; 111 box-shadow: 0 0 25px #909399; 112 } 113 114 .login-title { 115 text-align: center; 116 margin: 0 auto 40px auto; 117 color: #303133; 118 } 119</style>- 1
- 2
- 3
- 4
- 5
- 6
- 7
- 8
- 9
- 10
- 11
- 12
- 13
- 14
- 15
- 16
- 17
- 18
- 19
- 20
- 21
- 22
- 23
- 24
- 25
- 26
- 27
- 28
- 29
- 30
- 31
- 32
- 33
- 34
- 35
- 36
- 37
- 38
- 39
- 40
- 41
- 42
- 43
- 44
- 45
- 46
- 47
- 48
- 49
- 50
- 51
- 52
- 53
- 54
- 55
- 56
- 57
- 58
- 59
- 60
- 61
- 62
- 63
- 64
- 65
- 66
- 67
- 68
- 69
- 70
- 71
- 72
- 73
- 74
- 75
- 76
- 77
- 78
- 79
- 80
- 81
- 82
- 83
- 84
- 85
- 86
- 87
- 88
- 89
- 90
- 91
- 92
- 93
- 94
- 95
- 96
- 97
- 98
- 99
- 100
- 101
- 102
- 103
- 104
- 105
- 106
- 107
- 108
- 109
- 110
- 111
- 112
- 113
- 114
- 115
- 116
- 117
- 118
- 119
修改 router 下面路由函数 index.js
1import Vue from 'vue' 2import Router from 'vue-router' 3import HelloWorld from '@/components/HelloWorld' 4import Login from '@/views/Login' 5import Main from '@/views/Main' 6 7Vue.use(Router) 8 9export default new Router({ 10 routes: [ 11 { 12 path: '/', 13 name: 'HelloWorld', 14 component: HelloWorld 15 }, 16 { 17 // Main 页面 18 path: '/main', 19 name: 'Main', 20 component: Main 21 }, 22 { 23 // 登陆页面 24 path: '/login', 25 name: 'Login', 26 component: Login 27 }, 28 ] 29})- 1
- 2
- 3
- 4
- 5
- 6
- 7
- 8
- 9
- 10
- 11
- 12
- 13
- 14
- 15
- 16
- 17
- 18
- 19
- 20
- 21
- 22
- 23
- 24
- 25
- 26
- 27
- 28
- 29
修改 App.vue 文件
1<template> 2 <div id="app"> 3 <!--<img src="./assets/logo.png">--> 4 <router-view/> 5 </div> 6</template> 7 8<script> 9export default { 10 name: 'App' 11} 12</script> 13 14<style> 15#app { 16 font-family: 'Avenir', Helvetica, Arial, sans-serif; 17 -webkit-font-smoothing: antialiased; 18 -moz-osx-font-smoothing: grayscale; 19 text-align: center; 20 color: #2c3e50; 21 margin-top: 60px; 22} 23</style>- 1
- 2
- 3
- 4
- 5
- 6
- 7
- 8
- 9
- 10
- 11
- 12
- 13
- 14
- 15
- 16
- 17
- 18
- 19
- 20
- 21
- 22
- 23
最后在配置入口文件 main.js
1// The Vue build version to load with the `import` command 2// (runtime-only or standalone) has been set in webpack.base.conf with an alias. 3import Vue from 'vue' 4import App from './App' 5import router from './router' 6import VueRouter from 'vue-router' 7 8// 导入 elementUI 9import ElementUI from 'element-ui' 10import 'element-ui/lib/theme-chalk/index.css' 11 12// 导入 axios 13import axios from 'axios' 14import QS from 'qs' 15 16Vue.prototype.$axios = axios 17Vue.prototype.qs = QS 18 19Vue.config.productionTip = false 20 21Vue.use(VueRouter) 22Vue.use(ElementUI) 23 24 25/* eslint-disable no-new */ 26new Vue({ 27 el: '#app', 28 router, 29 //components: { App }, 30 //template: '<App/>' 31 render: h => h(App) 32 33})- 1
- 2
- 3
- 4
- 5
- 6
- 7
- 8
- 9
- 10
- 11
- 12
- 13
- 14
- 15
- 16
- 17
- 18
- 19
- 20
- 21
- 22
- 23
- 24
- 25
- 26
- 27
- 28
- 29
- 30
- 31
- 32
- 33
下面我们启动我们的前端程序
1npm run dev- 1
如果看到类似的
1Your application is running here: http://localhost:8080- 1
说明我们的前端代码构建成功。
现在我们在浏览器中打开上面的地址,就可以得到页面如下:
后端后端代码,我准备用 flask + flask_restful 来搭建
1class LoginView(Resource): 2 def post(self): 3 try: 4 username = request.get_json()['username'] 5 pwd = request.get_json()['password'] 6 user = User.query.filter_by(username=username).first() 7 if user is not None and user.verify_password(pwd): 8 login_user(user) 9 return {'code': 200, 'message': 'you are login now!'} 10 else: 11 return {'code': 403, 'message': 'wrong account or password'} 12 except: 13 raise 14 15 16api_login.add_resource(LoginView, '/login')- 1
- 2
- 3
- 4
- 5
- 6
- 7
- 8
- 9
- 10
- 11
- 12
- 13
- 14
- 15
- 16
这里仅仅给出了最核心的 api 代码,还是非常简单的。更多的关于 flask_restful,可以查看其官网。
至此,一个简单的前后端分离的单页面应用就完成了。
看完本文,你可以按着步骤自己实现下。刚接触的伙伴在看的过程中在某些地方可能有疑惑,其实我也研究了好久,也有好多存疑的地方。不过,我还是建议不要妄求每个点都了解的特别清楚,先明白关键点,试着实现一下,回头去看相关资料的时候,也更有感触一些。
好了,这就是今天分享的全部内容,喜欢就点个赞吧~
最后: 可以在公众号:伤心的辣条 ! 自行领取一份216页软件测试工程师面试宝典文档资料【免费的】。以及相对应的视频学习教程免费分享!,其中包括了有基础知识、Linux必备、Shell、互联网程序原理、Mysql数据库、抓包工具专题、接口测试工具、测试进阶-Python编程、Web自动化测试、APP自动化测试、接口自动化测试、测试高级持续集成、测试架构开发测试框架、性能测试、安全测试等。
学习不要孤军奋战,最好是能抱团取暖,相互成就一起成长,群众效应的效果是非常强大的,大家一起学习,一起打卡,会更有学习动力,也更能坚持下去。你可以加入我们的测试技术交流扣扣群:914172719(里面有各种软件测试资源和技术讨论)
喜欢软件测试的小伙伴们,如果我的博客对你有帮助、如果你喜欢我的博客内容,请 “点赞” “评论” “收藏” 一键三连哦!
-
相关阅读:
Vue源码学习(九):响应式前置:实现对象的依赖收集(dep和watcher)
创建一个GO模块
六 Jenkins自动化部署准备--插件安装和系统配置
Me-and-My-Girlfriend-1
自动抓取app数据技术方案总结
Linux 内存虚实内存映射
MyBatis之xml配置的解析
【Springcloud】elk分布式日志
2.7 Time Series
C# 将HTML转为XML
- 原文地址:https://blog.csdn.net/m0_67695717/article/details/125435865