-
springboot-kafka
此文章只展示 spring boot整合 kafka的操作,不讲原理
kafka原理
kafka操作
window10下安装 zookeeper和kafka[版本一直!]首先认识Kafka的名词

1、Producer:生产者,向kafka发送消息的角色
2、Consumer:消费者,从Kafka中获取消息的角色
3、Consumer Group:消费者组:消费者组 中有多个消费者,消费者一定属于某个消费组,一个分区的消息只能由一个消费者组中的一个消费者消费
4、Broker:一个Kafka服务器就是 broker,一个Kafka集群有多个broker组成,一个broker可以有多个Topic(主题)
5、Topic:主题,生产者和消费者分别向 Kafka的主题发送和接收消息,类似 rabbitmq的队列
6、Partition:分区,非常大的数据发送到一个Topic中,此时效率性能很低,可以将这个topic分到不同的broker上,并且每个broker上一个topic分为不同的区(partition),每个分区是有序的队列(分区有序,不能保证全局有序),通过不同的broker和不同的partition,发送接收消息,提高性能。
7、Replica:副本,为保证集群中某个节点发送故障,节点上的分区数据不丢失,Kafka提供了副本机制,一个Topic的每个分区都有若干个副本,一个leader 和多个follower
8、Leader:每个分区多个副本的主角色,生产者发送的对象,消费者消费的对象都是leader
9、Follower:每个分区多个副本的副角色,当主角色leader挂了,某个Follower会成为新的leader,它实时同步leader的数据,保持一致性。
1、springboot-kafka简单集成
1、pom文件添加依赖
<dependency> <groupId>org.springframework.kafka</groupId> <artifactId>spring-kafka</artifactId> </dependency>- 1
- 2
- 3
- 4
2、application.properties文件 添加配置
###########【Kafka集群】########### spring.kafka.bootstrap-servers=127.0.0.1:9092 ###########【初始化生产者配置】########### # 重试次数 spring.kafka.producer.retries=0 # 应答级别:多少个分区副本备份完成时向生产者发送ack确认(可选0、1、all/-1) spring.kafka.producer.acks=1 # 批量大小 spring.kafka.producer.batch-size=16384 # 提交延时 spring.kafka.producer.properties.linger.ms=0 # 当生产端积累的消息达到batch-size或接收到消息linger.ms后,生产者就会将消息提交给kafka # linger.ms为0表示每接收到一条消息就提交给kafka,这时候batch-size其实就没用了 # 声明事务 spring.kafka.producer.transaction-id-prefix=kafka_tx. # 生产端缓冲区大小 spring.kafka.producer.buffer-memory = 33554432 # Kafka提供的序列化和反序列化类 spring.kafka.producer.key-serializer=org.apache.kafka.common.serialization.StringSerializer spring.kafka.producer.value-serializer=org.apache.kafka.common.serialization.StringSerializer # 自定义分区器 # spring.kafka.producer.properties.partitioner.class=com.felix.kafka.producer.CustomizePartitioner ###########【初始化消费者配置】########### # 默认的消费组ID spring.kafka.consumer.properties.group.id=defaultConsumerGroup # 是否自动提交offset spring.kafka.consumer.enable-auto-commit=true # 提交offset延时(接收到消息后多久提交offset) spring.kafka.consumer.auto.commit.interval.ms=1000 # 当kafka中没有初始offset或offset超出范围时将自动重置offset # earliest:重置为分区中最小的offset; # latest:重置为分区中最新的offset(消费分区中新产生的数据); # none:只要有一个分区不存在已提交的offset,就抛出异常; spring.kafka.consumer.auto-offset-reset=latest # 消费会话超时时间(超过这个时间consumer没有发送心跳,就会触发rebalance操作) spring.kafka.consumer.properties.session.timeout.ms=120000 # 消费请求超时时间 spring.kafka.consumer.properties.request.timeout.ms=180000 # Kafka提供的序列化和反序列化类 spring.kafka.consumer.key-deserializer=org.apache.kafka.common.serialization.StringDeserializer spring.kafka.consumer.value-deserializer=org.apache.kafka.common.serialization.StringDeserializer # 消费端监听的topic不存在时,项目启动会报错(关掉) spring.kafka.listener.missing-topics-fatal=false # 设置批量消费 # spring.kafka.listener.type=batch # 批量消费每次最多消费多少条消息 # spring.kafka.consumer.max-poll-records=50- 1
- 2
- 3
- 4
- 5
- 6
- 7
- 8
- 9
- 10
- 11
- 12
- 13
- 14
- 15
- 16
- 17
- 18
- 19
- 20
- 21
- 22
- 23
- 24
- 25
- 26
- 27
- 28
- 29
- 30
- 31
- 32
- 33
- 34
- 35
- 36
- 37
- 38
- 39
- 40
- 41
- 42
- 43
- 44
- 45
- 46
- 47
- 48
- 49
- 50
3、测试发送与接收消息【点对点】
3.1、发送消息
注入 KafkaTemplate 这个kafka的操作工具对象,send方法,参数为:主题,和消息内容
,将消息内容发送到对应的 topic上。@Controller public class TestController { @Autowired(required = false) private KafkaTemplate<Object,Object> template; @ResponseBody @RequestMapping("/kafka") public void demo(){ template.send("topic-input","11111"); } }- 1
- 2
- 3
- 4
- 5
- 6
- 7
- 8
- 9
- 10
- 11
- 12
- 13
- 14
- 15
3.2、接收消息
@KafkaListener注解的使用
监听订阅的主题,获取消息
此处的@KafkaListener注解中的id 表示消费组,topics代表监听的主题@Component @Slf4j public class KafkaCustom { @KafkaListener(id = "webGroup",topics = "topic-input") public void getKafkaInfo(String input){ log.info("--topic-input--" + input); } }- 1
- 2
- 3
- 4
- 5
- 6
- 7
- 8
- 9
- 10
- 11
- 12
- 13
测试结果:
调用接口,发送主题消息,消费者成功获取该主题的消息内容
注意:此时的模式为 点对点,一个消息只能由一个消费者接收

4、关于topic的其他操作
包括:
1、获取分组下的表述信息
2、创建消费者
3、获取topic的lag
4、创建topic,指定partition
5、删除topic
6、列出所有topic名称
7、获取指定topic的分区数
8、修改指定topic的分区数
9、询Topic的配置信息
10、修改Topic的配置信息
11、修改Topic的配置信息package com.springboot.kafka.service; import org.apache.kafka.clients.admin.*; import org.apache.kafka.clients.consumer.Consumer; import org.apache.kafka.common.PartitionInfo; import org.apache.kafka.common.TopicPartition; import org.apache.kafka.common.config.ConfigResource; import org.springframework.beans.factory.annotation.Autowired; import org.springframework.boot.autoconfigure.kafka.KafkaProperties; import org.springframework.kafka.core.ConsumerFactory; import org.springframework.kafka.core.KafkaTemplate; import org.springframework.stereotype.Service; import java.util.*; @Service public class KafkaService { @Autowired private ConsumerFactory<Long, String> consumerFactory; @Autowired private KafkaTemplate<String, String> kafkaTemplate; @Autowired private KafkaProperties kafkaProperties; /** * 获取分组下的表述信息 **/ private long[] getDescribe(String topic) { long[] describe = new long[3]; Consumer<Long, String> consumer = createConsumer(); List<PartitionInfo> partitionInfos = kafkaTemplate.partitionsFor(topic); List<TopicPartition> tp = new ArrayList<>(); partitionInfos.forEach(str -> { TopicPartition topicPartition = new TopicPartition(topic, str.partition()); tp.add(topicPartition); long logEndOffset = consumer.endOffsets(tp).get(topicPartition); consumer.assign(tp); //consumer.position(topicPartition); long currentOffset = consumer.position(topicPartition); //System.out.println("logEndOffset : " + logEndOffset + ", currentOffset : "+ currentOffset); describe[0] += currentOffset; describe[1] += logEndOffset; describe[2] = describe[1] - describe[0]; tp.clear(); }); //System.out.println(Arrays.toString(describe)); return describe; } /** * 创建消费者 **/ private Consumer<Long, String> createConsumer() { return this.consumerFactory.createConsumer(); } /** * 获取topic的lag * @param topic * @return */ public Long getLag(String topic) { return getDescribe(topic)[2]; } /** * 创建topic,指定partition * @param topicName * @param numPar * @return */ public boolean createToipc(String topicName, int numPar) { AdminClient client = AdminClient.create(this.kafkaProperties.buildAdminProperties()); if(client !=null) { try { Collection<NewTopic> newTopics = new ArrayList<>(1); newTopics.add(new NewTopic(topicName, numPar, (short) 1)); client.createTopics(newTopics); } catch (Throwable e) { e.printStackTrace(); return false; } finally { client.close(); } } return true; } /** * 删除topic * @param topic * @return * @throws Exception */ public boolean deleteTopic(String topic) { AdminClient client = AdminClient.create(this.kafkaProperties.buildAdminProperties()); // 服务端server.properties需要设置delete.topic.enable=true,才可以使用同步删除,否则只是将主题标记为删除 try { client.deleteTopics(Arrays.asList(topic)); } catch (Throwable e) { e.printStackTrace(); return false; } finally { client.close(); } return true; } /** * 列出所有topic名称 * @return */ public String listTopics() { AdminClient client = AdminClient.create(this.kafkaProperties.buildAdminProperties()); String r = ""; if (client != null) { try { ListTopicsResult result = client.listTopics(); Set<String> topics = result.names().get(); r = topics.toString(); } catch (Throwable e) { e.printStackTrace(); } finally { client.close(); } } return r; } /** * 获取指定topic的分区数 * @param topic * @return */ public int getPartition(String topic) { AdminClient client = AdminClient.create(this.kafkaProperties.buildAdminProperties()); int num = 0; try { TopicDescription description = client.describeTopics(Arrays.asList(topic)).all().get().get(topic); //r = description.toString(); num = description.partitions().size(); } catch (Throwable e) { e.printStackTrace(); } finally { client.close(); } return num; } /** * 修改指定topic的分区数 * @param topic * @param numPartitions * @return:如果指定的新分区数小于现有分区数,不成功,返回false */ public boolean updatePartitions(String topic, Integer numPartitions) { AdminClient client = AdminClient.create(this.kafkaProperties.buildAdminProperties()); NewPartitions newPartitions = NewPartitions.increaseTo(numPartitions); Map<String, NewPartitions> map = new HashMap<>(1, 1); map.put(topic, newPartitions); try { client.createPartitions(map).all().get(); } catch (Throwable e) { e.printStackTrace(); return false; } finally { client.close(); } return true; } /** * 查询Topic的配置信息 */ public void describeConfig() { AdminClient client = AdminClient.create(this.kafkaProperties.buildAdminProperties()); ConfigResource configResource = new ConfigResource(ConfigResource.Type.TOPIC, "test1"); Collection<ConfigResource> coll = new ArrayList<ConfigResource>(); coll.add(configResource); DescribeConfigsResult result = client.describeConfigs(coll); try { Map<ConfigResource, Config> map = result.all().get(); map.forEach((key, value) -> System.out.println("name: " + key.name() + ", desc: " + value)); } catch (Throwable e) { e.printStackTrace(); } finally { client.close(); } } /** * 修改Topic的配置信息 */ public void incrementalAlterConfig() { // 指定ConfigResource的类型及名称 ConfigResource configResource = new ConfigResource(ConfigResource.Type.TOPIC, "MyTopic"); Collection<ConfigResource> coll = new ArrayList<ConfigResource>(); coll.add(configResource); // 配置项同样以ConfigEntry形式存在,只不过增加了操作类型 // 以及能够支持操作多个配置项,相对来说功能更多、更灵活 Collection<AlterConfigOp> configs = new ArrayList<AlterConfigOp>(); configs.add(new AlterConfigOp( new ConfigEntry("preallocate", "false"), AlterConfigOp.OpType.SET )); AdminClient client = AdminClient.create(this.kafkaProperties.buildAdminProperties()); Map<ConfigResource, Collection<AlterConfigOp>> configMaps = new HashMap<>(); configMaps.put(configResource, configs); AlterConfigsResult result = client.incrementalAlterConfigs(configMaps); try { System.out.println(result.all().get()); } catch (Throwable e) { e.printStackTrace(); } finally { client.close(); } } /** * 修改Topic的配置信息 */ public void alterConfig() { // 指定ConfigResource的类型及名称 ConfigResource configResource = new ConfigResource(ConfigResource.Type.TOPIC, "test1"); // 配置项以ConfigEntry形式存在 Collection<ConfigEntry> coll = new ArrayList<ConfigEntry>(); coll.add(new ConfigEntry("preallocate", "true")); Config config = new Config(coll); AdminClient client = AdminClient.create(this.kafkaProperties.buildAdminProperties()); Map<ConfigResource, Config> configMaps = new HashMap<>(); configMaps.put(configResource, config); AlterConfigsResult result = client.alterConfigs(configMaps); try { System.out.println(result.all().get()); } catch (Throwable e) { e.printStackTrace(); } finally { client.close(); } } }- 1
- 2
- 3
- 4
- 5
- 6
- 7
- 8
- 9
- 10
- 11
- 12
- 13
- 14
- 15
- 16
- 17
- 18
- 19
- 20
- 21
- 22
- 23
- 24
- 25
- 26
- 27
- 28
- 29
- 30
- 31
- 32
- 33
- 34
- 35
- 36
- 37
- 38
- 39
- 40
- 41
- 42
- 43
- 44
- 45
- 46
- 47
- 48
- 49
- 50
- 51
- 52
- 53
- 54
- 55
- 56
- 57
- 58
- 59
- 60
- 61
- 62
- 63
- 64
- 65
- 66
- 67
- 68
- 69
- 70
- 71
- 72
- 73
- 74
- 75
- 76
- 77
- 78
- 79
- 80
- 81
- 82
- 83
- 84
- 85
- 86
- 87
- 88
- 89
- 90
- 91
- 92
- 93
- 94
- 95
- 96
- 97
- 98
- 99
- 100
- 101
- 102
- 103
- 104
- 105
- 106
- 107
- 108
- 109
- 110
- 111
- 112
- 113
- 114
- 115
- 116
- 117
- 118
- 119
- 120
- 121
- 122
- 123
- 124
- 125
- 126
- 127
- 128
- 129
- 130
- 131
- 132
- 133
- 134
- 135
- 136
- 137
- 138
- 139
- 140
- 141
- 142
- 143
- 144
- 145
- 146
- 147
- 148
- 149
- 150
- 151
- 152
- 153
- 154
- 155
- 156
- 157
- 158
- 159
- 160
- 161
- 162
- 163
- 164
- 165
- 166
- 167
- 168
- 169
- 170
- 171
- 172
- 173
- 174
- 175
- 176
- 177
- 178
- 179
- 180
- 181
- 182
- 183
- 184
- 185
- 186
- 187
- 188
- 189
- 190
- 191
- 192
- 193
- 194
- 195
- 196
- 197
- 198
- 199
- 200
- 201
- 202
- 203
- 204
- 205
- 206
- 207
- 208
- 209
- 210
- 211
- 212
- 213
- 214
- 215
- 216
- 217
- 218
- 219
- 220
- 221
- 222
- 223
- 224
- 225
- 226
- 227
- 228
- 229
- 230
- 231
- 232
- 233
- 234
- 235
- 236
- 237
- 238
- 239
- 240
- 241
- 242
- 243
- 244
- 245
- 246
- 247
- 248
- 249
- 250
- 251
- 252
- 253
- 254
- 255
- 256
- 257
- 258
- 259
- 260
- 261
- 262
- 263
- 264
- 265
- 266
- 267
- 268
- 269
- 270
- 271
- 272
- 273
- 274
- 275
- 276
- 277
- 278
- 279
- 280
- 281
- 282
- 283
- 284
- 285
- 286
- 287
- 288
5、生产者的回调方法
方式一、
@RequestMapping("/kafka") @ResponseBody public String sendMessage2( ) { template.send("topic-test", "111111").addCallback(success -> { // 消息发送到的topic String topic = success.getRecordMetadata().topic(); System.out.println("消息发送到的topic:" + topic); // 消息发送到的分区 int partition = success.getRecordMetadata().partition(); System.out.println("消息发送到的分区:" + partition); // 消息在分区内的offset long offset = success.getRecordMetadata().offset(); System.out.println("消息在分区内的offset:" + offset); }, failure -> { System.out.println("发送消息失败:" + failure.getMessage()); }); return "end~"; }- 1
- 2
- 3
- 4
- 5
- 6
- 7
- 8
- 9
- 10
- 11
- 12
- 13
- 14
- 15
- 16
- 17
- 18
- 19
- 20
- 21
- 22
结果:

方式二:异步获取
@RequestMapping("/kafka/callbackTwo") @ResponseBody public void sendMessage3() { template.send("topic-test", "22222").addCallback(new ListenableFutureCallback<SendResult<Object, Object>>() { @Override public void onFailure(Throwable ex) { System.out.println("发送消息失败:"+ex.getMessage()); } @Override public void onSuccess(SendResult<Object, Object> result) { System.out.println("发送消息成功:主题:" + result.getRecordMetadata().topic() + "-分区:" + result.getRecordMetadata().partition() + "-偏移量:" + result.getRecordMetadata().offset()); } }); }- 1
- 2
- 3
- 4
- 5
- 6
- 7
- 8
- 9
- 10
- 11
- 12
- 13
- 14
- 15
- 16
- 17
- 18
结果:

6、生产者自定义分区器
kafka中每个topic被划分为多个分区,那么生产者将消息发送到topic时,具体追加到哪个分区呢?这就是所谓的分区策略,Kafka 为我们提供了默认的分区策略,同时它也支持自定义分区策略。其路由机制为:
① 若发送消息时指定了分区(即自定义分区策略),则直接将消息append到指定分区;
② 若发送消息时未指定 patition,但指定了 key(kafka允许为每条消息设置一个key),则对key值进行hash计算,根据计算结果路由到指定分区,这种情况下可以保证同一个 Key 的所有消息都进入到相同的分区;
③ patition 和 key 都未指定,则使用kafka默认的分区策略,轮询选出一个 patition;
我们来自定义一个分区策略,将消息发送到我们指定的partition,首先新建一个分区器类实现Partitioner接口,重写方法,其中partition方法的返回值就表示将消息发送到几号分区,
配置自定义分区
# 自定义分区器 spring.kafka.producer.properties.partitioner.class=com.springboot.kafka.config.SelfPartitioner- 1
- 2
代码:
package com.springboot.kafka.config; import org.apache.kafka.clients.producer.Partitioner; import org.apache.kafka.common.Cluster; import java.util.Map; /** * 自定义分区器 */ public class SelfPartitioner implements Partitioner { @Override public int partition(String topic, Object key, byte[] keyBytes, Object value, byte[] valueBytes, Cluster cluster) { // 0就是指定的分区数 return 0; } @Override public void close() { } @Override public void configure(Map<String, ?> map) { } }- 1
- 2
- 3
- 4
- 5
- 6
- 7
- 8
- 9
- 10
- 11
- 12
- 13
- 14
- 15
- 16
- 17
- 18
- 19
- 20
- 21
- 22
- 23
- 24
- 25
- 26
- 27
- 28
- 29
- 30
- 31
7、生产者事务回滚【配置文件要一样】
主要是在配置文件中开启事务
spring.kafka.producer.transaction-id-prefix=kafka_tx. spring.kafka.producer.retries=3 spring.kafka.producer.acks=-1- 1
- 2
- 3
不使用事务实例:
@RequestMapping("/kafka/transactiotn") @ResponseBody public void sendMessage7() { // 不声明事务:后面报错但前面消息已经发送成功了 template.send("topic1", "test executeInTransaction"); throw new RuntimeException("fail"); }- 1
- 2
- 3
- 4
- 5
- 6
- 7
- 8
这个是不声明事务的,后面报错,消息也会发出去

事务代码1:
使用事务必须在配置文件中配置开始事务,才可以生效@RequestMapping("/kafka/transactiotn") @ResponseBody public void sendMessage7() { // 声明事务:后面报错消息不会发出去 template.executeInTransaction(operations -> { operations.send("topic1", "test executeInTransaction"); throw new RuntimeException("fail"); }); }- 1
- 2
- 3
- 4
- 5
- 6
- 7
- 8
- 9
- 10
- 11
声明事务后,报错时消息不会发出去

事务代码2
使用事务必须在配置文件中配置开始事务,才可以生效@RequestMapping("/kafka/transactiotn") @ResponseBody @Transactional(rollbackFor = RuntimeException.class) public void sendMessage7() { // 不声明事务:后面报错但前面消息已经发送成功了 template.send("topic1", "test executeInTransaction"); throw new RuntimeException("fail"); }- 1
- 2
- 3
- 4
- 5
- 6
- 7
- 8
- 9
- 10
使用 注解@Transactional(rollbackFor = RuntimeException.class) 也是可以的
注意:一旦开启事务回滚,每个生产者发送消息的接口 都要有@Transactional注解,声明事务,否则会报错
8、消费者指定topic、partition、offset消费
监听topic1的0号分区,同时监听topic2的0号分区和topic2的1号分区里面offset从8开始的消息。
/** * @Title 指定topic、partition、offset消费 * @Description 同时监听topic1和topic2,监听topic1的0号分区、topic2的 "0号和1号" 分区,指向1号分区的offset初始值为8 * @Author long.yuan * @Date 2020/3/22 13:38 * @Param [record] * @return void **/ @KafkaListener(id = "consumer1",groupId = "felix-group",topicPartitions = { @TopicPartition(topic = "topic1", partitions = { "0" }), @TopicPartition(topic = "topic2", partitions = "0", partitionOffsets = @PartitionOffset(partition = "1", initialOffset = "8")) }) public void onMessage2(ConsumerRecord<?, ?> record) { System.out.println("topic:"+record.topic()+"|partition:"+record.partition()+"|offset:"+record.offset()+"|value:"+record.value()); }- 1
- 2
- 3
- 4
- 5
- 6
- 7
- 8
- 9
- 10
- 11
- 12
- 13
- 14
- 15
属性介绍:
① id:消费者ID;② groupId:消费组ID;
③ topics:监听的topic,可监听多个;
④ topicPartitions:可配置更加详细的监听信息,可指定topic、parition、offset监听。
注意:topics和topicPartitions不能同时使用;
9、消费者 批量消费
开启批量消费,一个消费者监听 多个主题
# 设置批量消费 spring.kafka.listener.type=batch # 批量消费每次最多消费多少条消息 spring.kafka.consumer.max-poll-records=50- 1
- 2
- 3
- 4
topics中,监听多个 topic
@KafkaListener(id = "consumer1",groupId = "lsgroup",topics = {"topic1","topic2"}) public void getKafkaInfo3(List<ConsumerRecord<?,?>> records){ System.out.println("批量消费:records.size==" + records.size()); for (ConsumerRecord<?,?> record : records) { System.out.println("---" + record.value()); } }- 1
- 2
- 3
- 4
- 5
- 6
- 7
- 8
@RequestMapping("/kafka") @ResponseBody public String sendMessage2() { template.send("topic1","11111"); template.send("topic2","22222"); return "end~"; }- 1
- 2
- 3
- 4
- 5
- 6
- 7
- 8
- 9
- 10
- 11

10、消费者异常处理器ConsumerAwareListenerErrorHandler
首先写个异常处理配置类
异常处理器的message.getPayload()也可以拿到各条消息的信息@Configuration @Slf4j public class kafkaConfig { @Bean public ConsumerAwareListenerErrorHandler consumerAwareErrorHandler() { return new ConsumerAwareListenerErrorHandler() { @Override public Object handleError(Message<?> message, ListenerExecutionFailedException e, Consumer<?, ?> consumer) { log.info("consumerAwareErrorHandler receive : "+message.getPayload().toString()); return null; } }; } }- 1
- 2
- 3
- 4
- 5
- 6
- 7
- 8
- 9
- 10
- 11
- 12
- 13
- 14
- 15
- 16
- 17
10.1、单个消费异常拦截
在kafka监听注解中使用上述的拦截实例
@Component @Slf4j public class ErrorListener11 { @KafkaListener(id = "err", topics = "topic1", errorHandler = "consumerAwareErrorHandler") public void errorListener(String data) { log.info("topic.quick.error receive : " + data); throw new RuntimeException("fail"); } }- 1
- 2
- 3
- 4
- 5
- 6
- 7
- 8
- 9
- 10
- 11
- 12
结果

或者【这个不会打印;log】@KafkaListener(id = "err", topics = "topic1", errorHandler = "consumerAwareErrorHandler") public void onMessage4(ConsumerRecord<?, ?> record) { log.info("111----"+record.toString()); throw new RuntimeException("简单消费-模拟异常"); }- 1
- 2
- 3
- 4
- 5
10.2、批量消费异常拦截
@KafkaListener(topics = {"topic2","topic3"},errorHandler="consumerAwareErrorHandler") public void onMessage5(List<ConsumerRecord<?, ?>> records) throws Exception { System.out.println("批量消费一次..."); throw new Exception("批量消费-模拟异常"); }- 1
- 2
- 3
- 4
- 5
此处同时监听两个topic的消息,

依旧可以获取,对应topic的消息体11、消息过滤器
消息过滤器可以在消息抵达consumer之前被拦截,在实际应用中,我们可以根据自己的业务逻辑,筛选出需要的信息再交由KafkaListener处理,不需要的消息则过滤掉。
在配置类中配置监听器容器工厂中的 消息过滤器----测试过滤消息体为奇数的topic
package com.springboot.kafka.config; import lombok.extern.slf4j.Slf4j; import org.apache.kafka.clients.consumer.Consumer; import org.springframework.beans.factory.annotation.Autowired; import org.springframework.beans.factory.annotation.Configurable; import org.springframework.context.annotation.Bean; import org.springframework.context.annotation.Configuration; import org.springframework.kafka.config.ConcurrentKafkaListenerContainerFactory; import org.springframework.kafka.core.ConsumerFactory; import org.springframework.kafka.listener.ConsumerAwareListenerErrorHandler; import org.springframework.kafka.listener.ListenerExecutionFailedException; import org.springframework.messaging.Message; import org.springframework.stereotype.Component; @Configuration @Slf4j public class kafkaConfig { @Autowired ConsumerFactory consumerFactory; /** * 消费者异常处理拦截器 * @return */ @Bean public ConsumerAwareListenerErrorHandler consumerAwareErrorHandler() { return new ConsumerAwareListenerErrorHandler() { @Override public Object handleError(Message<?> message, ListenerExecutionFailedException e, Consumer<?, ?> consumer) { // 相应 topic的消息体 log.info("consumerAwareErrorHandler receive : "+message.getPayload().toString()); return null; } }; } // 消息过滤器 @Bean public ConcurrentKafkaListenerContainerFactory filterContainerFactory() { ConcurrentKafkaListenerContainerFactory factory = new ConcurrentKafkaListenerContainerFactory(); factory.setConsumerFactory(consumerFactory); // 被过滤的消息将被丢弃 factory.setAckDiscarded(true); // 消息过滤策略 factory.setRecordFilterStrategy(consumerRecord -> { // 测试,过滤奇数 if (Integer.parseInt(consumerRecord.value().toString()) % 2 == 0) { return false; } //返回true消息则被过滤 return true; }); return factory; } }- 1
- 2
- 3
- 4
- 5
- 6
- 7
- 8
- 9
- 10
- 11
- 12
- 13
- 14
- 15
- 16
- 17
- 18
- 19
- 20
- 21
- 22
- 23
- 24
- 25
- 26
- 27
- 28
- 29
- 30
- 31
- 32
- 33
- 34
- 35
- 36
- 37
- 38
- 39
- 40
- 41
- 42
- 43
- 44
- 45
- 46
- 47
- 48
- 49
- 50
- 51
- 52
- 53
- 54
- 55
- 56
- 57
- 58
- 59
- 60
监听器中使用此过滤器
// 消息过滤监听 @KafkaListener(topics = {"topic4"},containerFactory = "filterContainerFactory") public void onMessage6(ConsumerRecord<?, ?> record) { System.out.println(record.value()); }- 1
- 2
- 3
- 4
- 5
生产者
for (int i = 1;i<11;i++ ) { template.send("topic4",String.valueOf(i)); }- 1
- 2
- 3
结果 :过滤了奇数的消息体,只保留了偶数的消息

12、消息转发
A从topicA中获取消息,经过处理后,转发到TopicB,再由B消费者监听处理消息
使用注解:@SendTo()
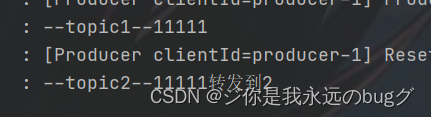
@KafkaListener(topics = "topic1") @SendTo("topic2") public String getKafkaInfo2(String input){ log.info("--topic1--" +input); return input + "转发到2"; } @KafkaListener(topics = "topic2") public void getKafkaInfo1(String input){ log.info("--topic2--" + input); }- 1
- 2
- 3
- 4
- 5
- 6
- 7
- 8
- 9
- 10
- 11
测试:
template.send("topic1","11111");- 1
结果:
13、定时启动、停止监听器
默认情况下:项目运行后,监听器就开始启动。下面开始实现,定时启动或停止监听器 使用KafkaListenerEndpointRegistry
① 禁止监听器自启动;
在配置类中 配置禁止自动开启// 监听器容器工厂 // 设置消息过滤器 // 设置禁止 监听器自启动 @Bean public ConcurrentKafkaListenerContainerFactory filterContainerFactory() { ConcurrentKafkaListenerContainerFactory factory = new ConcurrentKafkaListenerContainerFactory(); factory.setConsumerFactory(consumerFactory); // 被过滤的消息将被丢弃 factory.setAckDiscarded(true); // 设置禁止 监听器自启动 factory.setAutoStartup(false); // 消息过滤策略 factory.setRecordFilterStrategy(consumerRecord -> { // 测试,过滤奇数 if (Integer.parseInt(consumerRecord.value().toString()) % 2 == 0) { return false; } //返回true消息则被过滤 return true; }); return factory; }- 1
- 2
- 3
- 4
- 5
- 6
- 7
- 8
- 9
- 10
- 11
- 12
- 13
- 14
- 15
- 16
- 17
- 18
- 19
- 20
- 21
- 22
- 23
② 创建两个定时任务,一个用来在指定时间点启动定时器,另一个在指定时间点停止定时器;
首先在 启动类加上注解 @EnableScheduling 开启定时任务
然后 编写定时任务
根据监听器的Id进行 开启和关闭监听器package com.springboot.kafka.service; import org.apache.kafka.clients.consumer.ConsumerRecord; import org.springframework.beans.factory.annotation.Autowired; import org.springframework.kafka.annotation.KafkaListener; import org.springframework.kafka.config.KafkaListenerEndpointRegistry; import org.springframework.scheduling.annotation.Scheduled; import org.springframework.stereotype.Component; @Component public class CronTimer { /** * @KafkaListener注解所标注的方法并不会在IOC容器中被注册为Bean, * 而是会被注册在KafkaListenerEndpointRegistry中, * 而KafkaListenerEndpointRegistry在SpringIOC中已经被注册为Bean **/ @Autowired private KafkaListenerEndpointRegistry registry; // 监听器 @KafkaListener(id="timingConsumer",topics = "topic1",containerFactory = "filterContainerFactory") public void onMessage1(ConsumerRecord<?, ?> record){ System.out.println("消费成功:"+record.topic()+"-"+record.partition()+"-"+record.value()); } // 定时启动监听器 每5秒钟开启 @Scheduled(cron = "*/5 * * * * ?") public void startListener() { System.out.println("启动监听器..."); // "timingConsumer"是@KafkaListener注解后面设置的监听器ID,标识这个监听器 if (!registry.getListenerContainer("timingConsumer").isRunning()) { registry.getListenerContainer("timingConsumer").start(); } //registry.getListenerContainer("timingConsumer").resume(); } // 定时停止监听器 @Scheduled(cron = "*/4 * * * * ? ") public void shutDownListener() { System.out.println("关闭监听器..."); registry.getListenerContainer("timingConsumer").pause(); } }- 1
- 2
- 3
- 4
- 5
- 6
- 7
- 8
- 9
- 10
- 11
- 12
- 13
- 14
- 15
- 16
- 17
- 18
- 19
- 20
- 21
- 22
- 23
- 24
- 25
- 26
- 27
- 28
- 29
- 30
- 31
- 32
- 33
- 34
- 35
- 36
- 37
- 38
- 39
- 40
- 41
- 42
- 43
- 44
- 45
结果

-
相关阅读:
oj渊子赛马——贪心算法
排序算法之详解冒泡排序
128. SAP UI5 智能控件 Smart Controls 的初步认识
工具推荐#简单图片转换为ASCII图(基于字符)
tp5.1发送阿里云短信验证码
无代码和低代码平台:程序员的竞争优势
铜陵市省重点实验室、省工程技术研究中心认定奖励补贴和申报认定条件流程归集
web前端网页制作课作业——用DIV+CSS技术设计的家乡旅游主题网站
基于 nodejs+vue城市轨道交通线路查询系统mysql
开源项目-数据交换exchangis
- 原文地址:https://blog.csdn.net/qq_47848696/article/details/125422997