-
L5.linux命令每日一练 -- 第二章 文件和目录操作命令 -- tree和mkdir命令
2.3 tree:以树形结构显示目录下的内容
2.3.1 命令详解
【命令星级】 ★★★★☆
【功能说明】
tree命令的中文意思为“树”,功能是以树形结构列出指定目录下所有内容,包括所有文件、子目录及子目录里的目录和文件。
【语法格式】
tree [option] [directory] tree [选项] [目录]- 1
- 2
说明:
1)注意tree命令以及后面的选项和目录,每个元素之间都至少要有一个空格。
2)若tree命令后不接选项和目录,则默认显示当前所在路径目录的目录结构。
【选项说明】
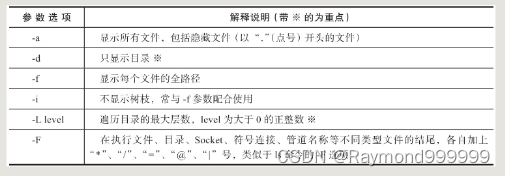
表2-4针对tree命令的参数选项进行了说明。
表2-4 tree命令的参数选项及说明
2.3.2 使用范例
在讲解范例之前,先做一些准备工作,步骤如下。
第一步,安装tree命令。
首先检查系统是否安装了tree命令,如果采用的是最小化安装Linux系统的方式,那么tree命令有可能并没有安装。此时可用yum 命令安装tree命令:
[root@centos7 ~]# rpm -qa tree #查询tree命令是否安装。 tree-1.6.0-10.el7.x86_64 #如果没有显示就执行下面的命令。 [root@centos7 ~]# yum install -y tree #安装tree命令的yum命令,本书开头已经带读者安装过了。- 1
- 2
- 3
第二步,调整系统字符集,防止树形结构显示乱码。
在使用树形结构时,很可能会因为字符集而导致出现乱码问题,比如导致树形的树枝部分都是问号,例如,下面的命令可作为临时解决树结构乱码的方法:
root@centos7 ~]# LANG=dm_US.UTF-8- 1
这个问题与Linux系统字符集以及我们连接Linux的客户端的字符集都有关联。
2.3.2.1 基础范例
**范例2-9:**不带任何参数执行tree命令。
[root@centos7 ~]# tree #显示当前目录结构。 . #“.”以当前目录为起点。 └── anaconda-ks.cfg 0 directories, 1 file- 1
- 2
- 3
- 4
- 5
**范例2-10:**以树形结构显示目录下的所有内容(-a功能)。
[root@centos7 ~]# tree -a #带-a参数显示所有文件(包括隐藏文件)。 . ├── anaconda-ks.cfg ├── .bash_history #在Linux系统中,以“.”(点号)开头的文件为隐藏文件,默认不显示。 ├── .bash_logout ├── .bash_profile ├── .bashrc ├── .cshrc ├── .tcshrc └── .viminfo 0 directories, 8 files- 1
- 2
- 3
- 4
- 5
- 6
- 7
- 8
- 9
- 10
- 11
- 12
**范例2-11:**只列出根目录下第一层的目录结构(-L功能)。
[root@centos7 ~]# tree -L 1 / #-L参数后接数字,表示查看目录的层数,若不带-L选项则默认显示所有层数。 / ├── ~.bashrc ├── bin -> usr/bin ├── boot ├── dev ├── etc ├── home ├── lib -> usr/lib ├── lib64 -> usr/lib64 ├── media ├── mnt ├── opt ├── proc ├── root ├── run ├── sbin -> usr/sbin ├── srv ├── sys ├── tmp ├── usr └── var 19 directories, 1 file- 1
- 2
- 3
- 4
- 5
- 6
- 7
- 8
- 9
- 10
- 11
- 12
- 13
- 14
- 15
- 16
- 17
- 18
- 19
- 20
- 21
- 22
- 23
- 24
**范例2-12:**只显示所有的目录(但不显示文件)。
[root@centos7 ~]# tree -d /boot #-d参数表示只显示目录。 /boot ├── efi │ └── EFI │ └── centos ├── grub └── grub2 ├── fonts ├── i386-pc └── locale 8 directories [root@centos7 ~]# tree -dL 1 /boot #-d参数只显示目录,-L参数表示显示层数,这里是1层。 /boot ├── efi ├── grub └── grub2 3 directories- 1
- 2
- 3
- 4
- 5
- 6
- 7
- 8
- 9
- 10
- 11
- 12
- 13
- 14
- 15
- 16
- 17
- 18
- 19
范例2-13:-f选项和-i选项的使用。
使用-f选项可显示完整的路径名称,使用-i选项则不显示树枝部分,示例代码如下:
[root@centos7 ~]# tree -L 1 -f /boot/ #-f显示内容的完整路径。 /boot ├── /boot/config-3.10.0-1127.19.1.el7.x86_64 ├── /boot/config-3.10.0-957.el7.x86_64 ├── /boot/efi ├── /boot/grub ├── /boot/grub2 ├── /boot/initramfs-0-rescue-eddf689a11a54dd69bbca212cf511592.img ├── /boot/initramfs-3.10.0-1127.19.1.el7.x86_64.img ├── /boot/initramfs-3.10.0-1127.19.1.el7.x86_64kdump.img ├── /boot/initramfs-3.10.0-957.el7.x86_64.img ├── /boot/initramfs-3.10.0-957.el7.x86_64kdump.img ├── /boot/symvers-3.10.0-1127.19.1.el7.x86_64.gz ├── /boot/symvers-3.10.0-957.el7.x86_64.gz ├── /boot/System.map-3.10.0-1127.19.1.el7.x86_64 ├── /boot/System.map-3.10.0-957.el7.x86_64 ├── /boot/vmlinuz-0-rescue-eddf689a11a54dd69bbca212cf511592 ├── /boot/vmlinuz-3.10.0-1127.19.1.el7.x86_64 └── /boot/vmlinuz-3.10.0-957.el7.x86_64 3 directories, 14 files [root@centos7 ~]# tree -L 1 -fi /boot/ #-i不显示“树枝”,当需要获取所有文件的完整路径时,这个命令很好用。 /boot /boot/config-3.10.0-1127.19.1.el7.x86_64 /boot/config-3.10.0-957.el7.x86_64 /boot/efi /boot/grub /boot/grub2 /boot/initramfs-0-rescue-eddf689a11a54dd69bbca212cf511592.img /boot/initramfs-3.10.0-1127.19.1.el7.x86_64.img /boot/initramfs-3.10.0-1127.19.1.el7.x86_64kdump.img /boot/initramfs-3.10.0-957.el7.x86_64.img /boot/initramfs-3.10.0-957.el7.x86_64kdump.img /boot/symvers-3.10.0-1127.19.1.el7.x86_64.gz /boot/symvers-3.10.0-957.el7.x86_64.gz /boot/System.map-3.10.0-1127.19.1.el7.x86_64 /boot/System.map-3.10.0-957.el7.x86_64 /boot/vmlinuz-0-rescue-eddf689a11a54dd69bbca212cf511592 /boot/vmlinuz-3.10.0-1127.19.1.el7.x86_64 /boot/vmlinuz-3.10.0-957.el7.x86_64 3 directories, 14 files- 1
- 2
- 3
- 4
- 5
- 6
- 7
- 8
- 9
- 10
- 11
- 12
- 13
- 14
- 15
- 16
- 17
- 18
- 19
- 20
- 21
- 22
- 23
- 24
- 25
- 26
- 27
- 28
- 29
- 30
- 31
- 32
- 33
- 34
- 35
- 36
- 37
- 38
- 39
- 40
- 41
- 42
2.3.2.2 技巧性范例
**范例2-14:**使用tree命令区分目录和文件的方法(使用-F和-d参数)。
[root@centos7 ~]# tree -L 1 -F /boot/ #使用-F参数会在目录后面添加“/”,以方便区分目录。 /boot/ ├── config-3.10.0-1127.19.1.el7.x86_64 ├── config-3.10.0-957.el7.x86_64 ├── efi/ #结尾带斜线的就是目录。 ├── grub/ ├── grub2/ ├── initramfs-0-rescue-eddf689a11a54dd69bbca212cf511592.img ├── initramfs-3.10.0-1127.19.1.el7.x86_64.img ├── initramfs-3.10.0-1127.19.1.el7.x86_64kdump.img ├── initramfs-3.10.0-957.el7.x86_64.img ├── initramfs-3.10.0-957.el7.x86_64kdump.img ├── symvers-3.10.0-1127.19.1.el7.x86_64.gz ├── symvers-3.10.0-957.el7.x86_64.gz ├── System.map-3.10.0-1127.19.1.el7.x86_64 ├── System.map-3.10.0-957.el7.x86_64 ├── vmlinuz-0-rescue-eddf689a11a54dd69bbca212cf511592* ├── vmlinuz-3.10.0-1127.19.1.el7.x86_64* └── vmlinuz-3.10.0-957.el7.x86_64* 3 directories, 14 files [root@centos7 ~]# tree -L 1 -F /boot/|grep /$ #过滤以斜线结尾的所有内容,如果大家暂时还看不懂这个方法,可以等学完grep命令后再回看。 /boot/ ├── efi/ ├── grub/ ├── grub2/ [root@centos7 ~]# tree -L 1 -d /boot/ #使用-d参数只显示目录树,轻松过滤内容中的目录。 /boot/ ├── efi ├── grub └── grub2 3 directories- 1
- 2
- 3
- 4
- 5
- 6
- 7
- 8
- 9
- 10
- 11
- 12
- 13
- 14
- 15
- 16
- 17
- 18
- 19
- 20
- 21
- 22
- 23
- 24
- 25
- 26
- 27
- 28
- 29
- 30
- 31
- 32
- 33
2.4 mkdir:创建目录
2.4.1 命令详解
【命令星级】 ★★★★★
【功能说明】
mkdir命令是由“make direcrories”中每个单词的粗体字母组合而成,其功能是创建目录,默认情况下,如果要创建的目录已经存在,则会提示文件存在,而不会继续创建目录。
【语法格式】
mkdir [iptoin] [directory] mkdir [选项] [目录]- 1
- 2
说明:
1)注意mkdir命令以及后面的选项和目录之间都至少要有一个空格。
2)mkdir命令可以同时创建多个目录,格式为mkdir dir1 dir2 …
【选项说明】
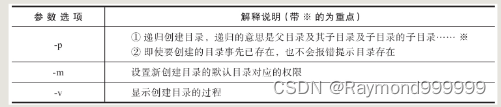
表2-5针对mkdir命令的参数选项进行了说明。
表2-5 mkdir命令的参数选项及说明
2.4.2 使用范例
2.4.2.1 基础范例
**范例2-15:**不适用任何命令参数创建目录的用法示例。
我们先查看下当然目录树的结构,命令如下:
[root@centos7 ~]# cd [root@centos7 ~]# tree -d . #根据结果可以看出当前目录下没有任何目录。 0 directories- 1
- 2
- 3
- 4
- 5
开始测试创建目录,并检查,命令如下:
[root@centos7 ~]# mkdir data #在当前目录下创建data目录,此处data是相对路径。 [root@centos7 ~]# tree -d . └── data #可以看到data目录已经创建。 1 directory [root@centos7 ~]# mkdir data #再次执行创建命令会提示目录已经存在。 mkdir: cannot create directory ‘data’: File exists- 1
- 2
- 3
- 4
- 5
- 6
- 7
- 8
扩展知识:
Windows下目录路径样式为d:\data\test,而Linux下的路径样式为/data/test,它们的目录顶点和分隔符均不相同。
**范例2-16:**使用-p参数递归创建目录。
当我们创建多级目录时,如果第一级目录(oldboy)不存在,则创建结构会报错,导致无法成功创建,操作如下:
[root@centos7 ~]# mkdir oldbot/test mkdir: cannot create directory ‘oldbot/test’: No such file or directory #提示没有这个文件或目录。- 1
- 2
此时,可以指定-p参数递归创建多级目录,命令如下:
[root@centos7 ~]# mkdir -p oldboy/test [root@centos7 ~]# tree -d . ├── data └── oldboy #同时创建了oldboy目录及oldboy的子目录test。 └── test 3 directories- 1
- 2
- 3
- 4
- 5
- 6
- 7
- 8
使用mkdir创建多级目录时,建议直接使用-p参数,可以避免出现“No such file or directory”这与没有文件或目录的报错了,且不会影响已存在的目录。
**范例2-17:**加-v参数显示创建目录的过程。
使用-v参数显示创建目录的详细过程,具体操作命令如下:
[root@centos7 ~]# mkdir -pv oldboy2/test mkdir: created directory ‘oldboy2’ mkdir: created directory ‘oldboy2/test’- 1
- 2
- 3
**提示:**其实这个-v并无实际用途。
**范例2-18:**创建目录时可使用-m参数设置目录的默认权限。
[root@centos7 ~]# mkdir dir1 [root@centos7 ~]# ls -ld dir1 #ls命令的使用方法详见后面的ls命令的相关内容。 drwxr-xr-x. 2 root root 6 Oct 5 21:03 dir1 #创建该目录的默认权限为755. [root@centos7 ~]# mkdir -m 333 dir2 #创建目录时指定333的数字权限。 [root@centos7 ~]# ls -ld dir2 d-wx-wx-wx. 2 root root 6 Oct 5 21:04 dir2 #可以看到权限已经发生了变化。- 1
- 2
- 3
- 4
- 5
- 6
**提示:**有关权限的知识课参考后文详解的chmod命令。
2.4.2.2 技巧性范例
范例2-19:同时创建多个目录及多级子目录。
在生产环境中,常常需要创建目录用来存放文件,如果同时创建多个目录并且每个目录下面可能还有多个子目录,那就需要执行多遍mkdir命令,这种做法比较笨。事实上,我们可以使用mkdir命令同时创建多个多级目录,具体命令操作如下:
[root@centos7 ~]# mkdir -pv neteagle/{dir1_1,dir1_2}/{dir2_1,dir2_2} #大括号{}里用逗号分隔。 mkdir: created directory ‘neteagle’ mkdir: created directory ‘neteagle/dir1_1’ mkdir: created directory ‘neteagle/dir1_1/dir2_1’ mkdir: created directory ‘neteagle/dir1_1/dir2_2’ mkdir: created directory ‘neteagle/dir1_2’ mkdir: created directory ‘neteagle/dir1_2/dir2_1’ mkdir: created directory ‘neteagle/dir1_2/dir2_2’ [root@centos7 ~]# tree -d neteagle #上面创建的目录命令所对应的目录结构如下。 neteagle ├── dir1_1 │ ├── dir2_1 │ └── dir2_2 └── dir1_2 ├── dir2_1 └── dir2_2 6 directories [root@centos7 ~]# mkdir -p test/dir{1..5} old/{a..g} #{1..5}以及{a..g}表示序列。 [root@centos7 ~]# tree -d test old test ├── dir1 ├── dir2 ├── dir3 ├── dir4 └── dir5 old ├── a ├── b ├── c ├── d ├── e ├── f └── g 12 directories- 1
- 2
- 3
- 4
- 5
- 6
- 7
- 8
- 9
- 10
- 11
- 12
- 13
- 14
- 15
- 16
- 17
- 18
- 19
- 20
- 21
- 22
- 23
- 24
- 25
- 26
- 27
- 28
- 29
- 30
- 31
- 32
- 33
- 34
- 35
- 36
扩展知识:
大括号({})的特殊用法。
在{}中使用逗号分割多个字符或单次时,使用echo命令可以将这些被分隔的字符或单词分别输出到屏幕上,示例如下:
[root@centos7 ~]# echo {B,C} #会输出B C到屏幕上。 B C- 1
- 2
如果{}前有字符时,输出结果如下:
[root@centos7 ~]# echo A{B,C} AB AC [root@centos7 ~]# echo A{,C} #如果逗号前面什么都没有,可以认为是一个空字符串。 A AC- 1
- 2
- 3
- 4
上述命令执行的结果示例如图2-1所示。

图2-1 大括号的展开操作示意图2.4.2.3 生产案例
**范例2-20:**克隆目录结构。
需求:如果写了一个Shell脚本,准备对某个目录(例如目录很大,几百个GB)做一些操作,那么,在此之前必须要先测试脚本,以确定它是否正确,而这就需要先搭建一个模拟环境了,当然,目录结构也需要复制过去,方法如下。
[root@centos7 ~]# tree -fid --noreport neteagle #显示所有目录树,--noreport不显示最后一行统计信息,也可以用find命令输出下面的目录树。 neteagle neteagle/dir1_1 neteagle/dir1_1/dir2_1 neteagle/dir1_1/dir2_2 neteagle/dir1_2 neteagle/dir1_2/dir2_1 neteagle/dir1_2/dir2_2 [root@centos7 ~]# tree -fid --noreport neteagle >>~/neteagle.txt #将目录树内容追加到家目录下的neteagle.txt文件里。 [root@centos7 ~]# cd /tmp/ [root@centos7 /tmp]# mkdir -p `cat ~/neteagle.txt` #mkdir命令后面可以接很多目录名称来批量创建目录。但是如果将所有目录都放在mkdir命令后面势必会导致命令太长,因此这里采用了一个巧妙的用法,使用了一对反引号(在键盘ESC下方),反引号内部使用cat命令读取~(家目录)下的neteagle.txt文件内容,这个文件内容就包含了所有的目录名称。最后大家要知道的是,一个命令语句中如果还有反引号包含的命令,那么需要优先执行反引号中的命令语句,就像本例应先执行cat命令,然后执行mkdir命令。cat命令的使用方法详解cat命令章节。 [root@centos7 /tmp]# tree -d /tmp/neteagle/ 查看上述命令操作结果。 /tmp/neteagle/ ├── dir1_1 │?? ├── dir2_1 │?? └── dir2_2 └── dir1_2 ├── dir2_1 └── dir2_2 6 directories- 1
- 2
- 3
- 4
- 5
- 6
- 7
- 8
- 9
- 10
- 11
- 12
- 13
- 14
- 15
- 16
- 17
- 18
- 19
- 20
- 21
-
相关阅读:
通过IP地址进行精准定位技术、方法与隐私问题的探讨
【论文阅读】ICLR 2022: Scene Transformer: A unified architecture for predicting future trajectories of multiple agents
安装Android Studio并创建一个Android Demo
LLM探索:GPT类模型的几个常用参数 Top-k, Top-p, Temperature
防汛救援便携式应急通信系统解决方案
【2023年11月第四版教材】软考高项极限冲刺篇笔记(2)
曲线艺术编程 coding curves 第九章 旋轮曲线(ROULETTE CURVES)
KITTI raw_data数据集百度云下载
iOS安全加固方法及实现
《铸梦之路》帧同步卡牌放置手游(斗罗大陆武魂觉醒、上古王冠)
- 原文地址:https://blog.csdn.net/qq_25599925/article/details/125350853