-
Vue2 Vue3对比
先上一个Vue3组件实例
<div id="root"> {{counter}} </div> <script type="module"> const Counter = { data() { return { counter: 0 } } } const app = Vue.createApp(Counter) app.mount('#root') </script>- 1
- 2
- 3
- 4
- 5
- 6
- 7
- 8
- 9
- 10
- 11
- 12
- 13
- 14
组件Counter挂载在根组件root节点上,你发现了什么?
根组件的data也变成了一个函数,通过return 返回一个变量定义状态值,vue2根组件是一个对象;vue3通过暴露createApp方法,便于我们创建根组件
接着往下看:const TodoItem = { props: ['todo'], template: ` <li>{{todo.text}}</li> ` } const TodoList = { data() { return { list: [ {id: 0, text: 'html'}, {id: 1, text: 'javascript'}, {id: 3, text: 'css'} ] } }, components: { TodoItem } } Vue.createApp(TodoList).mount('#root') app.mount('#root')- 1
- 2
- 3
- 4
- 5
- 6
- 7
- 8
- 9
- 10
- 11
- 12
- 13
- 14
- 15
- 16
- 17
- 18
- 19
- 20
- 21
- 22
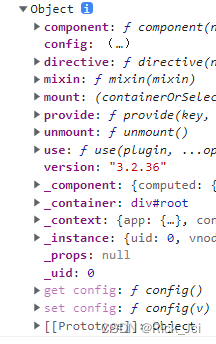
在Vue3实例化后的根组件对象比vue2更简洁了,vue2是一个Vue对象,Vue3是一个object对象
vue2对象实例: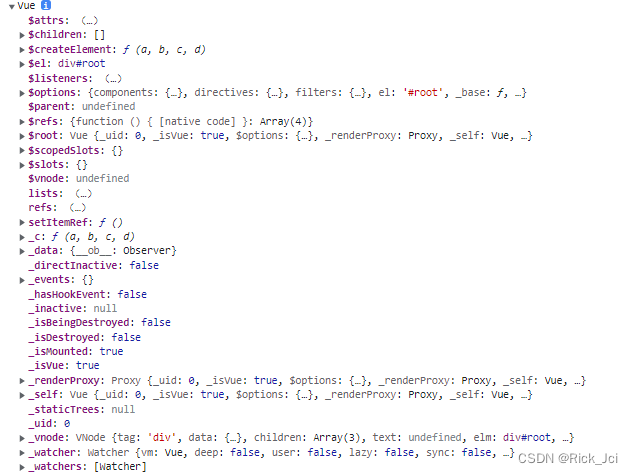
Vue3对象
应用和组件实例
每个 Vue 应用都是通过用 createApp 函数创建一个新的应用实例开始的:
const app = Vue.createApp({ /* 选项 */ })- 1
- 2
- 3
该应用实例是用来在应用中注册“全局”组件的。
const app = Vue.createApp({}) //注册组件 app.component('SearchInput', SearchInputComponent) //自定义指令 app.directive('focus', FocusDirective) //使用插件 app.use(LocalePlugin)- 1
- 2
- 3
- 4
- 5
- 6
- 7
应用实例暴露的大多数方法都会返回该同一实例,允许链式:
Vue.createApp({}) .component('SearchInput', SearchInputComponent) .directive('focus', FocusDirective) .use(LocalePlugin)- 1
- 2
- 3
- 4
Vue3中组件的使用:
<script> const TodoItem = { props: ['todo'], template: ` <li>{{todo.text}}</li> ` } const TodoList = { data() { return { list: [ {id: 0, text: 'html'}, {id: 1, text: 'javascript'}, {id: 3, text: 'css'} ] } }, //可以通过this.$options.components获取到子组件 components: { TodoItem }, mounted(){ console.log(this.$options.components) } } Vue.createApp(TodoList).mount('#root') </script>- 1
- 2
- 3
- 4
- 5
- 6
- 7
- 8
- 9
- 10
- 11
- 12
- 13
- 14
- 15
- 16
- 17
- 18
- 19
- 20
- 21
- 22
- 23
- 24
- 25
- 26
- 27
三、Vue3中插件封装和自定义指令
index.html
<div id="app"> <my-component></my-component> <input type="text" v-focus /> </div> <script type="module"> import i18nPlugin from './i18n.js' const app = Vue.createApp({ mounted() { console.log(this.$translate('greetings.hello')) } }) // 全局定义的组件 app.component('my-component', { template: ` <h1>自定义全局组件</h1> ` }) // 自定义指令(全局) app.directive('focus', { mounted(el) { el.focus() } }) // 使用插件 const i18nString = { greetings: { hello: '你好' }, oparator: { open: '打开', close: '关闭' } } app.use(i18nPlugin, i18nString) app.mount('#app') </script>- 1
- 2
- 3
- 4
- 5
- 6
- 7
- 8
- 9
- 10
- 11
- 12
- 13
- 14
- 15
- 16
- 17
- 18
- 19
- 20
- 21
- 22
- 23
- 24
- 25
- 26
- 27
- 28
- 29
- 30
- 31
- 32
- 33
- 34
- 35
- 36
i18n.js
export default { install: (app, options) => { // 这里options是app中 i18nString // 挂载一个全局属性到 app.config.globalProperties // key是$translate传进来的 greetings.hello 这个参数 app.config.globalProperties.$translate = key => { return key.split('.').reduce((o, i) => { if (o) { return o[i] } }, options) } // app.component() // app.directive() } }- 1
- 2
- 3
- 4
- 5
- 6
- 7
- 8
- 9
- 10
- 11
- 12
- 13
- 14
- 15
- 16
生命周期对比
图一:
图二:

beforeUnmount、unmouted 是 Vue3 调整的钩子。并且通过 app.unmount() 函数触发组件销毁。
v-for/v-if的区别
Vue2中v-for 优先级高于v-if Vue3中v-if优先级高于v-for,在Vue3中v-for遍历的对象可以通过ref绑定函数,将每个处理一遍,vue2无法处理
vue3示例:<div id="root"> <ul v-if="!list2"> <!-- <li v-for="li in lists" v-if="li!=='🥕'">{{ li }}</li> --> <li v-for="li in lists" :ref="setItemRef">{{ li }}</li> </ul> <my-component v-for="i in 3">{{i}}</my-component> </div> <script> const app = Vue.createApp({ data() { return { lists: ['🍒', '🍊', '🍇', '🥕'], refs: 'lists', itemRefs: [] } }, // vue3中这样的使用方法被刨除了通过const list2 = computed({get(){},set(){}})设置 computed: { list2() { return this.lists.every(value => { return value !== '🥕' }) } }, methods: { setItemRef(el) { if (el) { this.itemRefs.push(el) } } }, mounted() { // console.log(this.$refs.lists); console.log(this.itemRefs[0]) }, }) app.component('my-component', { template: ` <h1>my-component</h1> ` }) app.mount('#root') console.log(app)- 1
- 2
- 3
- 4
- 5
- 6
- 7
- 8
- 9
- 10
- 11
- 12
- 13
- 14
- 15
- 16
- 17
- 18
- 19
- 20
- 21
- 22
- 23
- 24
- 25
- 26
- 27
- 28
- 29
- 30
- 31
- 32
- 33
- 34
- 35
- 36
- 37
- 38
- 39
- 40
- 41
- 42
- 43
- 44
Vue3中的多事件处理器
事件处理程序中可以有多个方法,这些方法由逗号运算符分隔: <!-- 这两个 one() 和 two() 将执行按钮点击事件 --> <button @click="one($event), two($event)"> Submit </button> // ... methods: { one(event) { // 第一个事件处理器逻辑... }, two(event) { // 第二个事件处理器逻辑... } }- 1
- 2
- 3
- 4
- 5
- 6
- 7
- 8
- 9
- 10
- 11
- 12
- 13
- 14
- 15
Vue3中的事件处理封装得更加简便
<div id="root"> <input type="text" @keyup.13="handleClick"> </div> <script> Vue.createApp({ methods: { handleClick() { console.log('click.') } }, }).mount('#root') </script>- 1
- 2
- 3
- 4
- 5
- 6
- 7
- 8
- 9
- 10
- 11
- 12
vue3非 Prop 的 Attribute
一个非 prop 的 attribute 是指传向一个组件,但是该组件并没有相应 props 或 emits 定义的 attribute。常见的示例包括 class、style 和 id attribute。可以通过 a t t r s p r o p e r t y 访 问 那 些 a t t r i b u t e 。 v u e 2 中 会 将 s t y l e , c l a s s 等 默 认 挂 载 到 组 件 的 根 节 点 上 , V u e 3 中 通 过 组 件 内 设 置 i n h e r i t A t t r s : f a l s e , 不 会 将 这 些 挂 载 到 组 件 的 根 节 点 上 , 但 是 可 以 通 过 t h i s . attrs property 访问那些 attribute。 vue2中会将style,class等默认挂载到组件的根节点上,Vue3中通过 组件内设置 inheritAttrs: false,不会将这些挂载到组件的根节点上,但是可以通过this. attrsproperty访问那些attribute。vue2中会将style,class等默认挂载到组件的根节点上,Vue3中通过组件内设置inheritAttrs:false,不会将这些挂载到组件的根节点上,但是可以通过this.attrs获取<div id="root"> <date-picker data-status="activated" class="a"></date-picker> </div> <script> const app = Vue.createApp({ }) app.component('date-picker', { inheritAttrs: false, template: ` <div v-bind:class="$attrs.class"> <input type="datetime-local" v-bind:class="$attrs.class"/> </div> `, created() { // console.log(this.$attrs.class) } }) app.mount('#root')- 1
- 2
- 3
- 4
- 5
- 6
- 7
- 8
- 9
- 10
- 11
- 12
- 13
- 14
- 15
- 16
- 17
- 18
- 19
vue3中的自定义事件,父组件给子组件权利修改父组件的值
<div id="root"> {{counted}} <counter v-model:total="counted"></counter> </div> <script> const app = Vue.createApp({ data() { return { counted: 0, } }, updated(){ console.log("fatherupdated",this.counted) } }) app.component('counter', { //相当于父组件给子组件权利修改父组件的值,不破坏数据流的传递 // v-model绑定total到父组件的counted,相当于给父组件发消息,让父组件去更新值 props: ['total'], //自定义事件,根据父组件data变化响应式渲染,如果emits接收了浏览器默认事件,则浏览器默认事件不执行,这里把他理解为自定义事件 emits: ['update:total'], data() { return { count: 0, } }, updated(){ console.log("sonupdated",this.count) }, methods: { handleClick() { this.count++ console.log("son") this.$emit('update:total', this.count) } }, template: ` <button @click="handleClick">click</button> ` }) app.mount('#root') </script>- 1
- 2
- 3
- 4
- 5
- 6
- 7
- 8
- 9
- 10
- 11
- 12
- 13
- 14
- 15
- 16
- 17
- 18
- 19
- 20
- 21
- 22
- 23
- 24
- 25
- 26
- 27
- 28
- 29
- 30
- 31
- 32
- 33
- 34
- 35
- 36
- 37
- 38
- 39
- 40
- 41
- 42
- 43
Vue3中的插槽
匿名插槽 <template v-slot:default> Default slot content </template> 具名插槽 <template v-slot:footer> Footer content </template> V-slot:可以用#代理 <template #footer> Footer content </template>- 1
- 2
- 3
- 4
- 5
- 6
具名插槽接收参数
<todo-list #list="{ index, item }"> <span>{{index}}</span> - <span>{{item}}</span> </todo-list> template: ` <ul> <li v-for="(item, index) in items"> <slot name="list" :item="item" :index="index"></slot> </li> </ul> `- 1
- 2
- 3
- 4
- 5
- 6
- 7
- 8
- 9
- 10
- 11
- 12
provide-inject
//父组件provide provide() { return { msg: Vue.computed(() => this.str) } }, //子组件inject 接收 app.component('TodoListStatistics', { inject: ['msg'], template: ` <div>{{msg}} TodoListStatistics</div> `, })- 1
- 2
- 3
- 4
- 5
- 6
- 7
- 8
- 9
- 10
- 11
- 12
- 13
异步组件defineAsyncComponent
<div id="root"> <suspense> <template #default> <async-example></async-example> </template> <template #fallback> <div> loading... </div> </template> </suspense> </div> <script> const { createApp, defineAsyncComponent } = Vue const app = createApp({}) const AsyncComp = defineAsyncComponent( () => new Promise((resolve, reject) => { setTimeout(() => { resolve({ template: '<div>I am async!</div>' }) }, 3000) }) ) app.component('async-example', AsyncComp) app.mount('#root')- 1
- 2
- 3
- 4
- 5
- 6
- 7
- 8
- 9
- 10
- 11
- 12
- 13
- 14
- 15
- 16
- 17
- 18
- 19
- 20
- 21
- 22
- 23
- 24
- 25
- 26
- 27
Vue3抛出了$children,通过ref 获取组件
<div id="root"> <div> <my-button ref="btn">Change logo</my-button> </div> </div> <script> const app = Vue.createApp({ mounted() { console.log(this.$refs.btn) // [VueComponent] } }) app.component('my-button', { template: ` <button><slot></slot></button> ` }) app.mount('#root') </script>- 1
- 2
- 3
- 4
- 5
- 6
- 7
- 8
- 9
- 10
- 11
- 12
- 13
- 14
- 15
- 16
- 17
- 18
Vue3自定义指令
<input type="range" min="0" max="500" v-model="pinPadding"> <p v-pin:[direction]="pinPadding">text</p> const app = Vue.createApp({ data() { return { pinPadding: 200, direction: 'right' } } }) app.directive('pin', (el, binding) => { el.style.position = 'fixed' const s = binding.arg || 'top' el.style[s] = binding.value + 'px' })- 1
- 2
- 3
- 4
- 5
- 6
- 7
- 8
- 9
- 10
- 11
- 12
- 13
- 14
- 15
- 16
自定义标签
<table> <tr is="vue:mytr"></tr> </table> app.component('mytr', { template: ` <tr><td>abc</td></tr> ` })- 1
- 2
- 3
- 4
- 5
- 6
- 7
- 8
- 9
-
相关阅读:
【数据结构】链表C++编写的,它定义了一个链表,并实现了一些基本的链表操作,如创建新节点、插入节点、清空链表、输出链表以及查找节点
【PyTorch 攻略 (3/7)】线性组件、激活函数
buuctf(探险2)
线路位宽与 CPU 位宽
中国电信天翼云进入4.0阶段,打造一朵无处不在的分布式云
音频处理库性能对比:计算mel频谱的速度哪个更快?
httprunner4学习总结1 - 相关概念
《lwip学习6》-- ARP协议
Maven父子项目工程中的Servlet优化与准备【Servlet项目】
聚观365|抖音上线“防打扰保护工具”;亚马逊拟计划裁员1万人
- 原文地址:https://blog.csdn.net/qq_37905131/article/details/125395175