-
目标检测yolov3+文字识别CRNN 实现文本检测和识别
参考链接:
https://github.com/chineseocr/chineseocr
https://zhuanlan.zhihu.com/p/34757009
https://wenku.baidu.com/view/f4ec95e64328915f804d2b160b4e767f5acf80ab.html基于chineseocr的代码做简单修改,本文主要介绍思路和细节理论。
首先列出chineseocr代码的思路:
1、检测文本行角度: 使用cv2.dnn.readNetFromTensorflow加载一个Angle-model.pb,实现文字方向检测 0、90、180、270度检测;
2、检测文本行区域: 在步骤1摆正文本行的基础上,使用yolov3 检测出text proposals,然后使用CTPN中的文本线构造算法进行文本行合并;
3、OCR识别: 使用CRNN + CTC进行文字识别。一、文本行角度检测
剪切图像边缘,将图像变成(224,224,3)尺⼨,图像channel中⼼化处理,读取Angle-model(vgg16 : 5层卷积,2层全连接,最后经过softmax预测4个类别),预测⽂字朝向,代码如下:#!/usr/bin/env python3 # -*- coding: utf-8 -*- """ Created on Wed Jun 3 10:58:35 2020 @author: cong """ import os import cv2 import numpy as np # 单行文本角度检测 pwd = os.getcwd() # 获取当前路径 AngleModelPb = os.path.join(pwd,"models","Angle-model.pb") AngleModelPbtxt = os.path.join(pwd,"models","Angle-model.pbtxt") angleNet = cv2.dnn.readNetFromTensorflow(AngleModelPb,AngleModelPbtxt)##dnn 文字方向检测 def angle_detect(img,adjust=True): """ 文字方向检测 """ h,w = img.shape[:2] ROTATE = [0,90,180,270] if adjust: thesh = 0.05 xmin,ymin,xmax,ymax = int(thesh*w),int(thesh*h),w-int(thesh*w),h-int(thesh*h) img = img[ymin:ymax,xmin:xmax] # 剪切图片边缘 inputBlob = cv2.dnn.blobFromImage(img, scalefactor=1.0, size=(224, 224), swapRB=True , mean=[103.939,116.779,123.68],crop=False); angleNet.setInput(inputBlob) pred = angleNet.forward() index = np.argmax(pred,axis=1)[0] return ROTATE[index]- 1
- 2
- 3
- 4
- 5
- 6
- 7
- 8
- 9
- 10
- 11
- 12
- 13
- 14
- 15
- 16
- 17
- 18
- 19
- 20
- 21
- 22
- 23
- 24
- 25
- 26
- 27
- 28
- 29
- 30
- 31
- 32
- 33
- 34
- 35
- 36
- 37
- 38
上述代码返回图片文字方向的角度,进入yolov3前只是对图片简单的旋转:
im = Image.fromarray(img).transpose(Image.ROTATE_90) img = np.array(im)- 1
- 2
二、基于yolov3进行本文检测 + 文本线构造算法合并text proposals:
进入yolov3,resize图像大小(608,608),进入yolov3进行检测。yolov3的网络结构及其他细节不再赘述,下面只介绍标注的详细过程:kerasTextModel = os.path.join(pwd,"models","text.h5") # keras版本--文本行检测模型权重文件 keras_anchors = '8,11, 8,16, 8,23, 8,33, 8,48, 8,97, 8,139, 8,198, 8,283' class_names = ['none','text']- 1
- 2
- 3
由上述代码可以看出anchors宽度为8,也就是说标注样本中每个框的宽度为8,高度不定,标签只有两类:[‘none’,‘text’]。更加详细的可以去了解一下CTPN的样本。
yolov3检测的结果就是一系列的带有标签的box,接下来利用CTPN中的文本线构造算法合并text proposals,连接成一个文本检测框:

为了说明问题,假设某张图有如上图所示的2个text proposal,即蓝色和红色2组anchor boxes。CTPN采用如下算法构造文本线:
按照水平x坐标排序Anchor;
按照规则依次计算每个Anchor boxi的pair(boxj),组成pair(boxi,boxj);
通过pair(boxi,boxj)建立一个Connect graph,最终获得文本检测框。
下面详细解释,假设每个Anchor index如绿色数字,同时每个Anchor Softmax score如黑色数字:

文本线构造算法通过如下方式建立每个Anchor boxi的 pair(boxi,boxj):

 此部分最终返回图像中的每一行的连通文本框boxes。
三、CRNN + CTC进行文字识别
主要解决作者目前的疑惑:
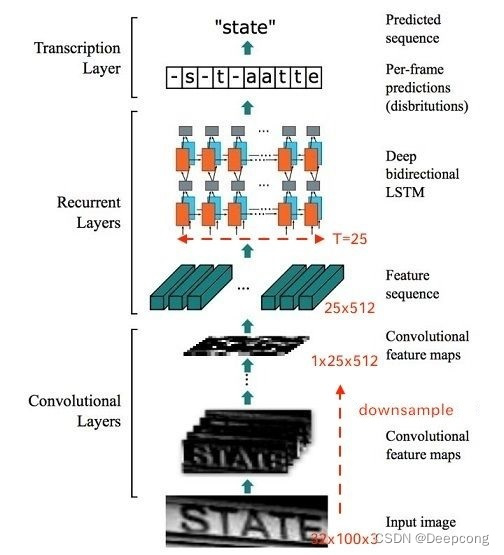
1、CRNN的具体网络结构:输入一个文本行box怎样输出识别结果的???
2、CTC到底是什么??
目标检测输入:608*608
然后检测框进入CRNN中的CNN的输入大小为:(1,1,32,w)
CNN提取特征结束,进入RNN的尺寸为:(w/4,1,512) # T= w/4
RNN的输出结果为:(w/4,1,5530) # T * (N+1) # N:字符个数
先上一个参考链接:
https://zhuanlan.zhihu.com/p/43534801CRNN的网络结构:CNN+RNN(biLSTM)
代码中的结构如下:class CRNN(nn.Module): def __init__(self, imgH, nc, nclass, nh, leakyRelu=False,lstmFlag=True,GPU=False,alphabet=None): """ 是否加入lstm特征层 """ super(CRNN, self).__init__() assert imgH % 16 == 0, 'imgH has to be a multiple of 16' ks = [3, 3, 3, 3, 3, 3, 2] ps = [1, 1, 1, 1, 1, 1, 0] ss = [1, 1, 1, 1, 1, 1, 1] nm = [64, 128, 256, 256, 512, 512, 512] self.lstmFlag = lstmFlag self.GPU = GPU self.alphabet = alphabet cnn = nn.Sequential() def convRelu(i, batchNormalization=False): nIn = nc if i == 0 else nm[i - 1] nOut = nm[i] cnn.add_module('conv{0}'.format(i), nn.Conv2d(nIn, nOut, ks[i], ss[i], ps[i])) if batchNormalization: cnn.add_module('batchnorm{0}'.format(i), nn.BatchNorm2d(nOut)) if leakyRelu: cnn.add_module('relu{0}'.format(i), nn.LeakyReLU(0.2, inplace=True)) else: cnn.add_module('relu{0}'.format(i), nn.ReLU(True)) convRelu(0) cnn.add_module('pooling{0}'.format(0), nn.MaxPool2d(2, 2)) # 64x16x64 convRelu(1) cnn.add_module('pooling{0}'.format(1), nn.MaxPool2d(2, 2)) # 128x8x32 convRelu(2, True) convRelu(3) cnn.add_module('pooling{0}'.format(2), nn.MaxPool2d((2, 2), (2, 1), (0, 1))) # 256x4x16 convRelu(4, True) convRelu(5) cnn.add_module('pooling{0}'.format(3), nn.MaxPool2d((2, 2), (2, 1), (0, 1))) # 512x2x16 convRelu(6, True) # 512x1x16 self.cnn = cnn if self.lstmFlag: self.rnn = nn.Sequential( BidirectionalLSTM(512, nh, nh), BidirectionalLSTM(nh, nh, nclass)) else: self.linear = nn.Linear(nh*2, nclass) def forward(self, input): # conv features conv = self.cnn(input) b, c, h, w = conv.size() assert h == 1, "the height of conv must be 1" conv = conv.squeeze(2) conv = conv.permute(2, 0, 1) # [w, b, c] if self.lstmFlag: # rnn features output = self.rnn(conv) T, b, h = output.size() output = output.view(T, b, -1) else: T, b, h = conv.size() t_rec = conv.contiguous().view(T * b, h) output = self.linear(t_rec) # [T * b, nOut] # view()的作用相当于numpy中的reshape,重新定义矩阵的形状。 output = output.view(T, b, -1) return output- 1
- 2
- 3
- 4
- 5
- 6
- 7
- 8
- 9
- 10
- 11
- 12
- 13
- 14
- 15
- 16
- 17
- 18
- 19
- 20
- 21
- 22
- 23
- 24
- 25
- 26
- 27
- 28
- 29
- 30
- 31
- 32
- 33
- 34
- 35
- 36
- 37
- 38
- 39
- 40
- 41
- 42
- 43
- 44
- 45
- 46
- 47
- 48
- 49
- 50
- 51
- 52
- 53
- 54
- 55
- 56
- 57
- 58
- 59
- 60
- 61
- 62
- 63
- 64
- 65
- 66
- 67
- 68
- 69
- 70
- 71
- 72
- 73
- 74
- 75
- 76
网络结构如下:
<bound method CRNN.predict_job of CRNN( (cnn): Sequential( (conv0): Conv2d(1, 64, kernel_size=(3, 3), stride=(1, 1), padding=(1, 1)) (relu0): ReLU(inplace) (pooling0): MaxPool2d(kernel_size=2, stride=2, padding=0, dilation=1, ceil_mode=False) (conv1): Conv2d(64, 128, kernel_size=(3, 3), stride=(1, 1), padding=(1, 1)) (relu1): ReLU(inplace) (pooling1): MaxPool2d(kernel_size=2, stride=2, padding=0, dilation=1, ceil_mode=False) (conv2): Conv2d(128, 256, kernel_size=(3, 3), stride=(1, 1), padding=(1, 1)) (batchnorm2): BatchNorm2d(256, eps=1e-05, momentum=0.1, affine=True, track_running_stats=True) (relu2): ReLU(inplace) (conv3): Conv2d(256, 256, kernel_size=(3, 3), stride=(1, 1), padding=(1, 1)) (relu3): ReLU(inplace) (pooling2): MaxPool2d(kernel_size=(2, 2), stride=(2, 1), padding=(0, 1), dilation=1, ceil_mode=False) (conv4): Conv2d(256, 512, kernel_size=(3, 3), stride=(1, 1), padding=(1, 1)) (batchnorm4): BatchNorm2d(512, eps=1e-05, momentum=0.1, affine=True, track_running_stats=True) (relu4): ReLU(inplace) (conv5): Conv2d(512, 512, kernel_size=(3, 3), stride=(1, 1), padding=(1, 1)) (relu5): ReLU(inplace) (pooling3): MaxPool2d(kernel_size=(2, 2), stride=(2, 1), padding=(0, 1), dilation=1, ceil_mode=False) (conv6): Conv2d(512, 512, kernel_size=(2, 2), stride=(1, 1)) (batchnorm6): BatchNorm2d(512, eps=1e-05, momentum=0.1, affine=True, track_running_stats=True) (relu6): ReLU(inplace) ) (rnn): Sequential( (0): BidirectionalLSTM( (rnn): LSTM(512, 256, bidirectional=True) (embedding): Linear(in_features=512, out_features=256, bias=True) ) (1): BidirectionalLSTM( (rnn): LSTM(256, 256, bidirectional=True) (embedding): Linear(in_features=512, out_features=5530, bias=True) ) ) )>- 1
- 2
- 3
- 4
- 5
- 6
- 7
- 8
- 9
- 10
- 11
- 12
- 13
- 14
- 15
- 16
- 17
- 18
- 19
- 20
- 21
- 22
- 23
- 24
- 25
- 26
- 27
- 28
- 29
- 30
- 31
- 32
- 33
- 34
- 35
CTC:
对于Recurrent Layers,如果使用常见的Softmax cross-entropy loss,则每一列输出都需要对应一个字符元素。那么训练时候每张样本图片都需要标记出每个字符在图片中的位置,再通过CNN感受野对齐到Feature map的每一列获取该列输出对应的Label才能进行训练。
在实际情况中,标记这种对齐样本非常困难(除了标记字符,还要标记每个字符的位置),工作量非常大。另外,由于每张样本的字符数量不同,字体样式不同,字体大小不同,导致每列输出并不一定能与每个字符一一对应。
当然这种问题同样存在于语音识别领域。例如有人说话快,有人说话慢,那么如何进行语音帧对齐,是一直以来困扰语音识别的巨大难题。
所以CTC提出一种对不需要对齐的Loss计算方法,用于训练网络,被广泛应用于文本行识别和语音识别中。CTC暂时参考https://zhuanlan.zhihu.com/p/43534801
后续再总结!!! -
相关阅读:
Spring - Spring Cloud Gateway网关实战及原理解析
【附源码】计算机毕业设计JAVA学生信息管理系统
静态通讯录
【idea】win 10 / win 11:idea 、Alibaba Dragonwell 11、maven、git 下载与安装
MotionLayout的使用
Mybatis - 核心配置解读
境电商为什么要做独立站?API一键对接秒上架瞬间拥有全平台几十亿商品和用户!
手写Demo体验volatile可见性的作用
什么是边缘计算?它为何如此重要?-天拓四方
【文本数据挖掘】中文命名实体识别:HMM模型+BiLSTM_CRF模型(Pytorch)【调研与实验分析】
- 原文地址:https://blog.csdn.net/DeepCBW/article/details/125014763