-
《逆向工程核心原理》学习笔记(七):反调试技术
前言
继续学习《逆向工程核心原理》,本篇笔记是第七部分:反调试技术,包括一些静态反调试技术和动态反调试技术
值得注意的是,这本书距今有将近10年了,故这里这些都是比较老的东西了
一、反调试技术概况
反调试技术对调试器和OS有很强的的依赖性,分类如下所示:

二、静态反调试技术
静态反调试技术主要是通过一些API探测调试器,并使程序无法运行
1、PEB
PEB结构体信息可以判断进程是否处于调试状态
介绍具体可见:《逆向工程核心原理》学习笔记(六):高级逆向分析技术
几个用到的成员如下:
结构体成员 调试信息 破解之法 BeingDebugged调试时值为 1用OD将其修改为 0即可Ldr未使用的堆内存区域全部填充 0xFEEEFEEE,而Ldr指向的_ PEB _ LDR _ DATA结构体就在堆内存区域将 0xFEEEFEEE都改写为NULL即可ProcessHeap指向 Heap结构体,非调试状态时,Heap结构体的Flags为0x2,ForceFlags为0x0;调试时这两个值都会变将这两个值改回 0x2和0x0即可NtGlobalFlag调试时值为 0x70用OD将其修改为 0即可一个例子如下:
#include "stdio.h" #include "windows.h" #include "tchar.h" void PEB() { HMODULE hMod = NULL; FARPROC pProc = NULL; LPBYTE pTEB = NULL; LPBYTE pPEB = NULL; BOOL bIsDebugging = FALSE; // IsDebuggerPresent() bIsDebugging = IsDebuggerPresent(); printf("IsDebuggerPresent() = %d\n", bIsDebugging); if( bIsDebugging ) printf(" => Debugging!!!\n\n"); else printf(" => Not debugging...\n\n"); // Ldr pProc = GetProcAddress(GetModuleHandle(L"ntdll.dll"), "NtCurrentTeb"); pTEB = (LPBYTE)(*pProc)(); // address of TEB pPEB = (LPBYTE)*(LPDWORD)(pTEB+0x30); // address of PEB printf("PEB.Ldr\n"); DWORD pLdrSig[4] = { 0xEEFEEEFE, 0xEEFEEEFE, 0xEEFEEEFE, 0xEEFEEEFE }; LPBYTE pLdr = (LPBYTE)*(LPDWORD)(pPEB+0xC); __try { while( TRUE ) { if( !memcmp(pLdr, pLdrSig, sizeof(pLdrSig)) ) { printf(" => Debugging!!!\n\n"); break; } pLdr++; } } __except (EXCEPTION_EXECUTE_HANDLER) { printf(" => Not debugging...\n\n"); } // Process Heap - Flags bIsDebugging = FALSE; LPBYTE pHeap = (LPBYTE)*(LPDWORD)(pPEB+0x18); DWORD dwFlags = *(LPDWORD)(pHeap+0xC); printf("PEB.ProcessHeap.Flags = 0x%X\n", dwFlags); if( dwFlags != 0x2 ) printf(" => Debugging!!!\n\n"); else printf(" => Not debugging...\n\n"); // Process Heap - ForceFlags bIsDebugging = FALSE; DWORD dwForceFlags = *(LPDWORD)(pHeap+0x10); printf("PEB.ProcessHeap.ForceFlags = 0x%X\n", dwForceFlags); if( dwForceFlags != 0x0 ) printf(" => Debugging!!!\n\n"); else printf(" => Not debugging...\n\n"); // NtGlobalFlag bIsDebugging = FALSE; DWORD dwNtGlobalFlag = *(LPDWORD)(pPEB+0x68); printf("PEB.NtGlobalFlag = 0x%X\n", dwNtGlobalFlag); if( (dwNtGlobalFlag & 0x70) == 0x70 ) printf(" => Debugging!!!\n\n"); else printf(" => Not debugging...\n\n"); } int _tmain(int argc, TCHAR* argv[]) { PEB(); printf("\npress any key to quit...\n"); _gettch(); return 0; }- 1
- 2
- 3
- 4
- 5
- 6
- 7
- 8
- 9
- 10
- 11
- 12
- 13
- 14
- 15
- 16
- 17
- 18
- 19
- 20
- 21
- 22
- 23
- 24
- 25
- 26
- 27
- 28
- 29
- 30
- 31
- 32
- 33
- 34
- 35
- 36
- 37
- 38
- 39
- 40
- 41
- 42
- 43
- 44
- 45
- 46
- 47
- 48
- 49
- 50
- 51
- 52
- 53
- 54
- 55
- 56
- 57
- 58
- 59
- 60
- 61
- 62
- 63
- 64
- 65
- 66
- 67
- 68
- 69
- 70
- 71
- 72
- 73
- 74
- 75
- 76
2、NtQueryInformationProcess()
NtQueryInformationProcess()定义如下:NTSYSAPI NTSTATUS NTAPI NtQueryInformationProcess ( IN HANDLE ProcessHandle, // 进程句柄 IN PROCESSINFOCLASS InformationClass, // 信息类型 OUT PVOID ProcessInformation, // 缓冲指针 IN ULONG ProcessInformationLength, // 以字节为单位的缓冲大小 OUT PULONG ReturnLength OPTIONAL // 写入缓冲的字节数 );- 1
- 2
- 3
- 4
- 5
- 6
- 7
第二个参数
PROCESSINFOCLASS是枚举类型,其中与反调试有关的成员有三个:ProcessDebugPort(0x7)ProcessDebugObjectHandle(0x1E)ProcessDebugFlags(0x1F)
(1)ProcessDebugPort(0x7)
进程处于调试状态时,操作系统会为他分配1个调试端口(Debug Port)
PROCESSINFOCLASS设为ProcessDebugPort(0x07)时,调用NtQueryInformationProcess()函数就可以获取调试端口- 若处于调试状态,
dwDebugPort会被置为0xFFFFFFFF - 若处于非调试状态,
dwDebugPort值会被设置为0

(2)ProcessDebugObjectHandle(0x1E)
调试进程时,会生成一个调试对象(Debug Obiect)
NtQueryInformationProcess()函数的第二个参数值PROCESSINFOCLASS为ProcessDebugObjectHandle(0x1E)时,函数的第三个参数就能获取到调试对象句柄- 进程处于调试状态->调试句柄存在->返回值不为 NULL
- 处于非调试状态 , 返回值为 NULL

(3)ProcessDebugFlags(0x1F)
调试标志(Debug Flags) 的值也可以判断进程是否处于被调试状态
当
NtQueryInformationProcess()第二个参数PROCESSINFOCLASS为ProcessDebugFlags(0x1F)时,第三个参数:- 调试状态:
0 - 非调试状态:
1
(4)例子
#include "stdio.h" #include "windows.h" #include "tchar.h" enum PROCESSINFOCLASS { ProcessBasicInformation = 0, ProcessQuotaLimits, ProcessIoCounters, ProcessVmCounters, ProcessTimes, ProcessBasePriority, ProcessRaisePriority, ProcessDebugPort = 7, ProcessExceptionPort, ProcessAccessToken, ProcessLdtInformation, ProcessLdtSize, ProcessDefaultHardErrorMode, ProcessIoPortHandlers, ProcessPooledUsageAndLimits, ProcessWorkingSetWatch, ProcessUserModeIOPL, ProcessEnableAlignmentFaultFixup, ProcessPriorityClass, ProcessWx86Information, ProcessHandleCount, ProcessAffinityMask, ProcessPriorityBoost, MaxProcessInfoClass, ProcessWow64Information = 26, ProcessImageFileName = 27, ProcessDebugObjectHandle = 30, ProcessDebugFlags = 31, SystemKernelDebuggerInformation = 35 }; void MyNtQueryInformationProcess() { typedef NTSTATUS (WINAPI *NTQUERYINFORMATIONPROCESS)( HANDLE ProcessHandle, PROCESSINFOCLASS ProcessInformationClass, PVOID ProcessInformation, ULONG ProcessInformationLength, PULONG ReturnLength ); NTQUERYINFORMATIONPROCESS pNtQueryInformationProcess = NULL; pNtQueryInformationProcess = (NTQUERYINFORMATIONPROCESS) GetProcAddress(GetModuleHandle(L"ntdll.dll"), "NtQueryInformationProcess"); // ProcessDebugPort (0x7) DWORD dwDebugPort = 0; pNtQueryInformationProcess(GetCurrentProcess(), ProcessDebugPort, &dwDebugPort, sizeof(dwDebugPort), NULL); printf("NtQueryInformationProcess(ProcessDebugPort) = 0x%X\n", dwDebugPort); if( dwDebugPort != 0x0 ) printf(" => Debugging!!!\n\n"); else printf(" => Not debugging...\n\n"); // ProcessDebugObjectHandle (0x1E) HANDLE hDebugObject = NULL; pNtQueryInformationProcess(GetCurrentProcess(), ProcessDebugObjectHandle, &hDebugObject, sizeof(hDebugObject), NULL); printf("NtQueryInformationProcess(ProcessDebugObjectHandle) = 0x%X\n", hDebugObject); if( hDebugObject != 0x0 ) printf(" => Debugging!!!\n\n"); else printf(" => Not debugging...\n\n"); // ProcessDebugFlags (0x1F) BOOL bDebugFlag = TRUE; pNtQueryInformationProcess(GetCurrentProcess(), ProcessDebugFlags, &bDebugFlag, sizeof(bDebugFlag), NULL); printf("NtQueryInformationProcess(ProcessDebugFlags) = 0x%X\n", bDebugFlag); if( bDebugFlag == 0x0 ) printf(" => Debugging!!!\n\n"); else printf(" => Not debugging...\n\n"); } int _tmain(int argc, TCHAR* argv[]) { MyNtQueryInformationProcess(); printf("\npress any key to quit...\n"); _gettch(); return 0; }- 1
- 2
- 3
- 4
- 5
- 6
- 7
- 8
- 9
- 10
- 11
- 12
- 13
- 14
- 15
- 16
- 17
- 18
- 19
- 20
- 21
- 22
- 23
- 24
- 25
- 26
- 27
- 28
- 29
- 30
- 31
- 32
- 33
- 34
- 35
- 36
- 37
- 38
- 39
- 40
- 41
- 42
- 43
- 44
- 45
- 46
- 47
- 48
- 49
- 50
- 51
- 52
- 53
- 54
- 55
- 56
- 57
- 58
- 59
- 60
- 61
- 62
- 63
- 64
- 65
- 66
- 67
- 68
- 69
- 70
- 71
- 72
- 73
- 74
- 75
- 76
- 77
- 78
- 79
- 80
- 81
- 82
- 83
- 84
- 85
- 86
- 87
- 88
- 89
- 90
- 91
- 92
- 93
- 94
- 95
- 96
(5)破解之法
对
PROCESSINFOCLASS的值进行操作- 直接 HOOK API
- 修改返回值
- 利用 OD 插件 strong OD 中 KernelMode 可以绕过
3、NtQuerySystemInformation()
ntdll!NtQuerySystemInformation()API是系统函数,用来获取当前运行的多种OS信息NTSTATUS WINAPI NtQuerySystemInformation( _In_ SYSTEM_INFORMATION_CLASS SystemInformationClass, //指定需要的系统信息类型 _Inout_ PVOID SystemInformation, //结构体地址 _In_ ULONG SystemInformationLength, _Out_opt_ PULONG ReturnLength );- 1
- 2
- 3
- 4
- 5
- 6
SYSTEM_INFORMATION_CLASS是枚举类型,如下:

调试状态下SYSTEM_KERNEL_DEBUGGER_INFORMATION.DebuggerEnabled值为1破解之法:
- Win XP 编辑boot.ini,删除
/debugport=com1 /baudrate=115200 /Debug - Win 7 执行
bcdedit /debug off
可以参考下:NtQuerySystemInformation用法详解
一个例子如下:
#include "stdio.h" #include "windows.h" #include "tchar.h" void MyNtQuerySystemInformation() { typedef NTSTATUS (WINAPI *NTQUERYSYSTEMINFORMATION)( ULONG SystemInformationClass, PVOID SystemInformation, ULONG SystemInformationLength, PULONG ReturnLength ); typedef struct _SYSTEM_KERNEL_DEBUGGER_INFORMATION { BOOLEAN DebuggerEnabled; BOOLEAN DebuggerNotPresent; } SYSTEM_KERNEL_DEBUGGER_INFORMATION, *PSYSTEM_KERNEL_DEBUGGER_INFORMATION; NTQUERYSYSTEMINFORMATION NtQuerySystemInformation; NtQuerySystemInformation = (NTQUERYSYSTEMINFORMATION) GetProcAddress(GetModuleHandle(L"ntdll"), "NtQuerySystemInformation"); ULONG SystemKernelDebuggerInformation = 0x23; ULONG ulReturnedLength = 0; SYSTEM_KERNEL_DEBUGGER_INFORMATION DebuggerInfo = {0,}; NtQuerySystemInformation(SystemKernelDebuggerInformation, (PVOID) &DebuggerInfo, sizeof(DebuggerInfo), // 2 bytes &ulReturnedLength); printf("NtQuerySystemInformation(SystemKernelDebuggerInformation) = 0x%X 0x%X\n", DebuggerInfo.DebuggerEnabled, DebuggerInfo.DebuggerNotPresent); if( DebuggerInfo.DebuggerEnabled ) printf(" => Debugging!!!\n\n"); else printf(" => Not debugging...\n\n"); } int _tmain(int argc, TCHAR* argv[]) { MyNtQuerySystemInformation(); printf("\npress any key to quit...\n"); _gettch(); return 0; }- 1
- 2
- 3
- 4
- 5
- 6
- 7
- 8
- 9
- 10
- 11
- 12
- 13
- 14
- 15
- 16
- 17
- 18
- 19
- 20
- 21
- 22
- 23
- 24
- 25
- 26
- 27
- 28
- 29
- 30
- 31
- 32
- 33
- 34
- 35
- 36
- 37
- 38
- 39
- 40
- 41
- 42
- 43
- 44
- 45
- 46
- 47
- 48
- 49
4、NtQueryObject()
ntdll!NtQueryObject()API用来获取各种内核对象的信息NTSTATUS NtQueryObject( _In_opt_ HANDLE Handle, _In_ OBJECT_INFORMATION_CLASS objectInformationClass, _Out_opt_ PVOID ObjectInformation, _In_ ULONG ObjectInformationLength, _Out_opt_ PULONG ReturnLength );- 1
- 2
- 3
- 4
- 5
- 6
- 7
类似的,是第二个参数是枚举类型,相关信息的结构体指针返回到第三个参数

使用ObjectAllTypesInformation获取系统所有对象信息,从中检测是否存在调试对象破解之法:在调用
ntdll.ZwQueryObject()API的CALL ESI指令下断点,然后将栈中ObjectAllTypesInformation的值改为0一个例子:
#include "stdio.h" #include "windows.h" #include "tchar.h" typedef enum _OBJECT_INFORMATION_CLASS { ObjectBasicInformation, ObjectNameInformation, ObjectTypeInformation, ObjectAllTypesInformation, ObjectHandleInformation } OBJECT_INFORMATION_CLASS, *POBJECT_INFORMATION_CLASS; void MyNtQueryObject() { typedef struct _LSA_UNICODE_STRING { USHORT Length; USHORT MaximumLength; PWSTR Buffer; } LSA_UNICODE_STRING, *PLSA_UNICODE_STRING, UNICODE_STRING, *PUNICODE_STRING; typedef NTSTATUS (WINAPI *NTQUERYOBJECT)( HANDLE Handle, OBJECT_INFORMATION_CLASS ObjectInformationClass, PVOID ObjectInformation, ULONG ObjectInformationLength, PULONG ReturnLength ); #pragma pack(1) typedef struct _OBJECT_TYPE_INFORMATION { UNICODE_STRING TypeName; ULONG TotalNumberOfHandles; ULONG TotalNumberOfObjects; }OBJECT_TYPE_INFORMATION, *POBJECT_TYPE_INFORMATION; typedef struct _OBJECT_ALL_INFORMATION { ULONG NumberOfObjectsTypes; OBJECT_TYPE_INFORMATION ObjectTypeInformation[1]; } OBJECT_ALL_INFORMATION, *POBJECT_ALL_INFORMATION; #pragma pack() POBJECT_ALL_INFORMATION pObjectAllInfo = NULL; void *pBuf = NULL; ULONG lSize = 0; BOOL bDebugging = FALSE; NTQUERYOBJECT pNtQueryObject = (NTQUERYOBJECT) GetProcAddress(GetModuleHandle(L"ntdll.dll"), "NtQueryObject"); // Get the size of the list pNtQueryObject(NULL, ObjectAllTypesInformation, &lSize, sizeof(lSize), &lSize); // Allocate list buffer pBuf = VirtualAlloc(NULL, lSize, MEM_RESERVE | MEM_COMMIT, PAGE_READWRITE); // Get the actual list pNtQueryObject((HANDLE)0xFFFFFFFF, ObjectAllTypesInformation, pBuf, lSize, NULL); pObjectAllInfo = (POBJECT_ALL_INFORMATION)pBuf; UCHAR *pObjInfoLocation = (UCHAR *)pObjectAllInfo->ObjectTypeInformation; POBJECT_TYPE_INFORMATION pObjectTypeInfo = NULL; for( UINT i = 0; i < pObjectAllInfo->NumberOfObjectsTypes; i++ ) { pObjectTypeInfo = (POBJECT_TYPE_INFORMATION)pObjInfoLocation; if( wcscmp(L"DebugObject", pObjectTypeInfo->TypeName.Buffer) == 0 ) { bDebugging = (pObjectTypeInfo->TotalNumberOfObjects > 0) ? TRUE : FALSE; break; } // calculate next struct pObjInfoLocation = (UCHAR*)pObjectTypeInfo->TypeName.Buffer; pObjInfoLocation += pObjectTypeInfo->TypeName.Length; pObjInfoLocation = (UCHAR*)(((ULONG)pObjInfoLocation & 0xFFFFFFFC) + sizeof(ULONG)); } if( pBuf ) VirtualFree(pBuf, 0, MEM_RELEASE); printf("NtQueryObject(ObjectAllTypesInformation)\n"); if( bDebugging ) printf(" => Debugging!!!\n\n"); else printf(" => Not debugging...\n\n"); } int _tmain(int argc, TCHAR* argv[]) { MyNtQueryObject(); printf("\npress any key to quit...\n"); _gettch(); return 0; }- 1
- 2
- 3
- 4
- 5
- 6
- 7
- 8
- 9
- 10
- 11
- 12
- 13
- 14
- 15
- 16
- 17
- 18
- 19
- 20
- 21
- 22
- 23
- 24
- 25
- 26
- 27
- 28
- 29
- 30
- 31
- 32
- 33
- 34
- 35
- 36
- 37
- 38
- 39
- 40
- 41
- 42
- 43
- 44
- 45
- 46
- 47
- 48
- 49
- 50
- 51
- 52
- 53
- 54
- 55
- 56
- 57
- 58
- 59
- 60
- 61
- 62
- 63
- 64
- 65
- 66
- 67
- 68
- 69
- 70
- 71
- 72
- 73
- 74
- 75
- 76
- 77
- 78
- 79
- 80
- 81
- 82
- 83
- 84
- 85
- 86
- 87
- 88
- 89
- 90
- 91
- 92
- 93
- 94
- 95
5、ZwSerInformationThread()
ZwSerInformationThread()等同于NtSetInformationThread,通过将ThreadInformationClass设置ThreadHideFromDebugger(0x11),可以禁止线程产生调试事件。函数原型如下:typedef enum _THREAD_INFORMATION_CLASS { ThreadBasicInformation, ThreadTimes, ThreadPriority, ThreadBasePriority, ThreadAffinityMask, ThreadImpersonationToken, ThreadDescriptorTableEntry, ThreadEnableAlignmentFaultFixup, ThreadEventPair, ThreadQuerySetWin32StartAddress, ThreadZeroTlsCell, ThreadPerformanceCount, ThreadAmILastThread, ThreadIdealProcessor, ThreadPriorityBoost, ThreadSetTlsArrayAddress, ThreadIsIoPending, ThreadHideFromDebugger // 17 (0x11) } THREAD_INFORMATION_CLASS, *PTHREAD_INFORMATION_CLASS; typedef NTSTATUS (WINAPI* ZWSETINFORMATIONTHREAD)( HANDLE ThreadHandle, //接收当前线程的句柄 THREAD_INFORMATION_CLASS ThreadInformationClass, //表示线程信息类型 PVOID ThreadInformation, ULONG ThreadInformationLength );- 1
- 2
- 3
- 4
- 5
- 6
- 7
- 8
- 9
- 10
- 11
- 12
- 13
- 14
- 15
- 16
- 17
- 18
- 19
- 20
- 21
- 22
- 23
- 24
- 25
- 26
- 27
破解方法:调试执行到该函数时,若发现第
ThreadInformationClass参数值为0x11,跳过或者将修改为0一个例子:
#include "stdio.h" #include "windows.h" #include "tchar.h" void DetachDebugger() { typedef enum _THREAD_INFORMATION_CLASS { ThreadBasicInformation, ThreadTimes, ThreadPriority, ThreadBasePriority, ThreadAffinityMask, ThreadImpersonationToken, ThreadDescriptorTableEntry, ThreadEnableAlignmentFaultFixup, ThreadEventPair, ThreadQuerySetWin32StartAddress, ThreadZeroTlsCell, ThreadPerformanceCount, ThreadAmILastThread, ThreadIdealProcessor, ThreadPriorityBoost, ThreadSetTlsArrayAddress, ThreadIsIoPending, ThreadHideFromDebugger // 17 (0x11) } THREAD_INFORMATION_CLASS, *PTHREAD_INFORMATION_CLASS; typedef NTSTATUS (WINAPI* ZWSETINFORMATIONTHREAD)( HANDLE ThreadHandle, THREAD_INFORMATION_CLASS ThreadInformationClass, PVOID ThreadInformation, ULONG ThreadInformationLength ); ZWSETINFORMATIONTHREAD pZwSetInformationThread = NULL; pZwSetInformationThread = (ZWSETINFORMATIONTHREAD) GetProcAddress(GetModuleHandle(L"ntdll.dll"), "ZwSetInformationThread"); pZwSetInformationThread(GetCurrentThread(), ThreadHideFromDebugger, NULL, 0); printf("ZwSetInformationThread() -> Debugger detached!!!\n\n"); } int _tmain(int argc, TCHAR* argv[]) { DetachDebugger(); printf("\npress any key to quit...\n"); _gettch(); return 0; }- 1
- 2
- 3
- 4
- 5
- 6
- 7
- 8
- 9
- 10
- 11
- 12
- 13
- 14
- 15
- 16
- 17
- 18
- 19
- 20
- 21
- 22
- 23
- 24
- 25
- 26
- 27
- 28
- 29
- 30
- 31
- 32
- 33
- 34
- 35
- 36
- 37
- 38
- 39
- 40
- 41
- 42
- 43
- 44
- 45
- 46
- 47
- 48
- 49
- 50
- 51
- 52
- 53
6、ETC
更简单的思路:判断当前系统是否为逆向分析专用系统,一些例子如下

一个例子:#include "stdio.h" #include "windows.h" #include "tchar.h" void FindDebuggerWindow() { BOOL bDebugging = FALSE; // using ClassName if( FindWindow(L"OllyDbg", NULL) || // OllyDbg FindWindow(L"TIdaWindow", NULL) || // IDA Pro FindWindow(L"WinDbgFrameClass", NULL) ) // Windbg bDebugging = TRUE; printf("FindWindow()\n"); if( bDebugging ) printf(" => Found a debugger window!!!\n\n"); else printf(" => Not found a debugger window...\n\n"); // using WindowName bDebugging = FALSE; TCHAR szWindow[MAX_PATH] = {0,}; HWND hWnd = GetDesktopWindow(); hWnd = GetWindow(hWnd, GW_CHILD); hWnd = GetWindow(hWnd, GW_HWNDFIRST); while( hWnd ) { if( GetWindowText(hWnd, szWindow, MAX_PATH) ) { if( _tcsstr(szWindow, L"IDA") || _tcsstr(szWindow, L"OllyDbg") || _tcsstr(szWindow, L"WinDbg") ) { bDebugging = TRUE; break; } } hWnd = GetWindow(hWnd, GW_HWNDNEXT); } printf("GetWindowText()\n"); if( bDebugging ) printf(" => Found a debugger window!!!\n\n"); else printf(" => Not found a debugger window...\n\n"); } int _tmain(int argc, TCHAR* argv[]) { FindDebuggerWindow(); printf("\npress any key to quit...\n"); _gettch(); return 0; }- 1
- 2
- 3
- 4
- 5
- 6
- 7
- 8
- 9
- 10
- 11
- 12
- 13
- 14
- 15
- 16
- 17
- 18
- 19
- 20
- 21
- 22
- 23
- 24
- 25
- 26
- 27
- 28
- 29
- 30
- 31
- 32
- 33
- 34
- 35
- 36
- 37
- 38
- 39
- 40
- 41
- 42
- 43
- 44
- 45
- 46
- 47
- 48
- 49
- 50
- 51
- 52
- 53
- 54
- 55
三、动态反调试技术
动态反调试技术扰乱调试器跟踪功能,使程序中的代码和数据无法查看
1、异常
(1)SEH
以基于INT3异常为例
代码执行流如下:

源码如下:#include "stdio.h" #include "windows.h" #include "tchar.h" void AD_BreakPoint() { printf("SEH : BreakPoint\n"); __asm { // install SEH push handler push DWORD ptr fs:[0] mov DWORD ptr fs:[0], esp // generating exception int 3 // 1) debugging // go to terminating code mov eax, 0xFFFFFFFF jmp eax // process terminating!!! // 2) not debugging // go to normal code handler: mov eax, dword ptr ss:[esp+0xc] mov ebx, normal_code mov dword ptr ds:[eax+0xb8], ebx xor eax, eax retn normal_code: // remove SEH pop dword ptr fs:[0] add esp, 4 } printf(" => Not debugging...\n\n"); } int _tmain(int argc, TCHAR* argv[]) { AD_BreakPoint(); return 0; }- 1
- 2
- 3
- 4
- 5
- 6
- 7
- 8
- 9
- 10
- 11
- 12
- 13
- 14
- 15
- 16
- 17
- 18
- 19
- 20
- 21
- 22
- 23
- 24
- 25
- 26
- 27
- 28
- 29
- 30
- 31
- 32
- 33
- 34
- 35
- 36
- 37
- 38
- 39
- 40
- 41
- 42
- 43
- 44
- 45
- 46
- 47
破解之法:

(2)SetUnhandledExceptionFilter()
进程中发生异常时,若SEH未处理,则会调用
kernel32!SetUnhandledExceptionFilter()
然后弹出进程停止工作的弹窗一个例子:
#include "stdio.h" #include "windows.h" #include "tchar.h" LPVOID g_pOrgFilter = 0; LONG WINAPI ExceptionFilter(PEXCEPTION_POINTERS pExcept) { SetUnhandledExceptionFilter((LPTOP_LEVEL_EXCEPTION_FILTER)g_pOrgFilter); // 8900 MOV DWORD PTR DS:[EAX], EAX // FFE0 JMP EAX pExcept->ContextRecord->Eip += 4; return EXCEPTION_CONTINUE_EXECUTION; } void AD_SetUnhandledExceptionFilter() { printf("SEH : SetUnhandledExceptionFilter()\n"); g_pOrgFilter = (LPVOID)SetUnhandledExceptionFilter( (LPTOP_LEVEL_EXCEPTION_FILTER)ExceptionFilter); __asm { xor eax, eax; mov dword ptr [eax], eax jmp eax } printf(" => Not debugging...\n\n"); } int _tmain(int argc, TCHAR* argv[]) { AD_SetUnhandledExceptionFilter(); return 0; }- 1
- 2
- 3
- 4
- 5
- 6
- 7
- 8
- 9
- 10
- 11
- 12
- 13
- 14
- 15
- 16
- 17
- 18
- 19
- 20
- 21
- 22
- 23
- 24
- 25
- 26
- 27
- 28
- 29
- 30
- 31
- 32
- 33
- 34
- 35
- 36
- 37
- 38
- 39
- 40
2、Timing Check
调试必然要耗费更多时间,故可以通过计算运行时间来判断是否处于调试状态,有两种:
- 用CPU的计数器(Counter)
- 用系统的实际时间(Time)

一个例子:基于RDTSC(Read Time Stamp Counter,读取时间戳计数器)#include "stdio.h" #include "windows.h" #include "tchar.h" void DynAD_RDTSC() { DWORD dwDelta = 0; printf("Timing Check (RDTSC method)"); __asm { pushad // 第一次执行RDTSC rdtsc // 将结果TSC放入栈 push edx push eax // 用于消耗时间的循环 xor eax, eax mov ecx, 0x3e8 _LOOP_START: inc eax loop _LOOP_START // 第二次执行RDTSC rdtsc // 在栈中输入第一次求得的TSC pop esi // eax pop edi // edx // check high order bits cmp edx, edi ja _DEBUGGER_FOUND // check low order bits sub eax, esi mov dwDelta, eax cmp eax, 0xffffff //若比这个值大,则判定为调试状态 jb _DEBUGGER_NOT_FOUND // debugger found -> crash!!! _DEBUGGER_FOUND: xor eax, eax mov [eax], eax // debugger not found _DEBUGGER_NOT_FOUND: popad } printf(" : delta = %X (ticks)\n", dwDelta); printf(" => Not debugging...\n\n"); } int _tmain(int argc, TCHAR* argv[]) { DynAD_RDTSC(); return 0; }- 1
- 2
- 3
- 4
- 5
- 6
- 7
- 8
- 9
- 10
- 11
- 12
- 13
- 14
- 15
- 16
- 17
- 18
- 19
- 20
- 21
- 22
- 23
- 24
- 25
- 26
- 27
- 28
- 29
- 30
- 31
- 32
- 33
- 34
- 35
- 36
- 37
- 38
- 39
- 40
- 41
- 42
- 43
- 44
- 45
- 46
- 47
- 48
- 49
- 50
- 51
- 52
- 53
- 54
- 55
- 56
- 57
- 58
- 59
破解之法:
- 直接用RUN命令越过相关代码
- 将第二个RDTSC值修改为与第一个相同
- 操纵条件分支指令
3、陷阱标志
陷阱标志是EFLAGS寄存器的第9位TF,TF为1时,CPU进入单步执行模式:CPU执行1条指令后,触发EXCEPTION_SINGLE_STEP异常,然后TF归0

这可以和SEH结合起来,例子如下:#include "stdio.h" #include "windows.h" #include "tchar.h" void DynAD_SingleStep() { printf("Trap Flag (Single Step)\n"); __asm { // install SEH push handler push DWORD ptr fs:[0] mov DWORD ptr fs:[0], esp // 因无法直接修改EFLAGS,故通过栈修改 pushfd // 将EFLAGS的值压入栈 or dword ptr ss:[esp], 0x100 //将TF值改为1 popfd //将修改后的TF值存入EFLAGS nop // 1) debugging // go to terminating code mov eax, 0xFFFFFFFF jmp eax // process terminating!!! // 2) not debugging // go to normal code handler: mov eax, dword ptr ss:[esp+0xc] mov ebx, normal_code mov dword ptr ds:[eax+0xb8], ebx xor eax, eax retn normal_code: // remove SEH pop dword ptr fs:[0] add esp, 4 } printf(" => Not debugging...\n\n"); } int _tmain(int argc, TCHAR* argv[]) { DynAD_SingleStep(); return 0; }- 1
- 2
- 3
- 4
- 5
- 6
- 7
- 8
- 9
- 10
- 11
- 12
- 13
- 14
- 15
- 16
- 17
- 18
- 19
- 20
- 21
- 22
- 23
- 24
- 25
- 26
- 27
- 28
- 29
- 30
- 31
- 32
- 33
- 34
- 35
- 36
- 37
- 38
- 39
- 40
- 41
- 42
- 43
- 44
- 45
- 46
- 47
- 48
- 49
破解之法:

同时在注册SEH的地址和新的EIP地址分别设置断点4、0xCC探测
0xCC是断点对应的x86指令,通过探测该指令同样可以判断是否处于调试状态(1)API断点
调试时,常常是把断点设置在API代码的开始部分,故检测API代码的第一个字节
常用API如下:


(2)比较校验和
调试时做了些操作会导致校验和不同

一个例子#include "stdio.h" #include "windows.h" #include "tchar.h" DWORD g_dwOrgChecksum = 0xF5934986; int _tmain(int argc, TCHAR* argv[]); void DynAD_Checksum() { BOOL bDebugging = FALSE; DWORD dwSize = 0; printf("Checksum\n"); __asm { mov ecx, offset _tmain mov esi, offset DynAD_Checksum sub ecx, esi // ecx : loop count (buf size) xor eax, eax // eax : checksum xor ebx, ebx _CALC_CHECKSUM: movzx ebx, byte ptr ds:[esi] add eax, ebx rol eax, 1 inc esi loop _CALC_CHECKSUM cmp eax, g_dwOrgChecksum je _NOT_DEBUGGING mov bDebugging, 1 _NOT_DEBUGGING: } if( bDebugging ) printf(" => Debugging!!!\n\n"); else printf(" => Not debugging...\n\n"); } int _tmain(int argc, TCHAR* argv[]) { DynAD_Checksum(); return 0; }- 1
- 2
- 3
- 4
- 5
- 6
- 7
- 8
- 9
- 10
- 11
- 12
- 13
- 14
- 15
- 16
- 17
- 18
- 19
- 20
- 21
- 22
- 23
- 24
- 25
- 26
- 27
- 28
- 29
- 30
- 31
- 32
- 33
- 34
- 35
- 36
- 37
- 38
- 39
- 40
- 41
- 42
- 43
- 44
- 45
- 46
- 47
破解之法:修改CRC的比较语句,当然这有难度
四、高级反调试技术
1、垃圾代码
简单讲就是添加大量无意义的代码,更甚的是其中可能还含有有用的代码或反调试技术
一个例子:用一堆SUB和ADD来给EBX设值,然后JMP EBX

2、扰乱代码对齐
向代码插入设计过的不必要的代码来降低反汇编代码的可读性
一个例子:

就A3对应MOV,用来处理4个字节的立即数
但是这里的A368是故意添加的,实际上是7201,F7进入后可得真实代码

OD和IDA有时候都对这个扰乱束手无策,可能还是停掉智能分析好点3、加密/解密
一段包含有垃圾代码的加解密如下:
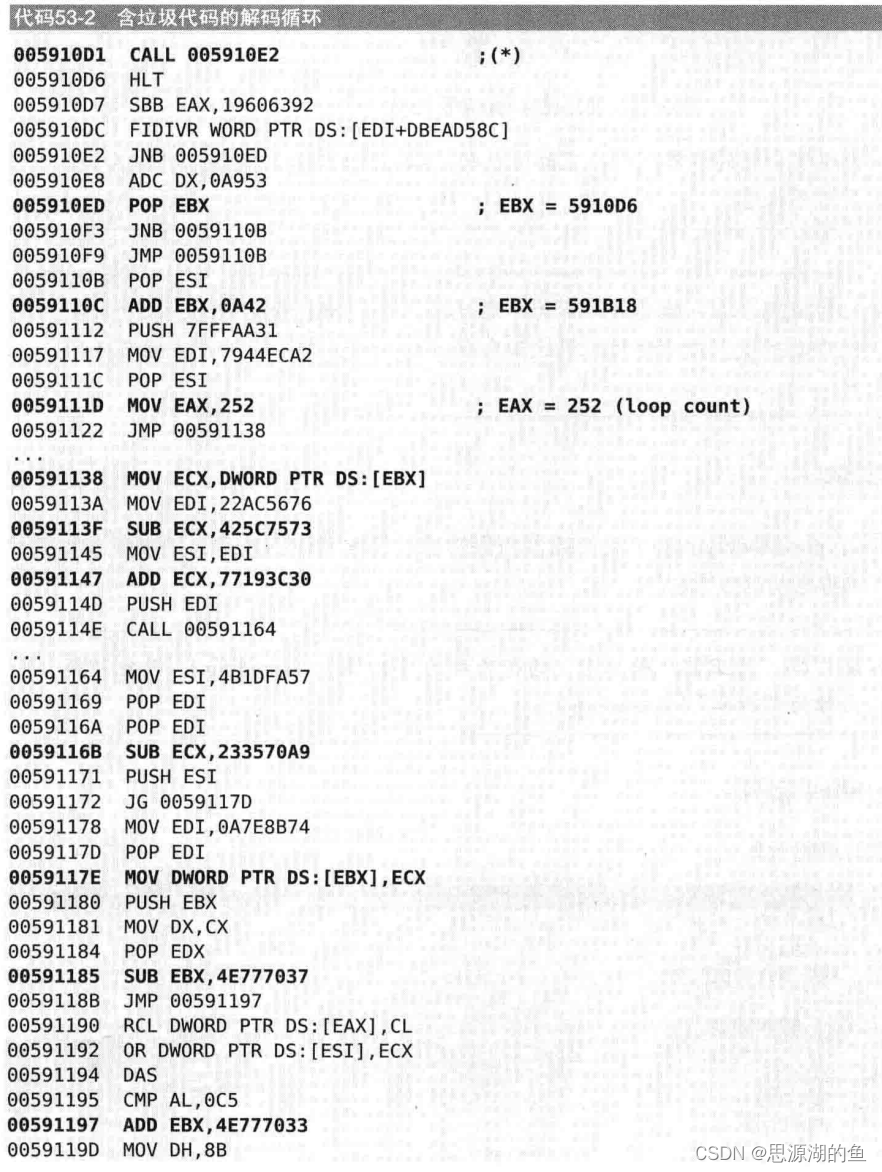

去掉垃圾代码后如下:

其中最核心的指令如下:

EAX为解码循环计数
EBX存放了要解密区域的地址4、Stolen Bytes
将部分源码(主要是OEP)转移到压缩器创建的内存区域中运行
一个例子:
正常程序如下:

保护后的程序如下:OEP区域已删除

5、API重定向
将主要的API代码复制到其他内存区域,然后修改调用API的代码,从而使复制的API得以执行,这样的话,即使在原API处设置断点也没用
书中给了个结合垃圾代码和扰乱代码对齐的例子,有点复杂,一时没看太明白Q.Q,先记一笔,回头再看看
6、Debug Blocker
用调试模式运行自身程序,这样别的调试器就无法调试正在被调试的进程
- 自我创建技术:父进程负责创建子进程,但是由子进程负责运行实际代码,所以调试器如果调试父进程则得不到OEP,但是如果调试子进程就能找到OEP代码
- Debug Blocker技术弥补了这一缺点,即使是子进程也无法调试

SEH反调试是在同一内存空间处理异常,但是Debug Blocker是在调试进程的内存空间处理被调试进程的异常,所以其他调试器不能附加目标进程,要附加目标进程就先得断开与父进程的联系,但是断开之后子进程也不能继续运行,这就是Debug Blocker的精(bian)妙(tai)之处
另外有进阶版本的Debug Blocker——Nanomite技术:将被调试进程的所有条件跳转指令修改为INT3(软件断点0xCC),或者触发异常的指令,然后会转移到调试者(父进程)执行,调试进程里有条件跳转指令的表格,记录所有跳转地址,取出需要的地址再传给被调试进程,然后继续指令执行。所以要调试Nanomite保护的程序,要恢复出源程序,就得编程自动化实现
结语
学习了一些反调试技术,现在可能有更新更牛逼的,后续再学
-
相关阅读:
【Python+selenium】自动化生成测试报告
Java_集合泛型、Collection接口
mysql之数据聚合
小功能⭐️退出游戏 && 监听事件
【JY】YJK前处理参数详解及常见问题分析:控制信息(二)
windows上传文件到linux的方法
2-61 基于matlab的光学干涉仿真系统
springboot+个人博客 毕业设计-附源码191613
异构图注意力网络Heterogeneous Graph Attention Network ( HAN )
本地浏览器打开远程服务器上的Jupyter Notebook
- 原文地址:https://blog.csdn.net/weixin_44604541/article/details/124981176