-
别说你不会网络请求了,6000字入门Axios框架


大家好,我是周棋洛,可以叫我小周,这是一篇关于网络请求框架的基础文章,后续会深入研究,同时搭配 json-server ,对于不熟悉前后端交互的小伙伴,可以快速的感受前后端交互,简直太友好!❤️
与君共勉:你有感兴趣的,就去折腾,全心全意的折腾,真的能学到很多东西,而这些东西,远远不是那些具体的知识点,更多的是,你的学习能力,折腾的能力,逻辑思维

快速搭建服务 json-server
服务简介
GitHub地址 在不到30秒内获得一个完整的假REST API,零编码

1.在文件夹下打开命令行窗口,进行安装:
npm install -g json-server- 1
2.包含一些数据的 json 文件
{ "posts": [ { "id": 1, "title": "json-server", "author": "typicode" } ], "comments": [ { "id": 1, "body": "some comment", "postId": 1 } ], "profile": { "name": "typicode" } }- 1
- 2
- 3
- 4
- 5
- 6
- 7
- 8
- 9
3.启动服务
json-server --watch db.json- 1

4.测试


让他装到了!!!
Axios概念引入

Axios 是一个基于promise 网络请求库 💻,作用于 node.js 和浏览器⌨️中。 它是isomorphic 的(即同一套代码可以运行在浏览器和node.js中)。 在服务端它使用原生node.js http 模块, 而在客户端(浏览端) 则使用XMLHttpRequests
本文是对Axios的学习 📚,就不使用 npm 进行安装了,推荐使用 cdn 引入 ⬇️
<script src="https://unpkg.com/axios/dist/axios.min.js"></script>- 1
<!DOCTYPE html> <html lang="en"> <head> <meta charset="UTF-8"> <title>Axios引入</title> <script src="../js/axios.min.js"></script> </head> <body> <script> console.log(axios); </script> </body> </html>- 1
- 2
- 3
- 4
- 5
- 6
- 7
- 8
- 9
- 10
- 11
- 12
- 13

如下所示,引入成功!🍰
Axios基本使用
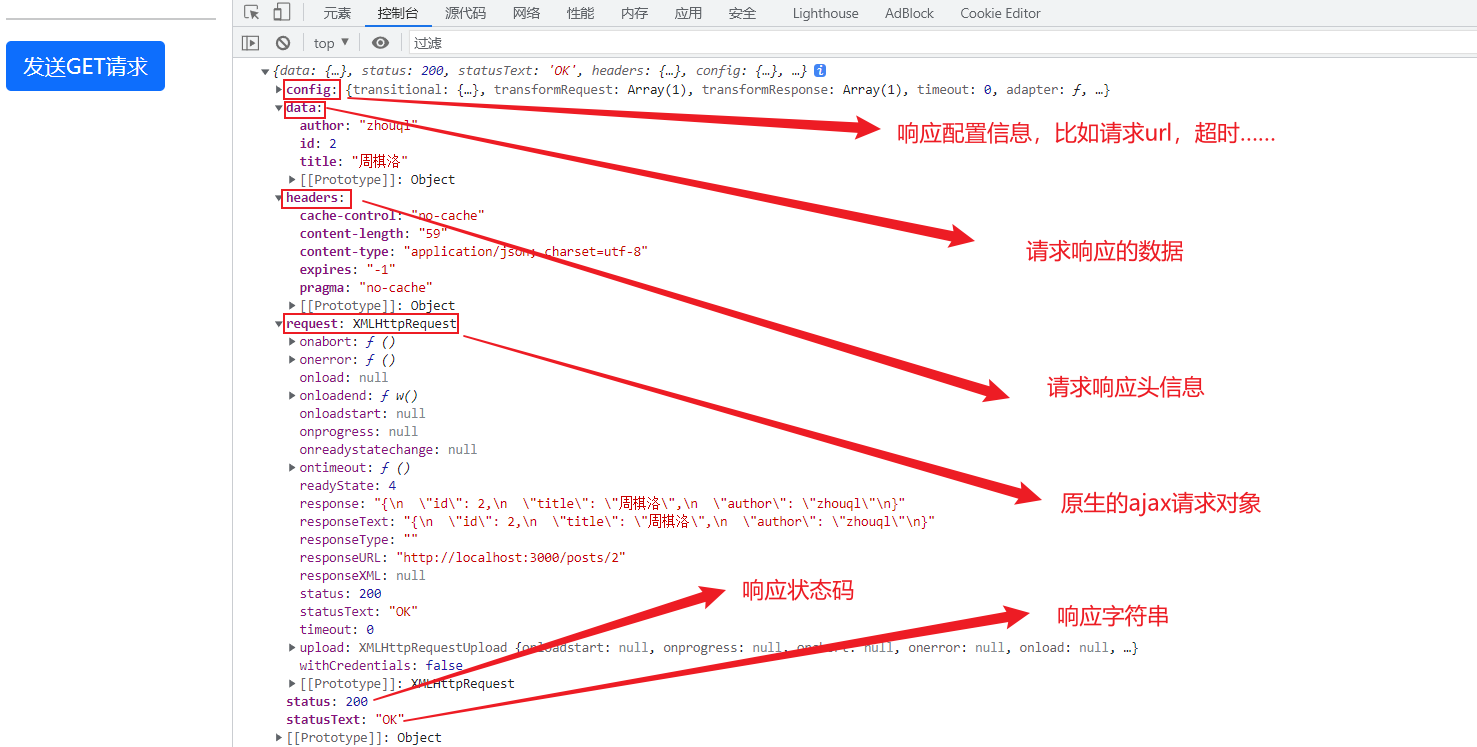
先启动 🔛 json-server 服务,然后使用 axios 框架发起 get 请求,还有其他一些请求,这里先不写了,因为最重要的是 axios 请求的语法

基本写法就是传入配置对象,基本的请求方式,请求url,请求参数……,基于promise的,使用.then获取回调响应函数<!DOCTYPE html> <html lang="en"> <head> <meta charset="UTF-8"> <title>基本使用</title> <script src="../js/axios.min.js"></script> <link href="https://cdn.jsdelivr.net/npm/bootstrap@5.0.0-beta1/dist/css/bootstrap.min.css" rel="stylesheet"> <style> h3 { margin-top: 50px; } </style> </head> <body> <div class="container"> <h3>基本使用</h3> <hr> <button type="button" class="btn btn-primary">发送GET请求</button> <button type="button" class="btn btn-secondary">发送POST请求</button> <button type="button" class="btn btn-success">发送PUT请求</button> <button type="button" class="btn btn-danger">发送Danger</button> </div> <script> // 获取所有按钮 const btns = document.querySelectorAll("button"); // 给第一个按钮绑定事件 btns[0].onclick = function () { // 发送ajax请求 axios({ //请求类型 method: 'GET', //url url: 'http://localhost:3000/posts/2', }).then(response => { console.log(response); }); } </script> </body> </html>- 1
- 2
- 3
- 4
- 5
- 6
- 7
- 8
- 9
- 10
- 11
- 12
- 13
- 14
- 15
- 16
- 17
- 18
- 19
- 20
- 21
- 22
- 23
- 24
- 25
- 26
- 27
- 28
- 29
- 30
- 31
- 32
- 33
- 34
- 35
- 36
- 37
- 38
- 39
- 40
Axios请求方法
Axios请求方法官网汇总

request方法
axios#request(config)

<!DOCTYPE html> <html lang="en"> <head> <meta charset="UTF-8"> <title>request</title> <script src="../js/axios.min.js"></script> <link href="https://cdn.jsdelivr.net/npm/bootstrap@5.0.0-beta1/dist/css/bootstrap.min.css" rel="stylesheet"> </head> <body> <div class="container"> <hr> <button type="button" class="btn btn-primary">发送GET请求</button> </div> <script> const btn = document.querySelector("button"); btn.onclick = function () { axios.request({ method: 'get', url: 'http://localhost:3000/posts/2' }).then(resp => { console.log(resp); }) } </script> </body> </html>- 1
- 2
- 3
- 4
- 5
- 6
- 7
- 8
- 9
- 10
- 11
- 12
- 13
- 14
- 15
- 16
- 17
- 18
- 19
- 20
- 21
- 22
- 23
- 24
- 25
- 26
- 27
- 28
- 29
- 30
post方法
axios#post(url[, data[, config]])

<!DOCTYPE html> <html lang="en"> <head> <meta charset="UTF-8"> <title>post</title> <script src="../js/axios.min.js"></script> <link href="https://cdn.jsdelivr.net/npm/bootstrap@5.0.0-beta1/dist/css/bootstrap.min.css" rel="stylesheet"> </head> <body> <div class="container"> <hr> <button type="button" class="btn btn-primary">发送POST请求</button> </div> <script> const btn = document.querySelector("button"); btn.onclick = function () { axios.post("http://localhost:3000/comments", { "body": "哈哈哈", "postId": 2 }).then(resp => { console.log(resp); }) } </script> </body> </html>- 1
- 2
- 3
- 4
- 5
- 6
- 7
- 8
- 9
- 10
- 11
- 12
- 13
- 14
- 15
- 16
- 17
- 18
- 19
- 20
- 21
- 22
- 23
- 24
- 25
- 26
- 27
- 28
- 29
- 30
Axios响应解析
Axios请求配置对象
url:请求地址
method:请求方式
baseURL: 可以方便地为axios实例设置,以传递相对URL
transformRequest:
transformResponse:
对请求或响应进行处理headers: 请求头信息
params: 配置对象,请求参数
timeout: 请求超过时间,就会被取消,单位为毫秒
withCredentials: 跨域请求时是否携带cookie,默认不携带
responseType: 响应格式,默认为 json
responseEncoding: 响应字符集设置
Axios默认配置
把一些重复的配置,使用默认配置来减少代码冗余
<!DOCTYPE html> <html lang="en"> <head> <meta charset="UTF-8"> <title>默认配置</title> <script src="../js/axios.min.js"></script> <link href="https://cdn.jsdelivr.net/npm/bootstrap@5.0.0-beta1/dist/css/bootstrap.min.css" rel="stylesheet"> </head> <body> <div class="container"> <hr> <button type="button" class="btn btn-primary">发送GET请求</button> </div> <script> const btn = document.querySelector("button"); // 默认配置 axios.defaults.method = "GET"; axios.defaults.baseURL = "http://localhost:3000"; btn.onclick = function () { axios({ url: '/posts/2' }).then(resp => { console.log(resp); }) } </script> </body> </html>- 1
- 2
- 3
- 4
- 5
- 6
- 7
- 8
- 9
- 10
- 11
- 12
- 13
- 14
- 15
- 16
- 17
- 18
- 19
- 20
- 21
- 22
- 23
- 24
- 25
- 26
- 27
- 28
- 29
- 30
- 31
- 32

Axios创建实例对象发送请求
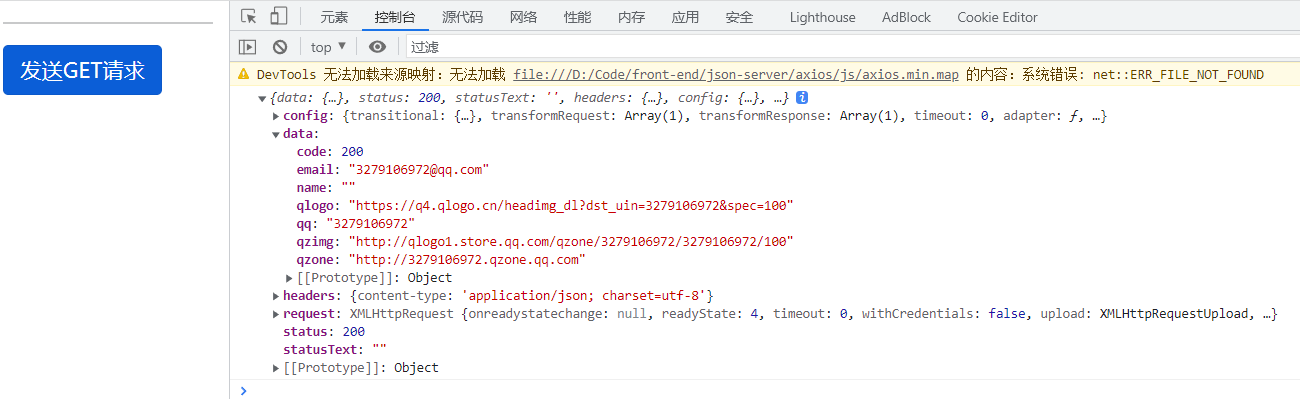
假如业务接口来自于多个服务器,再使用默认配置就不行了,这时可以借助Axios创建出的实例对象,在对象中配置基本url,可以创建多个,这就完美了
<!DOCTYPE html> <html lang="en"> <head> <meta charset="UTF-8"> <title>axios创建实例对象发送请求</title> <script src="../js/axios.min.js"></script> <link href="https://cdn.jsdelivr.net/npm/bootstrap@5.0.0-beta1/dist/css/bootstrap.min.css" rel="stylesheet"> </head> <body> <div class="container"> <hr> <button type="button" class="btn btn-primary">发送GET请求</button> </div> <script> const btn = document.querySelector("button"); const obj = axios.create({ baseURL: "https://api.sumt.cn/api/qq.info.php", method: "GET" }) btn.onclick = function () { // obj({ // params: { // "qq": "3279106972" // } // }).then(resp => { // console.log(resp); // }) obj.get('?qq=3279106972').then(resp => { console.log(resp); }) } </script> </body> </html>- 1
- 2
- 3
- 4
- 5
- 6
- 7
- 8
- 9
- 10
- 11
- 12
- 13
- 14
- 15
- 16
- 17
- 18
- 19
- 20
- 21
- 22
- 23
- 24
- 25
- 26
- 27
- 28
- 29
- 30
- 31
- 32
- 33
- 34
- 35
- 36
- 37
- 38
Axios拦截器
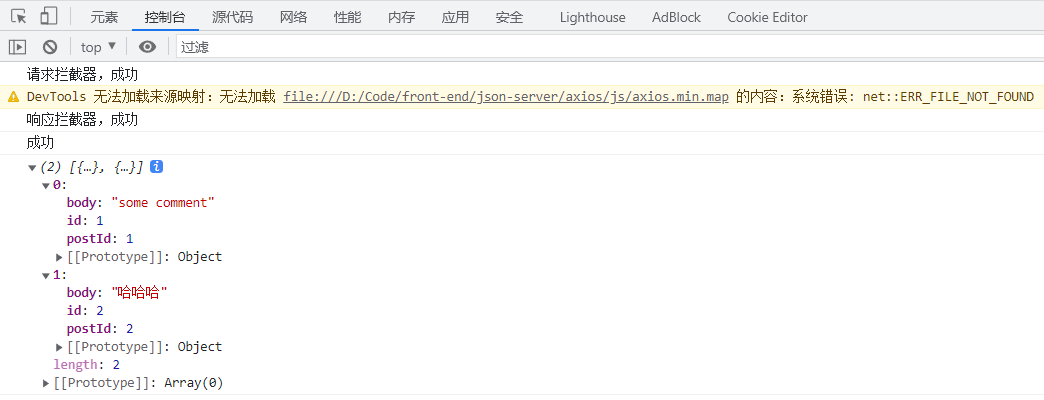
你可以在请求或响应开始前,对参数进行一些校验等操作,再决定此请求到底要不要发送
<!DOCTYPE html> <html lang="en"> <head> <meta charset="UTF-8"> <title>axios拦截器</title> <script src="../js/axios.min.js"></script> </head> <body> <script> const btn = document.querySelector("button"); // 设置请求拦截器 axios.interceptors.request.use(function (config) { console.log("请求拦截器,成功"); //可以对配置对象进行获取并校验 config.params return config; //throw "异常" }, function (error) { console.log("请求拦截器,错误"); return Promise.reject(error); }); // 设置响应拦截器 axios.interceptors.response.use(function (response) { console.log("响应拦截器,成功"); // 只返回响应体 return response.data; }, function (error) { console.log("响应拦截器,失败"); return Promise.reject(error); }); // 发送请求 axios.get("http://localhost:3000/comments").then(resp => { console.log("成功"); console.log(resp); }).catch(er => { console.log("失败了"); }) </script> </body> </html>- 1
- 2
- 3
- 4
- 5
- 6
- 7
- 8
- 9
- 10
- 11
- 12
- 13
- 14
- 15
- 16
- 17
- 18
- 19
- 20
- 21
- 22
- 23
- 24
- 25
- 26
- 27
- 28
- 29
- 30
- 31
- 32
- 33
- 34
- 35
- 36
- 37
- 38
- 39
- 40
- 41
- 42
- 43
- 44
Axios取消请求
json-server延时处理,在启动时添加-d参数
json-server --watch db.json -d 2000- 1
<!DOCTYPE html> <html lang="en"> <head> <meta charset="UTF-8"> <title>axios创建实例对象发送请求</title> <script src="../js/axios.min.js"></script> <link href="https://cdn.jsdelivr.net/npm/bootstrap@5.0.0-beta1/dist/css/bootstrap.min.css" rel="stylesheet"> </head> <body> <div class="container"> <hr> <button type="button" class="btn btn-primary">发送请求</button> <button type="button" class="btn btn-success">取消请求</button> </div> <script> let cancel = null; const btn1 = document.querySelector(".btn-primary"); const btn2 = document.querySelector(".btn-success"); btn1.addEventListener('click', function () { //检测上一次请求是否完成 if (cancel !== null) { cancel(); } axios({ method: 'get', url: 'http://localhost:3000/comments/2', cancelToken: new axios.CancelToken(function (c) { cancel = c; }) }).then(resp => { console.log(resp); cancel = null; }) }); btn2.addEventListener('click', function () { cancel(); }); </script> </body> </html>- 1
- 2
- 3
- 4
- 5
- 6
- 7
- 8
- 9
- 10
- 11
- 12
- 13
- 14
- 15
- 16
- 17
- 18
- 19
- 20
- 21
- 22
- 23
- 24
- 25
- 26
- 27
- 28
- 29
- 30
- 31
- 32
- 33
- 34
- 35
- 36
- 37
- 38
- 39
- 40
- 41
- 42
- 43
- 44

-
相关阅读:
EN 12209建筑五金件锁、插销及其锁板—CE认证
【深度学习 Pytorch笔记 B站刘二大人 数据集加载 Dataset&DataLoader 模块实现与源码解读(7/10)】
3-2数据链路层-流量控制与可靠传输机制
POJ1017 Packets(贪心算法训练)
信钰证券:股票k线图中b和s是什么情况?一文带你了解!
SpringCloud基础7——Redis分布式缓存
短视频营销:品牌与年轻消费者的新连接方式
天猫京东整站商品数据分析,天猫商品价格数据接口,京东商品价格数据接口,电商平台商品价格数据接口流程介绍
OpenCV4(C++)—— 几何图形的绘制
visummirrors seurattoscanpy dietseurat
- 原文地址:https://blog.csdn.net/m0_53321320/article/details/124698783