-
从0开始学JAVA【3】
线程

新建状态: 使用 new 关键字和 Thread 类或其子类建立一个线程对象后,该线程对象就处于新建状态。它保持这个状态直到程序 start() 这个线程。 就绪状态: 当线程对象调用了start()方法之后,该线程就进入就绪状态。就绪状态的线程处于就绪队列中,要等待JVM里线程调度器的调度。 运行状态: 如果就绪状态的线程获取 CPU 资源,就可以执行 run(),此时线程便处于运行状态。处于运行状态的线程最为复杂,它可以变为阻塞状态、就绪状态和死亡状态。- 1
- 2
- 3
- 4
- 5
- 6
- 7
- 8
Thread
Runnable
Callable && Future
Callable产生结果,Future获取结果。
使用步骤如下: 创建 Callable 接口的实现类,并实现 call() 方法,该 call() 方法将作为线程执行体,并且有返回值; 创建 Callable 实现类的实例,使用 FutureTask 类来包装 Callable 对象,该 FutureTask 对象封装了该 Callable 对象的 call() 方法的返回值; 使用 FutureTask 对象作为 Thread 对象的 target 创建并启动新线程; 调用 FutureTask 对象的 get() 方法来获得子线程执行结束后的返回值。- 1
- 2
- 3
- 4
- 5
- 6
- 7
- 8
- 9
- 10
- 11
package com.company; import java.util.concurrent.Callable; import java.util.concurrent.FutureTask; import java.util.*; public class Task { public static void main(String[] args) throws Exception{ Scanner input =new Scanner(System.in); int num=input.nextInt(); Function f=new Function(); f.runThread(num); } } class Function { public void runThread(int num) { // 在这里开启线程 获取线程执行的结果 ThreadCallable tc=new ThreadCallable(); tc.number=num; FutureTask<Integer> ft=new FutureTask<Integer>(tc); new Thread(ft).start(); try{ System.out.print("线程的返回值为:"+ft.get()); }catch(Exception e){ e.printStackTrace(); } } } /* 在这里实现Callable接口及方法 */ class ThreadCallable implements Callable{ public int number; public Integer call()throws Exception{ int an; double a=(1+Math.sqrt(5))/2; double b=(1-Math.sqrt(5))/2; double c=1/(Math.sqrt(5)); an=(int)(c*(Math.pow(a,number)-Math.pow(b,number))); return an; } }- 1
- 2
- 3
- 4
- 5
- 6
- 7
- 8
- 9
- 10
- 11
- 12
- 13
- 14
- 15
- 16
- 17
- 18
- 19
- 20
- 21
- 22
- 23
- 24
- 25
- 26
- 27
- 28
- 29
- 30
- 31
- 32
- 33
- 34
- 35
- 36
- 37
- 38
- 39
- 40
- 41
- 42
- 43
- 44
- 45
- 46
- 47
第2关:使用 Callable 和 Future 创建线程
package step2; import java.util.concurrent.Callable; import java.util.concurrent.FutureTask; public class Task { public void runThread(int num) { // 在这里开启线程 获取线程执行的结果 //请在此添加实现代码 /********** Begin **********/ Callable<Integer> callable = new ThreadCallable(num); FutureTask<Integer> futureTask = new FutureTask<>(callable); new Thread(futureTask).start();//开启线程 try { Integer result = futureTask.get(); System.out.println("线程的返回值为:" + result); } catch (Exception e) { e.printStackTrace(); } /********** End **********/ } } /********** Begin **********/ /* 在这里实现Callable接口及方法 */ class ThreadCallable implements Callable<Integer> { private int num; public ThreadCallable() { } public ThreadCallable(int num) { this.num = num; } public Integer call() throws Exception { int[] arr = new int[2]; arr[0] = 1; arr[1] = 1; for (int i = 2; i < num; i++) { int tmp = arr[1]; arr[1] = arr[0] + arr[1]; arr[0] = tmp; } return arr[1]; } } /********** End **********/- 1
- 2
- 3
- 4
- 5
- 6
- 7
- 8
- 9
- 10
- 11
- 12
- 13
- 14
- 15
- 16
- 17
- 18
- 19
- 20
- 21
- 22
- 23
- 24
- 25
- 26
- 27
- 28
- 29
- 30
- 31
- 32
- 33
- 34
- 35
- 36
- 37
- 38
- 39
- 40
- 41
- 42
第1关:线程的状态与调度


第2关:常用函数(sleep/join)
package step2; import java.util.*; import java.util.Scanner; public class Task { public static void main(String[] args) { Scanner sc = new Scanner(System.in); int num = sc.nextInt(); //请在此添加实现代码 /********** Begin **********/ /**创建自定义线程,实现求第num项斐波那契数列的值num从0开始, 并且在main函数中获取子线程最终计算的结果。*/ /********** End **********/ Thread t = new MyThread(num); t.start(); try { t.join(); } catch (Exception e) { e.printStackTrace(); } // System.out.println("主线程结束"); } } //请在此添加实现代码 /********** Begin **********/ /**创建自定义线程,实现求第num项斐波那契数列的值num从0开始*/ class MyThread extends Thread { private int num; public MyThread(int num) { this.num = num; } public void run() { // System.out.println("子线程开始运行"); int a1=1; int a2=1; int a3=0; for (int i = 3; i <=num;i++) { a3=a2+a1;//2.根据前两个数算出第三个数 a1=a2;//3.更新第一第二个数 a2=a3; } System.out.println("子线程计算结果为:" + a3); try { Thread.sleep(30); } catch (InterruptedException e) { e.printStackTrace(); } //System.out.println("子线程结束"); } } /********** End **********/- 1
- 2
- 3
- 4
- 5
- 6
- 7
- 8
- 9
- 10
- 11
- 12
- 13
- 14
- 15
- 16
- 17
- 18
- 19
- 20
- 21
- 22
- 23
- 24
- 25
- 26
- 27
- 28
- 29
- 30
- 31
- 32
- 33
- 34
- 35
- 36
- 37
- 38
- 39
- 40
- 41
- 42
- 43
- 44
- 45
- 46
- 47
- 48
- 49
- 50
- 51
- 52
- 53
- 54
- 55
- 56
- 57
- 58
- 59
第3关:常用函数(wait/yield)
package step3; //建立三个线程,A线程打印5次E,B线程打印5次D,C线程打印5次U,要求线程同时运行,交替打印5次EDU。 public class MyThread implements Runnable { //请在此添加实现代码 private String name; private Object prev; private Object self; private MyThread(String name, Object prev,Object self) { this.name = name; this.prev = prev; this.self = self; } public void run() { int count = 5; while (count > 0) { synchronized (prev) { synchronized (self) { System.out.print(name); count--; self.notify(); } try { prev.wait(); } catch (InterruptedException e) { e.printStackTrace(); } } } System.exit(0);//退出jvm } /********** Begin **********/ public static void main(String[] args) throws Exception { Object a = new Object(); Object b = new Object(); Object c = new Object(); MyThread ta = new MyThread("E", c,a); MyThread tb = new MyThread("D", a,b); MyThread tc = new MyThread("U", b,c); new Thread(ta).start(); Thread.sleep(100); //确保按顺序A、B执行 new Thread(tb).start(); Thread.sleep(100); new Thread(tc).start(); Thread.sleep(100); } /********** End **********/ }- 1
- 2
- 3
- 4
- 5
- 6
- 7
- 8
- 9
- 10
- 11
- 12
- 13
- 14
- 15
- 16
- 17
- 18
- 19
- 20
- 21
- 22
- 23
- 24
- 25
- 26
- 27
- 28
- 29
- 30
- 31
- 32
- 33
- 34
- 35
- 36
- 37
- 38
- 39
- 40
- 41
- 42
- 43
- 44
- 45
- 46
- 47
- 48
- 49
- 50
- 51
- 52
- 53
- 54
- 55

3-6Java高级特性 - 多线程基础(3)线程同步
Java内存模型只保证了基本读取和赋值是原子性操作,如果要实现大范围的原子性,可以通过synchronized和lock来实现,lock(锁)和synchronized(同步)在后面的关卡会介绍。

第2关:使用synchronized关键字同步线程
在Java中,每一个对象都有一个锁标记(monitor),也被称为监视器,当多个线程访问对象时,只有获取了对象的锁才能访问。
当某个线程访问这个对象synchronized方法或者代码块时,就获取到了这个对象的锁,

第3关:使用线程锁(Lock)实现线程同步
Lock不是Java语言内置的,而是一个类。
使用Lock必须在try{}catch{}块中进行,并且将释放锁的操作放在finally块中进行,以保证锁一定被被释放,防止死锁的发生。Lock lock = ...; if(lock.tryLock()) { try{ //处理任务 }catch(Exception ex){ }finally{ lock.unlock(); //释放锁 } }else { //如果不能获取锁,则直接做其他事情 }- 1
- 2
- 3
- 4
- 5
- 6
- 7
- 8
- 9
- 10
- 11
tryLock()顾名思义,是用来尝试获取锁的,并且该方法有返回值,表示获取成功与否,获取成功返回true,失败返回false,从方法可以发现,该方法如果没有获取到锁时不会继续等待的,而是会直接返回值。
lock()实现同步呢?相信你已经想到了,只要将Lock定义成全局变量package step3; import java.util.concurrent.TimeUnit; import java.util.concurrent.locks.Lock; import java.util.concurrent.locks.ReentrantLock; public class Task { public static void main(String[] args) { final Insert insert = new Insert(); Thread t1 = new Thread(new Runnable() { public void run() { insert.insert(Thread.currentThread()); } }); Thread t2 = new Thread(new Runnable() { public void run() { insert.insert(Thread.currentThread()); } }); Thread t3 = new Thread(new Runnable() { public void run() { insert.insert(Thread.currentThread()); } }); // 设置线程优先级 t1.setPriority(Thread.MAX_PRIORITY); t2.setPriority(Thread.NORM_PRIORITY); t3.setPriority(Thread.MIN_PRIORITY); t1.start(); t2.start(); t3.start(); } } class Insert { public static int num; // 在这里定义Lock private Lock lock = new ReentrantLock(); public void insert(Thread thread) { /********* Begin *********/ lock.lock(); try{ System.out.println(thread.getName()+"得到了锁"); for (int i = 0; i < 5; i++) { num++; System.out.println(num); } }catch (Exception e){ }finally{ System.out.println(thread.getName()+"释放了锁"); lock.unlock(); } /********* End *********/ } }- 1
- 2
- 3
- 4
- 5
- 6
- 7
- 8
- 9
- 10
- 11
- 12
- 13
- 14
- 15
- 16
- 17
- 18
- 19
- 20
- 21
- 22
- 23
- 24
- 25
- 26
- 27
- 28
- 29
- 30
- 31
- 32
- 33
- 34
- 35
- 36
- 37
- 38
- 39
- 40
- 41
- 42
- 43
- 44
- 45
- 46
- 47
- 48
- 49
- 50
- 51
- 52
- 53
- 54
- 55
- 56
- 57
- 58
- 59
- 60
- 61
- 62
- 63
- 64
第4关:使用volatile实现变量的可见性
volatile是干啥用的,有什么含义和特点呢? 当一个共享变量被volatile修饰时,它就具备了“可见性”,即这个变量被一个线程修改时, 这个改变会立即被其他线程知道。 当一个共享变量被volatile修饰时,会禁止“指令重排序”。- 1
- 2
- 3
- 4
- 5
- 6
中断线程一般都会采用下面代码
//线程1 boolean stop = false; while(!stop){ doSomething(); } //线程2 stop = true;- 1
- 2
- 3
- 4
- 5
- 6
- 7
3-7Java高级特性 - 多线程练习题
顺序输出
package step1; public class Task { public static void main(String[] args) throws Exception { /********* Begin *********/ //在这里创建线程, 开启线程 Object a = new Object(); Object b = new Object(); Object c = new Object(); MyThread ta = new MyThread("A",c,a); MyThread tb = new MyThread("B",a,b); MyThread tc = new MyThread("C",b,c); ta.start(); ta.sleep(100); tb.start(); tb.sleep(100); tc.start(); tc.sleep(100); /********* End *********/ } } class MyThread extends Thread { /********* Begin *********/ private String threadName; private Object prev; private Object self; public MyThread(String name,Object prev,Object self){ this.threadName = name; this.prev = prev; this.self = self; } public void run() { int count = 5; while(count>0){ synchronized(prev){ synchronized(self){ System.out.println("Java Thread"+this.threadName+this.threadName); count--; self.notify(); } try { prev.wait(); } catch (InterruptedException e) { e.printStackTrace(); } } } System.exit(0); } /********* End *********/ }- 1
- 2
- 3
- 4
- 5
- 6
- 7
- 8
- 9
- 10
- 11
- 12
- 13
- 14
- 15
- 16
- 17
- 18
- 19
- 20
- 21
- 22
- 23
- 24
- 25
- 26
- 27
- 28
- 29
- 30
- 31
- 32
- 33
- 34
- 35
- 36
- 37
- 38
- 39
- 40
- 41
- 42
- 43
- 44
- 45
- 46
- 47
- 48
- 49
- 50
- 51
售票问题
package step2; /********* Begin *********/ import java.util.concurrent.locks.ReentrantLock; //定义站台类,实现卖票的功能。 public class Station extends Thread { private static ReentrantLock lock = new ReentrantLock(); private static int ticket = 20; @Override public void run() { while (true) { try { lock.lock(); if (ticket > 0) { try { Thread.sleep(10); } catch (InterruptedException e1) { // TODO 自动生成的 catch 块 e1.printStackTrace(); } System.out.println("卖出了第" + ticket + "张票"); ticket--; } else { System.out.println("票卖完了"); System.exit(0); } } finally { lock.unlock(); } } } } /********* End *********/- 1
- 2
- 3
- 4
- 5
- 6
- 7
- 8
- 9
- 10
- 11
- 12
- 13
- 14
- 15
- 16
- 17
- 18
- 19
- 20
- 21
- 22
- 23
- 24
- 25
- 26
- 27
- 28
- 29
- 30
- 31
- 32
- 33
- 34
- 35
- 36
- 37
- 38
- 39
- 40
- 41
- 42
- 43
- 44
3-8Java高级特性 - Java反射’
三种获取Class类型的实例的方法;
通过Object类中的getClass()方法;
通过静态方法Class.forName(“全类名”);
通过类字面常量Class.class。
第1关:了解 Class 对象
package step1; /** * 学员任务文件 */ public class Reflect_stu { public static void main(String[] args) { System.out.println("通过Object 类中的 getClass() 获取的 Class 对象为:" + getPersonClass1()); System.out.println("通过静态方法 Class.forName() 获取的 Class 对象为:" + getPersonClass2()); System.out.println("通过类字面常量获取 Class 的对象为:" + getPersonClass3()); } /** * 通过 Object 类中的 getClass() 获取的 Class 对象 * * @return */ public static Class getPersonClass1() { /********** Begin *********/ return new Person().getClass(); /********** End *********/ } /** * 通过静态方法 Class.forName() 获取的 Class 对象 * <p> * 注意:Person 类的全路径为: step1.Person * * @return */ public static Class getPersonClass2() { /********** Begin *********/ Class clazz = null; String className = "step1.Person"; try { clazz = Class.forName(className); } catch(ClassNotFoundException e) { } return clazz; /********** End *********/ } /** * 通过类字面常量获取 Class 的对象 * * @return */ public static Class getPersonClass3() { /********** Begin *********/ return Person.class; /********** End *********/ } }- 1
- 2
- 3
- 4
- 5
- 6
- 7
- 8
- 9
- 10
- 11
- 12
- 13
- 14
- 15
- 16
- 17
- 18
- 19
- 20
- 21
- 22
- 23
- 24
- 25
- 26
- 27
- 28
- 29
- 30
- 31
- 32
- 33
- 34
- 35
- 36
- 37
- 38
- 39
- 40
- 41
- 42
- 43
- 44
- 45
- 46
- 47
- 48
- 49
- 50
- 51
- 52
- 53
- 54
- 55
- 56
- 57
- 58
- 59
- 60
- 61
第2关:利用反射分析类的能力
反射的基本概念
反射就是在运行时才知道要操作的类是什么,并且可以在运行时获取类的完整构造,并调用对应的方法。
提示: Method.getReturnType()可以获得方法的返回类型。 打印方法或域的修饰符可以调用提供的printModifiers()方法 打印方法的参数可以调用提供的printParamTypes()方法 Field的getType方法可以获得域类型、getName方法可以获得域的名称- 1
- 2
- 3
- 4
- 5
- 6
- 7
- 8
- 9
java.lang.reflect包中有三个类Field、Method和Constructor分别用于描述类的域、方法和构造器。
Class类中的getFields()、getMethods()和getConstructors()方法将分别返回类提供的 public 域、方法和构造器,其中包括超类的共有成员。
Class类中的getDeclareFields()、getDeclareMethods()和getDeclareConstructors()方法将分别返回类中声明的全部域、方法和构造器,其中包括私有和受保护的成员,但不包括超类的成员。package step2; import java.lang.reflect.Constructor; import java.lang.reflect.Field; import java.lang.reflect.Method; import java.lang.reflect.Modifier; class Apple { private String name; public Apple(){} public Apple(String name){} public void setName(String name) { this.name = name; } } public class Reflect_stu { public static void main(String[] args) { // 请根据提供的 classPath 获取 step2.Apple 的 Class 对象, 请使用 Class.forName() 方法, 注意捕获异常 // 通关之后,你也可以修改 clasapath 为其他类路径,分析某个类的能力, 例如: java.util.Date String classPath = "step2.Apple"; Class clazz = null; /********** Begin *********/ try { clazz = Class.forName(classPath); } catch (ClassNotFoundException e) { e.printStackTrace(); } /********** End *********/ printFields(clazz); printConstructors(clazz); printMethods(clazz); } /** * 请打印类的每个域,输出格式为:修饰符 类型 变量名; * @param clazz */ public static void printFields(Class clazz) { /********** Begin *********/ Field[] fields = clazz.getDeclaredFields(); for (Field field : fields) { // 获得描述域所属类型的Class对象 Class type = field.getType(); //获得域的名字 String name = field.getName(); // 获得域的描述符 String modifiers = Modifier.toString(field.getModifiers()); if (modifiers.length() > 0) { System.out.print(modifiers + " "); } System.out.println(type.getName() + " " + name + ";"); } /********** End *********/ } /** * 打印构造函数,输出格式为:修饰符 方法名称(参数) * @param clazz */ public static void printConstructors(Class clazz) { Constructor[] constructors = clazz.getDeclaredConstructors(); for (Constructor constructor : constructors) { Class[] paramTypes = null; /********** Begin *********/ String name = constructor.getName(); String modifiers = Modifier.toString(constructor.getModifiers()); if (modifiers.length() > 0) { System.out.print(modifiers + " "); } System.out.print(name + "("); paramTypes = constructor.getParameterTypes(); /********** End *********/ printParamTypes(paramTypes); } } /** * 请针对每个方法打印其签名,格式为:修饰符 返回值类型 方法名称(参数); * @param clazz */ public static void printMethods(Class clazz) { Method[] methos = clazz.getDeclaredMethods(); for (Method method : methos) { Class[] paramTypes = null; /********** Begin *********/ Class returnType = method.getReturnType(); String name = method.getName(); String modifiers = Modifier.toString(method.getModifiers()); if (modifiers.length() > 0) { System.out.print(modifiers + " "); } System.out.print(returnType.getName() + " " + name + "("); //Class[] paramTypes = method.getParameterTypes(); paramTypes = method.getParameterTypes(); /********** End *********/ printParamTypes(paramTypes); } } /** * 打印方法参数 * @param paramTypes */ private static void printParamTypes(Class[] paramTypes) { for (int j = 0; j < paramTypes.length; ++j) { if (j > 0) { System.out.print(","); } System.out.print(paramTypes[j].getName()); } System.out.println(");"); } }- 1
- 2
- 3
- 4
- 5
- 6
- 7
- 8
- 9
- 10
- 11
- 12
- 13
- 14
- 15
- 16
- 17
- 18
- 19
- 20
- 21
- 22
- 23
- 24
- 25
- 26
- 27
- 28
- 29
- 30
- 31
- 32
- 33
- 34
- 35
- 36
- 37
- 38
- 39
- 40
- 41
- 42
- 43
- 44
- 45
- 46
- 47
- 48
- 49
- 50
- 51
- 52
- 53
- 54
- 55
- 56
- 57
- 58
- 59
- 60
- 61
- 62
- 63
- 64
- 65
- 66
- 67
- 68
- 69
- 70
- 71
- 72
- 73
- 74
- 75
- 76
- 77
- 78
- 79
- 80
- 81
- 82
- 83
- 84
- 85
- 86
- 87
- 88
- 89
- 90
- 91
- 92
- 93
- 94
- 95
- 96
- 97
- 98
- 99
- 100
- 101
- 102
- 103
- 104
- 105
- 106
- 107
- 108
- 109
- 110
- 111
- 112
- 113
- 114
- 115
- 116
- 117
- 118
- 119
- 120
- 121
- 122
- 123
- 124
- 125
- 126
- 127
第3关:在运行时使用反射分析对象
如何通过 Field 类的 get 方法获取对象域

package step3; import java.lang.reflect.AccessibleObject; import java.lang.reflect.Field; import java.lang.reflect.Modifier; public class Reflect_stu { public static String toString(Object obj) { Class cl = obj.getClass(); String r = ""; r += "["; // 请获取所有 Field 并设置访问权限为 true /********** Begin *********/ Field[] fields = null; fields=cl.getDeclaredFields(); AccessibleObject.setAccessible(fields, true); /********** End *********/ for (Field f : fields) { // 此处 if,逻辑为判断 Field 域是否为非静态域 if (!Modifier.isStatic(f.getModifiers())) { if (!r.endsWith("[")) r += ","; r += f.getName() + "="; try { // 请获取域的类型及值 /********** Begin *********/ Class t = null; Object val = null; t =f.getType(); val = f.get(obj); /********** End *********/ // isPrimitive() 用于判断是否为基本数据类型,若为基础数据类型直接拼接,否则递归调用 toString 方法 if (t.isPrimitive()) r += val; else r += toString(val); } catch (Exception e) { e.printStackTrace(); } } } r += "]"; return r; } public static void main(String[] args) { Person person = new Person(88, 19, 175); System.out.println(toString(person)); } } class Person { public Integer weight; private Integer age; private Double height; public Person(Integer weight, Integer age, double height) { this.weight = weight; this.age = age; this.height = height; } }- 1
- 2
- 3
- 4
- 5
- 6
- 7
- 8
- 9
- 10
- 11
- 12
- 13
- 14
- 15
- 16
- 17
- 18
- 19
- 20
- 21
- 22
- 23
- 24
- 25
- 26
- 27
- 28
- 29
- 30
- 31
- 32
- 33
- 34
- 35
- 36
- 37
- 38
- 39
- 40
- 41
- 42
- 43
- 44
- 45
- 46
- 47
- 48
- 49
- 50
- 51
- 52
- 53
- 54
- 55
- 56
- 57
- 58
- 59
- 60
- 61
- 62
- 63
- 64
- 65
- 66
第4关:利用反射进行方法调用
通过反射创建对象
通过Class对象的newInstance()方法
第一种:通过Class对象的newInstance()方法。 Class clazz = Apple.class; Apple apple = (Apple)clazz.newInstance();- 1
- 2
- 3
- 4
通过Constructor对象的 newInstance()方法
第二种:通过Constructor对象的newInstance()方法 Class clazz = Apple.class; Constructor constructor = clazz.getConstructor(); Apple apple = (Apple)constructor.newInstance();- 1
- 2
- 3
- 4
- 5
如何通过反射调用对象方法
// 获取类的 Class 对象实例 Class clz = Class.forName("Apple"); // 根据 Class 对象实例获取 Constructor 对象 Constructor appleConstructor = clz.getConstructor(); // 使用 Constructor 对象的 newInstance 方法获取反射类对象 Object appleObj = appleConstructor.newInstance(); // 而如果要调用某一个方法,则需要经过下面的步骤: // 1、获取方法的 Method 对象 Method setPriceMethod = clz.getMethod("setPrice", int.class); // 2、用 invoke 方法调用方法 setPriceMethod.invoke(appleObj, 14); class Apple { public void setPrice(int price) { //省略 } // 省略 }- 1
- 2
- 3
- 4
- 5
- 6
- 7
- 8
- 9
- 10
- 11
- 12
- 13
- 14
- 15
- 16
- 17
package step4; import java.lang.reflect.Constructor; import java.lang.reflect.InvocationTargetException; import java.lang.reflect.Method; /**使用反射调用 Apple 类的 setPrice()方法,设置苹果价格为 14,并打印价格。接着还要用反射去调用getTotal方法获取单价为 20,数量 24 的总金额并打印。*/ public class Reflect_stu { public static void main(String[] args) throws InvocationTargetException { //使用反射调用 Class clazz = null; try { // 获取类的 Class 对象实例 clazz = Class.forName("step4.Apple"); /********** Begin *********/ // 获取方法的 Method 对象 Method setPriceMethod = clazz.getMethod("setPrice", double.class); // 根据 Class 对象实例获取 Constructor 对象 Constructor appleConstructor = clazz.getConstructor(); // 使用 Constructor 对象的 newInstance 方法获取反射类对象 Object apple = appleConstructor.newInstance(); //用 invoke 方法调用方法 setPriceMethod.invoke(apple, 14); Method getPriceMethod = clazz.getMethod("getPrice"); System.out.println(getPriceMethod.invoke(apple)); Method getTotal = clazz.getMethod("getTotal", double.class, int.class); System.out.println(getTotal.invoke(apple, 20, 24)); /********** End *********/ } catch (Exception e) { e.printStackTrace(); } } } class Apple { private double price; private int count; public Apple() { } public double getPrice() { return price; } public void setPrice(double price) { this.price = price; } public int getCount() { return count; } public void setCount(int count) { this.count = count; } public double getTotal(double price, int count) { return price * count; } }- 1
- 2
- 3
- 4
- 5
- 6
- 7
- 8
- 9
- 10
- 11
- 12
- 13
- 14
- 15
- 16
- 17
- 18
- 19
- 20
- 21
- 22
- 23
- 24
- 25
- 26
- 27
- 28
- 29
- 30
- 31
- 32
- 33
- 34
- 35
- 36
- 37
- 38
- 39
- 40
- 41
- 42
- 43
- 44
- 45
- 46
- 47
- 48
- 49
- 50
- 51
- 52
- 53
- 54
- 55
- 56
- 57
- 58
- 59
- 60
- 61
- 62
- 63
- 64
- 65
- 66
- 67
3-9Java高级特性 - JDBC(上)
JDBC(Java DataBase Connectivity)是一种用于执行SQL语句的Java API,它由一组用Java语言编写的类和接口组成。换句话说:就是可以直接通过java语言,去操作数据库。
JDBC库包括常与数据库使用相关的API: 连接数据库; 创建SQL或MySQL语句; 在数据库中执行SQL或MySQL查询; 查看和修改结果记录。- 1
- 2
- 3
- 4
- 5
第1关JDBC连接数据库


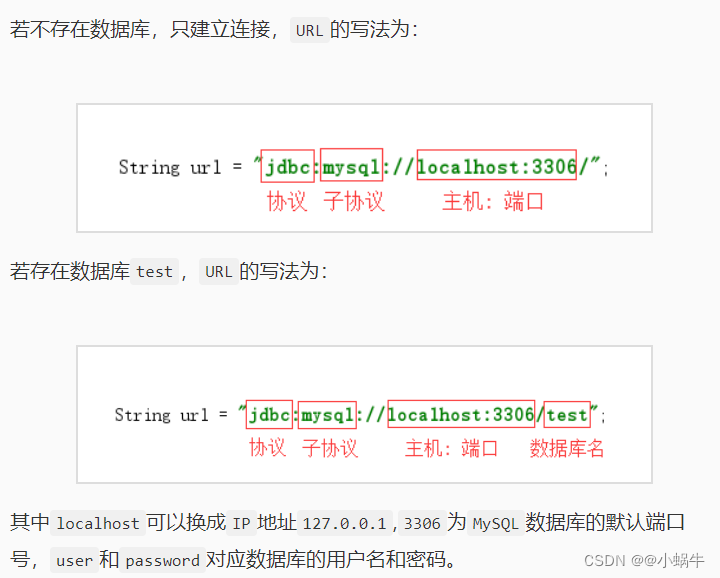
package jdbc; import java.sql.*; public class jdbcConn { public static void getConn() { /********** Begin **********/ try { //1.注册驱动 Class.forName("com.mysql.jdbc.Driver" ); } catch (ClassNotFoundException e) { e.printStackTrace(); } /********** End **********/ /********** Begin **********/ Connection conn = null; Statement statement = null; //2.建立连接并创建数据库和表 //建立数据库连接(Connection)一定要抛出异常 try{ String url = "jdbc:mysql://localhost:3306"; conn = DriverManager.getConnection(url,"root","123123"); }catch(SQLException e){ e.printStackTrace(); } // 创建执行SQL语句的Statement对象 try { statement = conn.createStatement(); } catch (SQLException e) { e.printStackTrace(); } //创建数据库 try { String sql1="drop database if exists mysql_db"; String sql2="create database mysql_db"; statement.executeUpdate(sql1);//执行sql语句 statement.executeUpdate(sql2); } catch (SQLException e) { e.printStackTrace(); } //创建表 try { statement.executeUpdate("use mysql_db");//选择在哪个数据库中操作 String sql = "create table student(" + "id int not null, " + "name varchar(20)," + "sex varchar(4),"+ "age int "+ ")"; statement.executeUpdate(sql); } catch (SQLException e) { e.printStackTrace(); } /********** End **********/ //为确保资源释放代码能运行,资源释放代码一定要放在finally语句中。 finally { try { if(statement!=null) statement.close(); if(conn!=null) conn.close(); } catch (SQLException e) { e.printStackTrace(); } } } }- 1
- 2
- 3
- 4
- 5
- 6
- 7
- 8
- 9
- 10
- 11
- 12
- 13
- 14
- 15
- 16
- 17
- 18
- 19
- 20
- 21
- 22
- 23
- 24
- 25
- 26
- 27
- 28
- 29
- 30
- 31
- 32
- 33
- 34
- 35
- 36
- 37
- 38
- 39
- 40
- 41
- 42
- 43
- 44
- 45
- 46
- 47
- 48
- 49
- 50
- 51
- 52
- 53
- 54
- 55
- 56
- 57
- 58
- 59
- 60
- 61
- 62
- 63
- 64
- 65
- 66
- 67
- 68
- 69
- 70
- 71
- 72
- 73
- 74
- 75
- 76
第2关JDBC对表中数据的操作
package jdbc; import java.sql.*; import java.util.ArrayList; import java.util.List; public class jdbcInsert { public static void insert(){ /********** Begin **********/ try { //加载驱动 Class.forName("com.mysql.jdbc.Driver" ); } catch (ClassNotFoundException e) { e.printStackTrace(); } /********** End **********/ Connection conn = null; PreparedStatement statement = null; /********** Begin **********/ //连接并插入数据 try{ String url = "jdbc:mysql://localhost:3306/mysql_db"; conn = DriverManager.getConnection (url,"root","123123"); statement = conn.prepareStatement("insert into student(id,name,sex,age) values(?,?,?,?)");//使用占位符来先占个位置 statement.setInt(1,1); statement.setString(2, "张三"); statement.setString(3,"男"); statement.setInt(4, 19); statement.executeUpdate();//每执行一个sql语句就需要执行该方法 statement.setInt(1,2); statement.setString(2, "李四"); statement.setString(3,"女"); statement.setInt(4, 18); statement.executeUpdate(); statement.setInt(1,3); statement.setString(2, "王五"); statement.setString(3,"男"); statement.setInt(4, 20); statement.executeUpdate(); PreparedStatement statement1 = conn.prepareStatement("select * from student"); ResultSet r = statement1.executeQuery();//将执行结果给ResultSet while (r.next()) {//循环判断表中是否还有数据 System.out.println(r.getString(1)+" "+r.getString(2)+" "+ r.getString(3)+" "+r.getString(4));//通过列的索引查询 //一行数据 } } catch (SQLException e) { e.printStackTrace(); } /********** End **********/ finally { try { if (statement != null) statement.close(); if (conn != null) conn.close(); } catch (SQLException e) { e.printStackTrace(); } } } }- 1
- 2
- 3
- 4
- 5
- 6
- 7
- 8
- 9
- 10
- 11
- 12
- 13
- 14
- 15
- 16
- 17
- 18
- 19
- 20
- 21
- 22
- 23
- 24
- 25
- 26
- 27
- 28
- 29
- 30
- 31
- 32
- 33
- 34
- 35
- 36
- 37
- 38
- 39
- 40
- 41
- 42
- 43
- 44
- 45
- 46
- 47
- 48
- 49
- 50
- 51
- 52
- 53
- 54
- 55
- 56
- 57
- 58
- 59
- 60
- 61
- 62
- 63
- 64
- 65
- 66
- 67
- 68
- 69
- 70
- 71
第3关JDBC事务
package jdbc; import java.sql.*; public class jdbcTransaction { public static void transaction(){ try { Class.forName("com.mysql.jdbc.Driver" ); } catch (ClassNotFoundException e) { e.printStackTrace(); } Connection conn = null; PreparedStatement ps = null; /********** Begin **********/ //连接数据库并开启事务 try { String url = "jdbc:mysql://localhost:3306/mysql_db"; conn = DriverManager.getConnection (url,"root","123123" ); conn.setAutoCommit(false);//关闭自动提交开启事务 ps = conn.prepareStatement("insert into student(id,name,sex,age) values(?,?,?,?)"); ps.setInt(1,4); ps.setString(2, "赵六"); ps.setString(3,"女"); ps.setInt(4, 21); ps.executeUpdate(); conn.commit();//提交事务 } catch (SQLException e) { try { //事务回滚 conn.rollback();//回滚事务 回滚到你开始事务之前 } catch (SQLException e1) { e1.printStackTrace(); } } /********** End **********/ finally { try { if(ps!=null) ps.close(); if (conn != null) conn.close(); } catch (SQLException e1) { e1.printStackTrace(); } } } }- 1
- 2
- 3
- 4
- 5
- 6
- 7
- 8
- 9
- 10
- 11
- 12
- 13
- 14
- 15
- 16
- 17
- 18
- 19
- 20
- 21
- 22
- 23
- 24
- 25
- 26
- 27
- 28
- 29
- 30
- 31
- 32
- 33
- 34
- 35
- 36
- 37
- 38
- 39
- 40
- 41
- 42
- 43
- 44
- 45
- 46
- 47
- 48
- 49
- 50
- 51
- 52
- 53
- 54
3-10Java高级特性 - JDBC(下)
第1关指定类型JDBC封装
package step1; import java.sql.Connection; import java.sql.DriverManager; import java.sql.PreparedStatement; import java.sql.ResultSet; import java.sql.SQLException; import java.util.ArrayList; import java.util.List; import test.News; public class JDBCUtils { /** * 连接数据库 */ private static Connection getConnection() { Connection conn=null; /********** Begin **********/ String url="jdbc:mysql://localhost:3306/mysql_db"; try { //注册驱动 Class.forName("com.mysql.jdbc.Driver"); conn = DriverManager.getConnection (url,"root","123123"); }catch (ClassNotFoundException e) { e.printStackTrace(); }catch (SQLException e) { e.printStackTrace(); } /********** End **********/ return conn; } /** * 更新数据方法 * @param news * @throws SQLException */ public void update(News news) throws SQLException { Connection conn = getConnection(); PreparedStatement ps = null; /********** Begin **********/ String sql = "update news set title = ? ,author_name = ? where id = ?"; try{ ps = conn.prepareStatement(sql); ps.setObject(1, news.getTitle()); ps.setObject(2, news.getAuthor_name()); ps.setObject(3, news.getId()); ps.execute(); }catch(SQLException e){ e.printStackTrace(); throw new SQLException("更新数据失败"); }finally{ close(null, ps, conn); } /********** End **********/ } /** * 查询所有数据 * @return * @throws SQLException */ public List<News> findAll() throws SQLException { Connection conn = getConnection(); PreparedStatement ps = null; ResultSet rs = null; News news = null; List<News> newsList = new ArrayList<News>(); /********** Begin **********/ String sql = "select * from news"; try { ps = conn.prepareStatement(sql); rs = ps.executeQuery();//将执行结果给ResultSet while (rs.next()) { news = new News(rs.getInt(1), rs.getString(2), rs.getString(3)); newsList.add(news); } }catch(SQLException e){ e.printStackTrace(); throw new SQLException("查询所有数据失败"); }finally{ close(rs, ps, conn); } /********** End **********/ return newsList; } /** * 删除方法 * @param id * @throws SQLException */ public void delete(int id) throws SQLException{ Connection conn = getConnection(); PreparedStatement ps = null; /********** Begin **********/ String sql = "delete from news where id=?"; try { ps = conn.prepareStatement(sql); ps.setObject(1, id); ps.execute(); }catch(SQLException e){ e.printStackTrace(); throw new SQLException(" 删除数据失败"); } finally{ close(null, ps, conn); } /********** End **********/ } /** * 增加对象 * @param news * @throws SQLException */ public void insert(News news) throws SQLException { Connection conn = getConnection(); PreparedStatement ps = null; String sql = "insert into news(id,title,author_name)values(?,?,?)"; try{ ps = conn.prepareStatement(sql); ps.setInt(1, news.getId()); ps.setString(2, news.getTitle()); ps.setString(3, news.getAuthor_name()); ps.executeUpdate(); }catch(SQLException e){ e.printStackTrace(); throw new SQLException("添加数据失败"); }finally{ close(null, ps, conn); } } /** * 根据id查询对象 * @param id * @return * @throws SQLException */ public News findById(int id) throws SQLException { Connection conn = getConnection(); PreparedStatement ps = null; ResultSet rs = null; News news = null; String sql = "select * from news where id=?"; try{ ps = conn.prepareStatement(sql); ps.setInt(1, id); rs = ps.executeQuery(); if(rs.next()){ news = new News(); news.setId(id); news.setTitle(rs.getString(2)); news.setAuthor_name(rs.getString(3)); } }catch(SQLException e){ e.printStackTrace(); throw new SQLException("根据ID查询数据失败"); } finally{ close(rs, ps, conn); } return news; } /** * 关闭数据库连接 * @param rs * @param ps * @param conn */ public static void close(ResultSet rs,PreparedStatement ps,Connection conn){ try { if(rs!=null)rs.close(); if(ps!=null)ps.close(); if(conn!=null)conn.close(); } catch (SQLException e) { e.printStackTrace(); } } }- 1
- 2
- 3
- 4
- 5
- 6
- 7
- 8
- 9
- 10
- 11
- 12
- 13
- 14
- 15
- 16
- 17
- 18
- 19
- 20
- 21
- 22
- 23
- 24
- 25
- 26
- 27
- 28
- 29
- 30
- 31
- 32
- 33
- 34
- 35
- 36
- 37
- 38
- 39
- 40
- 41
- 42
- 43
- 44
- 45
- 46
- 47
- 48
- 49
- 50
- 51
- 52
- 53
- 54
- 55
- 56
- 57
- 58
- 59
- 60
- 61
- 62
- 63
- 64
- 65
- 66
- 67
- 68
- 69
- 70
- 71
- 72
- 73
- 74
- 75
- 76
- 77
- 78
- 79
- 80
- 81
- 82
- 83
- 84
- 85
- 86
- 87
- 88
- 89
- 90
- 91
- 92
- 93
- 94
- 95
- 96
- 97
- 98
- 99
- 100
- 101
- 102
- 103
- 104
- 105
- 106
- 107
- 108
- 109
- 110
- 111
- 112
- 113
- 114
- 115
- 116
- 117
- 118
- 119
- 120
- 121
- 122
- 123
- 124
- 125
- 126
- 127
- 128
- 129
- 130
- 131
- 132
- 133
- 134
- 135
- 136
- 137
- 138
- 139
- 140
- 141
- 142
- 143
- 144
- 145
- 146
- 147
- 148
- 149
- 150
- 151
- 152
- 153
- 154
- 155
- 156
- 157
- 158
- 159
- 160
- 161
- 162
- 163
- 164
- 165
- 166
- 167
- 168
- 169
- 170
- 171
- 172
- 173
- 174
- 175
- 176
- 177
- 178
- 179
- 180
- 181
- 182
- 183
- 184
- 185
- 186
- 187
- 188
- 189
- 190
- 191
- 192
第2关泛型JDBC封装


3-11JDBC基础编程练习
第1关JDBC更新员工密码
package step1; import java.sql.*; public class UpdatePass { // 修改数据 public static void updateDB() { /********* Begin *********/ // 第一步:加载驱动 try { //1.注册驱动 Class.forName("com.mysql.jdbc.Driver" ); } catch (ClassNotFoundException e) { e.printStackTrace(); } // 第二步:建立连接, "root"和"123123"是针对MySQL设置了用户名(root)和密码(123123)的情况 Connection conn = null; Statement statement = null; // 127.0.0.1:3306是mysql服务器地址及端口 数据库编码格式设置为utf-8 try{ String url="jdbc:mysql://127.0.0.1:3306"; conn = DriverManager.getConnection(url,"root","123123"); }catch(SQLException e){ e.printStackTrace(); } // 第三步:建立statement对象 try{ statement = conn.createStatement(); }catch(SQLException e){ e.printStackTrace(); } // 第四步:修改数据 try{ statement.executeUpdate("use tsgc"); String sql1="update employee set password='hello' where sex='女'"; statement.executeUpdate(sql1); }catch(SQLException e){ e.printStackTrace(); } // 第五步:关闭statement对象和连接对象 finally { try { if(statement!=null) statement.close(); if(conn!=null) conn.close(); } catch (SQLException e) { e.printStackTrace(); } } /********* End *********/ } }- 1
- 2
- 3
- 4
- 5
- 6
- 7
- 8
- 9
- 10
- 11
- 12
- 13
- 14
- 15
- 16
- 17
- 18
- 19
- 20
- 21
- 22
- 23
- 24
- 25
- 26
- 27
- 28
- 29
- 30
- 31
- 32
- 33
- 34
- 35
- 36
- 37
- 38
- 39
- 40
- 41
- 42
- 43
- 44
- 45
- 46
- 47
- 48
- 49
- 50
- 51
- 52
- 53
- 54
- 55
- 56
- 57
- 58
- 59
- 60
- 61
- 62
- 63
- 64
第2关JDBC查询员工信息
package step1; import java.sql.*; public class QueryPass { // 查询数据代码不用上实验报告 public static void queryDB() { /********* Begin *********/ // 第一步:加载驱动 try { //1.注册驱动 Class.forName("com.mysql.jdbc.Driver" ); } catch (ClassNotFoundException e) { e.printStackTrace(); } // 第二步:建立连接, "root"和"123123"是针对MySQL设置了用户名(root)和密码(123123)的情况 // 127.0.0.1:3306是mysql服务器地址及端口 数据库编码格式设置为utf-8 Connection conn=null; Statement statement=null; try{ String url="jdbc:mysql://127.0.0.1:3306"; conn = DriverManager.getConnection(url,"root","123123"); }catch(SQLException e){ e.printStackTrace(); } // 第三步:建立statement对象 try{ statement = conn.createStatement(); }catch(SQLException e){ e.printStackTrace(); } // 第四步:查询数据 try{ statement.executeUpdate("use tsgc"); PreparedStatement statement1 = conn.prepareStatement("select * from employee"); ResultSet r = statement1.executeQuery();//将执行结果给ResultSet while (r.next()) {//循环判断表中是否还有数据 System.out.println("no:"+r.getString(1)+" " +"name:"+r.getString(2)+" " +"password:"+r.getString(3)+" " +"sex:"+r.getString(4)+" " +"salary:"+r.getFloat(5));//通过列的索引查询 //一行数据 } }catch(SQLException e){ e.printStackTrace(); } // 第五步:关闭statement对象和连接对象 finally { try { if (statement != null) statement.close(); if (conn != null) conn.close(); } catch (SQLException e) { e.printStackTrace(); } } /********* End *********/ } }- 1
- 2
- 3
- 4
- 5
- 6
- 7
- 8
- 9
- 10
- 11
- 12
- 13
- 14
- 15
- 16
- 17
- 18
- 19
- 20
- 21
- 22
- 23
- 24
- 25
- 26
- 27
- 28
- 29
- 30
- 31
- 32
- 33
- 34
- 35
- 36
- 37
- 38
- 39
- 40
- 41
- 42
- 43
- 44
- 45
- 46
- 47
- 48
- 49
- 50
- 51
- 52
- 53
- 54
- 55
- 56
- 57
- 58
- 59
- 60
- 61
- 62
- 63
- 64
- 65
- 66
- 67
- 68
- 69
- 70
- 71
- 72
- 73
- 74
- 75
- 76
- 77
- 78
-
相关阅读:
docker 本地保存镜像方法--docker export 和docker save 使用介绍
SpringMVC的执行流程
【无标题】
5分钟教你如何设计一个安全web架构
2020华数杯全国大学生数学建模竞赛A题-低温防护服御寒仿真模拟(二)(附带赛题解析&获奖论文及MATLAB代码)
什么是前端框架中的数据绑定(data binding)?有哪些类型的数据绑定?
YZ系列工具之YZ12:VBA_4种方法设计下拉列表
工具篇 | Gradle入门与使用指南 - 附Github仓库地址
记一次实战 Shiro反序列化内网上线
[SpringBoot]SpringBoot整合第三方技术
- 原文地址:https://blog.csdn.net/Manonll/article/details/124915867