-
Canvas 画布
1. 初识
1.1 认识画布
<body> <canvas id="c1" width="600" height="400">canvas> <script> // 找到画布 let c1 = document.getElementById("c1"); // 获取画笔,上下文对象 let ctx = c1.getContext("2d"); // 绘制图形 ctx.fillRect(100, 200, 300 , 300); script> body>canvas表示画布,用于绘制图形,id为标识元素的唯一性,width 为画布宽度,height 为画布高度ctx.fillRect(100, 200, 300, 300);用于绘制矩形,四个参数分别为
位置x, 位置y, 宽度, 高度canvas 的 style 也可以设置宽高
<canvas id="c1" width="600" height="400" style="height: 200px; width: 200px;">canvas>画布是 600*400,而设置的 style 为 200*200,那如果画布中是一张图片,那图片的宽缩放为原来的三分之一,高为原来的一半。它和 canvas 外部放一个 div 是不一样的。
1.2 兼容性
if(!c1.getContext){
    console.log("当前浏览器不支持 canvas, 请下载最新的浏览器");
}
当浏览器支持 canvas 时,才可以获得画布的上下文,即可以
getContext,否则返回undefined<canvas id="c1" width="600" height="400"> 当前浏览器不支持 canvas, 请下载最新的浏览器 <a href="https://www.google.cn/intl/zh-CN/chrome/">立即下载a> canvas>也可以将要提示的内容放入内部,如果浏览器不支持 canvas,那 canvas 标签会被看作一个自定义元素,里面的内容就会显示出来
1.3 上下文属性
let c1 = document.getElementById("c1");
let ctx = c1.getContext("2d");
console.log(ctx); // 查看属性
查看输出

这里的属性是画笔的属性,比如
fillStyle表示填充时使用的颜色,font指定填充文字时的字体大小和字体。最后的原型CanvasRenderingContext2D包含了非常多的方法,用来画矩形、圆形、图片等。let c1 = document.getElementById("c1"); let ctx = c1.getContext("2d"); ctx.fillStyle = "lightblue"; // 切换填充的颜色2. 绘制
2.1 绘制基本图形
2.1.1 绘制矩形
填充模式
填满画布
fillRect,将内部填满颜色,颜色由画笔的fillStyle指定let c1 = document.getElementById("c1"); let ctx = c1.getContext("2d"); ctx.fillRect(100, 200, 300 , 300);或者如下写法,更麻烦
ctx.beginPath();
ctx.rect(100, 200, 300, 300);
ctx.stroke(); // 这个如果不写是不会画出来的
ctx.closePath();
这里的 canvas 起始位置是相对于画布而言的,注:这里的 canvas 是 600*400 的,所以这个矩形在画布的中下部位。
路径模式
// x, y, width, height
ctx.strokeRect(100, 100, 200, 100);
也可以这么写
ctx.beginPath();
ctx.rect(100, 100, 200, 100);
ctx.fill(); // 这个如果不写是不会画出来的
ctx.closePath();
这里如果你这么写,即没有使用 beginPath 加 endPath,那么它就会认为你是使用的一个画笔完成的两次绘画,而加上后,就是两个画笔两次绘画
ctx.rect(100, 100, 200, 100);
ctx.stroke();

ctx.rect(0, 0, 200, 100);
ctx.fill();
正确的应该这么写
ctx.beginPath();
ctx.rect(100, 100, 200, 100);
ctx.stroke();
ctx.closePath();

ctx.beginPath();
ctx.rect(0, 0, 200, 100);
ctx.fill();
ctx.closePath();
清除模式
// x, y, 清除的高度, 清除的宽度
ctx.clearRect(0, 0, c1.clientWidth, c1.clientHeight);
那么这个就会起到橡皮擦的作用,把画布清空了,如何做到动态擦除效果呢?
可以使用定时器
let height = 0; let t1 = setInterval(() => { height++; ctx.clearRect(0, 0, c1.clientWidth, height); if(height > c1.clientHeight){ clearInterval(t1); } }, 10);如果你想擦除效果更好,可以双循环横向+纵向擦除,像雨刮器一样
2.1.2 绘制圆形
使用
arc方法进行绘制,该方法有六个参数,其中前五个是必须要指定的ctx.arc(圆心x, 圆心y, 半径, 起始弧度, 结束弧度, 是否顺时针);arc其实绘制的是圆弧,而不是圆形。如下各种角度的圆弧绘制ctx.beginPath(); ctx.arc(100, 100, 50, 0, Math.PI / 6); ctx.fill(); ctx.closePath(); ctx.beginPath(); ctx.arc(200, 100, 50, 0, Math.PI / 4); ctx.fill(); ctx.closePath(); ctx.beginPath(); ctx.arc(300, 100, 50, 0, Math.PI / 2); ctx.fill(); ctx.closePath(); ctx.beginPath(); ctx.arc(450, 100, 50, 0, Math.PI); ctx.fill(); ctx.closePath(); ctx.beginPath(); ctx.arc(600, 100, 50, 0, Math.PI * 2); ctx.fill(); ctx.closePath();
是不是和想象的不一样,它是如何绘制和填充的呢?
它是在起始角度和结束角度之间绘制一个圆弧,然后一条直线连接它们的起始点与终点,最后填充。
如下是使用
stroke代替fill方法后的效果。
绘制笑脸
ctx.beginPath();
// 脸
ctx.arc(75, 75, 50, 0, Math.PI * 2);
// 嘴巴
ctx.arc(75, 75, 35, 0, Math.PI);
// 左眼
ctx.arc(60, 65, 5, 0, Math.PI *2);
// 右眼
ctx.arc(90, 65, 5, 0, Math.PI * 2);

ctx.stroke();
ctx.closePath();
这里它连笔了,正如前面的
rect遇到的问题,我们可以使用beginPath+closePath去在绘制每个部分时用一个新的画笔,但是这样很麻烦,每一次绘制都是beginPath + arc + stroke + closePath四个语句。并且我实际上并不需要新的画笔去画,只是不想连笔而已(就类似于我们在纸上乱画,抬一下手,换个起点就可以)ctx.beginPath(); ctx.arc(75, 75, 50, 0, Math.PI * 2); // 画笔移动到要绘制嘴巴的起始点,即 75 + 35, 35 ctx.moveTo(110, 75); ctx.arc(75, 75, 35, 0, Math.PI); // 移动到绘制左眼的起始点,即 60 + 5, 65 ctx.moveTo(65, 65); ctx.arc(60, 65, 5, 0, Math.PI *2); ctx.moveTo(95, 65); ctx.arc(90, 65, 5, 0, Math.PI * 2); ctx.stroke(); ctx.closePath();❓ 这里弧度位置是在哪里呢?
想象一个 x,y 坐标轴,x 轴正方向就是 0 弧度,然后顺时针就是弧度增大的方向。
2.1.3 绘制直线
使用
lineTo(x, y)方法,绘制一条从当前位置到指定 x,y 位置的直线开始点和之前的位置有关,可以通过
moveTo(x,y)函数改变比如我们绘制一个三角形
ctx.beginPath();
ctx.moveTo(300, 200); // 起始点
ctx.lineTo(350, 250);
ctx.lineTo(350, 200);
ctx.lineTo(300, 200);

ctx.stroke();
ctx.closePath();
每次
lineTo到达的终点作为下一次的起点也可以使用
fill方法填充
2.1.4 绘制圆弧
它的思想是两条直线,蓝色为起始点,也是画笔开始绘画的位置,红色为另外两个点,然后给定一个圆半径,绘制与这两条直线相切的圆弧

ctx.beginPath();
// 两条直线
ctx.moveTo(200, 200);
ctx.lineTo(200, 250);
ctx.lineTo(150, 250);

// 圆弧和直线的关系
ctx.moveTo(300, 200);
ctx.lineTo(300, 250);
ctx.lineTo(250, 250);

ctx.moveTo(300, 200);
ctx.arcTo(300, 250, 250, 250, 25);
// 圆弧
ctx.moveTo(400, 200);
ctx.arcTo(400, 250, 350, 250, 25);
ctx.stroke();
ctx.closePath();
第一个点和第二个点相连,第二个点和第一个相连,形成两条直线

只不过由于画圆弧是从起始点开始的,所以有一段直线,我们可以设置半径为 50(而不是25),也就是起始点到直角位置的高度,那就是一个真正的圆弧了

2.1.5 绘制贝塞尔二次曲线
蓝色为起始点,红色为控制点,绿色为终点,贝塞尔曲线的思路就是,在两条直线都取到线段长度的十分之一处,两个点的连线的十分之一处就是一个绘制的点。如此,都到线段长度的二分之一时,取两个点连线的二分之一处为一个绘制的点。。。。

绘制气泡聊天框
ctx.beginPath();

ctx.moveTo(200, 300);
ctx.quadraticCurveTo(150, 300, 150, 200);
ctx.quadraticCurveTo(150, 100, 300, 100);
ctx.quadraticCurveTo(450, 100, 450, 200);
ctx.quadraticCurveTo(450, 300, 250, 300);
ctx.quadraticCurveTo(250, 350, 150, 350);
ctx.quadraticCurveTo(200, 350, 200, 300);

ctx.strokeStyle = "lightblue";
ctx.stroke();
ctx.closePath();
除蓝色以外其他框是我绘制的直线,也是绘制贝塞尔二次曲线的依据
2.1.6 绘制贝塞尔三次曲线
和二次的差不多,只不过是有了两个控制点
ctx.beginPath();

ctx.moveTo(200, 300);
ctx.bezierCurveTo(250, 250, 300, 300, 200, 400);
ctx.moveTo(200, 300);
ctx.bezierCurveTo(150, 250, 100, 300, 200, 400);

ctx.strokeStyle = "red";
ctx.stroke();
ctx.closePath();
蓝色直线是进行绘制的依据,除了上下两个点之外,最右边的两个点都是控制点。
它是取三条直线的十分之一处,第一条直线与第二条直线该位置处相连形成一条直线,第二个与第三个相连形成一条直线,这新的两条直线各自十分之一处连线形成的直线的十分之一处就是要使用的点,有点绕。
2.1.7 封装路径
我们可以把绘制的路径使用变量进行保存
let hertPath = new Path2D();

hertPath.moveTo(200, 300);
hertPath.bezierCurveTo(250, 250, 300, 300, 200, 400);
hertPath.moveTo(200, 300);
hertPath.bezierCurveTo(150, 250, 100, 300, 200, 400);

ctx.strokeStyle = "red";
ctx.stroke(hertPath);
这里也就不需要
beginPaht + closePath啦,直接在 Path2D 中进行保存,记住,它只是保存了路径而已,并没有绘制,我们把路径给画笔,ctx.stroke(hertPath),他就可以开始绘制了。2.2 颜色控制
2.2.1 颜色设置
-
strokeStyle线段的颜色
还可以使用#FFFFFF以及rgbrgba
ctx.strokeStyle = "red";
ctx.stroke(hertPath);
画笔在设置完颜色后,如果没有进行修改,则会使用于后面所有的绘制
fillStyle
填充的颜色
如下
let hertPath = new Path2D();

hertPath.moveTo(200, 300);
hertPath.bezierCurveTo(250, 250, 300, 300, 200, 400);
hertPath.moveTo(200, 300);
hertPath.bezierCurveTo(150, 250, 100, 300, 200, 400);

ctx.strokeStyle = "red";
ctx.fillStyle = "rgba(255, 200, 200, 0.3)";
// 画笔的两次绘制
ctx.stroke(hertPath);
ctx.fill(hertPath);
可以实现有边框和填充效果
设置全局透明度
ctx.globalAlpha = 0.5;会让所有路径及填充都有透明效果,一般不用,不如使用
rgba在想透明的时候去设置即可,比较灵活2.2.2 线性渐变
let linearGradient = ctx.createLinearGradient(0, 0, 600, 400);
linearGradient.addColorStop(0, "red");
linearGradient.addColorStop(1, "blue");
// 应用颜色
ctx.fillStyle = linearGradient;
createLinearGradient(startX, startY, endX, endY)
线性渐变,指定两个点,两个点的连线就是渐变方向linearGradient.addColorStop(percent, color)
指定在哪个位置使用哪个颜色,percent的值为 [0,1],指代是在线段上的哪个位置

这里你会发现,矩形并不是从头开始就是红色,而是从紫色开始的,这是因为
linearGradient是从 0,0 位置开始的,并不是从矩形左上角开始的,所以并不是红色,在使用 fill 的地方填充上对应的颜色。这里我们把渐变颜色起始点改一下,并且终点就是矩形的右下角
let linearGradient = ctx.createLinearGradient(100, 200, 400, 500);
这就是一个完整的渐变了。
我们也可以据此实现一个渐变动画
let index = 0; function render() { ctx.clearRect(0, 0, 600, 400); // 清除画布 index += 0.01; if(index > 1){ index = 0; } let linearGradient = ctx.createLinearGradient(100, 200, 400, 500); linearGradient.addColorStop(0, "red"); linearGradient.addColorStop(index, "#ffcccc"); linearGradient.addColorStop(1, "blue"); ctx.fillStyle = linearGradient; ctx.fillRect(100, 200, 300, 300); requestAnimationFrame(render); } requestAnimationFrame(render);2.2.3 径向渐变
let readiaGradient = ctx.createRadialGradient(300, 200, 0, 300, 200, 100);

readiaGradient.addColorStop(0, "red");
readiaGradient.addColorStop(0.3, "#ffcccc");
readiaGradient.addColorStop(1, "blue");
ctx.fillStyle = readiaGradient;

ctx.fillRect(0, 0, 600, 400);
createRadialGradient(x1, y1, r1, x2, y2, r2)是从圆心向外扩散的颜色
有两个圆的圆心位置及半径,从中心向外扩散,半径为 0,也就是从一个点开始了。

模拟3D球
let readiaGradient = ctx.createRadialGradient(250, 150, 10, 300, 200, 100);

readiaGradient.addColorStop(0, "#ffcccc");
readiaGradient.addColorStop(1, "red");
ctx.fillStyle = readiaGradient;

ctx.arc(300, 200, 100, 0, Math.PI * 2);
ctx.fill();
在小圆球的中间那部分不是纯白色,但也不是指定的
#ffcccc,不知道为什么2.2.4 圆锥渐变
let coneGradient = ctx.createConicGradient(0, 300, 200);

coneGradient.addColorStop(0, "blue");
coneGradient.addColorStop(0.5, "yellow");
coneGradient.addColorStop(1, "red");
ctx.fillStyle = coneGradient;

ctx.fillRect(0, 0, 600, 400);
三个参数,第一个指定起始角度,第二个和第三个指定圆心位置

2.3 pattern 印章填充样式
let image = new Image();
image.src = "./下载.jpg";
// onload,图片加载完成后执行
image.onload = function () {
    let pattern = ctx.createPattern(image, "repeat");
    ctx.fillStyle = pattern;
    ctx.fillRect(0, 0, 600, 400);
}
参数一:可以是 image 对象,也可以是 canvas 对象
参数二:重复方式
[repeat | no-repeat | repeat-x | repeat-y]
2.4 线条样式
ctx.moveTo(200, 150);
ctx.lineTo(300, 200);
ctx.lineTo(400, 150);

ctx.stroke();
lineWidth
线条宽度,默认值为 1,即 1px
ctx.lineWidth = 5;
lineCap
设置线条端点样式
butt:平齐round:半圆square:正方形
第一个就是默认的
第二个就是有弧度了
第三个

第三个跟第一个差不多,只不过比如原来长度是 30 吧,然后如果用第一个,那长度还是 30,用第三个就多了个小方块,变长了一点点
lineJoin
设置两个线段连接处的样式
-
mitterctx.moveTo(100, 50); ctx.lineTo(110, 100); ctx.lineTo(120, 50); ctx.lineJoin = "mitter"; ctx.lineWidth = 5; ctx.stroke();
它会在两个线段的连接处继续延申,达到一个尖锐的效果,但是如果两条直线之间的角度非常小,那么尖锐部分突出的就更多,我们还可以进行一个限制ctx.miterLimit = 5; // 5px, 超出后直接磨平 -
roundctx.lineJoin = "round";
-
bevelctx.lineJoin = "bevel";
为一个平整的角
2.4.1 虚线样式
setLineDash
设置虚线,
setLineDash([实线长度, 空白长度])ctx.moveTo(100, 50); ctx.lineTo(200, 100); ctx.lineTo(300, 50); ctx.lineWidth = 1; ctx.setLineDash([10, 5]); ctx.stroke();
lineDashOffset
设置线的偏移量,下面也是用一个动画来演示
let index = 0; function render() { ctx.clearRect(0, 0, 600, 400); index = index > 40 ? 0 : index + 1; ctx.moveTo(100, 50); ctx.lineTo(200, 100); ctx.lineTo(300, 50); ctx.lineWidth = 1; ctx.setLineDash([10, 5]); ctx.lineDashOffset = index; ctx.stroke(); requestAnimationFrame(render); } render();2.5 阴影设置
ctx.rect(100, 100, 100, 80);
ctx.shadowOffsetX = 10;
ctx.shadowOffsetY = 10;
ctx.shadowBlur = 5;
ctx.shadowColor = "rgba(255, 100, 100, 1)";

ctx.stroke();
等同于 css 中的
box-shadow中的四个参数。2.6 绘制图片

将图片放入画布,只有一个函数
ctx.drawImage,但是他有三种可选的参数列表let img = new Image(); img.src = "./girl.jpg"; img.onload = function () { ctx.drawImage(img, 0, 0); }指定要放入画布的图片及在画布中的位置,不进行任何缩放与裁剪,由于原图是 4096 * 3048 的,所以画布 600 * 400 放不下,只能放一点左上角的。

第二种
let img = new Image();
img.src = "./girl.jpg";
img.onload = function () {
    ctx.drawImage(img, 0, 0, 600, 400);
}
第4,5个参数指定图片的缩放,将宽缩小到 600,高缩小到 400,不过不是等比例缩放,可能出现扭曲。

第三种
将图片进行裁剪及缩放,比如我想将这个图片的头部裁剪出来(要结合图片本身的像素大小去裁剪)
let img = new Image();
img.src = "./girl.jpg";
img.onload = function () {
    ctx.drawImage(img, 1024, 0, 2048, 2400, 0, 0, 600, 400);
}
第2、3个参数指定裁剪的起始位置,第4、5个指定宽高,后面就是放入画布的位置以及宽高

2.7 绘制视频
绘制动态视频并添加水印
<body>
    <canvas id="c1" width="600" height="400">
        当前浏览器不支持 canvas, 请下载最新的浏览器
        <a href="https://www.google.cn/intl/zh-CN/chrome/">立即下载a>
    canvas>

    <video src="./video.mp4" controls hidden>video>
    <button id="controller-button">播放/暂停button>
    <script>
        let c1 = document.getElementById("c1");
        let ctx = c1.getContext("2d");

        let video = document.querySelector("video");

        let btn = document.querySelector("#controller-button");
        btn.onclick = function (){
            if(video.paused){
                video.play();
                render();
            }else{
                video.pause();
            }
        }

        let img = new Image();
        img.src = "./girl.jpg";

        function render() {
            ctx.drawImage(video, 0, 0, 600, 400);
            ctx.drawImage(img, 400, 350, 200, 50);
            requestAnimationFrame(render);
        }
    script>
body>
我们对视频添加
hidden属性,让他隐藏起来。并设置一个按钮用于控制播放与暂停里面的
render函数中的ctx.drawImage(video, 0, 0, 600, 400);用于对视频的每一帧进行截取并放入画布,然后第二个ctx.drawImage(img, 400, 350, 200, 50);就是在画布右下角放入一个图片,充当水印这里呢,实际上并不是播放的原本的视频了,而是对原来的视频进行抽帧,然后放入画布中进行播放,并添加了水印。这样我们可以实现爱奇艺中的全屏、百分之80等等页面的缩放,以及水印,比如XX出品,广告植入等。
2.8 绘制文字
2.8.1 大小/字体
ctx.fillStyle = "lightblue";
ctx.font = "100px Microsoft YaHei"; // 字体大小 + family
ctx.fillText("二狗!", 300, 200);

ctx.fillStyle = "#000";
ctx.arc(300, 200, 5, 0, 2 * Math.PI);
ctx.fill();
文字也可以是
stroke,那里面就不填充颜色,就是镂空的。
fillText还有第四个参数maxWidth,来限制文本内容的最大宽度,比如这里限制到 100ctx.fillText("二狗!", 300, 200, 100);
第二三个参数指定文字在画布的起始位置,黑点就是所标注的起始位置,可以看到文字在起始点的右上方。
2.8.2 文本对齐选项
有五个选项
[start, end, left, right, center],默认为startctx.textAlign = "start"; // 注意要在 fillText 之前使用
ctx.textAlign = "end";
ctx.textAlign = "left";
ctx.textAlign = "right";
ctx.textAlign = "center";
left和start,right和end效果差不多2.8.3 文本基线对齐
textBaseline有三个选项[top | middle | bottom | alphabetic],默认值就是最后一个ctx.textBaseline = "top";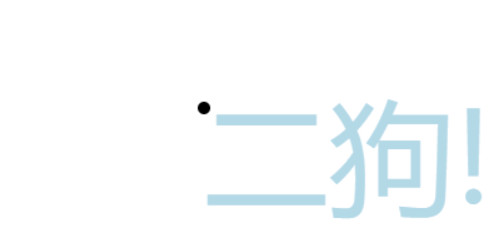
ctx.textBaseline = "middle";
ctx.textBaseline = "bottom";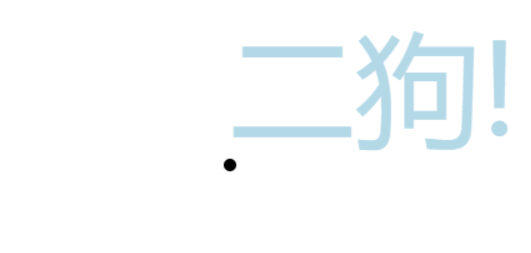
ctx.textBaseline = "alphabetic";
2.8.4 文本方向
一般用不到,没什么用
ctx.direction = "rtl"; // 文本从右到左
2.8.5 预测量文本宽度
我们有时候需要知道文本绘制后所占的宽度等信息
let res = ctx.measureText("Hello!");
console.log(res);
其中
width代表文本所占宽度actualBoundingBoxLeft和actualBoundingBoxRight代表文字左边、右边到 我们指定的(300. 200)这个垂直的线的距离actualBoundingBoxAscent和actualBoundingBoxDescent分别代表那个点到文字最上边和最下边的距离3. 变换
3.1 位移
使用
translate(x, y)ctx.translate(100, 100); ctx.fillRect(0, 0, 50, 50); ctx.translate(100, 100); ctx.fillRect(0, 0, 50, 50);
translate移动的是整个坐标系,第一次移动是将坐标原点从 (0,0) 移动到了 (100, 100),那之后的 (0,0) 实际上就是 (100,100)。第二次移动又是在第一次的基础上。3.2 缩放
ctx.scale(5, 2); ctx.fillRect(0, 0, 50, 50);scale是将坐标系横纵坐标进行拉伸,x 拉伸 5 倍,也就是说现在的50px等于原来的250px。
3.3 旋转
也是将坐标轴进行旋转的,以 x 轴正方向为 0 度,顺时针方向为正的角度
ctx.rotate(Math.PI / 6);
ctx.fillRect(0, 0, 50, 50);
这里正方向就旋转走了。
🐯 先旋转再平移和先平移再旋转是不一样的
ctx.translate(300, 200);
ctx.rotate(Math.PI / 4);
ctx.fillRect(-250, -25, 500, 50);
效果如图所示

ctx.rotate(Math.PI / 4);
ctx.translate(300, 200);
ctx.fillRect(-250, -25, 500, 50);
先旋转再平移

3.4 transforms
使用一个方法对矩阵坐标进行修改,包括位移、缩放、旋转。计算机图形学
transform(a, b, c, d, e, f)这个方法是将当前的变形矩阵乘上一个基于自身参数的矩阵
[ a, c, e b, d, f 0, 0, 1 ]a水平方向的缩放b竖直方向的倾斜偏移c水平方向的倾斜偏移d竖直方向的缩放e水平方向的移动f竖直方向的移动只进行位移
ctx.translate(100, 100);等价于
ctx.transform(1, 0, 0, 1, 100, 100);水平坐标轴不变,第一二个参数
(1, 0)竖直坐标轴不变,第三四个参数
(0, 1)也是理解为,
a d都取 1,就是不缩放,b c取0,不进行偏移不管了,用前面的那三个就行
4. 合成
CanvasRenderingContext2D:globalCompositeOperation 属性 - Web API | MDN
ctx.fillStyle = "rgb(0, 0, 255)";
ctx.fillRect(300, 200, 100, 100);
ctx.fillStyle = "rgb(255, 0, 0)";
ctx.fillRect(250, 150, 100, 100);
默认的效果是后来的会叠加到原来的图像上。也就是默认的
source-over,图像之间的叠加处理有二三十种,在需要的时候查看一下文档。使用
source-in取重叠部分ctx.fillStyle = "rgb(0, 0, 255)"; ctx.fillRect(300, 200, 100, 100); ctx.globalCompositeOperation = "source-in"; // 必须写在这个位置 ctx.fillStyle = "rgb(255, 0, 0)"; ctx.fillRect(250, 150, 100, 100);
ctx.globalCompositeOperation = "source-in";
ctx.fillStyle = "rgb(0, 0, 255)";
ctx.fillRect(300, 200, 100, 100);

ctx.fillStyle = "rgb(255, 0, 0)";
ctx.fillRect(250, 150, 100, 100);
如果这么写,原来画布是空白的,和第一个绘制的蓝色图形是没有重叠的,那重叠后结果就是空白,空白和第二个绘制的红色图形又没有重叠,结果又是空白。
实现刮刮乐
<!DOCTYPE html> <html lang="en"> <head> <meta charset="UTF-8"> <meta name="viewport" content="width=device-width, initial-scale=1.0"> <title>Document</title> <style> .container{ position: relative; } #ggk{ width: 600px; height: 400px; margin: 0; padding: 0; position: absolute; top: 180px; left: 260px; z-index: -10; } </style> </head> <body> <div class="container"> <canvas id="c1" width="600" height="400"> 当前浏览器不支持 canvas, 请下载最新的浏览器 <a href="https://www.google.cn/intl/zh-CN/chrome/">立即下载</a> </canvas> <div id="ggk">谢谢惠顾</div> </div> <script> let c1 = document.getElementById("c1"); let ctx = c1.getContext("2d"); ctx.fillStyle = "lightgray"; ctx.fillRect(0, 0, 600, 400); let isDraw = false; c1.onmousedown = function(){ isDraw = true; } c1.onmouseup = function(){ isDraw = false; } c1.onmousemove = function(e){ if(isDraw){ const x = e.pageX; const y = e.pageY; ctx.globalCompositeOperation = "destination-out"; ctx.fillStyle = "lightpink"; ctx.arc(x, y, 20, 0, 2*Math.PI); ctx.fill(); } } </script> </body> </html>5. 裁剪
将某个区域进行显示,其余部分不显示,使用
cliplet c1 = document.getElementById("c1"); let ctx = c1.getContext("2d"); let chatPath = new Path2D(); chatPath.moveTo(200, 300); chatPath.quadraticCurveTo(150, 300, 150, 200); chatPath.quadraticCurveTo(150, 100, 300, 100); chatPath.quadraticCurveTo(450, 100, 450, 200); chatPath.quadraticCurveTo(450, 300, 250, 300); chatPath.quadraticCurveTo(250, 350, 150, 350); chatPath.quadraticCurveTo(200, 350, 200, 300); ctx.strokeStyle = "lightblue"; // ctx.stroke(chatPath); ctx.clip(chatPath); let img = new Image(); img.src = "./girl.jpg"; img.onload = function(){ ctx.drawImage(img, 0, 0, 600, 400); }
6. 状态的恢复与保存
save()保存画布的所有状态restore()恢复画布的上一个状态Canvas 状态存储在栈中,每当 save 方法被调用后,当前的状态被推送到栈中保存。绘画状态包括
- 当前的变形(即移动,缩放,旋转)
- 属性
- strokeStyle
- fillStyle
- globalAlpha
- lineWidth
- lineCap
- lineJoin
- miterLimit
- lineDashOffset
- shadowOffsetX
- shadowOffsetY
- shadowBlur
- shadowColor
- globalCompositeOperation
- font
- textAlign
- textBaseline
- direction
- imageSmoothingEnabled
- 当前的裁剪路径
clipping path
ctx.fillStyle = "red";
ctx.fillRect(0, 0, 50, 50);
ctx.save(); // 存

ctx.fillStyle = "blue";
ctx.fillRect(0, 50, 50, 50);
ctx.save(); // 存

ctx.fillStyle = "yellow";
ctx.fillRect(0, 100, 50, 50);
ctx.save(); // 存

ctx.restore(); // 取
ctx.fillRect(0, 150, 50, 50);

ctx.restore(); // 取
ctx.fillRect(0, 200, 50, 50);

ctx.restore(); // 取
ctx.fillRect(0, 250, 50, 50);
7. 图片像素操作
可以直接通过 ImageData 对象操纵像素数据,直接读取或将数据数组写入该对象中。
const img = new Image();
img.src = "./girl.jpg";
img.onload = function(){
    ctx.drawImage(img, 0, 0, 600, 400);
    // 获取图片的数据
    let imageData = ctx.getImageData(0, 0, 600, 400);
    console.log(imageData);

    for(let i = 0; i < imageData.data.length; i += 4){
        // 计算灰度
        const avg = (imageData.data[i] +
            imageData.data[i + 1] +
            imageData.data[i + 2]) / 3;

        imageData.data[i] = imageData.data[i + 1] = imageData.data[i + 2] = avg;
    }

    ctx.putImageData(imageData, 0, 0, 300, 200, 300, 200);
}
其中,输出的
imageData如下所示,数组是一维的,每相邻四个值代表某个像素的rgba
putImageData中的七个参数,第二三个是目标画布中放置图像数据的x,y。第四五个是提取图像数据的左上角的x,y,默认为0,0。第六七是要绘制矩形的宽高,默认为图像的宽高。8. 封装
let c1 = document.getElementById("c1");
let ctx = c1.getContext("2d");

class Heart {
    constructor(x, y){
        // 定义绘图的初始位置
        this.x = x;
        this.y = y;
        // 填充的颜色
        this.color = "red";
        // 路径保存
        this.heartPath = new Path2D();
        // 记录鼠标是否在该图形中
        this.isIn = false;
        // 事件列表
        this.eventMapList = {
            hover: [],
            leave: []
        }
		 // 鼠标事件
        c1.onmousemove = (e) => {
            let x = e.offsetX;
            let y = e.offsetY;
            this.isIn = ctx.isPointInPath(this.heartPath, x, y);
            if(this.isIn){
                this.eventMapList.hover.forEach((item) => {
                    item();
                })
            }else{
                this.eventMapList.leave.forEach((item) => {
                    item();
                })
            }
        }
    }

    // 添加 hover 事件
    onHover(fn){
        this.eventMapList.hover.push(fn);
    }
	 // 添加 leave 事件
    onLeave(fn){
        this.eventMapList.leave.push(fn);
    }

    setPosition(x, y){
        this.x = x;
        this.y = y;
    }

    // 绘图
    draw() {
        this.heartPath.moveTo(this.x, this.y);
        this.heartPath.bezierCurveTo(
            this.x + 50,
            this.y - 50,
            this.x + 100,
            this.y,
            this.x,
            this.y + 50
        );
        this.heartPath.bezierCurveTo(
            this.x - 100,
            this.y,
            this.x - 50,
            this.y - 50,
            this.x,
            this.y
        );
        // 在绘制前先保存画布原来的状态,用完再恢复
        ctx.save();
        ctx.fillStyle = this.color;
        ctx.fill(this.heartPath);
        ctx.restore();
    }
}

let heart = new Heart(100, 100);
// 添加事件
heart.onHover(() => {
    heart.color = "blue";
    heart.draw();
})
heart.onLeave(() => {
    heart.color = "red";
    heart.draw();
})
heart.draw();

// 动画帧
function render(){
    ctx.clearRect(0, 0, c1.width, c1.height);
    heart.draw();
    requestAnimationFrame(render);
}
render();
9. 保存
saveBtn.onclick = function (){ let urlData = canvas.toDataURL(); let img = new Image(); img.src = urlData; let downloadA = document.createElement('a'); downloadA.setAttribute('download', '...'); downloadA.href = urlData; downloadA.click(); // 点击按钮后自己下载 } -
-
相关阅读:
【笔记】保留两位小数的金额正则表达式
猿创征文|我的 Java 成长之路
MFC Windows 程序设计[152]之耍酷滑动滚动条
OPENAI 开发者大会_观后感_231107
python中items()函数
小项目中怎么防止Vue的闪现画面效果
微调(linear probing和 full finetune)技巧
cpu实时数据是什么意思?
了解eslint的使用
显示 frames per second
- 原文地址:https://blog.csdn.net/weixin_57796792/article/details/143331703