-
Spring Cloud全家桶(上)【Nacos、OpenFeign、LoadBalancer、GateWay、金丝雀灰色发布】
0.零基础入门微服务实战课
- 1.微服务和 Spring Cloud
- 2.为什么要学微服务?
- 3.Spring Cloud 组件介绍
- 1.什么是 Nacos?
- 2.Nacos 基本使用
- 1.什么是 OpenFeign?
- 2.OpenFeign 基础使用
- 3.超时重试机制
- 4.自定义超时重试机制
- 5.超时重试底层实现
- 1.什么是 LoadBalancer?
- 2.为什么要学 LoadBalancer?
- 3.如何使用?
- 4.默认负载均衡策略
- 5.随机负载均策略
- 6.Nacos 权重负载均器
- 7.自定义负载均衡器
- 8.缓存
- 9.执行原理
- 1.什么是网关?
- 2.网关有什么用?
- 3.Spring Cloud Gateway 组成
- 4.Spring Cloud Gateway 基础使用
- 5.匹配多个 Path
- 6.更多断言 (Predicate) 类型
- 7.Gateway+Nacos+LoadBalancer
- 8.过滤器
- 限流
- 重试过滤器
- 9.工作原理
- 代码地址
- 全链路灰色发布
- 流程思路(先到网关、再调用nacos服务,nacos服务根据负载均衡器调用)
- 1.负载均衡模块
- 2.网关模块
- 3.服务模块
- 思路
1.微服务和 Spring Cloud
1.1 什么是微服务?
==微服务是将一个大型的、单一的应用程序拆分成多个小型服务,每个服务负责实现特定的业务功能,==并且可以通过网络通信与其他服务通讯。
微服务的优点是开发更灵活(不同微服务可以使用不同开发语言)、更容易维护、更好的可伸缩性和可用性更高,以及更好的团队协作。1.2 什么是 Spring Cloud?
Spring Cloud 是一个用于构建分布式系统和微服务架构的开发工具集合。它基于 Spring Framework,为开发人员提供了一套简化分布式系统开发的解决方案。
Spring Cloud 提供了一系列的组件和库,用于实现分布式系统的常见功能和模式,包括服务注册与发现、负载均衡、断路器、配置管理、消息总线、分布式追踪、网关等等。它简化了在构建分布式系统时所需的开发工作,并提供了一致而可靠的开发模式。
通过使用 Spring Cloud,开发人员可以快速构建基于微服务架构的应用程序,并将各个微服务协调管理起来。这样,每个微服务可以根据自身的需求独立开发、部署和扩展,通过服务间的调用和协作来实现整体功能。1.3 微服务 VS Spring Cloud
微服务是一种架构思想,而 Spring Coud 是对于微服务实现的一种规范。当然很多地方也把 Spring Cloud 用来代指微服务,但二者还是不同的,前者是思想,或者是规范。
思想 VS 规范- 思想是指解决问题或完成任务的方法、策略或思考方式
- 规范是一组详细的规则、指南或标准,用于确保系统、组件或功能在实际开发中按照某个特定的方法或标准进行实现。
2.为什么要学微服务?
Java从业者学习微服务有几个重要原因:
-
可扩展性和灵活性: 微服务架构允许将应用程序拆分成小型、独立的服务,每个服务专注于单一功能。这种分解提高了系统的灵活性和可扩展性,有利于应对不断变化的需求和规模。
-
技术多样性: 微服务架构通常采用多语言和多技术栈的方式,使得开发团队可以选择最适合其需求的技术来构建特定的服务。对于Java从业者来说,学习微服务意味着他们有机会接触和掌握其他语言和技术,拓宽自己的技术栈。
-
团队协作和快速交付: 微服务架构将大型应用程序拆分成小的团队可以独立开发和部署的服务,这种方式促进了团队之间的协作,同时也能够实现快速交付和持续集成/部署。
-
容错性和可维护性: 微服务的独立部署和运行使得系统更加容错,即使一个服务发生故障,也不会影响到整个系统的运行。此外,每个微服务都可以独立进行开发、测试和部署,有利于系统的维护和演进。
-
云原生和容器化: 微服务与云原生应用开发和容器化技术紧密相关,如Docker和Kubernetes等。Java从业者学习微服务也就意味着他们有机会学习和应用这些先进的技术,为将来的职业发展打下基础。
3.Spring Cloud 组件介绍
Spring Cloud Alibaba 是一套基于 Spring Cloud 的开源框架,它提供了一系列与阿里巴巴生态相关的组件和工具,帮助开发者快速构建和部署分布式应用和微服务架构。以下是 Spring Cloud Alibaba 的一些核心组件介绍:
-
Nacos(注册中心和配置中心):Nacos 是一个功能强大的注册中心和配置中心,支持动态服务发现、服务健康检查、动态配置管理等功能。
-
Sentinel(流量控制和熔断降级):Sentinel 提供了流量控制、熔断降级、系统负载保护等功能,帮助保障微服务架构的稳定性和可靠性。
-
RocketMQ(消息队列):RocketMQ 是一款高可靠、高吞吐量的分布式消息队列,适用于大规模分布式系统中的消息通信和异步处理。
-
Dubbo(RPC 框架):Dubbo 是一款高性能的远程服务调用框架,支持多种协议和序列化方式,能够实现微服务之间的远程调用。
-
Seata(分布式事务):Seata 是一个开源的分布式事务解决方案,支持分布式事务的一致性和高性能。
-
Alibaba Cloud SDK(阿里云 SDK):提供了与阿里云产品集成的各种 SDK,方便开发者在 Spring Cloud 应用中使用阿里云的各种服务,如对象存储、数据库、消息队列等。
这些组件和工具共同构成了 Spring Cloud Alibaba 生态系统,为开发者提供了一站式的解决方案,帮助他们构建可靠、高效的分布式应用和微服务架构。
1.Nacos 入门与实战
- 1.微服务和 Spring Cloud
- 2.为什么要学微服务?
- 3.Spring Cloud 组件介绍
- 1.什么是 Nacos?
- 2.Nacos 基本使用
- 1.什么是 OpenFeign?
- 2.OpenFeign 基础使用
- 3.超时重试机制
- 4.自定义超时重试机制
- 5.超时重试底层实现
- 1.什么是 LoadBalancer?
- 2.为什么要学 LoadBalancer?
- 3.如何使用?
- 4.默认负载均衡策略
- 5.随机负载均策略
- 6.Nacos 权重负载均器
- 7.自定义负载均衡器
- 8.缓存
- 9.执行原理
- 1.什么是网关?
- 2.网关有什么用?
- 3.Spring Cloud Gateway 组成
- 4.Spring Cloud Gateway 基础使用
- 5.匹配多个 Path
- 6.更多断言 (Predicate) 类型
- 7.Gateway+Nacos+LoadBalancer
- 8.过滤器
- 限流
- 重试过滤器
- 9.工作原理
- 代码地址
- 全链路灰色发布
- 流程思路(先到网关、再调用nacos服务,nacos服务根据负载均衡器调用)
- 1.负载均衡模块
- 2.网关模块
- 3.服务模块
- 思路
1.什么是 Nacos?
Nacos /na:kats/是 Dynamic Naming and Confiquration Service 的首字母简称,一个更易于构建云原生应用的动态服务发现、配置管理和服务管理平台。
Nacos 致力于帮助您发现、配置和管理微服务。Nacos 提供了一组简单易用的特性集,帮助您快速实现动态服务发现、服务配置、服务元数据及流量管理。
Nacos 帮助您更敏捷和容易地构建、交付和管理微服务平台。 Nacos 是构建以“服务”为中心的现代应用架构(例如微服务范式、云原生范式)的服务基础设施。1.1 Nacos 功能
- 配置中心
- 注册中心
1.1.1 配置中心
配置中心是一种集中化管理配置的服务。
它的主要作用有以下几个:- 集中管理配置信息: 配置中心将不同服务的配置信息集中放在一起进行管理,实现了配置信息的集中存储。
- 动态更新配置: 配置中心中的配置信息可以通过操作界面或 API进行动态更新,无需重启服务就可以应用最新的配置信息。
- 配置信息共享: 将配置集中在配置中心中,不同的服务实例可以共享同一套配置信息。
- 配置信息安全: 配置中心可以对配置信息提供安全管理、权限控制等管理功能.
- 信息追溯: 支持配置版本管理、历史记录等管理功能。
1.1.2 注册中心
注册中心是微服务架构中的一个重要组件,用于实现服务的注册与发现。
注册中心的主要作用包括以下几个:- 服务注册: 服务实例启动时,将自身信息注册到注册中心,包括服务名称、地址、端口等。
- 服务发现: 消费者向注册中心查询服务,并获取服务实例信息来访问服务。
- 服务健康检查: 注册中心定期检查服务实例健康状况,过滤不健康实例。
- 服务路由: 提供服务的路由与负载均衡功能。
- 服务监控: 统计服务调用次数,时长等,用于监控服务状态。
- 服务更新: 当服务实例信息变更时,向注册中心发送更新信息通知。
通过注册中心,服务提供者和消费者只需与注册中心交互即可,从而实现服务的注册与发现,降低了服务间的耦合度。
1.2 Nacos 优点
- 简单易用:经过几万人使用反馈优化,简单易用。
- 特性丰富:阿里十年软负载在这个领域积累丰富特性,提供了丰富的特性。
- 超高性能:苛刻场景要求极致性能。
- 超大容量:经受了阿里规模经济的强大容量测试,可用于生产级别的超大型系统。
- 高可用:双十一不能失败,造就了高可用能力。
2.Nacos 基本使用
2.1 Nacos 部署安装
2.1.1 部署方式
Nacos 有以下三种部署方式:
- 单机模式:将注册中心、配置中心等功能集成在一个进程内,全部部署在一台机器上,适用于测试和单机试用。
- 集群模式:多个 Nacos 服务器实例组成一个集群。这些实例通过相互通信和协调工作,共同提供服务注册、配置管理和服务发现等功能。在集群模式下,所有的实例共享相同的数据,数据变更会自动同步到所有的实例中,客户端可以随机选择任意一个实例进行注册和发现服务。
- 多集群模式:多集群模式是为了满足在不同区域或网络中进行部署和扩展的需求。在多集群模式中,可以选择将不同的 Nacos 实例组成多个相互独立的集群,每个集群可以拥有自己独立的配置和注册中心,并可以跨集群进行服务注册和发现。多集群模式适用于分布式系统的多区域部署,并可以使用不同的网络和存储设施。每个集群具有独立的数据和配置,但可以通过自定义的同步机制在集群之间共享数据。
多集群的作用:
- 不同机房部署:将 Nacos 集群分布在不同的机房,实现异地多活,提高服务的可用性。当单个机房不可用时,通过域名解析可快速切换到另一个机房的服务。
- 不同运营商部署:跨运营商部署 Nacos 集群,避免单一运营商网络问题导致服务中断。
2.1.2 安装并启动
① 预备环境准备
Nacos 安装和运行需要依赖 JDK 环境,因此在安装之前,需要先在服务器安装 JDK 1.8+ 的环境
② 安装并启动
Nacos 有以下两种安装方式:- 源码安装
- 编译压缩包安装(推荐)
推荐使用编译压缩包安装,操作更简单,出现问题的概率更小。编译压缩包安装流程:
下载压缩包:从 https://github.com/alibaba/nacos/releases 下载最新编译后的压缩包;解压压缩包:使用 unzip nacos-server- v e r s i o n . z i p 或者 t a r − x v f n a c o s − s e r v e r − version.zip 或者 tar -xvf nacos-server- version.zip或者tar−xvfnacos−server−version.tar.gz;- 进入 Nacos 运行目录:cd nacos/bin;
- 启动 Nacos 服务:
a.Linux/MacOS:sh startup.sh -m standalone 启动 Nacos 单机模式;
b.Windows:startup.cmd -m standalone 启动 Nacos 单机模式。
启动成功之后就可以使用:http://localhost:8084/nacos 访问 Nacos 的控制台了,如下图所示

集群部署
2.2.3 配置数据源
Nacos 单机模式默认使用的是内置的嵌入式数据库 Derby 作为数据存储的,但是 Derby 不适合承载生产环境大规模部署,因为它有以下限制:
- 数据存储容量最大只有 2GB;
- 不支持集群模式下数据的高可用复制;
- 性能和并发能力有限。
因此,在生产环境中使用单机模式时,可以使用外置数据库作为数据存储,比如 MySQL。
数据源切换为 MySQL
Nacos 0.7 版本增加了支持 MySQL 数据源能力,具体的操作步骤:- 安装数据库,版本要求:5.6.5+;
- 初始化 MySQL 数据库,数据库初始化文件:mysql-schema.sql;
- 修改 Nacos 安装目录中 conf/application.properties 文件,增加支持 MySQL 数据源配置,添加 MySQL 数据源的 URL、用户名和密码,配置如下:
1 spring.datasource.platform=mysql
2 db.num=1
3 db.url.0=jdbc:mysgl://localhost:3306/nacos?characterEncoding=utf8&connectTimeout=1000&socketT
4 db.user=nacos devtest
5 db.password=youdontknow
再以单机模式启动 Nacos,Nacos 所有写嵌入式数据库的数据都写到了 MySQL。
最后重启 Nacos 服务。2.2.4 开启控制台授权登录(可选)
首先,找到 Nacos 安装目录的中的 conf/application.properties 文件,修改以下几次内容为以下配置
nacos.core.auth.enabled=true1
nacos,core.auth,plugin,nacos,token.secret.key=SecretKey012345678901234567890123456789012345672# 访问 Nacos 敏感接囗的白名单,key 和 value 必须要有值3
nacos.core.auth.server.identity.key=nacos“
5 nacos.core.auth.server.identity.value=nacos
2.2 配置中心使用

2.2.1 创建配置信息

参数说明:
- 命名空间(线上、线下、测试):Nacos 基于命名空间(Namespace)帮助用户逻辑隔离多个命名空间,这可以帮助用户更好的管理测试、预发、生产等多环境服务和配置,让每个环境的同一个配置(如数据库数据源)可以定义不同的值
- Data ID(项目名称):配置的唯一标识,用于查找配置文件。
- Group:配置分组,用于设置小组信息,例如 DEV GROUP 开发小组,TEST GROUP 测试小组,
2.2.2 Spring Boot 使用配置中心 ★

Spring Boot 项日使用配置中心,实现步骤如下
1. 项目中添加 nacos-config 依赖。
2. 在项目配置文件(application.properties)中设置 Nacos 相关信息。
3. 使用 @Value 注解和 @RefreshScope 实现配置的读取和自动更新。
①添加配置中心依赖
        <dependency>
            <groupId>com.alibaba.cloudgroupId>
            <artifactId>spring-cloud-starter-alibaba-nacos-configartifactId>
        dependency>
②设置 Nacos 服务端信息
在项目配置文件(application.properties)中添加如下信息:# Nacos认证信息 spring.cloud.nacos.config.username=nacos spring.cloud.nacos.config.password=nacos spring.cloud.nacos.config.contextPath=/nacos # 设置配置中心服务端地址 spring.cloud.nacos.config.server-addr=localhost:8848 # Nacos 配置中心的namespace。需要注意,如果使用 public 的 namcespace ,请不要填写这个值,直接留空即可 # spring.cloud.nacos.config.namespace= #spring.cloud.nacos.config.group= spring.config.import=nacos:nacos-config-example③ 读取配置文件
@RestController
@RefreshScope
public class TestController {
    @Value("${myconfig}")
    private String myconfig;

    @RequestMapping("/getconfig")
    public String getMyconfig() {
        return myconfig;
    }
}
2.3 注册中心使用

注册中心通常有两个角色:- 服务提供者(也叫生产者):对外提供服务的微服务应用。它会把自身的服务地址注册到注册中心,以供消费者发现和调用。
- 服务消费者(也叫消费者):调用其他微服务的应用程序。它会向注册中心订阅自己需要的服务,并基于服务提供者注册的信息发起远程调用。
2.3.1 生产者实现 ★
生产者实现步骤总共有以下 3 步:
1. 添加 nacos-discovery 框架支持
2. 配置 nacos 服务器端信息
3. 编写调用接口
①添加注册中心依赖
        <dependency>
            <groupId>com.alibaba.cloudgroupId>
            <artifactId>spring-cloud-starter-alibaba-nacos-discoveryartifactId>
        dependency>
② 设置 Nacos 服务端信息
spring:
  application:
    name: nacos-discovery-demo # Nacos 服务名(很重要,命名不用使用“_”)
  cloud:
    nacos:
      discovery:
        server-addr: localhost:8848
        username: nacos
        password: nacos
        ephemeral: true # 设置此服务为永久实例
#        group: TEST_GROUP
server:
  port: 0 # 动态端口
③ 编写调用接口
@RestController
@RequestMapping("/user")
public class UserController {

    @Autowired
    private ServletWebServerApplicationContext context;

    @RequestMapping("/getnamebyid")
    public String getNameById(Integer id) throws InterruptedException {
        System.out.println("-------------------- Do Provider getNameById method."
                + LocalDateTime.now());
        Thread.sleep(1500);
        return "provider-name-" + id +
                " | port:" + context.getWebServer().getPort();
    }
}


2.3.2 消费者实现


注册中心消费者的实现比生产者要复杂一些,首先是消费者要调用生产者的 HTTP 接口,需要引入 Spring CloudOpenFeign 进行 HTTP 调用,其次为了实现负载均衡,我们还需要添加客户端负载均衡器 Spring CloudLoadBalancer.Spring Cloud OpenFeign:Spring Cloud OpenFeign 是 Spring Cloud 生态系统中的一个组件,它是基于Netflix 的 Feign 库开发的,用于简化和优化微服务架构中的服务间通信。Spring Cloud OpenFeign 提供了-种声明式的方式来定义和调用 HTTP API,使得服务间的通信变得更加简单和直观。通过使用注解和接口定义,开发人员可以轻松地声明需要调用的远程服务的接口和方法,并且无需编写繁琐的 HTTP 请求代码。Spring Cloud LoadBalancer:Spring Cloud 团队提供的一种客户端负载均衡器。负载均衡(Load Balancer):一种在多个服务实例之间分配负载和流量的技术,目的是提高服务的整体性能和可靠性。
消费者的实现步骤如下:
1.添加依赖(注册中心、Openfeign、Spring Cloud LoadBalancer)
        <dependency>
            <groupId>com.alibaba.cloudgroupId>
            <artifactId>spring-cloud-starter-alibaba-nacos-discoveryartifactId>
        dependency>
        <dependency>
            <groupId>org.springframework.cloudgroupId>
            <artifactId>spring-cloud-starter-loadbalancerartifactId>
        dependency>
        <dependency>
            <groupId>org.springframework.cloudgroupId>
            <artifactId>spring-cloud-starter-openfeignartifactId>
        dependency>
2.配置 Nacos 服务端信息
spring:
  application:
    name: nacos-consumer-demo
  cloud:
    nacos:
      discovery:
        server-addr: localhost:8848
        username: nacos
        password: nacos
        register-enabled: false # 消费者(不需要将此服务注册到nacos)
#    openfeign:
#      client:
#        config:
#          default:
##            connect-timeout: 1000 # 连接超时时间
##            read-timeout: 1000 # 读取超时时间
##            retryer: com.example.consumer.config.CustomRetryer
server:
  port: 8080
3.在项目中开启 Openfeign
@SpringBootApplication
@EnableFeignClients // 开启 OpenFeign
public class ConsumerApplication {

    public static void main(String[] args) {
        SpringApplication.run(ConsumerApplication.class, args);
    }

}
4.编写 Openfeign 调用代码
@Service
@FeignClient("nacos-discovery-demo") // 表示调用 nacos 中的 nacos-discovery-demo 服务
public interface UserService {

    @RequestMapping("/user/getnamebyid") // 调用生产者的"/user/getnamebyid"接口
    public String getNameById(@RequestParam("id") int id);

}
5.编写代码通过 Openfeiqn 调用生产者
@RestController
public class BusinessController {

    @Autowired
    private UserService userService;

    @RequestMapping("/getnamebyid")
    public String getNameById(Integer id){
        return userService.getNameById(id);
    }

}
2.3.3 注册中心参数说明

重要参数说明:
-
分组 :注册服务所在的组名,默认是 DEFAULT_GROUP,例如:研发小组,测试小组等。
-
保护闽值:健康节点要求的最小百分比。用于在服务出现不健康实例时,阻止流量过度向少量健康实例集中保护服务的整体可用性。保护阈值应设置为一个0到1之间的浮点数,默认值为 0。当集群中的健康实例占比小于设置的保护阈值时,就会触发阈值保护功能。触发保护阈值后,Nacos 会将全部实例(健康实例+非健康实例)返回给调用者,虽然可能会损失一部分流量,但能保证集群中剩余的健康实例能正常工作。
-
服务路由类型:用于实现不同的路由需求,常见的路由类型有以下两种:
none:默认路由,基于权重的轮询负载均衡路由策略。
label:标签路由,相同标签的实例会被聚合为一个集群,不同标签则实现流量隔离 -
临时实例:Nacos 中的实例分为临时实例和永久实例(也叫持久实例),临时实例的生命周期和服务的运行周期相同,服务停止运行 Nacos 中就会将临时实例删除;而永久示例即时程序终止,也会保留在 Nacos 中。在配置文件中通过:spring.cloud.nacos.discovery.ephemeral=true 设置。
-
权重:用于实现负载均衡,取值范围1到 100,数值越大,权重越大,负载均衡被分配的概率也就越高。
临时实例 VS 永久实例
永久实例(persistent instance)和临时实例(ephemeral instance)是注册中心的两种不同的服务类型,永久实例(Persistent Instance):是指注册到 Nacos 的服务实例,其注册信息会一直保留在 Nacos 服务器。上,直到主动注销或被删除。这意味着即使服务实例下线或不可用,它的注册信息仍然会保留在 Nacos 上,直到显式取消注册。永久实例适用于需要长期存在的服务,比如稳定部署的服务或长时间运行的后端服务。
临时实例(Ephemeral Instance):是指注册到 Nacos 的服务实例,其注册信息在实例下线或不可用时会自动被删除。如果服务实例下线、断开连接或主动注销,Nacos 会自动从注册表中删除这些实例的信息。临时实例适用于临时性的服务实例,比如临时加入集群的短期任务或特定场景下的临时服务。2.3.4 健康检测机制
Nacos 中的健康检测机制是用来检查服务健康状态的,只有健康的节点才会被服务消费端调用,这样才能保证程序稳定、正常的运行。
Nacos 中提供了两种健康检测的机制:- 客户端主动上报(健康状态的)机制。
- 服务器端反向探测(健康状态的)机制,
如何理解这两种机制呢?
想象一下这么一个场景,你所在的地区突然发生地质灾書,你被掩盖在废墟下面,搜救队必须要知道你在废墟里面,那么才能对你进行施救。那有什么方法可以让救援队知道你在废墟下面?
- 第一种,你在废墟里面大喊 help! help!Iam here!,让搜救队知道你的位置和健康状态。
- 第二种,搜救队使用了他们的专业检查设备,探测到你正埋在废墟下面。
以上这两种方法和 Nacos 的两种健康检测机制类似,也就是客户端主动上报机制,是客户端每隔一段时间,主动向 Nacos 服务器端上报自己的健康状况,而服务器端反向探测机制是 Nacos 服务器端来检测客户端是否健康。
临时实例:主动上报
永久实例:反向探测- 临时实例(也可以叫做非持久化实例):对应的是客户端主动上报机制。
- 永久实例(也可以叫做持久化实例):服务端反向探测机制。健康检查机制执行流程
在 Nacos 中,用户可以通过两种方式进行临时实例的注册,通过 Nacos 的 OpenAPI 进行服务注册或通过 Nacos提供的 SDK 进行服务注册。而 OpenAPI 和 SDK 的健康检测机制是不同的,它们的区别如下。
- OpenAPI 的注册方式实际是用户根据自身需求调用 Http 接口对服务进行注册,然后通过 Http 接口发送心跳到注册中心。在注册服务的同时会注册一个全局的客户端心跳检测的任务。在服务一段时间没有收到来白客户端的心跳后,该任务会将其标记为不健康,如果在间隔的时间内还未收到心跳,那么该任务会将其剔除。
- SDK 的注册方式实际是通过 RPC 与注册中心保持连接(Nacos 2.x 版本中,旧版的还是仍然通过 OpenAPI 的方式),客户端会定时的通过 RPC 连接向 Nacos 注册中心发送心跳,保持连接的存活。如果客户端和注册中心的连接断开,那么注册中心会主动剔除该 client 所注册的服务,达到下线的效果。同时 Nacos 注册中心还会在注册中心启动时,注册一个过期客户端清除的定时任务,用于删除那些健康状态超过一段时间的客户端。从上面的特点我们可以发现,对于不同类型的使用方式,Nacos 对于健康检查的特点实际都是相同的,都是由客户端向注册中心发送心跳,注册中心会在连接断开或是心跳过期后将不健康的实例移除。
这两种方式相同的是:临时实例每隔5秒会主动上报一次自己的健康状况,发送的数据包叫做心跳包,发送心跳包的机制叫做心跳机制。如果心跳包的间隔时间超过了 15 秒,那么 Nacos 服务器端就会将此服务实例标记为非健康实例,如果心跳包超过了 30s秒,那么 Nacos 服务器端将会把此服务实例从服务列表中删除掉。
3.1 配置自动刷新原理
Nacos 配置中心是支持配置项自动刷新的,而其实现的原理是通过长轮询+事件驱动的方式来实现的,具体来说:
- 客户端向 Nacos 服务器发送一个带有监听器(Listener)的请求,以获取某个特定配置的值。
- Nacos 服务器接收到请求后,会检查该配置是否发生了变化。如果没有变化,则该请求将被阻塞,直到超时或配置发生变化。
- 当配置发生变化时,Nacos 服务器会立即响应,并将新的配置值返回给客户端
4.客户端接收到新的配置值后,可以根据需要更新自身的配置。
长轮询 VS 长连接
长轮询和长连接是不同的,长轮询是一种通过挂起请求等待服务器响应的方式来实现实时通信,而长连接则是-种客户端与服务器之间保持持久性连接,来实现实时数据传输和通信的方式。但长轮询更节省资源,降低了服务器的负载和网络带宽,长轮询只是有数据时才响应请求,避免了空闲请求,降低了负载和网络带宽。3.2 注册中心底层实现
Nacos 注册中心的底层实现主要依赖于两个关键组件:服务注册(Service Register)和服务发现(ServiceDiscovery
服务注册:是指将服务实例的元数据(包括 IP 地址、端口号、服务名称等)注册到 Nacos 服务器上,以便其他服务能够发现和访问该服务。在服务启动时,它会向 Nacos 服务器发送一个注册请求,将自身的信息注册到持定的命名空间和分组中,
服务发现:是指根据服务名称从 Nacos 服务器获取已注册的服务实例列表,并将其提供给需要调用该服务的服务消费者。消费者可以通过调用 Nacos 提供的 API 或集成 Nacos 客户端库来获取服务实例列表。具体来说,Nacos 注册中心的实现包括以下几个步骤:
服务注册:当服务启动时,它会向 Nacos 服务器发送一个注册请求,包含自己的元数据信息。Nacos 服务器接收到注册请求后,在内存中维护一个注册表,将服务实例的元数据保存起来,用于后续的服务发现。
心跳机制:注册成功后,服务实例会定期向 Nacos 服务器发送心跳请求,以表明自己的健康状态和可用性。这样 Nacos 服务器可以监控各个服务实例的状态,并及时剔除不可用或下线的实例。
它会向 Nacos 服务器发送一个服务发现请求,包含所需服务的服务发现:当服务消费者需要访问某个服务时名称。Nacos 服务器根据服务名称查找注册表,并返回该服务的实例列表给消费者
负载均衡:在服务发现的过程中,Nacos 还提供了负载均衡的支持。消费者可以选择合适的负载均衡策略来选择其中一个或多个服务实例进行调用。2.OpenFeign 入门与使用
- 1.微服务和 Spring Cloud
- 2.为什么要学微服务?
- 3.Spring Cloud 组件介绍
- 1.什么是 Nacos?
- 2.Nacos 基本使用
- 1.什么是 OpenFeign?
- 2.OpenFeign 基础使用
- 3.超时重试机制
- 4.自定义超时重试机制
- 5.超时重试底层实现
- 1.什么是 LoadBalancer?
- 2.为什么要学 LoadBalancer?
- 3.如何使用?
- 4.默认负载均衡策略
- 5.随机负载均策略
- 6.Nacos 权重负载均器
- 7.自定义负载均衡器
- 8.缓存
- 9.执行原理
- 1.什么是网关?
- 2.网关有什么用?
- 3.Spring Cloud Gateway 组成
- 4.Spring Cloud Gateway 基础使用
- 5.匹配多个 Path
- 6.更多断言 (Predicate) 类型
- 7.Gateway+Nacos+LoadBalancer
- 8.过滤器
- 限流
- 重试过滤器
- 9.工作原理
- 代码地址
- 全链路灰色发布
- 流程思路(先到网关、再调用nacos服务,nacos服务根据负载均衡器调用)
- 1.负载均衡模块
- 2.网关模块
- 3.服务模块
- 思路
1.什么是 OpenFeign?
OpenFeign 的全称为 Spring Cloud OpenFeign(下文简称 OpenFeign),是 Spring Cloud 团队开发的一款基于Feign 的框架,声明式 Web 服务客户端。
Feign 是 Netfix 开源的一个声明式的 Web 服务客户端,它简化了基于 HTTP 的服务调用,使得服务间的通信变得更加简单和灵活。Feiqn 通过定义接口、注解和动态代理等方式,将服务调用的过程封装起来,开发者只需要定义服务接口,而无需关心底层的 HTTP 请求和序列化等细节。
OpenFeign 功能升级
OpenFeign 在 Feign 的基础上提供了以下增强和扩展功能:- 更好的集成 Spring Cloud 组件:OpenFeign 与 Spring Cloud 其他组件(如服务发现、负载均衡等)紧密集成,可以无缝地与其他 Spring Cloud 组件一起使用。
- 支持 @Feignclient 注解:0penFeign 引入了 @FeignClient 注解作为 Feign 客户端的标识,可以方便地定义和使用远程服务的声明式接口。
- 错误处理改进:OpenFeiqn 对异常的处理做了增强,提供了更好的错误信息和异常处理机制,使得开发者可以3更方便地进行错误处理。例如 OpenFeiqn 提供的错误解码器(DefaultErrorDecoder)和回退策略(当服务端返回错误响应或请求失败时,OpenFeiqn 会调用回退策略中的逻辑,提供一个默认的处理结果)。
- 更丰富的配置项:OpenFeiqn 提供了丰富的配置选项,可以对 Feiqn 客户端的行为进行灵活的配置,例如超时设置、重试策略等。
2.OpenFeign 基础使用
2.1 添加依赖
        <dependency>
            <groupId>com.alibaba.cloudgroupId>
            <artifactId>spring-cloud-starter-alibaba-nacos-discoveryartifactId>
        dependency>
        <dependency>
            <groupId>org.springframework.cloudgroupId>
            <artifactId>spring-cloud-starter-loadbalancerartifactId>
        dependency>
        <dependency>
            <groupId>org.springframework.cloudgroupId>
            <artifactId>spring-cloud-starter-openfeignartifactId>
        dependency>
2.2 配置 Nacos 服务端信息
spring:
  application:
    name: nacos-consumer-demo
  cloud:
    nacos:
      discovery:
        server-addr: localhost:8848
        username: nacos
        password: nacos
        register-enabled: false # 消费者(不需要将此服务注册到nacos)
    openfeign:
      client:
        config:
          default:
            connect-timeout: 1000 # 连接超时时间
            read-timeout: 1000 # 读取超时时间
            retryer: com.example.consumer.config.CustomRetryer
server:
  port: 8080
2.3 项目中开启 OpenFeign
@SpringBootApplication
@EnableFeignClients // 开启 OpenFeign
public class ConsumerApplication {

    public static void main(String[] args) {
        SpringApplication.run(ConsumerApplication.class, args);
    }

}
2.4 编写 OpenFeign 调用代码
@Service
@FeignClient("nacos-discovery-demo") // 表示调用 nacos 中的 nacos-discovery-demo 服务
public interface UserService {

    @RequestMapping("/user/getnamebyid") // 调用生产者的"/user/getnamebyid"接口
    public String getNameById(@RequestParam("id") int id);

}
2.5 调用 OpenFeign 接口代码
@RestController
public class BusinessController {

    @Autowired
    private UserService userService;

    @RequestMapping("/getnamebyid")
    public String getNameById(Integer id){
        return userService.getNameById(id);
    }

}
3.超时重试机制
在微服务架构中,服务之间是通过网络进行通信的,而网络是非常复杂性和不稳定的,所以在调用服务时可能会失败或超时,那么在这种情况下,我们就需要给 OpenFeign 配置超时重试机制了。
什么是超时重试?
答:超时重试是一种在网络通信中常用的策略,用于处理请求在一定时间内未能得到响应或得到超时响应的情况。当发起请求后,如果在规定的时间内没有得到预期的响应,就会触发超时重试机制,重新发送请求。超时重试的主要目的是提高请求的可靠性和稳定性,以应对网络不稳定、服务不可用、响应延迟等不确定因素OpenFeign 默认情况下是不会自动开启超时重试的,所以想要开启超时重试,需要通过以下2 步来实现:- 配置超时重试,
- 覆盖 Retryer 对象
3.1 配置超时重试
spring:
  application:
    name: nacos-consumer-demo
  cloud:
    nacos:
      discovery:
        server-addr: localhost:8848
        username: nacos
        password: nacos
        register-enabled: false # 消费者(不需要将此服务注册到nacos)
    openfeign:
      client:
        config:
          default:
            connect-timeout: 1000 # 连接超时时间
            read-timeout: 1000 # 读取超时时间
            retryer: com.example.consumer.config.CustomRetryer
server:
  port: 8080
3.2 覆盖 Retryer

@Configuration // 将当前对象存储在 IoC 容器
public class RetryerConfig {
    @Bean
    public Retryer retryer(){
        return new Retryer.Default(1000,1000,3);
    }
}
4.自定义超时重试机制
自定义超时重试机制的实现分为以下两步:
- 自定义超时重试类(实现 Retryer 接口,并重写 continueOrPropagate 方法)
- 设置配置文件。
4.1 自定义超时重试类
常见的超时重试策略有以下三种:
- 固定间隔重试:每次重试之间的时间间隔固定不变,例如每次重试之间相隔1秒。
- 指数重试:每次重试之间的时间间隔按指数递增。例如,初始间隔为1秒,每次重试后加倍,即第一次1 秒,第二次 2 秒,第三次 4秒,以此类推。
- 随机间隔重试:每次重试之间的时间间隔是随机的,通过引入随机性来防止多个失败请求同时发生。例如,每3.次重试的时间间隔在一定范围内随机选择。

package com.example.consumer.config;

import feign.RetryableException;
import feign.Retryer;

import java.time.LocalDateTime;

/**
 * 自定义超时重传类
 */
public class CustomRetryer implements Retryer {

    private final int maxAttempts;  // 最大尝试次数
    private final long backoff;     // 超时间隔时间
    int attempt; // 当前尝试次数

    public CustomRetryer() {
        this.maxAttempts = 3;
        this.backoff = 1000L;
        this.attempt = 0;
    }

    @Override
    public void continueOrPropagate(RetryableException e) {
        if (attempt++ >= maxAttempts) {
            throw e;
        }
        long interval = this.backoff; // 重试间隔时间
        System.out.println(LocalDateTime.now() + " | 执行一次重试:" + interval);
        try {
            Thread.sleep(interval * attempt);
        } catch (InterruptedException ex) {
            throw new RuntimeException(ex);
        }
    }

    @Override
    public Retryer clone() {
        return new CustomRetryer();
    }
}
4.2 设置配置文件
spring:
  application:
    name: nacos-consumer-demo
  cloud:
    nacos:
      discovery:
        server-addr: localhost:8848
        username: nacos
        password: nacos
        register-enabled: false # 消费者(不需要将此服务注册到nacos)
    openfeign:
      client:
        config:
          default:
            connect-timeout: 1000 # 连接超时时间
            read-timeout: 1000 # 读取超时时间
            retryer: com.example.consumer.config.CustomRetryer
server:
  port: 8080
5.超时重试底层实现

5.1 超时底层实现
OpenFeign 超时的底层实现是通过配置底层的 HTTP 客户端来实现的。Openfeign 允许你在请求连接和读取数据阶段设置超时时间,具体的超时配置可以通过设置 HTP 客户端的连接超时(connectTimeout)和读取超时(readTimeout)来实现,你可以在配置文件中设置超时参数。OpenFeiqn 底层的 HTTP 客户端,可以使用 Apache HttpClient 或 OkHtpClient 来实现,默认使用的是 ApacheHttpClient 实现的。
5.2 重试底层实现
  @Override
  public Object invoke(Object[] argv) throws Throwable {
    RequestTemplate template = buildTemplateFromArgs.create(argv);
    Options options = findOptions(argv);
    Retryer retryer = this.retryer.clone();
    try {
      if (methodInfo.isAsyncReturnType()) {
        return executeAndDecode(template, options, retryer);
      } else {
        return executeAndDecode(template, options, retryer).join();
      }
    } catch (CompletionException e) {
      throw e.getCause();
    }
  }

  private CompletableFuture<Object> executeAndDecode(RequestTemplate template,
                                                     Options options,
                                                     Retryer retryer) {
    CancellableFuture<Object> resultFuture = new CancellableFuture<>();

    executeAndDecode(template, options)
        .whenComplete((response, throwable) -> {
          if (throwable != null) {
            if (!resultFuture.isDone() && shouldRetry(retryer, throwable, resultFuture)) {
              if (logLevel != Logger.Level.NONE) {
                logger.logRetry(metadata.configKey(), logLevel);
              }

              resultFuture.setInner(
                  executeAndDecode(template, options, retryer));
            }
          } else {
            resultFuture.complete(response);
          }
        });

    return resultFuture;
  }
/* * Copyright 2012-2022 The Feign Authors * * Licensed under the Apache License, Version 2.0 (the "License"); you may not use this file except * in compliance with the License. You may obtain a copy of the License at * * http://www.apache.org/licenses/LICENSE-2.0 * * Unless required by applicable law or agreed to in writing, software distributed under the License * is distributed on an "AS IS" BASIS, WITHOUT WARRANTIES OR CONDITIONS OF ANY KIND, either express * or implied. See the License for the specific language governing permissions and limitations under * the License. */ package feign; import static java.util.concurrent.TimeUnit.SECONDS; /** * Cloned for each invocation to {@link Client#execute(Request, feign.Request.Options)}. * Implementations may keep state to determine if retry operations should continue or not. */ public interface Retryer extends Cloneable { /** * if retry is permitted, return (possibly after sleeping). Otherwise propagate the exception. */ void continueOrPropagate(RetryableException e); Retryer clone(); class Default implements Retryer { private final int maxAttempts; private final long period; private final long maxPeriod; int attempt; long sleptForMillis; public Default() { this(100, SECONDS.toMillis(1), 5); } public Default(long period, long maxPeriod, int maxAttempts) { this.period = period; this.maxPeriod = maxPeriod; this.maxAttempts = maxAttempts; this.attempt = 1; } // visible for testing; protected long currentTimeMillis() { return System.currentTimeMillis(); } public void continueOrPropagate(RetryableException e) { if (attempt++ >= maxAttempts) { throw e; } long interval; if (e.retryAfter() != null) { interval = e.retryAfter().getTime() - currentTimeMillis(); if (interval > maxPeriod) { interval = maxPeriod; } if (interval < 0) { return; } } else { interval = nextMaxInterval(); } try { Thread.sleep(interval); } catch (InterruptedException ignored) { Thread.currentThread().interrupt(); throw e; } sleptForMillis += interval; } /** * Calculates the time interval to a retry attempt.
* The interval increases exponentially with each attempt, at a rate of nextInterval *= 1.5 * (where 1.5 is the backoff factor), to the maximum interval. * * @return time in milliseconds from now until the next attempt. */ long nextMaxInterval() { long interval = (long) (period * Math.pow(1.5, attempt - 1)); return interval > maxPeriod ? maxPeriod : interval; } @Override public Retryer clone() { return new Default(period, maxPeriod, maxAttempts); } } /** * Implementation that never retries request. It propagates the RetryableException. */ Retryer NEVER_RETRY = new Retryer() { @Override public void continueOrPropagate(RetryableException e) { throw e; } @Override public Retryer clone() { return this; } }; }所以,OpenFeign 的重试功能是通过其内置的 Retryer 组件和底层的 HTTP 客户端实现的。Retryer 组件提供了重试策略的逻辑实现,而远程接口则通过 HTTP 客户端来完成调用。
3.Spring Cloud LoadBalancer 入门与使用
- 1.微服务和 Spring Cloud
- 2.为什么要学微服务?
- 3.Spring Cloud 组件介绍
- 1.什么是 Nacos?
- 2.Nacos 基本使用
- 1.什么是 OpenFeign?
- 2.OpenFeign 基础使用
- 3.超时重试机制
- 4.自定义超时重试机制
- 5.超时重试底层实现
- 1.什么是 LoadBalancer?
- 2.为什么要学 LoadBalancer?
- 3.如何使用?
- 4.默认负载均衡策略
- 5.随机负载均策略
- 6.Nacos 权重负载均器
- 7.自定义负载均衡器
- 8.缓存
- 9.执行原理
- 1.什么是网关?
- 2.网关有什么用?
- 3.Spring Cloud Gateway 组成
- 4.Spring Cloud Gateway 基础使用
- 5.匹配多个 Path
- 6.更多断言 (Predicate) 类型
- 7.Gateway+Nacos+LoadBalancer
- 8.过滤器
- 限流
- 重试过滤器
- 9.工作原理
- 代码地址
- 全链路灰色发布
- 流程思路(先到网关、再调用nacos服务,nacos服务根据负载均衡器调用)
- 1.负载均衡模块
- 2.网关模块
- 3.服务模块
- 思路
1.什么是 LoadBalancer?
LoadBalancer(负载均衡器)是一种网络设备或软件机制,用于分发传入的网络流量负载(请求)到多个后端目标服务器上,从而实现系统资源的均衡利用和提高系统的可用性和性能。
1.1负载均衡分类
负载均衡分为服务器端负载均衡和客户端负载均衡。
- 服务器端负载均衡指的是存放在服务器端的负载均衡器,例如 Nginx、HAProxy、F5 等.
- 客户端负载均衡指的是嵌套在客户端的负载均衡器,例如 Ribbon、Spring Cloud LoadBalancer。
1.2 常见负载均衡策略

但无论是服务器端负载均衡和客户端负载均衡,它们的负载均衡策略都是相同的,因为负载均衡策略本质上是一种思想。
常见的负载均衡策略有以下几个:- 轮询(Round Robin):轮询策略按照顺序将每个新的请求分发给后端服务器,依次循环。这是一种最简单的负载均衡策略,适用于后端服务器的性能相近,且每个请求的处理时间大致相同的情况。
- 随机选择(Random):随机选择策略随机选择一个后端服务器来处理每个新的请求。这种策略适用于后端服2务器性能相似,且每个请求的处理时间相近的情况,但不保证请求的分发是均的。
- 最少连接(Least Connections):最少连接策略将请求分发给当前连接数最少的后端服务器。这可以确保负载均衡在后端服务器的连接负载上均衡,但需要维护连接计数。
- IP 哈希(IP Hash):IP 哈希策略使用客户端的 IP 地址来计算哈希值,然后将请求发送到与哈希值对应的后端服务器。这种策略可用于确保来自同一客户端的请求都被发送到同一台后端服务器,适用于需要会话保持的情况。
- 加权轮询(Weighted Round Robin):加权轮询策略给每个后端服务器分配一个权重值,然后按照权重值比例来分发请求。这可以用来处理后端服务器性能不均衡的情况,将更多的请求分发给性能更高的服务器。
- 加权随机选择(Weighted Random):加权随机选择策略与加权轮询类似,但是按照权重值来随机选择后端服务器。这也可以用来处理后端服务器性能不均衡的情况,但是分发更随机。
- 最短响应时间(Least Response Time):最短响应时间策略会测量每个后端服务器的响应时间,并将请求发送到响应时间最短的服务器。这种策略可以确保客户端获得最快的响应,适用于要求低延迟的应用。
2.为什么要学 LoadBalancer?
作为早期版本中内置的负载均衡器 Ribbon,在 Spring Cloud 2020.0.0 中已经被移除了,更新日志详见,https://github.com/spring-cloud/spring-cloud-release/wiki/Spring-Cloud-2020.0-Release-Notes取而代之的是 Spring Cloud LoadBalancer,并日它也是 Spring cloud 官方提供的负载均衛器,所以咱们的课程就要学习最新最主流的机制栈,而 Spring Cloud LoadBalancer 则是绕不过去的必学知识。
3.如何使用?
在项目中添加 Spring Cloud OpenFeign 和注册中心如 Nacos 之后,再添加 Spring Cloud LoadBalancer 则会在进行接口调用时直接使用 Spring Cloud LoadBalancer。
4.默认负载均衡策略
Spring Cloud LoadBalancer 负载均衡策略默认的是轮询,这一点可以通过 Spring Cloud LoadBalancer 的配置类LoadBalancerClientConfiguration 中发现,它的部分源码如下:
public class LoadBalancerClientConfiguration {

	private static final int REACTIVE_SERVICE_INSTANCE_SUPPLIER_ORDER = 193827465;

	@Bean
	@ConditionalOnMissingBean
	public ReactorLoadBalancer<ServiceInstance> reactorServiceInstanceLoadBalancer(Environment environment,
			LoadBalancerClientFactory loadBalancerClientFactory) {
		String name = environment.getProperty(LoadBalancerClientFactory.PROPERTY_NAME);
		return new RoundRobinLoadBalancer(
				loadBalancerClientFactory.getLazyProvider(name, ServiceInstanceListSupplier.class), name);
	}
继续查看 RoundRobinLoadBalancer 核心实现源码如下:
	private Response<ServiceInstance> getInstanceResponse(List<ServiceInstance> instances) {
		if (instances.isEmpty()) {
			if (log.isWarnEnabled()) {
				log.warn("No servers available for service: " + serviceId);
			}
			return new EmptyResponse();
		}

		// Do not move position when there is only 1 instance, especially some suppliers
		// have already filtered instances
		if (instances.size() == 1) {
			return new DefaultResponse(instances.get(0));
		}

		// Ignore the sign bit, this allows pos to loop sequentially from 0 to
		// Integer.MAX_VALUE
		int pos = this.position.incrementAndGet() & Integer.MAX_VALUE;

		ServiceInstance instance = instances.get(pos % instances.size());

		return new DefaultResponse(instance);
	}
5.随机负载均策略
Spring Cloud LoadBalancer 内置了两种负载均衡策略
- 轮询负载均衡策略,默认负载均衡策略。
- 随机负载均衡策略
而要实现随机负载均衡策略的步骤如下:
- 创建随机负载均衡策略。
- 设置随机负载均衡策略。


5.1 创建随机负载均衡器
public class RandomLoadBalancerConfig {
    @Bean
    public ReactorLoadBalancer<ServiceInstance> randomLoadBalancer(
            Environment environment, LoadBalancerClientFactory loadBalancerClientFactory) {
        String name = environment.getProperty("loadbalancer.client.name");
        return new RandomLoadBalancer(
                loadBalancerClientFactory.getLazyProvider(name,
                        ServiceInstanceListSupplier.class), name);
    }
}
5.2 设置随机负载均衡器 (局部设置)
package com.example.consumer.service;

import com.example.consumer.config.CustomLoadBalancerConfig;
import com.example.consumer.config.NacosLoadBalancerConfig;
import com.example.consumer.config.RandomLoadBalancerConfig;
import org.springframework.cloud.loadbalancer.annotation.LoadBalancerClient;
import org.springframework.cloud.openfeign.FeignClient;
import org.springframework.stereotype.Service;
import org.springframework.web.bind.annotation.RequestMapping;
import org.springframework.web.bind.annotation.RequestParam;

@Service
@FeignClient("loadbalancer-service")
// 设置局部负载均衡策略
@LoadBalancerClient(name = "loadbalancer-service",
        configuration = RandomLoadBalancerConfig.class)
public interface UserService {
    @RequestMapping("/user/getname")
    String getName(@RequestParam("id") Integer id);
}
5.3 设置全局负载均衡器
package com.example.consumer;

import com.example.consumer.config.CustomLoadBalancerConfig;
import com.example.consumer.config.RandomLoadBalancerConfig;
import org.springframework.boot.SpringApplication;
import org.springframework.boot.autoconfigure.SpringBootApplication;
import org.springframework.cloud.loadbalancer.annotation.LoadBalancerClients;
import org.springframework.cloud.openfeign.EnableFeignClients;

@SpringBootApplication
@EnableFeignClients // 开启 Openfeign
// 设置全局的负载均衡策略
@LoadBalancerClients(defaultConfiguration =
        RandomLoadBalancerConfig.class)
public class ConsumerApplication {

    public static void main(String[] args) {
        SpringApplication.run(ConsumerApplication.class, args);
    }

}
6.Nacos 权重负载均器
Nacos 中支持两种负载均衡器,一种是权重负载均衡器,另一种是第三方 CMDB(地域就近访问)标签负载均後器,我们可以将 Spring Cloud Loadbalancer 直接配置为 Nacos 的负载均衡器,它默认就是权重负载均衡策略。它的配置有以下两步:
- 创建 Nacos 负载均衡器
- 设置负载均衡器

6.1 创建 Nacos 负载均衡器
@LoadBalancerClients(defaultConfiguration = NacosLoadBalancerConfig.class)
public class NacosLoadBalancerConfig {
    @Resource
    private NacosDiscoveryProperties nacosDiscoveryProperties;
    @Bean
    public ReactorLoadBalancer<ServiceInstance> nacosLoadBalancer(
            Environment environment, LoadBalancerClientFactory loadBalancerClientFactory) {
        String name = environment.getProperty("loadbalancer.client.name");
        return new NacosLoadBalancer(
                loadBalancerClientFactory.getLazyProvider(name,
                        ServiceInstanceListSupplier.class), name
                ,nacosDiscoveryProperties);
    }
}
6.2 设置负载均衡器
@SpringBootApplication
@EnableFeignClients // 开启 Openfeign
// 设置全局的负载均衡策略
@LoadBalancerClients(defaultConfiguration =
        NacosLoadBalancerConfig.class)
public class ConsumerApplication {

    public static void main(String[] args) {
        SpringApplication.run(ConsumerApplication.class, args);
    }

}
7.自定义负载均衡器
实现自定义负载均衡策略需要以下 3步:
- 创建自定义负载均衡器
- 封装自定义负载均衡器
- 为服务设置自定义负载均衡器
7.1 创建自定义负载均衡器
package com.example.consumer.config;

import jakarta.servlet.http.HttpServletRequest;
import jakarta.servlet.http.HttpServletRequestWrapper;
import org.apache.commons.logging.Log;
import org.apache.commons.logging.LogFactory;
import org.springframework.beans.factory.ObjectProvider;
import org.springframework.cloud.client.ServiceInstance;
import org.springframework.cloud.client.loadbalancer.DefaultResponse;
import org.springframework.cloud.client.loadbalancer.EmptyResponse;
import org.springframework.cloud.client.loadbalancer.Request;
import org.springframework.cloud.client.loadbalancer.Response;
import org.springframework.cloud.loadbalancer.core.*;
import org.springframework.web.context.request.RequestContextHolder;
import org.springframework.web.context.request.ServletRequestAttributes;
import reactor.core.publisher.Mono;

import java.util.List;

public class CustomLoadBalancer implements ReactorServiceInstanceLoadBalancer {
    private static final Log log = LogFactory.getLog(RandomLoadBalancer.class);
    private final String serviceId;
    private ObjectProvider<ServiceInstanceListSupplier> serviceInstanceListSupplierProvider;

    public CustomLoadBalancer(ObjectProvider<ServiceInstanceListSupplier> serviceInstanceListSupplierProvider, String serviceId) {
        this.serviceId = serviceId;
        this.serviceInstanceListSupplierProvider = serviceInstanceListSupplierProvider;
    }

    public Mono<Response<ServiceInstance>> choose(Request request) {
        ServiceInstanceListSupplier supplier = (ServiceInstanceListSupplier)this.serviceInstanceListSupplierProvider.getIfAvailable(NoopServiceInstanceListSupplier::new);
        return supplier.get(request).next().map((serviceInstances) -> {
            return this.processInstanceResponse(supplier, serviceInstances);
        });
    }

    private Response<ServiceInstance> processInstanceResponse(ServiceInstanceListSupplier supplier, List<ServiceInstance> serviceInstances) {
        Response<ServiceInstance> serviceInstanceResponse = this.getInstanceResponse(serviceInstances);
        if (supplier instanceof SelectedInstanceCallback && serviceInstanceResponse.hasServer()) {
            ((SelectedInstanceCallback)supplier).selectedServiceInstance((ServiceInstance)serviceInstanceResponse.getServer());
        }

        return serviceInstanceResponse;
    }

    private Response<ServiceInstance> getInstanceResponse(List<ServiceInstance> instances) {
        if (instances.isEmpty()) {
            if (log.isWarnEnabled()) {
                log.warn("No servers available for service: " + this.serviceId);
            }

            return new EmptyResponse();
        } else {
            // 核心:自定义随机策略
            // 获取 Request 对象
            ServletRequestAttributes attributes = (ServletRequestAttributes)
                    RequestContextHolder.getRequestAttributes();
            HttpServletRequest request = attributes.getRequest();
            String ipAddress = request.getRemoteAddr();
            System.out.println("用户 IP:" + ipAddress);
            int hash = ipAddress.hashCode();
            // 自定义负载均衡策略【这行代码是关键】
            int index = hash % instances.size();
            // 得到服务实例方法
            ServiceInstance instance = (ServiceInstance) instances.get(index);
            return new DefaultResponse(instance);
        }
    }
}
7.2 封装自定义负载均衡器
public class CustomLoadBalancerConfig {
    @Bean
    public ReactorLoadBalancer<ServiceInstance> customLoadBalancer(
            Environment environment, LoadBalancerClientFactory loadBalancerClientFactory) {
        String name = environment.getProperty("loadbalancer.client.name");
        return new CustomLoadBalancer(
                loadBalancerClientFactory.getLazyProvider(name,
                        ServiceInstanceListSupplier.class), name);
    }
}
7.3 设置自定义负载均器
@SpringBootApplication
@EnableFeignClients // 开启 Openfeign
// 设置全局的负载均衡策略
@LoadBalancerClients(defaultConfiguration =
        CustomLoadBalancerConfig.class)
public class ConsumerApplication {

    public static void main(String[] args) {
        SpringApplication.run(ConsumerApplication.class, args);
    }

}
8.缓存
Spring Cloud LoadBalancer 在获取实例时有两种选择:
- 即时获取:每次从注册中心得到最新健康的实例,效果好、开销太大。
- 缓存服务列表:每次得到服务列表之后,缓存一段时间,这样既能保证性能,同时也能兼容一定的及时性。而 Spring Cloud LoadBalancer 中默认开启了缓存服务列表的功能。Spring
Cloud LoadBalancer 默认缓存的重要特性有两项:
- 缓存的过期时间为 35s。
- 缓存保存个数为 256 个
我们可以通过以下配置来改变这些配置:
关闭缓存
    loadbalancer:
      cache:
        enabled: true # 关闭 loadbalancer 缓存
        ttl: 10 # 缓存存活时间
        capacity: 1000 # 缓存存储容量
9.执行原理
OpenFeign 底层是通过 HTTP 客户端对象 RestTemplate 实现接口请求的,而负载均衡器的作用只是在请求客户端发送请求之前,得到一个服务的地址给到 RestTemplate 对象,而 Spring Cloud LoadBalancer 的整体类图如下:

通过查看 Spring Cloud LoadBalancer 源码我们可以发现,@LoadBalanced 注解出 spring-cloud-commons 实现查看实现逻辑我们发现, spring-cloud-commons 存在自动配置类 LoadBalancerAutoConfiquration,当满足条件时将自动创建 LoadBalancerInterceptor 并注入到 RestTemplate 中,部分源码如下:
Spring Cloud LoadBalancer 是 Spring Cloud 提供的一种客户端负载均衡解决方案,用于替代 Netflix Ribbon。它通过将负载均衡逻辑从服务端移到客户端,使得每个客户端实例都可以独立地选择要调用的服务实例,从而实现更灵活和高效的负载均衡。
底层执行原理
Spring Cloud LoadBalancer 的核心组件包括
ServiceInstanceListSupplier、LoadBalancerClient和LoadBalancer。下面结合源码来详细说明其执行原理。1.
ServiceInstanceListSupplierServiceInstanceListSupplier是一个接口,用于提供服务实例列表。它的实现类负责从服务注册中心(如 Eureka、Consul 等)获取可用的服务实例列表。public interface ServiceInstanceListSupplier { Flux<List<ServiceInstance>> get(); }Flux是 Reactor 库中的一个类,表示一个异步序列。ServiceInstanceListSupplier的get方法返回一个Flux,它会异步地提供服务实例列表。2.
LoadBalancerClientLoadBalancerClient是一个接口,定义了负载均衡客户端的基本操作。它的主要方法是choose,用于选择一个服务实例。public interface LoadBalancerClient { <T> ServiceInstance choose(String serviceId, Request<T> request); }choose方法接受服务 ID 和请求信息,返回一个ServiceInstance对象,表示选择的服务实例。3.
LoadBalancerLoadBalancer是负载均衡的核心接口,定义了负载均衡的策略。它的主要方法是choose,用于根据负载均衡策略选择一个服务实例。public interface LoadBalancer<T> { Mono<Response<T>> choose(Request request); }choose方法返回一个Mono,其中Mono是 Reactor 库中的另一个类,表示一个异步的单值序列。执行流程
-
获取服务实例列表:
ServiceInstanceListSupplier从服务注册中心获取可用的服务实例列表,并返回一个Flux。
-
选择服务实例:
LoadBalancer使用负载均衡策略(如轮询、随机等)从服务实例列表中选择一个服务实例。LoadBalancerClient调用LoadBalancer的choose方法,获取选择的服务实例。
-
执行请求:
LoadBalancerClient使用选择的服务实例执行请求,并返回结果。
源码示例
以下是一个简单的
ServiceInstanceListSupplier实现示例:public class SimpleServiceInstanceListSupplier implements ServiceInstanceListSupplier { private final List<ServiceInstance> instances; public SimpleServiceInstanceListSupplier(List<ServiceInstance> instances) { this.instances = instances; } @Override public Flux<List<ServiceInstance>> get() { return Flux.just(instances); } }以下是一个简单的
LoadBalancer实现示例:public class RoundRobinLoadBalancer implements LoadBalancer<ServiceInstance> { private final AtomicInteger position; private final ServiceInstanceListSupplier supplier; public RoundRobinLoadBalancer(ServiceInstanceListSupplier supplier) { this.supplier = supplier; this.position = new AtomicInteger(0); } @Override public Mono<Response<ServiceInstance>> choose(Request request) { return supplier.get().next().map(instances -> { if (instances.isEmpty()) { return new EmptyResponse(); } int pos = Math.abs(this.position.incrementAndGet()); ServiceInstance instance = instances.get(pos % instances.size()); return new DefaultResponse(instance); }); } }总结
Spring Cloud LoadBalancer 通过
ServiceInstanceListSupplier获取服务实例列表,通过LoadBalancer选择服务实例,并通过LoadBalancerClient执行请求。其核心思想是将负载均衡逻辑从服务端移到客户端,使得每个客户端实例都可以独立地选择要调用的服务实例,从而实现更灵活和高效的负载均衡。4.Spring Cloud Gateway 入门与使用
- 1.微服务和 Spring Cloud
- 2.为什么要学微服务?
- 3.Spring Cloud 组件介绍
- 1.什么是 Nacos?
- 2.Nacos 基本使用
- 1.什么是 OpenFeign?
- 2.OpenFeign 基础使用
- 3.超时重试机制
- 4.自定义超时重试机制
- 5.超时重试底层实现
- 1.什么是 LoadBalancer?
- 2.为什么要学 LoadBalancer?
- 3.如何使用?
- 4.默认负载均衡策略
- 5.随机负载均策略
- 6.Nacos 权重负载均器
- 7.自定义负载均衡器
- 8.缓存
- 9.执行原理
- 1.什么是网关?
- 2.网关有什么用?
- 3.Spring Cloud Gateway 组成
- 4.Spring Cloud Gateway 基础使用
- 5.匹配多个 Path
- 6.更多断言 (Predicate) 类型
- 7.Gateway+Nacos+LoadBalancer
- 8.过滤器
- 限流
- 重试过滤器
- 9.工作原理
- 代码地址
- 全链路灰色发布
- 流程思路(先到网关、再调用nacos服务,nacos服务根据负载均衡器调用)
- 1.负载均衡模块
- 2.网关模块
- 3.服务模块
- 思路
1.什么是网关?
网关是一种网络设备,用于连接两个或多个不同网络,将数据从一个网络转发到另一个网络。它充当了两个网络之间的桥梁,负责转发数据并处理来自不同网络的通信协议转换。
网关具备转发、路由和过滤数据的功能。它能够识别不同网络中的数据包,并根据其目的地址和源地址决定如何转发数据。同时,网关还可以实施网络安全策略,对进出的数据包进行检查和过滤,保护网络安全。
网关在互联网中起到重要作用,它连接了内部局域网和外部互联网,使得数据能够在不同网络之间传递和交换。
2.网关有什么用?
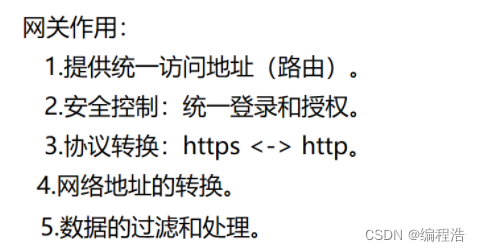
网关的主要作用有以下几个:
- 路由功能:网关可以根据目标地址的不同,选择最佳的路径将数据包从源网络路由到日标网络。它通过维护路由表来确定数据包的转发方向,并选择最优的路径。
- 安全控制(统一认证授权):网关可以实施网络安全策略,对进出的数据包进行检查和过滤。它可以验证和授权来自源网络的数据包,并阳止未经授权的访问。防火墙是一种常见的网关设备,用于过滤和保护网络免受恶意攻击和未经授权的访问。
- 协议转换:不同网络使用不同的通信协议,网关可以进行协议转换,使得不同网络的设备可以互相通信。例如,例如将 HTTPS 协议转换成 HTTP 协议。
- 网络地址转换(NAT):网关还可以执行网络地址转换,将内部网络使用的私有 IP 地址转换为外部网络使用的公共 IP 地址,以实现多台计算机共享一个公共 IP 地址出去上网。
3.Spring Cloud Gateway 组成
- 路由(Route):定义了请求应该被转发到哪个目标地址。路由由 ID、目标 URI、断言和过滤器组成。通过面置多个路由,可以实现不同请求的路由规则。
- 断言(Predicate):用于匹配请求的条件,如果请求匹配断言条件,则会被路由到对应的目标地址。断言可以基于请求的路径、请求头、请求参数等信息进行匹配。
- 过滤器(Filter):用于在请求路由前或路由后进行一些处理,如添加头部信息、修改请求体等。过滤器可以在全局范围或特定路由范围内配置,多个过滤器可以组成过滤器链。

4.Spring Cloud Gateway 基础使用
Spring Cloud Gateway 使用步骤如下
- 添加 Gateway 依赖。
- 设置网关路由规则。
具体实现如下
添加依赖
        <dependency>
            <groupId>org.springframework.cloudgroupId>
            <artifactId>spring-cloud-starter-gatewayartifactId>
        dependency>
设置路由规则
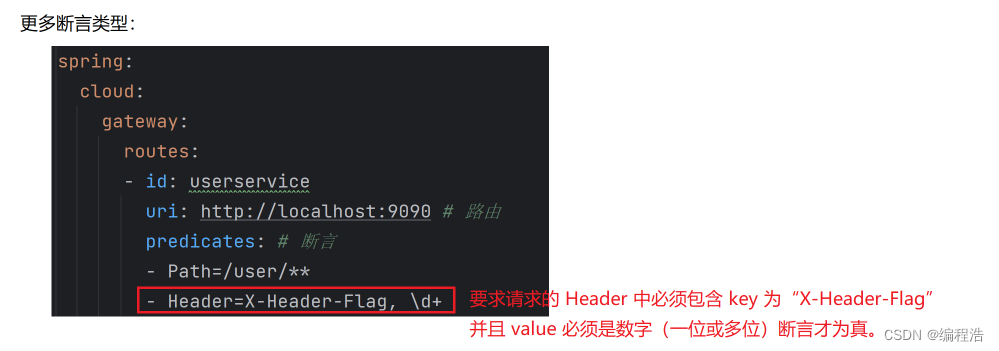
spring:
  cloud:
    gateway:
      routes:
      - id: userservice
        uri: http://localhost:9090 # 路由
        predicates: # 断言
        - Path=/user/**
        - Header=X-Header-Flag, \d+
      - id: orderservice
        uri: http://localhost:9091
        predicates:
        - Path=/order/**
server:
  port: 10086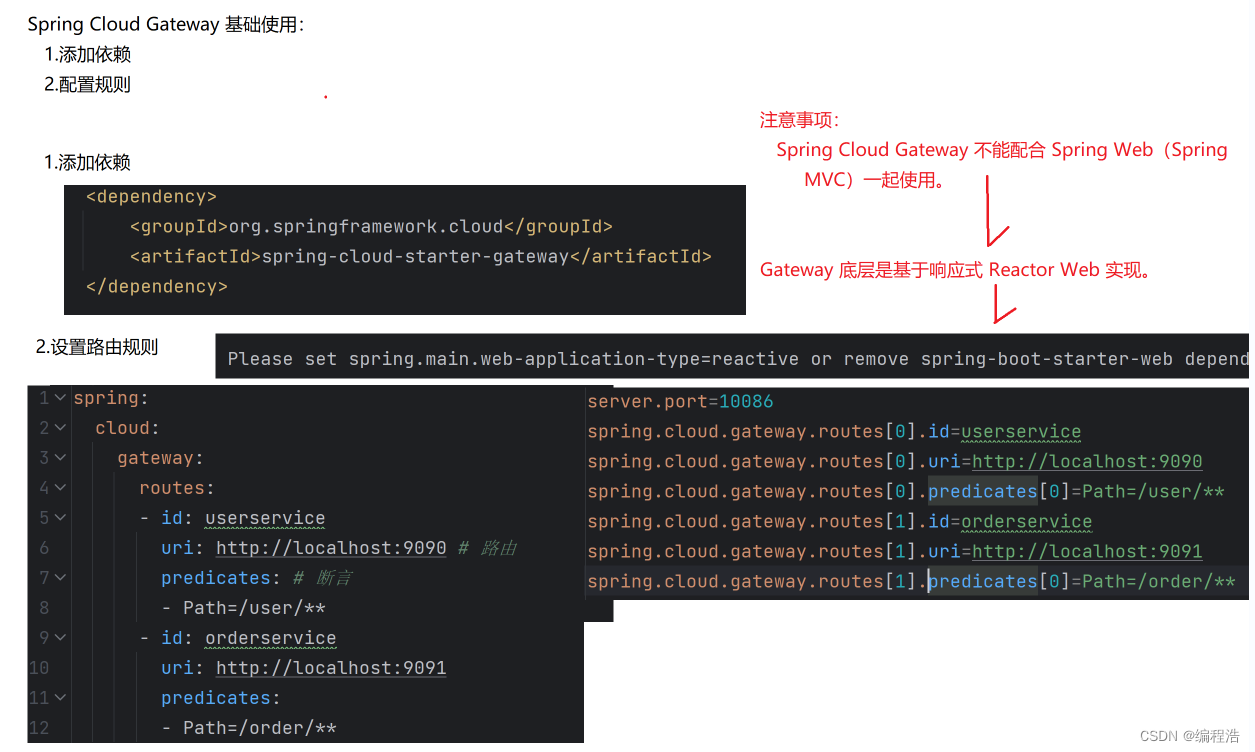
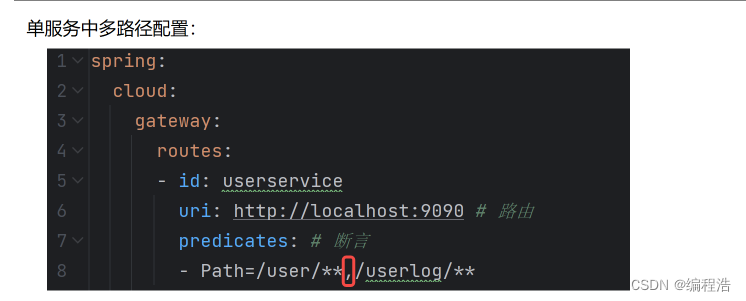
5.匹配多个 Path
Spring Cloud Gateway(网关路由规则)中是允许设置多个 Path 的,只需要在 Path 中使用英文逗号"“隔开即可
如下所示:gateway : routes: - id: userservice uri: http://192.168.1.7:51627 predicates: -Path=/user/**,/u/**6.更多断言 (Predicate) 类型
Spring Cloud Gateway 支持的断言类型目前有 12 种,包含以下这些:
- 根据时间匹配(包含 3 种类型)
a.After:请求在指定时间之后才匹配,
b.Before:请求在指定时间之前才匹配,
c.Between:请求在指定时间中间才匹配。 - Cookie:配置请求中的 Cookie 值。
- Header:配置请求中的 Header 值,
- Host:匹配请求头中的 Host 值,
- Method:匹配请求头中的 Method 的值。
- Path:匹配请求路径。
- Query:匹配请求参数。
- RemoteAddr:匹配请求的IP 地址,支持 IPV4 和IPV6
- Weight:根据权重来分发请求,权重根据 qroup 来计算,
- XForwardedRemoteAddr:根据X-Forwarded-For 所配

6.1 根据时间匹配
spring:
	cloud:
		gateway:
			routes:
			-id: userservice
			uri: http://192.168.1.7:51627
			predicates:
			-Before=2023-11-02T19:05:08.020+08:00[Asia/shanghai]
7.Gateway+Nacos+LoadBalancer
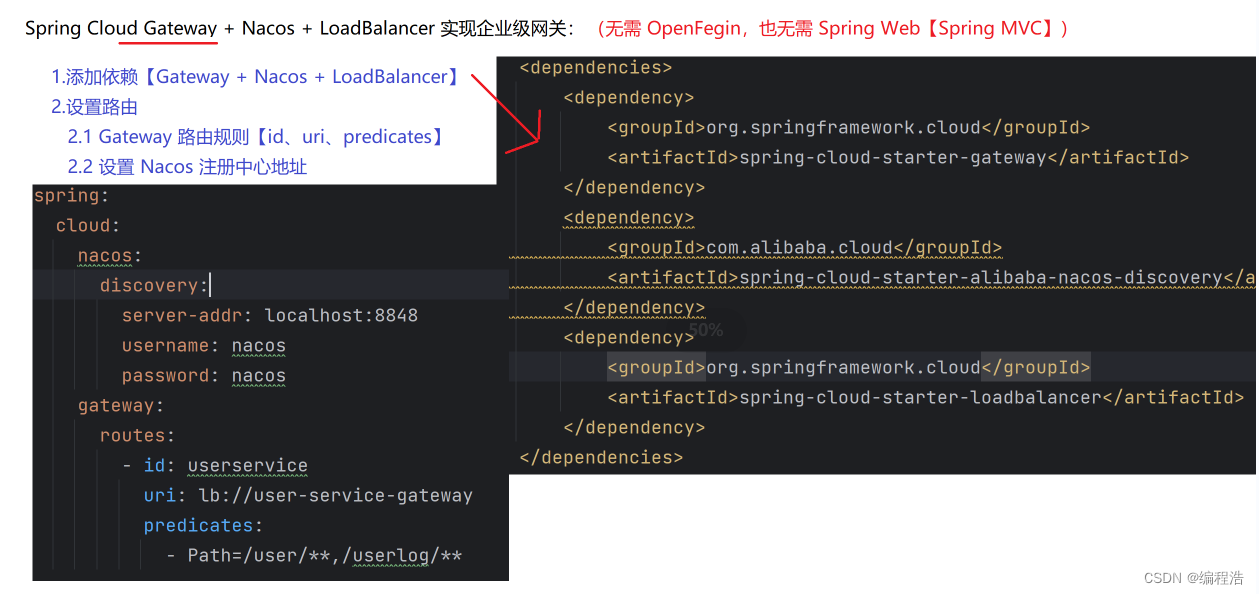
7.1 添加依赖
<!--注册中心--37.2 设置路由规则
8.过滤器
8.1 什么是过滤器?
过滤器通常用于拦截、处理或修改数据流或事件流,在数据流中执行特定的操作或转换。
8.2为什么需要用过滤器?
- 功能扩展和定制:过滤器可以用于对现有功能进行扩展和定制。通过拦截和处理数据流或事件流,可以修改数据,增加额外的功能逻辑,实现特定的业务需求。例如,可以使用过滤器在请求之前进行身份验证、权限控制,或者在响应之后进行日志记录、数据转换等操作。
- 数据校验和过滤:过滤器可以用于对数据进行校验和过滤。在接收到数据之后,可以使用过滤器对数据进行检查,验证数据的合法性,过滤掉无效或不符合要求的数据。这有助于保证数据的准确性、完整性和安全性。
- 安全保护:过滤器可以用于提供安全保护措施。可以使用过滤器对输入的请求进行检查和清洗,以防止潜在的安全漏洞,例如跨站脚本攻击(XSS)、跨站请求伪造(CSRF)等攻击。过滤器还可以进行访问控制,验证权限和实施安全策略。
- 性能优化:过滤器可以用于性能优化。例如,在数据处理流水线中,可以使用过滤器对数据进行转换、过滤或缓存,以提高处理速度和效率。过滤器还可以用于数据压缩、缓存预热等场景,减少数据传输和处理的成本。
- 统一处理和逻辑复用:过滤器提供了一种统一的处理方式,可以在不同的组件或模块上应用相同的逻辑或处理方式。通过将处理逻辑抽象为过滤器,可以避免重复代码、统一错误处理和异常处理等,提高代码的复用性和可维护性。
8.3 Spring Cloud Gateway 过滤器
Spring Cloud Gateway 是一个基于 Spring WebFlux 的 API 网关,提供了路由和过滤器功能。过滤器在请求和响应的生命周期中起到重要作用。Spring Cloud Gateway 提供了三种类型的过滤器:内置过滤器、全局过滤器和自定义过滤器。
1. 内置过滤器
内置过滤器是 Spring Cloud Gateway 提供的预定义过滤器,常用于常见的网关功能,如鉴权、限流、重试等。
常见的内置过滤器有:
- AddRequestHeader
- AddRequestParameter
- AddResponseHeader
- DedupeResponseHeader
- PrefixPath
- RedirectTo
- RemoveRequestHeader
- RemoveResponseHeader
- RewritePath
- SetPath
- SetRequestHeader
- SetResponseHeader
- StripPrefix
示例代码:
spring:
  cloud:
    gateway:
      routes:
      - id: add_request_header_route
        uri: http://httpbin.org:80
        filters:
        - AddRequestHeader=X-Request-Example, ExampleValue
        predicates:
        - Path=/get
在这个示例中,
AddRequestHeader过滤器会在请求头中添加X-Request-Example头,值为ExampleValue。2. 全局过滤器
全局过滤器是应用于所有路由的过滤器。它们通常用于跨所有路由的通用功能,如日志记录、监控等。
示例代码:
import org.springframework.cloud.gateway.filter.GlobalFilter;
import org.springframework.cloud.gateway.filter.factory.rewrite.ModifyRequestBodyGatewayFilterFactory;
import org.springframework.core.Ordered;
import org.springframework.stereotype.Component;
import org.springframework.web.server.ServerWebExchange;
import reactor.core.publisher.Mono;

@Component
public class CustomGlobalFilter implements GlobalFilter, Ordered {

    @Override
    public Mono<Void> filter(ServerWebExchange exchange, GatewayFilterChain chain) {
        System.out.println("Global Pre Filter executed");
        return chain.filter(exchange).then(Mono.fromRunnable(() -> {
            System.out.println("Global Post Filter executed");
        }));
    }

    @Override
    public int getOrder() {
        return -1; // Order of the filter
    }
}
在这个示例中,
CustomGlobalFilter是一个全局过滤器,它会在每个请求前后打印日志。3. 自定义过滤器
自定义过滤器是用户根据具体需求编写的过滤器,可以应用于特定路由或全局。
示例代码:
import org.springframework.cloud.gateway.filter.GatewayFilter;
import org.springframework.cloud.gateway.filter.GatewayFilterChain;
import org.springframework.cloud.gateway.filter.factory.AbstractGatewayFilterFactory;
import org.springframework.stereotype.Component;
import org.springframework.web.server.ServerWebExchange;
import reactor.core.publisher.Mono;

@Component
public class CustomFilter extends AbstractGatewayFilterFactory<CustomFilter.Config> {

    public CustomFilter() {
        super(Config.class);
    }

    @Override
    public GatewayFilter apply(Config config) {
        return (exchange, chain) -> {
            System.out.println("Custom Pre Filter executed");
            return chain.filter(exchange).then(Mono.fromRunnable(() -> {
                System.out.println("Custom Post Filter executed");
            }));
        };
    }

    public static class Config {
        // Configuration properties for the filter
    }
}
在这个示例中,
CustomFilter是一个自定义过滤器,它会在特定路由的请求前后打印日志。配置自定义过滤器:
spring:
  cloud:
    gateway:
      routes:
      - id: custom_filter_route
        uri: http://httpbin.org:80
        filters:
        - name: CustomFilter
        predicates:
        - Path=/get
在这个配置中,
CustomFilter会应用于/get路径的请求。总结
- 内置过滤器:Spring Cloud Gateway 提供的预定义过滤器,适用于常见的网关功能。
- 全局过滤器:应用于所有路由的过滤器,适用于跨所有路由的通用功能。
- 自定义过滤器:用户根据具体需求编写的过滤器,可以应用于特定路由或全局。
通过这些过滤器,Spring Cloud Gateway 提供了灵活的请求和响应处理能力,满足各种网关需求。
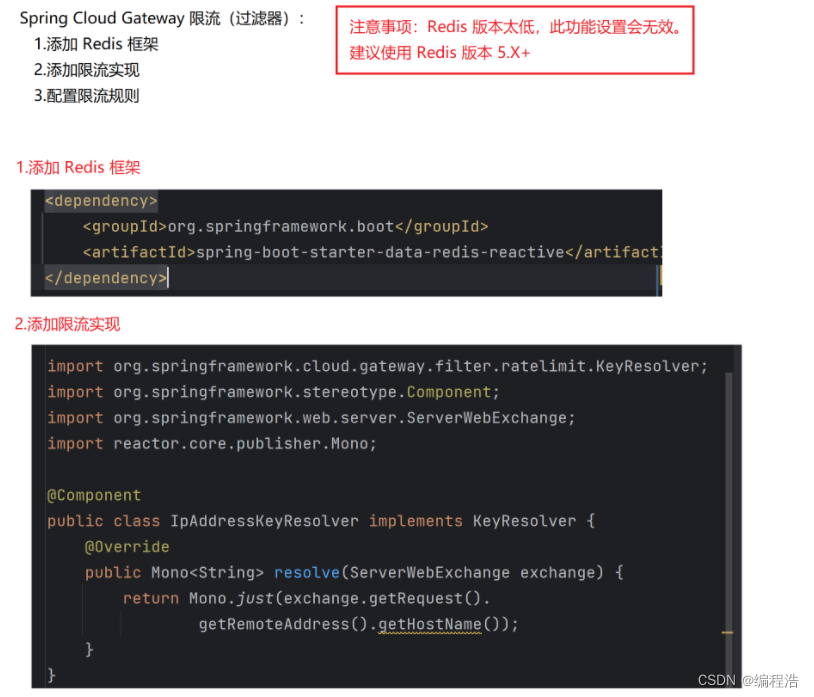
限流

重试过滤器
9.工作原理
SpringCloudGateway的工作原理可以概括为以下几个关键点:
-
核心组件:
- Filter:过滤器是SpringCloudGateway中用于处理请求和响应的重要组件。它们可以在请求进入或离开网关时执行特定的操作,如身份验证、限流、日志记录等。
- Route:路由是网关最基础的部分,用于定义请求的转发规则。每个路由都由一个唯一的标识符和一个或多个断言组成。
- Predicates:断言用于匹配请求,决定请求是否符合路由条件。如果断言为真,则说明请求URL和配置的路由匹配。
- GatewayFilter:Spring Cloud Gateway中的过滤器分为两种类型,分别是Gateway Filter和Global Filter。它们可以对请求和响应进行处理。
-
路由机制:
- SpringCloudGateway使用路由模型来定义请求的转发规则。每个路由都由一个唯一的标识符和一个或多个断言组成。
- 匹配成功后,请求将按照定义的规则转发到相应的服务。
-
过滤器机制:
- 过滤器可以在请求进入或离开网关时执行特定的操作。
- 通过在路由中添加过滤器,可以实现更加灵活的请求处理逻辑。
-
动态路由:
- 动态路由允许在运行时根据条件动态添加或修改路由规则。
- 编程式动态路由通过编程式API,可以在运行时动态创建、修改或删除路由规则。
-
性能与特性:
- SpringCloudGateway基于WebFlux框架开发,默认使用RxNetty作为响应式Web容器,通过非阻塞方式处理高并发请求,提升服务资源利用的可伸缩性。
- 支持动态路由,能够匹配任何请求属性上的路由。
- 支持基于HTTP请求的路由匹配(如Path、Method、Header、Host等)。
- 集成了Hystrix断路器,提供限流等功能。
- 过滤器可以修改HTTP请求和HTTP响应(如增加/修改Header、增加/修改请求参数、改写请求Path等)。
-
与Zuul的性能对比:
- SpringCloudGateway的RPS(每秒请求数)是Zuul的1.6倍,显示出更优秀的性能。
综上所述,SpringCloudGateway通过其核心组件(Filter、Route、Predicates和GatewayFilter)和路由、过滤器机制,以及动态路由等特性,为微服务架构提供了一种简单而有效的API路由管理方式,并具备高性能和丰富的功能。
难点:
- 网关实现灰度,从loadBalancer找到对应的userService
- 传递灰度标签方法:设置在请求头和响应头
- 服务调用服务:通过openFeign
代码地址
全链路灰色发布
概念和实现思路:
灰度发布(Gray Release,也称为灰度发布或金丝雀发布)是指在软件或服务发布过程中,将新版本的功能或服务以较小的比例引入到生产环境中,仅向部分用户或节点提供新功能的一种发布策略。
在传统的全量发布中,新版本的功能会一次性全部部署到所有的用户或节点上。然而,这种方式潜在的风险是如果新版本存在缺陷或问题,可能会对所有用户或节点产生严重的影响,导致系统崩溃或服务不可用。相比之下,灰度发布采用较小的规模,并逐步将新版本的功能引入到生产环境中,仅向一小部分用户或节点提供新功能。通过持续监测和评估,可以在发现问题时及时回滚或修复。这种逐步引入新版本的方式可以降低风险并提高系统的稳定性和可靠性。
在灰度发布过程中,可以采用不同的划分方式。常见的划分方式包括:- 用户划分:根据用户标识或用户组进行划分,在整个用户群体中只选择一小部分用户获得新功能。
- 地域划分:在不同地区或不同节点上进行划分,在其中的一小部分地区或节点进行新功能的发布。
- 流量划分:根据流量的百分比或请求次数进行划分,只将一部分请求流量引导到新功能上。
- 通过灰度发布,可以在发布新功能时最小化风险、快速获取反馈,并逐步迭代,确保系统的稳定性和可用性。这种策略已经成为现代软件开发和发布中的一种常见实践。
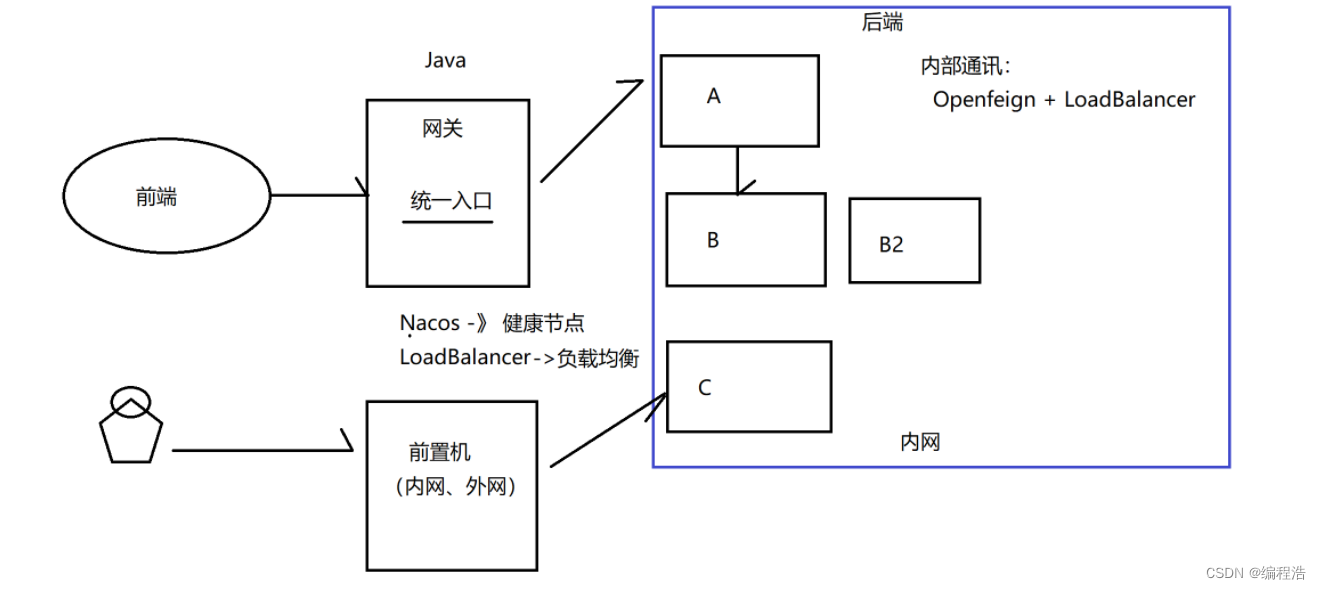
流程思路(先到网关、再调用nacos服务,nacos服务根据负载均衡器调用)

灰度发布的具体实现步骤如下:- 前端程序在灰度测试的用户 Header 头中打上标签,例如在 Header 中添加"gray-tag: true”,其表示要进行灰常测试(访问灰度服务),而其他则为访问正式服务。
- 在负载均衡器 Spring Cloud LoadBalancer 中,拿到 Header 中的“gray-tag”进行判断,如果此标签不为空,并等于“true”的话,表示要访问灰度发布的服务,否则只访问正式的服务。
- 在网关 Spring Cloud Gateway 中,将 Header 标签"gray-tag: true"继续往下一个调用服务中传递。
- 在后续的调用服务中,需要实现以下两个关键功能:
a. 在负载均衡器 Spring Cloud LoadBalancer 中,判断灰度发布标签,将请求分发到对应服务。
b. 将灰度发布标签(如果存在),继续传递给下一个调用的服务。
经过第四步的反复传递之后,整个 Spring Cloud 全链路的灰度发布就完成了。
1.负载均衡模块
1.1 自定义负载均衡器
/**
 * 全局变量
 */
public class GlobalVariable {
    public static final String GRAY_TAGE = "gray-tag";
}
package com.loadbalancer.gray; import org.apache.commons.logging.Log; import org.apache.commons.logging.LogFactory; import org.springframework.beans.factory.ObjectProvider; import org.springframework.cloud.client.ServiceInstance; import org.springframework.cloud.client.loadbalancer.*; import org.springframework.cloud.loadbalancer.core.*; import org.springframework.http.HttpHeaders; import reactor.core.publisher.Mono; import java.util.List; import java.util.Random; import java.util.concurrent.atomic.AtomicInteger; /** * 定义灰度发布的负载均衡算法 */ public class GrayLoadBalancer implements ReactorServiceInstanceLoadBalancer { private static final Log log = LogFactory.getLog(GrayLoadBalancer.class); private final String serviceId; private AtomicInteger position; // 位置,下标 private ObjectProvider<ServiceInstanceListSupplier> serviceInstanceListSupplierProvider; public GrayLoadBalancer(ObjectProvider<ServiceInstanceListSupplier> serviceInstanceListSupplierProvider, String serviceId) { this.serviceId = serviceId; this.serviceInstanceListSupplierProvider = serviceInstanceListSupplierProvider; this.position = new AtomicInteger(new Random().nextInt(1000)); } public Mono<Response<ServiceInstance>> choose(Request request) { // 提供备选的服务实例列表 ServiceInstanceListSupplier supplier = (ServiceInstanceListSupplier) this.serviceInstanceListSupplierProvider.getIfAvailable(NoopServiceInstanceListSupplier::new); // 选择服务实例 return supplier.get(request).next().map((serviceInstances) -> { return this.processInstanceResponse(supplier, serviceInstances, request); }); } private Response<ServiceInstance> processInstanceResponse(ServiceInstanceListSupplier supplier, List<ServiceInstance> serviceInstances, Request request) { // 从备选的服务列表中选择一个具体的服务实例 Response<ServiceInstance> serviceInstanceResponse = this.getInstanceResponse(serviceInstances, request); if (supplier instanceof SelectedInstanceCallback && serviceInstanceResponse.hasServer()) { ((SelectedInstanceCallback) supplier).selectedServiceInstance((ServiceInstance) serviceInstanceResponse.getServer()); } return serviceInstanceResponse; } private Response<ServiceInstance> getInstanceResponse(List<ServiceInstance> instances, Request request) { // 实例为空 if (instances.isEmpty()) { if (log.isWarnEnabled()) { log.warn("No servers available for service: " + this.serviceId); } return new EmptyResponse(); } else { // 服务不为空 // 灰度节点的业务实现 // 0.得到 Request 对象[通过方法参数的传递得到此对象] // 1.从 Request 对象的 Header 中得到灰度标签 RequestDataContext requestContext = (RequestDataContext) request.getContext(); HttpHeaders headers = requestContext.getClientRequest().getHeaders(); List<String> headersList = headers.get(GlobalVariable.GRAY_TAGE); if (headersList != null && headersList.size() > 0 && headersList.get(0).equals("true")) { // 灰度请求 // 灰度列表 List<ServiceInstance> grayList = instances.stream(). filter(i -> i.getMetadata().get(GlobalVariable.GRAY_TAGE) != null && i.getMetadata().get(GlobalVariable.GRAY_TAGE).equals("true")). toList(); if (grayList.size() > 0) { // 存在灰度服务节点 instances = grayList; } } else { // 正式节点 // 2.将实例进行分组【正式服务列表|灰度服务列表】 instances = instances.stream(). filter(i -> i.getMetadata().get(GlobalVariable.GRAY_TAGE) == null || !i.getMetadata().get(GlobalVariable.GRAY_TAGE).equals("true")). toList(); } // 3.使用负载均衡算法选择上一步列表中的某一个节点 int pos = this.position.incrementAndGet() & Integer.MAX_VALUE; ServiceInstance instance = (ServiceInstance)instances.get(pos % instances.size()); return new DefaultResponse(instance); } } }1.2 封装负载均衡器
/**
 * 封装灰度发布负载均衡器
 */
public class GrayLoadBalancerConfig  {
    @Bean
    ReactorLoadBalancer<ServiceInstance> grayLoadBalancer(Environment environment,
                                                            LoadBalancerClientFactory loadBalancerClientFactory) {
        String name = environment.getProperty(LoadBalancerClientFactory.PROPERTY_NAME);
        // 负载均衡器
        return new GrayLoadBalancer(loadBalancerClientFactory
                .getLazyProvider(name, ServiceInstanceListSupplier.class),
                name);
    }
}
2.网关模块
配置网关
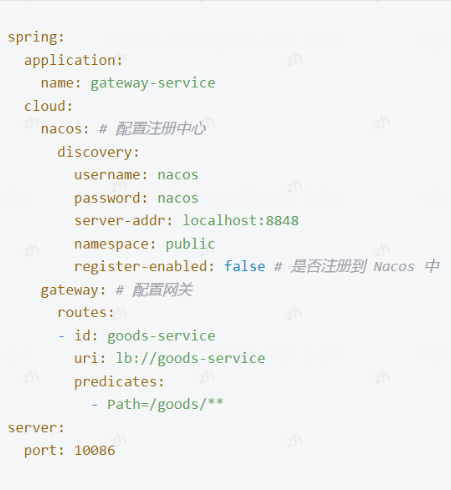
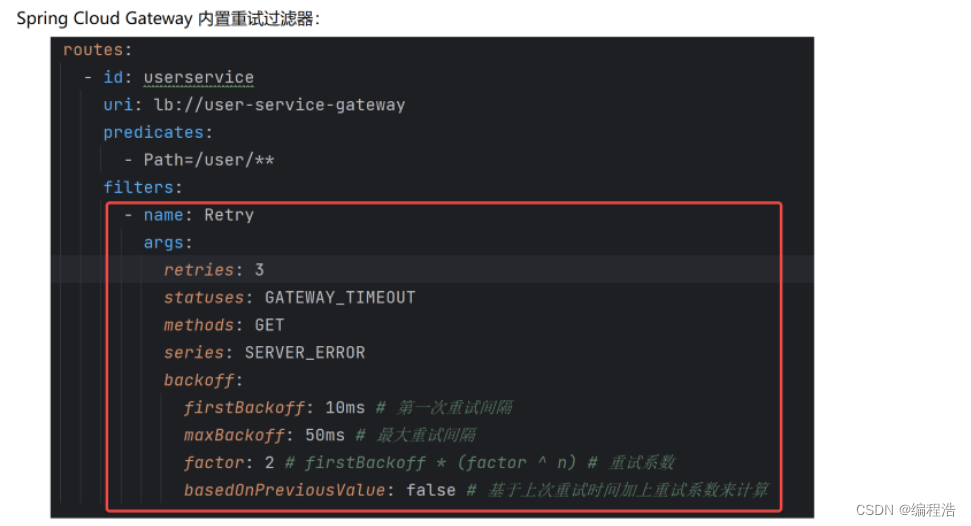
spring:
  main:
    web-application-type: reactive
  application:
    name: gateway-gray
  cloud:
    nacos:
      discovery:
        server-addr: localhost:8848
        username: nacos
        password: nacos
        register-enabled: false
    gateway:
      routes:
        - id: user-service
          uri: lb://user-service-gray
          predicates:
            - Path=/user/**
server:
  port: 10086
自定义过滤器
判断是否有灰度标签 如果有则传递
package com.example.gateway.config;


import org.springframework.cloud.gateway.filter.GatewayFilterChain;
import org.springframework.cloud.gateway.filter.GlobalFilter;
import org.springframework.http.server.reactive.ServerHttpRequest;
import org.springframework.http.server.reactive.ServerHttpResponse;
import org.springframework.stereotype.Component;
import org.springframework.web.server.ServerWebExchange;
import reactor.core.publisher.Mono;
import com.loadbalancer.gray.*;

@Component
public class LoadBalancerFilter implements GlobalFilter {
    @Override
    public Mono<Void> filter(ServerWebExchange exchange, GatewayFilterChain chain) {
        // 得到 request、response 对象
        ServerHttpRequest request = exchange.getRequest();
        ServerHttpResponse response = exchange.getResponse();
        // 判断灰度标签
        if (request.getQueryParams().getFirst(GlobalVariable.GRAY_TAGE) != null) {
            // 设置灰度标识
            response.getHeaders().set(GlobalVariable.GRAY_TAGE,
                    "true");
        }
        // 此步骤正常,执行下一步
        return chain.filter(exchange);
    }
}
3.服务模块
3.1 注册为灰色服务实例
spring:
  application:
    name: user-service-gray
  cloud:
    nacos:
      discovery:
        server-addr: localhost:8848
        username: nacos
        password: nacos
        metadata: { "gray-tag": "true" } # 当前为灰度节点
server:
  port: 0
3.2 设置负载均衡器
@SpringBootApplication
@EnableFeignClients
@LoadBalancerClients(defaultConfiguration =
        GrayLoadBalancerConfig.class)
public class NewUserServiceApplication {

    public static void main(String[] args) {
        SpringApplication.run(NewUserServiceApplication.class, args);
    }

}
3.3 传递灰度标签
@Component
public class FeignRequestInterceptor implements RequestInterceptor {
    @Override
    public void apply(RequestTemplate requestTemplate) {
        // 从 RequestContextHolder 中获取 HttpServletRequest
        ServletRequestAttributes attributes = (ServletRequestAttributes)
                RequestContextHolder.getRequestAttributes();
        HttpServletRequest request = attributes.getRequest();
        Enumeration<String> headerNames = request.getHeaderNames();
        while (headerNames.hasMoreElements()){
            String key = headerNames.nextElement();
            String value = request.getHeader(key);
            requestTemplate.header(key,value);
        }
    }
}
思路
1. 用户访问网关:网关过滤 找到灰度标签 传递灰度标签
@Component
public class LoadBalancerFilter implements GlobalFilter {
    @Override
    public Mono<Void> filter(ServerWebExchange exchange, GatewayFilterChain chain) {
        // 得到 request、response 对象
        ServerHttpRequest request = exchange.getRequest();
        ServerHttpResponse response = exchange.getResponse();
        // 判断灰度标签
        if (request.getQueryParams().getFirst(GlobalVariable.GRAY_TAGE) != null) {
            // 设置灰度标识
            response.getHeaders().set(GlobalVariable.GRAY_TAGE,
                    "true");
        }
        // 此步骤正常,执行下一步
        return chain.filter(exchange);
    }
}
2. 自定义loadbalance:loadbalance根据标签进行分发
public class GrayLoadBalancerConfig  {
    @Bean
    ReactorLoadBalancer<ServiceInstance> grayLoadBalancer(Environment environment,
                                                            LoadBalancerClientFactory loadBalancerClientFactory) {
        String name = environment.getProperty(LoadBalancerClientFactory.PROPERTY_NAME);
        // 负载均衡器
        return new GrayLoadBalancer(loadBalancerClientFactory
                .getLazyProvider(name, ServiceInstanceListSupplier.class),
                name);
    }
}
/** * 定义灰度发布的负载均衡算法 */ public class GrayLoadBalancer implements ReactorServiceInstanceLoadBalancer { private static final Log log = LogFactory.getLog(GrayLoadBalancer.class); private final String serviceId; private AtomicInteger position; // 位置,下标 private ObjectProvider<ServiceInstanceListSupplier> serviceInstanceListSupplierProvider; public GrayLoadBalancer(ObjectProvider<ServiceInstanceListSupplier> serviceInstanceListSupplierProvider, String serviceId) { this.serviceId = serviceId; this.serviceInstanceListSupplierProvider = serviceInstanceListSupplierProvider; this.position = new AtomicInteger(new Random().nextInt(1000)); } public Mono<Response<ServiceInstance>> choose(Request request) { // 提供备选的服务实例列表 ServiceInstanceListSupplier supplier = (ServiceInstanceListSupplier) this.serviceInstanceListSupplierProvider.getIfAvailable(NoopServiceInstanceListSupplier::new); // 选择服务实例 return supplier.get(request).next().map((serviceInstances) -> { return this.processInstanceResponse(supplier, serviceInstances, request); }); } private Response<ServiceInstance> processInstanceResponse(ServiceInstanceListSupplier supplier, List<ServiceInstance> serviceInstances, Request request) { // 从备选的服务列表中选择一个具体的服务实例 Response<ServiceInstance> serviceInstanceResponse = this.getInstanceResponse(serviceInstances, request); if (supplier instanceof SelectedInstanceCallback && serviceInstanceResponse.hasServer()) { ((SelectedInstanceCallback) supplier).selectedServiceInstance((ServiceInstance) serviceInstanceResponse.getServer()); } return serviceInstanceResponse; } private Response<ServiceInstance> getInstanceResponse(List<ServiceInstance> instances, Request request) { // 实例为空 if (instances.isEmpty()) { if (log.isWarnEnabled()) { log.warn("No servers available for service: " + this.serviceId); } return new EmptyResponse(); } else { // 服务不为空 // 灰度节点的业务实现 // 0.得到 Request 对象[通过方法参数的传递得到此对象] // 1.从 Request 对象的 Header 中得到灰度标签 RequestDataContext requestContext = (RequestDataContext) request.getContext(); HttpHeaders headers = requestContext.getClientRequest().getHeaders(); List<String> headersList = headers.get(GlobalVariable.GRAY_TAGE); if (headersList != null && headersList.size() > 0 && headersList.get(0).equals("true")) { // 灰度请求 // 灰度列表 List<ServiceInstance> grayList = instances.stream(). filter(i -> i.getMetadata().get(GlobalVariable.GRAY_TAGE) != null && i.getMetadata().get(GlobalVariable.GRAY_TAGE).equals("true")). toList(); if (grayList.size() > 0) { // 存在灰度服务节点 instances = grayList; } } else { // 正式节点 // 2.将实例进行分组【正式服务列表|灰度服务列表】 instances = instances.stream(). filter(i -> i.getMetadata().get(GlobalVariable.GRAY_TAGE) == null || !i.getMetadata().get(GlobalVariable.GRAY_TAGE).equals("true")). toList(); } // 3.使用负载均衡算法选择上一步列表中的某一个节点 int pos = this.position.incrementAndGet() & Integer.MAX_VALUE; ServiceInstance instance = (ServiceInstance)instances.get(pos % instances.size()); return new DefaultResponse(instance); } } }3. service被调用后:再调用其他服务 利用feign传递标签
@Component public class FeignRequestInterceptor implements RequestInterceptor { @Override public void apply(RequestTemplate requestTemplate) { // 从 RequestContextHolder 中获取 HttpServletRequest ServletRequestAttributes attributes = (ServletRequestAttributes) RequestContextHolder.getRequestAttributes(); HttpServletRequest request = attributes.getRequest(); Enumeration<String> headerNames = request.getHeaderNames(); while (headerNames.hasMoreElements()){ String key = headerNames.nextElement(); String value = request.getHeader(key); requestTemplate.header(key,value); } } } -
相关阅读:
Python 作为开发语言可以吗?怎么掌握 python 才能提升自己
简单聊聊什么是react-redux,它能解决哪些问题
Mysql密码忘记后怎么重置密码,mysql8之后有改动
【JAVASE开发】带你零基础学JAVA项目(二嗨租车项目篇)
Linux权限
软件测试/测试开发丨接口自动化测试学习笔记,加密与解密
(六)正则表达式——PHP
2022-11-14 西安 activiti工作流(01)
java毕业设计广告投放(附源码、数据库)
C语言—程序环境和预处理
- 原文地址:https://blog.csdn.net/m0_63571404/article/details/139613826