-
RabbitMQ-交换机
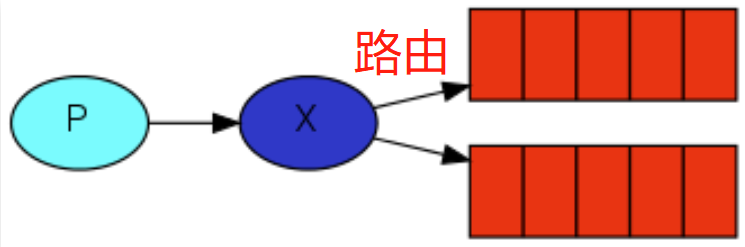
交换机
**交换机 **是消息队列中的一个组件,其作用类似于网络路由器。它负责将我们发送的消息转发到相应的目标,就像快递站将快递发送到对应的站点,或者网络路由器将网络请求转发到相应的服务器或客户端一样。交换机的主要功能是提供转发消息的能力,根据消息的路由规则将消息投递到合适的队列或绑定的消费者。
我们可以理解为,如果说一个快递站已经承受不了那么多的快递了,就建多个快递站。fanout
扇出,广播
特点:消息会被转发到所有绑定到该交换机的队列
场景:很适用于发布订阅的场景,比如写日志,可以多个系统间共享
示例场景:

生产者代码:package com.yupi.springbootinit.mq; import com.rabbitmq.client.Channel; import com.rabbitmq.client.Connection; import com.rabbitmq.client.ConnectionFactory; import java.util.Scanner; public class FanoutProducer { // 交换机名字 private static final String EXCHANGE_NAME = "fanout-exchange"; public static void main(String[] argv) throws Exception { ConnectionFactory factory = new ConnectionFactory(); factory.setHost("localhost"); try (Connection connection = factory.newConnection(); Channel channel = connection.createChannel()) { // 创建交换机 channel.exchangeDeclare(EXCHANGE_NAME, "fanout"); Scanner scanner = new Scanner(System.in); while (scanner.hasNext()) { String message = scanner.nextLine(); channel.basicPublish(EXCHANGE_NAME, "", null, message.getBytes("UTF-8")); System.out.println(" [x] Sent '" + message + "'"); } } } }- 1
- 2
- 3
- 4
- 5
- 6
- 7
- 8
- 9
- 10
- 11
- 12
- 13
- 14
- 15
- 16
- 17
- 18
- 19
- 20
- 21
- 22
- 23
- 24
- 25
- 26
- 27
- 28
消费者代码:
package com.yupi.springbootinit.mq; import com.rabbitmq.client.Channel; import com.rabbitmq.client.Connection; import com.rabbitmq.client.ConnectionFactory; import com.rabbitmq.client.DeliverCallback; public class FanoutConsumer { //交换机名字 private static final String EXCHANGE_NAME = "fanout-exchange"; public static void main(String[] argv) throws Exception { //建立连接 ConnectionFactory factory = new ConnectionFactory(); factory.setHost("localhost"); Connection connection = factory.newConnection(); //创建频道 Channel channel1 = connection.createChannel(); // 声明交换机 channel1.exchangeDeclare(EXCHANGE_NAME, "fanout"); // 创建队列1,连接到交换机上 String queueName = "xiaowang_queue"; channel1.queueDeclare(queueName, true, false, false, null); channel1.queueBind(queueName, EXCHANGE_NAME, ""); // 创建队列2,连接到交换机上 String queueName2 = "xiaoli_queue"; channel1.queueDeclare(queueName2, true, false, false, null); channel1.queueBind(queueName2, EXCHANGE_NAME, ""); System.out.println(" [*] Waiting for messages. To exit press CTRL+C"); // 创建交付回调函数1 DeliverCallback deliverCallback1 = (consumerTag, delivery) -> { String message = new String(delivery.getBody(), "UTF-8"); System.out.println(" [小王] Received '" + message + "'"); }; // 创建交付回调函数2 DeliverCallback deliverCallback2 = (consumerTag, delivery) -> { String message = new String(delivery.getBody(), "UTF-8"); System.out.println(" [小李] Received '" + message + "'"); }; // 开始消费消息队列1 channel1.basicConsume(queueName, true, deliverCallback1, consumerTag -> { }); // 开始消费消息队列2 channel1.basicConsume(queueName2, true, deliverCallback2, consumerTag -> { }); } }- 1
- 2
- 3
- 4
- 5
- 6
- 7
- 8
- 9
- 10
- 11
- 12
- 13
- 14
- 15
- 16
- 17
- 18
- 19
- 20
- 21
- 22
- 23
- 24
- 25
- 26
- 27
- 28
- 29
- 30
- 31
- 32
- 33
- 34
- 35
- 36
- 37
- 38
- 39
- 40
- 41
- 42
- 43
- 44
- 45
Direct
官方教程:https://www.rabbitmq.com/tutorials/tutorial-four-java.html
特点:消息会根据路由键转发到指定的队列
场景:特定的消息只交给特定的系统(程序)来处理
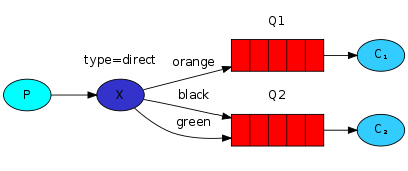
注意:不同队列可以绑定相同的路由键

示例场景:
老板在发送消息同时会带上路由键,根据路由键找对应的队列来发送

生产者代码:package com.yupi.springbootinit.mq; import com.rabbitmq.client.Channel; import com.rabbitmq.client.Connection; import com.rabbitmq.client.ConnectionFactory; import java.util.Scanner; public class DirectProducer { private static final String EXCHANGE_NAME = "direct-exchange"; public static void main(String[] argv) throws Exception { ConnectionFactory factory = new ConnectionFactory(); factory.setHost("localhost"); try (Connection connection = factory.newConnection(); Channel channel = connection.createChannel()) { //声明交换机是direct channel.exchangeDeclare(EXCHANGE_NAME, "direct"); //输入消息 和 路由键 Scanner scanner = new Scanner(System.in); while (scanner.hasNext()) { String userInput = scanner.nextLine(); String[] strings = userInput.split(" "); if (strings.length < 1) { continue; } String message = strings[0]; String routingKey = strings[1]; //发布消息的时候注意指定路由键 channel.basicPublish(EXCHANGE_NAME, routingKey, null, message.getBytes("UTF-8")); System.out.println(" [x] Sent '" + message + " with routing:" + routingKey + "'"); } } } }- 1
- 2
- 3
- 4
- 5
- 6
- 7
- 8
- 9
- 10
- 11
- 12
- 13
- 14
- 15
- 16
- 17
- 18
- 19
- 20
- 21
- 22
- 23
- 24
- 25
- 26
- 27
- 28
- 29
- 30
- 31
- 32
- 33
- 34
- 35
- 36
- 37
消费者代码:
package com.yupi.springbootinit.mq; import com.rabbitmq.client.Channel; import com.rabbitmq.client.Connection; import com.rabbitmq.client.ConnectionFactory; import com.rabbitmq.client.DeliverCallback; public class DirectConsumer { private static final String EXCHANGE_NAME = "direct-exchange"; public static void main(String[] argv) throws Exception { ConnectionFactory factory = new ConnectionFactory(); factory.setHost("localhost"); Connection connection = factory.newConnection(); Channel channel = connection.createChannel(); //声明交换机,不过生成者已经声明过了,消费者声不声明都可以 channel.exchangeDeclare(EXCHANGE_NAME, "direct"); // 创建队列 String queueName = "xiaoyu_queue"; channel.queueDeclare(queueName, true, false, false, null); channel.queueBind(queueName, EXCHANGE_NAME, "xiaoyu"); //指定2交换机和路由键 // 创建队列,随机分配一个队列名称 String queueName2 = "xiaopi_queue"; channel.queueDeclare(queueName2, true, false, false, null); channel.queueBind(queueName2, EXCHANGE_NAME, "xiaopi"); System.out.println(" [*] Waiting for messages. To exit press CTRL+C"); DeliverCallback xiaoyuDeliverCallback = (consumerTag, delivery) -> { String message = new String(delivery.getBody(), "UTF-8"); System.out.println(" [xiaoyu] Received '" + delivery.getEnvelope().getRoutingKey() + "':'" + message + "'"); }; DeliverCallback xiaopiDeliverCallback = (consumerTag, delivery) -> { String message = new String(delivery.getBody(), "UTF-8"); System.out.println(" [xiaopi] Received '" + delivery.getEnvelope().getRoutingKey() + "':'" + message + "'"); }; channel.basicConsume(queueName, true, xiaoyuDeliverCallback, consumerTag -> { }); channel.basicConsume(queueName2, true, xiaopiDeliverCallback, consumerTag -> { }); } }- 1
- 2
- 3
- 4
- 5
- 6
- 7
- 8
- 9
- 10
- 11
- 12
- 13
- 14
- 15
- 16
- 17
- 18
- 19
- 20
- 21
- 22
- 23
- 24
- 25
- 26
- 27
- 28
- 29
- 30
- 31
- 32
- 33
- 34
- 35
- 36
- 37
- 38
- 39
- 40
- 41
- 42
- 43
- 44
- 45
- 46
- 47
- 48
- 49
topic
官方教程:https://www.rabbitmq.com/tutorials/tutorial-five-java.html
特点:消息会根据一个模糊的路由键转发到指定的队列
场景:特定的一类消息可以交给特定的一类系统(程序)来处理
规则:- :匹配一个单词,比如.orange,那么 abc.orange、ikun.orange 都能匹配
- #:匹配0个或多个单词,比如orange.#,那么orange,orange.abc.ikun都能匹配
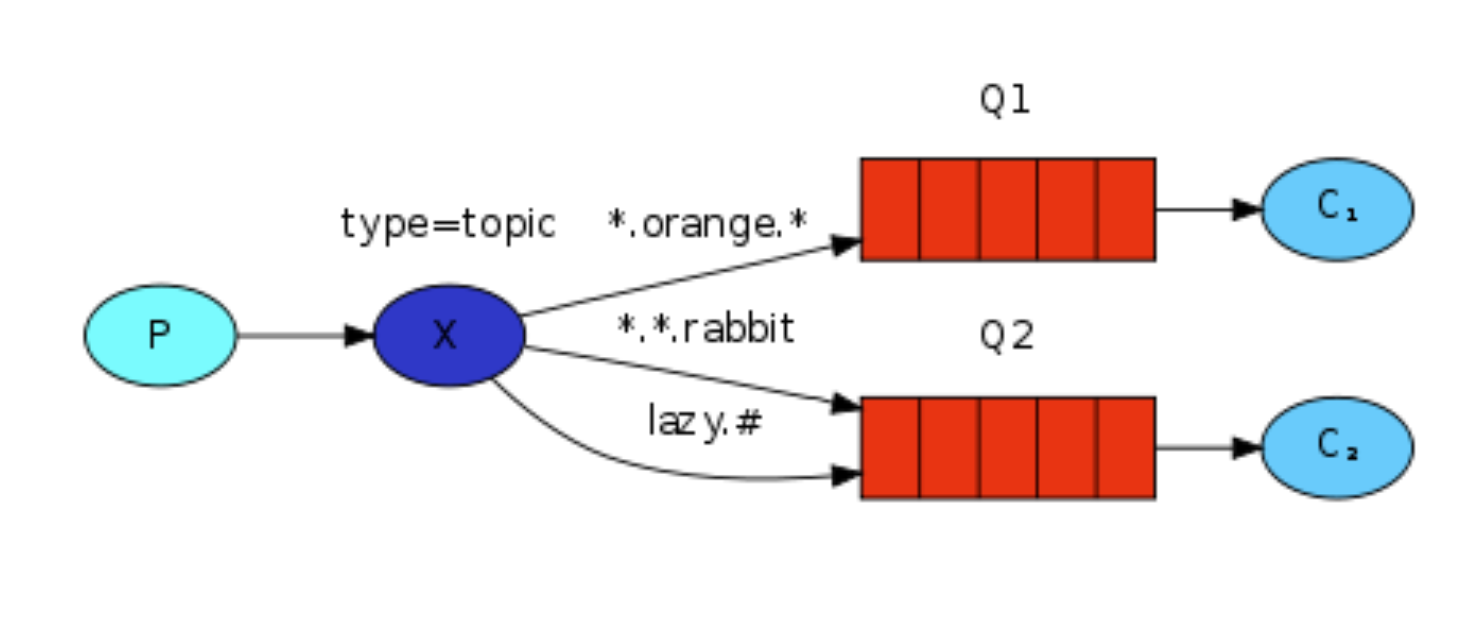
应用场景:
老板要下发一个任务,让多个组来处理

生产者代码:package com.yupi.springbootinit.mq; import com.rabbitmq.client.Channel; import com.rabbitmq.client.Connection; import com.rabbitmq.client.ConnectionFactory; import java.util.Scanner; public class TopicProducer { private static final String EXCHANGE_NAME = "topic-exchange"; public static void main(String[] argv) throws Exception { ConnectionFactory factory = new ConnectionFactory(); factory.setHost("localhost"); try (Connection connection = factory.newConnection(); Channel channel = connection.createChannel()) { channel.exchangeDeclare(EXCHANGE_NAME, "topic"); Scanner scanner = new Scanner(System.in); while (scanner.hasNext()) { String userInput = scanner.nextLine(); String[] strings = userInput.split(" "); if (strings.length < 1) { continue; } String message = strings[0]; String routingKey = strings[1]; channel.basicPublish(EXCHANGE_NAME, routingKey, null, message.getBytes("UTF-8")); System.out.println(" [x] Sent '" + message + " with routing:" + routingKey + "'"); } } } }- 1
- 2
- 3
- 4
- 5
- 6
- 7
- 8
- 9
- 10
- 11
- 12
- 13
- 14
- 15
- 16
- 17
- 18
- 19
- 20
- 21
- 22
- 23
- 24
- 25
- 26
- 27
- 28
- 29
- 30
- 31
- 32
- 33
- 34
- 35
- 36
消费者代码:
package com.yupi.springbootinit.mq; import com.rabbitmq.client.Channel; import com.rabbitmq.client.Connection; import com.rabbitmq.client.ConnectionFactory; import com.rabbitmq.client.DeliverCallback; public class TopicConsumer { private static final String EXCHANGE_NAME = "topic-exchange"; public static void main(String[] argv) throws Exception { ConnectionFactory factory = new ConnectionFactory(); factory.setHost("localhost"); Connection connection = factory.newConnection(); Channel channel = connection.createChannel(); channel.exchangeDeclare(EXCHANGE_NAME, "topic"); // 创建队列 String queueName = "frontend_queue"; channel.queueDeclare(queueName, true, false, false, null); channel.queueBind(queueName, EXCHANGE_NAME, "#.前端.#"); // 创建队列 String queueName2 = "backend_queue"; channel.queueDeclare(queueName2, true, false, false, null); channel.queueBind(queueName2, EXCHANGE_NAME, "#.后端.#"); // 创建队列 String queueName3 = "product_queue"; channel.queueDeclare(queueName3, true, false, false, null); channel.queueBind(queueName3, EXCHANGE_NAME, "#.产品.#"); System.out.println(" [*] Waiting for messages. To exit press CTRL+C"); DeliverCallback xiaoaDeliverCallback = (consumerTag, delivery) -> { String message = new String(delivery.getBody(), "UTF-8"); System.out.println(" [xiaoa] Received '" + delivery.getEnvelope().getRoutingKey() + "':'" + message + "'"); }; DeliverCallback xiaobDeliverCallback = (consumerTag, delivery) -> { String message = new String(delivery.getBody(), "UTF-8"); System.out.println(" [xiaob] Received '" + delivery.getEnvelope().getRoutingKey() + "':'" + message + "'"); }; DeliverCallback xiaocDeliverCallback = (consumerTag, delivery) -> { String message = new String(delivery.getBody(), "UTF-8"); System.out.println(" [xiaoc] Received '" + delivery.getEnvelope().getRoutingKey() + "':'" + message + "'"); }; channel.basicConsume(queueName, true, xiaoaDeliverCallback, consumerTag -> { }); channel.basicConsume(queueName2, true, xiaobDeliverCallback, consumerTag -> { }); channel.basicConsume(queueName3, true, xiaocDeliverCallback, consumerTag -> { }); } }- 1
- 2
- 3
- 4
- 5
- 6
- 7
- 8
- 9
- 10
- 11
- 12
- 13
- 14
- 15
- 16
- 17
- 18
- 19
- 20
- 21
- 22
- 23
- 24
- 25
- 26
- 27
- 28
- 29
- 30
- 31
- 32
- 33
- 34
- 35
- 36
- 37
- 38
- 39
- 40
- 41
- 42
- 43
- 44
- 45
- 46
- 47
- 48
- 49
- 50
- 51
- 52
- 53
- 54
- 55
- 56
- 57
- 58
- 59
- 60
- 61
- 62
这样生产者发消息:前端.后端

就可以匹配到前端和后端两个队列

Headers
可以根据headers中的内容来指定发送到哪个队列,由于性能差,比较复杂,一般不推荐使用
RPC
支持用消息队列来模拟RPC的调用,但是一般没必要,直接用 Dubbo、GRPC 等 RPC 框架就好了。
-
相关阅读:
王阳明学习笔记
MFC list control控件数据修改
GoFrame的gmap相比Go原生的map,天然支持排序和有序遍历!?
MATLAB算术运算符、关系运算符、逻辑运算符、按位集合运算符
Python安装教程
理解多态,让不同的“人”做同一件事情会产生不同的结果
AWS无服务器 应用程序开发—第九章 权限(Amazon IAM)
C++调试:GDB调试器(GDB主要调试的是C/C++的程序)
ROS 动态参数 事实调参方式
ASEMI-GBJ5010电源控制柜所用整流桥
- 原文地址:https://blog.csdn.net/m0_74870396/article/details/137874281
