-
虚幻引擎5 Gameplay框架(一)
GamePlay概论与打包和批处理脚本
GamePlay简介与创建项目
- GamePlay框架:用于设计游戏规则,组织和管理游戏核心逻辑、规则以及交互的一套结构化体系。
- Default Pawn Class:定义角色行为逻辑,接收玩家控制器的输入,一般都写在这个类中
- HUD Class:告诉游戏玩家目前的状态,HUD主要用于管理UUserWidget
- Player Controller Class:主要控制Pawn的Actor,本质上就是代表人类的意愿
- 相机管理
- 输入系统
- Player Controller与Player的关联
- 管理HUD
- 网络语言通话功能
- Game State Class:游戏层面的数据变化,例如:游戏是否开始了,阵营得分,存放所有玩家的PlayerState。随关卡的生成销毁
- Player State Class:用于存放每个玩家在游戏中状态的类,玩家自己的数据。随关卡的生成销毁
- Spectator Class:Spectator类通常指的是游戏中的观战者模式相关的类

- 虚幻引擎3C概念:Controller、Camera、Character:
逻辑闭环- Controller:
用于接收来自输入设备的输入信号,Controller并不直接控制角色的物理运动,而是通过与对应的Pawn(可能是Character类型)进行交互,发送命令和更新状态。主要用于控制Pawn,通过输入信号又可以控制玩家角色,然后配合相机,从游戏获取信息,控制Character的反馈。 - Camera:实时为玩家显示游戏中画面。
设置Camera与Controller配合,可以实现第一人称视角(FPV)、第三人称视角(TPV)和其他多种视角模式,同时也可以调整相机的视野、远近裁剪面、缩放等因素,以增强玩家的游戏体验。 - Character:游戏中代表的玩家或者非玩家实体对象(AI控制)。
Character 类通常是从 Pawn 类派生而来,Character通常带有骨骼动画系统支持,能够进行复杂的动作表现,并且与物理系统相结合,进行运动和碰撞检测。
- Controller:
综上所述,“3C”构成了虚幻引擎中角色控制和视觉表达的核心要素,它们相互协同工作,共同实现了游戏中角色的交互行为及玩家的视觉感知。- 1
模版代码:Character初始化构造
- GetCapsuleComponent()->
InitCapsuleSize(42.f, 96.0f);- 初始化胶囊体的宽高度
- 头文件:#include “Components/CapsuleComponent.h”
- 让相机不做旋转
bUseControllerRotationPitch = false; bUseControllerRotationYaw = false; bUseControllerRotationRoll = false;- 1
- 2
- 3
- GetCharacterMovement()->
bOrientRotationToMovement= true;- 角色在输入方向时,进行旋转
- 头文件:#include “GameFramework/CharacterMovementComponent.h”
- 如果是这里是false,就会反方向行走

- GetCharaterMovement()->
RotationRate= FRotator(0.0f, 500.0f, 0.0f);- 控制角色转向时的速率
//跳跃高度 GetCharacterMovement()->JumpZVelocity = 700.f; //跳跃向前浮动移动速率 GetCharacterMovement()->AirControl = 0.35f; //最大移动速度 GetCharacterMovement()->MaxWalkSpeed = 500.f; //以最小模拟摇杆倾斜行走时,我们应该加速到的地面速度 GetCharacterMovement()->MinAnalogWalkSpeed = 20.f; //行走时减速,不加加速度。这是一个恒定的反作用力,它直接使速度降低一个恒定值 GetCharacterMovement()->BrakingDecelerationWalking = 2000.f;- 1
- 2
- 3
- 4
- 5
- 6
- 7
- 8
- 9
- 10
- CameraBoom =
CreateDefaultSubobject<USpringArmComponent>(TEXT(“CameraBoom”));- 创建一个相机臂组件
- 头文件:#include “GameFramework/SpringArmComponent.h”
CreateDefaultSubobject:这是一个模版函数
template<class TReturnType> TReturnType* CreateDefaultSubobject(FName SubobjectName, bool bTransient = false) { UClass* ReturnType = TReturnType::StaticClass(); return static_cast<TReturnType*>(CreateDefaultSubobject(SubobjectName, ReturnType, ReturnType, /*bIsRequired =*/ true, bTransient)); }- 1
- 2
- 3
- 4
- 5
- 6
- 相机臂就可以理解为一个自拍杆,这样就可以查看角色的最佳角度
//附加到根组件上 CameraBoom->SetupAttachment(RootComponent); //相机臂长度 CameraBoom->TargetArmLength = 400.0f; //打开相机臂的旋转,让控制器控制相机臂,之前让相机不做旋转,因为相机被相机臂控制 //这里就像自拍时,我们借助一个自拍杆来更好调整相机角度 CameraBoom->bUsePawnControlRotation = true;- 1
- 2
- 3
- 4
- 5
- 6
- 7
- FollowCamera = CreateDefaultSubobject(TEXT(“FollowCamera”));
- 创建相机组件
- 头文件:#include “Camera/CameraComponent.h”
//将摄像机固定在吊杆的末端,让吊杆调整到与控制器方向相匹配的位置 FollowCamera->SetupAttachment(CameraBoom, USpringArmComponent::SocketName); /* 让相机不相对于手臂旋转,即便这里是true也无妨, 因为最终还是根据相机臂的旋转进行。 除非相机臂的旋转是false,那这里为true就会进行以相机为中心进行旋转 */ FollowCamera->bUsePawnControlRotation = false;- 1
- 2
- 3
- 4
- 5
- 6
- 7
模版代码:增强输入逻辑流程
- 增强输入系统是一个插件,首先我们就得在项目中添加增强输入这个插件

- 然后我们要区分行为与映射上下文
UInputMappingContext:映射上下文,理解是管理行为的管理员UInputAction:理解为行为操作
/** MappingContext */ UPROPERTY(EditAnywhere, BlueprintReadOnly, Category = Input, meta = (AllowPrivateAccess = "true")) class UInputMappingContext* DefaultMappingContext; /** Jump Input Action */ UPROPERTY(EditAnywhere, BlueprintReadOnly, Category = Input, meta = (AllowPrivateAccess = "true")) class UInputAction* JumpAction; /** Move Input Action */ UPROPERTY(EditAnywhere, BlueprintReadOnly, Category = Input, meta = (AllowPrivateAccess = "true")) class UInputAction* MoveAction; /** Look Input Action */ UPROPERTY(EditAnywhere, BlueprintReadOnly, Category = Input, meta = (AllowPrivateAccess = "true")) class UInputAction* LookAction;- 1
- 2
- 3
- 4
- 5
- 6
- 7
- 8
- 9
- 10
- 11
- 12
- 13
- 14
- 15
- 这里声明的映射上下文要与行为,要与虚幻引擎对应相接,因为我们需要从虚幻中去获取用户输入的行为操作,进行数据逻辑响应该有的操作

- 行为需要绑定函数进行行为控制,此函数必须传入
FInputActionValue值- 头文件:
#include "InputActionValue.h",因为在.h中声明头文件,一定要在#include "GamePlayCodeParsingCharacter.generated.h"上方添加头文件 - FInputActionValue:获取虚幻中行为的值类型,以下四种类型
- using Button =
bool; - using Axis1D =
float; - using Axis2D =
FVector2D; - using Axis3D =
FVector;
- 头文件:
/** Called for movement input */ void Move(const FInputActionValue& Value); /** Called for looking input */ void Look(const FInputActionValue& Value);- 1
- 2
- 3
- 4
- 5
- 为行为绑定函数操作,需要将用户输入组件强转为增强输入组件进行绑定操作,问就是虚幻官方定义的规则必须遵循
- 头文件:
#include "EnhancedInputComponent.h"
void AGamePlayCodeParsingCharacter::SetupPlayerInputComponent(class UInputComponent* PlayerInputComponent) { // Set up action bindings if (UEnhancedInputComponent* EnhancedInputComponent = CastChecked<UEnhancedInputComponent>(PlayerInputComponent)) { //Jumping EnhancedInputComponent->BindAction(JumpAction, ETriggerEvent::Triggered, this, &ACharacter::Jump); EnhancedInputComponent->BindAction(JumpAction, ETriggerEvent::Completed, this, &ACharacter::StopJumping); //Moving EnhancedInputComponent->BindAction(MoveAction, ETriggerEvent::Triggered, this, &AGamePlayCodeParsingCharacter::Move); //Looking EnhancedInputComponent->BindAction(LookAction, ETriggerEvent::Triggered, this, &AGamePlayCodeParsingCharacter::Look); } }- 1
- 2
- 3
- 4
- 5
- 6
- 7
- 8
- 9
- 10
- 11
- 12
- 13
- 14
- 15
- 16
- 17
移动的实现原理
void AGamePlayCodeParsingCharacter::Move(const FInputActionValue& Value) { // input is a Vector2D FVector2D MovementVector = Value.Get<FVector2D>(); if (Controller != nullptr) { // find out which way is forward const FRotator Rotation = Controller->GetControlRotation(); const FRotator YawRotation(0, Rotation.Yaw, 0); // get forward vector const FVector ForwardDirection = FRotationMatrix(YawRotation).GetUnitAxis(EAxis::X); // get right vector const FVector RightDirection = FRotationMatrix(YawRotation).GetUnitAxis(EAxis::Y); // add movement AddMovementInput(ForwardDirection, MovementVector.Y); AddMovementInput(RightDirection, MovementVector.X); } }- 1
- 2
- 3
- 4
- 5
- 6
- 7
- 8
- 9
- 10
- 11
- 12
- 13
- 14
- 15
- 16
- 17
- 18
- 19
- 20
- 21
- 22
- 那就来浅浅解释一下虚幻5中为什么这样写逻辑
-
已知虚幻中的X:Pitch,Y:Yaw,Z:Roll
-
我们获取到
FInputActionValue这个结构体中的FVector2D,注意这里是FVector2D,这是数学平面坐标系
FVector2D MovementVector = value.Get();//获取速度

-
而在UE三维移动中,我们只需要关注Yaw(也就是Y)
FRotator YawRotation = FRotator(0, Rotation.Yaw, 0);

-
然后在虚幻中默认为右方向以角色右手为正方向,所以那平面坐标系里面X是不是就是前后了,Y是左右
FVector ForwardDirection = FRotationMatrix(YawRotation).GetUnitAxis(EAxis::X);
FVector RightDirection = FRotationMatrix(YawRotation).GetUnitAxis(EAxis::Y);

-
此时我们已经得到了前后左右的单位向量后,回到开始的逻辑因为UE5增强输入系统传入的是
FInputActionValue结构体了,然后获取的是FVector2D这是个数学平面坐标系,所以添加到角色移动中,这里前后就是数学平面坐标系的Y了,左右就是X了
AddMovementInput(ForwardDirection, MovementVector.Y);
AddMovementInput(RightDirection, MovementVector.X);
-
AddMovementInput函数源码:最后返回就是WorldDirection * ScaleValue,而这个ScaleValue值正负决定前后,这里的AddMovementInput(ForwardDirection, MovementVector.Y);传入的正负值由映射上下文的修改器决定了,对于移动来说,一切都是线性的,正为前进,负为后退
void APawn::AddMovementInput(FVector WorldDirection, float ScaleValue, bool bForce /*=false*/) { UPawnMovementComponent* MovementComponent = GetMovementComponent(); if (MovementComponent) { MovementComponent->AddInputVector(WorldDirection * ScaleValue, bForce); } else { Internal_AddMovementInput(WorldDirection * ScaleValue, bForce); } }- 1
- 2
- 3
- 4
- 5
- 6
- 7
- 8
- 9
- 10
- 11
- 12
视角旋转实现原理
- 添加偏航和俯仰输入到控制器
AddControllerYawInput(LookAxisVector.X):Yaw轴左右转向,数学坐标系中X左右AddControllerPitchInput(LookAxisVector.Y):Pitch轴抬头低头,数学坐标系中Y上下
void AGamePlayCodeParsingCharacter::Look(const FInputActionValue& Value) { // input is a Vector2D FVector2D LookAxisVector = Value.Get<FVector2D>(); if (Controller != nullptr) { // add yaw and pitch input to controller AddControllerYawInput(LookAxisVector.X); AddControllerPitchInput(LookAxisVector.Y); } }- 1
- 2
- 3
- 4
- 5
- 6
- 7
- 8
- 9
- 10
- 11
- 12
- 甚至可以在这控制抬头与低头的范围
void AGamePlayCodeParsingCharacter::Look(const FInputActionValue& Value) { // input is a Vector2D FVector2D LookAxisVector = Value.Get<FVector2D>(); if (Controller != nullptr) { // add yaw and pitch input to controller AddControllerYawInput(LookAxisVector.X); if (GetControlRotation().Pitch < 270.f && GetControlRotation().Pitch>180.f && LookAxisVector.Y > 0.f) { return; } if (GetControlRotation().Pitch < 180.f && GetControlRotation().Pitch>45.f && LookAxisVector.Y < 0.f) { return; } AddControllerPitchInput(LookAxisVector.Y); } }- 1
- 2
- 3
- 4
- 5
- 6
- 7
- 8
- 9
- 10
- 11
- 12
- 13
- 14
- 15
- 16
- 17
- 18
- 19
- 20
- 添加映射上下文,别问为什么这么长,虚幻官方规定的规则
void AGamePlayCodeParsingCharacter::BeginPlay() { // Call the base class Super::BeginPlay(); //Add Input Mapping Context if (APlayerController* PlayerController = Cast<APlayerController>(Controller)) { if (UEnhancedInputLocalPlayerSubsystem* Subsystem = ULocalPlayer::GetSubsystem<UEnhancedInputLocalPlayerSubsystem>(PlayerController->GetLocalPlayer())) { Subsystem->AddMappingContext(DefaultMappingContext, 0); } } }- 1
- 2
- 3
- 4
- 5
- 6
- 7
- 8
- 9
- 10
- 11
- 12
- 13
- 14
- 最后在虚幻中填写修改器与行为次数值

虚幻引擎中的网络模式
- 虚幻引擎中的四种网络模式
NM_Standalone:单机的游戏服务器,但任被认为是服务器NM_DedicatedServer:独立服务器,没有本地玩家的服务器NM_ListenServer:有本地玩家,网络上的其他玩家可以使用的服务器NM_Client:客户端连接到远程服务器,因为这是枚举类型,是可以做对比的,注意每一个小于这个值的模式都是一种服务器,所以检查NetMode < NM Client总是某种类型的服务器
enum ENetMode { /** Standalone: a game without networking, with one or more local players. Still considered a server because it has all server functionality. */ NM_Standalone, /** Dedicated server: server with no local players. */ NM_DedicatedServer, /** Listen server: a server that also has a local player who is hosting the game, available to other players on the network. */ NM_ListenServer, /** * Network client: client connected to a remote server. * Note that every mode less than this value is a kind of server, so checking NetMode < NM_Client is always some variety of server. */ NM_Client, NM_MAX, };- 1
- 2
- 3
- 4
- 5
- 6
- 7
- 8
- 9
- 10
- 11
- 12
- 13
- 14
- 15
- 16
- 17
- 18
- 19
- 模式的运行规则

- 四种网络模式的区别

- NM_DedicatedServer需要单独打包,所以虚幻引擎中是没有选择项的

- NM_ListenServer下运行,本地窗口既是服务器又是客户端一

独立服务器和客户端打包
- 打包之前要项目设置几点
- 创建压缩烘焙包

- 选中自己游戏里面有多少张地图就要选择多少张,然后需要的编译模式

- 创建压缩烘焙包
- 打独立单机包,这里的二进制配置文件如果是项目里面编译模式对应的话,就会打包得快一些


打包服务器与客户端的前提要素
- 打包服务器与客户端前需要
- 复制两个Editor.Target.cs文件进行改写


- 添加这两个改好名字的现有项到项目中

- 复制两个Editor.Target.cs文件进行改写
- 然后修改这两个文件里面的代码错误,然后进行编译
- GamePlayCodeParsingClient.Target .cs
// Copyright Epic Games, Inc. All Rights Reserved. using UnrealBuildTool; using System.Collections.Generic; public class GamePlayCodeParsingClientTarget : TargetRules { public GamePlayCodeParsingClientTarget(TargetInfo Target) : base(Target) { Type = TargetType.Client; DefaultBuildSettings = BuildSettingsVersion.V2; IncludeOrderVersion = EngineIncludeOrderVersion.Unreal5_1; ExtraModuleNames.Add("GamePlayCodeParsing"); } }- 1
- 2
- 3
- 4
- 5
- 6
- 7
- 8
- 9
- 10
- 11
- 12
- 13
- 14
- 15
- 16
- GamePlayCodeParsingServer.Target.cs
// Copyright Epic Games, Inc. All Rights Reserved. using UnrealBuildTool; using System.Collections.Generic; public class GamePlayCodeParsingServerTarget : TargetRules { public GamePlayCodeParsingServerTarget(TargetInfo Target) : base(Target) { Type = TargetType.Server; DefaultBuildSettings = BuildSettingsVersion.V2; IncludeOrderVersion = EngineIncludeOrderVersion.Unreal5_1; ExtraModuleNames.Add("GamePlayCodeParsing"); } }- 1
- 2
- 3
- 4
- 5
- 6
- 7
- 8
- 9
- 10
- 11
- 12
- 13
- 14
- 15
- 编译过后,就会出现这两个打包项

打包服务器
- 然后进行打包服务器
- 此时就已经打包好了,独立服务器是不进行渲染的,打开是看不到游戏界面的,但是可以看见日志消息

- 创建这个
.exe的快捷方式,然后在属性里面添加命令行-log命令参数就可以看见日志消息
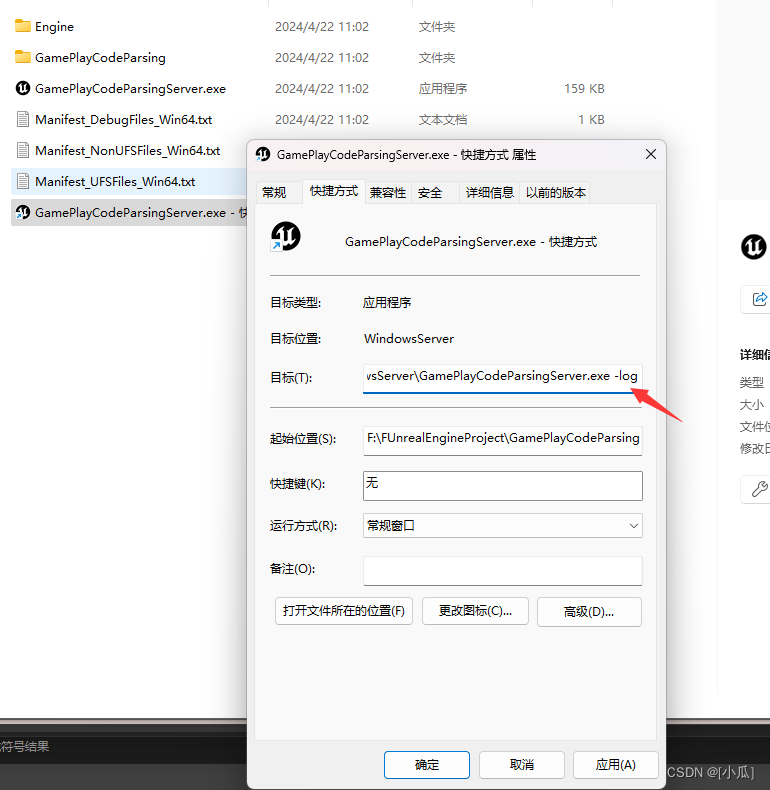

- 创建这个
打包客户端
- 打包客户端

- 创建这个
.exe的快捷方式,然后在属性里面添加命令行-WINDOWED -ResX=800 -ResY=450,可以让运行的项目不是全屏状态


建立客户端与服务器连接逻辑
- 首先创建自己的控制器

- 然后在GameMode里面注册我们的控制器

- 在控制器里面重写BeginPlay,然后在BeginPlay里面连接服务器
- ETravelType源码


- 虚幻里面默认端口为7777

void AGamePlayPlayerController::BeginPlay() { Super::BeginPlay(); //获取当前网络模式 ENetMode NM = GetNetMode(); if (NM == NM_Standalone) { FURL map; map.Host = "127.0.0.1";//本地地址 map.Port = 7777;//虚幻默认端口号 map.Map = "ThirdPersonMap"; //旅行到不同的地图或者地址 ClientTravel(map.ToString(), ETravelType::TRAVEL_Absolute); } }- 1
- 2
- 3
- 4
- 5
- 6
- 7
- 8
- 9
- 10
- 11
- 12
- 13
- 14
- 15
- 16
- 17
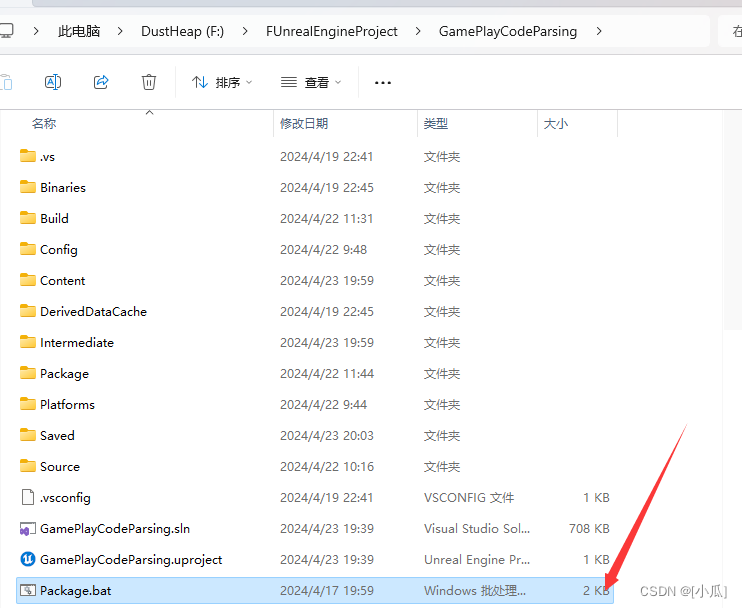
使用批处理脚本打包
- 当我们打包后,如果需要改代码就得重新进行打包
- 我们使用一个批处理脚本进行打包
- 虚幻引擎官方文档:虚幻命令行参数文档
echo off echo ----------------------------------------------------- echo Run Package echo ----------------------------------------------------- set ProjectName= 这里是你自己的项目名 ::设置编译类型 set /p BuildType=Set BuildType (1-DebugGame 2-Development 3-Test 4-Shipping) : if %BuildType% equ 1 set Config=DebugGame if %BuildType% equ 2 set Config=Development if %BuildType% equ 3 set Config=Test if %BuildType% equ 4 set Config=Shipping ::根据目标设置打包参数 set /p Target=Set TargetType (1:Client 2:Server 3:Game) : if %Target% equ 1 set Args=-cookcultures=zh-Hans+zh-Hant+en -CrashReporter -Client if %Target% equ 2 set Args=-serverplatform=Win64 -Server -noclient if %Target% equ 3 set Args=-cookcultures=zh-Hans+zh-Hant+en -CrashReporter start %~dp0..\..\UnrealEngine-5.2\Engine\Build\BatchFiles\RunUAT.bat BuildCookRun ^ -project=%~dp0%ProjectName%.uproject ^ -platform=Win64 ^ -clientconfig=%Config% ^ -serverconfig=%Config% ^ -allmaps ^ %Args% ^ -build ^ -cook ^ -stage- 1
- 2
- 3
- 4
- 5
- 6
- 7
- 8
- 9
- 10
- 11
- 12
- 13
- 14
- 15
- 16
- 17
- 18
- 19
- 20
- 21
- 22
- 23
- 24
- 25
- 26
- 27
- 28
- 29
- 30
-
将这个批处理文件放在项目目录下
-
项目在Development Server下生成一下,因为之前就是Development Editor下编译的,这样使用这个服务器会比较快一点

-
然后使用批处理程序进行服务器打包


-
然后使用批处理程序进行客户端打包
-
项目在Development Client下生成一下


-
然后再使用两个脚本打开服务器与客户端
-
客户端脚本
@echo off echo ------------------------------------ echo Run Client echo ------------------------------------ set ProjectName=你的项目 set ClientMapName=你的地图名字 ::编译目标配置 set /p Config=set[1:DebugGame 2:Test 3:Shipping 4:Development]: if %Config% equ 1 set BinConfig=DebugGame if %Config% equ 2 set BinConfig=Test if %Config% equ 3 set BinConfig=Shipping if %Config% equ 4 set BinConfig=Development set /p Name=Select player name: 1-AAA 2-BBB : if %Name% equ 1 set PlayerName=AAA if %Name% equ 2 set PlayerName=BBB ::启动客户端 start "CLIENT<%ClientMapName%>" ^ Saved/StagedBuilds/WindowsClient/%ProjectName%/Binaries/Win64/%ProjectName%Client.exe ^ %ClientMapName% ^ -game ^ -PlayerName=%PlayerName% ^ -nothreadtimeout ^ -notimeouts ^ -windowed ^ -ResX=900 ^ -ResY=500 ^ -log log=Client.log ^ -locallogtimes exit /B 1- 1
- 2
- 3
- 4
- 5
- 6
- 7
- 8
- 9
- 10
- 11
- 12
- 13
- 14
- 15
- 16
- 17
- 18
- 19
- 20
- 21
- 22
- 23
- 24
- 25
- 26
- 27
- 28
- 29
- 30
- 31
- 32
- 33
- 34
- 服务器脚本
@echo off echo ------------------------------------ echo Run Server echo ------------------------------------ set ProjectName=GamePlayCodeParsing set MapName=ThirdPersonMap set ServerName=GamePlay_Server ::编译目标配置 set /p Config=set[1:DebugGame 2:Test 3:Shipping 4:Development]: if %Config% equ 1 set BinConfig=DebugGame if %Config% equ 2 set BinConfig=Test if %Config% equ 3 set BinConfig=Shipping if %Config% equ 4 set BinConfig=Development start "SERVER<%MapName%>" ^ Saved/StagedBuilds/WindowsServer/%ProjectName%/Binaries/Win64/%ProjectName%Server.exe ^ %ProjectName% %MapName%?Listen?MaxPlayers=10 ^ -server ^ -game ^ -ServerName=%ServerName% ^ -notimeouts ^ -log log=Server.log ^ -locallogtimes- 1
- 2
- 3
- 4
- 5
- 6
- 7
- 8
- 9
- 10
- 11
- 12
- 13
- 14
- 15
- 16
- 17
- 18
- 19
- 20
- 21
- 22
- 23
- 24
- 25
- 然后打开服务器脚本


- 打开两个客户端看看是否连接上了


使用批处理脚本运行独立进程游戏模式
-
通过批处理脚本在未打包的情况下运行服务器与客户端
-
使用
DebugGame Editor编译模式生成一下,这样就会出现UnrealEditor-Win64-DebugGame.exe


-
服务器脚本
@echo off echo ------------------------------------ echo Run EditorServer Debug echo ------------------------------------ set ProjectName=GamePlayCodeParsing set MapName=ThirdPersonMap start "EditorServer_%ProjectName%_%MapName%" ^ %~dp0..\..\UnrealEngine-5.2\Engine\Binaries\Win64\UnrealEditor-Win64-DebugGame.exe ^ %~dp0%ProjectName%.uproject %MapName% ^ -server ^ -notimeouts ^ -log log=Log_EditorServer_%ProjectName%_%MapName%.log- 1
- 2
- 3
- 4
- 5
- 6
- 7
- 8
- 9
- 10
- 11
- 12
- 13
- 14
- 客户端脚本
@echo off echo ------------------------------------ echo Run EditorClient DebugGame echo ------------------------------------ set ProjectName=GamePlayCodeParsing set MapName=ThirdPersonMap set /p Name=Select player name: 1-Xiaogua 2-Dagua : if %Name% equ 1 set PlayerName=Xiaogua if %Name% equ 2 set PlayerName=Dagua start "EditorClient<%PlayerName%>" ^ %~dp0..\..\UnrealEngine-5.2\Engine\Binaries\Win64\UnrealEditor-Win64-DebugGame.exe ^ %~dp0%ProjectName%.uproject %MapName% ^ -game ^ -PlayerName=%PlayerName% ^ -windowed ^ -ResX=900 ^ -ResY=500 ^ -notimeouts ^ -log log=Log_EditorClient_%ProjectName%_%PlayerName%.log- 1
- 2
- 3
- 4
- 5
- 6
- 7
- 8
- 9
- 10
- 11
- 12
- 13
- 14
- 15
- 16
- 17
- 18
- 19
- 20
- 21
- 22
-
打开服务器与客户端批处理程序就可以不打包也能开启服务器与客户端

-
也可以使用虚幻引擎进行对接入服务器,我们逻辑写的是单机模式下才进行服务器连接,所以我们需要把网络模式换成
NM_Standalone -
然后换成独立进程开启就可以连接上了
-
tisp:
注意开虚幻引擎的时候不要用Windows调试器开,直接Ctrl+F7开虚幻引擎就可以连接了

-
连接


- GamePlay框架:用于设计游戏规则,组织和管理游戏核心逻辑、规则以及交互的一套结构化体系。
-
相关阅读:
开源模型应用落地-工具使用篇-向量数据库(三)
【嵌入式】嵌入式系统稳定性建设:最后的防线
LeetCode - 112. 路径总和;113. 路径总和 II【进阶】
【目标检测】36、OTA: Optimal Transport Assignment for Object Detection
新版微信小程序发布指南
面试题库(十三):场景和设计
金丝桃素白蛋白纳米粒-大肠杆菌血清抗体复合物|凝血因子Ⅷ人血清白蛋白HSA纳米粒|地奥司明人血清白蛋白纳米粒
Maxwell安装、配置、脚本制作
Shell
vue3入门之简介
- 原文地址:https://blog.csdn.net/qq_44924388/article/details/137978862
