-
CSS基础笔记
第一课
CSS(层叠式样式表);样式规则由 选择器、 属性 以及 属性值 组成
内联样式表、内嵌样式表、外部样式表
内联样式表
写在标签里 用 style 属性进行表示,优先级比 内嵌 和 外部 高
<h1 style="color: blue; text-align: center;">内联样式,h1我是蓝色h1>- 1
内嵌样式表
写在 head 标签内,使用 style 标签包含,优先级比 外部 高
DOCTYPE html> <html lang="en"> <head> <meta charset="UTF-8"> <meta http-equiv="X-UA-Compatible" content="IE=edge"> <meta name="viewport" content="width=device-width, initial-scale=1.0"> <title>CSS文本属性title> <style> /* 选择器{样式} */ h1 { color: red; } p { color: green; font-size: 30px; } .red { color: red; } .blue { color: blue; } .yellow { color: yellow; } .green { color: green; } span{ font-size: 200px; } style> head> <body style="background-image: url(../HTML/材料/img/bj.gif);"> <div> <h1>我是红色h1> <p>我是绿色,字体大小是 30 pxp> <h1 style="color: blue; text-align: center;">内联样式,h1我是蓝色h1> <div style="text-align: center;"> <span class="blue">Gspan> <span class="red">ospan> <span class="yellow">ospan> <span class="blue">gspan> <span class="green">lspan> <span class="red">espan> div> div> body> html>- 1
- 2
- 3
- 4
- 5
- 6
- 7
- 8
- 9
- 10
- 11
- 12
- 13
- 14
- 15
- 16
- 17
- 18
- 19
- 20
- 21
- 22
- 23
- 24
- 25
- 26
- 27
- 28
- 29
- 30
- 31
- 32
- 33
- 34
- 35
- 36
- 37
- 38
- 39
- 40
- 41
- 42
- 43
- 44
- 45
- 46
- 47
- 48
- 49
外联样式表
在 head 标签内,使用 link 标签外链外部文件 .css,优先级较低
DOCTYPE html> <html lang="en"> <head> <meta charset="UTF-8"> <meta http-equiv="X-UA-Compatible" content="IE=edge"> <meta name="viewport" content="width=device-width, initial-scale=1.0"> <title>外联样式表title> <link rel="stylesheet" href="./css/01-02-外联样式表.css"> head> <body> <h1>你好,世界h1> body> html>- 1
- 2
- 3
- 4
- 5
- 6
- 7
- 8
- 9
- 10
- 11
- 12
- 13
/* css文件里面只有样式没有标签 */ body { background-image: url(../../HTML/材料/img/bj.gif); } h1 { color: pink; text-align: center; }- 1
- 2
- 3
- 4
- 5
- 6
- 7
- 8
第二课
!importtant 用于定义优先级最高
important 后面 才加 分号
<head> <style> h1 { color: red; } h2 { color: brown !important; } style> head> <body> <h1 style="color: blue;">你好 世界h1> <h2 style="color: blue;">你好 蓝色h2> body>- 1
- 2
- 3
- 4
- 5
- 6
- 7
- 8
- 9
- 10
- 11
- 12
- 13
- 14
标签选择器
就是标签名的选择器,对HTML标签指定样式规则。
p { color: red; } div { color; green; }- 1
- 2
- 3
- 4
- 5
- 6
ID选择器
id 的值必须唯一,id 是标签内的一个 属性
格式:#id名 {}
<head> <style> #id1 { color: red; } #id2 { color: blue; } #id3 { color: black; } #id4 { color: green; } style> head> <body> <h1>id选择器的使用h1> <p id="id1">id选择器p> <p id="id2">id选择器p> <p id="id3">id选择器p> <p id="id4">id选择器p> body>- 1
- 2
- 3
- 4
- 5
- 6
- 7
- 8
- 9
- 10
- 11
- 12
- 13
- 14
- 15
- 16
- 17
- 18
- 19
- 20
- 21
- 22
- 23
类选择器
可以为标有特定class值的HTML元素指定样式规则。
css语法:. 类选择器名{}
标签语法:<标签名 class=“类选择器名”>
head> <style> .class1 { color: red; text-align: center; } .class2 { color: green; text-align: right; } style> head> <body> <h1>类选择器h1> <p class="class1">这是class1p> <p class="class2">这是class2p> body>- 1
- 2
- 3
- 4
- 5
- 6
- 7
- 8
- 9
- 10
- 11
- 12
- 13
- 14
- 15
- 16
- 17
全局选择器
可以为页面所有的HTML页面的所有元素指定样式
语法:*{}
* { margin: 0; padding: 0; } 这里两个清零很重要,因为有的标签有默认的 margin 和 padding 所以写页面的时候,通配符双清零很重要!!!!- 1
- 2
- 3
- 4
- 5
- 6
群组选择器
语法:选择器名1 , 选择器名2 , 选择器名3 ,…
p,div,.class1{ color: red; }- 1
- 2
- 3
<h2>群组选择器h2> <p id="xuanzeqi1">这是id选择器p> <div>这是div标签选择器div> <h3 class="class1">这是类选择器h3>- 1
- 2
- 3
- 4
后代选择器
父子关系的标签
语句:父选择器名 空格 子选择器名 {}
p span { color: red; } #id1 span { color: blue; } .class1 span { color: green; }- 1
- 2
- 3
- 4
- 5
- 6
- 7
- 8
- 9
<h2>后代选择器h2> <p><span>后代选择器span>的应用p> <p id="id1"><span>后代选择器span>的应用p> <p class="class1"><span>后代选择器span>的应用p>- 1
- 2
- 3
- 4
伪类选择器
用于添加选择器的一些特殊效果,例如HTML元素在不同状态下使用不同的样式。
使用最多的是 连接的伪类选择器
link:未访问连接
visited:已访问链接
hover:鼠标悬停
active:鼠标按下不松的时候
注意 一定要按照顺序link,visited,hover,active的顺序来写
/* text-decoration属性清除默认的下划线 */ a { text-decoration: none; } a:link { color: red; } a:visited { color: green; } a:hover { color: blue; } a:active { color: black; }- 1
- 2
- 3
- 4
- 5
- 6
- 7
- 8
- 9
- 10
- 11
- 12
- 13
- 14
- 15
- 16
<div> <div> <a href="#">这是测试a> div> div>- 1
- 2
- 3
- 4
- 5
属性选择器
定于属性选择器的语法格式:选择器名[属性名]{}
子串匹配属性选择器
[ab^=“def”] 选择ab属性以def开头的
字体属性
font:简写属性;font-style font-weight font-size font-family;
斜不斜 粗不粗 大不大/高不高 什么样
font-size:字体大小
font-weight:字体粗细
font-family:字体
font-style:字形,italic 斜体
/* 符合属性:简写的方式 */ /* font: font-style font-weight font-size font-family; */ p { font-family:'Segoe UI', Tahoma, Geneva, Verdana, sans-serif; font-size: 24px; font-weight: bold; font-style: italic; }- 1
- 2
- 3
- 4
- 5
- 6
- 7
- 8
文本属性
color:文本言责
line-height:行高
letter-spacing:字符间距
text-indent:缩进
text-decoration:字体的初始化,none就是空,即清除字体样式
text-align;文本对齐的方式
p { text-indent: 2em; text-align: left; text-decoration: none; color: brown; line-height: 50px; }- 1
- 2
- 3
- 4
- 5
- 6
- 7
text-shadow 阴影:水平偏移 垂直偏移 模糊半径 颜色值
水平和垂直正值的是右下,负值是左上
模糊半径不可为负,越小阴影越明显
.title { font: italic 700 60px/80px "宋体"; color: rgba(235, 16, 16, 0.856); text-shadow: 10px 10px 1px green; }- 1
- 2
- 3
- 4
- 5
word-wrap 自动换行
.huanhang { width: 120px; border: 1px solid black; /* 多余字进行换行 */ word-wrap: break-word; }- 1
- 2
- 3
- 4
- 5
- 6
font-face 导入自己的字体
@font-face { font-family: "guaiti"; src: url(./css/怪体2.ttf); } div { font-family: "guaiti"; } .title { text-shadow: 5px 5px 10px gray; color: rgb(192, 12, 12); } .author { color: rgb(231, 149, 163); text-shadow: 5px 5px 10px gray; }- 1
- 2
- 3
- 4
- 5
- 6
- 7
- 8
- 9
- 10
- 11
- 12
- 13
- 14
- 15
背景属性 background
background-color:背景颜色
background-image:背景图片
background-repeat:背景重复,指定只显示一次背景图像:no-repeat
background-position: right top; 用于指定背景图像的位置
background-origin:设置图片的相对位置,前提是得有padding,值有content-box:相对于内容,padding-box:相对于外盒
div { background-color: bisque; } .fistword { font-size: 300%; }- 1
- 2
- 3
- 4
- 5
- 6
body { background-image: url(./css/hs.png); background-repeat: no-repeat; background-size: 100vw 100vh; }- 1
- 2
- 3
- 4
- 5
.warp { background-image: url(./css/yks.png); background-repeat: no-repeat; background-position: left; padding: 60px; background-origin: padding-box; }- 1
- 2
- 3
- 4
- 5
- 6
- 7
第三课
列表属性
list-style:简写属性。主要用 none
list-style-image:图像设置列表项标志(即用图片替换 ·)
list-style-position:设置列表中列表项标志的位置
list-style-type:设置列表项标志的类型,
/* 主要用于消除列表的默认样式 */ ul { list-style: none; } /* 用列表做导航栏 */ ul { height: 300px; width: 200px; list-style: none; text-align: center; /* margin: 0; */ padding: 0; } ul li { height: 30px; line-height: 30px; display: list-item; color: white; }- 1
- 2
- 3
- 4
- 5
- 6
- 7
- 8
- 9
- 10
- 11
- 12
- 13
- 14
- 15
- 16
- 17
- 18
- 19
- 20
表格属性
border-collapse:设置是否把表格边框合并为单一的边框,值为 collapse
caption-side:设置表格标题的位置
vertical-align:设置文本垂直对齐方式
text-align:设置文本水平对齐方式
border-spacing:属性和 cellspacing 类似
.class1 { border: 1px solid red; text-align: center; /* 把表格边框合并为单一的边框 */ border-collapse: collapse; /* 表格居中的css实现 */ margin: 0 auto; } .class1 tr td { border: 1px solid blue; } .class2 { border: 1px solid red; border-spacing: 0; } .class2 tr td { border: 1px solid blue; } .class3 { border: 1px solid red; border-spacing: 30px; float: right; } .class3 tr td { border: 1px solid blue; }- 1
- 2
- 3
- 4
- 5
- 6
- 7
- 8
- 9
- 10
- 11
- 12
- 13
- 14
- 15
- 16
- 17
- 18
- 19
- 20
- 21
- 22
- 23
- 24
- 25
- 26
- 27
<div> <table class="class1"> <tr> <td>itemtd> <td>itemtd> tr> <tr> <td>itemtd> <td>itemtd> tr> table> <table class="class2"> <tr> <td>itemtd> <td>itemtd> tr> <tr> <td>itemtd> <td>itemtd> tr> table> <table class="class3"> <tr> <td>测试td> <td>测试td> tr> table> div>- 1
- 2
- 3
- 4
- 5
- 6
- 7
- 8
- 9
- 10
- 11
- 12
- 13
- 14
- 15
- 16
- 17
- 18
- 19
- 20
- 21
- 22
- 23
- 24
- 25
- 26
- 27
- 28
- 29
- 30

案例
DOCTYPE html> <html lang="zh-CN"> <head> <meta charset="UTF-8"> <meta http-equiv="X-UA-Compatible" content="IE=edge"> <meta name="viewport" content="width=device-width, initial-scale=1.0"> <title>表格、列表课堂任务title> <style> table { margin: auto auto; /* border: 1px solid black; */ width: 1100px; text-align: center; vertical-align: middle; } .top { height: 350px; } .bottom { height: 170px; } .top .font { color: white; font-size: 80px; } .bottom td { color: rgb(100,149,237); font-size: 40px; } ul { height: 300px; width: 200px; list-style: none; text-align: center; /* margin: 0; */ padding: 0; } ul li { height: 30px; line-height: 30px; display: list-item; color: white; } style> head> <body> <div> <table cellspacing="2"> <tr class="top"> <td style="width: 200px;background-color: rgb(60,114,106);"> <ul> <li>手机电话卡li> <li>电视盒子li> <li>笔记本li> <li>智能家电li> <li>健康家居li> <li>出行儿童li> <li>路由器手机配件li> <li>移动电源 插线板li> <li>耳机 音箱li> <li>生活 米兔li> ul> td> <td colspan="3" style="background-color: rgb(100,149,237);" class="font">900×350td> tr> <tr class="bottom"> <td style="width: 200px;background-color: pink;">200×170td> <td style="background-color: yellow;">316×170td> <td style="background-color: rgb(16,142,37);">316×170td> <td style="background-color: rgb(137,68,206);">316×170td> tr> table> div> body> html>- 1
- 2
- 3
- 4
- 5
- 6
- 7
- 8
- 9
- 10
- 11
- 12
- 13
- 14
- 15
- 16
- 17
- 18
- 19
- 20
- 21
- 22
- 23
- 24
- 25
- 26
- 27
- 28
- 29
- 30
- 31
- 32
- 33
- 34
- 35
- 36
- 37
- 38
- 39
- 40
- 41
- 42
- 43
- 44
- 45
- 46
- 47
- 48
- 49
- 50
- 51
- 52
- 53
- 54
- 55
- 56
- 57
- 58
- 59
- 60
- 61
- 62
- 63
- 64
- 65
- 66
- 67
- 68
- 69
- 70
- 71
- 72
- 73
- 74
- 75
盒子模型
内容、内边距、边框和外边框
width 和 height 只改变内容的大小
margin:外边框
padding:内边距
border:边框
边框 border
宽度:border-width;顺序是 上 右 下 左 、上下 左右 、上下 左右、上 左右 下
样式:border-style;solid 实线
颜色:border-color;
阴影:box-shadow:水平 垂直 阴影半径 阴影颜色,水平和垂直正值为右下;阴影半径必须为正值,数值越小越清晰;
例如 border:1px solid black;
div { border-style: solid; background-color: #ffc; /* border-top-width: 2px; border-right-width: 3px; border-bottom-width: 4px; border-left-width: 5px; */ /* 顺序是上右下左 */ border-width: 2px 3px 4px 5px; width: 300px; } span { /* 顺序是 上 左右 下 */ border-width: 2px 5px 2px; }- 1
- 2
- 3
- 4
- 5
- 6
- 7
- 8
- 9
- 10
- 11
- 12
- 13
- 14
- 15
- 16
边框圆角 border-radius
-
border-radius 属性指定圆角的半径
-
若只提供一个值,将全部应用到 4 个角
-
顺序按照 左上、右上、右下、坐下(顺时针)
<div style="border: 5px solid black; border-radius: 50px;"> 边框圆角 div> 如果是圆形的话 长宽相等的正方形 border-radius为长宽的一半- 1
- 2
- 3
- 4
- 5
- 6
- 7
- 8
阴影:box-shadow:水平 垂直 阴影半径 阴影颜色,水平和垂直正值为右下;阴影半径必须为正值,数值越小越清晰;
.top { height: 500px; border: 5px solid blue; border-radius: 10px; background-color: rgb(36, 36, 170); text-align: center; overflow: hidden; } .bottom { background-color: brown; border-radius: 2px; box-shadow: 10px 10px 5px green; }- 1
- 2
- 3
- 4
- 5
- 6
- 7
- 8
- 9
- 10
- 11
- 12
- 13
- 14
<div class="top"> <div style="height: 100%;width: 800px;margin: 0 auto; border: 3px dotted burlywood;"> <img src="./img/单元2-6_西安事变.PNG" alt="" style="width: 100%;"> div> div> <div class="bottom"> <ul> <li>张学良li> <li>杨虎城li> <li>蒋介石li> ul> div>- 1
- 2
- 3
- 4
- 5
- 6
- 7
- 8
- 9
- 10
- 11
- 12

第四课
padding 内边距
padding:内边距的距离值
div { width: 128px; height: 128px; background-color: #ffc; border-style: solid; padding: 10px 20px; }- 1
- 2
- 3
- 4
- 5
- 6
- 7
<div style="margin: 0 auto;"> <img src="./img/淘宝.JPG" alt="淘宝logo" style="width: 128px;height: 128px;"> div>- 1
- 2
- 3
外边距中 inline即行内元素的注意事项
两个水平行内元素之间的外边距 margin-right margin-left 为两个水平行内元素的距离之和
两个垂直行内元素之间的外边距 margin-top margin-bottom 为两个垂直行内元素的距离的最大值的那个
内边距与外边距 案例
* { margin: 0; padding: 0; } .context { border: 1px solid blue; font-size: 32px; text-indent: 1em; padding: 5px 0; margin: 5px 0; }- 1
- 2
- 3
- 4
- 5
- 6
- 7
- 8
- 9
- 10
- 11
<div style="width: 400px; margin: 0 auto;"> <div> <img src="./img/单元2-6_澳门回归.PNG" alt="澳门回归" style="width: 100%;"> div> <div class="context"> 澳门名称: div> <div class="context"> 澳门简历: div> <div class="context"> 日期由来: div> <div class="context"> 纪念活动: div> div>- 1
- 2
- 3
- 4
- 5
- 6
- 7
- 8
- 9
- 10
- 11
- 12
- 13
- 14
- 15
- 16
- 17

溢出 overflow
hidden:隐藏溢出
scroll:溢出部分用滚动条显示
visible:默认,直接溢出
div { width: 200px; height: 100px; border: 1px solid black; }- 1
- 2
- 3
- 4
- 5
<div> <div>玩的好的后啊维护的基本挖掘哇哦的比较拗口我本地接口带u我表弟把我i第九位那就按可能大家那我叫你 啊啊伟大伟大无法无法无法哇大碗大碗大碗的div> <br><br><br><br><br> <div style="overflow: hidden;">玩的好的后啊维护的基本挖掘哇哦的比较拗口我本地接口带u我表弟把我i第九位那就按可能大家那我叫你 啊啊伟大伟大无法无法无法哇大碗大碗大碗的div> <br><br><br><br><br> <div style="overflow: scroll;">玩的好的后啊维护的基本挖掘哇哦的比较拗口我本地接口带u我表弟把我i第九位那就按可能大家那我叫你 啊啊伟大伟大无法无法无法哇大碗大碗大碗的div> <br><br><br><br><br> <div style="overflow: hidden;text-overflow: ellipsis;white-space: nowrap;">玩的好的后啊维护的基本挖掘哇哦的比较拗口我本地接口带u我表弟把我i第九位那就按可能大家那我叫你 啊啊伟大伟大无法无法无法哇大碗大碗大碗的div> div>- 1
- 2
- 3
- 4
- 5
- 6
- 7
- 8
- 9
浮动 float
left:靠左浮动
right:靠右浮动
none:不浮动
浮动元素需要 父级设置一个宽度,子元素脱离文档流后不得超过父级的宽度,即 子浮动宽度小于父级宽度
浮动元素属性设置后,就算是 inline 即行内元素也会变成 block 即块级元素
float 受父类影响!!!
div { float: left; width: 200px; height: 100px; border: 1px solid black; margin-right: 20px; }- 1
- 2
- 3
- 4
- 5
- 6
- 7
<div style="width: 900px;border: 1px solid red;"> <div>玩的好的...div> <div style="overflow: hidden;">玩的好.../div> <div style="overflow: scroll;">玩的好的...div> <div style="overflow: hidden;text-overflow: ellipsis;white-space: nowrap;">玩的好...div> div>- 1
- 2
- 3
- 4
- 5
- 6
- 7
- 8
- 9

ul 中 li 变成横向,需要对 li 进行 float:left
ul { list-style: none; } ul li { float: left; margin-right: 20px; border: 1px solid black; padding: 5px; cursor: pointer; background-color: white; }- 1
- 2
- 3
- 4
- 5
- 6
- 7
- 8
- 9
- 10
- 11
第五课
相对定位 position:relative
position:relative
是相对于 父级元素 的调动
使用相对定位的盒子对 父级 和 兄弟 并无影响
left:30px
right:30px
top:30px
bottom:30px
#id1 { background-color: blue; } #id2 { position: relative; left: 10px; top: 10px; background-color: red; }- 1
- 2
- 3
- 4
- 5
- 6
- 7
- 8
- 9
<div id="id1"> <div id="id2">Boxdiv> div>- 1
- 2
- 3

绝对定位 position:absolute
相对于 浏览器页面 的调用
#father { background-color: blue; width: 700px; height: 500px; } #father div { background-color: red; border: 1px solid yellow; width: 500px; height: 100px; margin: 0 auto; } #box2 { position: absolute; top: 0; right: 0; }- 1
- 2
- 3
- 4
- 5
- 6
- 7
- 8
- 9
- 10
- 11
- 12
- 13
- 14
- 15
- 16
- 17
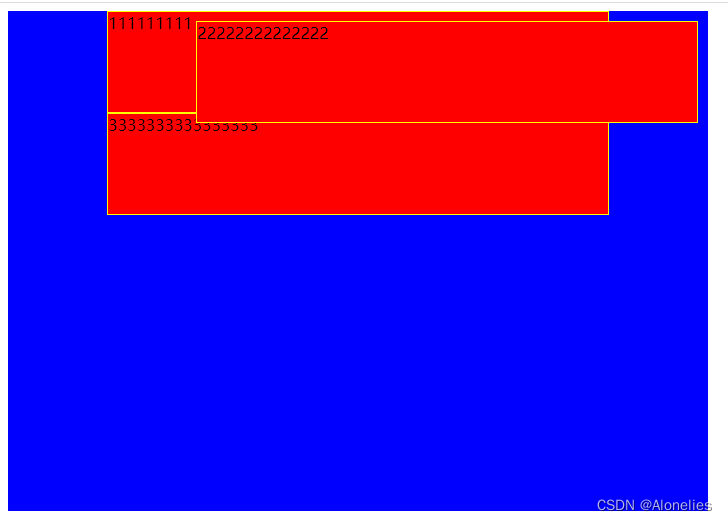
<div id="father"> <div>111111111div> <div id="box2">22222222222222div> <div>3333333333333333div> div>- 1
- 2
- 3
- 4
- 5

当父元素被定位,box2就会以其 父亲 作为绝对定位的基准
#father { background-color: blue; width: 700px; height: 500px; position: relative; <----------- } #box2 { position: absolute; top: 10px; right: 10px; }- 1
- 2
- 3
- 4
- 5
- 6
- 7
- 8
- 9
- 10
- 11
- 12
z-index 属性
用于设置重叠元素的堆叠顺序,默认是0,允许负值。z-index 仅能在定位元素上奏效
越 大 越 在上
#father { background-color: black; width: 700px; height: 500px; position: relative; } #father div { border: 1px solid yellow; width: 300px; height: 100px; } #box1 { background-color: blue; position: absolute; left: 10px; } #box2 { background-color: red; position: absolute; left: 60px; } #box3 { background-color: green; position: absolute; left: 110px; }- 1
- 2
- 3
- 4
- 5
- 6
- 7
- 8
- 9
- 10
- 11
- 12
- 13
- 14
- 15
- 16
- 17
- 18
- 19
- 20
- 21
- 22
- 23
- 24
- 25
- 26
<div id="father"> <div id="box1">box1div> <div id="box2">box2div> <div id="box3">box3div> div>- 1
- 2
- 3
- 4
- 5

#box1 { background-color: blue; position: absolute; left: 10px; z-index: 1; <----------------------- } #box2 { background-color: red; position: absolute; left: 60px; z-index: 3; <----------------------- margin-top: 30px; <----------------------- } #box3 { background-color: green; position: absolute; left: 110px; z-index: 2; <----------------------- }- 1
- 2
- 3
- 4
- 5
- 6
- 7
- 8
- 9
- 10
- 11
- 12
- 13
- 14
- 15
- 16
- 17
- 18
- 19

小练
#wrap { width: 800px; height: 500px; background-color: green; margin: 0 auto; position: relative; border: 2px solid blue; } #box1 { width: 300px; height: 200px; background-color: gray; position: absolute; left: 30px; top: 30px; } #box2 { width: 300px; height: 200px; background-color: gray; position: absolute; right: 30px; top: 30px; } #box3 { width: 200px; height: 200px; border-radius: 100px; background-color: blue; position: absolute; top: 180px; left: 300px; z-index: 2; border: 2px solid white; } #box4 { width: 400px; height: 100px; background-color: red; position: absolute; bottom: 30px; left: 200px; z-index: 1; border-radius: 30px; border: 2px solid white; }- 1
- 2
- 3
- 4
- 5
- 6
- 7
- 8
- 9
- 10
- 11
- 12
- 13
- 14
- 15
- 16
- 17
- 18
- 19
- 20
- 21
- 22
- 23
- 24
- 25
- 26
- 27
- 28
- 29
- 30
- 31
- 32
- 33
- 34
- 35
- 36
- 37
- 38
- 39
- 40
- 41
- 42
- 43
- 44
- 45
- 46
<div id="wrap"> <div id="box1">方块1div> <div id="box2">方块2div> <div id="box3">圆形div> <div id="box4">圆角矩形div> div>- 1
- 2
- 3
- 4
- 5
- 6
display 属性
inline:行内元素
block:块元素
none:无元素,无元素就是 不显示 里面的内容
<div> <span>默认spanspan> <span>默认spanspan> <span style="display: block;">属性改为 block 的spanspan> <span style="display: block;">属性改为 block 的spanspan> <div>默认divdiv> <div>默认divdiv> <div style="display: inline;">属性改为 inline 的divdiv> <div style="display: inline;">属性改为 inline 的divdiv> <div style="display: none;">属性改为 none 的divdiv> div>- 1
- 2
- 3
- 4
- 5
- 6
- 7
- 8
- 9
- 10
- 11
flex 布局
容器->项目,主轴(水平)、交叉轴(垂直)
-
相关阅读:
零时科技创始人邓永凯先生受邀对话《公链隐私保护及生态安全》
人工智能 | ShowMeAI资讯日报 #2022.06.22
使用.NetCore自带的后台作业,出入队简单模拟生产者消费者处理请求响应的数据
一道求导题:1004T3
深度比较常见库中序列化和反序列化性能的性能差异
系统时间和JVM的Date时间不一致问题解决
umich cv-2-2
Python二级题:MOOC学校名单|关键词提取和查找
UI设计都有哪些设计原则,分享三个给你
java计算机毕业设计网络教学平台源程序+mysql+系统+lw文档+远程调试
- 原文地址:https://blog.csdn.net/Alonelies/article/details/136684194
