-
【C++】vector的使用和模拟实现(超级详解!!!!)
前言
提示:这里可以添加本文要记录的大概内容:C++中的vector是一个强大而灵活的动态数组容器,它提供了在运行时动态增长和收缩的能力,极大地简化了数组的管理。vector是标准模板库(STL)中的一部分,为程序员提供了高效的数据存储和操作方式。在本博客中,我们将深入介绍vector的基本用法,并进行深度剖析和模拟实现,以帮助你更好地理解和利用这一重要的C++容器。
提示:以下是本篇文章正文内容,下面案例可供参考1.vector的介绍及使用
1.1 vector的介绍
vector是一个动态数组容器,它以模板类的形式实现,能够存储同一类型的元素。其最显著的特点之一是能够在运行时动态调整数组大小,而不需要手动管理内存。通过push_back()进行元素的追加、pop_back()进行末尾元素的删除,以及使用迭代器进行元素的遍历,vector提供了简单而强大的操作方式。
vector的内部实现采用动态数组,这意味着它能够在需要时自动分配更多的内存空间,以适应元素的增加。这种机制确保了vector的高效性,使得它适用于各种规模和类型的数据集。参考文献:
Josuttis, N. M. (2007). The C++ Standard Library: A Tutorial and Reference (2nd Edition). Addison-Wesley.
Stroustrup, B. (2013). The C++ Programming Language (4th Edition). Addison-Wesley.
Meyers, S. (2001). Effective STL: 50 Specific Ways to Improve Your Use of the Standard Template Library. Addison-Wesley.1.2 vector的使用
vector学习时一定要学会查看文档:vector文档介绍,vector在实际中非常的重要,在实际中我们熟悉常见的接口就可以,下面列出了哪些接口是要重点掌握的。1.2.1 vector的定义
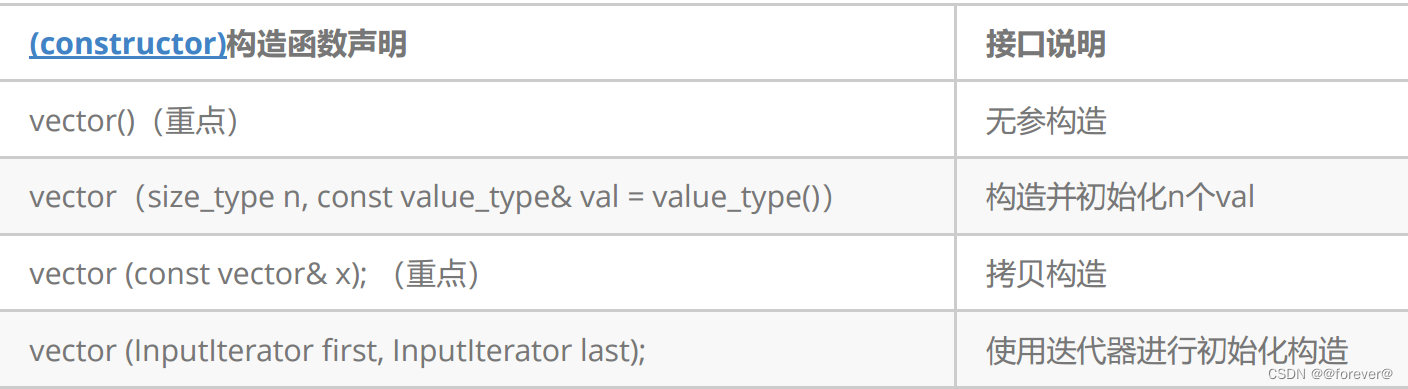
#define _CRT_SECURE_NO_WARNINGS 1 #include#include using namespace std; int main() { vector<int> v1;//无参构造 v1.push_back(0); v1.push_back(1); v1.push_back(2); v1.push_back(3); v1.push_back(4); v1.push_back(5); v1.push_back(6); for (int i = 0; i < v1.size(); i++) { cout << v1[i] << " "; } cout << endl; vector<int> v2(v1); v2.push_back(8); v2.push_back(8); v2.push_back(8); for (int i = 0; i < v2.size(); i++) { cout << v2[i] << " "; } cout << endl; return 0; } - 1
- 2
- 3
- 4
- 5
- 6
- 7
- 8
- 9
- 10
- 11
- 12
- 13
- 14
- 15
- 16
- 17
- 18
- 19
- 20
- 21
- 22
- 23
- 24
- 25
- 26
- 27
- 28
- 29
- 30
- 31
- 32
- 33
1.2.2 vector iterator 的使用

图解:

#include#include using namespace std; void Print1(const vector<int>&v)//正向遍历 { vector<int>::const_iterator it = v.begin(); while (it != v.end()) { cout << *it << " "; it++; } cout << endl; } void Print2(const vector<int>& v)//反向遍历 { vector<int>::const_reverse_iterator it = v.rbegin(); while (it != v.rend()) { cout << *it << " "; it++; } cout << endl; } int main() { vector<int> v1; v1.push_back(1); v1.push_back(2); v1.push_back(3); v1.push_back(4); v1.push_back(5); v1.push_back(6); Print1(v1); Print2(v1); // 使用迭代器进行修改 vector<int>::iterator it = v1.begin(); while (it != v1.end()) { *it *= 2; it++; } Print1(v1); Print2(v1); return 0; } - 1
- 2
- 3
- 4
- 5
- 6
- 7
- 8
- 9
- 10
- 11
- 12
- 13
- 14
- 15
- 16
- 17
- 18
- 19
- 20
- 21
- 22
- 23
- 24
- 25
- 26
- 27
- 28
- 29
- 30
- 31
- 32
- 33
- 34
- 35
- 36
- 37
- 38
- 39
- 40
- 41
- 42
- 43
- 44
- 45
1.2.3 vector 空间增长问题
-
capacity的代码在vs和g++下分别运行会发现,vs下capacity是按1.5倍增长的,g++是按2倍增长的。
这个问题经常会考察,不要固化的认为,顺序表增容都是2倍,具体增长多少是根据具体的需求定义
的。vs是PJ版本STL,g++是SGI版本STL。 -
reserve只负责开辟空间,如果确定知道需要用多少空间,reserve可以缓解vector增容的代价缺陷问题。
-
resize在开空间的同时还会进行初始化,影响size。
// vector::capacity #include#include using namespace std; int main() { vector<int> v; cout << "making v growing!!!!" << endl; cout << "capacity changed:" << v.capacity() << endl; for (int i = 0; i < 100; i++) { v.push_back(i); if (v.size() == v.capacity()) cout << "capacity changed:" << v.capacity() << endl; } return 0; } - 1
- 2
- 3
- 4
- 5
- 6
- 7
- 8
- 9
- 10
- 11
- 12
- 13
- 14
- 15
- 16
- 17
- 18
- 19
- 20
运行结果:

// vector::reserve #include#include using namespace std; int main() { vector<int> v; for (int i = 0; i < 100; i++) { v.push_back(i); } cout << "size:" << v.size()<<endl; cout << "capacity:" << v.capacity()<<endl; v.reserve(200); cout << "size:" << v.size() << endl; cout << "capacity:" << v.capacity() << endl; return 0; } - 1
- 2
- 3
- 4
- 5
- 6
- 7
- 8
- 9
- 10
- 11
- 12
- 13
- 14
- 15
- 16
- 17
- 18
- 19
运行结果:

// vector::resize #include#include using namespace std; int main() { vector<int> v; //for (int i = 0; i < 100; i++) //{ // v.push_back(i); //} cout << "size:" << v.size()<<endl; cout << "capacity:" << v.capacity()<<endl; v.resize(200); cout << "size:" << v.size() << endl; cout << "capacity:" << v.capacity() << endl; v.resize(100); cout << "size:" << v.size() << endl; cout << "capacity:" << v.capacity() << endl; v.resize(101,8); cout << "size:" << v.size() << endl; cout << "capacity:" << v.capacity() << endl; for (auto e : v) { cout << e << " "; } return 0; } - 1
- 2
- 3
- 4
- 5
- 6
- 7
- 8
- 9
- 10
- 11
- 12
- 13
- 14
- 15
- 16
- 17
- 18
- 19
- 20
- 21
- 22
- 23
- 24
- 25
- 26
- 27
- 28
- 29
- 30
- 31
- 32
运行结果:

1.2.3 vector 增删查改

// push_back/pop_back #include#include using namespace std; int main() { int arr[] = { 1,2,3,4 }; vector<int> v(arr, arr + sizeof(arr) / sizeof(arr[0])); v.push_back(5); v.push_back(6); vector<int>::iterator it = v.begin(); while (it != v.end()) { cout << *it<<" "; it++; } cout << endl; v.pop_back(); v.pop_back(); it = v.begin(); while (it != v.end()) { cout << *it << " "; it++; } return 0; } // push_back/pop_back - 1
- 2
- 3
- 4
- 5
- 6
- 7
- 8
- 9
- 10
- 11
- 12
- 13
- 14
- 15
- 16
- 17
- 18
- 19
- 20
- 21
- 22
- 23
- 24
- 25
- 26
- 27
- 28
运行结果:

// find / insert / erase #include#include using namespace std; int main() { vector<int> v; v.push_back(1); v.push_back(2); v.push_back(3); v.push_back(4); vector<int>::iterator pos = find(v.begin(), v.end(), 3); v.insert(pos, 0); for (auto e : v) { cout << e << " "; } cout << endl; pos = find(v.begin(), v.end(), 3); v.erase(pos); for (auto e : v) { cout << e << " "; } return 0; } - 1
- 2
- 3
- 4
- 5
- 6
- 7
- 8
- 9
- 10
- 11
- 12
- 13
- 14
- 15
- 16
- 17
- 18
- 19
- 20
- 21
- 22
- 23
- 24
- 25
- 26
运行结果:

// operator[]+index 和 C++11中vector的新式for+auto的遍历 // vector使用这两种遍历方式是比较便捷的。 #include#include using namespace std; int main() { vector<int> v = { 1,2,3,4 }; //operator[]+index for (int i = 0; i < v.size(); i++) { cout << v[i]<<" "; } cout << endl; for (int i = 0; i < v.size(); i++) { v[i] *= 2; } vector<int> swapv; swapv.swap(v); for (auto e : swapv) { cout << e << " "; } return 0; } - 1
- 2
- 3
- 4
- 5
- 6
- 7
- 8
- 9
- 10
- 11
- 12
- 13
- 14
- 15
- 16
- 17
- 18
- 19
- 20
- 21
- 22
- 23
- 24
- 25
- 26
- 27
运行结果:

1.2.4 vector 迭代器失效问题。(重点!!!)
迭代器的主要作用就是让算法能够不用关心底层数据结构,其底层实际就是一个指针,或者是对指针进行了所谓的封装,比如:vector的迭代器就是原生态指针T*。因此迭代器失效,实际就是迭代器底层对应指针所指向的空间被销毁了,而使用一块已经被释放的空间,造成的后果是程序崩溃(即如果继续使用已经失效的迭代器,程序可能会崩溃)。对于vector可能会导致其迭代器失效的操作有
- 会引起其底层空间改变的操作,都有可能是迭代器失效,比如:resize、reserve、insert、assign、
push_back等。
#include#include using namespace std; int main() { vector<int> v = { 1,2,3,4 }; auto it = v.begin(); while (it != v.end()) { cout << *it << " "; ++it; } v.reserve(100); while (it != v.end()) { cout << *it << " "; ++it; } return 0; } - 1
- 2
- 3
- 4
- 5
- 6
- 7
- 8
- 9
- 10
- 11
- 12
- 13
- 14
- 15
- 16
- 17
- 18
- 19
- 20
- 21
运行错误:

出错原因:以上操作,都有可能会导致vector扩容,也就是说vector底层原理旧空间被释放掉,而在打印时,it还使用的是释放之间的旧空间,在对it迭代器操作时,实际操作的是一块已经被释放的空间,而引起代码运行时崩溃。
解决方式:在以上操作完成之后,如果想要继续通过迭代器操作vector中的元素,只需给it重新赋值即可。2. 指定位置元素的删除操作–erase
#includeusing namespace std; #include int main() { int a[] = { 1, 2, 3, 4 }; vector<int> v(a, a + sizeof(a) / sizeof(int)); // 使用find查找3所在位置的iterator vector<int>::iterator pos = find(v.begin(), v.end(), 3); // 删除pos位置的数据,导致pos迭代器失效。 v.erase(pos); cout << *pos << endl; // 此处会导致非法访问 return 0; } - 1
- 2
- 3
- 4
- 5
- 6
- 7
- 8
- 9
- 10
- 11
- 12
- 13
- 14
- 15
- 16
erase删除pos位置元素后,pos位置之后的元素会往前搬移,没有导致底层空间的改变,理论上讲迭代器不应该会失效,但是:如果pos刚好是最后一个元素,删完之后pos刚好是end的位置,而end位置是没有元素的,那么pos就失效了。
因此删除vector中任意位置上元素时,vs就认为该位置迭代器失效了。迭代器失效解决办法:在使用前,对迭代器重新赋值即可1.2.5 vector 在OJ中有关的练习题
2.vector深度剖析及模拟实现

2.1 std::vector的核心框架接口的模拟实现dzj::vector
模拟实现代码
本文章内容后续会完善一些!!!
总结
通过本文的阅读,我们详细了解了C++中vector的基本概念、使用方法和一些关键特性。从动态数组的角度深度剖析了vector的内部机制,以及通过模拟实现进一步加深了对其工作原理的理解。vector的灵活性和高效性使其成为C++编程中不可或缺的工具,无论是在简单的数组操作还是复杂的数据结构中,都能展现其强大的应用价值。通过学习和研究vector,我们能够更好地优化代码、提高程序的效率,为C++编程带来更多便利。希望本文对你在使用和理解C++中的vector时有所帮助。
-
相关阅读:
深度学习中的epoch, batch 和 iteration
用ZeroTier搭建属于自己的虚拟局域网(VLAN)
Java 网络编程 —— 安全网络通信
Django-Import-Export插件控制数据导入流程
VScode中js关闭烦人的ts检查
stm32Cubemx USB虚拟串口
Win11+VS2022配置编译VTK9.1
一次解决TS类型警告的傻X经过
链表快慢指针合集(力扣)
ctf-pikachu-xxe
- 原文地址:https://blog.csdn.net/m0_68002296/article/details/136331779
