-
后端程序员入门react笔记(五)ajax请求
常见的ajax
-
Ajax
最原始的方式,基于原生的js -
XmlHttpRequest
多个请求之间如果有先后关系,会存在很多层回调的问题,也是基于原生js -
Jquery Ajax
基于原生XHR封装,依赖Jquery框架,由jquery 框架去封装原生的XML(Xml)封装的API,支持JSONP,如果只是用于发送Ajax而使用jQuery,不推荐。 -
Fetch
Fetch是一种HTTP数据请求的方式,是XMLHttpRequest的一种替代方案。Fetch不是ajax的进一步封装,它们是两个东西。Fetch函数就是原生js,和XMLHttpRequest是同级别的原生js的api,Fetch 的出现就是为了解决 XHR 的问题,它实现了 Promise 规范,返回 Promise 实例;而 Promise 是为解决异步回调问题而摸索出的一套方案。 -
axios
对原生XHR的封装,需要进行安装,可以在客户端使用,也可以在node端使用,Axios 是一个基于 promise (Promise 是异步编程的一种解决方案)的 HTTP 库,可以用在浏览器和 node.js 中。
Axios
接下来我们重点了解一下axios
特性
- 可以从浏览器中创建 XMLHttpRequests
- 可以从 node.js 创建 http 请求
- 支持 Promise API
- 可以拦截请求和响应
- 可以转换请求数据和响应数据
- 可以取消请求
- 自动转换 JSON 数据
- 客户端支持防御 XSRF
基本使用
我们只需要在组件中引入axios组件即可使用,我们简单举个列子看一下,请求响应的处理在 then 和 catch 回调中,请求正常会进入 then ,请求异常则会进 catch
import React, {Component} from 'react'; //引入组件 import axios from 'axios'; class App extends Component { getData = () => { //发送请求 请求响应的处理在 then 和 catch 回调中,请求正常会进入 then ,请求异常则会进 catch axios.get('http://localhost/data').then((res) => { console.log(res); }).catch((err) => { console.log(err); }) } render() { return ( <button onClick={this.getData}> 点击获取数据</button> ); } } export default App;- 1
- 2
- 3
- 4
- 5
- 6
- 7
- 8
- 9
- 10
- 11
- 12
- 13
- 14
- 15
- 16
- 17
- 18
- 19
- 20
发送请求的两种方式
axios提供了两种方式来发送请求, 一种是通过axios(config)来发送请求,另一种就是上面列子中的axios.get,
axios(config)
config是一个对象,里面配置了请求相关的信息,比如下面这个例子
axios( { //请求方法 method: 'post', //请求url url: '/user/12345', //请求参数 data: { firstName: 'Fred', lastName: 'Flintstone' } } ).then(res=>{//请求成功 console.log(res); }).catch(err=>{//请求失败 console.log(err); })- 1
- 2
- 3
- 4
- 5
- 6
- 7
- 8
- 9
- 10
- 11
- 12
- 13
- 14
- 15
- 16
- 17
- config可配置的相关项
config里面可以配置代理,超时,相应的最大尺寸,是否重定向等等
{ // `url` 是用于请求的服务器 URL url: '/user', // `method` 是创建请求时使用的方法 method: 'get', // default // `baseURL` 将自动加在 `url` 前面,除非 `url` 是一个绝对 URL。 // 它可以通过设置一个 `baseURL` 便于为 axios 实例的方法传递相对 URL baseURL: 'https://some-domain.com/api/', // `transformRequest` 允许在向服务器发送前,修改请求数据 // 只能用在 'PUT', 'POST' 和 'PATCH' 这几个请求方法 // 后面数组中的函数必须返回一个字符串,或 ArrayBuffer,或 Stream transformRequest: [function (data, headers) { // 对 data 进行任意转换处理 return data; }], // `transformResponse` 在传递给 then/catch 前,允许修改响应数据 transformResponse: [function (data) { // 对 data 进行任意转换处理 return data; }], // `headers` 是即将被发送的自定义请求头 headers: {'X-Requested-With': 'XMLHttpRequest'}, // `params` 是即将与请求一起发送的 URL 参数 // 必须是一个无格式对象(plain object)或 URLSearchParams 对象 params: { ID: 12345 }, // `paramsSerializer` 是一个负责 `params` 序列化的函数 // (e.g. https://www.npmjs.com/package/qs, http://api.jquery.com/jquery.param/) paramsSerializer: function(params) { return Qs.stringify(params, {arrayFormat: 'brackets'}) }, // `data` 是作为请求主体被发送的数据 // 只适用于这些请求方法 'PUT', 'POST', 和 'PATCH' // 在没有设置 `transformRequest` 时,必须是以下类型之一: // - string, plain object, ArrayBuffer, ArrayBufferView, URLSearchParams // - 浏览器专属:FormData, File, Blob // - Node 专属: Stream data: { firstName: 'Fred' }, // `timeout` 指定请求超时的毫秒数(0 表示无超时时间) // 如果请求话费了超过 `timeout` 的时间,请求将被中断 timeout: 1000, // `withCredentials` 表示跨域请求时是否需要使用凭证 withCredentials: false, // default // `adapter` 允许自定义处理请求,以使测试更轻松 // 返回一个 promise 并应用一个有效的响应 (查阅 [response docs](#response-api)). adapter: function (config) { /* ... */ }, // `auth` 表示应该使用 HTTP 基础验证,并提供凭据 // 这将设置一个 `Authorization` 头,覆写掉现有的任意使用 `headers` 设置的自定义 `Authorization`头 auth: { username: 'janedoe', password: 's00pers3cret' }, // `responseType` 表示服务器响应的数据类型,可以是 'arraybuffer', 'blob', 'document', 'json', 'text', 'stream' responseType: 'json', // default // `responseEncoding` indicates encoding to use for decoding responses // Note: Ignored for `responseType` of 'stream' or client-side requests responseEncoding: 'utf8', // default // `xsrfCookieName` 是用作 xsrf token 的值的cookie的名称 xsrfCookieName: 'XSRF-TOKEN', // default // `xsrfHeaderName` is the name of the http header that carries the xsrf token value xsrfHeaderName: 'X-XSRF-TOKEN', // default // `onUploadProgress` 允许为上传处理进度事件 onUploadProgress: function (progressEvent) { // Do whatever you want with the native progress event }, // `onDownloadProgress` 允许为下载处理进度事件 onDownloadProgress: function (progressEvent) { // 对原生进度事件的处理 }, // `maxContentLength` 定义允许的响应内容的最大尺寸 maxContentLength: 2000, // `validateStatus` 定义对于给定的HTTP 响应状态码是 resolve 或 reject promise 。如果 `validateStatus` 返回 `true` (或者设置为 `null` 或 `undefined`),promise 将被 resolve; 否则,promise 将被 rejecte validateStatus: function (status) { return status >= 200 && status < 300; // default }, // `maxRedirects` 定义在 node.js 中 follow 的最大重定向数目 // 如果设置为0,将不会 follow 任何重定向 maxRedirects: 5, // default // `socketPath` defines a UNIX Socket to be used in node.js. // e.g. '/var/run/docker.sock' to send requests to the docker daemon. // Only either `socketPath` or `proxy` can be specified. // If both are specified, `socketPath` is used. socketPath: null, // default // `httpAgent` 和 `httpsAgent` 分别在 node.js 中用于定义在执行 http 和 https 时使用的自定义代理。允许像这样配置选项: // `keepAlive` 默认没有启用 httpAgent: new http.Agent({ keepAlive: true }), httpsAgent: new https.Agent({ keepAlive: true }), // 'proxy' 定义代理服务器的主机名称和端口 // `auth` 表示 HTTP 基础验证应当用于连接代理,并提供凭据 // 这将会设置一个 `Proxy-Authorization` 头,覆写掉已有的通过使用 `header` 设置的自定义 `Proxy-Authorization` 头。 proxy: { host: '127.0.0.1', port: 9000, auth: { username: 'mikeymike', password: 'rapunz3l' } }, // `cancelToken` 指定用于取消请求的 cancel token // (查看后面的 Cancellation 这节了解更多) cancelToken: new CancelToken(function (cancel) { }) }- 1
- 2
- 3
- 4
- 5
- 6
- 7
- 8
- 9
- 10
- 11
- 12
- 13
- 14
- 15
- 16
- 17
- 18
- 19
- 20
- 21
- 22
- 23
- 24
- 25
- 26
- 27
- 28
- 29
- 30
- 31
- 32
- 33
- 34
- 35
- 36
- 37
- 38
- 39
- 40
- 41
- 42
- 43
- 44
- 45
- 46
- 47
- 48
- 49
- 50
- 51
- 52
- 53
- 54
- 55
- 56
- 57
- 58
- 59
- 60
- 61
- 62
- 63
- 64
- 65
- 66
- 67
- 68
- 69
- 70
- 71
- 72
- 73
- 74
- 75
- 76
- 77
- 78
- 79
- 80
- 81
- 82
- 83
- 84
- 85
- 86
- 87
- 88
- 89
- 90
- 91
- 92
- 93
- 94
- 95
- 96
- 97
- 98
- 99
- 100
- 101
- 102
- 103
- 104
- 105
- 106
- 107
- 108
- 109
- 配置全局默认值
我们可以给axios配置默认值
axios.defaults.baseURL = 'https://api.example.com'; axios.defaults.headers.common['Authorization'] = AUTH_TOKEN; axios.defaults.headers.post['Content-Type'] = 'application/x-www-form-urlencoded';- 1
- 2
- 3
- 4
axios.option
我们也可以使用axios.get()这种方式发送请求,里面定义data和config
axios.get('http://localhost/data').then().catch() axios.post('http://localhost/data',{name:'张三'},{timeout: 1000}).then().catch()- 1
- 2
拦截器
axios提供了请求拦截器和响应拦截器,帮助我们在请求前对config做一些配置,判断是否重复提交,或者对config做一些检查以及配置纠正等,响应拦截器帮助我们根据不同的返回内容做不同的数据处理,相关案例如下
import React, {Component} from 'react'; //引入组件 import axios from 'axios'; // 创建一个请求拦截器 请求头附加一个token 值是1111 const requestInterceptor = axios.interceptors.request.use( (config) => { config.headers['token'] = '1111111'; return config; }, (error) => { // 处理请求错误 return Promise.reject(error); } ); // 创建一个响应拦截器 const responseInterceptor = axios.interceptors.response.use( (response) => { // 处理响应数据 return response; }, (error) => { console.log(error); // 处理响应错误 return Promise.reject(error); } ); class App extends Component { // 添加请求拦截器 getData = () => { axios.post('http://localhost/data',{name:'张三'},{timeout: 1000}).then(res=>{ console.log(res); },err=>{ console.log(err); }).catch(err=>{ console.log(err); }) } render() { return ( <button onClick={this.getData}> 点击获取数据</button> ); } } // 移除拦截器 axios.interceptors.request.eject(requestInterceptor); axios.interceptors.response.eject(responseInterceptor); export default App;- 1
- 2
- 3
- 4
- 5
- 6
- 7
- 8
- 9
- 10
- 11
- 12
- 13
- 14
- 15
- 16
- 17
- 18
- 19
- 20
- 21
- 22
- 23
- 24
- 25
- 26
- 27
- 28
- 29
- 30
- 31
- 32
- 33
- 34
- 35
- 36
- 37
- 38
- 39
- 40
- 41
- 42
- 43
- 44
- 45
- 46
- 47
- 48
- 49
开启后端服务,发送请求
我们知道,我们前端的服务器是3000端口,但是我们后端的服务器不一定是3000,也可能是80端口,现在我启动一个go编写的后台服务,调用一下接口
我这现在有一个获取博客详情的接口,端口号是8080
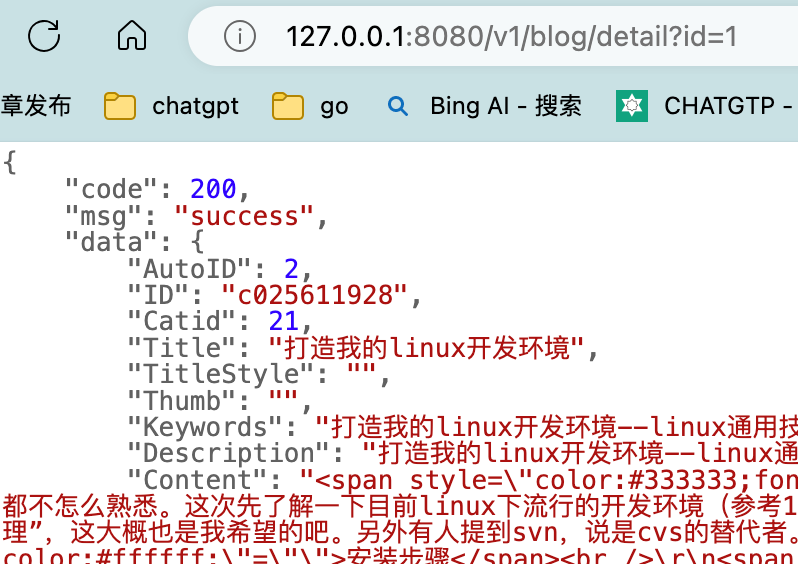
接下来我们通过axios访问一下getData = () => { axios.get('http://127.0.0.1:8080/v1/blog/detail?id=123').then(res=>{ console.log(res); },err=>{ console.log(err); }).catch(err=>{ console.log(err); }) }- 1
- 2
- 3
- 4
- 5
- 6
- 7
- 8
- 9
问题来了,浏览器发送了请求,后端的gin服务收到了请求,但是结果没过来,浏览器报错说我跨域了。这说明主要问题在Ajax引擎对响应的处理那块。怎么办?作为后端人员最熟悉不过的方式就是做个代理。

配置代理
怎么配置代理呢?我们可以在react项目根目录下的
package.json里面配置上这样一句声明,这表示请求的3000端口的请求会被转发到8080,对于后端人员都明白,这个转发规则是什么呢?优先匹配3000服务的路径,匹配不到再转去8080服务。"proxy": "http://127.0.0.1:8080"- 1
- 把axios的请求改为本域名下路径就可以了
axios.get('/v1/blog/detail?id=123')- 1
- 添加完毕后我们重启服务,响应数据回来了

- 但是上面这种有一个问题,就是不够灵活,比如我们常用的
/blog/v1/detail需要代理到blog服务,但是我/goods/v1/detail是要代理到goods服务器。我们需要更灵活的配置方式,那么我们就需要借助一个第三方库http-proxy-middleware,接下来我们在src目录下新建一个setupProxy.js文件,内容如下
const {createProxyMiddleware} =require('http-proxy-middleware') module.exports=function(app){ app.use( createProxyMiddleware('/api',{ // api 是需要转发的请求(所有带/api 前缀的请求都会转发给8080) target:'http://localhost:8080', // 配置转发目标地址(能返回数据的服务器地址) changeOrigin:true, // 控制服务器接收到的请求头中host字段的值 //设置为true,服务器端接收的host就是8080,如果为false,那么后端服务器接收到的host就是3000 // changeOrigin 默认值为false 但我们一般将changeOrigin值设为true pathRewrite:{'^/api':''} // 去请求前缀,保证交给后台服务器是正常请求地址(必须配置) }), ) }- 1
- 2
- 3
- 4
- 5
- 6
- 7
- 8
- 9
- 10
- 11
- 12
- 13
- 14
- 在发送请求的时候,如果是需要代理,我们只需要在原来的url上面加上
/api/就可以了,或者和后端协商好某个统一前缀也能解决。
axios.get('/api/v1/blog/detail?id=123')//被转发后就是/v1/blog/detail?id=123- 1
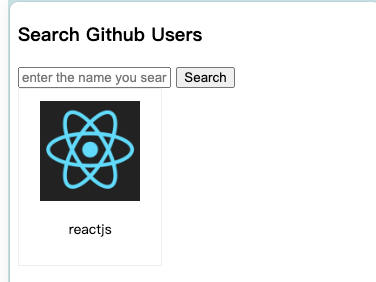
案例一 用户搜索
静态页面渲染
- index.js
import React from "react"; import ReactDOM from "react-dom/client"; import App from "./App"; const content=<App/> const root=ReactDOM.createRoot(document.getElementById("root")) root.render(content)- 1
- 2
- 3
- 4
- 5
- 6
- app.jsx
import React, {Component} from 'react'; import Search from './components/Search/Search' import List from "./components/List/List"; class App extends Component { render() { return ( <div> <div className="container"> <Search></Search> <List></List> </div> </div> ); } } export default App;- 1
- 2
- 3
- 4
- 5
- 6
- 7
- 8
- 9
- 10
- 11
- 12
- 13
- 14
- 15
- 16
- 17
- 18
- Search.jsx
import React, {Component} from 'react'; class Search extends Component { render() { return ( <div> <section className="jumbotron"> <h3 className="jumbotron-heading">Search Github Users</h3> <div> <input type="text" placeholder="enter the name you search"/> <button>Search</button> </div> </section> </div> ); } } export default Search;- 1
- 2
- 3
- 4
- 5
- 6
- 7
- 8
- 9
- 10
- 11
- 12
- 13
- 14
- 15
- 16
- 17
- 18
- 19
- list.jsx
import React, {Component} from 'react'; import './List.css' class List extends Component { render() { return ( <div> <div className="row"> <div className="card"> <a rel="noreferrer" href="https://github.com/reactjs" target="_blank"> <img alt="head_protrait" src="https://avatars.githubusercontent.com/u/6412038?v=3" style={{width:'100px'}}/> </a> <p className="card-text">reactjs</p> </div> </div> </div> ); } } export default List;- 1
- 2
- 3
- 4
- 5
- 6
- 7
- 8
- 9
- 10
- 11
- 12
- 13
- 14
- 15
- 16
- 17
- 18
- 19
- 20
- 21
配置代理 获取数据
真实接口地址如下
https://api.github.com/search/users?q=react,我们先拿到数据吧,点击search获取到input的内容,并尝试请求数据- Search.jsx
import React, {Component, createRef} from 'react'; import axios from "axios"; class Search extends Component { searchInput=createRef() searchData=()=>{ //获取input的值 const key=this.searchInput.current.value //发送Ajax请求 axios.get(`/api/search/users?q=${key}`).then(res=>{ console.log(res); },(err)=>{ console.log(err); }).catch(err=>{ console.log(err); }) // } render() { return ( <div> <section className="jumbotron"> <h3 className="jumbotron-heading">Search Github Users</h3> <div> <input type="text" ref={this.searchInput} placeholder="enter the name you search"/> <button onClick={this.searchData}>Search</button> </div> </section> </div> ); } } export default Search;- 1
- 2
- 3
- 4
- 5
- 6
- 7
- 8
- 9
- 10
- 11
- 12
- 13
- 14
- 15
- 16
- 17
- 18
- 19
- 20
- 21
- 22
- 23
- 24
- 25
- 26
- 27
- 28
- 29
- 30
- 31
- 32
- 33
- 34
- 35
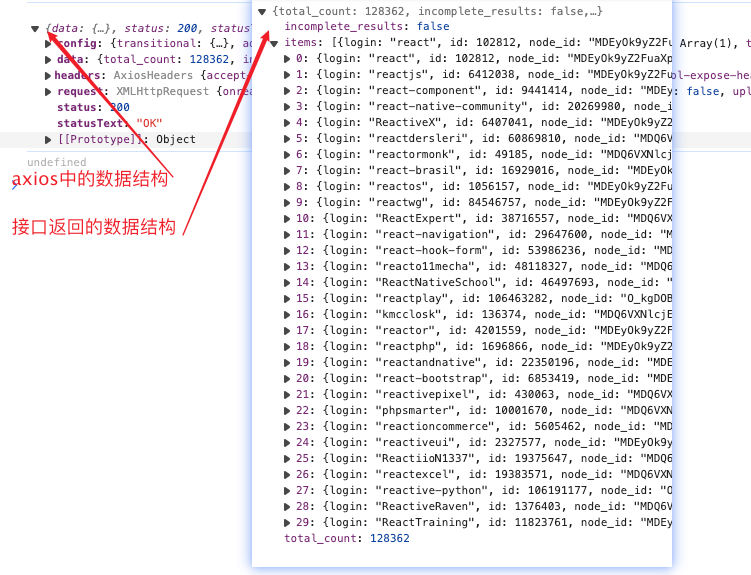
- 点击搜索后我们发现一个问题,接口返回的和axios里面的结构不一致,可以看出,axios对接口数据又做了封装
把数据传递给state,并渲染列表
- list.jsx
class List extends Component { render() { const data=this.props.data; return ( <div> <div className="row"> { data.map((item,index)=>{ return <div className="card" key={item.html_url}> <a rel="noreferrer" href={item.html_url} target="_blank"> <img alt="head_protrait" src={item.avatar_url} style={{width:'100px'}}/> </a> <p className="card-text">{item.login}</p> </div> }) } </div> </div> ); } }- 1
- 2
- 3
- 4
- 5
- 6
- 7
- 8
- 9
- 10
- 11
- 12
- 13
- 14
- 15
- 16
- 17
- 18
- 19
- 20
- 21
- app.js
getData=(data)=>{ console.log(data); this.setState( { list:data } ) }- 1
- 2
- 3
- 4
- 5
- 6
- 7
- 8

发布订阅和同步机制
我们从上一个搜索的例子其实可以看到,在app search list组件直接传递数据的时候,我们都绕不开父组件app,那么有没有一种方式,让search 和list直接沟通,而不需要再通过父组件App传递? 这就用到了发布订阅。
其实后端同学都很熟悉发布订阅模式,首先我们需要创建一个topic,然后有发布者,还得有订阅者。
接下来我们使用第三方组件pubsubjs来体验一下发布订阅,- search.jsx
import React, {Component, createRef} from 'react'; import axios from "axios"; import PubSub from 'pubsub-js'; class Search extends Component { searchInput=createRef() searchData=()=>{ //获取input的值 const key=this.searchInput.current.value //发送Ajax请求 axios.get(`/api/search/users?q=${key}`).then(res=>{ //发布消息 PubSub.publish('list',res.data.items); },(err)=>{ console.log(err); }).catch(err=>{ console.log(err); }) // } render() { return ( <div> <section className="jumbotron"> <h3 className="jumbotron-heading">Search Github Users</h3> <div> <input type="text" ref={this.searchInput} placeholder="enter the name you search"/> <button onClick={this.searchData}>Search</button> </div> </section> </div> ); } } export default Search;- 1
- 2
- 3
- 4
- 5
- 6
- 7
- 8
- 9
- 10
- 11
- 12
- 13
- 14
- 15
- 16
- 17
- 18
- 19
- 20
- 21
- 22
- 23
- 24
- 25
- 26
- 27
- 28
- 29
- 30
- 31
- 32
- 33
- 34
- 35
- 36
- 37
- list.jsx
import React, {Component} from 'react'; import './List.css' import PubSub from 'pubsub-js'; class List extends Component { state ={ data:[] } getData = (msg, data) => { this.setState({ data:data }) } //挂载完毕开始订阅 componentDidMount() {//用一个函数处理订阅消息 const token= PubSub.subscribe('list', this.getData); this.setState({ token:token }) } //卸载后取消订阅 componentWillUnmount() { PubSub.unsubscribe(this.state.token); } render() { const data=this.state.data; return ( <div> <div className="row"> { data.map((item,index)=>{ return <div className="card" key={item.html_url}> <a rel="noreferrer" href={item.html_url} target="_blank"> <img alt="head_protrait" src={item.avatar_url} style={{width:'100px'}}/> </a> <p className="card-text">{item.login}</p> </div> }) } </div> </div> ); } } export default List;- 1
- 2
- 3
- 4
- 5
- 6
- 7
- 8
- 9
- 10
- 11
- 12
- 13
- 14
- 15
- 16
- 17
- 18
- 19
- 20
- 21
- 22
- 23
- 24
- 25
- 26
- 27
- 28
- 29
- 30
- 31
- 32
- 33
- 34
- 35
- 36
- 37
- 38
- 39
- 40
- 41
- 42
- 43
- 44
- 45
- 46
- 47
- 48
- 49
-
-
相关阅读:
对象存储之:多版本
SpringBoot2入门必读(4):Spring boot集成Mybatis(一)
Polygon zkEVM哈希状态机——Keccak-256和Poseidon
“程序包com.sun.tools.javac.util不存在” 问题解决
【Java】解决Java报错:IllegalArgumentException
MySQL 迁移 Oracle 场景中自增主键的实践
2216.美化数组的最少删除数
通信协议(二)——SPI协议
一文看懂推荐系统:概要01:推荐系统的基本概念
android工程师面试题目,安卓开发面试宝典
- 原文地址:https://blog.csdn.net/qq_39962403/article/details/136241318
