-
深度学习神经网络实战:多层感知机,手写数字识别
目的
利用tensorflow.js训练模型,搭建神经网络模型,完成手写数字识别
设计
简单三层神经网络
- 输入层
28*28个神经原,代表每一张手写数字图片的灰度 - 隐藏层
100个神经原 - 输出层
-10个神经原,分别代表10个数字
代码
// 导入 TensorFlow.js 库 import tf from "@tensorflow/tfjs"; import * as tfjsnode from "@tensorflow/tfjs-node"; import * as tfvis from "@tensorflow/tfjs-vis"; import fs from "fs"; import plot from "nodeplotlib"; // 定义模型 const model = tf.sequential(); // 添加输入层 model.add( tf.layers.dense({ units: 64, inputShape: [784], activation: "relu" }) ); // 添加隐藏层 model.add(tf.layers.dense({ units: 100, activation: "relu" })); // 添加输出层 model.add(tf.layers.dense({ units: 10, activation: "softmax" })); // 编译模型 model.compile({ optimizer: "sgd", loss: "categoricalCrossentropy", metrics: ["accuracy"], }); const trainDataLen = 3000; const testDataLen = 2000; // 加载 MNIST 数据集 import pkg from "mnist"; const { set: Dataset } = pkg; const set = Dataset(trainDataLen, testDataLen); const trainingSet = set.training; const testSet = set.test; const trainXs = []; const testXs = []; const trainLabels = []; const testLabels = []; for (let i = 0; i < trainingSet.length; i++) { trainXs.push(trainingSet[i].input); trainLabels.push(trainingSet[i].output.indexOf(1)); } for (let i = 0; i < testSet.length; i++) { testXs.push(testSet[i].input); testLabels.push(testSet[i].output.indexOf(1)); } // 准备数据 const trainXsTensor = tf.tensor(trainXs, [trainDataLen, 784]); const trainYsOneHot = tf.oneHot(trainLabels, 10); //记录每轮模型训练中的损失和精度,为了绘制曲线图 var accPlot = []; var lossPlot = []; // 模型训练 model .fit(trainXsTensor, trainYsOneHot, { batchSize: 64, epochs: 100, validationSplit: 0.2, callbacks: { onEpochBegin: (epoch) => console.log(`Epoch ${epoch + 1} started...`), onEpochEnd: async (epoch, logs) => { console.log( `Epoch ${epoch + 1} completed. Loss: ${logs.loss.toFixed( 3 )}, Accuracy: ${logs.acc.toFixed(3)}` ); //记录loss和acc,绘制曲线图 accPlot.push(logs.acc.toFixed(3)); lossPlot.push(logs.loss.toFixed(3)); await tf.nextFrame(); // 防止阻塞 }, onBatchEnd: async (batch, logs) => { console.log( `Batch ${batch} completed. Loss: ${logs.loss.toFixed( 3 )}, Accuracy: ${logs.acc.toFixed(3)}` ); await tf.nextFrame(); // 防止阻塞 }, }, }) .then((history) => { console.log("Training completed!", history); //绘制模型训练过程中的损失函数和模型精度曲线变化 const epochs = Array.from({ length: lossPlot.length }, (_, i) => i + 1); plot.plot( [ { x: epochs, y: lossPlot, name: "Loss" }, { x: epochs, y: accPlot, name: "Accuracy" }, ], { filename: "loss_acc.png", } ); //模型评估 const testXsTensor = tf.tensor(testXs, [testDataLen, 784]); const testYsOneHot = tf.oneHot(testLabels, 10); const result = model.evaluate(testXsTensor, testYsOneHot); const testLoss = result[0].dataSync()[0]; const testAccuracy = result[1].dataSync()[0]; console.log(`Test loss: ${testLoss.toFixed(3)}`); console.log(`Test accuracy: ${testAccuracy.toFixed(3)}`); //保存模型 model.save("file://./my-model").then(() => { console.log("Model saved!"); }); });- 1
- 2
- 3
- 4
- 5
- 6
- 7
- 8
- 9
- 10
- 11
- 12
- 13
- 14
- 15
- 16
- 17
- 18
- 19
- 20
- 21
- 22
- 23
- 24
- 25
- 26
- 27
- 28
- 29
- 30
- 31
- 32
- 33
- 34
- 35
- 36
- 37
- 38
- 39
- 40
- 41
- 42
- 43
- 44
- 45
- 46
- 47
- 48
- 49
- 50
- 51
- 52
- 53
- 54
- 55
- 56
- 57
- 58
- 59
- 60
- 61
- 62
- 63
- 64
- 65
- 66
- 67
- 68
- 69
- 70
- 71
- 72
- 73
- 74
- 75
- 76
- 77
- 78
- 79
- 80
- 81
- 82
- 83
- 84
- 85
- 86
- 87
- 88
- 89
- 90
- 91
- 92
- 93
- 94
- 95
- 96
- 97
- 98
- 99
- 100
- 101
- 102
- 103
- 104
- 105
- 106
- 107
- 108
- 109
- 110
- 111
- 112
- 113
- 114
- 115
- 116
- 117
- 118
- 119
- 120
package.json
{ "name": "neural_network", "version": "1.0.0", "description": "", "type": "module", "main": "mlpTest.js", "scripts": { "test": "echo \"Error: no test specified\" && exit 1", }, "author": "", "license": "ISC", "dependencies": { "@tensorflow/tfjs": "^4.17.0", "@tensorflow/tfjs-node": "^4.17.0", "@tensorflow/tfjs-vis": "^1.0.0", "mnist": "^1.1.0", "nodeplotlib": "^0.7.7" }, "devDependencies": { "@babel/core": "^7.0.0", "@babel/preset-env": "^7.0.0", "babel-loader": "^8.0.0", "webpack": "^5.0.0", "webpack-cli": "^4.0.0" } }- 1
- 2
- 3
- 4
- 5
- 6
- 7
- 8
- 9
- 10
- 11
- 12
- 13
- 14
- 15
- 16
- 17
- 18
- 19
- 20
- 21
- 22
- 23
- 24
- 25
- 26
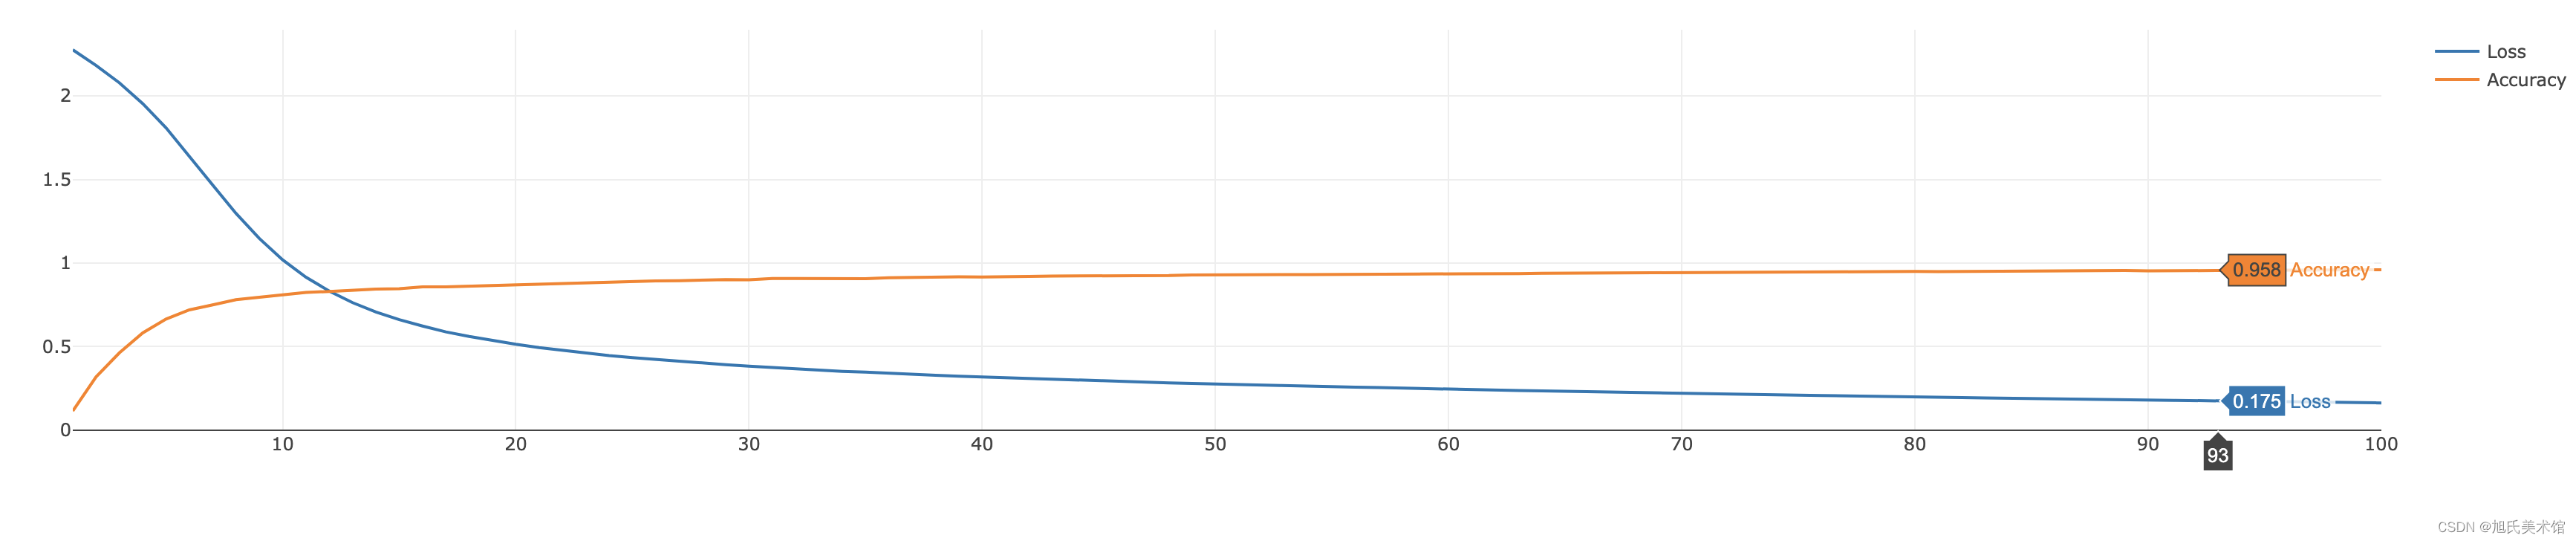
模型结果

损失函数与模型精度变化
- 输入层
-
相关阅读:
携职教育:2022年初级会计成绩查询倒计时,这几件事一定要注意
逆向-beginners之return
【LeetCode题目详解】第九章 动态规划part06 完全背的讲解 518. 零钱兑换 II 377. 组合总和 Ⅳ (day44补)
ISL1208时钟芯片 Linux下 i2c 设置报警时钟。
某马旅游网站开发(对servlet的优化)
12.建造者模式
SpringBoot 关于异步与事务一起使用的问题
第2章搭建CRM项目开发环境(数据库设计)
k8s--docker状态码(很重要)
记录一次成功的frida编译
- 原文地址:https://blog.csdn.net/ChenXvYuan_001/article/details/136243902
