-
Kubernetes安装nginx-controller作为统一网关
nginx-controller是什么呢?
- 它是一个能调度nginx的一个kubernetes operator,它能监听用户创建,更新,删除NginxConf对象,来调度本地的nginx实现配置的动态更新。如添加新的代理(http,https,tcp,udp),缓存(浏览器缓存,本地缓存),ssl证书(配置本身,ConfigMap,Secret),更新,删除等
- 它使用nginx本身的配置文件(如nginx.conf)来作为配置参数,使nginx配置更透明,易于维护
安装之前准备
- 你得有一个k8s环境
- 创建crd
如果你的版本是1.29以下的版本,请删掉crd里面所有有关x-kubernetes-validations的部分
crd.yamlapiVersion: apiextensions.k8s.io/v1 kind: CustomResourceDefinition metadata: name: nginxconfs.stable.lhstack.com spec: names: kind: NginxConf plural: nginxconfs singular: nginxconf listKind: NginxConfList shortNames: - ncf group: stable.lhstack.com scope: Namespaced versions: - name: v1 served: true storage: true schema: openAPIV3Schema: type: object description: "nginx 对应http/stream组中include哪一项引入的配置" x-kubernetes-validations: - rule: "has(self.spec) && has(self.spec.config)" message: "spec.config参数为必填项" - rule: "(self.spec.configType == 'custom' && size(self.spec.customConfigPath) > 0) || (has(self.spec.configType) && self.spec.configType != 'custom') || !has(self.spec.configType)" message: "spec.configType是custom时,spec.customConfigPath参数为必填项" properties: spec: type: object required: - config properties: additions: type: object description: "附加ConfigMap,Secret,文本内容到指定路径文件中,使用场景: 如tls证书" properties: values: type: array description: "将items.value中的内容输出到容器指定路径" items: type: object x-kubernetes-validations: - rule: "size(self.value) != 0 && size(self.path) != 0" message: "values.value,values.value参数为必填项" properties: value: type: string description: "要输出到文件的内容" path: type: string description: "输出目标路径" secrets: type: array description: "将secret中的内容输出到容器指定路径" items: type: object x-kubernetes-validations: - rule: "(has(self.name) && has(self.path)) || (has(self.name) && has(self.items))" message: "(secrets.path,secrets.name)或者(secrets.items,secrets.name)参数为必填项" - rule: "(has(self.path) && !has(self.items)) || (!has(self.path) && has(self.items))" message: "secrets.path和secrets.items参数不能并存,只能二选一" properties: path: type: string description: "输出目标路径,同items参数不能并存,此路径必须是一个目录,不存在即创建目录(多级目录会同时创建)" name: type: string description: "secret名称" namespace: type: string description: "secret所在命名空间" items: type: array description: "secret中每一项,同path参数不能并存" items: type: object x-kubernetes-validations: - rule: "size(self.key) != 0 && size(self.path) != 0" message: "items.key和items.path不能为空" properties: key: type: string description: "secret项中的key" path: type: string description: "secret中key的value值需要输出到的目标文件路径,此路径必须是一个文件地址,不存在即创建文件(多级目录会同时创建目录)" configMaps: type: array description: "将configMap中的内容输出到容器指定路径" items: type: object x-kubernetes-validations: - rule: "(has(self.name) && has(self.path)) || (has(self.name) && has(self.items))" message: "(configMaps.path,configMaps.name)或者(configMaps.items,configMaps.name)参数为必填项" - rule: "(has(self.path) && !has(self.items)) || (!has(self.path) && has(self.items))" message: "configMaps.path和configMaps.items参数不能并存,只能二选一" properties: path: type: string description: "输出目标路径,同items参数不能并存,此路径必须是一个目录,不存在即创建目录(多级目录会同时创建)" name: type: string description: "configMap名称" namespace: type: string description: "configMap所在命名空间" items: type: array description: "configMap中每一项,同path参数不能并存" items: type: object x-kubernetes-validations: - rule: "size(self.key) != 0 && size(self.path) != 0" message: "items.key和items.path不能为空" properties: key: type: string description: "configMap项中的key" path: type: string description: "configMap中key的value值需要输出到的目标文件路径,此路径必须是一个文件地址,不存在即创建文件(多级目录会同时创建目录)" customConfigPath: type: string description: "当configType=custom时才生效,定义配置写入到指定目录下面" configType: description: "配置类型,可选值 http,stream,custom,default: http" enum: - http - stream - custom type: string config: type: string description: | 配置内容: server { listen 80; listen [::]:80; server_name localhost; #access_log /var/log/nginx/host.access.log main; location / { root /usr/share/nginx/html; index index.html index.htm; } #error_page 404 /404.html; # redirect server error pages to the static page /50x.html # error_page 500 502 503 504 /50x.html; location = /50x.html { root /usr/share/nginx/html; } # proxy the PHP scripts to Apache listening on 127.0.0.1:80 # #location ~ \.php$ { # proxy_pass http://127.0.0.1; #} # pass the PHP scripts to FastCGI server listening on 127.0.0.1:9000 # #location ~ \.php$ { # root html; # fastcgi_pass 127.0.0.1:9000; # fastcgi_index index.php; # fastcgi_param SCRIPT_FILENAME /scripts$fastcgi_script_name; # include fastcgi_params; #} # deny access to .htaccess files, if Apache's document root # concurs with nginx's one # #location ~ /\.ht { # deny all; #} } ---- 1
- 2
- 3
- 4
- 5
- 6
- 7
- 8
- 9
- 10
- 11
- 12
- 13
- 14
- 15
- 16
- 17
- 18
- 19
- 20
- 21
- 22
- 23
- 24
- 25
- 26
- 27
- 28
- 29
- 30
- 31
- 32
- 33
- 34
- 35
- 36
- 37
- 38
- 39
- 40
- 41
- 42
- 43
- 44
- 45
- 46
- 47
- 48
- 49
- 50
- 51
- 52
- 53
- 54
- 55
- 56
- 57
- 58
- 59
- 60
- 61
- 62
- 63
- 64
- 65
- 66
- 67
- 68
- 69
- 70
- 71
- 72
- 73
- 74
- 75
- 76
- 77
- 78
- 79
- 80
- 81
- 82
- 83
- 84
- 85
- 86
- 87
- 88
- 89
- 90
- 91
- 92
- 93
- 94
- 95
- 96
- 97
- 98
- 99
- 100
- 101
- 102
- 103
- 104
- 105
- 106
- 107
- 108
- 109
- 110
- 111
- 112
- 113
- 114
- 115
- 116
- 117
- 118
- 119
- 120
- 121
- 122
- 123
- 124
- 125
- 126
- 127
- 128
- 129
- 130
- 131
- 132
- 133
- 134
- 135
- 136
- 137
- 138
- 139
- 140
- 141
- 142
- 143
- 144
- 145
- 146
- 147
- 148
- 149
- 150
- 151
- 152
- 153
- 154
- 155
- 156
- 157
- 158
- 159
- 160
- 161
- 162
- 163
- 164
- 165
- 166
- 167
- 168
- 169
- 170
- 171
- 172
- 173
- 174
- 执行命令,创建crd
kubectl apply -f crd.yaml
然后就可以使用kubectl explain NginxConf查看对应的文档了,如:


安装nginx-controller
这里我使用deployment来部署nginx-controller
deployment.yamlapiVersion: v1 kind: Namespace metadata: name: ingress --- apiVersion: v1 kind: ServiceAccount metadata: name: nginx-controller namespace: ingress --- apiVersion: rbac.authorization.k8s.io/v1 kind: ClusterRoleBinding metadata: name: nginx-controller namespace: ingress subjects: - kind: ServiceAccount name: nginx-controller namespace: ingress roleRef: apiGroup: rbac.authorization.k8s.io kind: ClusterRole name: cluster-admin --- apiVersion: apps/v1 kind: Deployment metadata: name: nginx-controller namespace: ingress spec: replicas: 2 selector: matchLabels: app: ingress template: metadata: labels: app: ingress spec: serviceAccountName: nginx-controller containers: - name: controller image: lhstack/nginx-controller:latest imagePullPolicy: IfNotPresent ports: - containerPort: 80 name: "http" protocol: "TCP" - containerPort: 443 name: "https" protocol: "TCP" readinessProbe: httpGet: port: 9099 path: /readyz successThreshold: 1 failureThreshold: 3 timeoutSeconds: 3 #请求超时 periodSeconds: 30 #每隔30秒检查一次 initialDelaySeconds: 5 #5秒之后开始检测 livenessProbe: httpGet: port: 9099 path: /healthz successThreshold: 1 failureThreshold: 3 timeoutSeconds: 3 #请求超时 periodSeconds: 60 #每隔60秒检查一次 initialDelaySeconds: 5 #5秒之后开始检测 env: - name: KUBE_NAMESPACE value: "ingress" # 这里用命名空间隔离配置,意味着只有ingress命名空间下的NginxConf才会生效,如果不设置或者为空,就会监听所有命名空间下的配置 resources: requests: memory: 32Mi cpu: 10m limits: memory: 64Mi cpu: 10m --- apiVersion: v1 kind: Service metadata: name: ingress namespace: ingress spec: selector: app: ingress type: NodePort clusterIP: 10.43.80.80 #这里固定一下ip,方便使用dns指向指定ip,前提是需要安装dns服务 ports: - port: 80 name: http protocol: TCP nodePort: 30080 - port: 443 name: https protocol: TCP nodePort: 30443- 1
- 2
- 3
- 4
- 5
- 6
- 7
- 8
- 9
- 10
- 11
- 12
- 13
- 14
- 15
- 16
- 17
- 18
- 19
- 20
- 21
- 22
- 23
- 24
- 25
- 26
- 27
- 28
- 29
- 30
- 31
- 32
- 33
- 34
- 35
- 36
- 37
- 38
- 39
- 40
- 41
- 42
- 43
- 44
- 45
- 46
- 47
- 48
- 49
- 50
- 51
- 52
- 53
- 54
- 55
- 56
- 57
- 58
- 59
- 60
- 61
- 62
- 63
- 64
- 65
- 66
- 67
- 68
- 69
- 70
- 71
- 72
- 73
- 74
- 75
- 76
- 77
- 78
- 79
- 80
- 81
- 82
- 83
- 84
- 85
- 86
- 87
- 88
- 89
- 90
- 91
- 92
- 93
- 94
- 95
- 96
- 97
- 98
- 99
- 100
然后就可以通过命令看到启动了两个容器
由于我本地的环境和默认的不太一样,所以ip,type可能不相同,但是影响不大,我相信你们也能理解

添加一个http代理
这里代理百度试试,由于我已经安装了dns服务,就可以通过域名直接访问
baidu-nginx-conf.yamlapiVersion: stable.lhstack.com/v1 kind: NginxConf metadata: name: baidu-web namespace: default #我本地配置监听的是default命名空间 spec: config: | server { server_name baidu.lhstack.com; listen 80; gzip on; gzip_types text/plain text/css application/json application/javascript text/xml application/xml application/xml+rss text/javascript; gzip_min_length 1000; gzip_comp_level 6; gzip_proxied any; gzip_vary on; location / { proxy_pass https://www.baidu.com; proxy_http_version 1.1; } }- 1
- 2
- 3
- 4
- 5
- 6
- 7
- 8
- 9
- 10
- 11
- 12
- 13
- 14
- 15
- 16
- 17
- 18
- 19
- 20
- 21
可以看到创建成功了,日志也已经检测到了


现在访问浏览器试试

增加tls证书支持
生成证书
这里我使用cfssl+cfssljson生成证书
编写ca-config.json
{ "signing": { "default": { "expiry": "876000h" }, "profiles": { "lhstack": { "expiry": "876000h", "usages": [ "signing", "key encipherment", "server auth", "client auth" ] } } } }- 1
- 2
- 3
- 4
- 5
- 6
- 7
- 8
- 9
- 10
- 11
- 12
- 13
- 14
- 15
- 16
- 17
- 18
编写ca-csr.json
{ "CN": "lhstack", "key": { "algo": "ecdsa", "size": 256 }, "names": [ { "C": "CN", "ST": "ChengDu", "L": "ChengDu", "O":"nginxConf", "OU":"lhstack" } ] }- 1
- 2
- 3
- 4
- 5
- 6
- 7
- 8
- 9
- 10
- 11
- 12
- 13
- 14
- 15
- 16
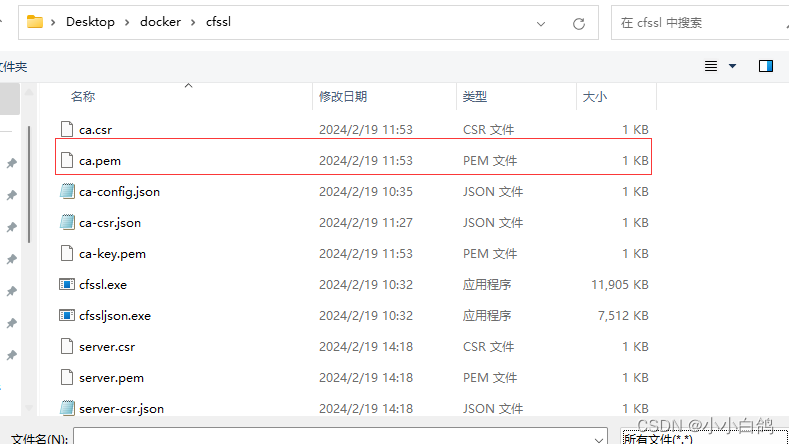
生成ca证书
cfssl gencert -initca ca-csr.json | cfssljson -bare ca编写server-crs.json配置
{ "CN": "lhstack.com", "hosts":[ "*.lhstack.com" ], "key": { "algo": "ecdsa", "size": 256 }, "names": [ { "C": "CN", "ST": "ChengDu", "L": "ChengDu", "O":"nginxConf", "OU":"lhstack" } ] }- 1
- 2
- 3
- 4
- 5
- 6
- 7
- 8
- 9
- 10
- 11
- 12
- 13
- 14
- 15
- 16
- 17
- 18
- 19
生成服务端证书
cfssl gencert -ca=ca.pem -ca-key=ca-key.pem -config=ca-config.json -profile=lhstack server-csr.json | cfssljson -bare server浏览器导入ca证书
Google浏览器 设置->隐私和安全->安全->管理证书->受信任的根证书颁发机构->导入->浏览->将文件类型选择为所有类型->选择ca.pem->导入即可


为代理服务添加证书
使用Value输出证书
编写配置
apiVersion: stable.lhstack.com/v1 kind: NginxConf metadata: name: baidu-web namespace: default #我本地配置监听的是default命名空间 spec: additions: values: - path: /opt/tls/baidu/tls.key value: | #复制server-key.pem的内容 -----BEGIN EC PRIVATE KEY----- MHcCAQEEIAT5gX3jgIEZS/ummtkAbNuazXZVjpm1g2huYRe1AAGeoAoGCCqGSM49 AwEHoUQDQgAEqOSRM0QVMX/yT1WY6iDp1mTEqKncfDPN2hWLR8wtK8UrfsZdteC4 tVq5qheqXpADlnXblDx8E88II/1L7mcgmg== -----END EC PRIVATE KEY----- - path: /opt/tls/baidu/tls.crt value: | #复制server.pem的内容 -----BEGIN CERTIFICATE----- MIICdjCCAhugAwIBAgIUbrgeVdgOzILZ0gBxHyWnApsTWn4wCgYIKoZIzj0EAwIw aTELMAkGA1UEBhMCQ04xEDAOBgNVBAgTB0NoZW5nRHUxEDAOBgNVBAcTB0NoZW5n RHUxEjAQBgNVBAoTCW5naW54Q29uZjEQMA4GA1UECxMHbGhzdGFjazEQMA4GA1UE AxMHbGhzdGFjazAgFw0yNDAyMTkwNjE0MDBaGA8yMTI0MDEyNjA2MTQwMFowbTEL MAkGA1UEBhMCQ04xEDAOBgNVBAgTB0NoZW5nRHUxEDAOBgNVBAcTB0NoZW5nRHUx EjAQBgNVBAoTCW5naW54Q29uZjEQMA4GA1UECxMHbGhzdGFjazEUMBIGA1UEAxML bGhzdGFjay5jb20wWTATBgcqhkjOPQIBBggqhkjOPQMBBwNCAASo5JEzRBUxf/JP VZjqIOnWZMSoqdx8M83aFYtHzC0rxSt+xl214Li1WrmqF6pekAOWdduUPHwTzwgj /UvuZyCao4GaMIGXMA4GA1UdDwEB/wQEAwIFoDAdBgNVHSUEFjAUBggrBgEFBQcD AQYIKwYBBQUHAwIwDAYDVR0TAQH/BAIwADAdBgNVHQ4EFgQUnxNd1Vf52CFI4Jnf mJdWJINRfkgwHwYDVR0jBBgwFoAUwt+oneC6wLTC+iMEYnhbxLrH7OAwGAYDVR0R BBEwD4INKi5saHN0YWNrLmNvbTAKBggqhkjOPQQDAgNJADBGAiEAhBQbWHu/9F6d 6E7s48ltk2Gv4Jhvfk27QPV1+e7GBdoCIQCyRc8+IgO7ejlpZIfIOoKkdFgSZ5CZ HUCQbhbgFgl0Bg== -----END CERTIFICATE----- config: | server { listen 80; #配置80端口永久重定向443 server_name baidu.lhstack.com; rewrite ^(.*)$ https://${server_name}$1 permanent; } server { server_name baidu.lhstack.com; listen 443 ssl http2; client_max_body_size 50m; ssl_certificate /opt/tls/baidu/tls.crt; ssl_certificate_key /opt/tls/baidu/tls.key; ssl_session_timeout 5m; ssl_ciphers ECDHE-RSA-AES128-GCM-SHA256:ECDHE:ECDH:AES:HIGH:!NULL:!aNULL:!MD5:!ADH:!RC4; ssl_protocols TLSv1 TLSv1.1 TLSv1.2 TLSv1.3; ssl_prefer_server_ciphers on; gzip on; gzip_types text/plain text/css application/json application/javascript text/xml application/xml application/xml+rss text/javascript; gzip_min_length 1000; gzip_comp_level 6; gzip_proxied any; gzip_vary on; location / { proxy_pass https://www.baidu.com; proxy_http_version 1.1; } }- 1
- 2
- 3
- 4
- 5
- 6
- 7
- 8
- 9
- 10
- 11
- 12
- 13
- 14
- 15
- 16
- 17
- 18
- 19
- 20
- 21
- 22
- 23
- 24
- 25
- 26
- 27
- 28
- 29
- 30
- 31
- 32
- 33
- 34
- 35
- 36
- 37
- 38
- 39
- 40
- 41
- 42
- 43
- 44
- 45
- 46
- 47
- 48
- 49
- 50
- 51
- 52
- 53
- 54
- 55
- 56
- 57
- 58
- 59
- 60
- 61
更新配置
kubectl apply -f baidu-nginx-conf.yaml
可以看到,更新成功了

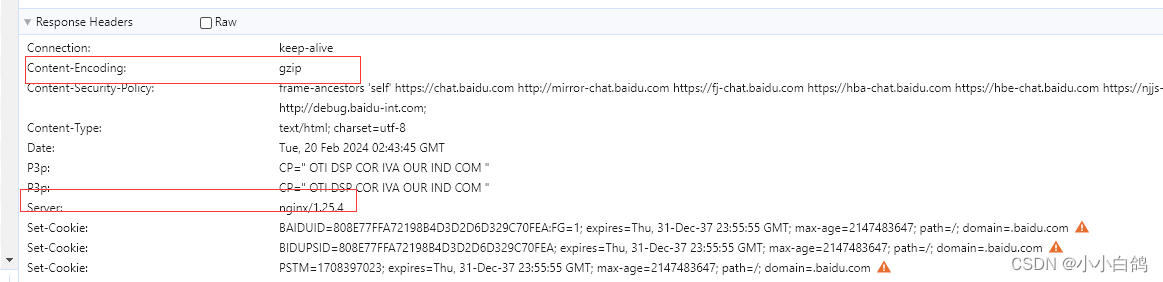
浏览器访问,可以看到,这里就变成https了

使用ConfigMap输出证书
删除之前的配置
kubectl delete -f baidu-nginx-conf.yaml
浏览器也不可访问,变成了我默认的服务

证书文件也清理干净了
编写配置
apiVersion: v1 kind: ConfigMap metadata: name: baidu-nginx-conf namespace: kube-system data: tls.key: | -----BEGIN EC PRIVATE KEY----- MHcCAQEEIAT5gX3jgIEZS/ummtkAbNuazXZVjpm1g2huYRe1AAGeoAoGCCqGSM49 AwEHoUQDQgAEqOSRM0QVMX/yT1WY6iDp1mTEqKncfDPN2hWLR8wtK8UrfsZdteC4 tVq5qheqXpADlnXblDx8E88II/1L7mcgmg== -----END EC PRIVATE KEY----- tls.crt: | -----BEGIN CERTIFICATE----- MIICdjCCAhugAwIBAgIUbrgeVdgOzILZ0gBxHyWnApsTWn4wCgYIKoZIzj0EAwIw aTELMAkGA1UEBhMCQ04xEDAOBgNVBAgTB0NoZW5nRHUxEDAOBgNVBAcTB0NoZW5n RHUxEjAQBgNVBAoTCW5naW54Q29uZjEQMA4GA1UECxMHbGhzdGFjazEQMA4GA1UE AxMHbGhzdGFjazAgFw0yNDAyMTkwNjE0MDBaGA8yMTI0MDEyNjA2MTQwMFowbTEL MAkGA1UEBhMCQ04xEDAOBgNVBAgTB0NoZW5nRHUxEDAOBgNVBAcTB0NoZW5nRHUx EjAQBgNVBAoTCW5naW54Q29uZjEQMA4GA1UECxMHbGhzdGFjazEUMBIGA1UEAxML bGhzdGFjay5jb20wWTATBgcqhkjOPQIBBggqhkjOPQMBBwNCAASo5JEzRBUxf/JP VZjqIOnWZMSoqdx8M83aFYtHzC0rxSt+xl214Li1WrmqF6pekAOWdduUPHwTzwgj /UvuZyCao4GaMIGXMA4GA1UdDwEB/wQEAwIFoDAdBgNVHSUEFjAUBggrBgEFBQcD AQYIKwYBBQUHAwIwDAYDVR0TAQH/BAIwADAdBgNVHQ4EFgQUnxNd1Vf52CFI4Jnf mJdWJINRfkgwHwYDVR0jBBgwFoAUwt+oneC6wLTC+iMEYnhbxLrH7OAwGAYDVR0R BBEwD4INKi5saHN0YWNrLmNvbTAKBggqhkjOPQQDAgNJADBGAiEAhBQbWHu/9F6d 6E7s48ltk2Gv4Jhvfk27QPV1+e7GBdoCIQCyRc8+IgO7ejlpZIfIOoKkdFgSZ5CZ HUCQbhbgFgl0Bg== -----END CERTIFICATE----- --- apiVersion: stable.lhstack.com/v1 kind: NginxConf metadata: name: baidu-web namespace: default #我本地配置监听的是default命名空间 spec: additions: configMaps: - name: baidu-nginx-conf namespace: kube-system #不填默认使用default作为命名空间 path: /opt/tls/baidu config: | server { listen 80; #配置80端口永久重定向443 server_name baidu.lhstack.com; rewrite ^(.*)$ https://${server_name}$1 permanent; } server { server_name baidu.lhstack.com; listen 443 ssl http2; client_max_body_size 50m; ssl_certificate /opt/tls/baidu/tls.crt; ssl_certificate_key /opt/tls/baidu/tls.key; ssl_session_timeout 5m; ssl_ciphers ECDHE-RSA-AES128-GCM-SHA256:ECDHE:ECDH:AES:HIGH:!NULL:!aNULL:!MD5:!ADH:!RC4; ssl_protocols TLSv1 TLSv1.1 TLSv1.2 TLSv1.3; ssl_prefer_server_ciphers on; gzip on; gzip_types text/plain text/css application/json application/javascript text/xml application/xml application/xml+rss text/javascript; gzip_min_length 1000; gzip_comp_level 6; gzip_proxied any; gzip_vary on; location / { proxy_pass https://www.baidu.com; proxy_http_version 1.1; } }- 1
- 2
- 3
- 4
- 5
- 6
- 7
- 8
- 9
- 10
- 11
- 12
- 13
- 14
- 15
- 16
- 17
- 18
- 19
- 20
- 21
- 22
- 23
- 24
- 25
- 26
- 27
- 28
- 29
- 30
- 31
- 32
- 33
- 34
- 35
- 36
- 37
- 38
- 39
- 40
- 41
- 42
- 43
- 44
- 45
- 46
- 47
- 48
- 49
- 50
- 51
- 52
- 53
- 54
- 55
- 56
- 57
- 58
- 59
- 60
- 61
- 62
- 63
- 64
- 65
- 66
- 67
- 68
- 69

更新配置
kubectl apply -f baidu-nginx-conf.yaml

浏览器也可以访问了
使用Secret输出证书
删除之前的配置
kubectl delete -f baidu-nginx-conf.yaml

证书文件也被清理干净

编写配置
apiVersion: v1 kind: Secret metadata: name: baidu-nginx-conf namespace: kube-system type: kubernetes/tls #data要求为base64格式 data: tls.key: LS0tLS1CRUdJTiBFQyBQUklWQVRFIEtFWS0tLS0tCk1IY0NBUUVFSUFUNWdYM2pnSUVaUy91bW10a0FiTnVhelhaVmpwbTFnMmh1WVJlMUFBR2VvQW9HQ0NxR1NNNDkKQXdFSG9VUURRZ0FFcU9TUk0wUVZNWC95VDFXWTZpRHAxbVRFcUtuY2ZEUE4yaFdMUjh3dEs4VXJmc1pkdGVDNAp0VnE1cWhlcVhwQURsblhibER4OEU4OElJLzFMN21jZ21nPT0KLS0tLS1FTkQgRUMgUFJJVkFURSBLRVktLS0tLQ== tls.crt: LS0tLS1CRUdJTiBDRVJUSUZJQ0FURS0tLS0tCk1JSUNkakNDQWh1Z0F3SUJBZ0lVYnJnZVZkZ096SUxaMGdCeEh5V25BcHNUV240d0NnWUlLb1pJemowRUF3SXcKYVRFTE1Ba0dBMVVFQmhNQ1EwNHhFREFPQmdOVkJBZ1RCME5vWlc1blJIVXhFREFPQmdOVkJBY1RCME5vWlc1bgpSSFV4RWpBUUJnTlZCQW9UQ1c1bmFXNTRRMjl1WmpFUU1BNEdBMVVFQ3hNSGJHaHpkR0ZqYXpFUU1BNEdBMVVFCkF4TUhiR2h6ZEdGamF6QWdGdzB5TkRBeU1Ua3dOakUwTURCYUdBOHlNVEkwTURFeU5qQTJNVFF3TUZvd2JURUwKTUFrR0ExVUVCaE1DUTA0eEVEQU9CZ05WQkFnVEIwTm9aVzVuUkhVeEVEQU9CZ05WQkFjVEIwTm9aVzVuUkhVeApFakFRQmdOVkJBb1RDVzVuYVc1NFEyOXVaakVRTUE0R0ExVUVDeE1IYkdoemRHRmphekVVTUJJR0ExVUVBeE1MCmJHaHpkR0ZqYXk1amIyMHdXVEFUQmdjcWhrak9QUUlCQmdncWhrak9QUU1CQndOQ0FBU281SkV6UkJVeGYvSlAKVlpqcUlPbldaTVNvcWR4OE04M2FGWXRIekMwcnhTdCt4bDIxNExpMVdybXFGNnBla0FPV2RkdVVQSHdUendnagovVXZ1WnlDYW80R2FNSUdYTUE0R0ExVWREd0VCL3dRRUF3SUZvREFkQmdOVkhTVUVGakFVQmdnckJnRUZCUWNECkFRWUlLd1lCQlFVSEF3SXdEQVlEVlIwVEFRSC9CQUl3QURBZEJnTlZIUTRFRmdRVW54TmQxVmY1MkNGSTRKbmYKbUpkV0pJTlJma2d3SHdZRFZSMGpCQmd3Rm9BVXd0K29uZUM2d0xUQytpTUVZbmhieExySDdPQXdHQVlEVlIwUgpCQkV3RDRJTktpNXNhSE4wWVdOckxtTnZiVEFLQmdncWhrak9QUVFEQWdOSkFEQkdBaUVBaEJRYldIdS85RjZkCjZFN3M0OGx0azJHdjRKaHZmazI3UVBWMStlN0dCZG9DSVFDeVJjOCtJZ083ZWpscFpJZklPb0trZEZnU1o1Q1oKSFVDUWJoYmdGZ2wwQmc9PQotLS0tLUVORCBDRVJUSUZJQ0FURS0tLS0t --- apiVersion: stable.lhstack.com/v1 kind: NginxConf metadata: name: baidu-web namespace: default #我本地配置监听的是default命名空间 spec: additions: secrets: - name: baidu-nginx-conf namespace: kube-system #不填默认使用default作为命名空间 path: /opt/tls/baidu config: | server { listen 80; #配置80端口永久重定向443 server_name baidu.lhstack.com; rewrite ^(.*)$ https://${server_name}$1 permanent; } server { server_name baidu.lhstack.com; listen 443 ssl http2; client_max_body_size 50m; ssl_certificate /opt/tls/baidu/tls.crt; ssl_certificate_key /opt/tls/baidu/tls.key; ssl_session_timeout 5m; ssl_ciphers ECDHE-RSA-AES128-GCM-SHA256:ECDHE:ECDH:AES:HIGH:!NULL:!aNULL:!MD5:!ADH:!RC4; ssl_protocols TLSv1 TLSv1.1 TLSv1.2 TLSv1.3; ssl_prefer_server_ciphers on; gzip on; gzip_types text/plain text/css application/json application/javascript text/xml application/xml application/xml+rss text/javascript; gzip_min_length 1000; gzip_comp_level 6; gzip_proxied any; gzip_vary on; location / { proxy_pass https://www.baidu.com; proxy_http_version 1.1; } }- 1
- 2
- 3
- 4
- 5
- 6
- 7
- 8
- 9
- 10
- 11
- 12
- 13
- 14
- 15
- 16
- 17
- 18
- 19
- 20
- 21
- 22
- 23
- 24
- 25
- 26
- 27
- 28
- 29
- 30
- 31
- 32
- 33
- 34
- 35
- 36
- 37
- 38
- 39
- 40
- 41
- 42
- 43
- 44
- 45
- 46
- 47
- 48
- 49

更新配置
kubectl apply -f baidu-nginx-conf.yaml

浏览器也能正常访问
如果证书过期了,需要更新证书内容怎么办?
如果使用的ConfigMap,Secret保存的证书,那么就需要手动更新ConfigMap,Secret,然后使用以下命令:- 触发所有NginxConf更新事件
这个指令会触发所有NginxConf事件,然后走更新流程,就会拉取最新的ConfigMap,Secret内容输出到指定路径
kubectl annotate NginxConf --all -A --overwrite updated=$(date +%s) - 触发一个NginxConf更新事件
如果已知需要更新的NginxConf配置,则使用此命令触发更新事件即可
kubectl annotate -n {命名空间} NginxConf {NginxConf的名称} --overwrite update=$(date +%s)
如果使用的Value输出,则不需要,因为value本身是NginxConf对象中的某一个参数,当发生修改时,kubernetes会判定为NginxConf发生了改变,自然而然就会触发更新事件由于部分图片违规,所以对域名做了遮掩处理,相关域名通过配置可查看
-
相关阅读:
音频修复和增强工具 iZotope RX 10 for mac激活最新
Python将时间数据转换成datetime.datetime类型
C++面试经典题型
Java数组
使用TortoiseGit建立本地仓库,上传初版工程
计算机网络:数据链路层功能
【LeetCode】——双指针(快慢指针)/多指针
【QT开发(15)】QT在没有桌面的系统中可以使用
程序分析与优化 - 3 数据流分析
学习笔记|ADC反推电源电压|扫描按键(长按循环触发)|课设级实战练习|STC32G单片机视频开发教程(冲哥)|第十八集:ADC实战
- 原文地址:https://blog.csdn.net/qq_42413011/article/details/136184182
