-
[Docker]七.配置 Docker 网络
一.Docker0 网络
1.多个容器之间如何通信,是否可以直接连接
默认启动的所有容器都会加入到docker0这个网络中,所有各个容器件是可以直接通信的

先看看网卡信息:

启动几个容器来演示一下:
- #启动mycentos这个容器
- [root@localhost zph]# docker run -it -d --name mycentos d757f6342cfa /bin/bash
- 7845d3930d4a6ee995f11c33e9dae2b688032b2d5c6a655148104ab4f33cd2c5
- [root@localhost zph]#
- [root@localhost zph]# docker ps
- CONTAINER ID IMAGE COMMAND CREATED STATUS PORTS NAMES
- 7845d3930d4a d757f6342cfa "/bin/bash" 11 seconds ago Up 3 seconds mycentos


说明了每次启动一个容器时,都会增加一个网卡信息,下面来测试一下几个容之间可以相互通信不?
分别查看 3 块网卡的 IP 信息
- [root@localhost zph]# docker exec -it mycentos ifconfig
- eth0: flags=4163
- inet 172.17.0.2 netmask 255.255.0.0 broadcast 172.17.255.255
- ether 02:42:ac:11:00:02 txqueuelen 0 (Ethernet)
- RX packets 45 bytes 5710 (5.5 KiB)
- RX errors 0 dropped 0 overruns 0 frame 0
- TX packets 0 bytes 0 (0.0 B)
- TX errors 0 dropped 0 overruns 0 carrier 0 collisions 0
- lo: flags=73
- inet 127.0.0.1 netmask 255.0.0.0
- loop txqueuelen 1000 (Local Loopback)
- RX packets 0 bytes 0 (0.0 B)
- RX errors 0 dropped 0 overruns 0 frame 0
- TX packets 0 bytes 0 (0.0 B)
- TX errors 0 dropped 0 overruns 0 carrier 0 collisions 0
- [root@localhost zph]# docker exec -it mycentos2 ifconfig
- eth0: flags=4163
- inet 172.17.0.3 netmask 255.255.0.0 broadcast 172.17.255.255
- ether 02:42:ac:11:00:03 txqueuelen 0 (Ethernet)
- RX packets 21 bytes 2436 (2.3 KiB)
- RX errors 0 dropped 0 overruns 0 frame 0
- TX packets 0 bytes 0 (0.0 B)
- TX errors 0 dropped 0 overruns 0 carrier 0 collisions 0
- lo: flags=73
- inet 127.0.0.1 netmask 255.0.0.0
- loop txqueuelen 1000 (Local Loopback)
- RX packets 0 bytes 0 (0.0 B)
- RX errors 0 dropped 0 overruns 0 frame 0
- TX packets 0 bytes 0 (0.0 B)
- TX errors 0 dropped 0 overruns 0 carrier 0 collisions 0
- [root@localhost zph]# docker exec -it mycentos3 ifconfig
- eth0: flags=4163
- inet 172.17.0.4 netmask 255.255.0.0 broadcast 172.17.255.255
- ether 02:42:ac:11:00:04 txqueuelen 0 (Ethernet)
- RX packets 20 bytes 2366 (2.3 KiB)
- RX errors 0 dropped 0 overruns 0 frame 0
- TX packets 0 bytes 0 (0.0 B)
- TX errors 0 dropped 0 overruns 0 carrier 0 collisions 0
- lo: flags=73
- inet 127.0.0.1 netmask 255.0.0.0
- loop txqueuelen 1000 (Local Loopback)
- RX packets 0 bytes 0 (0.0 B)
- RX errors 0 dropped 0 overruns 0 frame 0
- TX packets 0 bytes 0 (0.0 B)
- TX errors 0 dropped 0 overruns 0 carrier 0 collisions 0
发现:
mycentos 的IP地址为:172.17.0.2
mycentos2 的IP地址为:172.17.0.3
mycentos3 的IP地址为:172.17.0.4
进入mycentos容器,ping一下mycentos2,看看两个容器是否可以通信

ping得通,说明几个容器之间可以相互通信
然后,退出容器,在主机上ping一下容器,看看是否ping通
 ping得通,说明同一台主机上面的容器和主机之间是可以互相通信的
结论:默认情况同一台主机上面的容器是可以互相通信的,默认情况同一台主机上面的容器和主机之间是可以互相通信的2.通信原理
每启动一个 Docker 容器, Docker 就会给 Docker 容器分配一个 ip ,只要安装了 Docker ,就会有一个网卡 Docker0 , Docker0 使用的是桥接模式,使用的技术是 veth-pair 技术
- #启动mycentos这个容器
- [root@localhost zph]# docker run -it -d --name mycentos d757f6342cfa /bin/bash
- 7845d3930d4a6ee995f11c33e9dae2b688032b2d5c6a655148104ab4f33cd2c5
- [root@localhost zph]#
- [root@localhost zph]# docker ps
- CONTAINER ID IMAGE COMMAND CREATED STATUS PORTS NAMES
- 7845d3930d4a d757f6342cfa "/bin/bash" 11 seconds ago Up 3 seconds mycentos
说明了每次启动一个容器时,都会增加一个网卡信息


3.使用默认网络的问题
(1).没法使用计算机主机名实现通信

(2).没法实现网络隔离
当有几个容器:nignx, mysql等时,启动容器后,都加入了docker0网络,没法实现网络隔离
那么,该怎么处理呢,就需要进行自定义网络设置了,可以通过docker network来实现
二.Docker Network 详解
1.关于 docker network 命令
(1).docker network ls 查看当前计算机上的网络

(2).docker network inspect 查看网络详情
- [root@localhost zph]# docker network ls
- NETWORK ID NAME DRIVER SCOPE
- 2d19a8dfb493 bridge bridge local
- fe75119d5a77 dockerlnmp_default bridge local
- 9a2fe27fdd30 dockerlnmp_server bridge local
- fc03b9653496 host host local
- b8b81a5aa87c none null local
- [root@localhost zph]# docker network inspect 2d19a8dfb493
- [
- {
- "Name": "bridge",
- "Id": "2d19a8dfb4930b4581ec74f9b6c07878a5cb85378c6841c0ea3e0eabdc3d8bc3",
- "Created": "2023-11-18T18:36:58.528816645-08:00",
- "Scope": "local",
- "Driver": "bridge",
- "EnableIPv6": false,
- "IPAM": {
- "Driver": "default",
- "Options": null,
- "Config": [
- {
- "Subnet": "172.17.0.0/16",
- "Gateway": "172.17.0.1"
- }
- ]
- },
- "Internal": false,
- "Attachable": false,
- "Ingress": false,
- "ConfigFrom": {
- "Network": ""
- },
- "ConfigOnly": false,
- "Containers": {
- "005f0e3b21e468d2526f4b444b82b9459599d64db465cf029cc7b1794351cd64": {
- "Name": "mycentos2",
- "EndpointID": "e1935af85b74f19cd8d6b078c1535b09d6e509ff28da355b5473ca116643c8b2",
- "MacAddress": "02:42:ac:11:00:03",
- "IPv4Address": "172.17.0.3/16",
- "IPv6Address": ""
- },
- "7845d3930d4a6ee995f11c33e9dae2b688032b2d5c6a655148104ab4f33cd2c5": {
- "Name": "mycentos",
- "EndpointID": "7be4ae43f9e0881e63e58878d56507ad9235eb542212acf2874e35aa698e4d63",
- "MacAddress": "02:42:ac:11:00:02",
- "IPv4Address": "172.17.0.2/16",
- "IPv6Address": ""
- },
- "8f7731eea4d11d1829a1d963ba539bcab876a085bad442014a9727c519a455f2": {
- "Name": "mycentos3",
- "EndpointID": "25fc5c8d55d4ec52b786f78ddbbfc66551c372e6043466f04c98b14c1f695e6e",
- "MacAddress": "02:42:ac:11:00:04",
- "IPv4Address": "172.17.0.4/16",
- "IPv6Address": ""
- }
- },
- "Options": {
- "com.docker.network.bridge.default_bridge": "true",
- "com.docker.network.bridge.enable_icc": "true",
- "com.docker.network.bridge.enable_ip_masquerade": "true",
- "com.docker.network.bridge.host_binding_ipv4": "0.0.0.0",
- "com.docker.network.bridge.name": "docker0",
- "com.docker.network.driver.mtu": "1500"
- },
- "Labels": {}
- }
- ]
(3).docker network rm 删除网络
- #查看网络
- [root@localhost zph]# docker network ls
- NETWORK ID NAME DRIVER SCOPE
- 2d19a8dfb493 bridge bridge local
- fe75119d5a77 dockerlnmp_default bridge local
- 9a2fe27fdd30 dockerlnmp_server bridge local
- fc03b9653496 host host local
- f336219e4dbb mysql bridge local
- #删除网络
- [root@localhost zph]# docker network rm mysql
- mysql
- #查看是否已删除
- [root@localhost zph]# docker network ls
- NETWORK ID NAME DRIVER SCOPE
- 2d19a8dfb493 bridge bridge local
- fe75119d5a77 dockerlnmp_default bridge local
- 9a2fe27fdd30 dockerlnmp_server bridge local
- fc03b9653496 host host local
(4).docker network create 创建网络以及启动容器指定网络
通过docker network create 创建网络以及启动容器指定网络(可以创建网络的类型),这样当启动容器后就可以把容器加入到自己的网络了,这样就可以解决上面使用默认网络的问题:
- 没法实现网络隔离
- 没法使用计算机主机名实现通信
网络的类型分类如下
Docker 网络模式配置说明host 模式--net=host容器和宿主机共享 Network namespace,使用同一个ipcontainer 模式--net=container:NAME or ID容器和另外一个容器共享 Network namespace,kubernetes 中的 pod 就是多个容器共享一个Network namespacenone 模式--net=none容器有独立的 Network namespace ,但并没有对其进行任何网 络设置 ,如分配 evth pair 和网桥连接,配置 IP 等bridge 模式--net=bridge默认为该模式host 模式
如果启动容器的时候使用 host 模式,那么这个容器 将不会获得一个独立的 NetworkNamespace ,而是 和宿主机共用一个 Network Namespace 。容器将不会虚拟出自己的网卡, 配置自己的 IP 等,而是 使用宿主机的 IP 和端口, 但是,容器的其他方面,如文件系统、进 程列表等还是和宿主机隔离的。 使用 host 模式的容器可以直接使用宿主机的 IP 地址与外界通信,容器内部的服务端口也可 以使用宿主机的端口,不需要进行 NAT , host 最大的优势就是网络性能比较好,但是 docker host 上已经使用的端口就不能再用了, 网络的隔离性不好
container 模式
这个模式指定新创建的容器和 已经存在的一个容器 共享一个 Network Namespace ,而不是和宿主机共享。新创建的容器不会创建自己的网卡,配置自己的 IP ,而是和一个指定的容器共享 IP 、端口范围等。同样,两个容器除了网络方面,其他的如文件系统、进程列表等还是隔离的,两个容器的进程可以通过 lo 网卡设备通信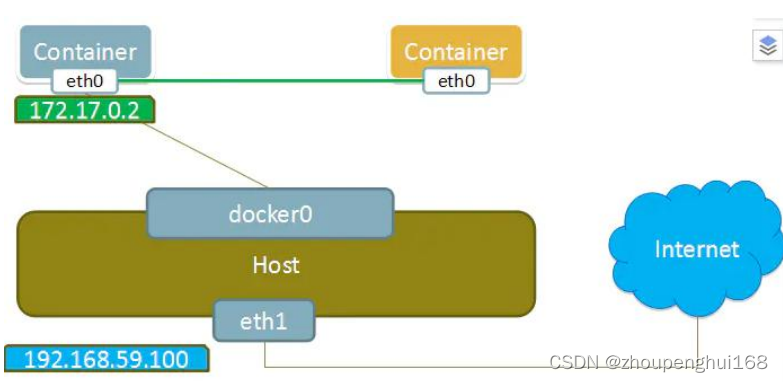 none 模式使用 none 模式, Docker 容器拥有自己的 Network Namespace ,但是,并不为 Docker 容器进行任何网络配置。也就是说,这个 Docker 容器没有网卡、 IP 、路由等信息。需要自己为 Docker 容器添加网卡、配置 IP 等。 这种网络模式下容器只有 lo 回环网络,没有其他网卡。 none 模式可以在容器创建时通过 --network=none 来指定。 这种类型的网络没有办法联网 ,封闭的网络能很好的保证容器的安全性
bridge 模式
当 Docker 进程启动时,会在主机上创建一个名为 docker0 的 虚拟网桥 ,此主机上启动 Docker容器会连接到这个虚拟网桥上,虚拟网桥的工作方式和物理交换机类似,这样主机上的所有容器就通过交换机连在了一个二层网络中,从docker0 子网中 分配一个 IP 给容器使用,并设置 docker0 的 IP 地址为容器的默认网关。在主机上创建一对 虚拟网卡 veth pair 设备,Docker 将 veth pair 设备的一端放在新创建的容器中,并命名为 eth0(容器的网卡),另一端放在主机中,以 vethxxx 这样类似的名字命名,并将这个网络设备加入到 docker0 网中。可以通过 brctl show 命令查看,bridge 模式是 docker 的默认网络模式,不写--net 参数,就是 bridge 模式。使用 docker run -p时, docker 实际是在 iptables 做了 DNAT 规则,实现端口转发功能,可以使用 iptables -t nat -vnL 查看
docker network create基本语法
--driver 配置网络连接方式,一般是bridge
--gateway: 配置网关
--subnet: 配置子网,局域网的网段
建议配置子网范围的时候范围不要太大

创建一个docker1网络
--driver bridge配置网络类型 bridge 桥接--subnet 192.168.1.0/24配置子网 建议每个网络的范围尽量小--gateway 192.168.1.1配置网关docker network create --driver bridge --subnet 192.168.1.0/24 --gateway 192.168.1.1 docker1- #创建一个docker网络
- [root@localhost zph]# docker network create --driver bridge --subnet 192.168.1.0/24 --gateway 192.168.1.1 docker1
- c0fbaf2266c86f504d02a9324c45fb49c1909f908631d6a2cd5b1bb04dc981a8
- #创建成功
- [root@localhost zph]# docker network ls
- NETWORK ID NAME DRIVER SCOPE
- 2d19a8dfb493 bridge bridge local
- c0fbaf2266c8 docker1 bridge local
- fe75119d5a77 dockerlnmp_default bridge local
- 9a2fe27fdd30 dockerlnmp_server bridge local
- fc03b9653496 host host local
创建一个docker2网络
--driver bridge配置网络类型 bridge 桥接--subnet 192.168.2.0/24配置子网 建议每个网络的范围尽量小--gateway 192.168.2.1配置网关docker network create --driver bridge --subnet 192.168.2.0/24 --gateway 192.168.2.1 docker2- #创建一个docker2网络
- [root@localhost zph]# docker network create --driver bridge --subnet 192.168.2.0/24 --gateway 192.168.2.1 docker2
- 2d9c2d29e6d308733bf266978914a6b43cbab575a2d99d0928908bc09a6d4f40
- #创建成功
- [root@localhost zph]# docker network ls
- NETWORK ID NAME DRIVER SCOPE
- 2d19a8dfb493 bridge bridge local
- c0fbaf2266c8 docker1 bridge local
- 2d9c2d29e6d3 docker2 bridge local
- fe75119d5a77 dockerlnmp_default bridge local
- 9a2fe27fdd30 dockerlnmp_server bridge local
- fc03b9653496 host host local
可以通过docker inspect docker1/docker2 查看相关配置:
- [root@localhost zph]# docker inspect docker1
- [
- {
- "Name": "docker1",
- "Id": "c0fbaf2266c86f504d02a9324c45fb49c1909f908631d6a2cd5b1bb04dc981a8",
- "Created": "2023-11-20T18:19:18.375826061-08:00",
- "Scope": "local",
- "Driver": "bridge",
- "EnableIPv6": false,
- "IPAM": {
- "Driver": "default",
- "Options": {},
- "Config": [
- {
- "Subnet": "192.168.1.0/24",
- "Gateway": "192.168.1.1"
- }
- ]
- },
- "Internal": false,
- "Attachable": false,
- "Ingress": false,
- "ConfigFrom": {
- "Network": ""
- },
- "ConfigOnly": false,
- "Containers": {},
- "Options": {},
- "Labels": {}
- }
- ]
- [root@localhost zph]# docker inspect docker2
- [
- {
- "Name": "docker2",
- "Id": "2d9c2d29e6d308733bf266978914a6b43cbab575a2d99d0928908bc09a6d4f40",
- "Created": "2023-11-20T18:21:29.173750083-08:00",
- "Scope": "local",
- "Driver": "bridge",
- "EnableIPv6": false,
- "IPAM": {
- "Driver": "default",
- "Options": {},
- "Config": [
- {
- "Subnet": "192.168.2.0/24",
- "Gateway": "192.168.2.1"
- }
- ]
- },
- "Internal": false,
- "Attachable": false,
- "Ingress": false,
- "ConfigFrom": {
- "Network": ""
- },
- "ConfigOnly": false,
- "Containers": {},
- "Options": {},
- "Labels": {}
- }
- ]
(5).启动容器指定网络
启动容器的时候可以加上 --net 参数可以指定启动容器的时候使用的网络,如果不加表示默认使用 docker0 网络--net bridge 表示使用 docker0 网络- #查看目前启动的容器
- [root@localhost zph]# docker ps
- CONTAINER ID IMAGE COMMAND CREATED STATUS PORTS NAMES
- 8f7731eea4d1 d757f6342cfa "/bin/bash" 42 hours ago Up 42 hours mycentos3
- 005f0e3b21e4 d757f6342cfa "/bin/bash" 42 hours ago Up 42 hours mycentos2
- 7845d3930d4a d757f6342cfa "/bin/bash" 42 hours ago Up 42 hours mycentos
- #查看对应的镜像
- [root@localhost zph]# docker images | grep d757f6342cfa
- mycentos v1 d757f6342cfa 2 days ago 434MB
- #启动一个容器mycentos4 ,并指定docker1为其网络
- [root@localhost zph]# docker run -it -d --name mycentos4 --net docker1 d757f6342cfa /bin/bash
- 0ef1ea47894936e011c3efbafd5dbc49df14e5285f836a08345a48eb800349e6
- #启动一个容器mycentos5,并指定docker1为其网络
- [root@localhost zph]# docker run -it -d --name mycentos5 --net docker1 d757f6342cfa /bin/bash
- a1a6d02bb8ba6ce5bfdc96b32e7d16d8e76ce9960656dab3a2281bf46fa86793
- #启动一个容器mycentos6,并指定docker2为其网络
- [root@localhost zph]# docker run -it -d --name mycentos6 --net docker2 d757f6342cfa /bin/bash
- a6ed25db1e1e221eb510ad80646674d775313977360dda6070f24b320230e6fd
- #启动一个容器mycentos7,并指定docker2为其网络
- ^[[A[root@localhost zpdocker run -it -d --name mycentos7 --net docker2 d757f6342cfa /bin/bash
- 63aaf78d8a855dd6700b1e7c91b206103155871b845f6de863eff6907896d5cc
- #查看启动的容器列表
- [root@localhost zph]# docker ps
- CONTAINER ID IMAGE COMMAND CREATED STATUS PORTS NAMES
- 63aaf78d8a85 d757f6342cfa "/bin/bash" 7 seconds ago Up 4 seconds mycentos7
- a6ed25db1e1e d757f6342cfa "/bin/bash" 18 seconds ago Up 16 seconds mycentos6
- a1a6d02bb8ba d757f6342cfa "/bin/bash" 27 seconds ago Up 24 seconds mycentos5
- 0ef1ea478949 d757f6342cfa "/bin/bash" About a minute ago Up About a minute mycentos4
- 8f7731eea4d1 d757f6342cfa "/bin/bash" 42 hours ago Up 42 hours mycentos3
- 005f0e3b21e4 d757f6342cfa "/bin/bash" 42 hours ago Up 42 hours mycentos2
- 7845d3930d4a d757f6342cfa "/bin/bash" 42 hours ago Up 42 hours mycentos
- #查看容器mycentos4配置信息:发现网络在docker1中,子网范围在192.168.1.0/24范围中
- [root@localhost zph]# docker inspect mycentos4
- [
- ...
- "Networks": {
- "docker1": {
- "IPAMConfig": null,
- "Links": null,
- "Aliases": [
- "0ef1ea478949"
- ],
- "NetworkID": "c0fbaf2266c86f504d02a9324c45fb49c1909f908631d6a2cd5b1bb04dc981a8",
- "EndpointID": "da176af0d1630cd9ab8c0bb78e6a3974933686f66f9c334c83b0b622f0b1d3fb",
- "Gateway": "192.168.1.1",
- "IPAddress": "192.168.1.2",
- "IPPrefixLen": 24,
- "IPv6Gateway": "",
- "GlobalIPv6Address": "",
- "GlobalIPv6PrefixLen": 0,
- "MacAddress": "02:42:c0:a8:01:02",
- "DriverOpts": null
- }
- }
- }
- }
- ]
- #查看容器mycentos5配置信息:发现网络在docker1中,子网范围在192.168.1.0/24范围中
- [root@localhost zph]# docker inspect mycentos5
- [
- ...
- "HostConfig": {
- "Binds": null,
- "ContainerIDFile": "",
- "LogConfig": {
- "Type": "json-file",
- "Config": {}
- },
- "NetworkMode": "docker1",
- "PortBindings": {},
- .
- "NetworkSettings": {
- "Networks": {
- "docker1": {
- "IPAMConfig": null,
- "Links": null,
- "Aliases": [
- "a1a6d02bb8ba"
- ],
- "NetworkID": "c0fbaf2266c86f504d02a9324c45fb49c1909f908631d6a2cd5b1bb04dc981a8",
- "EndpointID": "6611729f48e83c6c5b6829dd4cdb6437aca1aa0796679b9c6815769fac48a5cc",
- "Gateway": "192.168.1.1",
- "IPAddress": "192.168.1.3",
- "IPPrefixLen": 24,
- "
- }
- }
- }
- }
- ]
- #查看容器mycentos6配置信息:发现网络在docker2中,子网范围在192.168.2.0/24范围中
- [root@localhost zph]# docker inspect mycentos6
- [
- ...
- "NetworkMode": "docker2",
- "PortBindings": {},
- "RestartPolicy": {
- "Name": "no",
- "MaximumRetryCount": 0
- },
- "Networks": {
- "docker2": {
- "IPAMConfig": null,
- "Links": null,
- "Aliases": [
- "a6ed25db1e1e"
- ],
- "NetworkID": "2d9c2d29e6d308733bf266978914a6b43cbab575a2d99d0928908bc09a6d4f40",
- "EndpointID": "7973882a048f4d78a8d3f72e93b8f8a7ee914841689f8d342116a8be9a1ffb5d",
- "Gateway": "192.168.2.1",
- "IPAddress": "192.168.2.2",
- "IPPrefixLen": 24,
- ...
- }
- }
- }
- }
- ]
- #查看容器mycentos7配置信息:发现网络在docker2中,子网范围在192.168.2.0/24范围中
- [root@localhost zph]# docker inspect mycentos7
- [
- ...
- "Config": {
- "NetworkSettings": {
- ...
- "Networks": {
- "docker2": {
- "IPAMConfig": null,
- "Links": null,
- "Aliases": [
- "63aaf78d8a85"
- ],
- "NetworkID": "2d9c2d29e6d308733bf266978914a6b43cbab575a2d99d0928908bc09a6d4f40",
- "EndpointID": "d980fd516be8c6260647579dcad6e5dc9376e4090b7560ab206b04a3ce3ba5a0",
- "Gateway": "192.168.2.1",
- "IPAddress": "192.168.2.3",
- "IPPrefixLen": 24,
- ...
- }
- }
- }
- }
- ]
- #查看docker1网络:发现mycentos4,mycentos5容器在网络中
- [root@localhost zph]# docker inspect docker1
- [
- {
- "Name": "docker1",
- "Id": "c0fbaf2266c86f504d02a9324c45fb49c1909f908631d6a2cd5b1bb04dc981a8",
- "Created": "2023-11-20T18:19:18.375826061-08:00",
- "Scope": "local",
- "Driver": "bridge",
- "EnableIPv6": false,
- "IPAM": {
- "Driver": "default",
- "Options": {},
- "Config": [
- {
- "Subnet": "192.168.1.0/24",
- "Gateway": "192.168.1.1"
- }
- ]
- },
- ...
- "ConfigOnly": false,
- "Containers": {
- "0ef1ea47894936e011c3efbafd5dbc49df14e5285f836a08345a48eb800349e6": {
- "Name": "mycentos4",
- "EndpointID": "da176af0d1630cd9ab8c0bb78e6a3974933686f66f9c334c83b0b622f0b1d3fb",
- "MacAddress": "02:42:c0:a8:01:02",
- "IPv4Address": "192.168.1.2/24",
- "IPv6Address": ""
- },
- "a1a6d02bb8ba6ce5bfdc96b32e7d16d8e76ce9960656dab3a2281bf46fa86793": {
- "Name": "mycentos5",
- "EndpointID": "6611729f48e83c6c5b6829dd4cdb6437aca1aa0796679b9c6815769fac48a5cc",
- "MacAddress": "02:42:c0:a8:01:03",
- "IPv4Address": "192.168.1.3/24",
- "IPv6Address": ""
- }
- },
- "Options": {},
- "Labels": {}
- }
- ]
- #查看docker2网络:发现mycentos6,mycentos7容器在网络中
- [root@localhost zph]# docker inspect docker2
- [
- {
- "Name": "docker2",
- "Id": "2d9c2d29e6d308733bf266978914a6b43cbab575a2d99d0928908bc09a6d4f40",
- "Created": "2023-11-20T18:21:29.173750083-08:00",
- "Scope": "local",
- "Driver": "bridge",
- "EnableIPv6": false,
- "IPAM": {
- "Driver": "default",
- "Options": {},
- "Config": [
- {
- "Subnet": "192.168.2.0/24",
- "Gateway": "192.168.2.1"
- }
- ]
- },
- ...
- "Containers": {
- "63aaf78d8a855dd6700b1e7c91b206103155871b845f6de863eff6907896d5cc": {
- "Name": "mycentos7",
- "EndpointID": "d980fd516be8c6260647579dcad6e5dc9376e4090b7560ab206b04a3ce3ba5a0",
- "MacAddress": "02:42:c0:a8:02:03",
- "IPv4Address": "192.168.2.3/24",
- "IPv6Address": ""
- },
- "a6ed25db1e1e221eb510ad80646674d775313977360dda6070f24b320230e6fd": {
- "Name": "mycentos6",
- "EndpointID": "7973882a048f4d78a8d3f72e93b8f8a7ee914841689f8d342116a8be9a1ffb5d",
- "MacAddress": "02:42:c0:a8:02:02",
- "IPv4Address": "192.168.2.2/24",
- "IPv6Address": ""
- }
- },
- "Options": {},
- "Labels": {}
- }
- ]
使用主机名称可以 ping 通
 这样就把 centos4 和 centos5 ,centos6 和 centos7 分别加入了自定义的dockert1,docker2 网络,这样的话 centos4和 centos5是互通的,centos6和 centos7 是互通的,但是docker1,docker2 网络 docker0 网络默认是不互通的
(6).docker network connect 实现不同网络之间的连通
如上图,如果想my centos2 可以 访问docker1 里面的 centos4 和 centos5 ,这个时候就需要使用 docker network connect来实现- #查看mycentos2 ip地址: 发现是 172.17.0.3
- [root@localhost zph]# docker exec -it mycentos2 ifconfig
- eth0: flags=4163
- inet 172.17.0.3 netmask 255.255.0.0 broadcast 172.17.255.255
- ether 02:42:ac:11:00:03 txqueuelen 0 (Ethernet)
- RX packets 68 bytes 5754 (5.6 KiB)
- RX errors 0 dropped 0 overruns 0 frame 0
- TX packets 6 bytes 476 (476.0 B)
- TX errors 0 dropped 0 overruns 0 carrier 0 collisions 0
- lo: flags=73
- inet 127.0.0.1 netmask 255.0.0.0
- loop txqueuelen 1000 (Local Loopback)
- RX packets 0 bytes 0 (0.0 B)
- RX errors 0 dropped 0 overruns 0 frame 0
- TX packets 0 bytes 0 (0.0 B)
- TX errors 0 dropped 0 overruns 0 carrier 0 collisions 0
- #查看mycentos4 ip地址: 发现是 192.168.1.2
- [root@localhost zph]# docker exec -it mycentos4 ifconfig
- eth0: flags=4163
- inet 192.168.1.2 netmask 255.255.255.0 broadcast 192.168.1.255
- ether 02:42:c0:a8:01:02 txqueuelen 0 (Ethernet)
- RX packets 45 bytes 5699 (5.5 KiB)
- RX errors 0 dropped 0 overruns 0 frame 0
- TX packets 0 bytes 0 (0.0 B)
- TX errors 0 dropped 0 overruns 0 carrier 0 collisions 0
- lo: flags=73
- inet 127.0.0.1 netmask 255.0.0.0
- loop txqueuelen 1000 (Local Loopback)
- RX packets 0 bytes 0 (0.0 B)
- RX errors 0 dropped 0 overruns 0 frame 0
- TX packets 0 bytes 0 (0.0 B)
- TX errors 0 dropped 0 overruns 0 carrier 0 collisions 0
说明mycentos2和mycentos4直接是不能通信的,因为他们不在同一个网段,如果想他们通信,就需要把mycentos2加入到mycentos4的网段中才得行,这样就需要使用docker network connect语句来实现了,语法:
- #网络名:可以通过docker network ls查看
- docker network connect 网络名 容器名/容器ID
- #把mycentos2容器加入docker1网络
- [root@localhost zph]# docker network connect docker1 mycentos2
- #查看dokcer1网络,发现容器中已经加入了mycentos2了
- [root@localhost zph]# docker network inspect docker1
- [
- {
- "Name": "docker1",
- "Id": "c0fbaf2266c86f504d02a9324c45fb49c1909f908631d6a2cd5b1bb04dc981a8",
- "Created": "2023-11-20T18:19:18.375826061-08:00",
- "Scope": "local",
- "Driver": "bridge",
- "EnableIPv6": false,
- "IPAM": {
- "Driver": "default",
- "Options": {},
- "Config": [
- {
- "Subnet": "192.168.1.0/24",
- "Gateway": "192.168.1.1"
- }
- ]
- },
- "Internal": false,
- "Attachable": false,
- "Ingress": false,
- "ConfigFrom": {
- "Network": ""
- },
- "ConfigOnly": false,
- "Containers": {
- "005f0e3b21e468d2526f4b444b82b9459599d64db465cf029cc7b1794351cd64": {
- "Name": "mycentos2",
- "EndpointID": "144b2d2989d1aded19d04229865aa9beacc72e95cae36acc30fd719e578c0b1d",
- "MacAddress": "02:42:c0:a8:01:04",
- "IPv4Address": "192.168.1.4/24",
- "IPv6Address": ""
- },
- "0ef1ea47894936e011c3efbafd5dbc49df14e5285f836a08345a48eb800349e6": {
- "Name": "mycentos4",
- "EndpointID": "da176af0d1630cd9ab8c0bb78e6a3974933686f66f9c334c83b0b622f0b1d3fb",
- "MacAddress": "02:42:c0:a8:01:02",
- "IPv4Address": "192.168.1.2/24",
- "IPv6Address": ""
- },
- "a1a6d02bb8ba6ce5bfdc96b32e7d16d8e76ce9960656dab3a2281bf46fa86793": {
- "Name": "mycentos5",
- "EndpointID": "6611729f48e83c6c5b6829dd4cdb6437aca1aa0796679b9c6815769fac48a5cc",
- "MacAddress": "02:42:c0:a8:01:03",
- "IPv4Address": "192.168.1.3/24",
- "IPv6Address": ""
- }
- },
- "Options": {},
- "Labels": {}
- }
- ]
- #mycentos4 ping mycentos2,可以ping通
- [root@localhost zph]# docker exec -it mycentos4 ping mycentos2
- PING mycentos2 (192.168.1.4) 56(84) bytes of data.
- 64 bytes from mycentos2.docker1 (192.168.1.4): icmp_seq=1 ttl=64 time=0.176 ms
- 64 bytes from mycentos2.docker1 (192.168.1.4): icmp_seq=2 ttl=64 time=0.058 ms
这样就实现了不同网络不同容器之间的通信了
-
相关阅读:
过滤器 监听器
如何从命令行运行3dMax脚本(MAXScript或Python)?
信息检索(49):Learning Passage Impacts for Inverted Indexes
Idea上传项目到gitlab并创建使用分支
测试用例设计方法-场景法详解
【设计模式】26.结构型模式-代理模式(Proxy)
QGIS地理信息系统教程:GIS分析基础
药物临床试验数据递交FDA的规定
springboot整合mybatis实现增删改查
lego_loam 代码阅读与总结
- 原文地址:https://blog.csdn.net/zhoupenghui168/article/details/134484824