-
(二)pytest自动化测试框架之添加测试用例步骤(@allure.step())
前言
在编写自动化测试用例的时候经常会遇到需要编写流程性测试用例的场景,一般流程性的测试用例的测试步骤比较多,我们在测试用例中添加详细的步骤会提高测试用例的可阅读性。
allure提供的装饰器@allure.step()是allure测试报告框架非常有用的功能,它能帮助我们在测试用例中对测试步骤进行详细的描述。
@allure.step的使用例子:
实现一个购物的场景:1.登录;2.浏览商品;3.将商品加入到购物车中;4.下单;5.支付订单;
- # file_name: test_allure_step.py
- import pytest
- import allure
- @allure.step
- def login():
- """
- 执行登录逻辑
- :return:
- """
- print("执行登录逻辑")
- @allure.step
- def scan_good():
- """
- 执行浏览商品逻辑
- :return:
- """
- print("执行浏览商品逻辑")
- @allure.step
- def add_good_to_shopping_car():
- """
- 将商品添加到购物车
- :return:
- """
- print("将商品添加到购物车")
- @allure.step
- def generator_order():
- """
- 生成订单
- :return:
- """
- print("生成订单")
- @allure.step
- def pay():
- """
- 支付订单
- :return:
- """
- print("支付订单")
- def test_buy_good():
- """
- 测试购买商品:
- 步骤1:登录
- 步骤2:浏览商品
- 步骤3:将商品加入到购物车中
- 步骤4:下单
- 步骤5:支付
- :return:
- """
- login()
- scan_good()
- add_good_to_shopping_car()
- generator_order()
- pay()
- with allure.step("断言"):
- assert 1
- if __name__ == '__main__':
- pytest.main(['-s', 'test_allure_step.py'])
执行命令:
- > pytest test_allure_step.py --alluredir=./report/result_data
- > allure serve ./report/result_data
查看测试报告展示效果:

从报告中可以看到,我们事先通过@allure.step()定义好的步骤都展示在测试用例test_buy_good()下了。
@allure.step支持嵌套,step中调用step
- # file_name: steps.py
- import allure
- @allure.step
- def passing_step_02():
- print("执行步骤02")
- pass
测试用例:
- # file_name: test_allure_step_nested.py
- import pytest
- import allure
- from .steps import passing_step_02 # 从外部模块中导入
- @allure.step
- def passing_step_01():
- print("执行步骤01")
- pass
- @allure.step
- def step_with_nested_steps():
- """
- 这个步骤中调用nested_step()
- :return:
- """
- nested_step()
- @allure.step
- def nested_step_with_arguments(arg1, arg2):
- pass
- @allure.step
- def nested_step():
- """
- 这个步骤中调用nested_step_with_arguments(),并且传递参数
- :return:
- """
- nested_step_with_arguments(1, 'abc')
- def test_with_imported_step():
- """
- 测试@allure.step()支持调用从外部模块导入的step
- :return:
- """
- passing_step_01()
- passing_step_02()
- def test_with_nested_steps():
- """
- 测试@allure.step()支持嵌套调用step
- :return:
- """
- passing_step_01()
- step_with_nested_steps()
- passing_step_02()
- if __name__ == '__main__':
- pytest.main(['-s', 'test_allure_step_nested.py'])
执行命令:
- pytest test_allure_step_nested.py --alluredir=./report/result_data
- allure serve ./report/result_data
查看测试报告展示效果:
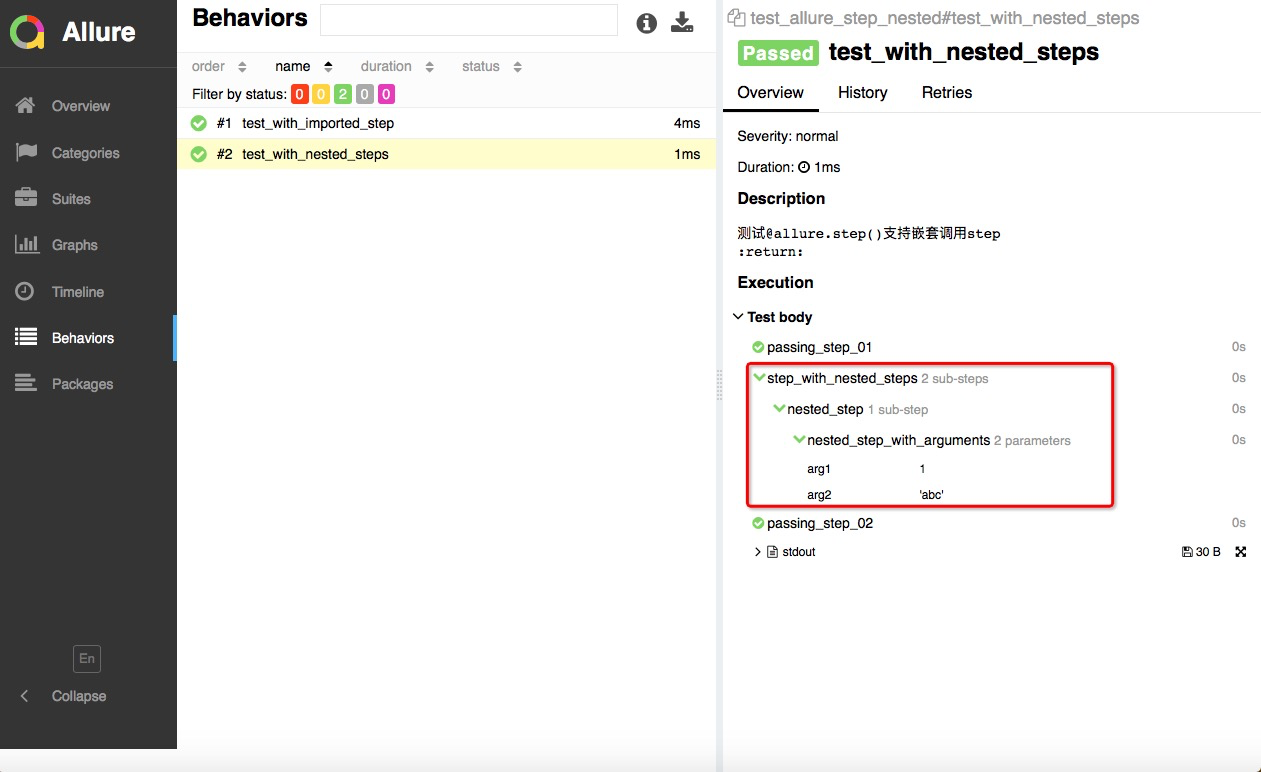
从上面的结果中可以看到:
- @step可以先保存到其他模块中,在测试用例中需要用到的时候导入就可以了;
- @step也支持在一个step中嵌套调用其他的step;嵌套的形式在测试报告中以树形展示出来了;
@allure.step支持添加描述且通过占位符传递参数
- # file_name: test_allure_step_with_placeholder.py
- import pytest
- import allure
- @allure.step('这是一个带描述语的step,并且通过占位符传递参数:positional = "{0}",keyword = "{key}"')
- def step_title_with_placeholder(arg1, key=None):
- pass
- def test_step_with_placeholder():
- step_title_with_placeholder(1, key="something")
- step_title_with_placeholder(2)
- step_title_with_placeholder(3, key="anything")
- if __name__ == '__main__':
- pytest.main(['-s', 'test_allure_step_with_placeholder.py'])
执行命令:
- pytest test_allure_step_with_placeholder.py --alluredir=./report/result_data
- allure serve ./report/result_data
查看测试报告展示效果:

从上面的执行结果中可以看到,@allure.step()是支持输入描述的,并且支持通过占位符向描述中传递参数。
在conftest.py文件中定义@allure.step
conftest.py文件:
- # file_name: conftest.py
- import pytest
- import allure
- @pytest.fixture()
- def fixture_with_conftest_step():
- conftest_step()
- @allure.step("这是一个在conftest.py文件中的step")
- def conftest_step():
- pass
测试用例:
- # file_name: test_allure_step_in_fixture_from_conftest.py
- import pytest
- import allure
- @allure.step
- def passed_step():
- pass
- def test_with_step_in_fixture_from_conftest(fixture_with_conftest_step):
- passed_step()
- if __name__ == '__main__':
- pytest.main(['-s', 'test_allure_step_in_fixture_from_conftest.py'])
执行命令:
- pytest test_allure_step_in_fixture_from_conftest.py --alluredir=./report/result_data
- allure serve ./report/result_data
查看测试报告展示效果:

从运行结果中可以看到,在fixture中定义的step会在setup和teardown单独以树形结构展示出来。
这可能是B站最详细的pytest自动化测试框架教程,整整100小时,全程实战!!!
-
相关阅读:
作为程序员,职业规划需要注意的四个阶段
vue全局字典值获取方法一例
Day49——盒子类型,浮动属性,定位属性,JavaScript基础语法
C语言文件操作
python播放声音库playsound以及获取路径以及修改库源码
Android13 实现有线网络和wifi共存
Spring Boot配置文件
抖音怎么录屏?这个方法,亲测好用
MC33665 + MC33774 控制流程及 TPL3 帧结构介绍
软设上午题错题知识点7
- 原文地址:https://blog.csdn.net/m0_68405758/article/details/134539140
