-
双点重发布&路由策略实验
任务&IP分配如下:


双点重发布实验
第一步:配置IP地址&环回地址
以R1为例,R2、R3、R4同理
- interface GigabitEthernet 0/0/0
- ip address 12.0.0.1 24
- interface GigabitEthernet 0/0/1
- ip address 13.0.0.1 24
- interface LookBack 0
- ip address 1.1.1.1 24
- display ip interface brief //查看IP表

第二步:开启RIP&OSPF
R1:
- rip 1
- version 2 //开启RIP
- network 1.0.0.0
- network 12.0.0.0
- network 13.0.0.0 //宣告网段
R2:
- rip 1
- version 2 //开启RIP
- network 2.0.0.0
- network 12.0.0.0 //宣告网段
- quit
- ospf 1 router-id 2.2.2.2 //开启OSPF
- area 0
- network 24.0.0.1 0.0.0.0 //宣告网段
R3:
- rip 1
- version 2
- network 13.0.0.0
- quit
- ospf 1 router-id 3.3.3.3
- area 0
- network 3.3.3.3 0.0.0.0
- network 34.0.0.1 0.0.0.0
R4:
- ospf 1 router-id 4.4.4.4
- area 0
- network 4.4.4.4 0.0.0.0
- network 34.0.0.2 0.0.0.0
- network 24.0.0.2 0.0.0.0
第三步:配置双向重发布
以R2为例,R3同理
- ospf
- import-route rip
- rip
- import-route ospf

第四步:更改网络类型
R3:
- interface LookBack 0
- ospf network-type broadcast

第五步:抓取流量
R1:
- ip ip-prefix aaa permit 3.3.3.0 24
- interface GigabitEthernet 0/0/0
- rip metricin ip-prefix aaa 5
- ip ip-prefix bbb permit 34.0.0.0 24
- interface GigabitEthernet 0/0/0
- rip metricin ip-prefix bbb 5
- ip ip-prefix ccc permit 24.0.0.0 24
- interface GigabitEthernet 0/0/1
- rip metricin ip-prefix ccc 5
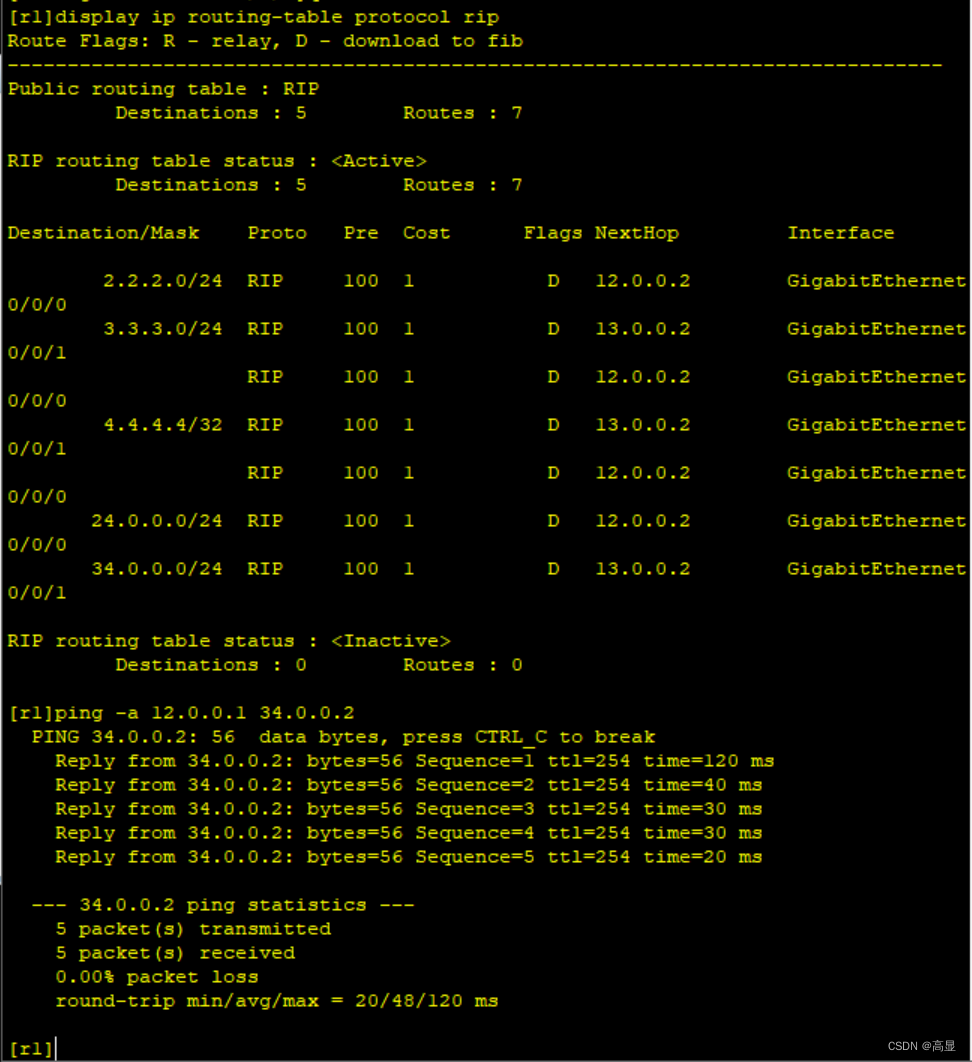
- display ip routing-table protocol rip


路由策略实验
第一步:配置IP&环回地址
以R1为例,R2~R4同理
- interface GigabitEthernet 0/0/0
- ip address 12.0.0.1 24
- interface LoopBack 0
- ip address 192.168.1.1 24
- interface LoopBack 1
- ip address 192.168.2.1 24
- interface LoopBack 2
- ip address 192.168.3.1 24
- interface LoopBack 3
- ip address 192.168.4.1 24
- display ip interface brief //查看IP表


第二步:开启RIP&OSPF
R1(R2同理):
- rip 1
- version 2 //开启RIP
- network 192.168.1.0
- network 192.168.2.0
- network 192.168.3.0
- network 192.168.4.0
- network 12.0.0.0 //宣告网段
R3(R2同理):
- ospf 1 //开启OSPF
- area 0 //创建区域0
- network 23.0.0.0 0.0.0.255 //宣告网段

第三步:配置重发布
R2:
- ospf 1
- import-route rip //开启重发布功能
在R3中查看OSPF表

第四步:抓取流量
R2:
- acl 2000 //开启ACL列表
- rule permit source 192.168.1.0 0.0.0.255 //设定规则,抓取192.168.1.0网段
- acl 2001
- rule permit source 192.168.1.0 0.0.0.255 //抓取192.168.2.0网段
- quit
- ip ip-prefix aa permit 192.168.3.0 24 //使用前缀列表抓取192.168.3.0网段
- ip ip-prefix bb permit 192.168.4.0 24 //抓取192.168.4.0网段
- display this //查看前缀列表
- display acl all //查看ACL规则


第五步:创建路由策略
R2:
- route-policy policy-1 deny node 10 //创建一条路由策略名为“policy-1”的列表
- if-match acl 2000 //匹配规则——acl 2000
- oapf 1 //进入OSPF
- import-route rip route-policy policy-1 //重发布“policy-1”
- quit
- route-policy policy-1 permit node 20 //回到路由策略,创建一条新列表
- if-match acl 2001 //匹配规则——acl 2001
- apply cost-type type-1 //更改参数
- route-policy policy-1 permit node 30 //回到路由策略,创建一条新列表
- if-match ip-prefix aa //匹配规则——前缀列表aa
- apply cost 10 //更改种子度量值
- route-policy policy-1 permit node 40 //回到路由策略,创建一条新列表
- if-match ip-prefix bb //匹配规则——前缀列表bb
- apply tag 666 //更改tag
- apply cost 10 //更改种子度量值
- apply cost-type type-1 //更改参数
- route-policy policy-1 permit node 50 //回到路由策略,创建一条新列表
- display route-policy policy-1 //查看所有规则


R3:
display ip routing-table protocol ospf //查看OSPF表
-
相关阅读:
Spark 面试题(十六)
分享职业技术培训类型
One bite of Stream(2)
【力扣】动态规划题目之“最”系列
python基础:廖雪峰的官方网站Python(部分)笔记
调试MT9V024
什么是回调函数?写出一个示例?
【漏洞复现】蓝凌EIS智慧协同平台 api.aspx接口处存在任意文件上传漏洞
完全背包代码模板
IX模式和其他模式
- 原文地址:https://blog.csdn.net/GaoXianGaoXian/article/details/134429931
