-
【Spring Boot】034-Spring Boot 整合 JUnit
【Spring Boot】034-Spring Boot 整合 JUnit
文章目录
一、单元测试
1、什么是单元
单元:最终能分解的尽可能小的、独立的、可执行的元素。
对于 Java 程序:单元 = 类的方法。
2、什么是单元测试
对程序中的一个个单元进行测试,看看是否能够正常使用、是否存在问题等。
3、为什么要单元测试
通过最小测试范围确定出一个功能单元是否正常可用,通过单元测试的编写和执行,可以在尽可能早期筛查、发现出一些问题。
二、JUnit
1、概述
简介
JUnit 是针对 Java 语言的一个经典单元测试框架,它在测试驱动方面具有重大意义。JUnit 促进了“先测试后编码”的理论,它强调测试数据与程序代码的配合关系,使得开发者在程序开发中形成“编码一点,测试一点”的过程,这种编码习惯可以提高程序的正确性和稳定性,进而提高开发者的产出效率,减少后期排查错误的时间和精力。
特点
- 开放的资源框架,用于编写和运行测试;
- 提供注释来识别测试方法;
- 提供断言来测试预期结果;
- 提供测试运行来运行测试;
- 允许编写代码更快,并能提高质量;
- 测试代码编写优雅简洁,花费时间较少;
- 测试代码可以自动运行并且检查自身结果并提供即时反馈,没有必要人工梳理测试结果的报告;
- 测试代码可以被组织为测试套件,包含测试用例,甚至其他的测试套件;
- …
2、JUnit4
概述
早期使用的 JUnit 版本为 4.x ,这个版本对 jdk 的最低限制是 jdk 1.5 ,整个 JUnit 4 的代码被整合到一个 jar 包中,使用时直接导入即可,主流的 IDE 都有对 JUnit 的原生支持。
基本用法
编写一个类 + 声明一个无参无返回值方法 + 加上@Test注解
使用 JUnit 4 的方式比较简单,只需要编写一个类,并声明一个无入参、无返回值的方法,并标注
@Test注解即可被 IDE 识别且运行。public class DemoTest { @Test public void test() { System.out.println("DemoTest test run ......"); } }- 1
- 2
- 3
- 4
- 5
- 6
- 7
3、JUnit5
概述
一个单独 jar 包 => 一组 jar 包组合而成 + 支持用户定制!
2017 年 9 月,JUnit 5.0.0 正式发布,它最低支持的 Java 版本是 Java 8 ,而且它的构建不再由一个独立的 jar 包构成,而是以一组 jar 包共同组合而成。抛弃历史包袱,通过支持扩展(Extension),JUnit 5 给用户提供了定制特殊的测试需求与方式。
组成
总的来说,JUnit 5 由 3 个模块构成,分别是 JUnit Platform 、JUnit Jupiter 、JUnit Vintage 。
- JUnit Platform :基于 JVM 上启动测试框架的基础,不仅支持 JUnit 的测试引擎,也可以兼容其他的测试引擎;
- JUnit Jupiter :JUnit 5 的核心,提供 JUnit 5 的新的编程模型,内部包含一个测试引擎,该测试引擎会基于 JUnit Platform 运行;
- JUnit Vintage :兼容 JUnit 4 、JUnit 3 支持的测试引擎。
使用 JUnit 5 的方式跟 JUnit 4 并无太大区别,同样是编写测试类,并声明方法,标注
@Test注解即可,不再编写示例代码解释。4、JUnit5 与 JUnit4 的常用注解对比
JUnit 5 相较于 JUnit 4 比较大的改动是注解的使用。下表展示了 JUnit 5 跟 JUnit 4 常用注解的对比。
注解意义 JUnit 5 JUnit 4 标注一个测试方法(无区别) @Test @Test 在每个测试方法前执行 @BeforeEach @Before 在每个测试方法后执行 @AfterEach @After 在当前类中的所有测试方法之前执行 @BeforeAll @BeforeClass 在当前类中的所有测试方法之后执行 @AfterAll @AfterClass 禁用测试方法/类 @Disabled @Ignore 标记和过滤 @Tag @Category 声明测试工厂进行动态测试(新增) @TestFactory / 嵌套测试(新增) @Nested / 注册自定义扩展(新增) @ExtendWith / 三、Spring Boot 整合 JUnit
1、Spring Boot 项目创建

2、引入依赖
项目创建完成后已经自动引入了!
spring-boot-starter-test<project xmlns="http://maven.apache.org/POM/4.0.0" xmlns:xsi="http://www.w3.org/2001/XMLSchema-instance" xsi:schemaLocation="http://maven.apache.org/POM/4.0.0 https://maven.apache.org/xsd/maven-4.0.0.xsd"> <modelVersion>4.0.0modelVersion> <parent> <groupId>org.springframework.bootgroupId> <artifactId>spring-boot-starter-parentartifactId> <version>2.7.17version> <relativePath/> parent> <groupId>com.zibogroupId> <artifactId>study-junitartifactId> <version>0.0.1-SNAPSHOTversion> <name>study-junitname> <description>study-junitdescription> <properties> <java.version>1.8java.version> properties> <dependencies> <dependency> <groupId>org.springframework.bootgroupId> <artifactId>spring-boot-starterartifactId> dependency> <dependency> <groupId>org.springframework.bootgroupId> <artifactId>spring-boot-starter-testartifactId> <scope>testscope> dependency> dependencies> <build> <plugins> <plugin> <groupId>org.springframework.bootgroupId> <artifactId>spring-boot-maven-pluginartifactId> <configuration> <image> <builder>paketobuildpacks/builder-jammy-base:latestbuilder> image> configuration> plugin> plugins> build> project>- 1
- 2
- 3
- 4
- 5
- 6
- 7
- 8
- 9
- 10
- 11
- 12
- 13
- 14
- 15
- 16
- 17
- 18
- 19
- 20
- 21
- 22
- 23
- 24
- 25
- 26
- 27
- 28
- 29
- 30
- 31
- 32
- 33
- 34
- 35
- 36
- 37
- 38
- 39
- 40
- 41
- 42
- 43
- 44
- 45
- 46
- 47
3、外部库

4、编写测试类
package com.zibo.studyjunit; import org.junit.jupiter.api.Test; import org.springframework.boot.test.context.SpringBootTest; @SpringBootTest class StudyJunitApplicationTests { @Test void contextLoads() { System.out.println("Hello World!"); } }- 1
- 2
- 3
- 4
- 5
- 6
- 7
- 8
- 9
- 10
- 11
- 12
- 13
- 14
5、运行结果截图

6、
@SpringBootTest本身支持依赖注入编写组件
package com.zibo.studyjunit.component; import org.springframework.stereotype.Component; @Component public class HelloComponent { public String sayHello() { return "Hello World!"; } }- 1
- 2
- 3
- 4
- 5
- 6
- 7
- 8
- 9
- 10
- 11
- 12
依赖注入
package com.zibo.studyjunit; import com.zibo.studyjunit.component.HelloComponent; import org.junit.jupiter.api.Test; import org.springframework.beans.factory.annotation.Autowired; import org.springframework.boot.test.context.SpringBootTest; @SpringBootTest class StudyJunitApplicationTests { @Autowired private HelloComponent helloComponent; @Test void contextLoads() { helloComponent.sayHello(); } }- 1
- 2
- 3
- 4
- 5
- 6
- 7
- 8
- 9
- 10
- 11
- 12
- 13
- 14
- 15
- 16
- 17
- 18
- 19
7、手动指定主启动类
概述
我们编写 SpringBoot 测试类时,不可能把全部的测试类都放到与 SpringBoot 主启动类同包下,当测试类一多,整个 test 目录会非常混乱。为了方便寻找与管理,我们还是需要将单元测试类也分包管理。但是请各位注意,当 SpringBoot 测试类被放到其他包的时候,运行 SpringBoot 测试类是有区别的。
子包下可正常运行
package com.zibo.studyjunit.demo; import org.junit.jupiter.api.Test; import org.springframework.boot.test.context.SpringBootTest; @SpringBootTest class Demo1Test { @Test void test1() { System.out.println("test1"); } }- 1
- 2
- 3
- 4
- 5
- 6
- 7
- 8
- 9
- 10
- 11
- 12
- 13
- 14
包外提示异常
package demo; import org.junit.jupiter.api.Test; import org.springframework.boot.test.context.SpringBootTest; @SpringBootTest class Demo2Test { @Test void test2() { System.out.println("test2"); } }- 1
- 2
- 3
- 4
- 5
- 6
- 7
- 8
- 9
- 10
- 11
- 12
- 13
- 14
结构截图

解决方案:显式声明主启动类的位置
代码
package demo; import com.zibo.studyjunit.StudyJunitApplication; import org.junit.jupiter.api.Test; import org.springframework.boot.test.context.SpringBootTest; @SpringBootTest(classes = StudyJunitApplication.class) class Demo2Test { @Test void test2() { System.out.println("test2"); } }- 1
- 2
- 3
- 4
- 5
- 6
- 7
- 8
- 9
- 10
- 11
- 12
- 13
- 14
- 15
运行结果截图

四、JUnit的断言机制
1、概述
下面讲解 JUnit 5 中的经典使用方式:断言。在 JUnit 4 中我们使用
Assert类进行断言,而到了 JUnit 5 中使用的类是Assertions,类名变了,使用方式却大差不差,下面通过几个简单示例讲解 JUnit 5 的断言使用。2、基本使用
Assertions 提供的最简单的断言方法,包含比对两个值是否相等、两个对象是否是同一个、对象是否为 null ,以及全场景通用的判断表达式的值为 true / false 。下面是一个简单的使用示例。
@Test void testSimple() { // 一、两个值是否相等 // 最简单的断言,断言计算值与预期值是否相等 int num = 3 + 5; Assertions.assertEquals(num, 8); double result = 10.0 / 3; // 断言计算值是否在浮点数的指定范围内上下浮动 Assertions.assertEquals(result, 3, 0.5); // 如果浮动空间不够,则会断言失败 // 断言失败! // Assertions.assertEquals(result, 3, 0.2); // 传入message可以自定义错误提示信息 // 断言失败! // Assertions.assertEquals(result, 3, 0.2, "计算数值偏差较大!"); // 二、两个对象是否是同一个 // 断言两个对象是否是同一个 Object o1 = new Object(); Object o2 = o1; Object o3 = new Object(); Assertions.assertSame(o1, o2); // 断言失败! // Assertions.assertSame(o1, o3); // 断言两个数组的元素是否完全相同 String[] arr1 = {"aa", "bb"}; String[] arr2 = {"aa", "bb"}; String[] arr3 = {"bb", "aa"}; Assertions.assertArrayEquals(arr1, arr2); // 断言失败! // Assertions.assertArrayEquals(arr1, arr3); // 三、对象是否为 null // 断言对象是否为 null Object o4 = null; Object o5 = new Object(); Assertions.assertNull(o4); // 断言失败! // Assertions.assertNull(o5); // 四、判断表达式的值为 true / false // 断言表达式的值为 true int a = 10; int b = 20; Assertions.assertTrue(a < b); // 断言表达式的值为 false Assertions.assertFalse(a > b); }- 1
- 2
- 3
- 4
- 5
- 6
- 7
- 8
- 9
- 10
- 11
- 12
- 13
- 14
- 15
- 16
- 17
- 18
- 19
- 20
- 21
- 22
- 23
- 24
- 25
- 26
- 27
- 28
- 29
- 30
- 31
- 32
- 33
- 34
- 35
- 36
- 37
- 38
- 39
- 40
- 41
- 42
- 43
- 44
- 45
- 46
- 47
- 48
- 49
- 50
- 51
- 52
3、组合条件断言
组合条件断言,实际上是要在一条断言中组合多个断言,要求这些断言同时、全部通过,则外部的组合断言才能通过。这种设计有点类似于父子断言。
@Test void testCombination() { // 组合条件断言,只有当所有断言都成功时,才会断言成功 int a = 10; int b = 20; int c = 30; // 断言 a < b 并且 b < c Assertions.assertAll("组合断言", () -> Assertions.assertTrue(a < b), () -> Assertions.assertTrue(b < c) ); }- 1
- 2
- 3
- 4
- 5
- 6
- 7
- 8
- 9
- 10
- 11
- 12
4、异常抛出断言
异常抛出的断言,指的是被测试的内容最终运行时必定会抛出一个异常,如果没有抛出异常则断言失败。
@Test void testException() { // 断言抛出指定类型的异常 Assertions.assertThrows(ArithmeticException.class, () -> { int i = 10 / 0; }); }- 1
- 2
- 3
- 4
- 5
- 6
- 7
5、执行超时断言
执行超时断言是,针对的是被测试代码的执行速度。
@Test void testTimeout() { // 断言在指定时间内完成 // 断言失败!org.opentest4j.AssertionFailedError: execution timed out after 100 ms Assertions.assertTimeoutPreemptively(java.time.Duration.ofMillis(100), () -> { Thread.sleep(200); }); }- 1
- 2
- 3
- 4
- 5
- 6
- 7
- 8
6、强制失败
类似于最原始的抛出异常的方式,(当满足某些条件时)直接断言失败!
@Test void testFail() { if (java.time.ZonedDateTime.now().getHour() > 12) { Assertions.fail(); } }- 1
- 2
- 3
- 4
- 5
- 6
五、前置条件检查机制
1、概述
前置条件的检查机制,同样应用在断言的场景中,它指的是:如果一个单元测试的前置条件不满足,则当前的测试会被跳过,后续的测试不会执行。使用前置条件检查机制,可以避免一些无谓的测试逻辑执行,从而提高单元测试的执行效率。
前置条件的检查使用的 API 是
Assumptions。2、代码演示
@Test void testAssumptions() { // 假设条件为 true 时,才会执行后面的断言 int num = 3 + 5; Assumptions.assumeTrue(num < 10); System.out.println("断言成功!"); // 假设条件为 false 时,不会执行后面的断言 Assumptions.assumeTrue(num > 10); // 断言失败!下面的代码不会执行 System.out.println("断言失败!"); }- 1
- 2
- 3
- 4
- 5
- 6
- 7
- 8
- 9
- 10
- 11
- 12
- 13
- 14
3、运行结果截图

六、嵌套测试
1、概述
嵌套测试是 JUnit 5 的一个高级特性,它支持我们在编写单元测试类时,以内部类的方式组织一些有关联的测试逻辑。有关嵌套测试的演示代码,在 JUnit 5 的官方文档中提供了一个非常全面的示例。
2、代码演示
package com.zibo.studyjunit.demo; import static org.junit.jupiter.api.Assertions.assertEquals; import static org.junit.jupiter.api.Assertions.assertFalse; import static org.junit.jupiter.api.Assertions.assertThrows; import static org.junit.jupiter.api.Assertions.assertTrue; import java.util.EmptyStackException; import java.util.Stack; import org.junit.jupiter.api.BeforeEach; import org.junit.jupiter.api.DisplayName; import org.junit.jupiter.api.Nested; import org.junit.jupiter.api.Test; import org.springframework.boot.test.context.SpringBootTest; @SpringBootTest class TestingAStackDemo { Stack<Object> stack; // 测试用例:使用new关键字实例化堆栈 @Test void isInstantiatedWithNew() { new Stack<>(); } @Nested class WhenNew { @BeforeEach void createNewStack() { // 在每个测试方法之前创建一个新的堆栈实例 stack = new Stack<>(); } // 测试用例:堆栈在刚创建时是否为空 @Test @DisplayName("is empty") void isEmpty() { assertTrue(stack.isEmpty()); } // 测试用例:在空栈上执行pop操作是否抛出EmptyStackException异常 @Test @DisplayName("throws EmptyStackException when popped") void throwsExceptionWhenPopped() { assertThrows(EmptyStackException.class, () -> stack.pop()); } @Nested @DisplayName("after pushing an element") class AfterPushing { String anElement = "an element"; @BeforeEach void pushAnElement() { // 在堆栈中推入一个元素 stack.push(anElement); } // 测试用例:在推入元素后,堆栈是否不再为空 @Test @DisplayName("it is no longer empty") void isNotEmpty() { assertFalse(stack.isEmpty()); } // 测试用例:在推入元素后,执行pop操作是否返回推入的元素并使堆栈为空 @Test @DisplayName("returns the element when popped and is empty") void returnElementWhenPopped() { assertEquals(anElement, stack.pop()); assertTrue(stack.isEmpty()); } } } }- 1
- 2
- 3
- 4
- 5
- 6
- 7
- 8
- 9
- 10
- 11
- 12
- 13
- 14
- 15
- 16
- 17
- 18
- 19
- 20
- 21
- 22
- 23
- 24
- 25
- 26
- 27
- 28
- 29
- 30
- 31
- 32
- 33
- 34
- 35
- 36
- 37
- 38
- 39
- 40
- 41
- 42
- 43
- 44
- 45
- 46
- 47
- 48
- 49
- 50
- 51
- 52
- 53
- 54
- 55
- 56
- 57
- 58
- 59
- 60
- 61
- 62
- 63
- 64
- 65
- 66
- 67
- 68
- 69
- 70
- 71
- 72
- 73
- 74
- 75
- 76
- 77
- 78
- 79
3、运行结果截图

4、注意点
官方提供的测试代码都是可以执行通过的,从这段测试代码中需要各位了解的几个关键特性:
- 单元测试类可以通过编写内部类,并标注
@Nested注解,表明内部类也是一个单元测试类; - 内部的单元测试类可以直接使用外部的成员属性,且可以利用外部定义的
@BeforeEach、@BeforeAll、@AfterEach、@AfterAll等前后置逻辑注解标注的方法; - 外部的单元测试无法利用内部类定义的前后置逻辑注解。
七、带入参的单元测试
1、概述
JUnit 5 中的一个重要特性是支持单元测试方法的参数依赖注入,这也打破了我们已有的认知。通常我们编写的测试方法是不能有方法入参的,但是 JUnit 5 允许我们在编写单元测试方法中予以声明方法入参。默认情况下 JUnit 5 支持以下几个参数类型的依赖注入:
TestInfo:内部组装了当前单元测试所属的 Class 、Method ,以及对应的展示名(DisplayName)等;RepetitionInfo:如果一个方法被标注了@RepeatedTest,或者该方法是一个@BeforeEach/@AfterEach方法,则可以拿到RepetitionInfo的信息,可以通过RepetitionInfo获取到当前重复信息以及相应的@RepeatedTest的重复总数;TestReporter:注入TestReporter后可以获得数据发布能力,可以向测试结果中注册一些特殊的数据,这些数据可以被TestExecutionListener获取到。
2、参数化测试
参数化测试是 JUnit 5 中提高单元测试效率的重要手段,它通过给单元测试方法传入特定的参数,可以使得 JUnit 在执行单元测试时逐个参数来检验和测试,这样做的好处是更加规整和高效地执行单元测试。
参数化测试支持我们使用如下的方式赋予参数:
- 基本类型:8 种基本数据类型 +
String+Class; - 枚举类型:自定义的枚举;
- CSV 文件:可传入一个 CSV 格式的表格文件,使用表格文件中的数据作为入参;
- 方法的数据返回:可以通过一个方法返回需要测试入参的数据(流的形式返回)。
3、基本类型
概述
在使用参数化测试时,标注的注解不再是
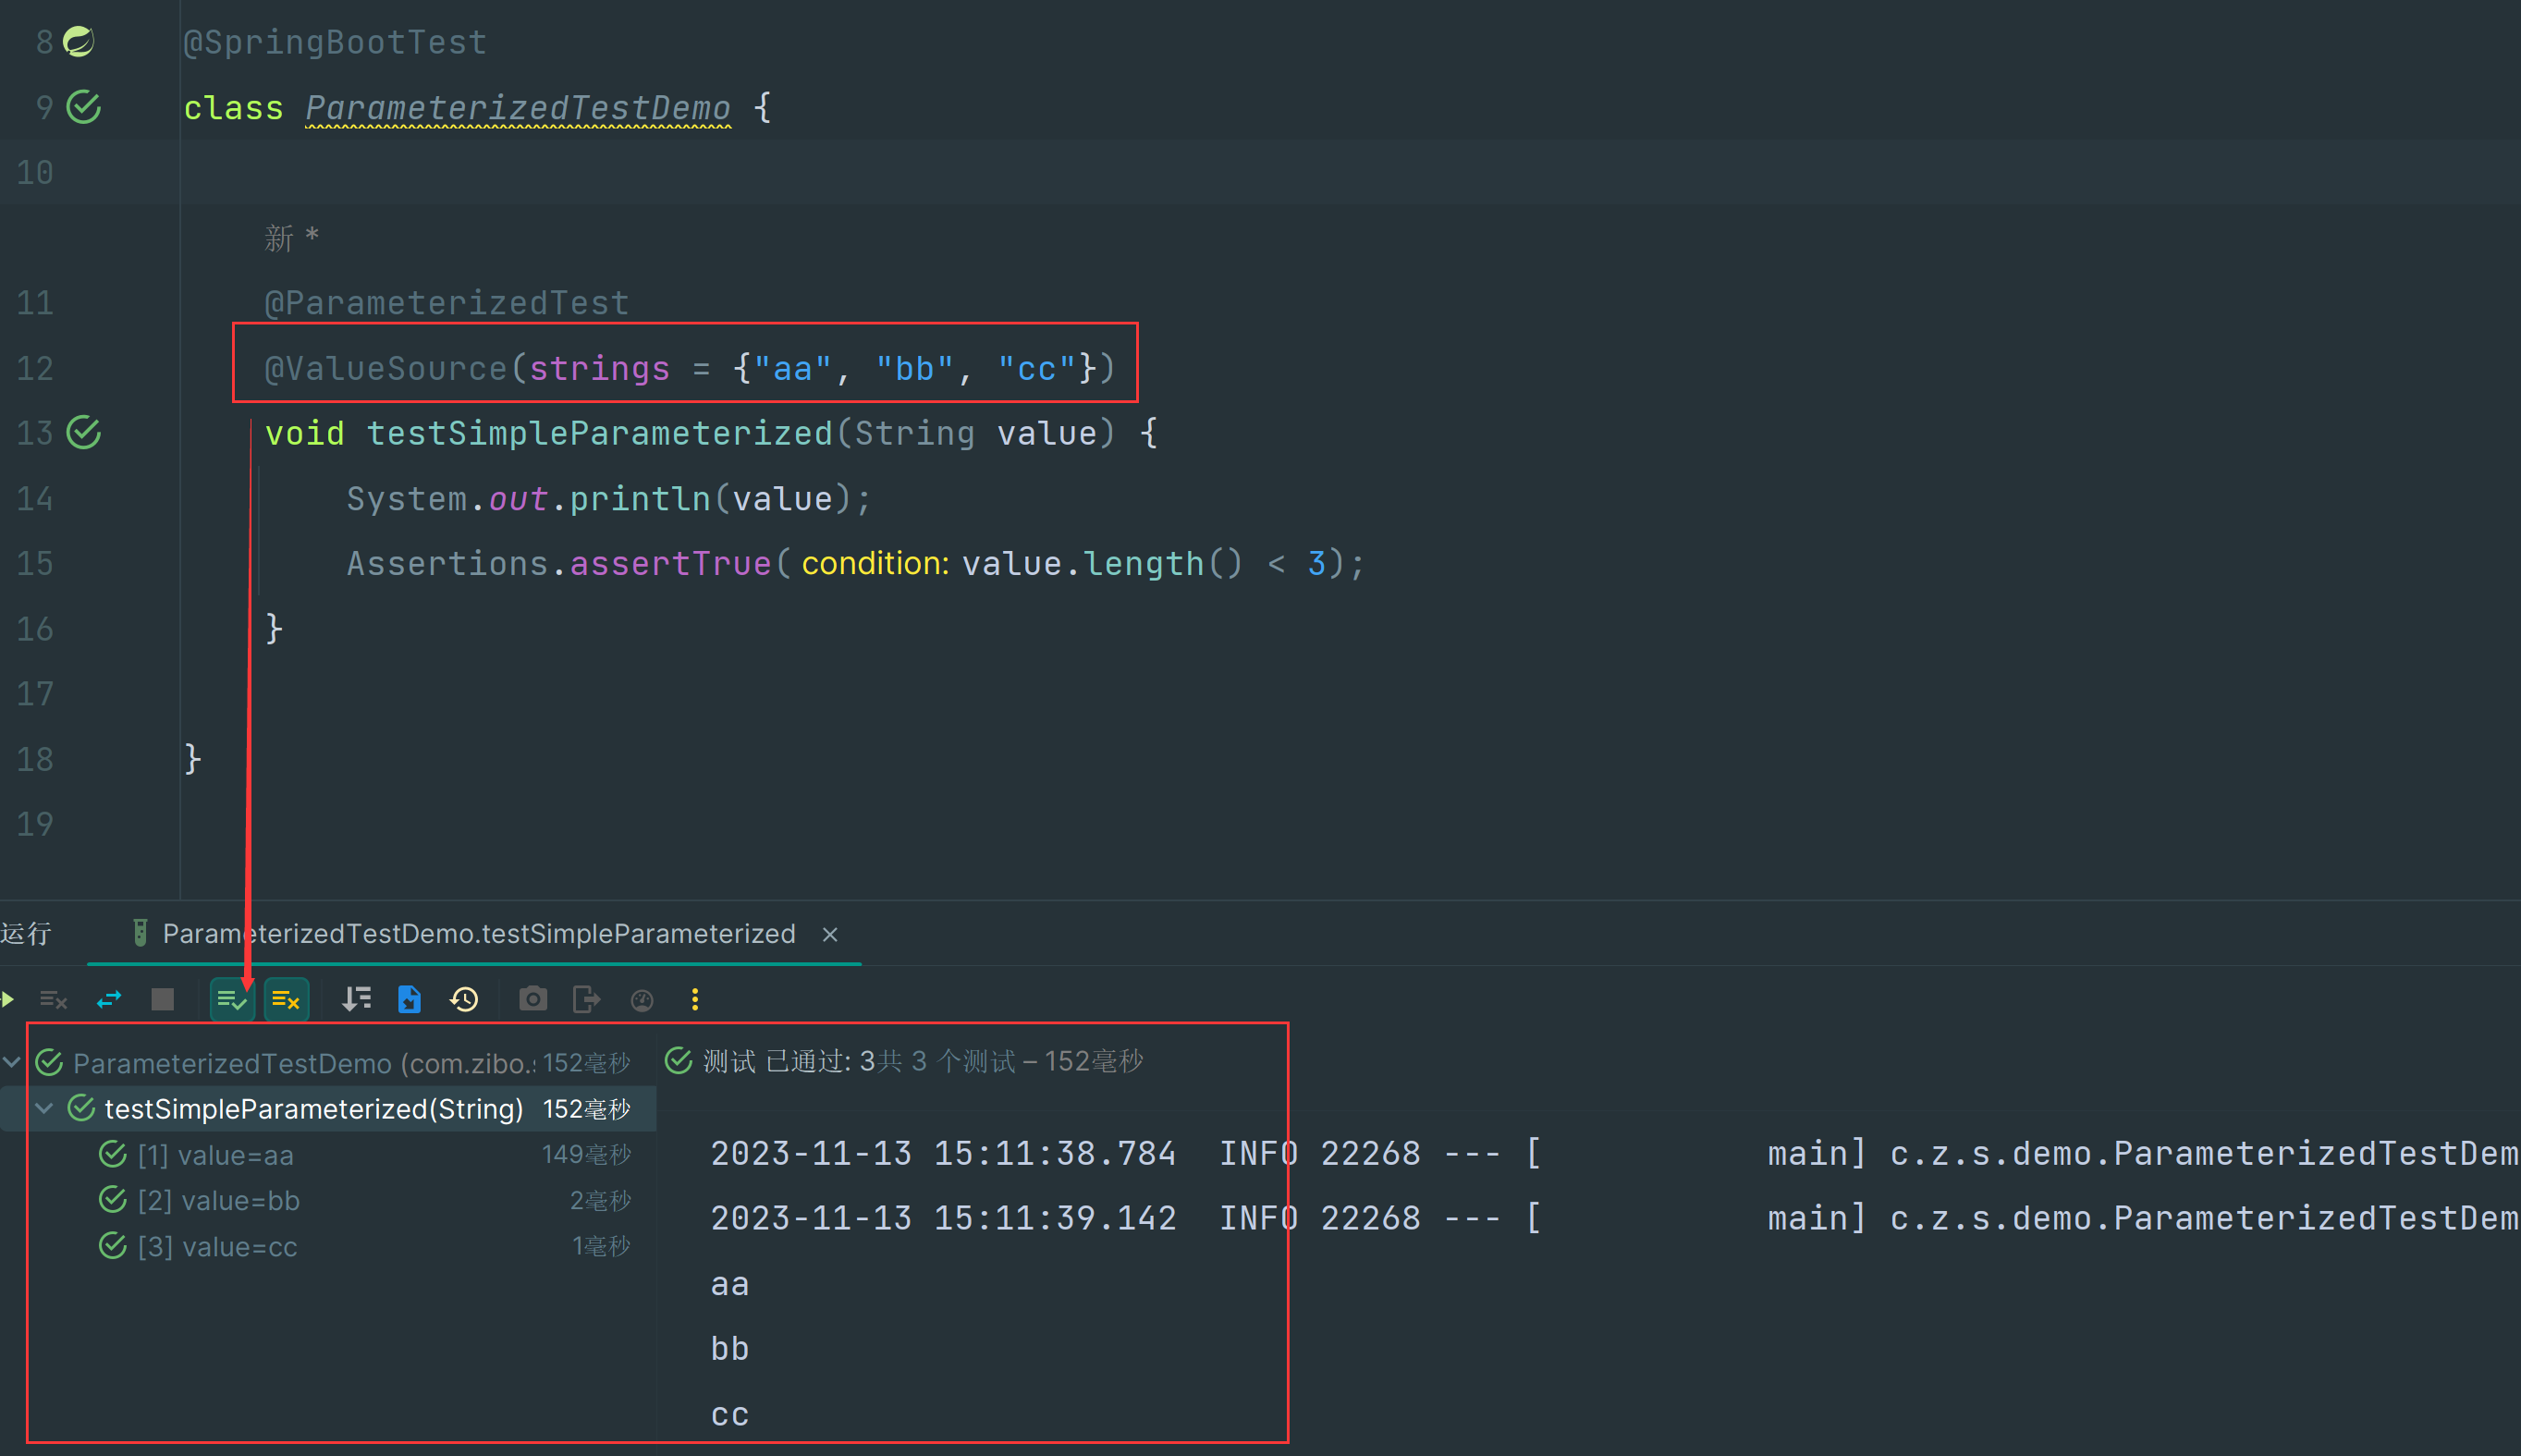
@Test,取而代之的是@ParameterizedTest;另外还需要声明需要传入的数据,对于简单的基本类型而言,使用@ValueSource注解即可指定。代码演示
package com.zibo.studyjunit.demo; import org.junit.jupiter.api.Assertions; import org.junit.jupiter.params.ParameterizedTest; import org.junit.jupiter.params.provider.ValueSource; import org.springframework.boot.test.context.SpringBootTest; @SpringBootTest class ParameterizedTestDemo { @ParameterizedTest @ValueSource(strings = {"aa", "bb", "cc"}) void testSimpleParameterized(String value) { System.out.println(value); Assertions.assertTrue(value.length() < 3); } }- 1
- 2
- 3
- 4
- 5
- 6
- 7
- 8
- 9
- 10
- 11
- 12
- 13
- 14
- 15
- 16
- 17
- 18
测试结果截图
4、方法数据流返回
概述
参数化测试最吸引人的点是可以引用一个方法来实现测试数据的参数化,既然可以在一个方法中构造单元测试的入参数据,那么完全可以从数据库 / 缓存等任意位置加载数据,并构造为流的形式返回。以此法编写的参数化测试具有极大的灵活度和自由度。
代码演示
@ParameterizedTest @MethodSource("dataProvider") // @MethodSource("getInteger") void testDataStreamParameterized(Integer value) { System.out.println(value); Assertions.assertTrue(value < 10); } private static Stream<Integer> dataProvider() { return Stream.of(1, 2, 3, 4, 5); } // 不能用这种方式,会报错 // 返回值必须是Stream或者Stream // private static Integer getInteger() { // return 1; // } private static Stream<Arguments> getInteger() { return Stream.of(Arguments.of(1), Arguments.of(2), Arguments.of(3)); }- 1
- 2
- 3
- 4
- 5
- 6
- 7
- 8
- 9
- 10
- 11
- 12
- 13
- 14
- 15
- 16
- 17
- 18
- 19
- 20
测试结果截图

-
相关阅读:
企业老板的百度百科应当如何创建?需要注意那些问题?
基于51单片机的花样流水灯设计
【问题】在安装torchvision的时候,会自动安装torch?
Spring AOP基于XML方式笔记整理
从驾考科目二到自动驾驶,聊聊 GPU 为什么对自动驾驶很重要
Dubbo服务调用扩展点Filter的介绍与使用
机械设计基础试题2
操作系统之启动过程
基于Docker搭建Redis集群并进行扩容、缩容教程
【AOP系列】6.缓存处理
- 原文地址:https://blog.csdn.net/qq_29689343/article/details/134378792
