-
Linux学习第39天:Linux I2C 驱动实验(三):哥俩好
Linux版本号4.1.15 芯片I.MX6ULL 大叔学Linux 品人间百味 思文短情长
linux I2C驱动试验整节的思维导图如下:

本节笔记主要学习试验程序的编写及运行测试。其中试验程序的编写主要包括修改设备树、AP3216驱动编写及编写测试APP。作为本节重点内容。
五、试验程序编写
1、修改设备树
1)、IO修改或添加
- 1 pinctrl_i2c1: i2c1grp {
- 2 fsl,pins = <
- 3 MX6UL_PAD_UART4_TX_DATA__I2C1_SCL 0x4001b8b0
- 4 MX6UL_PAD_UART4_RX_DATA__I2C1_SDA 0x4001b8b0
- 5 >;
- 6 };
pinctrl_i2c1 就是 I2C1 的 IO 节点,这里将 UART4_TXD 和 UART4_RXD 这两个 IO 分别
复用为 I2C1_SCL 和 I2C1_SDA,电气属性都设置为 0x4001b8b0。2)、在i2c1节点追加ap3216子节点
- 1 &i2c1 {
- 2 clock-frequency = <100000>;/*clock-frequency 属性为 I2C 频率,这里设置为 100KHz。*/
- 3 pinctrl-names = "default";
- 4 pinctrl-0 = <&pinctrl_i2c1>;/*pinctrl-0 属性指定 I2C 所使用的 IO 为示例代码中的 pinctrl_i2c1 子节
- 点。*/
- 5 status = "okay";
- 6
- 7 mag3110@0e {/*第 7~11 行, mag3110 是个磁力计, NXP 官方的 EVK 开发板上接了 mag3110,因此 NXP
- 在 i2c1 节点下添加了 mag3110 这个子节点。正点原子的 I.MX6U-ALPHA 开发板上没有用到
- mag3110,因此需要将此节点删除掉。*/
- 8 compatible = "fsl,mag3110";
- 9 reg = <0x0e>;
- 10 position = <2>;
- 11 };
- 12
- 13 fxls8471@1e {/*第 13~19 行, NXP 官方 EVK 开发板也接了一个 fxls8471,正点原子的 I.MX6U-ALPHA
- 开发板同样没有此器件,所以也要将其删除掉。*/
- 14 compatible = "fsl,fxls8471";
- 15 reg = <0x1e>;
- 16 position = <0>;
- 17 interrupt-parent = <&gpio5>;
- 18 interrupts = <0 8>;
- 19 };
- 20 };
添加 ap3216c子节点信息,完成以后的 i2c1 节点内容如下所示:
- 1 &i2c1 {
- 2 clock-frequency = <100000>;
- 3 pinctrl-names = "default";
- 4 pinctrl-0 = <&pinctrl_i2c1>;
- 5 status = "okay";
- 6
- 7 ap3216c@1e {/*ap3216c 子节点, @后面的“ 1e”是 ap3216c 的器件地址。*/
- 8 compatible = "alientek,ap3216c";
- 9 reg = <0x1e>;/*reg 属性也是设置 ap3216c 器件地址的,因此 reg 设置为 0x1e。*/
- 10 };
- 11 };
2、AP3216驱动编写- 32 struct ap3216c_dev {
- 33 dev_t devid; /* 设备号 */
- 34 struct cdev cdev; /* cdev */
- 35 struct class *class; /* 类 */
- 36 struct device *device; /* 设备 */
- 37 struct device_node *nd; /* 设备节点 */
- 38 int major; /* 主设备号 */
- 39 void *private_data; /* 私有数据 */
- 40 unsigned short ir, als, ps; /* 三个光传感器数据 */
- 41 };
ap3216c 设备结构体,第 39 行的 private_data 成员变量用于存放 ap3216c 对应的 i2c_client。第 40 行的 ir、 als 和 ps 分别存储 AP3216C 的 IR、 ALS 和 PS 数据。
static struct ap3216c_dev ap3216cdev;定义一个 ap3216c_dev 类型的设备结构体变量 ap3216cdev。
- 45 /*
- 46 * @description : 从 ap3216c 读取多个寄存器数据
- 47 * @param – dev : ap3216c 设备
- 48 * @param – reg : 要读取的寄存器首地址
- 49 * @param – val : 读取到的数据
- 50 * @param – len : 要读取的数据长度
- 51 * @return : 操作结果
- 52 */
- 53 static int ap3216c_read_regs(struct ap3216c_dev *dev, u8 reg,
- void *val, int len)
- 54 {
- 55 int ret;
- 56 struct i2c_msg msg[2];
- 57 struct i2c_client *client = (struct i2c_client *)
- dev->private_data;
- 58
- 59 /* msg[0]为发送要读取的首地址 */
- 60 msg[0].addr = client->addr; /* ap3216c 地址 */
- 61 msg[0].flags = 0; /* 标记为发送数据 */
- 62 msg[0].buf = ® /* 读取的首地址 */
- 63 msg[0].len = 1; /* reg 长度 */
- 64
- 65 /* msg[1]读取数据 */
- 66 msg[1].addr = client->addr; /* ap3216c 地址 */
- 67 msg[1].flags = I2C_M_RD; /* 标记为读取数据 */
- 68 msg[1].buf = val; /* 读取数据缓冲区 */
- 69 msg[1].len = len; /* 要读取的数据长度 */
- 70
- 71 ret = i2c_transfer(client->adapter, msg, 2);
- 72 if(ret == 2) {
- 73 ret = 0;
- 74 } else {
- 75 printk("i2c rd failed=%d reg=%06x len=%d\n",ret, reg, len);
- 76 ret = -EREMOTEIO;
- 77 }
- 78 return ret;
- 79 }
ap3216c_read_regs 函数实现多字节读取,但是 AP3216C 好像不支持连续多字节读取,此函数在测试其他 I2C 设备的时候可以实现多给字节连续读取,但是在 AP3216C 上不能连续读取多个字节。不过读取一个字节没有问题的。
- 81 /*
- 82 * @description : 向 ap3216c 多个寄存器写入数据
- 83 * @param – dev : ap3216c 设备
- 84 * @param – reg : 要写入的寄存器首地址
- 85 * @param – val : 要写入的数据缓冲区
- 86 * @param – len : 要写入的数据长度
- 87 * @return : 操作结果
- 88 */
- 89 static s32 ap3216c_write_regs(struct ap3216c_dev *dev, u8 reg,
- u8 *buf, u8 len)
- 90 {
- 91 u8 b[256];
- 92 struct i2c_msg msg;
- 93 struct i2c_client *client = (struct i2c_client *)
- dev->private_data;
- 94
- 95 b[0] = reg; /* 寄存器首地址 */
- 96 memcpy(&b[1],buf,len); /* 将要写入的数据拷贝到数组 b 里面 */
- 97
- 98 msg.addr = client->addr; /* ap3216c 地址 */
- 99 msg.flags = 0; /* 标记为写数据 */
- 100
- 101 msg.buf = b; /* 要写入的数据缓冲区 */
- 102 msg.len = len + 1; /* 要写入的数据长度 */
- 103
- 104 return i2c_transfer(client->adapter, &msg, 1);
- 105 }
ap3216c_write_regs 函数实现连续多字节写操作。
- 107 /*
- 108 * @description : 读取 ap3216c 指定寄存器值,读取一个寄存器
- 109 * @param – dev : ap3216c 设备
- 110 * @param – reg : 要读取的寄存器
- 111 * @return : 读取到的寄存器值
- 112 */
- 113 static unsigned char ap3216c_read_reg(struct ap3216c_dev *dev,
- u8 reg)
- 114 {
- 115 u8 data = 0;
- 116
- 117 ap3216c_read_regs(dev, reg, &data, 1);
- 118 return data;
- 119
- 120 #if 0
- 121 struct i2c_client *client = (struct i2c_client *)
- dev->private_data;
- 122 return i2c_smbus_read_byte_data(client, reg);
- 123 #endif
- 124 }
ap3216c_read_reg 函数用于读取 AP3216C 的指定寄存器数据,用于一个寄存器的数据读取。
- 126 /*
- 127 * @description : 向 ap3216c 指定寄存器写入指定的值,写一个寄存器
- 128 * @param – dev : ap3216c 设备
- 129 * @param – reg : 要写的寄存器
- 130 * @param – data : 要写入的值
- 131 * @return : 无
- 132 */
- 133 static void ap3216c_write_reg(struct ap3216c_dev *dev, u8 reg,
- u8 data)
- 134 {
- 135 u8 buf = 0;
- 136 buf = data;
- 137 ap3216c_write_regs(dev, reg, &buf, 1);
- 138 }
ap3216c_write_reg 函数用于向 AP3216C 的指定寄存器写入数据,用于一个寄存器的数据写操作。
- 141 * @description : 读取 AP3216C 的数据,读取原始数据,包括 ALS,PS 和 IR,
- 142 * :同时打开 ALS,IR+PS 的话两次数据读取的间隔要大于 112.5ms
- 143 * @param - ir : ir 数据
- 144 * @param - ps : ps 数据
- 145 * @param - ps : als 数据
- 146 * @return : 无。
- 147 */
- 148 void ap3216c_readdata(struct ap3216c_dev *dev)
- 149 {
- 150 unsigned char i =0;
- 151 unsigned char buf[6];
- 152
- 153 /* 循环读取所有传感器数据 */
- 154 for(i = 0; i < 6; i++)
- 155 {
- 156 buf[i] = ap3216c_read_reg(dev, AP3216C_IRDATALOW + i);
- 157 }
- 158
- 159 if(buf[0] & 0X80) /* IR_OF 位为 1,则数据无效 */
- 160 dev->ir = 0;
- 161 else /* 读取 IR 传感器的数据 */
- 162 dev->ir = ((unsigned short)buf[1] << 2) | (buf[0] & 0X03);
- 163
- 164 dev->als = ((unsigned short)buf[3] << 8) | buf[2];/* ALS 数据 */
- 165
- 166 if(buf[4] & 0x40) /* IR_OF 位为 1,则数据无效 */
- 167 dev->ps = 0;
- 168 else /* 读取 PS 传感器的数据 */
- 169 dev->ps = ((unsigned short)(buf[5] & 0X3F) << 4) |
- (buf[4] & 0X0F);
- 170 }
读取 AP3216C 的 PS、 ALS 和 IR 等传感器原始数据值。
- 172 /*
- 173 * @description : 打开设备
- 174 * @param – inode : 传递给驱动的 inode
- 175 * @param - filp : 设备文件, file 结构体有个叫做 private_data 的成员变量
- 176 * 一般在 open 的时候将 private_data 指向设备结构体。
- 177 * @return : 0 成功;其他 失败
- 178 */
- 179 static int ap3216c_open(struct inode *inode, struct file *filp)
- 180 {
- 181 filp->private_data = &ap3216cdev;
- 182
- 183 /* 初始化 AP3216C */
- 184 ap3216c_write_reg(&ap3216cdev, AP3216C_SYSTEMCONG, 0x04);
- 185 mdelay(50); /* AP3216C 复位最少 10ms */
- 186 ap3216c_write_reg(&ap3216cdev, AP3216C_SYSTEMCONG, 0X03);
- 187 return 0;
- 188 }
- 189
- 190 /*
- 191 * @description : 从设备读取数据
- 192 * @param – filp : 要打开的设备文件(文件描述符)
- 193 * @param - buf : 返回给用户空间的数据缓冲区
- 194 * @param - cnt : 要读取的数据长度
- 195 * @param – offt : 相对于文件首地址的偏移
- 196 * @return : 读取的字节数,如果为负值,表示读取失败
- 197 */
- 198 static ssize_t ap3216c_read(struct file *filp, char __user *buf,
- size_t cnt, loff_t *off)
- 199 {
- 200 short data[3];
- 201 long err = 0;
- 202
- 203 struct ap3216c_dev *dev = (struct ap3216c_dev *)
- filp->private_data;
- 204
- 205 ap3216c_readdata(dev);
- 206
- 207 data[0] = dev->ir;
- 208 data[1] = dev->als;
- 209 data[2] = dev->ps;
- 210 err = copy_to_user(buf, data, sizeof(data));
- 211 return 0;
- 212 }
- 213
- 214 /*
- 215 * @description : 关闭/释放设备
- 216 * @param - filp : 要关闭的设备文件(文件描述符)
- 217 * @return : 0 成功;其他 失败
- 218 */
- 219 static int ap3216c_release(struct inode *inode, struct file *filp)
- 220 {
- 221 return 0;
- 222 }
- 223
- 224 /* AP3216C 操作函数 */
- 225 static const struct file_operations ap3216c_ops = {
- 226 .owner = THIS_MODULE,
- 227 .open = ap3216c_open,
- 228 .read = ap3216c_read,
- 229 .release = ap3216c_release,
- 230 };
标准的支付设备驱动框架.
- 232 /*
- 233 * @description : i2c 驱动的 probe 函数,当驱动与
- 234 * 设备匹配以后此函数就会执行
- 235 * @param - client : i2c 设备
- 236 * @param - id : i2c 设备 ID
- 237 * @return : 0,成功;其他负值,失败
- 238 */
- 239 static int ap3216c_probe(struct i2c_client *client,
- const struct i2c_device_id *id)
- 240 {
- 241 /* 1、构建设备号 */
- 242 if (ap3216cdev.major) {
- 243 ap3216cdev.devid = MKDEV(ap3216cdev.major, 0);
- 244 register_chrdev_region(ap3216cdev.devid, AP3216C_CNT,
- AP3216C_NAME);
- 245 } else {
- 246 alloc_chrdev_region(&ap3216cdev.devid, 0, AP3216C_CNT,
- AP3216C_NAME);
- 247 ap3216cdev.major = MAJOR(ap3216cdev.devid);
- 248 }
- 249
- 250 /* 2、注册设备 */
- 251 cdev_init(&ap3216cdev.cdev, &ap3216c_ops);
- 252 cdev_add(&ap3216cdev.cdev, ap3216cdev.devid, AP3216C_CNT);
- 253
- 254 /* 3、创建类 */
- 255 ap3216cdev.class = class_create(THIS_MODULE, AP3216C_NAME);
- 256 if (IS_ERR(ap3216cdev.class)) {
- 257 return PTR_ERR(ap3216cdev.class);
- 258 }
- 259
- 260 /* 4、创建设备 */
- 261 ap3216cdev.device = device_create(ap3216cdev.class, NULL,
- ap3216cdev.devid, NULL, AP3216C_NAME);
- 262 if (IS_ERR(ap3216cdev.device)) {
- 263 return PTR_ERR(ap3216cdev.device);
- 264 }
- 265
- 266 ap3216cdev.private_data = client;
- 267
- 268 return 0;
- 269 }
ap3216c_probe 函数,当 I2C 设备和驱动匹配成功以后此函数就会执行,和platform 驱动框架一样。此函数前面都是标准的字符设备注册代码,最后面会将此函数的第一个参数 client 传递给 ap3216cdev 的 private_data 成员变量。
- 289 static const struct i2c_device_id ap3216c_id[] = {
- 290 {"alientek,ap3216c", 0},
- 291 {}
- 292 };
ap3216c_id 匹配表, i2c_device_id 类型。用于传统的设备和驱动匹配,也就是没有使用设备树的时候。
- 294 /* 设备树匹配列表 */
- 295 static const struct of_device_id ap3216c_of_match[] = {
- 296 { .compatible = "alientek,ap3216c" },
- 297 { /* Sentinel */ }
- 298 };
ap3216c_of_match 匹配表, of_device_id 类型,用于设备树设备和驱动匹配。这里只写了一个 compatible 属性,值为“ alientek,ap3216c”。
- 300 /* i2c 驱动结构体 */
- 301 static struct i2c_driver ap3216c_driver = {
- 302 .probe = ap3216c_probe,
- 303 .remove = ap3216c_remove,
- 304 .driver = {
- 305 .owner = THIS_MODULE,
- 306 .name = "ap3216c",
- 307 .of_match_table = ap3216c_of_match,
- 308 },
- 309 .id_table = ap3216c_id,
- 310 };
ap3216c_driver 结构体变量, i2c_driver 类型。
- 312 /*
- 313 * @description : 驱动入口函数
- 314 * @param : 无
- 315 * @return : 无
- 316 */
- 317 static int __init ap3216c_init(void)
- 318 {
- 319 int ret = 0;
- 320
- 321 ret = i2c_add_driver(&ap3216c_driver);
- 322 return ret;
- 323 }
驱动入口函数 ap3216c_init,此函数通过调用 i2c_add_driver 来向 Linux 内核注册 i2c_driver,也就是 ap3216c_driver。
- 325 /*
- 326 * @description : 驱动出口函数
- 327 * @param : 无
- 328 * @return : 无
- 329 */
- 330 static void __exit ap3216c_exit(void)
- 331 {
- 332 i2c_del_driver(&ap3216c_driver);
- 333 }
驱动出口函数 ap3216c_exit,此函数通过调用 i2c_del_driver 来注销掉前面注册的 ap3216c_driver。
3、编写测试APP
- 1 #include "stdio.h"
- 2 #include "unistd.h"
- 3 #include "sys/types.h"
- 4 #include "sys/stat.h"
- 5 #include "sys/ioctl.h"
- 6 #include "fcntl.h"
- 7 #include "stdlib.h"
- 8 #include "string.h"
- 9 #include
- 10 #include
- 11 #include
- 12 #include
- 13 #include
- 14 /***************************************************************
- 15 Copyright © ALIENTEK Co., Ltd. 1998-2029. All rights reserved.
- 16 文件名 : ap3216cApp.c
- 17 作者 : 左忠凯
- 18 版本 : V1.0
- 19 描述 : ap3216c 设备测试 APP。
- 20 其他 : 无
- 21 使用方法 : ./ap3216cApp /dev/ap3216c
- 22 论坛 : www.openedv.com
- 23 日志 : 初版 V1.0 2019/9/20 左忠凯创建
- 24 ***************************************************************/
- 25
- 26 /*
- 27 * @description : main 主程序
- 28 * @param - argc : argv 数组元素个数
- 29 * @param - argv : 具体参数
- 30 * @return : 0 成功;其他 失败
- 31 */
- 32 int main(int argc, char *argv[])
- 33 {
- 34 int fd;
- 35 char *filename;
- 36 unsigned short databuf[3];
- 37 unsigned short ir, als, ps;
- 38 int ret = 0;
- 39
- 40 if (argc != 2) {
- 41 printf("Error Usage!\r\n");
- 42 return -1;
- 43 }
- 44
- 45 filename = argv[1];
- 46 fd = open(filename, O_RDWR);
- 47 if(fd < 0) {
- 48 printf("can't open file %s\r\n", filename);
- 49 return -1;
- 50 }
- 51
- 52 while (1) {
- 53 ret = read(fd, databuf, sizeof(databuf));
- 54 if(ret == 0) { /* 数据读取成功 */
- 55 ir = databuf[0]; /* ir 传感器数据 */
- 56 als = databuf[1]; /* als 传感器数据 */
- 57 ps = databuf[2]; /* ps 传感器数据 */
- 58 printf("ir = %d, als = %d, ps = %d\r\n", ir, als, ps);
- 59 }
- 60 usleep(200000); /* 200ms */
- 61 }
- 62 close(fd); /* 关闭文件 */
- 63 return 0;
- 64 }
ap3216cApp.c 文件内容很简单,就是在 while 循环中不断的读取 AP3216C 的设备文件,从
而得到 ir、 als 和 ps 这三个数据值,然后将其输出到终端上。六、运行测试
1、编译驱动程序和测试APP
1)、编译驱动程序
- 1 KERNELDIR := /home/zuozhongkai/linux/IMX6ULL/linux/temp/linux-imxrel_imx_4.1.15_2.1.0_ga_alientek
- ......
- 4 obj-m := ap3216c.o/*第 4 行,设置 obj-m 变量的值为“ ap3216c.o”。*/
- ......
- 11 clean:
- 12 $(MAKE) -C $(KERNELDIR) M=$(CURRENT_PATH) clean
输入如下命令编译出驱动模块文件:
make -j32
编译成功以后就会生成一个名为“ ap3216c.ko”的驱动模块文件。2)、编译测试APP
输入如下命令编译 ap3216cApp.c 这个测试程序:
arm-linux-gnueabihf-gcc ap3216cApp.c -o ap3216cApp
编译成功以后就会生成 ap3216cApp 这个应用程序。2、运行测试
- depmod //第一次加载驱动的时候需要运行此命令
- modprobe ap3216c.ko //加载驱动模块
当驱动模块加载成功以后使用 ap3216cApp 来测试,输入如下命令:
./ap3216cApp /dev/ap3216c
测试 APP 会不断的从 AP3216C 中读取数据,然后输出到终端上,如图: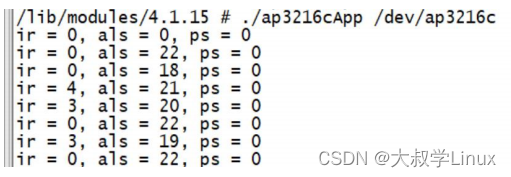
可以用手电筒照一下 AP3216C,或者手指靠近 AP3216C 来观察传感器数据有没有变
化。
本文为参考正点原子开发板配套教程整理而得,仅用于学习交流使用,不得用于商业用途。
-
相关阅读:
AI:75-基于生成对抗网络的虚拟现实场景增强
MySQL数据库入门到大牛_05_排序ORDER BY与分页LIMIT
Docker的数据管理(数据卷,容器互联)
四元数Quaternion的基本运算
K邻近算法k值选取以及kd树概念、原理、构建方法、最近邻域搜索和案例分析
【redis】--springboot集成redisson
微服务架构的现状与未来:服务网格与云原生趋势解析
二叉树搜索序列(回溯)
打赏收款收银台多合一支付收款HTML源码
从0到1开发一个React组件库
- 原文地址:https://blog.csdn.net/jiage987450/article/details/134333728
