-
Nignx及负载均衡&动静分离
目录
一.Nginx负载均衡
1.1.下载
输入命令 : cd javaCloudJun/software 进入到资源文件目录
安装 Nginx 的4个依赖
输入命令 : yum -y install gcc zlib zlib-devel pcre-devel openssl openssl-devel

输入命令 : tar -xvf nginx-1.13.7.tar.gz ( 解压 Nginx)

解压后进入其文件
命令 : cd nginx-1.13.7
编译,执行配置: 考虑到后续安装ssl证书 添加两个模块
命令 : ./configure --with-http_stub_status_module --with-http_ssl_module

1.2.安装
之后进行安装
命令 : make && make install

安装完后,进入该目录
输入命令 : cd /usr/local/nginx
进入 /usr/local/nginx/sbin 目录下启动:
输入命令 : cd sbin/
启动前安装 lsof 命令
输入命令 : yum install -y lsof

设置防火墙 开放 80 端口
输入命令 : firewall-cmd --zone=public --add-port=80/tcp --permanent
更新防火墙的端口并且查看已开放的端口
输入命令 : firewall-cmd --reload && firewall-cmd --list-port

# 启动
命令 : ./nginx
#查看
命令 : lsof -i:80

在浏览器中,输入虚拟机【Linux】-Centos的IP地址进行搜索

以上就是Nginx 的使用配置并且开启完成了哦。
1.3.负载均衡
在资源文件夹中,创建一个tomcat文件夹,来存放Tomcat
输入命令 : mkdir tomcat
并且将tomcat服务解压到指定目录,刚刚创建的tomcat文件夹中。
输入命令 : tar -xvf apache-tomcat-8.5.tar.gz -C tomcat

进入tomcat文件夹中
命令 : cd tomcat/
复制一个tomcat,准备2个tomcat
命令 : cp -r apache-tomcat-8.5.20/ apache-tomcat-8.5.20_8081/
查看命令 : ll

将其中的一个tomcat修改端口,避免两个服务同时开启时端口被占用的情况。
命令 : cd apache-tomcat-8.5.20/conf ( 进入到tomcat的conf文件中 )
找到server.xml 文件进行修改端口
命令 : vim server.xml ( 编辑文件修改端口 )

修改端口号:


修改后的所以代码 :
- <?xml version="1.0" encoding="UTF-8"?>
- <!--
- Licensed to the Apache Software Foundation (ASF) under one or more
- contributor license agreements. See the NOTICE file distributed with
- this work for additional information regarding copyright ownership.
- The ASF licenses this file to You under the Apache License, Version 2.0
- (the "License"); you may not use this file except in compliance with
- the License. You may obtain a copy of the License at
- http://www.apache.org/licenses/LICENSE-2.0
- Unless required by applicable law or agreed to in writing, software
- distributed under the License is distributed on an "AS IS" BASIS,
- WITHOUT WARRANTIES OR CONDITIONS OF ANY KIND, either express or implied.
- See the License for the specific language governing permissions and
- limitations under the License.
- -->
- <!-- Note: A "Server" is not itself a "Container", so you may not
- define subcomponents such as "Valves" at this level.
- Documentation at /docs/config/server.html
- -->
- <Server port="8006" shutdown="SHUTDOWN">
- <Listener className="org.apache.catalina.startup.VersionLoggerListener" />
- <!-- Security listener. Documentation at /docs/config/listeners.html
- <Listener className="org.apache.catalina.security.SecurityListener" />
- -->
- <!--APR library loader. Documentation at /docs/apr.html -->
- <Listener className="org.apache.catalina.core.AprLifecycleListener" SSLEngine="on" />
- <!-- Prevent memory leaks due to use of particular java/javax APIs-->
- <Listener className="org.apache.catalina.core.JreMemoryLeakPreventionListener" />
- <Listener className="org.apache.catalina.mbeans.GlobalResourcesLifecycleListener" />
- <Listener className="org.apache.catalina.core.ThreadLocalLeakPreventionListener" />
- <!-- Global JNDI resources
- Documentation at /docs/jndi-resources-howto.html
- -->
- <GlobalNamingResources>
- <!-- Editable user database that can also be used by
- UserDatabaseRealm to authenticate users
- -->
- <Resource name="UserDatabase" auth="Container"
- type="org.apache.catalina.UserDatabase"
- description="User database that can be updated and saved"
- factory="org.apache.catalina.users.MemoryUserDatabaseFactory"
- pathname="conf/tomcat-users.xml" />
- </GlobalNamingResources>
- <!-- A "Service" is a collection of one or more "Connectors" that share
- a single "Container" Note: A "Service" is not itself a "Container",
- so you may not define subcomponents such as "Valves" at this level.
- Documentation at /docs/config/service.html
- -->
- <Service name="Catalina">
- <!--The connectors can use a shared executor, you can define one or more named thread pools-->
- <!--
- <Executor name="tomcatThreadPool" namePrefix="catalina-exec-"
- maxThreads="150" minSpareThreads="4"/>
- -->
- <!-- A "Connector" represents an endpoint by which requests are received
- and responses are returned. Documentation at :
- Java HTTP Connector: /docs/config/http.html
- Java AJP Connector: /docs/config/ajp.html
- APR (HTTP/AJP) Connector: /docs/apr.html
- Define a non-SSL/TLS HTTP/1.1 Connector on port 8080
- -->
- <Connector port="8081" protocol="HTTP/1.1"
- connectionTimeout="20000"
- redirectPort="8443" />
- <!-- A "Connector" using the shared thread pool-->
- <!--
- <Connector executor="tomcatThreadPool"
- port="8080" protocol="HTTP/1.1"
- connectionTimeout="20000"
- redirectPort="8443" />
- -->
- <!-- Define a SSL/TLS HTTP/1.1 Connector on port 8443
- This connector uses the NIO implementation. The default
- SSLImplementation will depend on the presence of the APR/native
- library and the useOpenSSL attribute of the
- AprLifecycleListener.
- Either JSSE or OpenSSL style configuration may be used regardless of
- the SSLImplementation selected. JSSE style configuration is used below.
- -->
- <!--
- <Connector port="8443" protocol="org.apache.coyote.http11.Http11NioProtocol"
- maxThreads="150" SSLEnabled="true">
- <SSLHostConfig>
- <Certificate certificateKeystoreFile="conf/localhost-rsa.jks"
- type="RSA" />
- </SSLHostConfig>
- </Connector>
- -->
- <!-- Define a SSL/TLS HTTP/1.1 Connector on port 8443 with HTTP/2
- This connector uses the APR/native implementation which always uses
- OpenSSL for TLS.
- Either JSSE or OpenSSL style configuration may be used. OpenSSL style
- configuration is used below.
- -->
- <!--
- <Connector port="8443" protocol="org.apache.coyote.http11.Http11AprProtocol"
- maxThreads="150" SSLEnabled="true" >
- <UpgradeProtocol className="org.apache.coyote.http2.Http2Protocol" />
- <SSLHostConfig>
- <Certificate certificateKeyFile="conf/localhost-rsa-key.pem"
- certificateFile="conf/localhost-rsa-cert.pem"
- certificateChainFile="conf/localhost-rsa-chain.pem"
- type="RSA" />
- </SSLHostConfig>
- </Connector>
- -->
- <!-- Define an AJP 1.3 Connector on port 8009 -->
- <Connector port="8010" protocol="AJP/1.3" redirectPort="8443" />
- <!-- An Engine represents the entry point (within Catalina) that processes
- every request. The Engine implementation for Tomcat stand alone
- analyzes the HTTP headers included with the request, and passes them
- on to the appropriate Host (virtual host).
- Documentation at /docs/config/engine.html -->
- <!-- You should set jvmRoute to support load-balancing via AJP ie :
- <Engine name="Catalina" defaultHost="localhost" jvmRoute="jvm1">
- -->
- <Engine name="Catalina" defaultHost="localhost">
- <!--For clustering, please take a look at documentation at:
- /docs/cluster-howto.html (simple how to)
- /docs/config/cluster.html (reference documentation) -->
- <!--
- <Cluster className="org.apache.catalina.ha.tcp.SimpleTcpCluster"/>
- -->
- <!-- Use the LockOutRealm to prevent attempts to guess user passwords
- via a brute-force attack -->
- <Realm className="org.apache.catalina.realm.LockOutRealm">
- <!-- This Realm uses the UserDatabase configured in the global JNDI
- resources under the key "UserDatabase". Any edits
- that are performed against this UserDatabase are immediately
- available for use by the Realm. -->
- <Realm className="org.apache.catalina.realm.UserDatabaseRealm"
- resourceName="UserDatabase"/>
- </Realm>
- <Host name="localhost" appBase="webapps"
- unpackWARs="true" autoDeploy="true">
- <!-- SingleSignOn valve, share authentication between web applications
- Documentation at: /docs/config/valve.html -->
- <!--
- <Valve className="org.apache.catalina.authenticator.SingleSignOn" />
- -->
- <!-- Access log processes all example.
- Documentation at: /docs/config/valve.html
- Note: The pattern used is equivalent to using pattern="common" -->
- <Valve className="org.apache.catalina.valves.AccessLogValve" directory="logs"
- prefix="localhost_access_log" suffix=".txt"
- pattern="%h %l %u %t "%r" %s %b" />
- </Host>
- </Engine>
- </Service>
- </Server>
注 : 将该服务器tomcat的所以端口都进行了修改,以免其他所有端口也有冲突。
并且将这个服务器的页面显示内容进行修改,访问时容易分辨是哪个tomcat端口进入的
在tomcat根目录的webapps中的ROOT目录中,找到index.jsp文件,在MobaXterm工具的左边选中这个文件,右键点击第二个进行打开文件,并且修改编辑文件。

编辑后的所有内容如下 :
- <%--
- Licensed to the Apache Software Foundation (ASF) under one or more
- contributor license agreements. See the NOTICE file distributed with
- this work for additional information regarding copyright ownership.
- The ASF licenses this file to You under the Apache License, Version 2.0
- (the "License"); you may not use this file except in compliance with
- the License. You may obtain a copy of the License at
- http://www.apache.org/licenses/LICENSE-2.0
- Unless required by applicable law or agreed to in writing, software
- distributed under the License is distributed on an "AS IS" BASIS,
- WITHOUT WARRANTIES OR CONDITIONS OF ANY KIND, either express or implied.
- See the License for the specific language governing permissions and
- limitations under the License.
- --%>
- <%@ page session="false" pageEncoding="UTF-8" contentType="text/html; charset=UTF-8" %>
- <%
- java.text.SimpleDateFormat sdf = new java.text.SimpleDateFormat("yyyy");
- request.setAttribute("year", sdf.format(new java.util.Date()));
- request.setAttribute("tomcatUrl", "http://tomcat.apache.org/");
- request.setAttribute("tomcatDocUrl", "/docs/");
- request.setAttribute("tomcatExamplesUrl", "/examples/");
- %>
- <!DOCTYPE html>
- <html lang="en">
- <head>
- <meta charset="UTF-8" />
- <title><%=request.getServletContext().getServerInfo() %></title>
- <link href="favicon.ico" rel="icon" type="image/x-icon" />
- <link href="favicon.ico" rel="shortcut icon" type="image/x-icon" />
- <link href="tomcat.css" rel="stylesheet" type="text/css" />
- </head>
- <body>
- <h1>8081</h1>
- </body>
- </html>
返回到tomcat目录,并且开其两个服务(tomcat)
命令: cd apache-tomcat-8.5.20/bin ( 进入到tomcat的bin目录中 )
命令: ./startup.sh ( 开启服务 )

再到 nginx的目录中
命令: cd /usr/local/nginx

并且进入 : sbin目录
输入 : cd sbin
命令 : ./nginx -s reload
注 : 重新开启nginx

之后在浏览器中访问,就有两个服务在运行用一个了
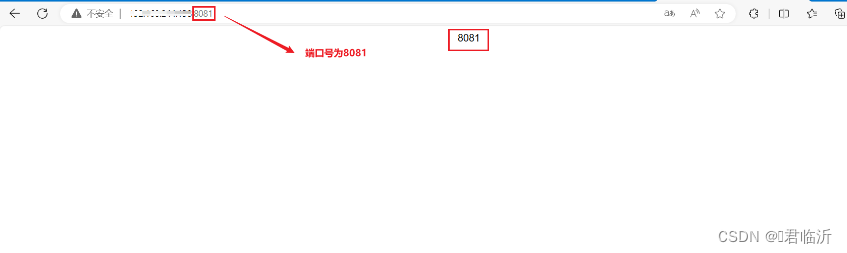
8080:

8081:
二.前端部署
2.1. 准备工作
前端项目打包之前需要增加以下的设置
在前端项目中 config文件下的index.js中要增加以下代码 :
assetsPublicPath: './',//修改后

在前端项目中 build文件下的 utils.js 中增加以下代码 :
// 解决icon路径加载错误
publicPath:'../../'
在前端项目的跟目录中,cmd打开命令窗口
输入命令 : npm run build ( 进行前端项目打包 )

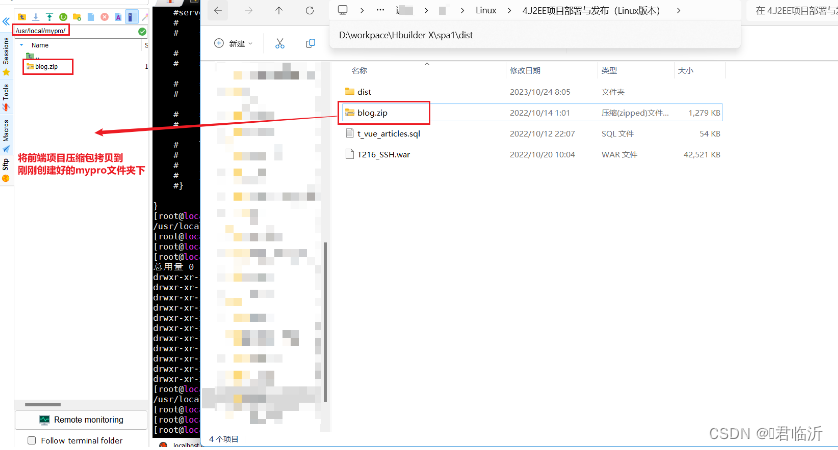
命令执行后,会出现如图中以下文件 dist

在 /usr/local/ 目录下创建一个文件夹,为mypor ,并且进入文件夹,之后将dist文件拖入mypor文件夹中
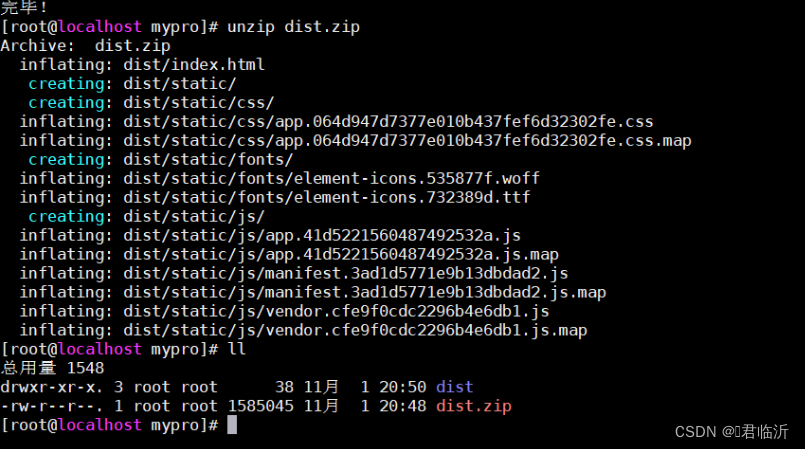
并且选中zip解压的命令 : yum install -y unzip

将该文件进行解压
输入命令 : unzip dist.zip
2.2.部署
输入命令 : cd /usr/local/nginx/conf/ 找到nginx.conf进行编辑
以下是所有代码 :
- #user nobody;
- worker_processes 1;
- #error_log logs/error.log;
- #error_log logs/error.log notice;
- #error_log logs/error.log info;
- #pid logs/nginx.pid;
- events {
- worker_connections 1024;
- }
- http {
- include mime.types;
- default_type application/octet-stream;
- #log_format main '$remote_addr - $remote_user [$time_local] "$request" '
- # '$status $body_bytes_sent "$http_referer" '
- # '"$http_user_agent" "$http_x_forwarded_for"';
- #access_log logs/access.log main;
- sendfile on;
- #tcp_nopush on;
- #keepalive_timeout 0;
- keepalive_timeout 65;
- #gzip on;
- #服务器的集群
- upstream tomcat_list { #服务器集群名字
- server 127.0.0.1:8080 weight=1; #服务器1 weight是权重的意思,权重越大,分配的概率越大。
- server 127.0.0.1:8081 weight=2; #服务器2 weight是权重的意思,权重越大,分配的概率越大
- }
- server {
- listen 80;
- server_name localhost;
- #charset koi8-r;
- #access_log logs/host.access.log main;
- location / {
- root /usr/local/mypro/dist;
- #proxy_pass http://tomcat_list;
- index index.html index.htm;
- }
- location ^~/api/ {
- #^~/api/表示匹配前缀是api的请求,proxy_pass的结尾有/, 则会把/api/*后面的路径直接拼接到后面,即移除api
- proxy_pass http://tomcat_list/;
- }
- #error_page 404 /404.html;
- # redirect server error pages to the static page /50x.html
- #
- error_page 500 502 503 504 /50x.html;
- location = /50x.html {
- root html;
- }
- # proxy the PHP scripts to Apache listening on 127.0.0.1:80
- #
- #location ~ \.php$ {
- # proxy_pass http://127.0.0.1;
- #}
- # pass the PHP scripts to FastCGI server listening on 127.0.0.1:9000
- #
- #location ~ \.php$ {
- # root html;
- # fastcgi_pass 127.0.0.1:9000;
- # fastcgi_index index.php;
- # fastcgi_param SCRIPT_FILENAME /scripts$fastcgi_script_name;
- # include fastcgi_params;
- #}
- # deny access to .htaccess files, if Apache's document root
- # concurs with nginx's one
- #
- #location ~ /\.ht {
- # deny all;
- #}
- }
- # another virtual host using mix of IP-, name-, and port-based configuration
- #
- #server {
- # listen 8000;
- # listen somename:8080;
- # server_name somename alias another.alias;
- # location / {
- # root html;
- # index index.html index.htm;
- # }
- #}
- # HTTPS server
- #
- #server {
- # listen 443 ssl;
- # server_name localhost;
- # ssl_certificate cert.pem;
- # ssl_certificate_key cert.key;
- # ssl_session_cache shared:SSL:1m;
- # ssl_session_timeout 5m;
- # ssl_ciphers HIGH:!aNULL:!MD5;
- # ssl_prefer_server_ciphers on;
- # location / {
- # root html;
- # index index.html index.htm;
- # }
- #}
- }
输入命令 : cd /usr/local/nginx/sbin/
输入命令 :./nginx -s reload 重启nginx
在将后端的war包 传入tomcat服务器中。
并且输入命令 : ./startup.sh (开启访问)

在浏览器中进行访问 使用虚拟机的IP加tomcat的端口
在到文件资源管理器中进入到 以下本地目录
C:\Windows\System32\drivers\etc
找到 hosts 文件进行修改IP的请求

在进浏览器中进行访问 使用虚拟机的IP加tomcat的端口,即可哦!!!
好啦今天就到这里了哦!!!希望能帮到你哦!!!
-
相关阅读:
力扣(LeetCode)31. 下一个排列(C语言)
数据库连接池长时间不用,乍一用还用不了,结果是防火墙的锅
候选键的确定方法-如何判断属性集U的子集K是否为候选键、如何找到关系模式的候选键
(附源码)计算机毕业设计SSM敬老院信息管理系统
SpringBoot学习目录
游戏模板:MFPS 2.0: Multiplayer FPS
鸿蒙应用程序入口UIAbility详解
java数据结构与算法刷题-----LeetCode101:对称二叉树
ES选举:Elasticsearch中Master选举完全解读
mysql面试题14:讲一讲MySQL中什么是全同步复制?底层实现?
- 原文地址:https://blog.csdn.net/m0_74915426/article/details/134253934