-
AQS是什么?AbstractQueuedSynchronizer之AQS原理及源码深度分析
一、AQS概述
1、什么是AQS
AQS 的全称为(AbstractQueuedSynchronizer),这个类在 java.util.concurrent.locks 包下面。

其中,AbstractOwnableSynchronizer是AbstractQueuedLongSynchronizer和AbstractQueuedSynchronizer的父类。

其中AbstractOwnableSynchronizer和AbstractQueuedLongSynchronizer是jdk1.6引入的,AbstractQueuedSynchronizer是jdk1.5引入的。2、技术解释
AQS是用来实现锁或者其他同步器组件的公共基础部分的抽象实现,是重量级基础框架及整个JUC体系的基石,主要用于解决锁分配给“谁”的问题。
AQS用于实现依赖于先进先出 (FIFO) 等待队列的阻塞锁和相关同步器(信号量、事件等)。并通过一个int类型变量表示持有锁的状态。
如图所示,AQS利用CLH(Craig、Landin and Hagersten,是一个单向链表,但AQS中的队列是CLH变体的虚拟双向队列FIFO)队列 加上一个int类型的公共变量实现的。

AbstractQueuedLongSynchronizer:此类具有与完全相同 AbstractQueuedSynchronizer 的结构、属性和方法,不同之处在于所有与状态相关的参数和结果都定义为 long 而不是 int。在创建同步器(如需要 64 位状态的多级锁和屏障)时,此类可能很有用。AbstractQueuedLongSynchronizer并没有具体实现类,目前还是用的AbstractQueuedSynchronizer。
3、基本原理
抢到资源的线程直接使用处理业务逻辑,抢不到资源的线程必然需要
排队等候,而存储这些排队等候的资源就是AQS中的队列(CLH队列的变体-双端队列)。如果共享资源被占用,就需要一定的阻塞等待唤醒机制来保证锁分配,这个机制主要是CLH队列的变体来实现的,将暂时获取不到锁的线程加入到队列中,这个队列就是AQS同步队列的抽象实现。它将要请求共享资源的线程及自身的等待状态封装成队列的结点对象(Node),通过CAS、自选以及LockSupport.park()的方式,维护state变量的状态,使并发达到同步的效果。
4、AQS为什么这么重要
下图是AQS的众多实现类,我们发现,JUC中的许多非常重要的类,都有着AQS的影子:

我们平常用的ReentrantLock、Semaphore、CountDownLatch等等,这都是定义了程序员和锁交互的使用层API,隐藏了实现细节,使用就可以。而AQS就是统一规范并简化了锁的实现,将其抽象出来,屏蔽了同步状态管理、同步队列的管理和维护、阻塞线程排队和通知、唤醒机制等等。所以,AQS是一切锁和同步组件实现的公共基础部分。二、AQS数据结构
1、AQS的结构
AQS使用一个volatile的int类型的成员变量来表示同步状态,通过内置FIFO队列来完成资源获取的排队工作将每条要去抢占资源的线程封装成一个Node结点来实现锁的分配,通过CAS完成对state值的修改。
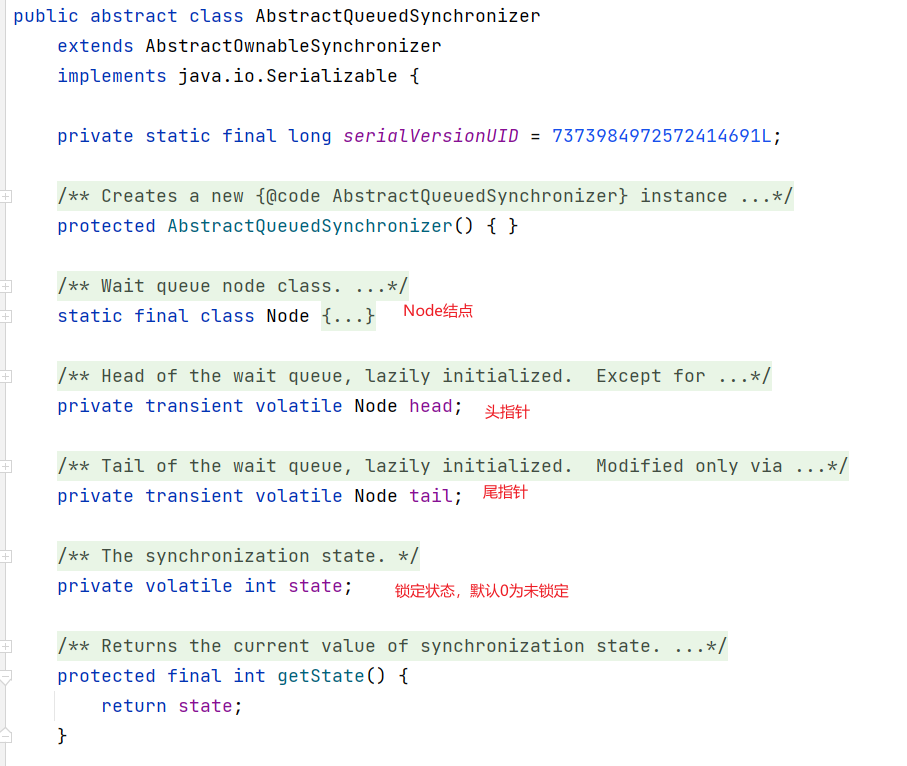
其中Node中也包含头指针和尾指针,也包含了一个重要的属性waitStatus,这里区别于AQS的state。

2、ReentrantLock与AbstractQueuedSynchronizer
3、AQS的state变量
该变量位0时意味着没有线程占用,大于等于1意味着有线程占用,其它线程需要等候。

4、AQS的队列
CLH:Craig、Landin and Hagersten,是一个单向链表,但AQS中的队列是CLH变体的虚拟双向队列FIFO。
其数据结构图如下:

官方图是单向链表,但是AQS实质是双端队列。

5、AQS的Node
Node分
共享和独占模式。(1)Node的waitStatus
Node就是等候区的线程的存储单元,一个线程对应一个Node。
Node的等待状态waitStatus是一个int类型的变量(区别于AQS的stete)。总共有如下几种:
// 线程被取消了 static final int CANCELLED = 1; // 后继线程需要唤醒 static final int SIGNAL = -1; // 等待condition唤醒 static final int CONDITION = -2; // 共享或同步状态获取将会无条件地传播下去 static final int PROPAGATE = -3; // 初始为0,状态是上面几种 volatile int waitStatus; // 前驱结点 volatile Node prev; // 后继节点 volatile Node next; // 当前线程 volatile Thread thread;- 1
- 2
- 3
- 4
- 5
- 6
- 7
- 8
- 9
- 10
- 11
- 12
- 13
- 14
- 15
- 16
- 17
- 18
- 19
- 20
(2)属性说明

其中waitStatus共有5个状态:
1.为0时,当第一个Node被初始化时的默认值。
2.为CANCELLED时(-1),表示线程获取锁的请求已经取消了。
3.为CONDITION(-2),表示节点在等待队列中,节点线程等待唤醒。
4.为PROPAGATE(-3),当前线程处在SHARED情况下,该字段才会使用。
5.SIGNAL(-1),表示线程已经准备好了,就等资源释放了。三、ReentrantLock的lock方法分析AQS源码
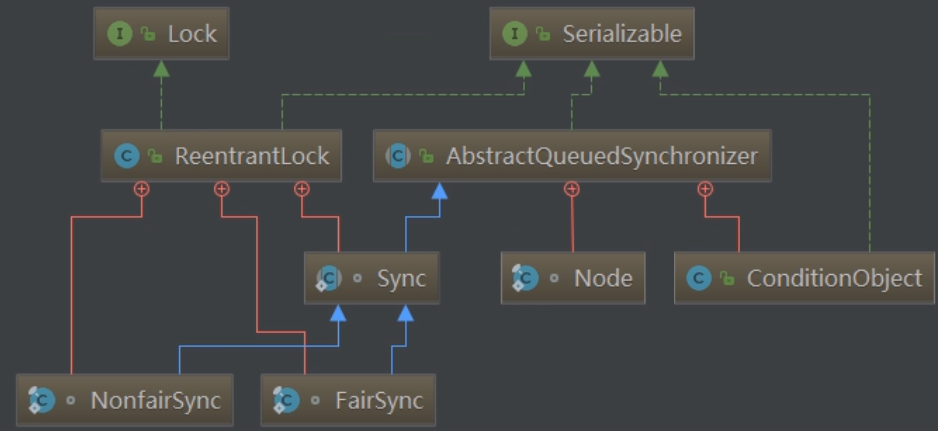
1、类图
Lock接口的实现类,基本都是通过【聚合】了一个【队列同步器】的子类(Sync)完成线程访问控制的。

2、FairSync和NonfairSync
FairSync是公平锁,讲究先来先到,线程在获取锁时,如果这个锁的等待队列中已经有线程在等待,那么当前线程就会进入等待队列中;
NonfairSync是非公平锁,不管是否有等待队列,如果可以获取锁,则立刻占有锁的对象。也就是说队列的第一个排队线程苏醒后,不一定就是排头的这个线程获取锁,它还是需要参加竞争(存在线程竞争的情况下),所以有可能出现后来的线程插队获取锁的现象。它们的源码相差很小:

最终调用的acquire(1),就是AQS的核心方法:public final void acquire(int arg) { if (!tryAcquire(arg) && acquireQueued(addWaiter(Node.EXCLUSIVE), arg)) selfInterrupt(); }- 1
- 2
- 3
- 4
- 5
3、tryAcquire():尝试获取锁
tryAcquire是AQS中定义的,但是由FairSync和NonfairSync重写:

我们分析NonfairSync:tryAcquire方法。protected final boolean tryAcquire(int acquires) { return nonfairTryAcquire(acquires); } final boolean nonfairTryAcquire(int acquires) { final Thread current = Thread.currentThread(); int c = getState(); // 获取锁状态 if (c == 0) { // 如果资源未被占用,compareAndSetState使用cas获取锁,设置锁状态 if (compareAndSetState(0, acquires)) { // 设置所属线程为当前线程 setExclusiveOwnerThread(current); // 获取锁 return true; } } // 如果当前资源被占用,并且是当前线程(可重入) else if (current == getExclusiveOwnerThread()) { int nextc = c + acquires; if (nextc < 0) // overflow throw new Error("Maximum lock count exceeded"); setState(nextc); // state + 1,仍然可以获取锁(可重入) return true; } return false; }- 1
- 2
- 3
- 4
- 5
- 6
- 7
- 8
- 9
- 10
- 11
- 12
- 13
- 14
- 15
- 16
- 17
- 18
- 19
- 20
- 21
- 22
- 23
- 24
- 25
- 26
- 27
所以,tryAcquire()是相当于做了一次尝试,尝试获取锁,如果获取锁那就皆大欢喜,获取不到就继续addWaiter(Node.EXCLUSIVE), arg)方法。
4、addWaiter():入队
// java.util.concurrent.locks.AbstractQueuedSynchronizer#addWaiter // mode – Node.EXCLUSIVE 表示独占,Node.SHARED 表示共享 private Node addWaiter(Node mode) { // 一个Node包含一个当前线程的实例 Node node = new Node(Thread.currentThread(), mode); // Try the fast path of enq; backup to full enq on failure Node pred = tail; // 尾指针 ,初始为null if (pred != null) { // 不为null时 node.prev = pred; if (compareAndSetTail(pred, node)) { // 设置尾指针为当前 pred.next = node; return node; } } // 入队 enq(node); return node; } // 将节点插入队列,必要时进行初始化 private Node enq(final Node node) { for (;;) { // 死循环不断重试 Node t = tail; // 尾结点 if (t == null) { // Must initialize 虚拟头结点必须初始化,里面没有线程 if (compareAndSetHead(new Node())) tail = head; } else { node.prev = t; if (compareAndSetTail(t, node)) { // 设置尾结点为当前节点 t.next = node; // 所有的Node形成一条链表 return t; } } } }- 1
- 2
- 3
- 4
- 5
- 6
- 7
- 8
- 9
- 10
- 11
- 12
- 13
- 14
- 15
- 16
- 17
- 18
- 19
- 20
- 21
- 22
- 23
- 24
- 25
- 26
- 27
- 28
- 29
- 30
- 31
- 32
- 33
- 34
- 35
最终形成如下的数据结构:

5、acquireQueued():队列线程挂起
// arg = 1 // Node是当前节点 final boolean acquireQueued(final Node node, int arg) { boolean failed = true; try { boolean interrupted = false; for (;;) { // predecessor获取前置节点 final Node p = node.predecessor(); // 如果是头结点,直接tryAcquire尝试获取锁 if (p == head && tryAcquire(arg)) { // 获取锁成功,将node设为头结点 setHead(node); // 将头结点的关联取消 p.next = null; // help GC failed = false; return interrupted; } // 尝试获取锁失败 或者不是第一个节点 // shouldParkAfterFailedAcquire : 设置前置节点的waitStatue0->-1,首次false,再次为true,再来个线程直接true if (shouldParkAfterFailedAcquire(p, node) && // LockSupport.park暂停当前线程 parkAndCheckInterrupt()) interrupted = true; } } finally { if (failed) cancelAcquire(node); } }- 1
- 2
- 3
- 4
- 5
- 6
- 7
- 8
- 9
- 10
- 11
- 12
- 13
- 14
- 15
- 16
- 17
- 18
- 19
- 20
- 21
- 22
- 23
- 24
- 25
- 26
- 27
- 28
- 29
- 30
private static boolean shouldParkAfterFailedAcquire(Node pred, Node node) { // 获取前驱结点的状态 int ws = pred.waitStatus; // 0 if (ws == Node.SIGNAL) // Node.SIGNAL :-1 即等待被占用的资源释放,直接返回true /* * This node has already set status asking a release * to signal it, so it can safely park. */ return true; if (ws > 0) { // > 0是CANCELLED状态,忽略改状态的节点,重新链接队列 /* * Predecessor was cancelled. Skip over predecessors and * indicate retry. */ do { node.prev = pred = pred.prev; } while (pred.waitStatus > 0); pred.next = node; } else { // 将当前节点的前驱结点设置为SIGNAL : -1,用于后续唤醒操作 /* * waitStatus must be 0 or PROPAGATE. Indicate that we * need a signal, but don't park yet. Caller will need to * retry to make sure it cannot acquire before parking. */ compareAndSetWaitStatus(pred, ws, Node.SIGNAL); // 把前置节点的waitStatue 改为 -1 } return false; }- 1
- 2
- 3
- 4
- 5
- 6
- 7
- 8
- 9
- 10
- 11
- 12
- 13
- 14
- 15
- 16
- 17
- 18
- 19
- 20
- 21
- 22
- 23
- 24
- 25
- 26
- 27
- 28
- 29
- 30
// 暂停 private final boolean parkAndCheckInterrupt() { LockSupport.park(this); // 线程挂起,等待被unpark、被中断 return Thread.interrupted(); // 返回当前线程中断状态,并清空中断状态 }- 1
- 2
- 3
- 4
- 5
6、cancelAcquire():中断等异常导致的取消
如果在自旋中,并没有获取锁,而是异常原因中断了,就会执行finally 中的cancelAcquire方法。
private void cancelAcquire(Node node) { // Ignore if node doesn't exist if (node == null) return; node.thread = null; // Skip cancelled predecessors Node pred = node.prev; // 前一个节点 while (pred.waitStatus > 0) // CANCELLED:1,再找前一个节点 node.prev = pred = pred.prev; // predNext is the apparent node to unsplice. CASes below will // fail if not, in which case, we lost race vs another cancel // or signal, so no further action is necessary. Node predNext = pred.next; // 下一个节点 // Can use unconditional write instead of CAS here. // After this atomic step, other Nodes can skip past us. // Before, we are free of interference from other threads. node.waitStatus = Node.CANCELLED; // 本节点的waitStatue设置为CANCELLED // If we are the tail, remove ourselves. if (node == tail && compareAndSetTail(node, pred)) { // 如果本节点为尾结点,就将尾结点设为上一个不为CANCELLED的节点 compareAndSetNext(pred, predNext, null); // 前一节点的next节点设为null } else { // 如果不是队尾 // If successor needs signal, try to set pred's next-link // so it will get one. Otherwise wake it up to propagate. int ws; if (pred != head && // 上一个不为CANCELLED的节点不是head节点 ((ws = pred.waitStatus) == Node.SIGNAL || // 上一个不为CANCELLED的节点waitStatus 为SIGNAL -1 (ws <= 0 && compareAndSetWaitStatus(pred, ws, Node.SIGNAL))) && pred.thread != null) { // 上一个不为CANCELLED的节点 thread不为null Node next = node.next; // 本节点的next if (next != null && next.waitStatus <= 0) compareAndSetNext(pred, predNext, next); // 上一个不为CANCELLED的节点 的next 设为为本节点的next } else { unparkSuccessor(node); // 本节点unlock } node.next = node; // help GC } }- 1
- 2
- 3
- 4
- 5
- 6
- 7
- 8
- 9
- 10
- 11
- 12
- 13
- 14
- 15
- 16
- 17
- 18
- 19
- 20
- 21
- 22
- 23
- 24
- 25
- 26
- 27
- 28
- 29
- 30
- 31
- 32
- 33
- 34
- 35
- 36
- 37
- 38
- 39
- 40
- 41
- 42
- 43
四、ReentrantLock的unlock方法分析AQS源码
1、unlock
public void unlock() { sync.release(1); } public final boolean release(int arg) { if (tryRelease(arg)) { // 释放state为0 Node h = head; if (h != null && h.waitStatus != 0) unparkSuccessor(h); // 唤醒 return true; } return false; }- 1
- 2
- 3
- 4
- 5
- 6
- 7
- 8
- 9
- 10
- 11
- 12
2、tryRelease():释放锁
protected final boolean tryRelease(int releases) { int c = getState() - releases;// 1 -1 = 0 if (Thread.currentThread() != getExclusiveOwnerThread()) throw new IllegalMonitorStateException(); boolean free = false; if (c == 0) { free = true; // 设置占用线程为null setExclusiveOwnerThread(null); } setState(c); state设为0 return free; }- 1
- 2
- 3
- 4
- 5
- 6
- 7
- 8
- 9
- 10
- 11
- 12
3、unparkSuccessor():唤醒等待线程
private void unparkSuccessor(Node node) { /* * If status is negative (i.e., possibly needing signal) try * to clear in anticipation of signalling. It is OK if this * fails or if status is changed by waiting thread. */ int ws = node.waitStatus; // 头结点的waitStatue ,有线程占用的话为-1 if (ws < 0) // 设为0 compareAndSetWaitStatus(node, ws, 0); /* * Thread to unpark is held in successor, which is normally * just the next node. But if cancelled or apparently null, * traverse backwards from tail to find the actual * non-cancelled successor. */ Node s = node.next; // 头结点的下一个节点 if (s == null || s.waitStatus > 0) { s = null; for (Node t = tail; t != null && t != node; t = t.prev) if (t.waitStatus <= 0) s = t; } if (s != null) // 唤醒下一个线程 LockSupport.unpark(s.thread); }- 1
- 2
- 3
- 4
- 5
- 6
- 7
- 8
- 9
- 10
- 11
- 12
- 13
- 14
- 15
- 16
- 17
- 18
- 19
- 20
- 21
- 22
- 23
- 24
- 25
- 26
五、大总结
(图片模糊的话,保存下来本地看)

参考资料
https://zhuanlan.zhihu.com/p/378219920
-
相关阅读:
虚拟摄像头之四: 谁在调用 v4l2_camera_HAL 摄像头驱动
Android系统之编译Intel5.1问题解决
【电源专题】什么是AC/DC转换器
去中心化标志符在DID中的核心地位
产品经理薪资水涨船高的根本原因是什么?
如何从Java工程师成长为架构师?
Mac 快捷键整理
nginx 正则匹配测试工具
Jmeter系列(4) 线程属性详解
PAT 1142 Maximal Clique(在几个数组中找到相同的点)
- 原文地址:https://blog.csdn.net/A_art_xiang/article/details/133985680
